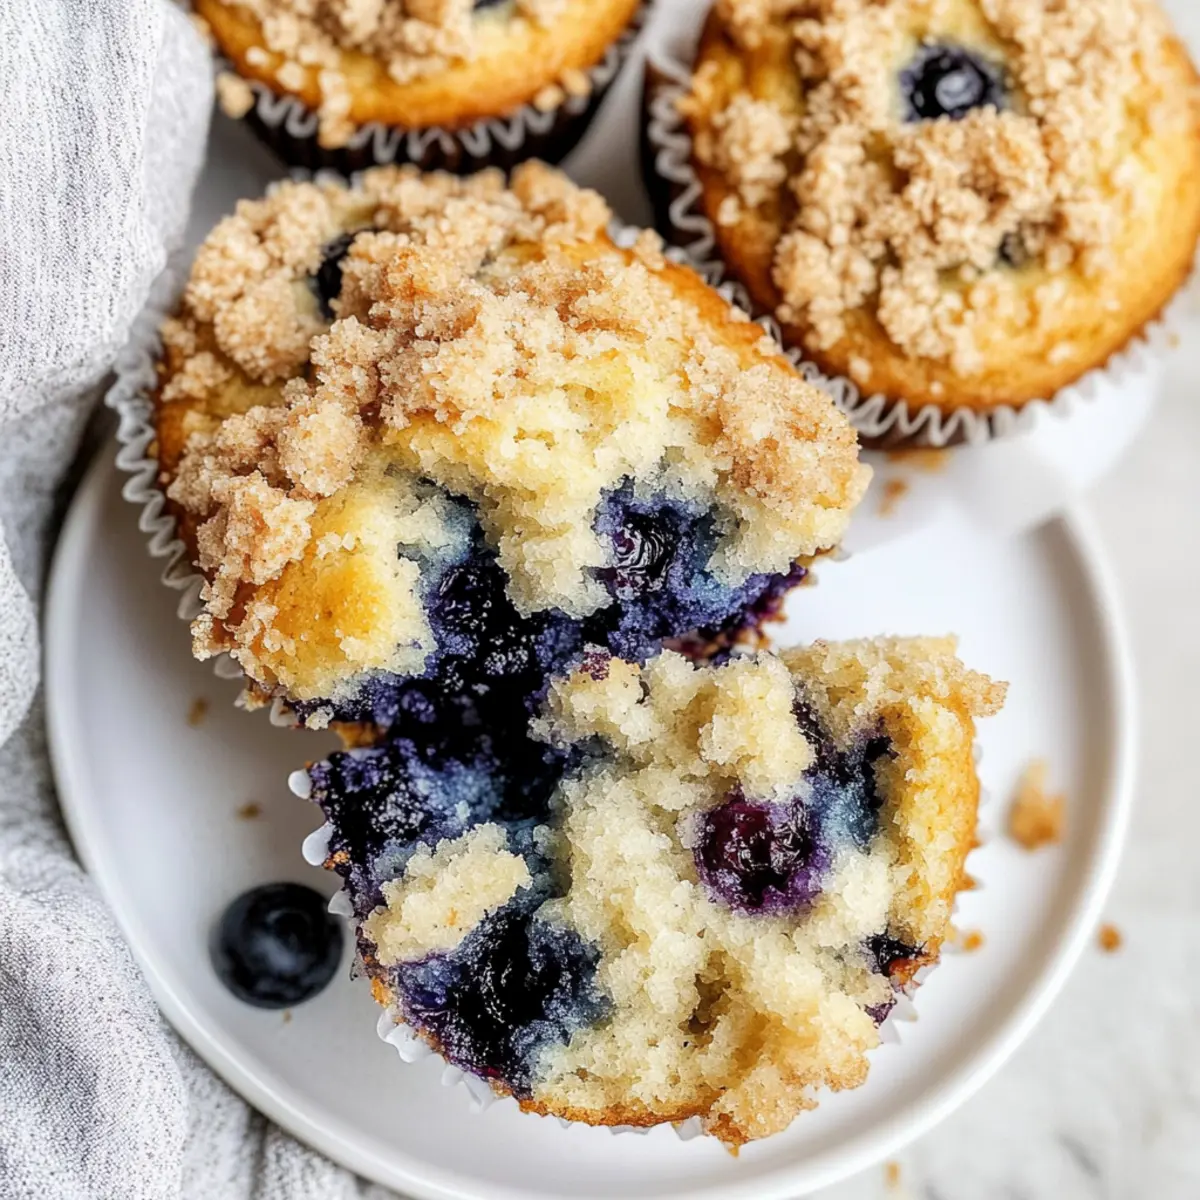
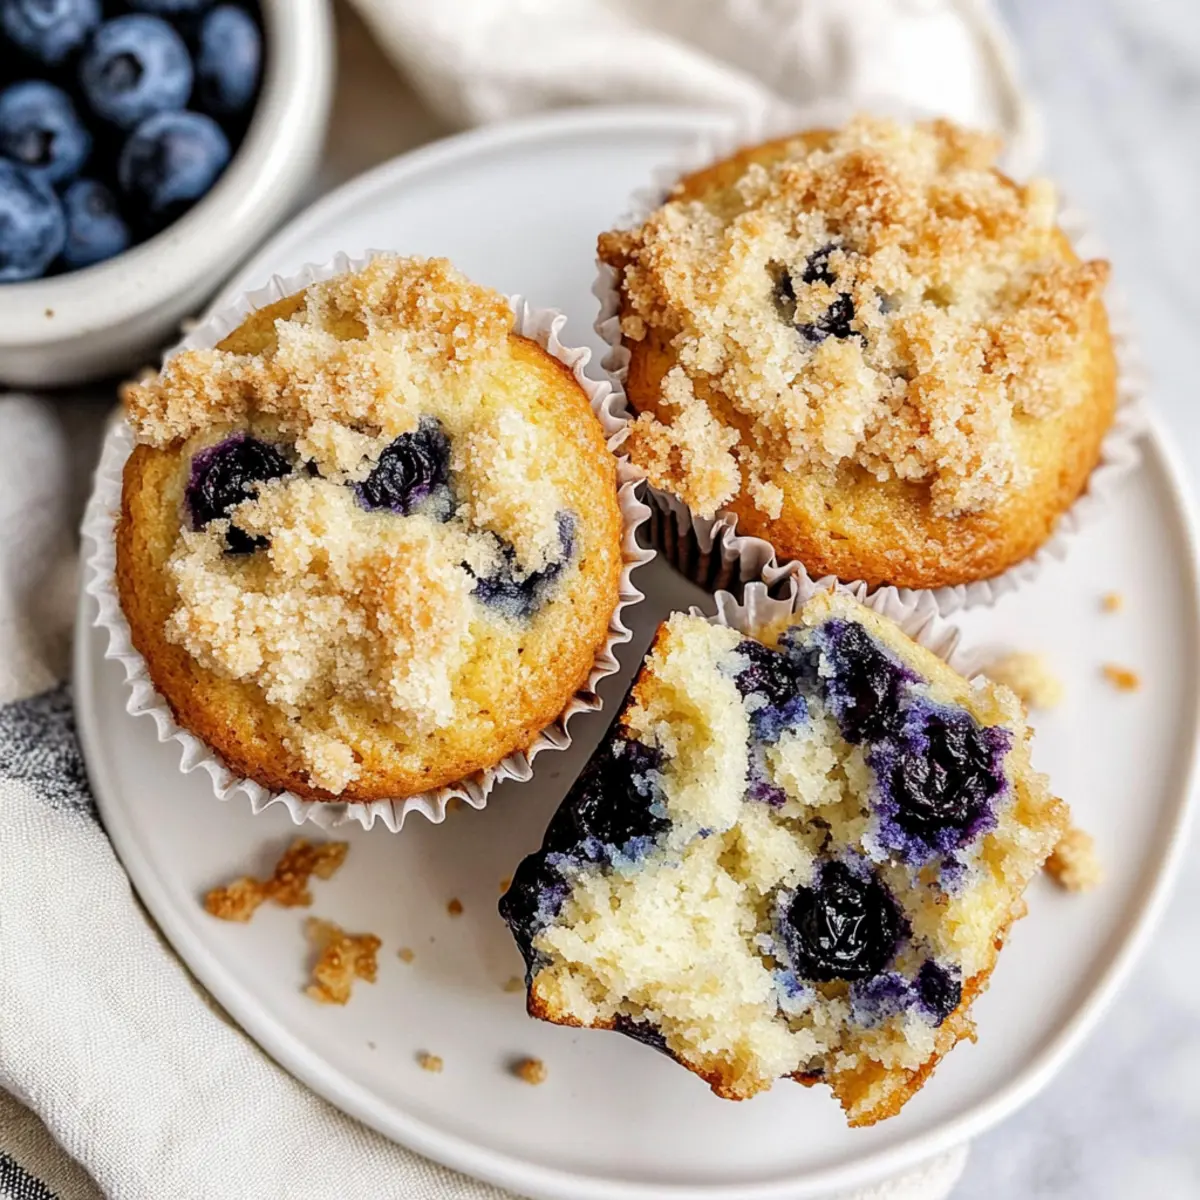
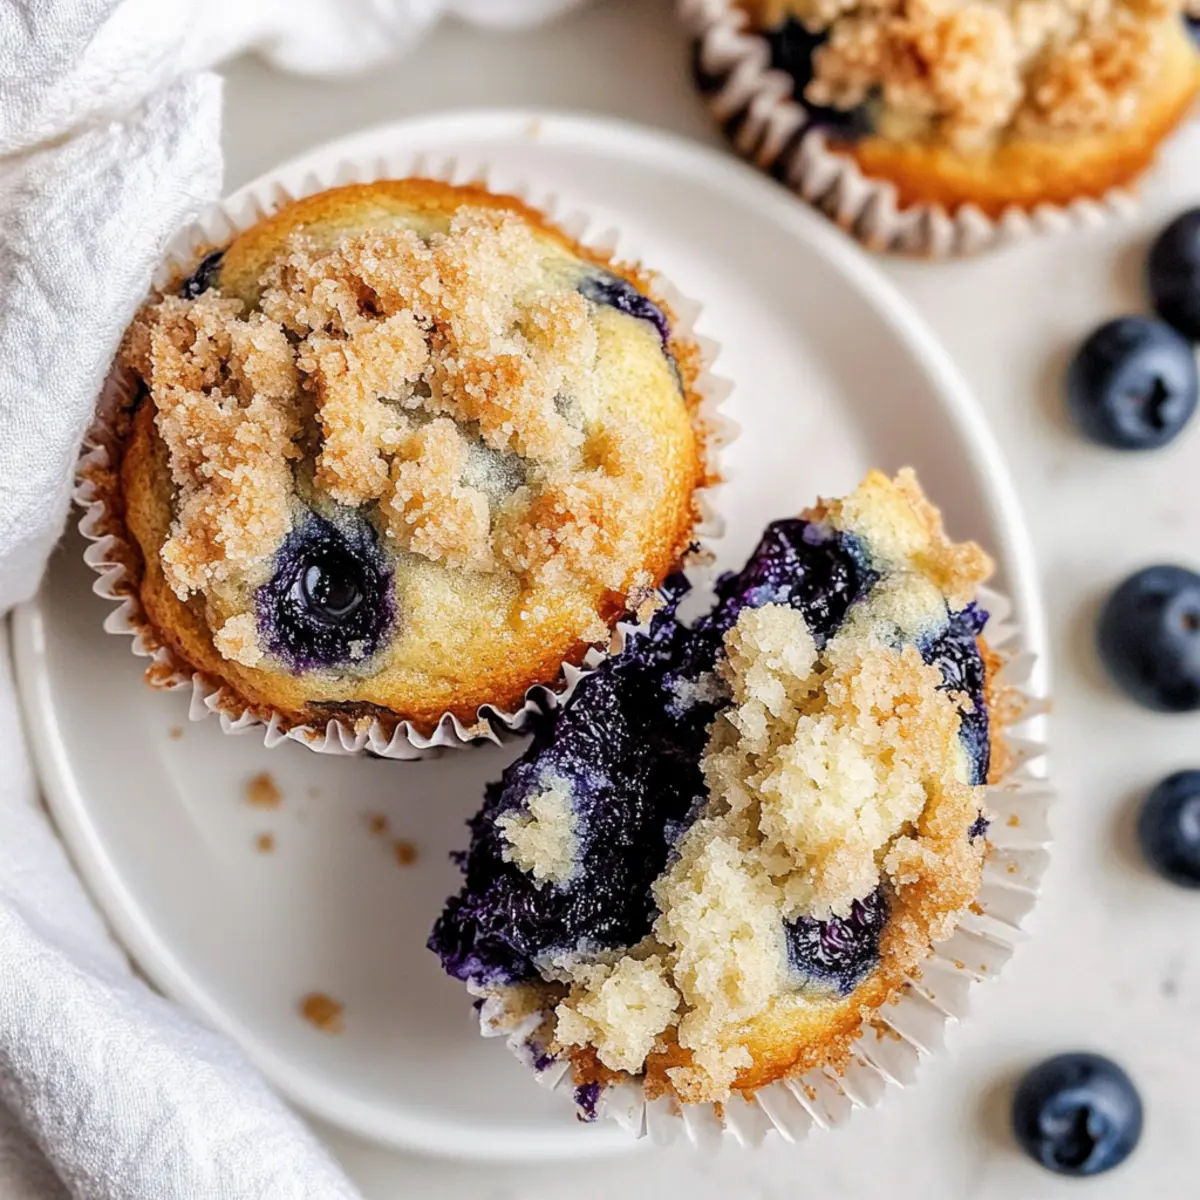
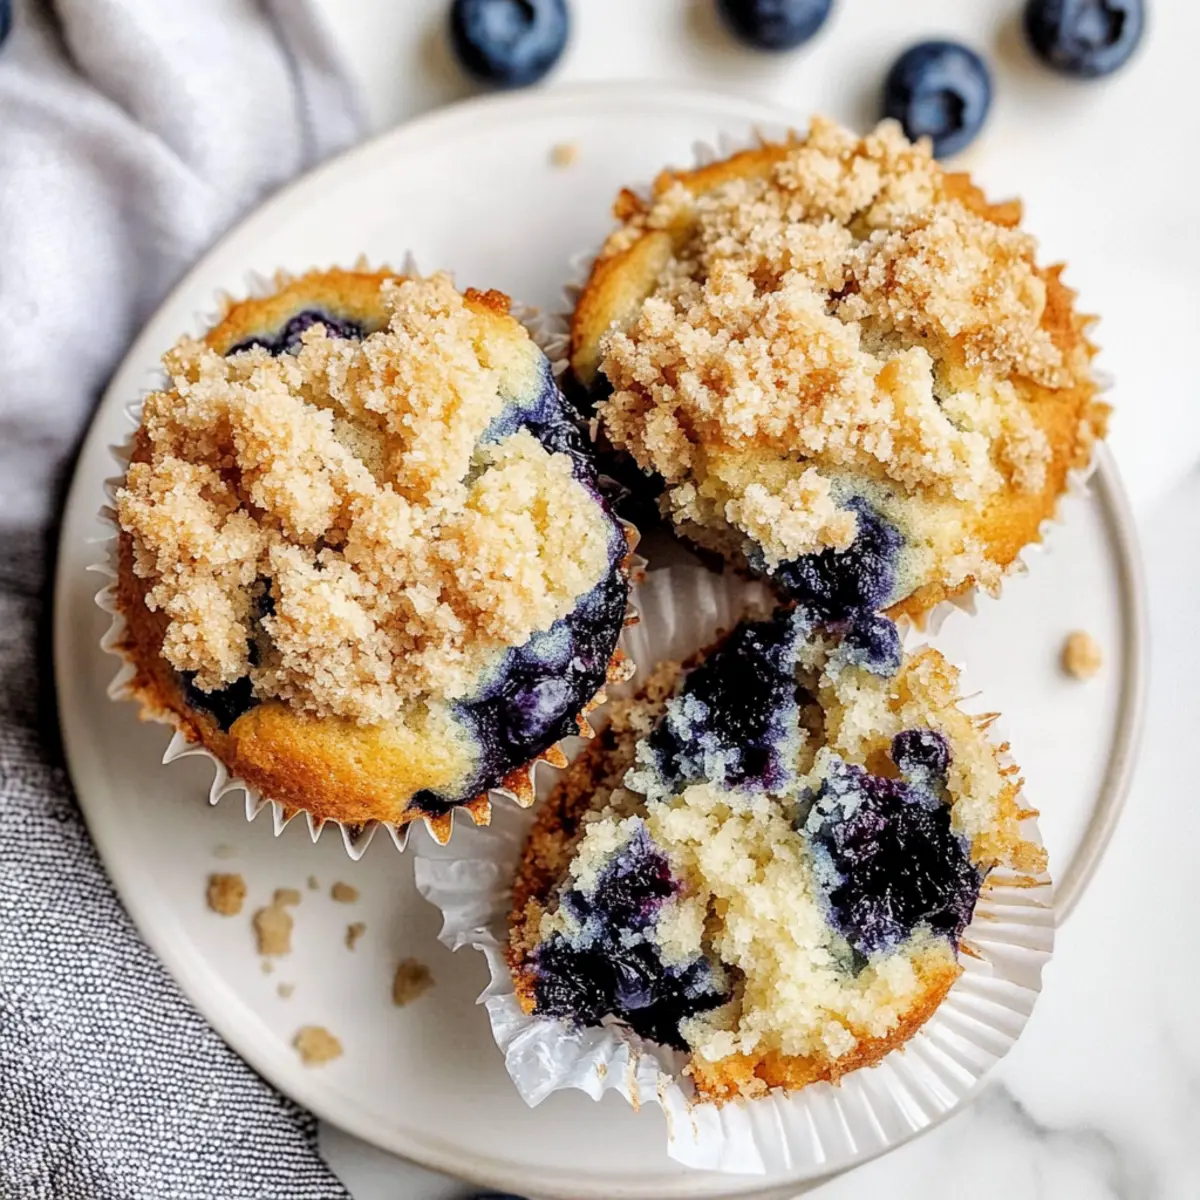
tastytrendingredients

  • Home
  • Recipes
    • Appetizers
    • Breakfast
    • Dessert
    • Dinner
    • Drinks
    • Salads
    • Snacks
    • Soups
  • About me
  • Contact me
menu icon
go to homepage
  • Home
  • Recipes
    • Appetizers
    • Breakfast
    • Dessert
    • Dinner
    • Drinks
    • Salads
    • Snacks
    • Soups
  • About me
  • Contact me
search icon
Homepage link
  • Home
  • Recipes
    • Appetizers
    • Breakfast
    • Dessert
    • Dinner
    • Drinks
    • Salads
    • Snacks
    • Soups
  • About me
  • Contact me
×

Savory Breakfast Egg Muffins for Easy Morning Bliss

August 11, 2025 by Grace Snow Leave a Comment

There’s something magical about those early morning hours, especially when they unfold with the tantalizing aroma of fresh food wafting through the kitchen. These Customizable Low-Carb Breakfast Egg Muffins are my go-to way to kick-start the day, blending the simplicity of eggs with endless flavor possibilities. Whether you’re craving Broccoli, Bacon & Cheddar, Italian Sausage, Kale & Parmesan, or Spinach, Tomato & Goat Cheese, each muffin is packed with protein and nutrients, making them oh-so-healthy for busy mornings without the guilt. And the best part? They can be prepped ahead of time, and each batch freezes beautifully, so you can grab a nutritious breakfast in a pinch. Curious to see how easily you can whip these together? Let’s dive right into the recipe!

Why Are These Egg Muffins a Must-Try?

Versatile Flavor: With options like Broccoli, Bacon & Cheddar or Spinach, Tomato & Goat Cheese, there's a flavor here for everyone.

Quick Prep Time: Ready in just 20-25 minutes, these muffins are ideal for busy mornings.

Meal Prep Winner: Make a batch ahead of time and store in the fridge or freezer for easy grab-and-go breakfasts.

Healthy and Hearty: Low-carb and protein-packed, each muffin keeps you full and satisfied.

Customizable Ingredients: Tailor fillings to your preferences—swap veggies, proteins, or cheese to fit any dietary needs.

Explore other delicious, make-ahead options like our Cornbread Breakfast Casserole to keep your mornings exciting!

Breakfast Egg Muffin Ingredients

For the Egg Base

  • Large Eggs – The foundation for these Breakfast Egg Muffins, providing structure and protein. Substitution: Can substitute with egg whites for a lower cholesterol option.
  • Kosher Salt & Black Pepper – Enhances flavor; adjust to your taste preference.

For the Broccoli, Bacon & Cheddar Variation

  • Broccoli Florets – Adds vibrant color and essential nutrients. Substitution: Use cauliflower for a different texture.
  • Bacon – Introduces a savory, crispy element. Substitution: Swap for turkey bacon to make it leaner.
  • Grated Cheddar Cheese – Provides rich flavor and creaminess. Substitution: Dairy-free cheese works well for a dairy-free choice.
  • Chives – Fresh herb that enhances flavor with a mild onion twist. Note: Green onions or scallions can be used in place.

For the Italian Sausage, Kale & Parmesan Variation

  • Italian Sausage – Brings hearty, satisfying flavor. Substitution: Plant-based sausage works perfectly for vegetarian options.
  • Shallot – Offers a sweet onion taste that complements the other ingredients. Substitution: Yellow onions can be used if shallots are unavailable.
  • Kale Leaves – A superfood that adds nutrients and a pop of color. Substitution: Spinach is a great alternative.

For the Spinach, Tomato & Goat Cheese Variation

  • Grape Tomatoes – Add juiciness and a hint of sweetness. Substitution: Cherry tomatoes can also be used.
  • Baby Spinach – Adds bright color and essential vitamins. Substitution: You can use Swiss chard for a different taste.
  • Green Onion – Provides a crunchy bite; optional for those who may want a milder flavor. Note: Can be omitted if desired.
  • Goat Cheese – Contributes creaminess and tanginess to every bite. Substitution: Feta cheese can work as a suitable alternative.

These versatile Breakfast Egg Muffins allow for endless customizations, ensuring that you can craft a breakfast that delights your taste buds while ticking all the nutrition boxes!

Step‑by‑Step Instructions for Breakfast Egg Muffins

Step 1: Prep Egg Base
Begin by preheating your oven to 350°F (175°C) and greasing a muffin tin with non-stick spray. In a large mixing bowl or measuring cup, whisk together the large eggs with kosher salt and black pepper until the mixture is fluffy and well-blended, about 1-2 minutes.

Step 2: Prepare Fillings
For the Broccoli, Bacon & Cheddar variation, cook the bacon in a skillet over medium heat until crispy, then drain on paper towels. Next, steam the broccoli florets until tender, roughly 3-4 minutes, and chop them into small pieces. For the other variations, cook the Italian sausage with shallots and kale, or roughly chop spinach and halve grape tomatoes for the Spinach, Tomato & Goat Cheese version, preparing each filling as per your chosen flavor.

Step 3: Assemble Muffins
Carefully distribute your prepared filling ingredients into the greased muffin cups, using about 1-2 tablespoons of each filling based on your preference. Once filled, pour the egg mixture over the fillings until each cup is about 90% full, ensuring that the ingredients are submerged but still visible.

Step 4: Bake
Place the muffin tin in the preheated oven and bake for 20-25 minutes, or until the egg muffins are set in the middle and slightly golden on the edges. Check for doneness by inserting a toothpick; it should come out clean when the muffins are ready.

Step 5: Cool and Remove
Once baked, remove the muffin tin from the oven and let the Breakfast Egg Muffins cool for about 5 minutes. To release them easily, run a knife around the edges of each muffin, then gently lift them out using a fork or your fingers. Enjoy warm, or let cool completely for meal prep storage!

Expert Tips for Breakfast Egg Muffins

  • Don’t Overbake: Keep a close eye on your muffins; overbaking can lead to dryness. Check them at 20 minutes for the perfect fluffiness.

  • Grease Properly: Use a non-stick spray or oil in your muffin tin to prevent sticking, ensuring an easy release every time.

  • Customize Creatively: Mix and match your favorite proteins and veggies. Getting creative with ingredients can result in delightful new flavors—don’t be afraid to try out various combinations!

  • Mix Evenly: Make sure the egg mixture gets distributed evenly among the fillings for consistent cooking and flavor in every single bite of your Breakfast Egg Muffins.

  • Storage Solutions: If you plan on making a big batch, allow them to cool completely before storing in an airtight container in the fridge for up to 5 days or freezing them for quick breakfasts later on.

How to Store and Freeze Breakfast Egg Muffins

Fridge: Store your Breakfast Egg Muffins in an airtight container in the fridge for up to 5 days. This keeps them fresh and ready for busy mornings.

Freezer: For long-term storage, freeze the muffins in a single layer on a baking sheet, then transfer to a freezer-safe bag. They can be stored for up to a month without losing flavor!

Reheating: To reheat, simply microwave a muffin for about 30-60 seconds or until warmed through. You can also bake them in a preheated oven at 350°F (175°C) for around 10-15 minutes.

Wrap for Freshness: For best results, wrap individual muffins in plastic wrap before freezing to prevent freezer burn and maintain their delightful taste.

Make Ahead Options

These Breakfast Egg Muffins are a fantastic choice for meal prep enthusiasts! You can prepare the fillings for your muffins up to 3 days in advance, simply chop your chosen vegetables and proteins, and store them in airtight containers in the fridge to keep them fresh. The egg mixture can also be whisked and refrigerated for up to 24 hours without losing its fluffy texture. When you're ready to enjoy your muffins, just fill your muffin cups with the prepped ingredients, pour in the egg mixture, and bake as directed. This approach saves you time in the mornings while ensuring your Breakfast Egg Muffins are just as delicious!

What to Serve with Customizable Low-Carb Egg Muffins?

Elevate your breakfast experience with delightful pairings that complement these fluffy, savory muffins.

  • Fresh Fruit Salad: A medley of seasonal fruits adds a refreshing sweetness, balancing the rich flavors of the egg muffins. The vibrant colors and varied textures create a delightful start to your day.

  • Avocado Toast: Creamy avocado on whole-grain bread provides healthy fats and pairs beautifully with the protein-packed muffins. The smooth texture enhances each bite, making it a satisfying combination.

  • Mixed Green Salad: A light salad dressed with lemon vinaigrette brings a crunchy, refreshing contrast, enhancing the savory notes of the muffins. Plus, it adds a burst of color to your breakfast table.

  • Yogurt Parfait: Creamy yogurt layered with granola and berries introduces a sweet, tangy element that complements the muffins perfectly. The crunchy granola adds a delightful texture, making each spoonful enjoyable.

  • Herbed Tomato Slices: Sliced tomatoes sprinkled with fresh herbs provide a light, juicy side that enhances the flavors of the muffins. This simple addition contributes a refreshing element to your meal.

  • Coffee or Herbal Tea: A warm beverage like freshly brewed coffee or calming herbal tea rounds out the breakfast experience. The rich or soothing flavors complement the savory egg muffins splendidly.

  • Smoothie: A fruity or green smoothie can add a nutritious boost to your breakfast while keeping it filling. Blend in your favorite ingredients for a refreshing, hydrating drink that pairs wonderfully with the muffins.

Indulge in these delicious accompaniments to turn your breakfast egg muffins into a hearty, well-rounded meal!

Breakfast Egg Muffins Variations & Substitutions

Feel free to take these delicious egg muffins and make them your own with these fun and tasty variations!

  • Vegetarian: Swap out meats for cooked lentils or chickpeas for a hearty vegetarian option. These not only add protein but also give a lovely texture and nutrition boost.

  • Dairy-Free: Use almond or coconut milk instead of traditional milk and opt for dairy-free cheese. It'll still be creamy, making it perfect for those avoiding dairy, without losing flavor.

  • Spicy Kick: Add diced jalapeños or a sprinkle of red pepper flakes for a spicy twist. If you enjoy heat, this will elevate your muffins to a whole new level.

  • Herb-Infused: Incorporate fresh herbs like basil, dill, or cilantro for an aromatic touch. Fresh herbs brighten up flavors and make your egg muffins feel even more gourmet.

  • Breakfast Sausage: Substitute Italian sausage with turkey or chicken sausage for a leaner protein option. This not only cuts down on calories but also adds a different dimension of flavor.

  • Mixed Veggies: Replace or mix the primary vegetables with whatever you have on hand, like zucchini, bell peppers, or mushrooms. Versatile and fresh, it's a fantastic way to clear out your fridge!

  • Savory Spice: Try adding spices such as turmeric or smoked paprika for depth of flavor. Just a pinch can transform your muffins and make them unforgettable.

For more breakfast inspiration, don't forget to check out our delightful Cornbread Breakfast Casserole recipes that pack flavor and can be tailored to numerous tastes!

Breakfast Egg Muffins Recipe FAQs

How do I select the best ingredients for my egg muffins?
When choosing vegetables, look for bright colors and firm textures. For example, broccoli should be vibrant green and free of dark spots. When it comes to cheese, opt for freshly grated varieties as they melt better compared to pre-shredded options, which often contain anti-caking agents.

How should I store my Breakfast Egg Muffins?
After preparing your muffins, allow them to cool completely before placing them into an airtight container. In the fridge, they’ll stay fresh for up to 5 days. If you choose to freeze, do so by wrapping each muffin in plastic wrap and placing them in a freezer-safe bag, where they can last for up to a month.

Can I freeze my Breakfast Egg Muffins?
Absolutely! To freeze your muffins, first, let them cool completely. Next, arrange them in a single layer on a baking sheet to freeze for about 1-2 hours. Once solid, transfer them to a freezer-safe bag or container. They’ll retain their deliciousness for up to 3 months, making breakfast quick and easy!

What if my egg muffins are sticking to the pan?
To prevent sticking, ensure you thoroughly grease your muffin tin with non-stick spray or a light coat of oil before adding your ingredients. If they do stick, run a butter knife around the edges after baking and gently lift them out with a fork. If possible, consider using silicone muffin cups for easy removal next time.

Are these Breakfast Egg Muffins safe for people with allergies?
While the base recipe is quite versatile, be cautious of allergens like dairy and gluten. You can make these muffins dairy-free by using plant-based cheese alternatives and gluten-free options when needed. Always check ingredient labels to ensure they fit your dietary requirements or those of your family.

How can I adjust the egg muffins for my dog's diet?
If you're considering sharing these muffins with your furry friend, feel free to omit any ingredient that’s not dog-safe, such as certain cheeses, onions, and meats. Use plain eggs and veggies like spinach or carrots, ensuring they’re cooked and chopped into small pieces for easy chewing. However, always consult your vet for any specific dietary needs for pets.

Breakfast Egg Muffins

Savory Breakfast Egg Muffins for Easy Morning Bliss

These Breakfast Egg Muffins are customizable, nutritious, and perfect for busy mornings.
Print Recipe Pin Recipe
Prep Time 10 minutes mins
Cook Time 25 minutes mins
Cooling Time 5 minutes mins
Total Time 40 minutes mins
Servings: 12 muffins
Course: Breakfast
Cuisine: American
Calories: 150
Ingredients Equipment Method Nutrition Notes

Ingredients
  

For the Egg Base
  • 12 large eggs Can substitute with egg whites for a lower cholesterol option.
  • 1 teaspoon kosher salt
  • 1 teaspoon black pepper
For the Broccoli, Bacon & Cheddar Variation
  • 1 cup broccoli florets Can substitute with cauliflower.
  • 6 slices bacon Can substitute with turkey bacon.
  • 1 cup grated cheddar cheese Dairy-free cheese works for dairy-free option.
  • 1 tablespoon chives Can substitute with green onions or scallions.
For the Italian Sausage, Kale & Parmesan Variation
  • 1 pound Italian sausage Plant-based sausage for vegetarian option.
  • 1 medium shallot Can substitute with yellow onions.
  • 1 cup kale leaves Can substitute with spinach.
For the Spinach, Tomato & Goat Cheese Variation
  • 1 cup grape tomatoes Can substitute with cherry tomatoes.
  • 2 cups baby spinach Can substitute with Swiss chard.
  • 1 green onion green onion Can be omitted.
  • 1 cup goat cheese Can substitute with feta cheese.

Equipment

  • Muffin tin
  • Mixing Bowl
  • Skillet
  • Whisk

Method
 

Step-by-Step Instructions for Breakfast Egg Muffins
  1. Preheat your oven to 350°F (175°C) and grease a muffin tin with non-stick spray. Whisk together the large eggs with kosher salt and black pepper until fluffy, about 1-2 minutes.
  2. For the Broccoli, Bacon & Cheddar variation, cook the bacon until crispy, draining on paper towels. Steam the broccoli until tender, roughly 3-4 minutes. Prepare the Italian sausage with shallots and kale, or chop spinach and halve grape tomatoes for the Spinach version.
  3. Distribute the filling ingredients into the greased muffin cups, using about 1-2 tablespoons of each filling. Pour the egg mixture over until each cup is about 90% full.
  4. Bake for 20-25 minutes, or until the muffins are set and golden. Check for doneness with a toothpick.
  5. Let cool for about 5 minutes, run a knife around the edges, and gently lift them out. Enjoy warm or cool completely for meal prep.

Nutrition

Serving: 1muffinCalories: 150kcalCarbohydrates: 3gProtein: 10gFat: 10gSaturated Fat: 4gPolyunsaturated Fat: 1gMonounsaturated Fat: 2gCholesterol: 150mgSodium: 300mgPotassium: 200mgFiber: 1gSugar: 1gVitamin A: 500IUVitamin C: 15mgCalcium: 100mgIron: 2mg

Notes

These muffins can be stored in the fridge for up to 5 days or frozen for a month. Reheat in the microwave or oven for best results.

Tried this recipe?

Let us know how it was!

Delicious Acai Bowl: Nutritious and Customizable Bliss

August 11, 2025 by Grace Snow Leave a Comment

With each vibrant spoonful of this Customizable Antioxidant-Rich Acai Bowl, I’m transported to a sun-kissed beach, feeling the tropical breeze on my skin. The beauty of this smoothie bowl lies in its simplicity: you can whip it up in just minutes, making it the perfect go-to for a refreshing breakfast or a snack that fuels your day. Packed with antioxidants and creamy goodness, this recipe invites you to explore endless topping possibilities—whether you’re in the mood for crunchy granola, luscious fruits, or a drizzle of honey, there’s a combination that will suit every craving. Plus, it’s entirely vegan-friendly, making it a guilt-free indulgence. Curious to see how your custom creation will turn out? Let’s dive in!

Why is the Acai Bowl a Must-Try?

Health Benefits: Each bite of this acai bowl delivers a powerhouse of antioxidants and essential vitamins, helping to boost your immune system.
Quick and Easy: In just a few minutes, you can create a delicious and nutritious meal, perfect for busy mornings or post-workout fuel.
Customizable: With a variety of toppings like chia seeds, mixed fruits, and coconut flakes, you can tailor each bowl to suit your taste and nutritional needs.
Vegan-Friendly: This recipe uses plant-based ingredients, so everyone can enjoy it without compromise.
Crowd-Pleaser: Impress family and friends with a visually stunning and delicious dish that’s perfect for any occasion! The delightful colors and flavors will keep them coming back for more.

Acai Bowl Ingredients

For the Base

  • Frozen Unsweetened Acai Packets – This is the star ingredient, providing that rich color and signature flavor; use 2 packets for a beautifully creamy texture.
  • Frozen Mixed Berries – Sweetens the mix and adds variety; feel free to swap with any frozen fruit you love.
  • Banana – Essential for a smooth base; ensure it's frozen for the best thickness.
  • Milk (or plant-based alternative) – Blends everything together beautifully; almond milk or coconut milk work wonders here.
  • Almond Butter – Adds creaminess and healthy fats; you can easily substitute it with peanut butter or sunflower seed butter for different flavors.

For the Toppings

  • Bee Pollen – A nutritional boost that enhances the health benefits of your acai bowl.
  • Chia Seeds – Provides a delightful crunch and a dose of fiber.
  • Coconut Flakes – Sweet and chewy, these add a tropical vibe to your bowl.
  • Mixed Berries – Perfect for enhancing both flavor and visual appeal; mix and match according to your preference.
  • Hemp Seeds – A crunchy, nutrient-dense addition that packs a healthy punch.
  • Cacao Nibs – Add a bit of chocolatey goodness if you’re craving something indulgent; these are perfect for a sweet crunch.

Step‑by‑Step Instructions for Customizable Antioxidant-Rich Acai Bowl

Step 1: Blend the Base
Start by gathering your blender, and add 2 frozen unsweetened acai packets, 1 cup of frozen mixed berries, 1 frozen banana, ½ cup of milk (or a plant-based alternative), and 2 tablespoons of almond butter. Blend on high for about 30-60 seconds, using a tamper if needed, until the mixture is smooth and thick resembling soft-serve ice cream.

Step 2: Prepare Serving Bowls
While your acai base blends, grab your favorite bowls. You want something shallow enough to showcase the colorful toppings you’ll add. Consider pre-chilling your bowls in the fridge if you prefer your acai bowl icy and fresh. Set them aside, ready for that gorgeous blend.

Step 3: Pour and Plate
Once blended to a velvety consistency, pour the acai bowl base into your prepared bowls, filling them about three-quarters full. This will leave space for the delightful toppings you'll add next. Take a moment to appreciate the vibrant purples and pinks of your acai mixture—it's as pleasing to the eye as it is nutritious!

Step 4: Add Your Toppings
Now comes the fun part: customizing your acai bowl! Top with a variety of fresh fruits like sliced bananas, strawberries, or blueberries. Sprinkle over chia seeds, coconut flakes, and hemp seeds to add texture. Feel free to get creative with drizzles of almond butter or honey for extra flavor.

Step 5: Serve and Enjoy
Once your toppings are beautifully arranged, serve your acai bowls immediately for optimal freshness. Each bowl is a canvas of color and flavor, ready to be enjoyed. Grab a spoon and dive into your delightful creation—every bite is a refreshing and nutrient-packed experience!

How to Store and Freeze Acai Bowl

Fridge: Store any leftover acai bowl in an airtight container for up to 2 days. However, note that the creamy texture may change slightly as the flavors meld.

Freezer: For longer storage, pour the acai mixture into a freezer-safe container or ice cube trays, and freeze for up to 1 month. Thaw overnight in the fridge before consuming.

Reheating: If frozen, you may need to blend the thawed mixture again to restore the smooth consistency before serving.

Make-Ahead Tips: To enjoy a quick, nutritious breakfast, prepare the acai base in advance and freeze it. Just thaw overnight for a delicious acai bowl in the morning!

What to Serve with Customizable Antioxidant-Rich Acai Bowl

Enjoy your acai bowl experience by pairing it with delightful sides and drinks that enhance its refreshing flavors.

  • Granola Parfaits: Layered with yogurt and fruit, these create a satisfying crunch that complements the creamy acai.
  • Coconut Yogurt: This adds a luscious, tropical twist and offers a dairy-free alternative that enhances the dish.
  • Fresh Tropical Fruit Salad: A burst of seasonal fruits brightens up the bowl while bringing a refreshing, juicy contrast.
  • Chia Pudding: Rich in nutrients and fiber, this creates an enjoyable contrast in texture while keeping things health-conscious.
  • Baked Sweet Potato Fries: These crispy delights provide a sweet-savory contrast, making each bite more interesting.
  • Matcha Green Tea: The earthy tones of matcha offer a calming balance to the sweetness of the acai bowl, perfect for a midday treat.
  • Almond Milk Smoothie: Whip up a smoothie with almond milk and spinach—an extra serving of nutrition that pairs beautifully.
  • Nutty Energy Balls: Offering a protein-packed snack, these can punctuate the meal with an indulgent sweetness.

Expert Tips for the Best Acai Bowl

  • Frozen Together: Use all frozen fruits: This enhances creaminess and thick texture, making your acai bowl delightful and indulgent.

  • Tamper Trick: Utilize a tamper: If your blender has one, use it to push the mixture down for an even blend without adding more liquid.

  • Sugar Savvy: Watch fruit quantities: While fruit is healthy, too many can add excess natural sugars; balance is key for a nutritious acai bowl.

  • Make-Ahead Magic: Prepare in advance: Blend and freeze the acai base ahead of time for a quick breakfast option; thaw overnight for best results.

  • Topping Options: Explore diverse toppings: From nuts to dried fruits, the more variety you incorporate, the more exciting your acai bowl will be!

Make Ahead Options

These Acai Bowls are perfect for busy home cooks looking to save time! You can prepare your acai bowl base up to 24 hours in advance by blending the acai packets, frozen mixed berries, banana, milk, and almond butter together and storing the mixture in an airtight container in the freezer. To maintain quality, ensure your mixture is well-sealed to prevent freezer burn. When you're ready to enjoy your bowl, simply thaw it overnight in the refrigerator. In the morning, pour the mixture into your bowls and add your desired toppings for a fresh and hassle-free breakfast. This way, you get the delightful flavors and creamy texture of your acai bowl without the morning rush!

Acai Bowl Variations to Try

Feeling adventurous in the kitchen? Let your creativity shine as you customize your acai bowl with these delicious variations.

  • Nut-Free: Swap almond butter for sunbutter to keep it nut-free, offering a similar creamy texture.
  • Tropical Twist: Add frozen mango instead of mixed berries to infuse your bowl with a sunny tropical flair. It creates a vibrant and refreshing taste!
  • Dark Chocolate Delight: Sprinkle cacao nibs or dark chocolate shavings over your toppings for a rich, indulgent dip into sweet satisfaction.
  • Protein-Packed: Mix in a scoop of your favorite protein powder to the base for an energizing boost that makes it perfect for post-workout recovery.
  • Honey Drizzle: Elevate your bowl with a drizzle of honey or agave syrup to add natural sweetness that perfectly contrasts the tartness of the acai.
  • Spicy Kick: Stir in a pinch of cayenne or chili powder for those who like to spice things up; it pairs surprisingly well with the sweetness!
  • Green Goodness: Blend in a handful of spinach or kale with your base, enriching your acai bowl without altering the delightful flavor. A nourishing way to sneak in greens!
  • Baked Crunch: Crumble some toasted granola over the top for an extra crunchy texture, ensuring every bite delivers a delightful crunch.

Feel free to indulge your creativity as you explore the topping options and make this acai bowl your own!

Acai Bowl Recipe FAQs

How do I select ripe bananas for my acai bowl?
Absolutely! When choosing bananas, look for ones that are firm with a vibrant yellow color and slight speckles. Avoid any with dark spots all over, as these may be overripe. For the best results in your acai bowl, freeze them once ripe; this guarantees a creamy texture when blended.

How should I store any leftover acai bowl?
Very simply! Store any leftover acai bowl in an airtight container in the fridge for up to 2 days. Just keep in mind that the creamy texture may change as the flavors meld together. If you want a more refreshing option, consider using it as a smoothie base!

Can I freeze my acai bowl mixture?
Of course! To freeze the acai mixture, pour it into a freezer-safe container or ice cube trays, and freeze for up to 1 month. When you're ready to enjoy, simply thaw it in the fridge overnight. Afterwards, blend again for that smooth, creamy texture before serving. It's a great make-ahead option for busy mornings!

What should I do if my acai bowl is too thick?
No worries, this happens! If your mixture turns out thicker than you'd like, try adding a splash of your chosen milk or plant-based alternative and blend again. If you're using frozen ingredients, they can often make the blend thicker, so adding a bit of liquid can help achieve that perfect consistency.

Are acai bowls safe for all dietary needs?
Absolutely! This acai bowl recipe is vegan-friendly, making it suitable for a wide range of dietary preferences. If you have allergies, you might want to avoid nuts by substituting almond butter with sunflower seed butter. Always make sure to check the ingredient labels for any hidden allergens!

What toppings can I use for my acai bowl?
The more the merrier! Get creative with toppings like fresh fruits, granola, almond slices, or coconut flakes. You can also add superfoods like chia seeds or hemp seeds for an extra nutritional boost. The combinations are endless, allowing you to craft a bowl that’s uniquely yours!

Acai Bowl

Delicious Acai Bowl: Nutritious and Customizable Bliss

This Acai Bowl is a refreshing and customizable breakfast option, packed with antioxidants and made from delicious, plant-based ingredients.
Print Recipe Pin Recipe
Prep Time 5 minutes mins
Total Time 5 minutes mins
Servings: 2 bowls
Course: Breakfast
Cuisine: Vegan
Calories: 350
Ingredients Equipment Method Nutrition Notes

Ingredients
  

For the Base
  • 2 packets Frozen Unsweetened Acai Packets Provides rich color and flavor.
  • 1 cup Frozen Mixed Berries Feel free to swap with other frozen fruits.
  • 1 each Banana Ensure it's frozen for best thickness.
  • ½ cup Milk (or plant-based alternative) Almond or coconut milk work well.
  • 2 tablespoons Almond Butter Can be substituted with peanut butter.
For the Toppings
  • 1 tablespoon Bee Pollen Enhances nutritional benefits.
  • 2 tablespoons Chia Seeds
  • ¼ cup Coconut Flakes
  • ½ cup Mixed Berries Mix and match as desired.
  • 2 tablespoons Hemp Seeds
  • 2 tablespoons Cacao Nibs For a chocolatey crunch.

Equipment

  • Blender

Method
 

Step-by-Step Instructions
  1. Blend the Base: Add 2 frozen acai packets, 1 cup frozen mixed berries, 1 frozen banana, ½ cup milk, and 2 tablespoons almond butter to a blender. Blend until smooth and thick.
  2. Prepare Serving Bowls: Grab shallow bowls to showcase the toppings. Optionally pre-chill for a refreshing experience.
  3. Pour and Plate: Pour the blended acai base into the bowls, filling them about three-quarters full.
  4. Add Your Toppings: Customize with fresh fruits, chia seeds, coconut flakes, and hemp seeds. Drizzle with almond butter or honey for extra flavor.
  5. Serve and Enjoy: Serve immediately for optimal freshness and enjoy your nutritious creation.

Nutrition

Serving: 1bowlCalories: 350kcalCarbohydrates: 45gProtein: 8gFat: 15gSaturated Fat: 2gPolyunsaturated Fat: 4gMonounsaturated Fat: 8gSodium: 25mgPotassium: 450mgFiber: 8gSugar: 15gVitamin A: 10IUVitamin C: 30mgCalcium: 15mgIron: 10mg

Notes

For the best texture, use all frozen fruits and consider preparing the acai base in advance and freezing it.

Tried this recipe?

Let us know how it was!

Discover Flavorful Turkish Eggs for an Epic Brunch Delight

August 11, 2025 by Grace Snow Leave a Comment

As I savored my first bite of Turkish Eggs, I was transported to a charming café in the heart of Istanbul, where the aroma of spices dances in the air. This dish, also known as Çılbır, features a creamy yogurt base topped with perfectly poached eggs, all drizzled with a luscious spiced butter sauce. In just 20 minutes, you can whip up this high-protein, gluten-free brunch delight that packs a punch of Mediterranean flavors. The best part? It's not only quick to prepare, but it’s a stunning dish that’s sure to impress your loved ones or treat yourself to a well-deserved indulgence. Curious about how to bring this vibrant dish to your table? Join me as we dive into the world of Turkish Eggs!

Why are Turkish Eggs a must-try?

Simplicity, this delightful recipe comes together in just 20 minutes, perfect for busy mornings or leisurely brunches. Rich Flavor abounds with a creamy yogurt base, perfectly poached eggs, and a spiced butter sauce that brings a fragrant kick. Nutrient-packed, this dish is high in protein and gluten-free, making it a guilt-free brunch option. Crowd-pleaser, it's visually stunning and guaranteed to impress family and friends. Versatile, feel free to add sautéed greens or swap spices to make it your own! For an extra level of indulgence, serve with crusty bread to soak up every last bit of that lovely sauce.

Turkish Eggs Ingredients

• Bring the Mediterranean flavors to your kitchen with this vibrant dish!

  • For the Yogurt Base

  • Greek yogurt – Provides creaminess and tang; substitute with regular or dairy-free yogurt for a lighter version.

  • Garlic (1 finely grated clove) – Adds a pungent, aromatic flavor to the yogurt; fresh garlic is preferred for the best taste.

  • Kosher salt and ground black pepper – Enhances overall flavors; adjust to your personal taste.

  • For the Poached Eggs

  • Large eggs (4) – The star of the dish, poached to silky perfection; for a vegan option, consider using a chickpea-based egg substitute.

  • White vinegar (1 tablespoon) – Helps the egg whites coagulate during poaching; apple cider vinegar can be used as an alternative.

  • For the Spiced Butter Sauce

  • Unsalted butter (4 tablespoons) – Provides richness and flavor; substitute with olive oil for a dairy-free option.

  • Aleppo pepper (2 teaspoons) – Offers a mild heat and unique flavor; swap with smoked paprika for a different flavor profile if unavailable.

  • Paprika (1 teaspoon) – Adds depth and color to the sauce; use sweet or smoked paprika depending on your preference.

  • For Garnishing

  • Chopped fresh herbs (dill, parsley, mint, etc.) – Enhances the dish's freshness and aroma; use any available herbs to garnish.

Step‑by‑Step Instructions for Turkish Eggs

Step 1: Prepare the Garlicky Yogurt
In a small bowl, combine the Greek yogurt, finely grated garlic, kosher salt, and ground black pepper. Stir everything together until the mixture is smooth and well-blended. This creamy base will add a delightful tanginess to your Turkish Eggs, so set it aside while you prepare the rest of the dish.

Step 2: Make the Spiced Butter Sauce
In a small pan over medium-low heat, melt the unsalted butter until it’s frothy but not browned, which will take about 2-3 minutes. Next, add the Aleppo pepper and paprika, stirring for 1 minute until fragrant. Be careful not to let the spices burn. Once ready, remove the pan from heat and set aside to let the flavors meld.

Step 3: Prepare the Eggs
Crack each of the large eggs into a strainer set over a bowl, allowing the excess egg whites to drain off for about 1-2 minutes. This step is crucial for achieving the perfect poached texture. Afterward, gently transfer each egg to individual ramekins, ready for poaching.

Step 4: Poach the Eggs
Bring a medium-sized pot of water to a gentle simmer over medium heat, then add the white vinegar to help the egg whites firm up. Lower the heat to maintain a steady simmer and carefully lower the ramekins with eggs into the water, poaching them for about 3 minutes. The whites should be set while the yolks remain runny, perfect for your Turkish Eggs.

Step 5: Assemble the Dish
Once poached, carefully remove the eggs with a slotted spoon and place them on paper towels to drain any excess water. On a serving plate, spread a generous layer of the garlicky yogurt. Top it with the poached eggs, drizzle the spiced butter sauce over everything, and finish with a sprinkle of your favorite chopped fresh herbs for a burst of color and freshness.

Turkish Eggs Variations & Substitutions

Feel free to get creative with your Turkish Eggs and explore new flavors that excite your taste buds!

  • Dairy-Free: Use coconut yogurt or any plant-based yogurt instead of Greek yogurt for a vegan-friendly option. This keeps the dish creamy without dairy.

  • Veggie Boost: Top the dish with sautéed kale or roasted bell peppers for a beautiful color contrast and added nutrition. These veggies perfectly complement the creamy base.

  • Spicy Kick: Swap the Aleppo pepper with a dash of cayenne or red chili flakes for an extra layer of heat. Just a pinch can elevate the overall flavor!

  • Herb Variation: Experiment with fresh basil or cilantro instead of the traditional dill and parsley for a unique aromatics twist. This can offer a fresh, vibrant taste to the dish.

  • Add Cheese: Crumble some feta or goat cheese over the top for a tangy richness that elevates each bite. The creamy essence melds seamlessly with the yogurt and eggs.

  • Savory Crust: Serve with toasted pita chips or crusty sourdough to add a delightful crunch. This provides a satisfying texture contrast to the creamy yogurt and runny eggs.

  • Egg Alternatives: For a vegan experience, try a chickpea scramble instead of poached eggs. It’s a fantastic, protein-packed substitute that still brings the dish together.

  • Make it Zesty: Add a squeeze of lemon juice before serving for a refreshing brightness that balances the richness of the yogurt and butter sauce. A simple addition that makes a big difference!

For more delicious ideas, you might want to check out how to make spiced chickpea dishes or explore my take on Mediterranean-style breakfast recipes. Happy cooking!

What to Serve with Creamy Turkish Eggs with Spiced Butter Sauce

Imagine a vibrant table filled with dishes that harmoniously complement the rich and creamy Turkish Eggs, enhancing your brunch experience.

  • Crusty Sourdough Bread: Perfect for soaking up the garlicky yogurt and spiced butter sauce, adding a delightful crunch to your meal. A slice of toasted sourdough adds warmth and heartiness.

  • Simple Green Salad: A light mix of greens, cucumbers, and cherry tomatoes dressed in a lemon vinaigrette balances the richness of the eggs, offering a refreshing contrast.

  • Roasted Vegetables: Caramelized bell peppers, zucchini, and eggplant bring natural sweetness and depth, pairing beautifully with the flavors of the yogurt and butter sauce.

  • Feta Cheese Crumbles: The salty tang of crumbled feta enhances the dish's Mediterranean vibe, adding creaminess and a flavor punch that complements the eggs perfectly.

  • Fresh Fruit Platter: Bright, seasonal fruits like berries, oranges, or melons provide a sweet, juicy contrast that refreshes the palate after that rich egg dish.

  • Turkish Tea: A warm cup of traditional Turkish tea brings an aromatic close to your brunch experience, with its delicate notes perfectly balancing the meal's flavors.

  • Spiced Chickpeas: Crunchy, roasted chickpeas seasoned with cumin or paprika offer a tasty protein boost and crunchy texture, making it a fun addition to your savory brunch spread.

  • Thick Yogurt Parfait: Layer Greek yogurt with honey and granola for a delightful and nutritious dessert that complements the brunch, providing a touch of sweetness.

How to Store and Freeze Turkish Eggs

Fridge: Store leftover Turkish Eggs in an airtight container for up to 3 days. Keep the poached eggs and yogurt mixture separate to retain freshness.

Freezer: It is not recommended to freeze Turkish Eggs, as the creamy yogurt and poached eggs may not maintain their quality once thawed.

Reheating: Gently reheat leftover poached eggs in warm water for about 5 minutes to restore their texture. Serve with freshly drizzled spiced butter sauce.

Make-Ahead Tips: The yogurt mixture can be prepared ahead and stored in the fridge for up to 2 days. Assemble the dish just before serving for the best flavor and presentation.

Make Ahead Options

Preparing Turkish Eggs ahead of time is a fantastic way to save precious minutes during busy mornings! You can assemble the garlicky yogurt and store it in the refrigerator for up to 3 days without losing flavor. Additionally, poach the eggs in advance and immerse them in a bowl of cold water; they will stay fresh for up to 2 days. When it's time to serve, simply reheat the poached eggs gently in warm water for a few minutes to regain their silky texture. With these make-ahead options, your Turkish Eggs will be just as delicious and ready to impress in no time!

Expert Tips for Turkish Eggs

  • Quality Yogurt: Use full-fat Greek yogurt for a creamier texture. Low-fat versions can lack flavor, affecting the overall dish.

  • Egg Poaching: Maintain a gentle simmer, not a rolling boil, to prevent the eggs from breaking apart. Perfect poaching ensures luscious runny yolks in your Turkish Eggs.

  • Customize Spices: Feel free to adjust Aleppo pepper and paprika levels according to your spice preference. Start low if you're unsure and build up for a personalized kick.

  • Fresh Herbs: Choose any combination of fresh herbs for your garnish. They not only add flavor but also enhance presentation, making your Turkish Eggs visually stunning.

  • Resting Eggs: If making ahead, store cooked poached eggs in cold water in the fridge. They’ll remain perfect for up to two days, ready to be warmed before serving.

  • Serving Suggestion: Pair with crusty bread to soak up the garlicky yogurt and spiced butter sauce, enhancing the entire flavor experience.

Turkish Eggs Recipe FAQs

What type of Greek yogurt should I use for Turkish Eggs?
Absolutely! I recommend using full-fat Greek yogurt for a rich and creamy texture that complements the dish beautifully. If you're looking for a lighter version, regular yogurt or a dairy-free option like coconut yogurt will work, but be mindful that the flavor may vary slightly.

How long can I store leftover Turkish Eggs?
You can store leftover Turkish Eggs in an airtight container in the fridge for up to 3 days. To keep them fresh, it’s best to separate the poached eggs from the yogurt mixture. This way, the yogurt stays creamy, and the eggs maintain their texture.

Can I freeze cooked Turkish Eggs?
Very! Unfortunately, freezing Turkish Eggs is not recommended. The creamy yogurt and poached eggs don’t handle freezing well and may lose their delicious texture when thawed. Instead, prep the yogurt mixture ahead and poach the eggs fresh for best results!

What’s the best way to reheat leftover poached eggs?
To gently reheat your poached eggs, fill a small pot with warm water and place the eggs in for about 5 minutes. This will help restore their delightful, runny yolks without cooking them further. Drizzle freshly made spiced butter sauce over them for an extra touch!

How can I make Turkish Eggs pet-friendly?
If you’d like to share a little with your furry friend, you could set aside a small quantity of plain yogurt without any added salt, garlic, or spices for them. Avoid the eggs altogether as they can be a bit rich for pets and focus on nutritious, pet-safe ingredients.

What should I do if my poached eggs break during cooking?
Don’t worry, this happens to the best of us! If your eggs break, you can create a delicious egg drop soup by letting the broken egg whites gently cook in the simmering water for a few moments longer. Alternatively, you can simply try again, ensuring the water is at a gentle simmer and perhaps adding a splash more vinegar to help with coagulation. Happy cooking!

Turkish Eggs

Discover Flavorful Turkish Eggs for an Epic Brunch Delight

Turkish Eggs, also known as Çılbır, are a creamy yogurt dish topped with poached eggs and spiced butter, making a delightful brunch.
Print Recipe Pin Recipe
Prep Time 20 minutes mins
Cook Time 10 minutes mins
Total Time 30 minutes mins
Servings: 4 servings
Course: Breakfast
Cuisine: Turkish
Calories: 300
Ingredients Equipment Method Nutrition Notes

Ingredients
  

For the Yogurt Base
  • 2 cups Greek yogurt or dairy-free yogurt
  • 1 clove Garlic finely grated
  • to taste Kosher salt
  • to taste Ground black pepper
For the Poached Eggs
  • 4 Large eggs or chickpea-based egg substitute
  • 1 tablespoon White vinegar or apple cider vinegar
For the Spiced Butter Sauce
  • 4 tablespoons Unsalted butter or olive oil
  • 2 teaspoons Aleppo pepper or smoked paprika
  • 1 teaspoon Paprika sweet or smoked
For Garnishing
  • to taste Chopped fresh herbs such as dill, parsley, mint

Equipment

  • small bowl
  • small pan
  • pot
  • strainer
  • ramekins
  • slotted spoon
  • serving plate

Method
 

Step-by-Step Instructions for Turkish Eggs
  1. Prepare the Garlicky Yogurt: In a small bowl, combine the Greek yogurt, finely grated garlic, kosher salt, and ground black pepper. Stir everything together until smooth.
  2. Make the Spiced Butter Sauce: In a small pan over medium-low heat, melt the unsalted butter until frothy. Add Aleppo pepper and paprika, stirring until fragrant.
  3. Prepare the Eggs: Crack each egg into a strainer set over a bowl to drain excess whites for 1-2 minutes.
  4. Poach the Eggs: Bring a pot of water to a gentle simmer, add white vinegar, and carefully lower the ramekins with eggs into the water, poaching for about 3 minutes.
  5. Assemble the Dish: Remove poached eggs with a slotted spoon, place on paper towels, spread garlicky yogurt on a plate, top with eggs, drizzle spiced butter sauce, and garnish with fresh herbs.

Nutrition

Serving: 1servingCalories: 300kcalCarbohydrates: 5gProtein: 14gFat: 25gSaturated Fat: 15gPolyunsaturated Fat: 2gMonounsaturated Fat: 7gCholesterol: 370mgSodium: 600mgPotassium: 200mgSugar: 3gVitamin A: 500IUVitamin C: 2mgCalcium: 150mgIron: 1mg

Notes

Quality yogurt and gentle simmering are crucial for perfect texture. Customize spices and use any fresh herbs for garnish. Serve with crusty bread.

Tried this recipe?

Let us know how it was!

Lemon Ricotta Protein Pancakes for a Zesty Breakfast Boost

August 11, 2025 by Grace Snow Leave a Comment

As I flipped the first pancake of the morning, a bright burst of zesty lemon filled the kitchen, wrapping us in its cheerful embrace. If you’re like me and often crave a breakfast that feels both indulgent and energizing, these Lemon Ricotta Protein Pancakes are just what you need. Naturally high in protein and gluten-free, this versatile recipe not only satisfies your taste buds but also brings a wholesome twist to your morning routine. With their soft, fluffy texture and a delightful hint of citrus, these pancakes are perfect for both busy weekdays and leisurely brunches. Plus, you can easily customize the ingredients to suit your dietary needs or whatever you have on hand. Ready to elevate your breakfast game? Let’s dive in!

Why Are These Pancakes a Game Changer?

High-Protein Power: Packed with protein from ricotta, these pancakes are a filling way to kickstart your day.
Gluten-Free Goodness: Made with almond and coconut flour, they cater to gluten-free diets without compromising on taste.
Versatile Ingredient Options: Easily swap ingredients to suit your dietary needs or pantry staples, ensuring they're always within reach.
Perfectly Fluffy Every Time: Thanks to clever mixing techniques and the right balance of ingredients, say goodbye to dense pancakes!
Meal Prep Friendly: Make a batch ahead of time to enjoy quick breakfasts that still pack a nutritious punch. These Lemon Ricotta Protein Pancakes will quickly turn into your go-to for brunch or a weekday treat!

Lemon Ricotta Protein Pancake Ingredients

• Gather these ingredients for a delightful breakfast experience!

For the Pancakes

  • Almond Flour – Provides a gluten-free base; substitute with coconut flour for a different texture.
  • Tapioca Flour – Contributes to a light and airy pancake; can be swapped with arrowroot powder.
  • Coconut Flour – Absorbs moisture and adds fiber; omit or increase almond flour if you skip it.
  • Baking Soda – Helps the pancakes rise for that fluffy texture we all adore!
  • Kosher Salt – A pinch enhances all the flavors beautifully.
  • Ricotta Cheese – Increases moisture and packs in protein; cottage cheese is a great substitute.
  • Eggs – Provide structure and lightness; for a vegan option, try a flax egg (1 tbsp ground flaxseed + 2.5 tbsp water).
  • Lemon Zest – Infuses the pancakes with a refreshing citrus aroma; be generous!
  • Vanilla Extract – Adds depth of flavor to your pancakes; can be omitted if desired.
  • Honey or Maple Syrup – Sweetens naturally; sugar alternatives like monk fruit work well too!

Step‑by‑Step Instructions for Lemon Ricotta Protein Pancakes

Step 1: Combine Dry Ingredients
In a large mixing bowl, whisk together almond flour, tapioca flour, coconut flour, baking soda, and a pinch of kosher salt until well blended. This step is crucial to ensure an even distribution of ingredients, leading to perfectly fluffy Lemon Ricotta Protein Pancakes. Aim for a uniform sandy texture, and set the bowl aside while you prepare the wet ingredients.

Step 2: Mix Wet Ingredients
In a separate bowl, add the creamy ricotta cheese and crack in the eggs. Whisk vigorously to combine until smooth, then incorporate the zesty lemon zest, vanilla extract, and your choice of honey or maple syrup. The mixture should be rich and creamy, introducing delightful flavors that will elevate your pancakes.

Step 3: Combine Mixtures
Carefully fold the wet ingredients into the dry mixture using a spatula until just combined. Be careful not to overmix; a few lumps are perfectly fine for achieving that light and airy texture in your Lemon Ricotta Protein Pancakes. Let the batter rest for about 5 minutes for better fluffiness while you prepare to cook.

Step 4: Cook Pancakes
Preheat a skillet or griddle over medium heat and grease it lightly with butter. Once hot, spoon approximately 1/4 cup of batter for each pancake onto the skillet. Cook for 2-3 minutes, watching for bubbles to form on the surface, signaling it’s time to flip. Flip the pancakes and cook for an additional 1-2 minutes, or until golden brown on both sides.

Step 5: Serve and Enjoy
Once cooked, transfer the pancakes onto a warm plate and serve immediately. Add maple syrup, a dollop of Greek yogurt, or a sprinkle of additional lemon zest to enhance the flavor of your Lemon Ricotta Protein Pancakes. Enjoy them warm to fully appreciate their fluffy texture and refreshing taste!

Make Ahead Options

These Lemon Ricotta Protein Pancakes are ideal for busy home cooks looking to save time during hectic mornings! You can prepare the batter up to 24 hours in advance by mixing all the dry ingredients and wet ingredients separately and refrigerating them. For even easier prep, cook a batch and store the pancakes in the fridge for up to 3 days or freeze them for up to 3 months. To maintain their fluffy texture, stack the pancakes with parchment paper between each layer in an airtight container or Ziplock bag. When you're ready to serve, simply reheat them in the microwave or toaster until warm, and enjoy a delicious, protein-packed breakfast with minimal effort!

Storage Tips for Lemon Ricotta Protein Pancakes

Room Temperature: Store leftover pancakes on the counter in an airtight container for up to 2 hours if they are still warm. For longer storage, refrigerate them.

Fridge: Keep pancakes in a tightly sealed container in the fridge for up to 3-4 days. They can be reheated in the microwave or briefly toasted for a fresh taste.

Freezer: For longer-term storage, freeze pancakes by placing them in a single layer on a baking sheet first, then transfer to a freezer bag or container for up to 3 months.

Reheating: When ready to enjoy, simply reheat in the microwave or toaster. This ensures that your Lemon Ricotta Protein Pancakes remain soft and delicious!

Lemon Ricotta Protein Pancakes Variations

Feel free to customize each bite of these delicious pancakes to perfectly suit your taste and nutritional needs!

  • Dairy-Free: Substitute ricotta cheese with silken tofu for a vegan-friendly option that still retains creaminess.
  • Sugar-Free: Opt for a sugar alternative like erythritol to sweeten without added calories.
  • Flavor Burst: Add a teaspoon of almond extract for a delightful twist on the classic flavor.
  • Spiced Up: Incorporate a pinch of cinnamon or nutmeg into the dry ingredients for a warm, cozy touch.
  • Citrus Swap: Try substituting lemon zest with orange or lime zest for a different refreshing flavor altogether.
  • Nutty Delight: Fold in chopped nuts or seeds into the pancake batter for added crunch and texture.
  • Fruit Infusion: Mix in fresh blueberries or sliced bananas for a fruity explosion that complements the zesty pancakes beautifully.
  • Savory Twist: Go savory by adding some sautéed spinach and feta cheese into the batter for a delicious brunch option that’s packed with protein.

With these variations, you can transform your Lemon Ricotta Protein Pancakes into an array of flavorful delights. Don't hesitate to explore new toppings or sides alongside the pancakes, like drizzling with homemade raspberry sauce or serving with a fresh fruit salad for a colorful, healthy breakfast!

What to Serve with Lemon Ricotta Protein Pancakes

As you savor each bite of fluffy perfection, consider how delightful these pancakes can be with complementary flavors and textures.

  • Fresh Berries: Bright and juicy, berries add a burst of natural sweetness and a refreshing contrast to the rich pancakes. Their vibrant colors also make your plate pop!
  • Greek Yogurt: Creamy and tangy, a dollop of Greek yogurt enhances the protein content and adds a luscious texture that perfectly balances the pancake's fluffiness.
  • Honey Drizzle: A light drizzle of honey brings an additional layer of sweetness, beautifully tying together the zesty lemon with rich flavors without overpowering the dish.
  • Crispy Bacon: The salty crunch of bacon offers a delightful contrast to the soft, sweet pancakes. The richness pairs well with the lemon, making each bite a treat.
  • Nut Butter: Smooth almond or peanut butter adds healthy fats and a hint of nuttiness, creating a savory-sweet combination that’s irresistibly good.
  • Chilled Sparkling Water: For a refreshing drink, nothing beats chilled sparkling water with a slice of lemon. It cleanses the palate and elevates the brunch experience.

As you explore these pairings, you’ll create a sensational breakfast spread that turns your Lemon Ricotta Protein Pancakes into a delightful meal everyone will come back for!

Expert Tips for Lemon Ricotta Protein Pancakes

  • Do Not Overmix: Overmixing the batter can lead to dense pancakes; mix just until combined for the best results.

  • Heat Matters: Be sure your skillet is preheated; pancakes will cook more evenly and puff up beautifully if the pan is hot.

  • Cooking Sprays: Instead of butter, consider using a non-stick spray for cooking; this offers an easy release and can make cleaning up simpler.

  • Fluffy Texture: Let the batter rest for a few minutes before cooking; this allows the almond flour to absorb moisture, resulting in fluffier Lemon Ricotta Protein Pancakes.

  • Storage Savvy: Leftover pancakes can be refrigerated for up to 3-4 days or frozen for quick breakfasts later; reheat in the microwave or toaster for best results.

Lemon Ricotta Protein Pancakes Recipe FAQs

What type of almond flour should I use?
You’ll want to use finely ground almond flour for the best texture in your Lemon Ricotta Protein Pancakes. This allows for a light and fluffy pancake. If you find almond flour too coarse, consider using blanched almond flour, as it is usually finer and blends better.

How should I store leftover pancakes?
Leftover Lemon Ricotta Protein Pancakes can be refrigerated in an airtight container for up to 3-4 days. To maintain their fluffiness, I recommend placing a piece of parchment paper between layers if you're stacking them. For longer storage, you can freeze them; just follow the instructions below!

Can I freeze these pancakes?
Absolutely! To freeze Lemon Ricotta Protein Pancakes, first, lay them out in a single layer on a baking sheet and place them in the freezer until firm, which usually takes about 2 hours. Once they're frozen, transfer them to a freezer bag or airtight container; they can be stored for up to 3 months. Just remember to label the container with the date.

What should I do if my batter is too thick or too thin?
If your pancake batter is too thick, you can add a splash of milk (dairy or non-dairy) to achieve your desired consistency. Start with 1 tablespoon at a time until it loosens up to your liking. Conversely, if your batter is too thin, you can sprinkle in a little more almond flour a tablespoon at a time, stirring gently until you reach the perfect thickness; be careful not to overmix!

Can I make these pancakes vegan?
Yes! To make Lemon Ricotta Protein Pancakes vegan, substitute the eggs with a flax egg—mix 1 tablespoon of ground flaxseed with 2.5 tablespoons of water, let it sit for about 5 minutes until it thickens, then use it in place of each egg. Additionally, you may want to replace the ricotta cheese with a plant-based alternative, like silken tofu blended until smooth.

Are there any allergen considerations with this recipe?
While these pancakes are gluten-free, be mindful of allergies to nuts if using almond flour. For nut-free alternatives, consider using sunflower seed flour or a gluten-free all-purpose blend. Always double-check labels for any allergens, especially if you are serving guests with dietary restrictions!

Lemon Ricotta Protein Pancakes

Lemon Ricotta Protein Pancakes for a Zesty Breakfast Boost

These Lemon Ricotta Protein Pancakes are a zesty, protein-packed breakfast option that is gluten-free and easily customizable.
Print Recipe Pin Recipe
Prep Time 10 minutes mins
Cook Time 15 minutes mins
Resting Time 5 minutes mins
Total Time 30 minutes mins
Servings: 4 pancakes
Course: Breakfast
Calories: 150
Ingredients Equipment Method Nutrition Notes

Ingredients
  

Pancake Ingredients
  • 1 cup Almond Flour Provides a gluten-free base
  • 1/4 cup Tapioca Flour Contributes to a light and airy pancake
  • 1/4 cup Coconut Flour Absorbs moisture and adds fiber
  • 1 teaspoon Baking Soda Helps the pancakes rise
  • 1/4 teaspoon Kosher Salt Enhances flavors
  • 1 cup Ricotta Cheese Increases moisture and protein
  • 2 large Eggs Provides structure
  • 1 tablespoon Lemon Zest Infuses pancakes with citrus aroma
  • 1 teaspoon Vanilla Extract Adds depth of flavor
  • 2 tablespoons Honey or Maple Syrup Sweetens naturally

Equipment

  • Mixing Bowl
  • Whisk
  • Spatula
  • Skillet
  • measuring cups

Method
 

Cooking Instructions
  1. In a large mixing bowl, whisk together almond flour, tapioca flour, coconut flour, baking soda, and kosher salt until well blended.
  2. In a separate bowl, whisk together ricotta cheese and eggs until smooth, then add lemon zest, vanilla extract, and honey or maple syrup.
  3. Fold the wet ingredients into the dry mixture gently until just combined; let the batter rest for 5 minutes.
  4. Preheat skillet over medium heat, add a little butter, and pour 1/4 cup of batter for each pancake. Cook for 2-3 minutes, then flip and cook until golden brown.
  5. Serve warm with maple syrup, Greek yogurt, or additional lemon zest.

Nutrition

Serving: 1pancakeCalories: 150kcalCarbohydrates: 12gProtein: 8gFat: 9gSaturated Fat: 3gPolyunsaturated Fat: 1gMonounsaturated Fat: 4gCholesterol: 70mgSodium: 100mgPotassium: 150mgFiber: 2gSugar: 3gVitamin A: 200IUVitamin C: 1mgCalcium: 150mgIron: 1mg

Notes

Do not overmix the batter for fluffier pancakes. Store leftovers in the fridge or freezer for later.

Tried this recipe?

Let us know how it was!

Delicious Pitaya Smoothie Bowl for a Refreshing Boost

August 11, 2025 by Grace Snow Leave a Comment

Every time I take a sip of this vibrant pitaya smoothie bowl, I’m instantly transported to a sun-soaked beach, where the colorful fruits dance with the waves in the distance. Knowing that it's packed with nutrients makes it even more satisfying. This refreshing pitaya smoothie bowl is not just a feast for the eyes; it’s a nutrient-dense superhero that can easily jazz up your morning routine or serve as a satisfying afternoon snack. With just a handful of ingredients like frozen pitaya, banana, and mixed berries, its quick preparation means you can whip it up even on the busiest mornings. Trust me, blending your way to health has never been this delicious! Ready to dive into this tropical delight? Let’s make some magic happen!

Why is the Pitaya Smoothie Bowl Special?

Vibrant Colors: The pitaya's stunning pink hue will brighten up your breakfast table, making it a feast for the eyes.

Nutrient-Packed: With its blend of fruits, this bowl is rich in antioxidants and essential vitamins, giving you a healthy boost to start your day.

Quick Prep: In just a few minutes, you can prepare this refreshing treat, perfect for hectic mornings or busy afternoons.

Versatile Toppings: Customize your smoothie bowl with various toppings like nuts or fruits, allowing you to get creative every time.

Crowd-Pleaser: Whether it’s for a family brunch or a solo snack, this pitaya smoothie bowl is sure to impress anyone looking for a deliciously healthy option. Enjoy it alone or pair it with something tasty like granola recipes for an even heartier meal!

Pitaya Smoothie Bowl Ingredients

For the Smoothie Base
• Frozen Pitaya Cubes – The key ingredient that brings vibrant color and a unique flavor to your pitaya smoothie bowl.
• Frozen Banana – This adds a creamy texture and natural sweetness essential for your smoothie.
• Frozen Mixed Berries – Packed with antioxidants, these enhance the flavor and provide additional nutrients.
• Coconut Water or Almond Milk – Choose coconut water for hydration or almond milk for a nutty twist; both will help blend the ingredients smoothly.

For Toppings
• Fresh Fruit – Sliced fruits like kiwi or strawberries not only enhance the look but also add extra vitamins.
• Nuts and Seeds – Almonds or chia seeds add crunch and healthy fats, making your pitaya smoothie bowl more filling.
• Coconut Flakes – Sprinkle on top for a tropical flair and added texture.
• Nut Butters – A dollop of almond or peanut butter can elevate the flavor and boost protein content.

Feel free to mix and match toppings to create your perfect pitaya smoothie bowl while enjoying the nutritious benefits this delightful dish has to offer!

Step‑by‑Step Instructions for Pitaya Smoothie Bowl

Step 1: Blend Base
In a high-powered blender, combine 1 cup of frozen pitaya cubes, 1 frozen banana, and 1 cup of frozen mixed berries. Pour in ½ to 1 cup of coconut water or almond milk to create a smooth blend. Start blending on high for about 30 seconds to one minute. Use a tamper if necessary to push down the ingredients until you achieve a thick, creamy texture and vibrant color.

Step 2: Check Consistency
Once blended, pause the blender and check the consistency of your pitaya smoothie bowl. If it's too thick for your liking, gradually add more coconut water or almond milk, blending again for an additional 15 seconds. Ideal consistency is thick enough to hold toppings while still being smooth and spoonable. Adjust to your taste preferences and blend for just a few more seconds if needed.

Step 3: Pour and Serve
Carefully pour the blended pitaya smoothie into a bowl, using a spatula to scrape down the sides of the blender if necessary. Aim to fill your bowl halfway to leave space for toppings. The beautiful pink hue should stand out, making it visually appealing. Take a moment to admire the vibrant color before adding your desired toppings.

Step 4: Add Toppings
Now comes the fun part! Customize your pitaya smoothie bowl with your choice of fresh fruit, nuts, seeds, or coconut flakes. Slice some kiwi or strawberries for added color and vitamins, and sprinkle a handful of almonds or chia seeds for crunch. Consider drizzling a bit of nut butter on top for extra flavor and protein.

Step 5: Enjoy Immediately
Once your toppings are in place, grab a spoon and dive into your delicious pitaya smoothie bowl! This refreshing treat is best enjoyed immediately to maintain its creamy texture and vibrant flavors. Relish every bite, knowing you’ve prepared a nutrient-dense dish that's both satisfying and healthy!

Expert Tips for Making the Perfect Pitaya Smoothie Bowl

• Frozen Fruit Focus: Ensure your fruits are fully frozen to achieve a creamy consistency in your pitaya smoothie bowl. Fresh fruit won’t yield the same texture.

• Liquid Limitation: Start with less liquid and gradually add more as needed. Too much liquid will thin your smoothie and compromise its thickness.

• Prepping Ahead: Prepare your smoothie base in advance and freeze it in portions. Thaw and stir the base before serving for an easy, quick snack.

• Taste Testing: Don’t be shy! Blend and taste as you go to adjust sweetness or thickness. You can always add a little honey or maple syrup for extra sweetness.

• Scoop and Serve: Serve the smoothie bowl right after making it to enjoy its vibrant colors and creamy texture at their best.

What to Serve with Pitaya Smoothie Bowl?

Bringing together a wholesome meal with vibrant flavors is as easy as pairing your delightful bowl with complementary dishes.

  • Granola Parfait: This crunchy treat adds a satisfying crunch and nutty flavor, enhancing the smoothie’s creaminess for a delightful contrast.

  • Coconut Yogurt: A scoop of creamy coconut yogurt on the side will amplify your tropical experience while providing additional probiotics for gut health.

  • Chia Seed Pudding: The texture of this creamy pudding perfectly balances the smoothness of the pitaya bowl, while also boosting fiber and omega-3s.

  • Avocado Toast: The rich creaminess of avocado toast adds healthy fats and is a filling addition that makes your breakfast feel more complete.

  • Fresh Citrus Salad: Bright, zesty flavors from a citrus salad can awaken your taste buds and add a refreshing element that complements the smoothie bowl’s sweetness.

  • Sparkling Lemonade: Pairing the smoothie bowl with a glass of sparkling lemonade offers a refreshing sip, balancing the smoothie’s flavors with a hint of tanginess.

  • Dark Chocolate Chips: Sprinkling a few dark chocolate chips on top provides a touch of indulgence while enhancing the healthiness with a dose of antioxidants.

  • Banana Oat Muffins: These soft muffins add a hearty, comforting element that makes for a wholesome brunch option alongside your smoothie bowl.

  • Fruit Skewers: Light and playful, a rainbow of fresh fruit skewers offers a delightful, interactive side perfect for a festive brunch or snack time.

Pitaya Smoothie Bowl Variations

Feel free to play around with this recipe and make it your own—your taste buds will thank you!

  • Fruit Swap: Try using frozen mango or pineapple instead of bananas for a tropical twist. Each fruit brings a unique sweetness that brightens the flavor profile.
  • Green Booster: Incorporate a handful of spinach or kale for an extra nutrient boost without altering the taste much. Your smoothie will remain vibrant and green, loaded with health benefits!
  • Nutty Flavor: Add a spoonful of nut butter, like almond or peanut, for creaminess and protein. The nutty flavor enhances your smoothie bowl while making it even more satisfying.
  • Creamy Texture: Use Greek yogurt as your base for added creaminess and tang. This substitution makes your smoothie bowl thicker, providing a delightful and hearty texture!
  • Coconut Milk Upgrade: Swap out coconut water for full-fat coconut milk for a richer, creamier base. This will elevate your pitaya smoothie bowl to dessert status.
  • Chia Pudding Layer: Try adding a layer of chia pudding on top of your smoothie base for added nutrition and a fun texture contrast. It’s an excellent way to introduce more fiber to your meal.
  • Heat it Up: For a spicy kick, sprinkle a pinch of cayenne pepper or ginger powder into the blend. This unexpected twist brings warmth and depth to your smoothie bowl.
  • Flavor Infusions: Blend in a few drops of vanilla extract or almond extract for an aromatic flavor boost. These subtle enhancements create layers of deliciousness that are sure to impress!

Be sure to check out my hearty granola recipes for a crunchy side to complement your delightful pitaya smoothie bowl!

How to Store and Freeze Pitaya Smoothie Bowl

Fridge: Store any leftover pitaya smoothie bowl in an airtight container in the fridge for up to 2 days. Give it a good stir before enjoying it again.

Freezer: If you want to prep ahead, freeze the smoothie base in individual portions for up to 3 months. Thaw in the fridge overnight before serving and mix well.

Reheating: Avoid reheating the smoothie bowl, as it’s best enjoyed cold. Simply blend any separated ingredients back together after thawing.

Toppings: For the best texture and flavor, add toppings like fresh fruit and nuts just before serving, rather than storing them mixed in.

Make Ahead Options

These refreshing Pitaya Smoothie Bowls are perfect for meal prep lovers! You can prepare the smoothie base by blending together the frozen pitaya, banana, and mixed berries up to 24 hours in advance. Simply store the mixture in an airtight container and refrigerate it. To maintain the creamy texture, avoid adding too much liquid at this stage. When you’re ready to serve, just give it a quick blend to revive its thick consistency, then pour it into a bowl and add your favorite toppings. This way, you’ll have a vibrant, nutrient-dense breakfast or snack ready to enjoy with minimal effort, keeping your mornings hassle-free!

Pitaya Smoothie Bowl Recipe FAQs

How do I select ripe pitaya for my smoothie bowl?
Absolutely! When choosing pitaya (dragon fruit), look for ones with vibrant skin and no dark spots. The fruit should yield slightly to gentle pressure, indicating ripeness. If you find a fruit with many dark spots or shriveling, it’s best to pass on it, as it may be overripe.

How should I store leftover pitaya smoothie bowl?
Very! You can keep any leftover pitaya smoothie bowl in an airtight container in the fridge for up to 2 days. Just remember to give it a good stir before enjoying it again to mix any separated ingredients back together.

Can I freeze the pitaya smoothie bowl for later?
Absolutely! You can freeze the smoothie base in individual portions for up to 3 months. Just pour your blended smoothie into ice cube trays or freezer-safe bags. Thaw in the fridge overnight before serving and mix well. It's best enjoyed chilled!

What can I do if my smoothie is too thick or too thin?
No worries! If your pitaya smoothie bowl is too thick, simply add a little more coconut water or almond milk – blend for another 15 seconds until you reach your desired consistency. If it’s too thin, a quick fix is just to add more frozen fruit, blending until smooth again. Always taste and adjust according to your preferences!

Are there any allergens in this recipe I should be aware of?
Definitely! This pitaya smoothie bowl is gluten-free and vegetarian, making it a healthy option for most diets. However, if you're allergic to nuts, be cautious with toppings like almond butter or nuts. Feel free to substitute with allergy-safe alternatives like sunflower seed butter or omit them entirely. Enjoy safely!

Pitaya Smoothie Bowl

Delicious Pitaya Smoothie Bowl for a Refreshing Boost

Enjoy a nutrient-packed pitaya smoothie bowl for a refreshing boost to start your day.
Print Recipe Pin Recipe
Prep Time 10 minutes mins
Total Time 10 minutes mins
Servings: 2 bowls
Course: Breakfast
Cuisine: Tropical
Calories: 220
Ingredients Equipment Method Nutrition Notes

Ingredients
  

Smoothie Base
  • 1 cup Frozen Pitaya Cubes Key ingredient for color and flavor
  • 1 unit Frozen Banana Adds creaminess and sweetness
  • 1 cup Frozen Mixed Berries Packed with antioxidants
  • ½ to 1 cup Coconut Water or Almond Milk Choose for blending
Toppings
  • 1 unit Fresh Fruit (e.g., Kiwi or Strawberries) Enhances vitamins and appearance
  • ¼ cup Nuts and Seeds (e.g., Almonds or Chia Seeds) Adds healthy fats and crunch
  • 2 tablespoons Coconut Flakes For tropical flair
  • 2 tablespoons Nut Butters (e.g., Almond or Peanut) Boosts flavor and protein

Equipment

  • High-powered blender

Method
 

Step-by-Step Instructions
  1. In a high-powered blender, combine frozen pitaya cubes, frozen banana, and frozen mixed berries. Pour in coconut water or almond milk to create a smooth blend. Blend on high for about 30 seconds to 1 minute.
  2. Check the consistency and add more coconut water or almond milk if too thick. Blend for an additional 15 seconds.
  3. Pour the blended pitaya smoothie into a bowl, leaving space for toppings. Admire the vibrant color.
  4. Customize your bowl with fresh fruits, nuts, seeds, or coconut flakes as toppings.
  5. Enjoy immediately for best texture and flavor!

Nutrition

Serving: 1bowlCalories: 220kcalCarbohydrates: 40gProtein: 4gFat: 7gSaturated Fat: 3gPolyunsaturated Fat: 1gMonounsaturated Fat: 3gSodium: 50mgPotassium: 300mgFiber: 6gSugar: 20gVitamin A: 100IUVitamin C: 30mgCalcium: 50mgIron: 1mg

Notes

Best enjoyed fresh. Store leftovers in an airtight container in the fridge for up to 2 days or freeze for longer storage.

Tried this recipe?

Let us know how it was!

Cornbread Breakfast Casserole: Your New Brunch Favorite

August 9, 2025 by Grace Snow Leave a Comment

The smell of baked cheese mingling with crispy bacon fills the kitchen, instantly transporting me to cozy Sunday mornings gathered around the table. That’s the magic of my Cornbread Breakfast Casserole, a dish that perfectly wraps together fluffy cornbread and custardy eggs for a savory breakfast experience. Not only is it a crowd-pleaser, but it’s also a fantastic make-ahead option, allowing you to savor lazy brunch moments without stress. Whether you're feeding a hungry family or prepping for a busy week, this versatile casserole suits every occasion, making it easy to enjoy homemade goodness on the go. Wouldn't you love to dig into a slice that’s as portable as it is comforting?

Why is Cornbread Breakfast Casserole a Must-Try?

Crowd-Pleasing Delight: This casserole combines comfort and flavor, a guaranteed hit for lazy Sundays or brunch gatherings.
Effortless Preparation: With simple steps, you’ll have a hearty breakfast ready in no time.
Flexible Ingredients: Customize it with your favorites—swap bacon for sausage or add fresh veggies for a nutritious twist!
Make-Ahead Convenience: Prepare it up to five days in advance, making breakfast stress-free during busy mornings.
Protein-Packed Goodness: Rich in protein and fiber, the Cornbread Breakfast Casserole fuels your day while keeping taste at the forefront. Enjoy it warm with a side of fresh fruit or a green salad for a balanced meal!

Cornbread Breakfast Casserole Ingredients

For the Casserole

  • Corn Muffin Mix – A fluffy base providing sweetness and structure; using Jiffy ensures delightful results.
  • Half-and-Half – Adds richness to the egg mixture; substitute with full-fat milk for a lighter option.
  • Eggs – Essential for binding the ingredients; large eggs yield the best texture for this Cornbread Breakfast Casserole.
  • Kosher Salt – Enhances flavor; adjust based on different ingredients you might use.

For the Add-Ins

  • Bacon – Offers a crispy texture and savory taste; swap for breakfast sausage or tempeh to accommodate dietary preferences.
  • Extra-Sharp Cheddar Cheese – Brings a rich, bold flavor; Monterey Jack or Swiss can be used for a different taste.
  • Pickled Jalapeños – Provides a spicy kick; consider roasted red peppers for a milder alternative.
  • Chives – Freshness and a gentle onion note; if unavailable, scallions can work, or simply omit.

This delightful combination of ingredients will create a breakfast experience that feels as good as it tastes!

Step‑by‑Step Instructions for Cornbread Breakfast Casserole

Step 1: Preheat the Oven and Prepare the Dish
Begin by preheating your oven to 350°F (175°C). While it warms up, take a 13x9" baking dish and spray it generously with nonstick cooking spray to ensure easy removal of your Cornbread Breakfast Casserole later. This preparation will help create a perfectly golden-brown crust that is easy to cut into squares when serving.

Step 2: Cook the Bacon
In a large skillet, cook diced bacon over medium heat until it becomes crispy, which should take about 8-10 minutes. Keep an eye on it to prevent burning, stirring occasionally for even cooking. Once done, carefully drain the bacon on paper towels and chop it into bite-sized pieces. This crispy bacon will add a delightful savory element to the casserole.

Step 3: Mix Corn Muffin Base
In a mixing bowl, whisk together one box of corn muffin mix and 1 cup of half-and-half until the mixture is smooth and combined, ensuring there are no lumps. This rich base will create a beautiful contrast to the fluffy eggs in your Cornbread Breakfast Casserole. Set this aside as you prepare the next steps.

Step 4: Add Eggs and Seasoning
Crack 6 large eggs into the mixing bowl with the corn muffin mixture. Sprinkle in 1 teaspoon of kosher salt, then whisk everything together until fully combined. The eggs will bind the ingredients and create a custardy texture, essential for the perfect Cornbread Breakfast Casserole. Ensure it's well mixed but avoid overmixing to prevent a dense outcome.

Step 5: Incorporate Add-Ins
Gently fold in the chopped bacon, 1 cup of extra-sharp cheddar cheese, 1/4 cup of pickled jalapeños, and 1/4 cup of chopped chives into the egg and corn mixture. Each ingredient adds its own unique flavor and texture, enhancing the overall dish. Mix until just combined so that the ingredients are distributed evenly throughout the mixture.

Step 6: Pour and Bake the Casserole
Pour the combined mixture into your prepared baking dish, spreading it evenly with a spatula to ensure uniform cooking. Place it in the preheated oven and bake for 25–30 minutes, or until the casserole is slightly puffed and the center has a gentle wobble. The top should be golden-brown and inviting when it’s ready!

Step 7: Cool and Slice
Once baked, carefully remove the Cornbread Breakfast Casserole from the oven and allow it to cool for about 10 minutes. This cooling period makes slicing easier and helps the flavors settle. After cooling, slice it into squares and serve warm. The comforting aroma invites everyone to enjoy a delicious piece of this make-ahead breakfast treasure.

Expert Tips for Cornbread Breakfast Casserole

  • Avoid Overmixing: Overmixing the batter can lead to a dense texture. Mix just until ingredients are combined for a light and fluffy casserole.

  • Check for Doneness: Keep an eye on your casserole towards the end of the baking time. The center should have a slight wobble indicating it's perfectly done—too firm means it may be overcooked.

  • Cool Before Refrigerating: For the best flavor and texture, let the casserole cool completely before storing. This helps meld the flavors for an even more delicious reheating experience.

  • Ingredient Substitutions: Feel free to swap ingredients based on your preferences or dietary needs! Use turkey bacon or swap in seasonal veggies for added nutrition while keeping the essence of the Cornbread Breakfast Casserole.

  • Serve with Sides: Enhance your serving experience by pairing this casserole with fresh fruit or a simple green salad for a refreshing balance to its savory flavors.

How to Store and Freeze Cornbread Breakfast Casserole

Fridge: Store any leftovers in an airtight container for up to 5 days. Allow the casserole to cool completely before refrigerating to preserve its texture.

Freezer: Freeze the baked Cornbread Breakfast Casserole for up to 3 months. Wrap it tightly in foil or plastic wrap, ensuring no air pockets remain.

Reheating: For the best results, reheat slices in the oven at 350°F (175°C) for about 15–20 minutes, or until warmed through. Avoid the microwave, as it can make the texture soggy.

Make-Ahead: You can prepare the casserole in advance and store it in the fridge overnight before baking. Just add an extra 5-10 minutes to the baking time when starting from cold.

What to Serve with Cornbread Breakfast Casserole?

The perfect accompaniment can elevate your Cornbread Breakfast Casserole into an unforgettable meal, brimming with flavor and balance.

  • Fresh Fruit Salad: A vibrant mix of seasonal fruits will add brightness and a refreshing contrast to the savory casserole.
  • Simple Green Salad: Crisp greens with a light vinaigrette complement the rich casserole, providing a delightful balance of textures.
  • Crispy Hash Browns: Golden, crunchy hash browns pair wonderfully, giving a satisfying texture that contrasts the softness of the casserole.
  • Savory Breakfast Sausages: Juicy and flavorful, they enhance the hearty experience and appeal for traditional breakfast lovers.
  • Greek Yogurt with Honey: A dollop of creamy Greek yogurt drizzled with honey adds a sweet touch, balancing out the savory flavors beautifully.
  • Mimosas: Light and bubbly mimosas provide a festive flair, making your brunch truly special while their citrus notes brighten up the meal.
  • Roasted Veggies: Mixing in seasonal roasted vegetables offers not just nutrition but also a roasted richness that complements the casserole's flavors.
  • Hot Sauce: For a kick of heat, a few dashes elevate the dish with a delightful spicy twist that pairs surprisingly well with the cornbread base.
  • Coffee or Tea: A warm drink rounds out the experience, inviting cozy conversations around the brunch table.

Cornbread Breakfast Casserole Variations

Feel free to personalize your Cornbread Breakfast Casserole and make it your own comforting masterpiece in the kitchen!

  • Dairy-Free: Use almond milk and a dairy-free cheese to keep it creamy without dairy.

  • Meatless Delight: Swap out the bacon for tempeh or chickpea crumbles for a hearty vegetarian alternative that’s packed with flavor.

  • Spice Level: Add sriracha or cayenne pepper to the egg mixture for a spicy kick that adds excitement to each bite.

  • Veggie Boost: Incorporate sautéed spinach, mushrooms, or bell peppers to increase nutrition while introducing delightful flavors that brighten up the casserole.

  • Smoky Flavor: Toss in some smoked paprika for an extra depth of flavor that will make you feel like you’re enjoying a lazy summer BBQ.

  • Herb Variations: Opt for fresh basil or parsley instead of chives to infuse a fresh, aromatic twist that compliments the savory notes beautifully.

  • Cheesy Twist: Try substituting extra-sharp cheddar with pepper jack for a melty, zesty experience that brings a new level of satisfaction to the dish.

  • Breakfast Hash: Add cooked diced potatoes or sweet potatoes into the mixture for a heartier casserole that’ll keep everyone fueled and satisfied throughout the morning.

For more delightful twists, don’t forget to explore using different combinations as you adjust to your family's taste preferences, just like you would do with a classic breakfast hash. Enjoy the process of creating a dish that brings everyone together at the table with joy!

Make Ahead Options

This Cornbread Breakfast Casserole is a fantastic meal prep option that saves time during busy mornings! You can prepare the entire casserole up to 5 days in advance. Simply follow the recipe through the mixing stage, pour it into your prepared baking dish, cover it tightly with plastic wrap, and refrigerate. On the day you plan to serve, bake it straight from the fridge; just add an extra 5-10 minutes to the baking time. For the best texture and flavor, allow the casserole to cool completely before refrigerating. You’ll be ready to enjoy a delicious, homemade breakfast with minimal effort—perfect for fueling your day!

Cornbread Breakfast Casserole Recipe FAQs

What type of corn muffin mix should I use?
For the best results, I recommend using Jiffy corn muffin mix. It provides the perfect balance of sweetness and structure that brings this Cornbread Breakfast Casserole to life. One box is all you need!

How should I store leftover Cornbread Breakfast Casserole?
Store any leftovers in an airtight container in the refrigerator for up to 5 days. Ensure the casserole has cooled completely before placing it in the fridge to maintain its texture.

Can I freeze the Cornbread Breakfast Casserole?
Absolutely! You can freeze your baked casserole for up to 3 months. Wrap it tightly in foil or plastic wrap, squeezing out any air pockets to prevent freezer burn.

How do I reheat the casserole for the best texture?
For the best texture, reheat slices in the oven at 350°F (175°C) for about 15–20 minutes. Avoid using the microwave, as it can make the casserole moist and less appealing.

What modifications can I make for dietary restrictions?
If you have dietary preferences, you can make various substitutions. Swap bacon for turkey bacon or tempeh to accommodate different diets. You can also mix in seasonal vegetables like spinach or bell peppers for added nutrition. Always check for any allergies, especially with ingredients like cheese or eggs.

What if my casserole turns out too dense?
To avoid a dense texture, be mindful not to overmix your batter. Combine ingredients just until they are incorporated, and keep an eye on your baking time. A slight wobble in the center when checking for doneness is a perfect sign—no need for a firm, overcooked texture.

Cornbread Breakfast Casserole

Cornbread Breakfast Casserole: Your New Brunch Favorite

Discover the Cornbread Breakfast Casserole, a delightful mixture of fluffy cornbread, custardy eggs, and savory bacon, perfect for any brunch gathering.
Print Recipe Pin Recipe
Prep Time 15 minutes mins
Cook Time 30 minutes mins
Cooling Time 10 minutes mins
Total Time 55 minutes mins
Servings: 8 slices
Course: Breakfast
Cuisine: American
Calories: 320
Ingredients Equipment Method Nutrition Notes

Ingredients
  

For the Casserole
  • 1 box Corn Muffin Mix Using Jiffy ensures delightful results.
  • 1 cup Half-and-Half Substitute with full-fat milk for a lighter option.
  • 6 large Eggs Essential for binding the ingredients.
  • 1 teaspoon Kosher Salt Enhances flavor.
For the Add-Ins
  • 6 slices Bacon Crispy texture and savory taste.
  • 1 cup Extra-Sharp Cheddar Cheese Rich and bold flavor.
  • 1/4 cup Pickled Jalapeños Provides a spicy kick.
  • 1/4 cup Chives Freshness and a gentle onion note.

Equipment

  • Oven
  • Large skillet
  • Mixing Bowl
  • 13x9 inch Baking Dish
  • Whisk
  • Spatula

Method
 

Step‑by‑Step Instructions
  1. Preheat your oven to 350°F (175°C) and prepare a 13x9" baking dish with nonstick spray.
  2. Cook diced bacon in a skillet over medium heat until crispy, about 8-10 minutes. Drain and chop into bite-sized pieces.
  3. In a mixing bowl, whisk together corn muffin mix and half-and-half until smooth.
  4. Add eggs and kosher salt to the mixture and whisk until fully combined.
  5. Fold in chopped bacon, cheddar cheese, jalapeños, and chives until just combined.
  6. Pour the mixture into the prepared baking dish and bake for 25–30 minutes until golden-brown.
  7. Allow to cool for about 10 minutes before slicing into squares and serving warm.

Nutrition

Serving: 1sliceCalories: 320kcalCarbohydrates: 27gProtein: 14gFat: 18gSaturated Fat: 9gPolyunsaturated Fat: 2gMonounsaturated Fat: 5gCholesterol: 150mgSodium: 800mgPotassium: 250mgFiber: 1gSugar: 3gVitamin A: 15IUVitamin C: 2mgCalcium: 20mgIron: 8mg

Notes

This make-ahead casserole can be prepared up to five days in advance. Serve with fresh fruit or a green salad for balance.

Tried this recipe?

Let us know how it was!

Hello world!

August 1, 2025 by admin 1 Comment

Welcome to WordPress. This is your first post. Edit or delete it, then start writing!

frzfzrrzberb

  • « Previous Page
  • 1
  • 2

Welcome!

Hi, I’m Grace, a Sydney-based home cook with a passion for bold flavors and trending ingredients. Whether you’re a busy beginner or a seasoned foodie, you’ll find dishes here that are fresh, fun, and full of flavor.

More about me

Popular Recipes

  • Burrito-Stuffed Sweet Potatoes
    Burrito-Stuffed Sweet Potatoes: A Flavorful Gluten-Free Meal
  • One-Pot Lentil and Walnut Bolognese
    One-Pot Lentil and Walnut Bolognese for Cozy Nights In
  • Vegetable Fritters with Chickpeas
    Flavor-Packed Vegetable Fritters with Chickpeas You’ll Love
  • Smashed Chickpea Avocado Sandwich
    Smashed Chickpea Avocado Sandwich: Creamy & Wholesome Delight

Footer

↑ back to top

About

  • Privacy Policy
  • Disclaimer
  • Terms & Conditions

Newsletter

  • Sign Up! for emails and updates

Contact

  • About me
  • Contact me

Copyright © 2025 TastyTrendIngredients