tastytrendingredients

  • Home
  • Recipes
    • Appetizers
    • Breakfast
    • Dessert
    • Dinner
    • Drinks
    • Salads
    • Snacks
    • Soups
  • About me
  • Contact me
menu icon
go to homepage
  • Home
  • Recipes
    • Appetizers
    • Breakfast
    • Dessert
    • Dinner
    • Drinks
    • Salads
    • Snacks
    • Soups
  • About me
  • Contact me
search icon
Homepage link
  • Home
  • Recipes
    • Appetizers
    • Breakfast
    • Dessert
    • Dinner
    • Drinks
    • Salads
    • Snacks
    • Soups
  • About me
  • Contact me
×

Spicy Ground Beef Stir-Fry Bowl That'll Warm Your Soul

February 2, 2026 by Grace Snow Leave a Comment

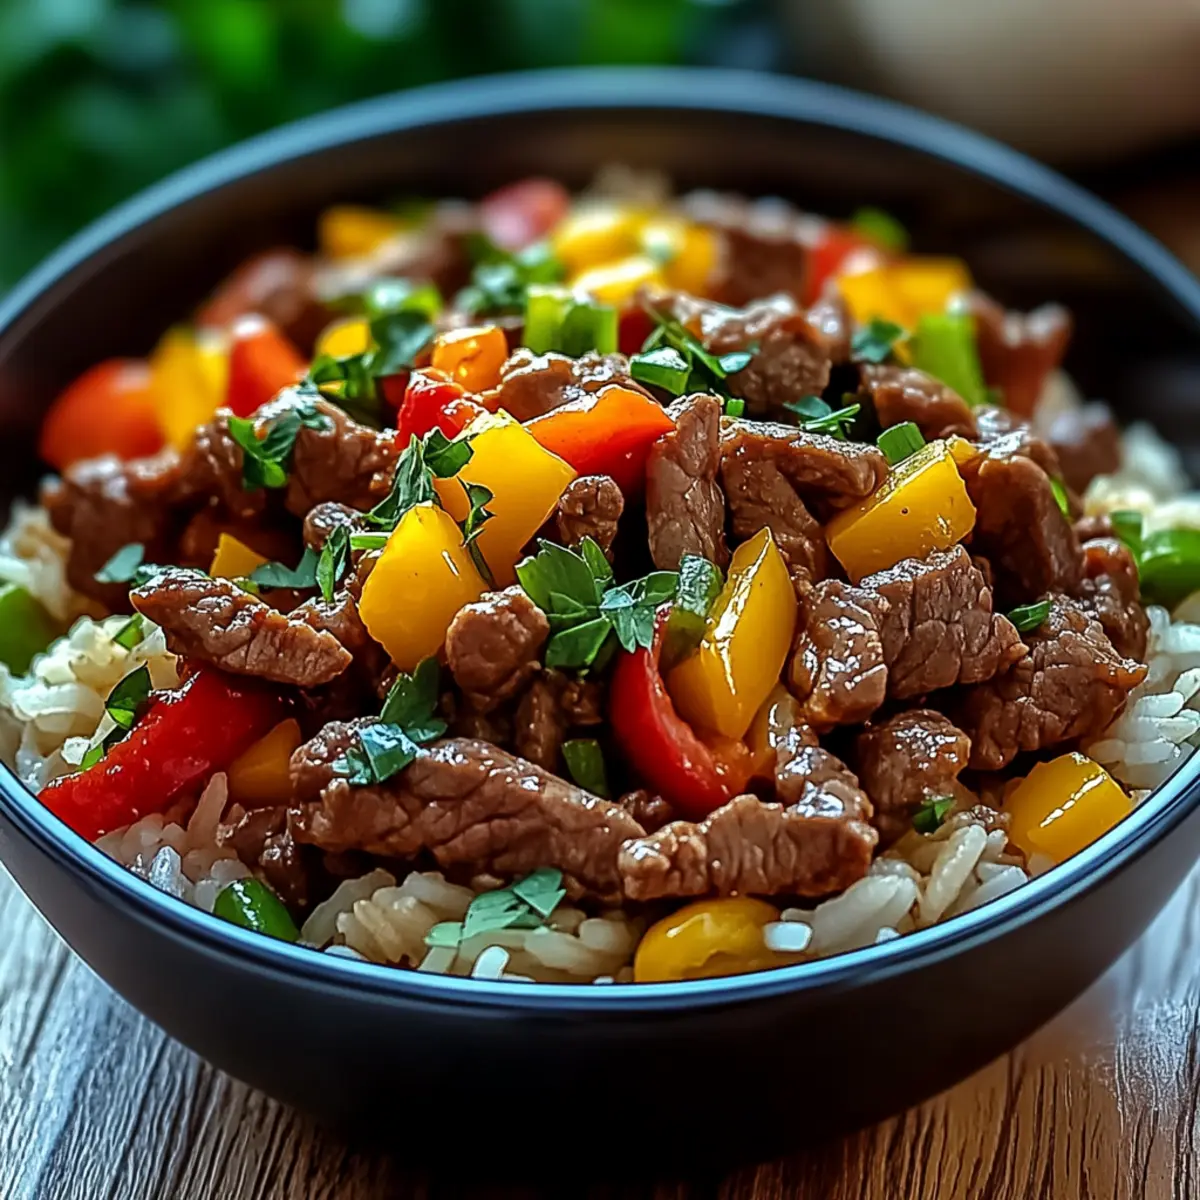
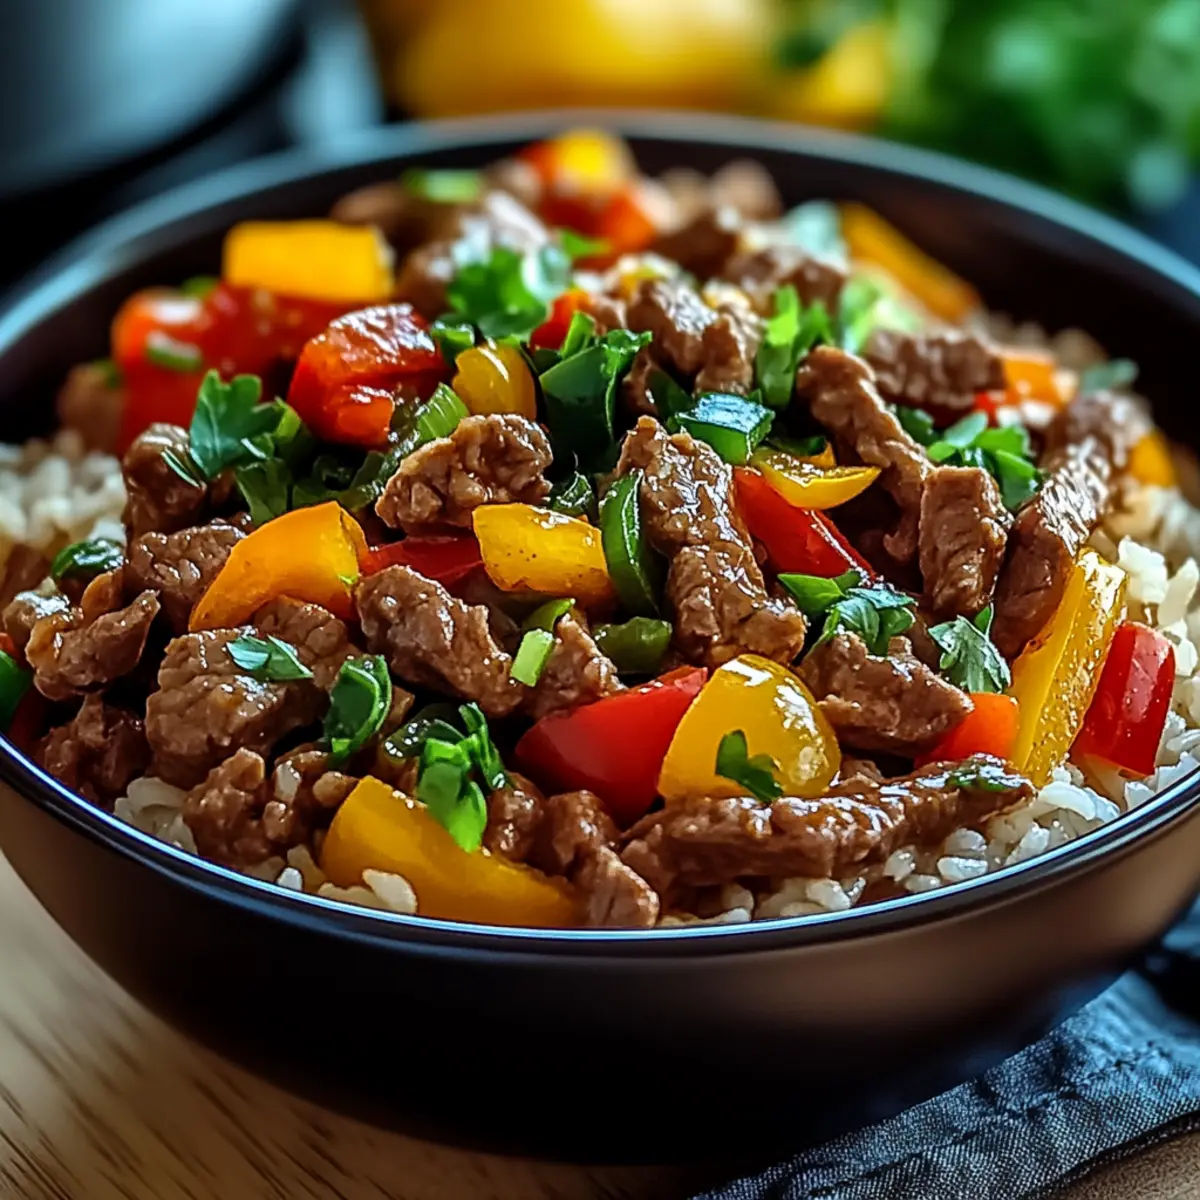
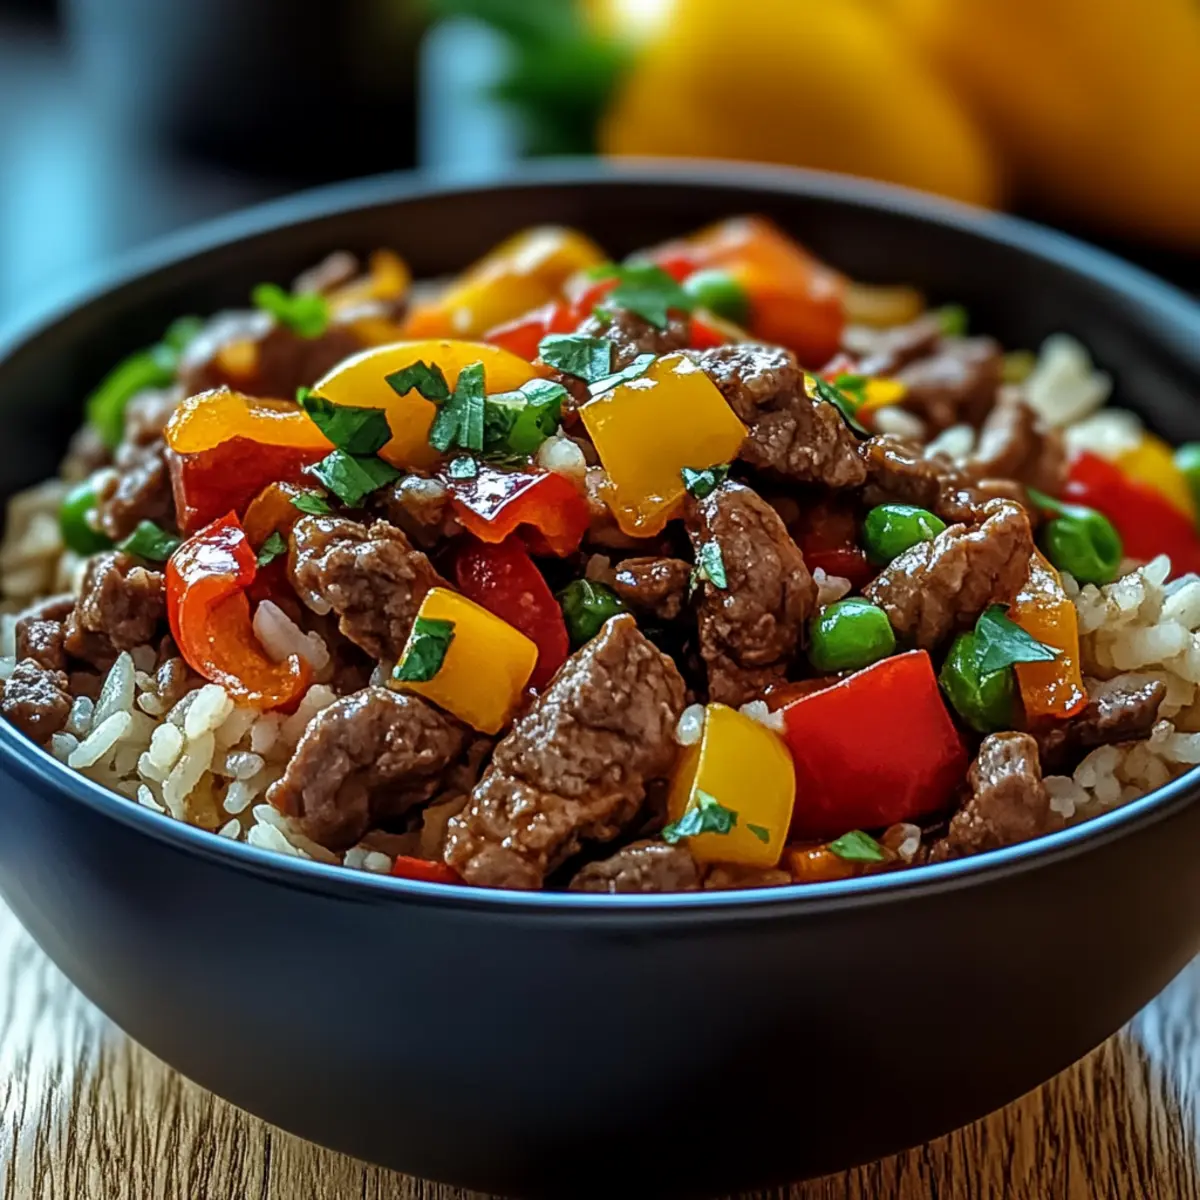
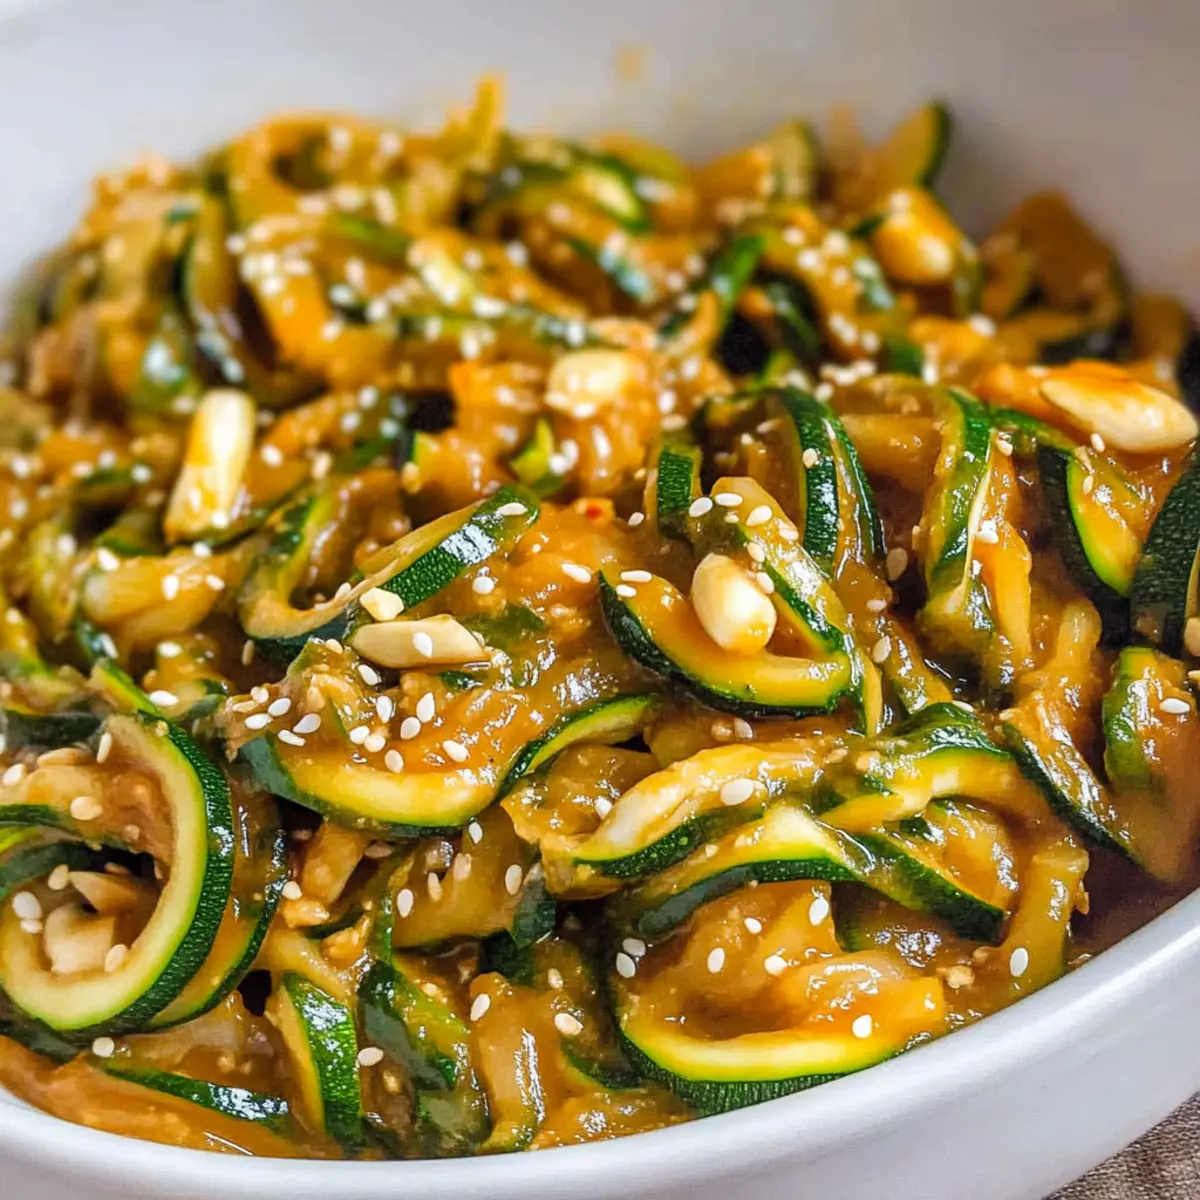
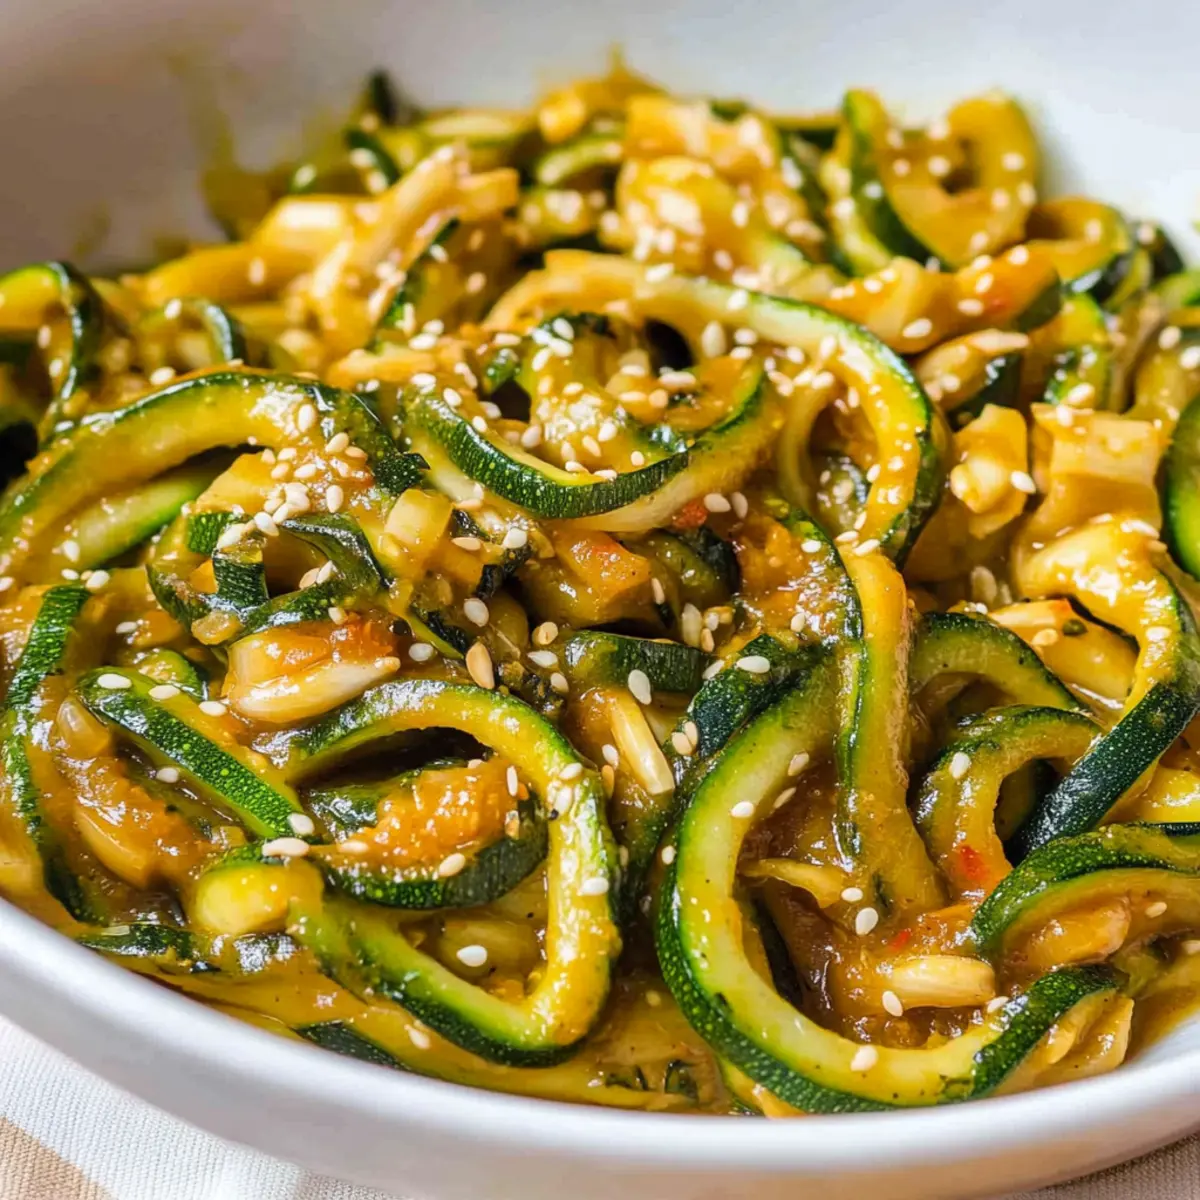
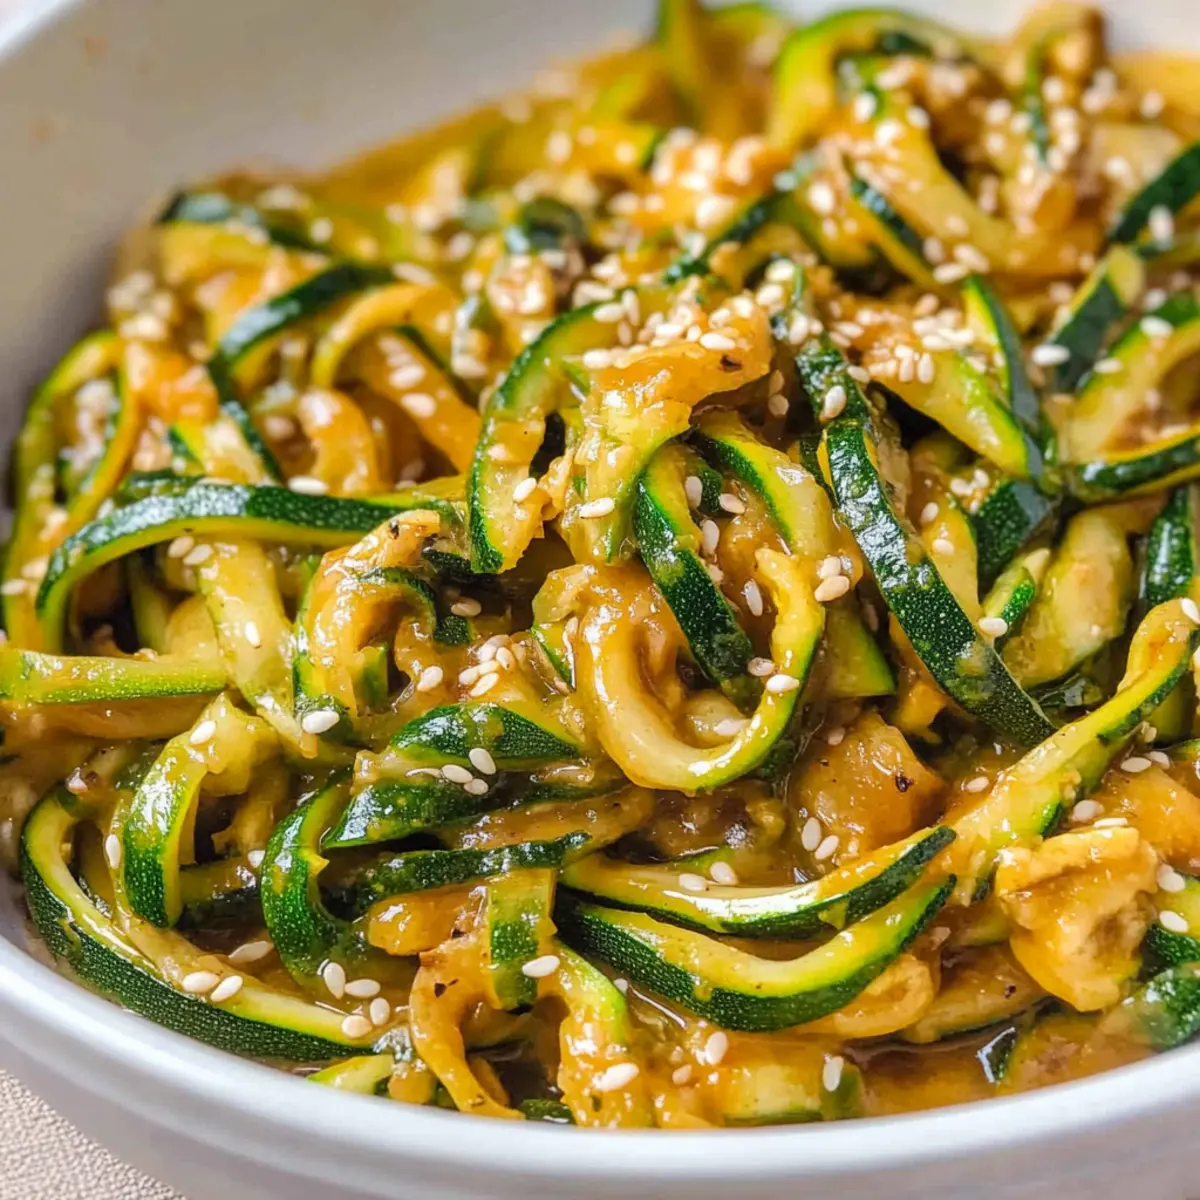
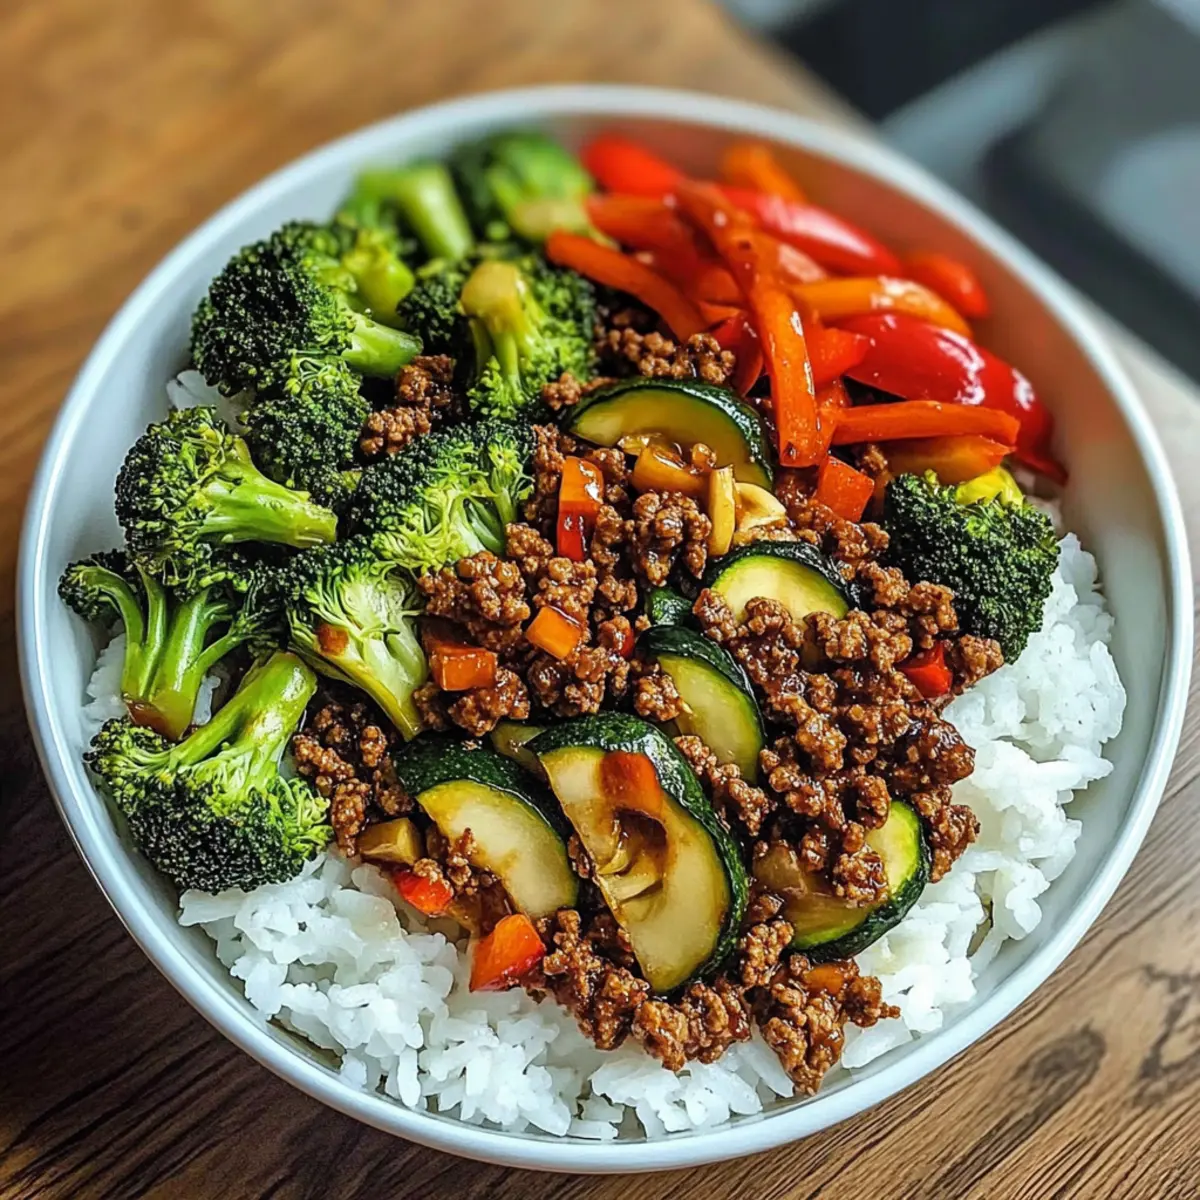
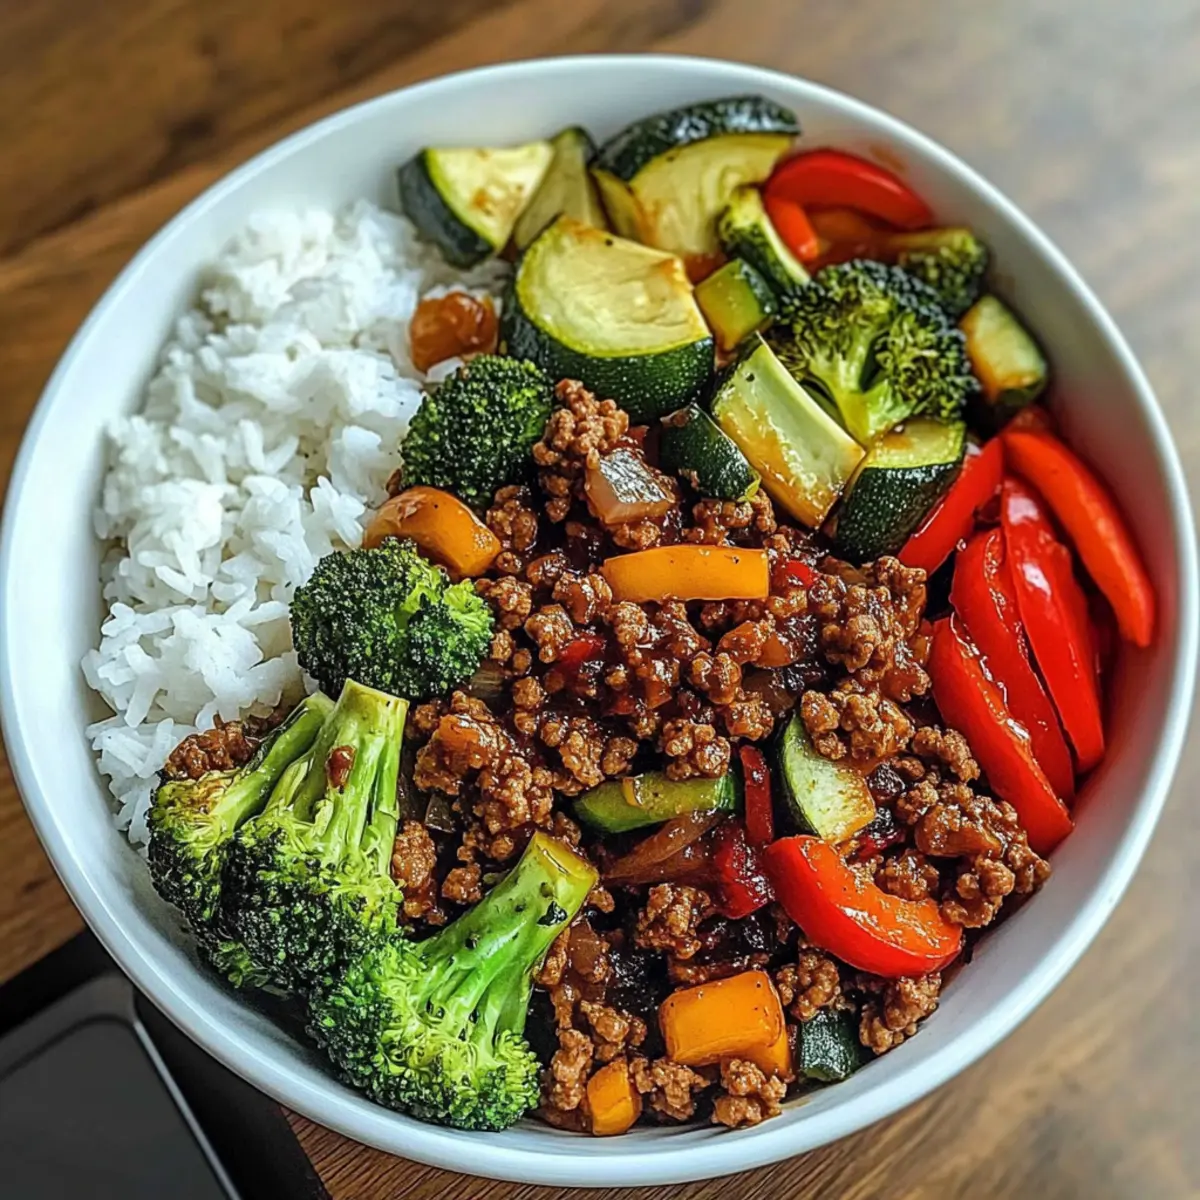
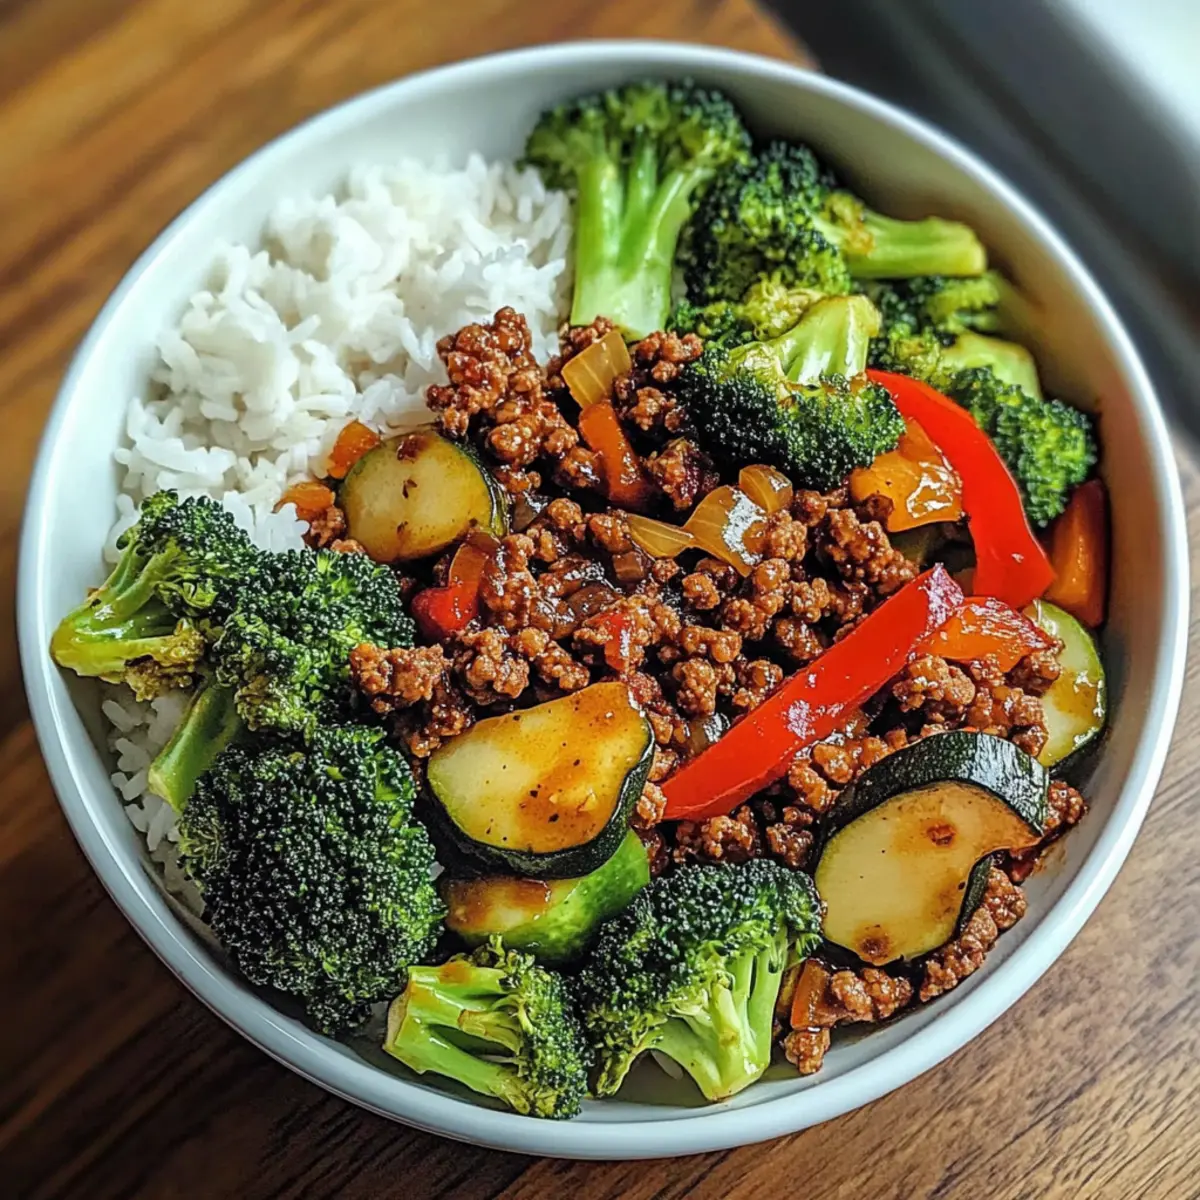
The sizzling sound of garlic hitting the pan instantly transports me to a bustling street market, where the aroma of delicious stir-fry fills the air. Today, I’m excited to share my Spicy Ground Beef Stir-Fry Bowl with Garlic Veggies—a vibrant dish that brings the essence of homemade comfort to your dinner table in just under 30 minutes. Packed with umami flavors and a delightful kick, this recipe not only satisfies your craving for bold tastes but also allows for endless customization. Whether you prefer swapping in ground turkey or mixing in your favorite veggies, it's the perfect quick meal for busy weeknights. So, are you ready to elevate your dinner game and whip up a bowl that everyone will love?

Why Is This Stir-Fry Bowl a Must-Try?

Quick and Easy: This Spicy Ground Beef Stir-Fry Bowl can be prepared in under 30 minutes, making it ideal for those hectic weeknights when dinner needs to be both fast and satisfying.

Customizable Delight: Tailor this dish to your taste by swapping proteins like ground turkey or tofu, and feel free to mix in your favorite vegetables like spinach or snow peas for added nutrition.

Bold Flavors: The harmonious blend of garlic, soy sauce, and chili flakes creates a rich umami experience that’ll keep your taste buds dancing.

Nutritious and Filling: Each bowl is packed with protein, fiber, and wholesome ingredients, perfectly balancing your macros for a post-workout meal or a hearty dinner.

Family-Friendly Appeal: Kids and adults alike will appreciate the vibrant colors and textures; serve it with a sprinkle of toasted sesame seeds or fresh herbs for an extra touch.

Want more quick meal ideas? Check out these poor man’s burrito bowls or try the delicious flavors of my Spicy Miso Tuna Noodle Casserole.

Spicy Ground Beef Stir-Fry Bowl Ingredients

• Get ready to create a flavor-packed meal!

For the Beef

  • Ground Beef – A hearty base; choose lean or grass-fed for a healthier option.
  • Soy Sauce – Enhances umami and saltiness; opt for tamari if you need a gluten-free version.
  • Chili Flakes – Bring on the heat! Adjust according to your preferred spice level.
  • Brown Sugar – Balances the spice with a hint of sweetness; swap for coconut sugar if preferred.
  • Sesame Oil – Adds a nutty flavor; substitute with olive oil if necessary.

For the Veggies

  • Garlic (Minced) – Infuses the dish with aromatic goodness; feel free to add more for extra flavor.
  • Broccoli Florets – Crunchy and nutrient-rich; you can also use snap peas or green beans as a substitute.
  • Red Bell Pepper – A sweet and colorful addition; yellow or orange bell peppers work beautifully too.
  • Zucchini – Adds moisture and texture; can be replaced with squash if desired.
  • Mushrooms – Provide deep umami flavor; select your favorite variety, like shiitake or button mushrooms.

For Serving

  • Steamed White Rice – The perfect base for your stir-fry bowl; use brown rice or cauliflower rice for a health boost.
  • Olive Oil – Necessary for sautéing veggies; vegetable oil can also do the trick.

Dive into this delightful Spicy Ground Beef Stir-Fry Bowl where customization meets deliciousness!

Step‑by‑Step Instructions for Spicy Ground Beef Stir-Fry Bowl

Step 1: Prep Ingredients
Start by washing and chopping your vegetables—broccoli into florets, bell pepper into strips, zucchini into half-moons, and mushrooms into slices. Mince the garlic and measure out your sauces, ensuring everything is ready to go. This organization will make the cooking process smooth and quick, paving the way for a delightful Spicy Ground Beef Stir-Fry Bowl.

Step 2: Cook Beef
In a large skillet, heat 1 tablespoon of sesame oil over medium heat. Once the oil is shimmering, add the minced garlic, sautéing for about 30 seconds until fragrant. Add the ground beef, breaking it apart with a spatula. Cook until browned and no longer pink, about 4-5 minutes. Stir in soy sauce, chili flakes, and brown sugar, allowing it to simmer for 3-4 minutes until everything is well combined and slightly thickened.

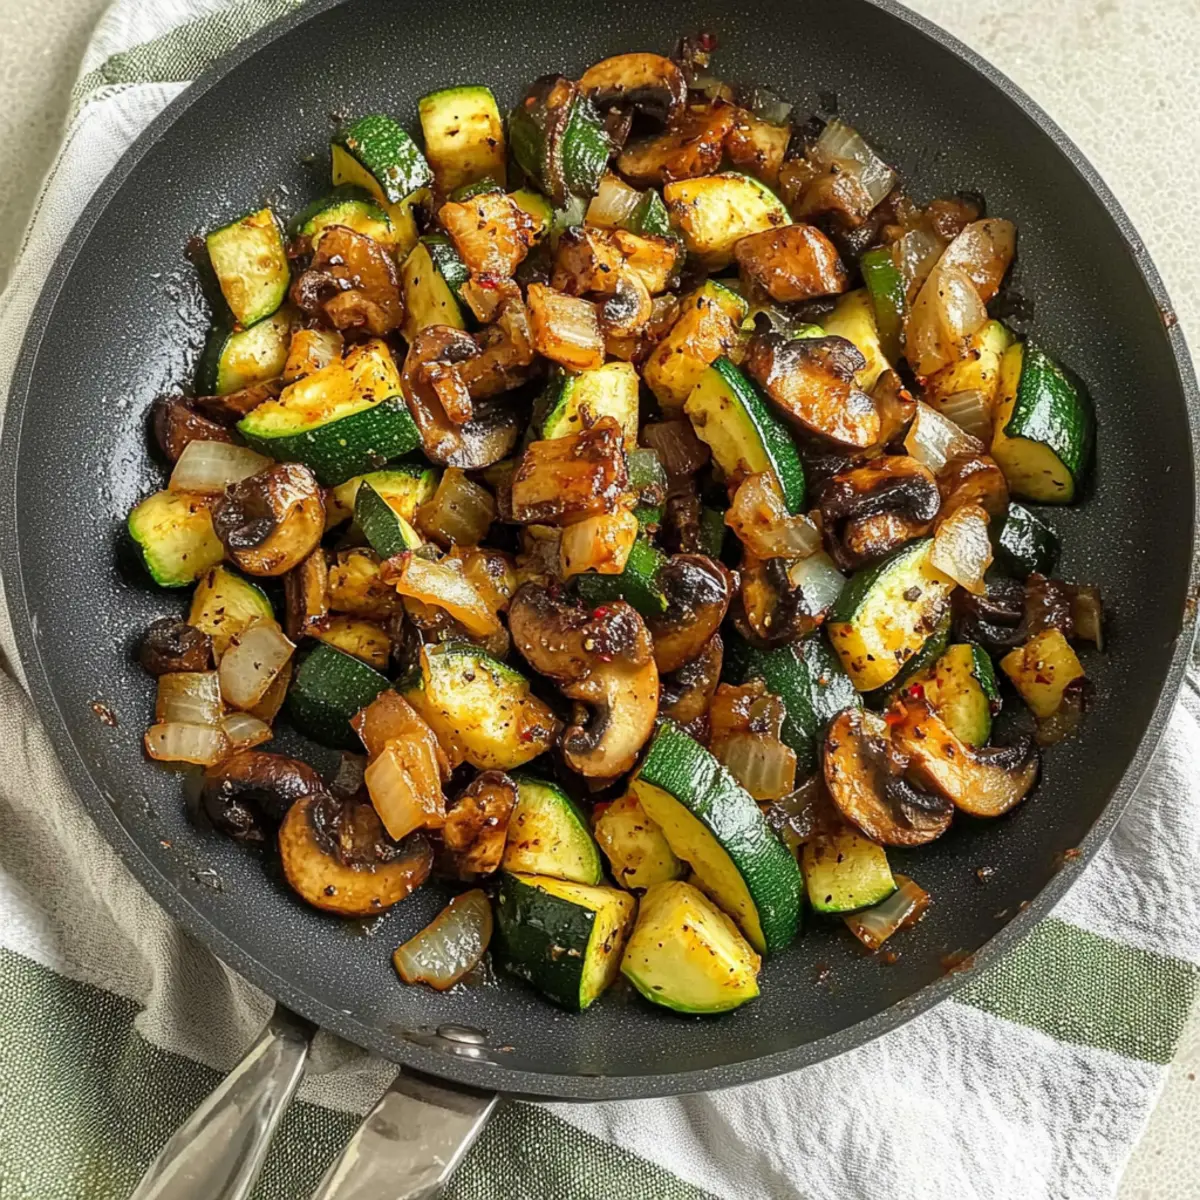
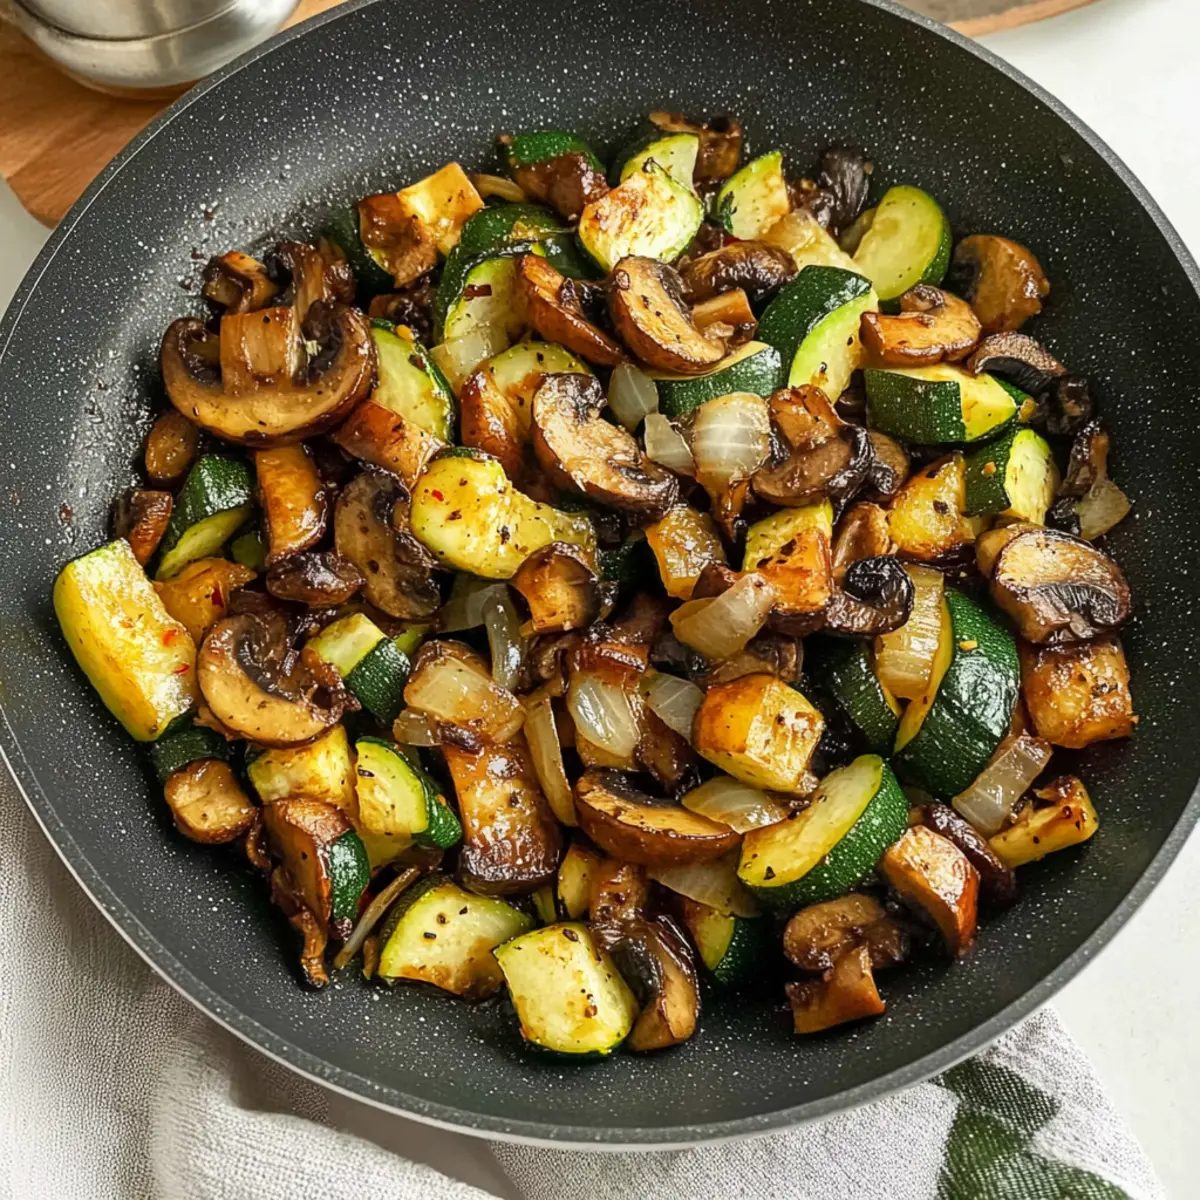
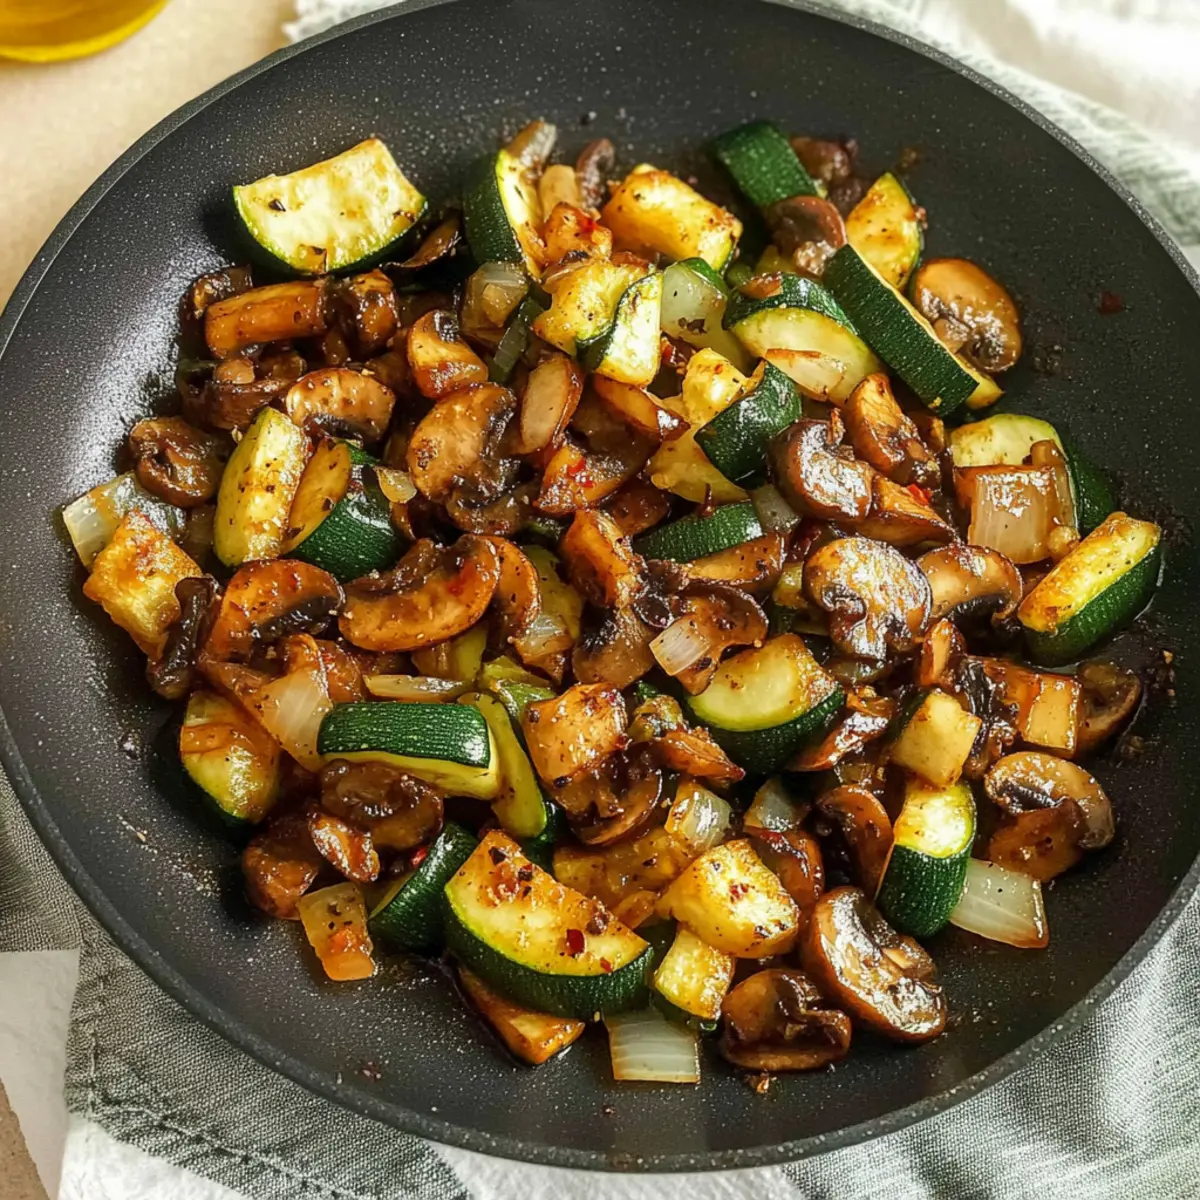
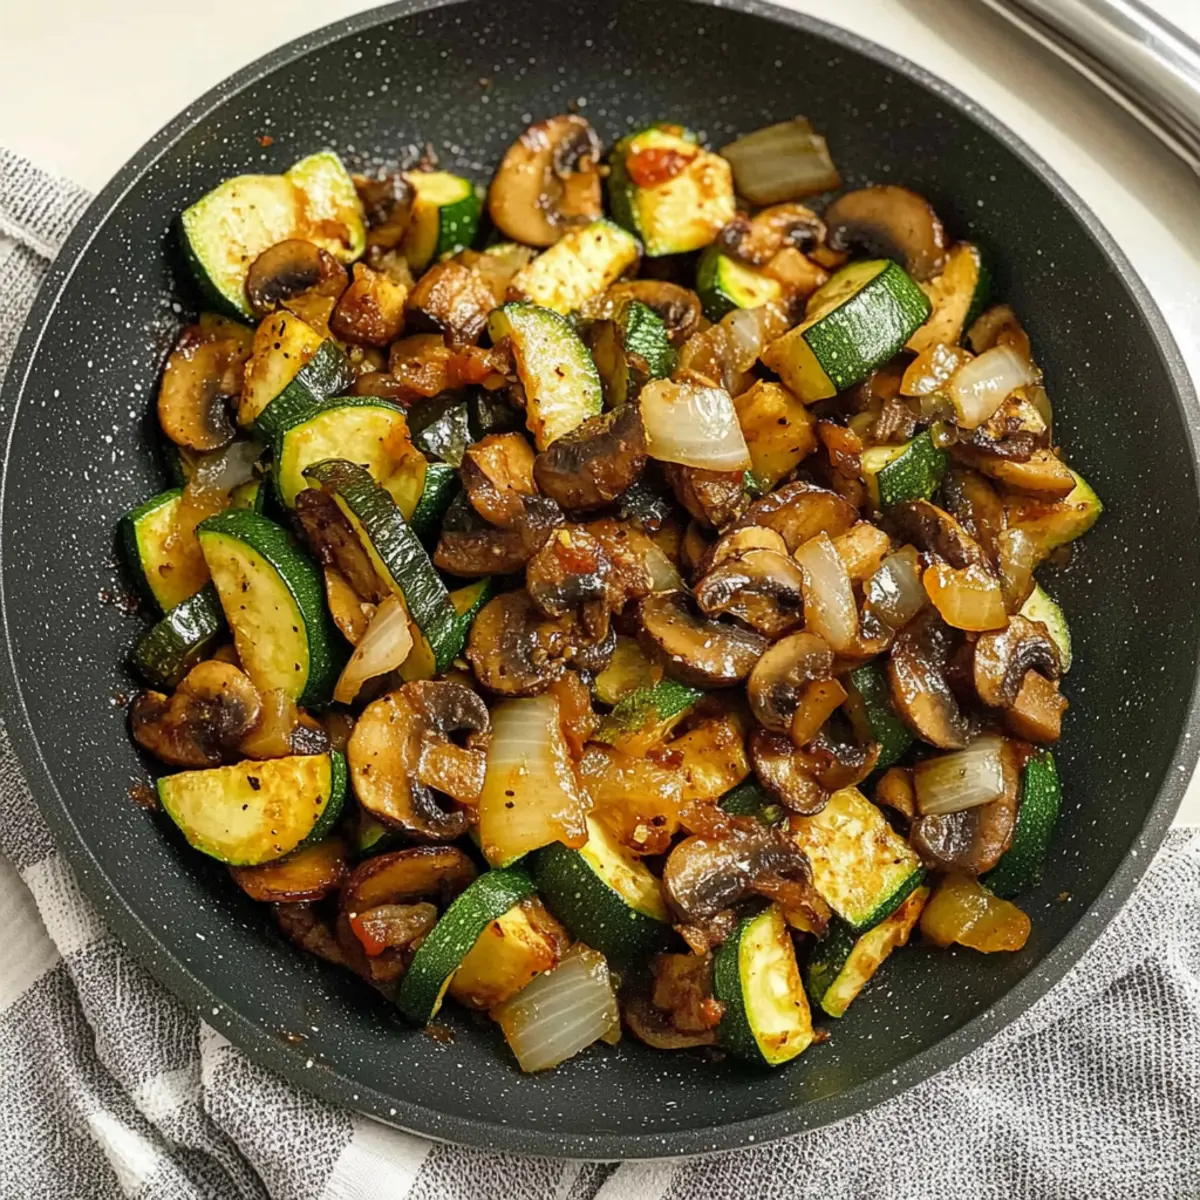
Step 3: Sauté Veggies
In a separate pan, heat 1 tablespoon of olive oil over medium-high heat. When the oil is hot and shimmering, add a clove of minced garlic, cooking for about 30 seconds until it becomes aromatic. Next, toss in the sliced mushrooms and stir-fry for 2 minutes until softened, then add broccoli, zucchini, and red bell pepper. Cook for an additional 3-4 minutes until vibrant and tender-crisp, stirring occasionally.

Step 4: Assemble Bowl
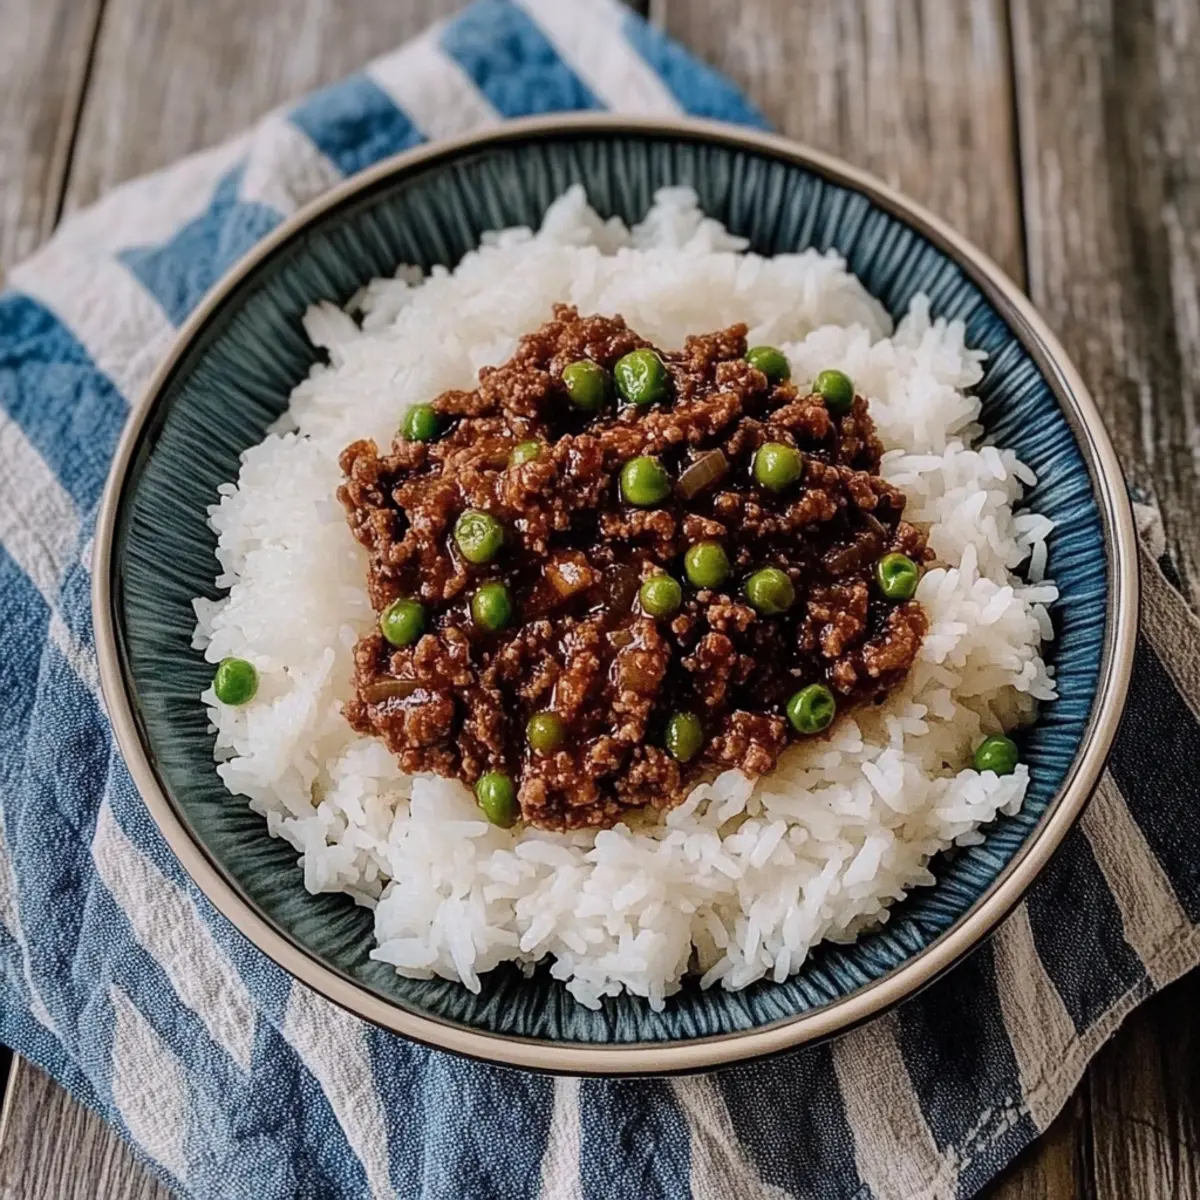
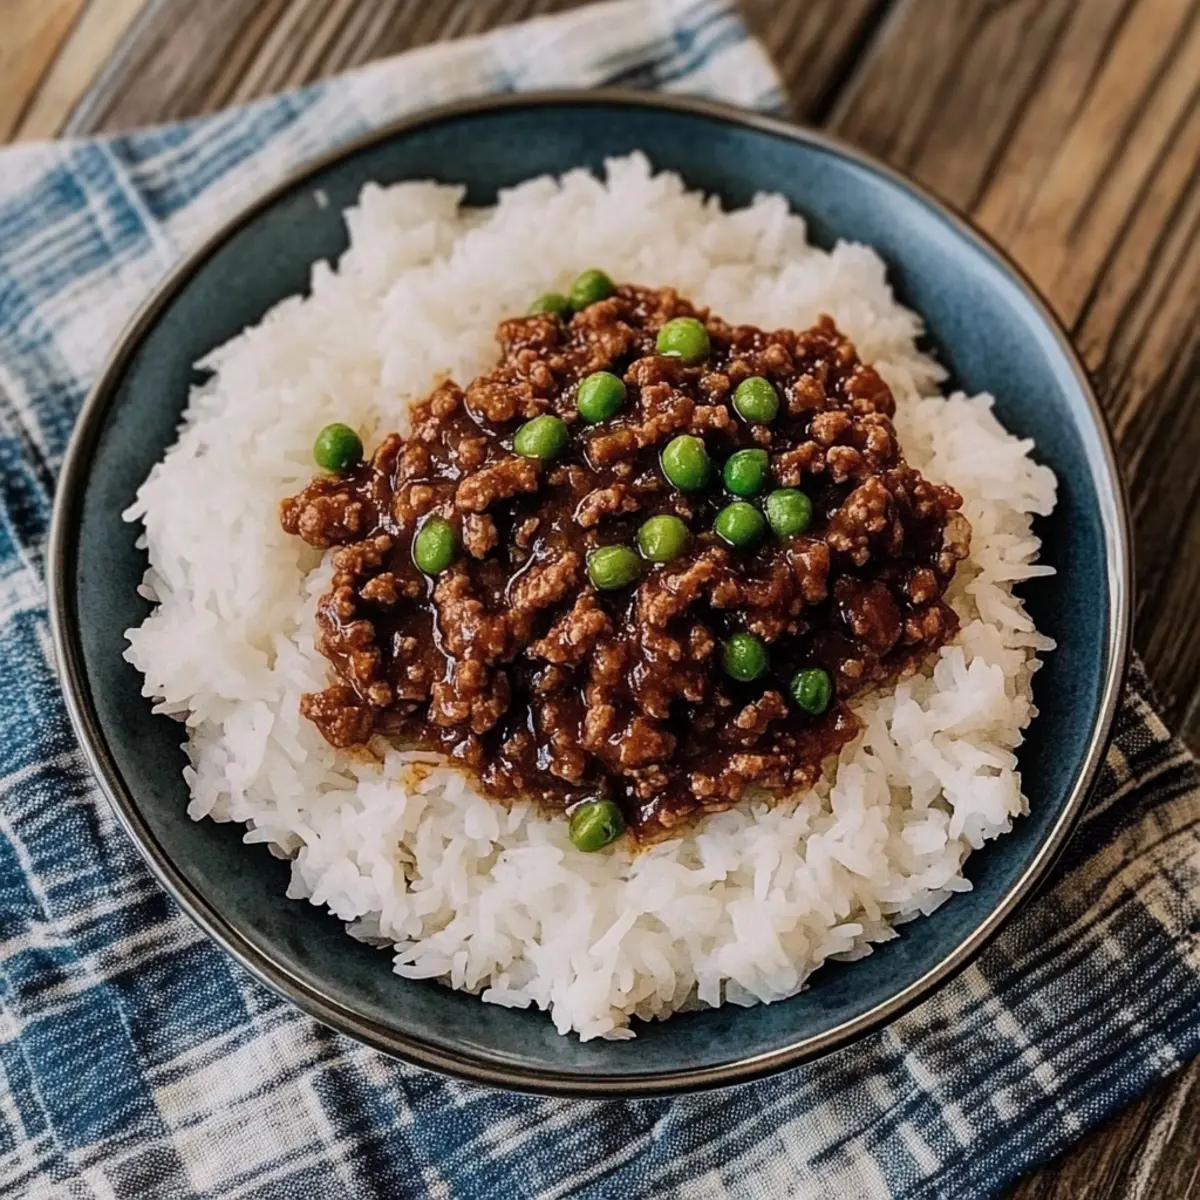
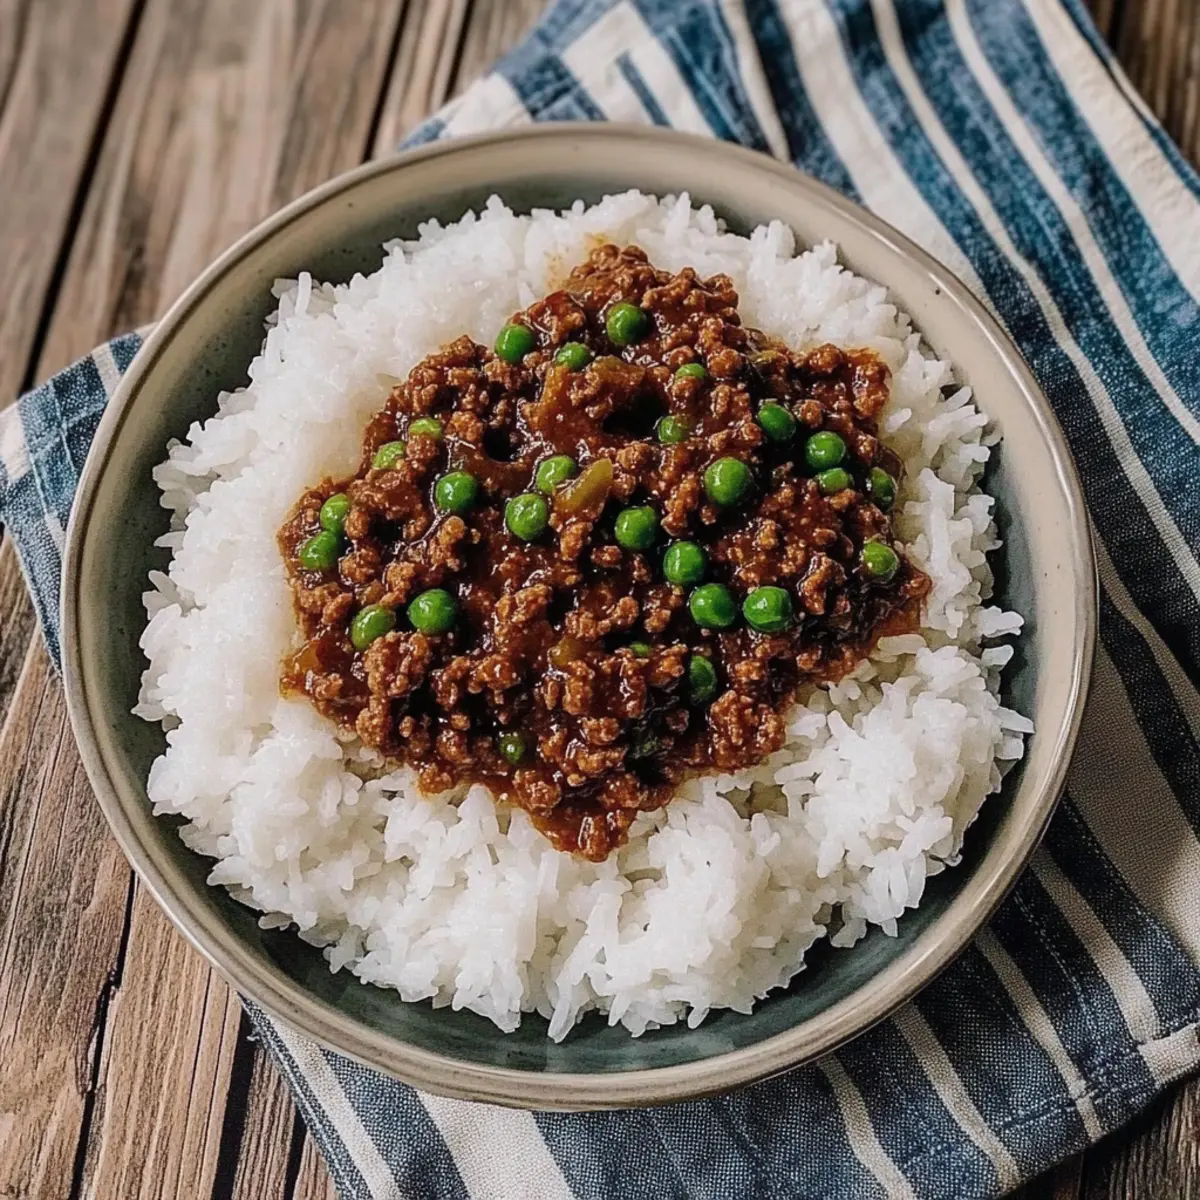
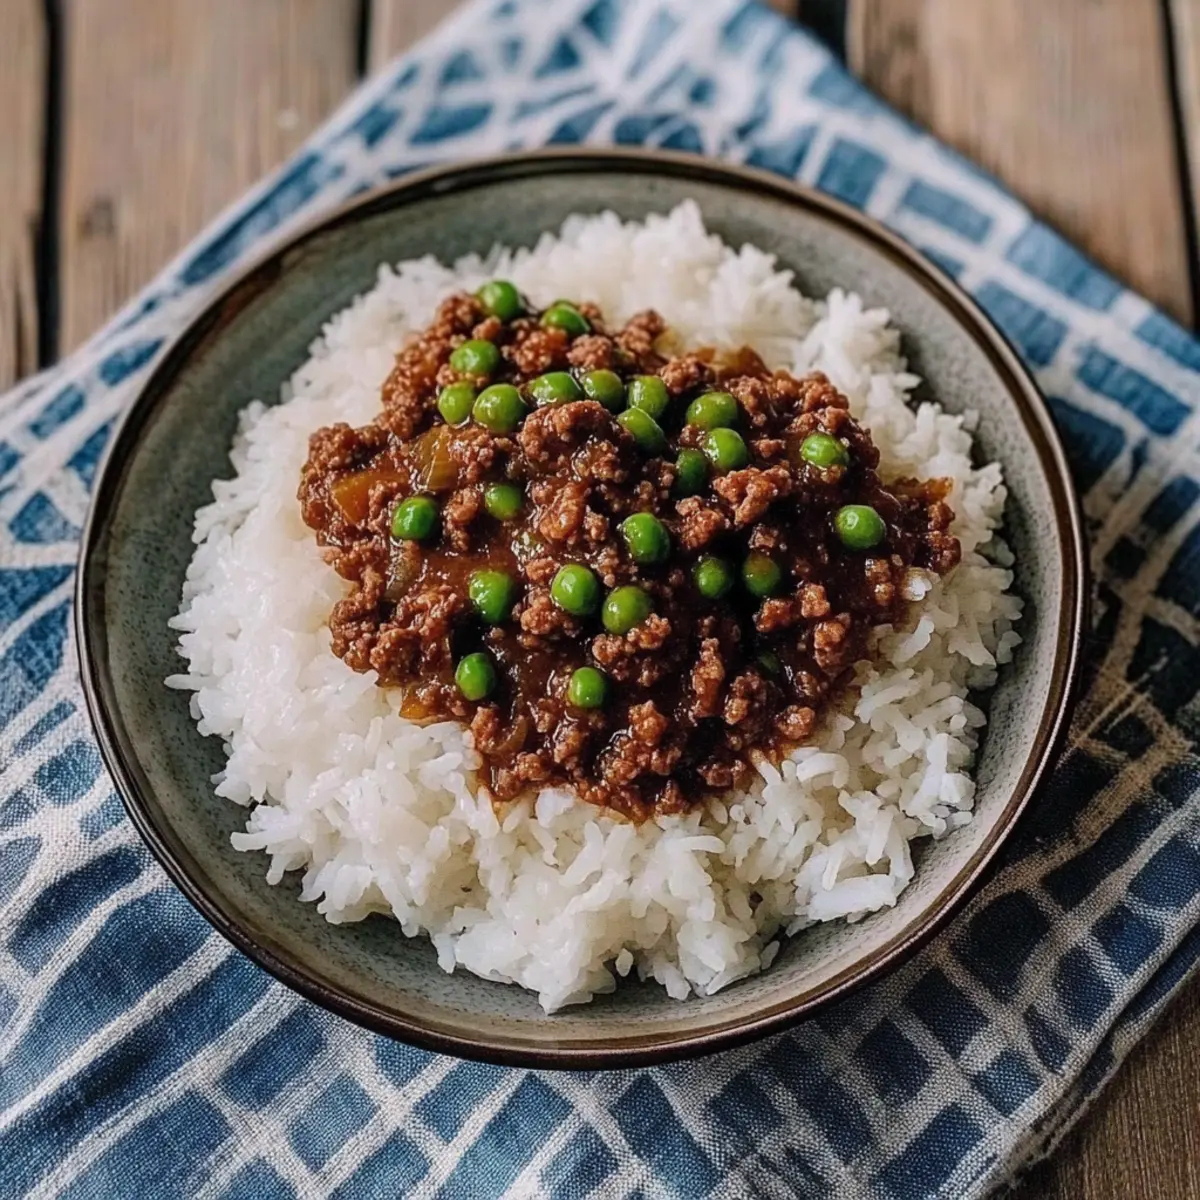
To assemble your Spicy Ground Beef Stir-Fry Bowl, start with a generous scoop of steaming white rice in the bottom of each bowl. Top with the savory ground beef mixture, followed by a colorful array of sautéed vegetables. Feel free to drizzle some extra soy sauce over the top for added flavor and serve immediately for the best experience.

How to Store and Freeze Spicy Ground Beef Stir-Fry Bowl

Fridge: Store leftovers in airtight containers for up to 4 days. Keep beef and veggies separate for best texture.

Freezer: Freeze the beef and vegetables in airtight bags for up to 3 months. Rice can also be frozen but may lose texture after thawing.

Reheating: Reheat components separately in the microwave, adding a splash of water or soy sauce to regain moisture.

Meal Prep Tip: Portion out the Spicy Ground Beef Stir-Fry Bowl in individual containers for easy access to a quick meal throughout the week!

Spicy Ground Beef Stir-Fry Bowl Swaps

Feel free to mix and match with these exciting variations to make this stir-fry bowl truly your own!

  • Ground Turkey: Substitute ground beef for a lighter option that still packs a punch.
  • Chicken: Use ground chicken for a lean alternative, maintaining the dish's great flavor.
  • Tofu: Opt for crumbled firm tofu as a fantastic vegetarian alternative, soaking up all the delicious sauces.
  • Shrimp: For a seafood twist, swap in shrimp, cooking them just until pink and tender for a delightful crunch.
  • Garlic Boost: Craving more garlic? Toss in extra cloves to amplify that irresistible aroma and taste.
  • Veggie Medley: Explore other veggies like bok choy or carrots for additional texture and color; let your creativity shine!
  • Rice Variations: Swap your white rice for brown, cauliflower rice, or even quinoa to enhance nutritional value.
  • Add Heat: Increase your chili flakes or add sliced jalapeños if you’re looking to turn up the spice factor!

The beauty of this dish lies in its versatility! Each swap can lead to a new culinary adventure, just like when trying my delicious Acai Bowl Nutritious or refreshing Pitaya Smoothie Bowl. Your culinary journey awaits!

What to Serve with Spicy Ground Beef Stir-Fry Bowl

A delicious, vibrant stir-fry deserves the perfect companions to create a well-rounded meal that warms the soul.

  • Creamy Mashed Potatoes: The smooth, buttery texture provides a comforting contrast to the spicy and crunchy stir-fry, balancing flavors wonderfully.

  • Fresh Cucumber Salad: Crisp and refreshing, this salad cuts through the heat and adds a delightful crunch, making each bite feel lighter.

  • Garlic Breadsticks: Their crunchy exterior and soft center complement the bold flavors of the stir-fry beautifully while adding a fun dipping element to your meal.

  • Steamed Edamame: Packed with protein and a subtle sweetness, these vibrant green pods are a quick and nutritious side that pairs nicely with the savory bowl.

  • Miso Soup: This warm, umami-rich soup offers a gentle earthiness that complements the flavors in your Spicy Ground Beef Stir-Fry Bowl, creating a harmonious meal experience.

  • Fruity Smoothies: A cold, refreshing smoothie made with tropical fruits adds a sweet touch that balances the heat from the dish, ensuring a satisfying end to your meal.

  • Toasted Sesame Seeds: A simple sprinkle over your meal adds nutty flavor and texture, enhancing every bite while beautifully finishing off your Spicy Ground Beef Stir-Fry Bowl.

  • Lemon Sorbet: For a light dessert, this zesty treat cleanses the palate after a spicy meal, leaving you feeling refreshed and satisfied.

Make Ahead Options

These Spicy Ground Beef Stir-Fry Bowls are a fantastic choice for meal prep enthusiasts! You can chop your vegetables and mince garlic up to 24 hours in advance, storing them in airtight containers to keep them fresh. Additionally, you can cook the ground beef mixture and refrigerate it for up to 3 days. When you're ready to serve, simply reheat the beef in a skillet while quickly sautéing the prepped veggies until tender-crisp. For the best quality, add the soy sauce just before serving to maintain the vibrant flavors. This way, you'll have a delicious and satisfying meal ready in no time, perfect for those busy weeknights!

Expert Tips for Spicy Ground Beef Stir-Fry Bowl

  • Use Day-Old Rice: When making a stir-fry, day-old rice has a firmer texture that prevents clumping. It’s the secret to achieving that perfect fried rice quality.

  • Don’t Overcook Veggies: Keep those vibrant colors and crunch! Sauté your vegetables just until tender-crisp to maintain their delightful texture in your Spicy Ground Beef Stir-Fry Bowl.

  • Adjust Your Heat: Remember, spice levels can vary greatly! Start with a smaller amount of chili flakes, then taste and adjust according to your personal preference to ensure it’s just right.

  • Flavor Boosts: For an irresistible finish, consider adding a fried egg on top of your bowl, or garnish with fresh herbs like cilantro or green onions for extra flavor and freshness.

  • Prep Ahead: Making this meal for a busy week? Chop your veggies and marinate the beef the night before, so when it’s time to cook, you have everything ready to go in a flash!

Spicy Ground Beef Stir-Fry Bowl Recipe FAQs

What type of ground beef should I use for the best flavors?
Absolutely! For an optimal taste, I recommend using either grass-fed or lean ground beef. If you're looking for a lighter option, ground turkey works wonderfully as a swap!

How should I store leftovers from my Spicy Ground Beef Stir-Fry Bowl?
Store leftovers in airtight containers, separating the beef and veggies for up to 4 days in the refrigerator. Keeping them separate helps maintain their textures. The rice can be refrigerated as well and will last for about 5 days.

Can I freeze my Spicy Ground Beef Stir-Fry Bowl for later?
Very! You can freeze the beef and vegetables together in airtight freezer bags for up to 3 months. I recommend portioning them out into individual servings for easy meal prep. Although rice can also be frozen, be aware it may lose texture when thawed.

What’s the best way to reheat my stir-fry leftovers?
To reheat, I suggest microwaving the components separately. Adding a splash of water or soy sauce helps to regain moisture and keep your meal delicious. Heat for 1-2 minutes or until heated through, stirring halfway for even warming.

Are there any dietary considerations I should be aware of?
Absolutely! If you have gluten sensitivities, opt for tamari instead of soy sauce to make it gluten-free. For those watching their spice intake or have children sensitive to heat, start with fewer chili flakes and adjust as needed. Also, if you're making this dish for pets, be cautious of ingredients like garlic and onions, which can be harmful to them.

How can I adjust the spice level in this dish?
If you're looking to control the heat, begin with a smaller amount of chili flakes—about half a teaspoon is a great start. Taste as you go and gradually add more if you'd like more heat. Everyone's spice tolerance is different, so make it your own!

Spicy Ground Beef Stir-Fry Bowl

Spicy Ground Beef Stir-Fry Bowl That'll Warm Your Soul

This Spicy Ground Beef Stir-Fry Bowl is a quick and customizable dish that brings bold flavors to your dinner table.
Print Recipe Pin Recipe
Prep Time 10 minutes mins
Cook Time 20 minutes mins
Total Time 30 minutes mins
Servings: 4 bowls
Course: Dinner
Cuisine: Asian
Calories: 450
Ingredients Equipment Method Nutrition Notes

Ingredients
  

For the Beef
  • 1 lb Ground Beef Choose lean or grass-fed for a healthier option.
  • 3 tbsp Soy Sauce Opt for tamari if gluten-free.
  • 1 tsp Chili Flakes Adjust according to your preferred spice level.
  • 1 tbsp Brown Sugar Can be swapped for coconut sugar.
  • 1 tbsp Sesame Oil Substitute with olive oil if necessary.
For the Veggies
  • 4 cloves Garlic (Minced) Feel free to add more for extra flavor.
  • 2 cups Broccoli Florets Can be substituted with snap peas or green beans.
  • 1 each Red Bell Pepper Yellow or orange bell peppers work as well.
  • 1 each Zucchini Can be replaced with squash if desired.
  • 1 cup Mushrooms Select your favorite variety.
For Serving
  • 4 cups Steamed White Rice Use brown rice or cauliflower rice for a health boost.
  • 1 tbsp Olive Oil Vegetable oil can also be used.

Equipment

  • Skillet
  • pan
  • Cutting Board
  • Knife

Method
 

Step-by-Step Instructions
  1. Prep Ingredients: Wash and chop vegetables—broccoli into florets, bell pepper into strips, zucchini into half-moons, and mushrooms into slices. Mince the garlic.
  2. Cook Beef: In a large skillet, heat sesame oil over medium heat. Add minced garlic and sauté for about 30 seconds. Then, add ground beef, cooking until browned (4-5 minutes). Stir in soy sauce, chili flakes, and brown sugar; simmer for 3-4 minutes.
  3. Sauté Veggies: In a separate pan, heat olive oil over medium-high heat. Add minced garlic and cook for 30 seconds. Toss in mushrooms and stir-fry for 2 minutes. Add broccoli, zucchini, and red bell pepper; cook for an additional 3-4 minutes.
  4. Assemble Bowl: Start with a scoop of rice in each bowl, top with ground beef mixture and sautéed vegetables. Drizzle extra soy sauce if desired and serve immediately.

Nutrition

Serving: 1bowlCalories: 450kcalCarbohydrates: 50gProtein: 30gFat: 18gSaturated Fat: 5gPolyunsaturated Fat: 1gMonounsaturated Fat: 3gCholesterol: 80mgSodium: 900mgPotassium: 800mgFiber: 4gSugar: 5gVitamin A: 500IUVitamin C: 80mgCalcium: 60mgIron: 3mg

Notes

Use day-old rice for the best texture. Don’t overcook the veggies to keep them vibrant. Adjust spice levels to your preference.

Tried this recipe?

Let us know how it was!

Cantonese Beef Rice Bowls for Quick, Cozy Family Dinners

February 2, 2026 by Grace Snow Leave a Comment

The aroma hit me like a warm embrace as I stirred the savory medley bubbling in my wok, a reminder of cozy family dinners past. These Cantonese Beef Rice Bowls marry tender ground beef and a luscious sauce, making it the ultimate quick comfort food for busy weeknights. In under 30 minutes, you can serve a dish that not only pleases the palate but also brings everyone around the table, reconnecting hearts and appetites alike. This recipe is a delightful crossover reminiscent of a beloved spaghetti bolognese, yet with a special twist that welcomes everyone, from the little ones to grandma. So, are you ready to transform your weeknight meals into a celebration of flavor and warmth?

Why will you love these beef rice bowls?

Quick & Easy: In just 30 minutes, you can whip up these delicious Cantonese Beef Rice Bowls, making them perfect for busy weeknights.

Family-Friendly Flavor: The savory sauce and tender beef combination makes this dish appealing to all ages—kids won't even notice it’s not spaghetti!

Customizable Delight: Feel free to swap ground beef for turkey or add in veggies like bell peppers or carrots, tailoring it to your family’s preferences.

One-Pan Wonder: With minimal cleanup, this recipe is a great way to enjoy a homemade meal without a mountain of dishes, just like my favorite Mans Burrito Bowls.

Satisfying Comfort: With a glossy sauce that clings to soft rice, every bite is a harmony of flavors, perfect for bringing everyone together around the dinner table.

Try these pork-filled flavors inspired by Ground Beef Enchiladas and discover the joys of diversity in your family food repertoire!

Cantonese Beef Rice Bowls Ingredients

For the Beef Mixture
• Oil – Adds fat for sautéing; use vegetable or peanut oil for frying.
• Ground Beef (1 pound) – Main protein source with rich flavor; can substitute with ground turkey or pork.
• Onion (1 medium, finely diced) – Provides an aromatic base for flavor; yellow or white onions work well.
• Garlic (3 cloves, minced) – Enhances the flavor profile; fresh garlic is recommended for best results.
• Shaoxing Wine (1 tablespoon) – Adds depth; can substitute with dry sherry or omit for an alcohol-free version.
• Chicken Stock (2.5 cups) – Provides a liquid foundation for the sauce; substitute with vegetable stock for a lighter option.
• Oyster Sauce (3 tablespoons) – Adds umami and richness; for a vegetarian version, use mushroom oyster sauce.
• Light Soy Sauce (2 tablespoons) – Offers salty depth; can substitute with tamari for gluten-free.
• Dark Soy Sauce (1 teaspoon) – Adds color and sweetness; can skip if not available.
• Sesame Oil (1 teaspoon) – Provides a nutty aroma; use toasted sesame oil for more flavor.
• White Pepper (1/8 teaspoon) – Adds mild heat; black pepper can be used as a substitute.
• Frozen Peas (1 cup) – Adds color and sweetness; fresh peas can also be used as a substitute.
• Cornstarch (2 tablespoons mixed with 2 tablespoons water) – Thickens the sauce; arrowroot can be used as an alternative.

For Serving
• Steamed Rice – Base for serving; jasmine or basmati rice complement the dish well.

Feel the joy of preparing these Cantonese Beef Rice Bowls—a meal that not only nourishes the body but warms the soul!

Step‑by‑Step Instructions for Cantonese Beef Rice Bowls

Step 1: Heat the Wok
Begin by heating a large wok or skillet over high heat for about 2 minutes until it’s shimmering. Add 2 tablespoons of vegetable oil, swirling it to coat the surface. The oil should glisten but not smoke, indicating it’s ready for cooking the meat. This high heat will help brown the beef beautifully, setting the stage for rich flavors.

Step 2: Brown the Ground Beef
Carefully add 1 pound of ground beef to the hot oil, using a spatula to break it into small pieces. Cook for approximately 5-6 minutes, stirring occasionally until the beef is slightly browned and no longer pink. As the beef sizzles and browns, you’ll notice a fragrant aroma filling your kitchen, promising delicious Cantonese Beef Rice Bowls.

Step 3: Sauté Aromatics
Lower the heat to medium and add 1 finely diced medium onion and 3 minced garlic cloves to the beef. Stir these ingredients together for about 3-4 minutes or until the onion becomes translucent and fragrant. This step adds a lovely depth of flavor to the meat, enriching your sauce that will coat the rice in just a bit.

Step 4: Introduce Shaoxing Wine
Pour in 1 tablespoon of Shaoxing wine, allowing it to deglaze the pan. Stir continuously for about 1 minute to mix it well with the beef and aromatics. The wine will evaporate slightly, enhancing the overall flavor profile of the Cantonese Beef Rice Bowls, as it adds a wonderful complexity with each stir.

Step 5: Add Chicken Stock and Simmer
Now, pour in 2.5 cups of chicken stock, bringing the mixture to a boil over high heat. As soon as it reaches a rolling boil, reduce the heat to low and let it simmer. Cover the wok and allow it to cook gently for about 5 minutes, letting all those flavors meld together wonderfully.

Step 6: Stir in Sauces and Simmer
Add 3 tablespoons of oyster sauce, 2 tablespoons of light soy sauce, 1 teaspoon of dark soy sauce, 1 teaspoon of sesame oil, and 1/8 teaspoon of white pepper to the simmering liquid. Mix thoroughly and cover again, letting it simmer for another 10 minutes. The sauce should thicken slightly, becoming rich and glossy, perfect for your Cantonese Beef Rice Bowls.

Step 7: Incorporate Frozen Peas
With the flavors developed, uncover the wok and stir in 1 cup of frozen peas. Stir-fry this mixture for about 1 minute or until the peas are heated through and vibrant green. This step not only adds a pop of color but also a delightful sweetness to the savory beef sauce, rounding out the dish beautifully.

Step 8: Thicken the Sauce
Prepare a cornstarch slurry by mixing 2 tablespoons of cornstarch with 2 tablespoons of water. Drizzle this mixture evenly into the simmering sauce while stirring constantly. Continue stirring for about 1-2 minutes until the sauce thickens to your desired consistency. Adjust the thickness by adding more water if necessary for the perfect coating consistency for your Cantonese Beef Rice Bowls.

Step 9: Serve Over Steamed Rice
Finally, serve the beef mixture generously over bowls of steaming jasmine or basmati rice. Ensure each bowl is topped with plenty of that thick, luscious sauce. This step brings everything together, creating a satisfying and hearty meal that’s ready to be enjoyed by the whole family.

What to Serve with Cantonese Beef Rice Bowls

When it comes to creating a well-rounded meal, a delightful array of sides can elevate your Cantonese Beef Rice Bowls into a feast for all senses.

  • Stir-Fried Bok Choy: The crunchy texture and mild bitterness of bok choy perfectly balance the rich flavors of the beef, bringing freshness to the table.
  • Cucumber Salad: A refreshing cucumber salad with a tangy dressing adds a crisp contrast, cleansing the palate between bites of savory beef.
  • Lightly Seasoned Edamame: These tender, protein-packed soybeans offer a subtle nuttiness that pairs wonderfully with the Asian-inspired flavors of the rice bowls.
  • Garlic Green Beans: Stir-fried with a hint of garlic, these green beans provide a satisfying crunch and complement the umami notes of the beef sauce beautifully.
  • Sesame Seeds: Sprinkling sesame seeds on top of the bowls not only enhances presentation but also adds a nutty flavor, making each bite even more delightful.
  • Chilled Tea: A refreshing green or jasmine tea serves as a perfect drink that harmonizes with the dish's warm spices and savory components.
  • Mango Sticky Rice: For dessert, this sweet Thai treat can serve as a lovely contrast to the savory meal, satisfying your sweet tooth with its creamy coconut flavor.

Cantonese Beef Rice Bowls Variations

Feel free to explore these creative twists on your Cantonese Beef Rice Bowls, making your dish even more delightful.

  • Lean Protein: Swap ground beef for ground turkey or chicken. This change adds a lighter touch while maintaining flavor.

  • Vegetable Boost: Add veggies like bell peppers or carrots for extra color and nutrition. They’ll brighten the dish and provide added crunch.

  • Vegetarian Option: Use mushroom oyster sauce and switch to a plant-based meat substitute. This delightful twist opens up the dish for all diets.

  • Gluten-Free Version: Replace soy sauce with tamari. This keeps the savory flavor intact without gluten—perfect for those with dietary restrictions.

  • Flavor Upgrade: Try adding a tablespoon of sriracha or chili garlic sauce for a spicy kick. The extra heat may become a new favorite for spice lovers!

  • Different Stocks: Experiment by substituting chicken stock with vegetable stock for a lighter flavor while allowing the umami of the sauces to shine.

  • Fruity Touch: Toss in pineapple chunks during the last minute of cooking. The sweetness pairs fantastically with the savory elements.

  • Noodle Twist: Transform it into a noodle dish by serving over noodles instead of rice. This adds a delightful change in texture, reminiscent of a savory stir-fry.

Each of these variations can enhance your Cantonese Beef Rice Bowls, offering exciting new flavors to enjoy alongside accompanying dishes like Fish Taco Bowls or Furikake Fried Rice. Enjoy experimenting with your family's newest weeknight favorite!

How to Store and Freeze Cantonese Beef Rice Bowls

Fridge: Keep your Cantonese Beef Rice Bowls in an airtight container for up to 3 days. This allows the flavors to meld, making each bite even more savory.

Freezer: For longer storage, freeze the beef mixture in a freezer-friendly container or bag for up to 3 months. Thaw in the fridge overnight before reheating.

Reheating: When ready to enjoy, reheat gently in the microwave or on the stovetop. If the sauce thickens too much during storage, add a splash of water for the desired consistency.

Make Ahead Options

These Cantonese Beef Rice Bowls are perfect for meal prep enthusiasts! You can prepare the beef mixture up to 3 days in advance by cooking it fully and then letting it cool before refrigerating in an airtight container. For best quality, also pre-cook your rice, storing it separately; this allows both components to retain their flavors and textures when reheating. When you're ready to serve, simply reheat the beef mixture on the stovetop over medium heat, adding a splash of water if the sauce has thickened too much. This way, you can enjoy a comforting, homemade meal in a fraction of the time—just as delicious as when it was first made!

Expert Tips for Cantonese Beef Rice Bowls

  • Stir Constantly: To avoid lumps in your sauce, make sure to stir constantly while adding the cornstarch slurry. This ensures a smooth, velvety texture.

  • Adjust Sauce Thickness: If your sauce is too thick, simply add a splash of water. Conversely, add more cornstarch slurry if it’s too thin, achieving that perfect consistency for your Cantonese Beef Rice Bowls.

  • High Heat for Flavor: Start with high heat when browning the ground beef to lock in those delicious juices. This step is crucial for enhancing the flavor of your dish.

  • Ingredient Substitutions: Feel free to experiment! Swap ground beef with turkey or try different vegetables like carrots for an entirely new twist on these rice bowls.

  • Use Fresh Garlic: For the best flavor, always go for fresh garlic instead of pre-minced. It adds a vibrant aroma that elevates your Cantonese Beef Rice Bowls to the next level.

Cantonese Beef Rice Bowls Recipe FAQs

How do I choose the best ground beef for this recipe?
When selecting ground beef, look for meat with around 80-85% lean content. This balance provides enough fat for flavor without being greasy. If you prefer a leaner option, ground turkey or pork works wonderfully too - just keep in mind that the flavor will differ.

What’s the best way to store leftover Cantonese Beef Rice Bowls?
Store your leftovers in an airtight container in the refrigerator for up to 3 days. The flavors will continue to meld, making each subsequent bite even more delightful. If you plan to enjoy it later, portion it out for quick servings when you’re ready!

Can I freeze this dish, and if so, how?
Absolutely! To freeze the Cantonese Beef Rice Bowls, transfer the beef mixture to a freezer-safe container or bag. Label it with the date and use it within 3 months for the best flavor. When you’re set to enjoy it again, thaw it overnight in the fridge, then reheat gently with a splash of water if the sauce thickens.

What should I do if my sauce turns out too thick or too thin?
No sweat! If your sauce is too thick, add water in small amounts while stirring until you reach your desired consistency. If it’s too thin, mix a little more cornstarch with water (1 tablespoon each) and stir it in while cooking until it thickens up nicely. Remember to adjust gradually – it's all about finding your perfect balance!

Are there any dietary considerations I should keep in mind?
Yes! For gluten-free options, substitute light soy sauce with tamari and ensure the oyster sauce you choose is gluten-free too. If you're catering to a vegetarian crowd, swap the beef for a meat substitute and use mushroom oyster sauce instead for that umami richness. Always check labels for potential allergens as well.

How can I make this dish more nutritious?
To amp up the nutritional value, try adding a rainbow of veggies like bell peppers or carrot slices into the beef mixture. They not only enhance the flavor but also boost the vitamins in your dinner, making your Cantonese Beef Rice Bowls delightful and colorful!

Cantonese Beef Rice Bowls

Cantonese Beef Rice Bowls for Quick, Cozy Family Dinners

Enjoy these delicious Cantonese Beef Rice Bowls, a comforting dish perfect for busy weeknights.
Print Recipe Pin Recipe
Prep Time 10 minutes mins
Cook Time 20 minutes mins
Total Time 30 minutes mins
Servings: 4 bowls
Course: Dinner
Cuisine: Cantonese
Calories: 450
Ingredients Equipment Method Nutrition Notes

Ingredients
  

For the Beef Mixture
  • 2 tablespoons vegetable oil or peanut oil for frying
  • 1 pound ground beef can substitute with ground turkey or pork
  • 1 medium onion, finely diced yellow or white onions work well
  • 3 cloves garlic, minced fresh garlic is recommended
  • 1 tablespoon Shaoxing wine or dry sherry, optional
  • 2.5 cups chicken stock or vegetable stock for a lighter option
  • 3 tablespoons oyster sauce or mushroom oyster sauce for vegetarian
  • 2 tablespoons light soy sauce or tamari for gluten-free
  • 1 teaspoon dark soy sauce can skip if not available
  • 1 teaspoon sesame oil use toasted for more flavor
  • 1/8 teaspoon white pepper or black pepper as a substitute
  • 1 cup frozen peas or fresh peas as a substitute
  • 2 tablespoons cornstarch mixed with 2 tablespoons water for thickening
For Serving
  • steamed rice jasmine or basmati rice complement the dish well

Equipment

  • Wok
  • Spatula
  • measuring cups
  • Measuring Spoons

Method
 

Step-by-Step Instructions
  1. Heat a large wok or skillet over high heat for about 2 minutes. Add vegetable oil, swirling to coat the surface.
  2. Add ground beef to the hot oil, breaking it into small pieces. Cook for 5-6 minutes until browned and no longer pink.
  3. Lower heat to medium and add diced onion and minced garlic to the beef. Stir for 3-4 minutes until onion is translucent.
  4. Pour in Shaoxing wine, stirring for about 1 minute to mix with the beef and aromatics.
  5. Add chicken stock and bring to a boil over high heat. Then reduce to low and simmer for 5 minutes.
  6. Stir in oyster sauce, light soy sauce, dark soy sauce, sesame oil, and white pepper. Simmer for another 10 minutes.
  7. Uncover the wok and stir in frozen peas. Stir-fry for about 1 minute until heated through.
  8. Prepare a cornstarch slurry by mixing cornstarch with water. Drizzle into the sauce while stirring constantly. Cook for 1-2 minutes until thickened.
  9. Serve the beef mixture over steamed rice, ensuring each bowl is topped with plenty of sauce.

Nutrition

Serving: 1bowlCalories: 450kcalCarbohydrates: 50gProtein: 30gFat: 15gSaturated Fat: 4gPolyunsaturated Fat: 1gMonounsaturated Fat: 9gCholesterol: 75mgSodium: 800mgPotassium: 600mgFiber: 3gSugar: 5gVitamin A: 500IUVitamin C: 10mgCalcium: 30mgIron: 3mg

Notes

Store leftovers in an airtight container for up to 3 days in the fridge. Reheat gently and adjust sauce thickness as needed.

Tried this recipe?

Let us know how it was!

Hearty Beef and Pepper Rice Bowl for Quick Weeknight Dinners

February 2, 2026 by Grace Snow Leave a Comment

As I rummaged through my pantry one hectic evening, the familiar aroma of sautéed garlic filled the air, instantly lifting my spirits. That’s when I realized—a Beef and Pepper Rice Bowl was just what my weeknight called for! Tender, juicy beef strips dance with vibrant peppers and onions, all layered over fluffy rice, creating an incredible flavor profile that’s as comforting as it is satisfying. This quick dinner option is a busy home-chef's dream, allowing for endless customization with your favorite toppings or vegetables. Whether you're feeding a crowd or enjoying a cozy night in, this hearty meal is sure to hit the spot. Curious about how to make your own Beef and Pepper Rice Bowl? Let’s dive into the details together!

Why Try the Beef and Pepper Rice Bowl?

Quick and Easy: Perfect for those busy weeknights, this meal comes together in a flash, allowing you to whip up dinner in less than 30 minutes!

Hearty Satisfaction: Tender beef combined with crunchy peppers creates a heartwarming dish that feels like a hug in bowl form.

Endless Customization: Feel free to swap in your favorite proteins or vegetables for a tailored meal experience. Whether it’s a sprinkle of cashews for texture or a splash of sesame oil for flair, the options are limitless!

Crowd-Pleasing: Serve it at family dinners or casual get-togethers, and watch everyone come back for seconds! Pair it with other wonderful dishes like Corn Furikake Fried Rice for an even more robust meal.

Flavor Explosion: With the delightful interplay of soy sauce and garlic, each bite is packed with savory goodness, making it hard to resist.

Dive into this fantastic recipe and discover how comforting a Beef and Pepper Rice Bowl can be!

Beef and Pepper Rice Bowl Ingredients

For the Beef
• Beef strips – Tender strips create a hearty base filled with flavor; feel free to substitute with chicken, pork, or tofu.

For the Vegetables
• Bell Peppers – Adds a sweet crunch; you can use any color or mild chili peppers for a kick.
• Onions – Sautéed for savory sweetness that enhances the overall taste; shallots can provide a milder flavor.
• Garlic – Infuses the dish with aromatic depth; for convenience, use garlic powder (1/4 tsp for each clove).

For the Rice
• Rice – Acts as a comforting base that absorbs all the delicious flavors; for a healthier twist, opt for brown rice or quinoa.

For Seasoning
• Soy Sauce – Delivers umami and saltiness essential to the dish; try tamari for gluten-free or coconut aminos for a lighter flavor.
• Olive Oil – Essential for sautéing the beef and vegetables evenly; canola or avocado oil makes great substitutes.
• Seasonings (Salt, Pepper, Paprika/Chili Powder) – Enhances the flavor profile; adjust to your preference for spice in your Beef and Pepper Rice Bowl.

Embrace the simplicity and joy of cooking with these ingredients, and watch your culinary creation come alive!

Step‑by‑Step Instructions for Beef and Pepper Rice Bowl

Step 1: Heat the Pan
Begin by heating a large skillet or wok over medium-high heat for about 2-3 minutes until it's hot. You want that sizzle when the ingredients hit the pan! This step is crucial for achieving a great sear on the beef in your Beef and Pepper Rice Bowl, ensuring it locks in all those savory juices.

Step 2: Sear the Beef
Add a drizzle of olive oil to the hot pan, swirling it around to coat the surface. Then, add your beef strips in a single layer, making sure not to overcrowd the pan. Sear the beef for about 5-7 minutes, turning occasionally until it’s browned and cooked through. Look for that beautiful caramelization, which adds depth to your dish!

Step 3: Sauté the Vegetables
Once the beef is ready, transfer it to a plate and cover it to keep warm. In the same skillet, toss in chopped onions and colorful bell peppers. Sauté these for 5-7 minutes until they're softened and slightly caramelized, bringing out their natural sweetness. The vibrant colors will transform your Beef and Pepper Rice Bowl into a feast for the eyes!

Step 4: Add Aromatics and Seasoning
Stir in minced garlic along with your chosen seasonings of paprika or chili powder, salt, and pepper. Cook for an additional minute until the garlic is fragrant but not browned. This aromatic blend will elevate the flavors in your Beef and Pepper Rice Bowl, filling your kitchen with a mouthwatering aroma.

Step 5: Combine with Rice
Next, fold the cooked beef back into the skillet with the sautéed vegetables. Add your cooked rice, mixing everything gently to combine. Stir well for about 2-3 minutes until all the ingredients are heated through and the rice is coated with the savory mixture. Your Beef and Pepper Rice Bowl is coming together beautifully!

Step 6: Adjust and Serve
Taste the dish and adjust the seasoning if necessary, adding more salt, pepper, or soy sauce as desired. Once everything is harmoniously blended, serve your Beef and Pepper Rice Bowl immediately in vibrant bowls. Garnish with fresh herbs or a drizzle of additional soy sauce for an extra punch of flavor!

Make Ahead Options

These Beef and Pepper Rice Bowls are fantastic for meal prep! You can chop the bell peppers, onions, and slice the beef up to 24 hours in advance; simply store them in an airtight container in the refrigerator to maintain freshness. The rice can also be cooked ahead and refrigerated for up to 3 days. When you're ready to enjoy your Beef and Pepper Rice Bowl, just sauté the prepped vegetables and beef together until heated through, mix in the refrigerated rice, and finish with any seasonings or soy sauce as desired. This simple approach saves time while ensuring your meal is just as delicious on serve day!

Tips for the Best Beef and Pepper Rice Bowl

Hot Pan Essential: Ensure your pan is pre-heated for a perfect sear on the beef, locking in those delicious juices and flavors.

Customize Veggies: Don’t be afraid to toss in extra vegetables like broccoli or snap peas to your Beef and Pepper Rice Bowl for added nutrition and color!

Meal Prep Friendly: Prep ingredients ahead of time and store them separately; cook everything together for a quick and easy dinner when you need it.

Storage Tips: Store leftovers in an airtight container for up to 3 days; when reheating, add a splash of water to keep rice moist and flavorful.

Garnish Wisely: Fresh herbs like cilantro or green onions elevate the dish, adding brightness and flavor; don’t skip this final touch!

How to Store and Freeze Beef and Pepper Rice Bowl

Fridge: Store leftover Beef and Pepper Rice Bowl in an airtight container for up to 3 days. It’s best enjoyed fresh but can be reheated.

Freezer: For longer storage, portion the Beef and Pepper Rice Bowl in freezer-safe containers and freeze for up to 3 months. Label with the date for easy tracking.

Reheating: To reheat, transfer to a skillet over medium heat with a splash of water to keep the rice from drying out. Stir gently until warmed through, about 5-7 minutes.

Meal Prep: If you decide to meal prep, you can store ingredients separately and assemble as needed for quick weeknight dinners without compromising flavor.

What to Serve with Beef and Pepper Rice Bowl?

Cozy up your dinner table with the perfect companions for this hearty dish, creating a delightful meal experience.

  • Creamy Mashed Potatoes: Their rich texture complements the savory beef and adds a comforting element to your plate. A dollop of gravy can elevate it even further!

  • Fresh Cucumber Salad: The crispness of cucumbers drizzled in a light vinaigrette provides a refreshing contrast, balancing the warmth of the rice bowl.

  • Roasted Broccoli with Garlic: Perfectly charred and infused with garlic, this veggie side adds a delicious depth of flavor while boosting nutrition.

  • Sweet and Spicy Pickles: Add an intriguing twist that enhances the dish’s flavor profile with a tangy kick! They’re delightful for munching on the side.

  • Szechuan Green Beans: These tender green beans stir-fried with soy sauce and sesame elevate your meal with a pop of color and crunch.

  • Fruit-Infused Sparkling Water: A bubbly drink adds a refreshing touch. Lemon and mint are a classic combo that won't overshadow the meal's savory notes.

  • Chocolate Mousse: For dessert, treat yourself to a rich chocolate mousse, providing a sweet finish that contrasts beautifully with the beef's bold flavors.

Transform your Beef and Pepper Rice Bowl into a multi-course delight with these complementary dish ideas!

Beef and Pepper Rice Bowl Variations

Unlock a world of flavors by customizing your Beef and Pepper Rice Bowl to suit your taste buds!

  • Dairy-Free: Skip any dairy-based toppings like cheese or sour cream to keep it light and fresh.
  • Spicy Kick: Add sliced jalapeños or a drizzle of sriracha to bring some heat to the dish! The warmth balances the savoriness beautifully.
  • Veggie-Packed: Toss in extra vegetables such as broccoli, snap peas, or zucchini for added crunch and nutrition. It turns this hearty meal into a colorful medley!
  • Flavor Boost: Swap regular soy sauce for a teriyaki or hoisin sauce to elevate the sweetness and complexity. It adds layers of flavor that will surprise your palate.
  • Rice Alternatives: Use cauliflower rice for a low-carb option, or try quinoa for a protein boost while maintaining that comforting texture.
  • Nutty Delight: Sprinkle toasted sesame seeds or nuts like cashews over the dish for a delightful crunch. It’ll change the entire mouthfeel and be absolutely satisfying!
  • Herb Infusion: Garnish with fresh herbs like basil, cilantro, or green onions. A sprinkle of fresh herbs adds a vibrant touch along with aromatic freshness that’s so appealing.
  • One-Pan Marvel: Consider adding chickpeas or edamame for a protein twist that’s equally hearty and wholesome, creating a complete meal in one pan!

For even more delicious rice ideas, don’t miss out on trying Roasted Bratwurst Peppers or a refreshing Corn Furikake Fried Rice. Happy cooking!

Beef and Pepper Rice Bowl Recipe FAQs

How do I choose the best beef for my Beef and Pepper Rice Bowl?
Absolutely! Look for tender cuts like flank steak, sirloin, or ribeye, as they provide great flavor and tenderness. Ensure the beef has a nice marbling of fat, which enhances the juiciness. If you’re short on time, pre-sliced beef strips are a fantastic option, saving you the prep work!

What is the best way to store leftovers of my Beef and Pepper Rice Bowl?
Very good question! Store your leftover Beef and Pepper Rice Bowl in an airtight container in the fridge for up to 3 days. To keep the rice moist while reheating, add a splash of water before warming it on the stove over medium heat for about 5-7 minutes or until heated through.

Can I freeze my Beef and Pepper Rice Bowl?
Certainly! To freeze, portion your Beef and Pepper Rice Bowl into freezer-safe containers and seal tightly. It will maintain its quality for up to 3 months. When you're ready to enjoy, thaw it overnight in the fridge and reheat gently in a skillet with a sprinkle of water to avoid drying out.

What can I do if my beef turns out tough in my Beef and Pepper Rice Bowl?
No worries! If your beef is tough, it may need a little extra attention. Make sure to cook it just until browned, and avoid overcooking, as this can lead to toughness. For a more tender bite, consider marinating the beef beforehand in a mix of soy sauce, garlic, and a touch of vinegar for about 30 minutes. Marinating helps break down the fibers and adds flavor, making every bite succulent!

Are there any dietary considerations for my Beef and Pepper Rice Bowl?
Absolutely! If you're serving this to those with allergies, it's important to choose gluten-free soy sauce for gluten sensitivities. For a healthier option, you might opt for brown rice or quinoa instead of white rice. Additionally, feel free to use alternative proteins like chicken, pork, or tofu for varying dietary needs. Always double-check ingredient labels to ensure they fit your guests' dietary restrictions!

Can I use frozen vegetables in my Beef and Pepper Rice Bowl?
Yes, you can absolutely use frozen vegetables for convenience! Just add them directly to the skillet when sautéing the onions and peppers, allowing a few extra minutes for them to cook through. This will save you prepping time and still provide a delicious flavor to your Beef and Pepper Rice Bowl!

Beef and Pepper Rice Bowl

Hearty Beef and Pepper Rice Bowl for Quick Weeknight Dinners

A Beef and Pepper Rice Bowl that is quick, satisfying, and customizable, perfect for busy weeknights.
Print Recipe Pin Recipe
Prep Time 10 minutes mins
Cook Time 20 minutes mins
Total Time 30 minutes mins
Servings: 4 bowl
Course: Dinner
Cuisine: Asian
Calories: 450
Ingredients Equipment Method Nutrition Notes

Ingredients
  

For the Beef
  • 1 pound Beef strips Feel free to substitute with chicken, pork, or tofu.
For the Vegetables
  • 2 cups Bell Peppers Any color or mild chili peppers can be used.
  • 1 cup Onions Shallots can provide a milder flavor.
  • 3 cloves Garlic Minced; for convenience, use garlic powder (1/4 tsp for each clove).
For the Rice
  • 2 cups Rice Brown rice or quinoa can be used for a healthier twist.
For Seasoning
  • 1/4 cup Soy Sauce Try tamari for gluten-free or coconut aminos for lighter flavor.
  • 2 tablespoons Olive Oil Canola or avocado oil makes great substitutes.
  • to taste Seasonings (Salt, Pepper, Paprika/Chili Powder) Adjust to your preference for spice.

Equipment

  • Skillet
  • Cutting Board
  • Knife

Method
 

Step-by-Step Instructions
  1. Heat a large skillet or wok over medium-high heat for about 2-3 minutes until hot.
  2. Add olive oil to the hot pan, swirl it to coat, then add beef strips in a single layer. Sear for 5-7 minutes until browned and cooked through.
  3. Transfer beef to a plate and cover to keep warm. In the same skillet, add chopped onions and bell peppers. Sauté for 5-7 minutes until softened.
  4. Stir in minced garlic and seasonings. Cook for an additional minute until garlic is fragrant.
  5. Fold cooked beef back into skillet with sautéed vegetables. Add cooked rice, mixing gently to combine.
  6. Taste and adjust seasoning if necessary. Serve immediately in bowls, garnished with fresh herbs or additional soy sauce.

Nutrition

Serving: 1bowlCalories: 450kcalCarbohydrates: 45gProtein: 30gFat: 15gSaturated Fat: 3gPolyunsaturated Fat: 1gMonounsaturated Fat: 10gCholesterol: 70mgSodium: 800mgPotassium: 600mgFiber: 3gSugar: 6gVitamin A: 1200IUVitamin C: 80mgCalcium: 40mgIron: 3mg

Notes

Customize with your favorite toppings or vegetables. Perfect for meal prep and leftovers.

Tried this recipe?

Let us know how it was!

Delicious Spicy Garlic Chinese Zucchini Recipe You’ll Love

February 2, 2026 by Grace Snow Leave a Comment

As the sizzling aroma of garlic fills my kitchen, I can’t help but feel a rush of excitement for this Spicy Garlic Chinese Zucchini recipe. It’s a fantastic way to elevate a humble vegetable into a show-stopping dish that caters to all dietary preferences—from gluten-free to vegan. With just a few simple ingredients, I can craft a colorful plate that dances with a perfect balance of nutty and spicy flavors. This quick-to-make recipe is not only an easy side dish but also a fabulous light meal that's packed with freshness. Plus, if you’re looking for versatility, you can effortlessly add your choice of protein to make it even heartier. Isn’t it time to bring a little excitement to your dinner table? Let’s dive into these zesty zoodles!

Why Is This Recipe a Must-Try?

Deliciously Unique: This Spicy Garlic Chinese Zucchini recipe flips traditional cooking on its head, transforming simple zucchini into vibrant zoodles that wow the palate.
Quick & Easy: Perfect for busy weeknights, this dish comes together in a snap, allowing you to savor dinner without the lengthy prep time.
Diet-Friendly: Whether you’re gluten-free or vegan, this adaptable recipe can fit any lifestyle, making it a fantastic choice for gatherings.
Flavor Explosion: With aromatic garlic and a zesty kick, each bite is a burst of flavor that keeps you coming back for more—perfect in or alongside Cheesy Garlic Bread.
Crowd-Pleaser: Serve it as a main or a side, and watch it disappear from the table—everyone will be asking for seconds.
Nutrient-Packed: Enjoy a dish that’s low in calories yet high in flavor and nutrients, offering you a guilt-free indulgence that satisfies!

Spicy Garlic Chinese Zucchini Ingredients

• Here’s what you’ll need for an irresistible Spicy Garlic Chinese Zucchini recipe.

For the Zoodles

  • Zucchini – The main ingredient that creates light and refreshing noodles (zoodles); choose firm zucchinis for the best texture.
  • Salt – Essential for drawing out moisture from the zucchini and enhancing flavor; sea salt makes a delightful alternative.

For the Flavorful Sauce

  • Garlic – Freshly chopped for aromatic depth and strong flavor; avoid powdered garlic for maximum impact.
  • Coconut Aminos – A gluten-free soy sauce alternative that brings savory depth; you can easily substitute with soy sauce.
  • Tahini (or Peanut/Almond Butter) – Adds creaminess and nutty undertones; use sunflower seed butter for a nut-free alternative.
  • Sesame Oil – Gives the dish a rich, distinctive flavor; essential for authenticity—substitute with olive oil if necessary.
  • Chili Powder – Adds that wonderfully spicy kick; adjust the amount based on your personal spice preference.
  • Chili Oil – An optional drizzle for extra heat and flavor enhancement; sriracha can be used as a fantastic substitute.
  • Honey (or Maple Syrup) – Balances the spice with a hint of sweetness; omit for sugar-free diets if desired.

For the Garnish

  • Toasted Sesame Seeds – Optional but adds great texture and visual appeal; feel free to replace with chopped nuts or skip altogether.

Step‑by‑Step Instructions for Spicy Garlic Chinese Zucchini Recipe

Step 1: Prepare the Zucchini
Begin by spiralizing or slicing two firm zucchinis into thin noodles, also known as zoodles. If you don't have a spiralizer, a vegetable peeler or julienne slicer will work, too. Aim for long, noodle-like strands to capture the essence of traditional pasta. This step creates the base of your Spicy Garlic Chinese Zucchini recipe, making it light and refreshing.

Step 2: Salt the Zoodles
Place the zoodles in a colander and sprinkle them with salt. Allow them to sit for about 30 minutes to draw out excess moisture. This process prevents the zoodles from becoming mushy, ensuring a satisfying crunch in every bite. You will know they are ready when you see moisture collecting in the bottom of the colander.

Step 3: Make the Flavorful Sauce
While the zoodles are resting, prepare your sauce by combining freshly chopped garlic, coconut aminos, tahini, sesame oil, chili powder, chili oil, and honey in a mixing bowl. Stir well until the mixture is smooth and well-blended. This aromatic sauce will enhance the taste of your Spicy Garlic Chinese Zucchini, packing it with flavors that dance on your palate.

Step 4: Squeeze Out Excess Moisture
After the 30-minute salting period, gently squeeze the zoodles to remove any excess moisture. Be careful not to overdo it, as you want to keep some water for flavor. This step ensures that your zoodles retain a lovely texture when combined with the sauce, allowing the flavors to cling beautifully and create a satisfying bite.

Step 5: Combine Zoodles and Sauce
In a large serving bowl, mix the drained zoodles with the previously prepared sauce. Toss gently to ensure each noodle is evenly coated with the rich, spicy sauce. This step transforms your simple zoodles into a vibrant, flavor-packed Spicy Garlic Chinese Zucchini dish that can serve as a dazzling side or a light main course.

Step 6: Chill for Enhanced Flavor
For those who have the time, let the finished dish sit in the refrigerator for a few hours or even overnight. This allows the ingredients to meld together, enhancing the flavor profile. If preferred, you can serve the zoodles cold or at room temperature, offering a refreshing option for your meal.

Spicy Garlic Chinese Zucchini Variations

Feel free to get creative with this Spicy Garlic Chinese Zucchini recipe and make it your own!

  • Protein Packed: Add cooked chicken, tofu, shrimp, or beef for a satisfying and heartier meal. Dinner just got exciting and filling!
  • Veggie Delight: Toss in some raw or sautéed bell peppers, carrots, or snap peas for a burst of color and added nutrients. Enjoy the lively crunch!
  • Spice it Up: Don’t be shy! Adjust the chili powder to your preferred spice level, or use fresh chopped chilies for a fiery twist that excites the taste buds.
  • Creamy Vegan Twist: Swap tahini for avocado or cashew cream for a super creamy and decadent version without losing the vegan touch. Talk about indulgence!
  • Nut-Free Option: Replace tahini with sunflower seed butter for a nut-free alternative that still delivers rich creaminess. Everyone can enjoy this tasty dish!
  • Saucy Goodness: Mix in a splash of sweet chili sauce or teriyaki for an Asian fusion vibe that takes flavors to another dimension. Embrace the delicious fusion of tastes!
  • Chill & Serve: Serve chilled for a refreshing summer meal or side dish. It’s great alongside grilled proteins or as part of a picnic spread. Perfect for those warm evenings!
  • Whole30-Friendly: Omit honey and use coconut sugar or leave it out entirely for a Whole30-compliant dish. No one needs to miss out on deliciousness!

Don’t forget to pair it with other delightful dishes like Honey Garlic Chicken or a side of Cheesy Zucchini Bake for a full meal experience!

Expert Tips for the Best Spicy Garlic Chinese Zucchini

  • Choose Quality Zucchini: Opt for firm zucchinis without blemishes to create perfect zoodles that won't turn mushy during cooking.
  • Mind the Salt: Avoid over-salting! If the zoodles sit too long, they can become excessively watery. Aim for 30 minutes maximum.
  • Fresh Garlic Matters: Use freshly chopped garlic for the best flavor. Powdered garlic lacks the aromatic impact needed for this spicy dish.
  • Adjust Spice Levels: Feel free to modify the chili powder based on your heat tolerance. Start with a small amount and gradually increase as desired.
  • Refrigerate for Flavor: Allow your salad to chill for a few hours or overnight—increasing flavor depth for the Spicy Garlic Chinese Zucchini recipe is key!
  • Protein Boost: Add your favorite protein, like grilled chicken or tofu, to turn your zoodles into a hearty meal that satisfies everyone!

How to Store and Freeze Spicy Garlic Chinese Zucchini

Fridge: Store leftovers in an airtight container for up to 5 days to maintain freshness and flavor. Be sure the dish has cooled to room temperature before sealing.

Freezer: For longer storage, freeze the zoodles without sauce for up to 2 months. When ready to eat, thaw and quickly sauté just until warmed.

Reheating: To reheat, gently warm the dish in a skillet over low heat, stirring occasionally. This maintains the crisp texture, ensuring your Spicy Garlic Chinese Zucchini recipe remains delightful.

Serving After Storage: If serving after refrigeration, enjoy it cold or let it come to room temperature for a refreshing twist that enhances the flavors.

Make Ahead Options

These Spicy Garlic Chinese Zucchini noodles are a fantastic choice for meal prep, saving you time on busy weeknights! You can prepare the zoodles by spiralizing the zucchini and letting them rest with salt up to 24 hours ahead, allowing the moisture to draw out and maintain their delightful crunch. The flavorful sauce can also be mixed in advance and stored in the refrigerator for up to 3 days. When you're ready to enjoy, simply combine the zoodles with the sauce, toss gently, and serve cold or at room temperature for a tasty meal that's just as delicious as when freshly made. By prepping ahead, you'll have an irresistible dish ready to go in no time!

What to Serve with Spicy Garlic Chinese Zucchini

Complement your meal with these delightful pairings that amplify flavor and texture while ensuring a well-rounded dining experience.

  • Sesame Broccoli: This lightly steamed side adds a crunchy, nutty element that echoes the sesame oil in the zoodles, creating a harmonious balance.
  • Grilled Chicken: Juicy and charred, the protein melds beautifully with the spice-infused zoodles, making for a fulfilling meal that’s both satisfying and light.
  • Coconut Rice: Fluffy and slightly sweet, the creamy texture of coconut rice enhances the meal's spiciness while providing a comforting base.
  • Sautéed Kale: Add a vibrant green element with sautéed kale, which offers a mild earthiness that contrasts the zoodles’ bold flavors beautifully.
  • Miso Soup: This warm and umami-rich broth serves as a soothing counterpart that complements the spicy profile of the dish, creating a wonderfully cozy meal.
  • Chilled Sake: Serve with a glass of chilled sake for a refreshing drink that enhances the flavors of your dish while providing a delightful dining experience.
  • Spicy Tofu Skewers: For a heartier touch, serve skewers of marinated tofu, grilled to perfection, bringing another layer of texture and flavor that complements the zoodles.
  • Lemon Sorbet: End the meal on a light note with lemon sorbet; its sharp citrus flavor cleanses the palate and refreshes after the spicy zoodles.
  • Radish Salad: Crisp and crunchy, a radish salad with a drizzle of vinegar offers a refreshing bite that brightens up the dish and adds zesty contrast.

Spicy Garlic Chinese Zucchini Recipe FAQs

How do I choose ripe zucchini?
Absolutely! When selecting zucchini, look for firm specimens without any blemishes or dark spots. They should have a glossy appearance, indicating freshness. Avoid soft or overly large zucchinis, as they tend to be watery and less flavorful.

What’s the best way to store leftovers?
You can store your Spicy Garlic Chinese Zucchini in an airtight container in the fridge for up to 5 days. To maintain the dish's crispness, make sure it's cooled to room temperature before sealing. This helps preserve its delicious flavors!

Can I freeze zucchini noodles?
Yes, you can! For freezing, I recommend storing the zoodles without any sauce. Place them in a freezer-safe container or bag, ensuring all air is removed to prevent freezer burn. They will keep well for up to 2 months. When ready to eat, simply thaw and sauté them in a pan until warmed through.

What if my zoodles become mushy?
Very often, mushy zoodles are a result of over-salting or letting them sit too long. Aim for a salting time of about 30 minutes, and gently squeeze out any moisture afterward—just enough to maintain some water content for flavor. If they still come out mushy, consider using less salt next time or eating them fresh instead.

Can I adjust the recipe for dietary restrictions?
Absolutely! The Spicy Garlic Chinese Zucchini recipe is highly adaptable. For gluten-free needs, use coconut aminos or gluten-free soy sauce. Vegans can enjoy it as is, while those with nut allergies can swap tahini for sunflower seed butter. There’s plenty of room to customize this dish to suit your dietary preferences!

Spicy Garlic Chinese Zucchini Recipe

Delicious Spicy Garlic Chinese Zucchini Recipe You’ll Love

This Spicy Garlic Chinese Zucchini recipe is a quick, flavorful dish that caters to all dietary preferences.
Print Recipe Pin Recipe
Prep Time 30 minutes mins
Cook Time 10 minutes mins
Total Time 40 minutes mins
Servings: 4 servings
Course: Sides
Cuisine: Chinese
Calories: 160
Ingredients Equipment Method Nutrition Notes

Ingredients
  

For the Zoodles
  • 2 medium Zucchini firm zucchinis for the best texture
  • 1 teaspoon Salt sea salt is a delightful alternative
For the Flavorful Sauce
  • 4 cloves Garlic freshly chopped
  • 4 tablespoons Coconut Aminos gluten-free soy sauce alternative
  • 2 tablespoons Tahini or Peanut/Almond Butter
  • 2 tablespoons Sesame Oil substitute with olive oil if necessary
  • 1 teaspoon Chili Powder adjust based on spice preference
  • 1 tablespoon Chili Oil optional drizzle for extra heat
  • 1 tablespoon Honey or Maple Syrup, omit for sugar-free diets
For the Garnish
  • 1 tablespoon Toasted Sesame Seeds optional but adds great texture

Equipment

  • Spiralizer
  • Mixing Bowl
  • Colander
  • Skillet

Method
 

Step-by-Step Instructions
  1. Spiralize or slice the zucchinis into thin noodles, known as zoodles.
  2. Place the zoodles in a colander and salt them. Let them sit for 30 minutes.
  3. In a mixing bowl, combine garlic, coconut aminos, tahini, sesame oil, chili powder, chili oil, and honey.
  4. After 30 minutes, gently squeeze out any excess moisture from the zoodles.
  5. Mix the drained zoodles with the prepared sauce in a large serving bowl.
  6. Chill the dish in the refrigerator for a few hours to enhance flavor.

Nutrition

Serving: 1servingCalories: 160kcalCarbohydrates: 12gProtein: 6gFat: 10gSaturated Fat: 1gPolyunsaturated Fat: 2gMonounsaturated Fat: 6gSodium: 500mgPotassium: 600mgFiber: 3gSugar: 3gVitamin A: 5IUVitamin C: 40mgCalcium: 4mgIron: 6mg

Notes

For a heartier meal, consider adding grilled chicken or tofu. Store leftovers in an airtight container for up to 5 days.

Tried this recipe?

Let us know how it was!

Sautéed Zucchini: Quick, Flavorful, and Guilt-Free Delight

February 2, 2026 by Grace Snow Leave a Comment

As I stood in my kitchen, the sun streaming through the window, I felt the urge to whip up a satisfying yet healthy side dish. That’s when I decided to make Quick and Easy Low-Carb Sautéed Zucchini. This delightful recipe not only showcases the star ingredient—tender zucchini—but also brings together earthy mushrooms and aromatic garlic, making it a perfect accompaniment to your favorite proteins. In under 15 minutes, you can create a dish that’s not only low-carb and vegetarian but also gluten-free! It’s a versatile, quick option that will easily become a staple in your kitchen. Whether you’re winding down the day or hosting a gathering, this sautéed zucchini is bound to be a crowd-pleaser. Ready to transform your meals with this simple, nutritious side? Let’s dive in!

Why is Sautéed Zucchini a Must-Try?

Quick and Easy: This recipe promises to have your sautéed zucchini ready in under 15 minutes, making it ideal for busy weeknights or last-minute dinner parties.

Low-Carb Delight: Perfect for those following a low-carb diet, this dish lets you indulge in vegetables without the guilt.

Flavorful and Versatile: The combination of garlic, Italian seasoning, and red pepper flakes adds depth and personality, while also allowing for creativity—feel free to toss in other veggies or herbs!

Crowd-Pleaser: Whether served with grilled chicken or as part of a vibrant grain bowl, this dish is sure to impress guests and family alike.

Storage-Friendly: Leftovers can be easily reheated and incorporated into soups or sauces, ensuring you don’t waste a bite. For more delicious veggie inspiration, check out my Cheesy Zucchini Bake!

Sautéed Zucchini Ingredients

• Ready to prepare this easy and healthy side?

For the Sauté

  • Olive Oil – Adds healthy fat and helps sauté the vegetables; you can substitute with avocado oil for a different flavor.
  • Butter – Provides richness and flavor; feel free to use unsalted or margarine as an alternative.
  • Medium Yellow Onion – Offers sweetness and depth; shallots or red onions can be used instead if you prefer.
  • White Button Mushrooms – Contributes umami flavor and texture; for a stronger taste, you can substitute with cremini mushrooms.

For the Veggies

  • Medium Zucchini – The star ingredient, providing bulk and nutrients; yellow squash can also be a good alternative to include in your sautéed zucchini.
  • Garlic – Enhances flavor; you can reduce the quantity or use garlic powder if you want a milder taste.

For Seasoning

  • Italian Seasoning – Adds a delicious blend of herbs to elevate the flavor; feel free to substitute with mixed dried herbs like oregano or thyme.
  • Red Pepper Flakes – Provides a hint of heat; adjust to your taste or switch to cayenne pepper for a spicier kick.
  • Kosher Salt and Fresh Ground Black Pepper – Essential for seasoning; consider using sea salt or table salt and adjust to your preference.

Step‑by‑Step Instructions for Sautéed Zucchini

Step 1: Heat the Base
In a large skillet, heat 1 tablespoon of olive oil and 2 tablespoons of butter over medium-high heat. Watch for the butter to melt and foam, signaling it's ready. This combination will create a flavorful base for your sautéed zucchini, so ensure the mixture is hot but not smoking before moving on to the next step.

Step 2: Sauté the Aromatics
Add the chopped medium yellow onion and white button mushrooms to the skillet. Sauté for about 5 minutes, stirring occasionally, until the onions are translucent and the mushrooms are browned. This process enhances their flavor and sweetness, forming a delicious base for your sautéed zucchini.

Step 3: Remove the Aromatics
Once the onions and mushrooms are nicely caramelized, carefully plate them and set aside. If the skillet appears dry, feel free to add a splash of olive oil. This step ensures that the sautéed zucchini can achieve a beautiful golden color without overcrowding the pan.

Step 4: Cook the Zucchini
Add the chopped medium zucchini to the skillet, spreading it in a single layer. Let it cook undisturbed for about 3 minutes before tossing gently. Continue to sauté for another 5-7 minutes, until the zucchini is browned and tender yet still slightly crisp. This step is key to achieving perfectly sautéed zucchini without mushiness.

Step 5: Add Garlic and Seasonings
Reduce the heat to low, then stir in 2 minced garlic cloves, 1 teaspoon of Italian seasoning, and a pinch of red pepper flakes. Cook for an additional minute, allowing the garlic to become fragrant. This infusion of flavor will elevate your sautéed zucchini, making it even more appetizing.

Step 6: Final Seasoning
Taste the mixture and season with kosher salt and freshly ground black pepper according to your preference. This final touch ensures that your sautéed zucchini is well-rounded in flavor and ready to impress. Stir everything together for even seasoning and let the mixture sit for 30 seconds to meld the flavors.

Step 7: Serve Immediately
Transfer the sautéed zucchini to a serving dish and enjoy promptly for the best flavor and texture. Serve alongside your favorite proteins or as a vibrant addition to a grain bowl. The colorful medley of flavors and textures is sure to be a delightful hit at your table!

Sautéed Zucchini: Flexible Twist Options

Feel free to personalize your sautéed zucchini experience with these variations that can tickle your taste buds in delightful ways!

  • Dairy-Free: Swap butter for a vegan margarine or simply increase olive oil for a dairy-free option that still delivers on flavor.
  • Cheesy Delight: Add a sprinkle of grated Parmesan cheese right before serving for an extra layer of richness and flavor. This simple twist can elevate your dish in an instant.
  • Extra Veggie Power: Incorporate bell peppers or carrots along with zucchini for an added splash of color and nutrition. The more, the merrier in a veggie medley!
  • Spicy Kick: If you love heat, double the red pepper flakes or toss in freshly diced jalapeños.
  • Herb Garden: Replace Italian seasoning with fresh herbs like basil or dill. It gives a fresh twist to the overall flavor profile, celebrating the herbs beautifully.
  • Grain Bowl Base: Turn this sautéed zucchini into a filling for grain bowls—mix with quinoa or brown rice, and top with your favorite proteins and sauces. It’s a nourishing meal you’ll love.
  • Mediterranean Flair: Add olives and sun-dried tomatoes for a Mediterranean spin on your sautéed zucchini. This pairing invites bold flavors that will leave everyone raving!
  • Zesty Citrus: Squeeze some fresh lemon juice over the finished dish to brighten up the flavors for a refreshing touch. A little zest can make all the difference!

Don’t miss out on trying out these delightful options—you may find your new favorite combination! For other delicious veggie inspirations, consider checking out my Cheesy Zucchini Bake or perhaps indulge in some flavorful stir-fried veggies!

Make Ahead Options

These Sautéed Zucchini are perfect for meal prep enthusiasts! You can chop the zucchini, onions, and mushrooms up to 24 hours in advance, storing them separately in airtight containers in the refrigerator to maintain their freshness. For the best results, drizzle the cut zucchini with a little lemon juice to prevent browning. When you’re ready to serve, simply heat olive oil and butter in a skillet, sauté the onions and mushrooms first, and then toss in the zucchini, garlic, and seasonings as directed. This way, you’ll have a delicious side dish ready in no time, making your busy weeknights a whole lot easier!

What to Serve with Quick and Easy Low-Carb Sautéed Zucchini

Elevate your meal with these delightful pairings that bring out the vibrant flavors of sautéed zucchini.

  • Grilled Chicken: Juicy, marinated chicken complements the zucchini’s mild flavor while adding satisfying protein to your plate.
  • Quinoa Salad: A lemony quinoa salad adds zing and freshness, creating a wholesome, nutrient-packed meal.
  • Parmesan Crusted Salmon: The richness of this flavorful fish enhances the sautéed zucchini, making for an elegant pairing.
  • Brown Rice: Simple brown rice offers a hearty base to soak up the savory juices from the sauté, enriching each bite.
  • Garlic Bread: Crunchy garlic bread provides a delightful contrast in texture, perfect for dipping into the savory flavors of the veggies.
  • Caprese Salad: Fresh mozzarella and tomatoes provide a refreshing balance to the sautéed zucchini, making your meal feel bright and vibrant.
  • Chardonnay: A glass of chilled Chardonnay enhances the dish's earthy notes while complementing any meat you choose.
  • Lemon Sorbet: Light and refreshing, this dessert provides a perfect close to the meal, cleansing your palate after the savory dishes.
  • Herb-Infused Olive Oil: Drizzle over your zucchini for a boost in flavor that connects beautifully with grilled meats and bread.

Expert Tips for Sautéed Zucchini

  • Cut Size Matters: Evenly cut zucchini into chunks instead of slices for a better texture. This creates those satisfying tender bites for your sautéed zucchini.

  • Avoid Overcrowding: Sauté in batches to prevent steaming. Overcrowding the skillet leads to mushy veggies; ensure they brown nicely instead!

  • Herb Adventures: Feel free to mix and match herbs and spices! Fresh parsley, dill, or thyme can add unique flavors to your sautéed zucchini.

  • Watch Cook Times: Pay close attention to cooking times. Zucchini cooks quickly; take care not to overcook and lose that lovely crunch.

  • Smart Leftovers: If you have extra sautéed zucchini, consider adding it to soups or sauces instead of freezing, as zucchini’s high water content doesn't freeze well.

How to Store and Freeze Sautéed Zucchini

Fridge: Store leftovers in an airtight container in the refrigerator for up to 3 days. This keeps your sautéed zucchini fresh, ready to enjoy later!

Freezer: While it’s not ideal to freeze sautéed zucchini due to its high water content, if you must, place it in a freezer-safe bag for up to 2 months. Thaw in the fridge before reheating.

Reheating: When reheating, gently warm the zucchini in a skillet over low heat to maintain its texture. Avoid the microwave if possible to prevent sogginess.

Leftover Ideas: Use any leftover sautéed zucchini in omelets, soups, or pasta dishes for a quick flavor boost—no waste here!

Sautéed Zucchini Recipe FAQs

What’s the best way to select zucchini for this recipe?
Absolutely! Look for medium zucchini that feels firm to the touch and has smooth, unblemished skin. Avoid ones with dark spots or soft spots, as those indicate overripeness. For optimal flavor and nutrition, choose zucchini that’s bright in color and relatively small, around 6 to 8 inches long.

How long can I store leftovers in the fridge?
Very! You can store any leftover sautéed zucchini in an airtight container in the refrigerator for up to 3 days. To maintain the best taste and texture, I recommend consuming it within this timeframe, as the zucchini can become mushy over time.

Can I freeze sautéed zucchini?
While it’s possible to freeze sautéed zucchini, it's not the ideal option due to its high water content, which can lead to a mushy texture upon thawing. If you choose to freeze it, place the cooled zucchini in a freezer-safe bag and use it within 2 months. When you’re ready to use it, thaw in the refrigerator and reheat on the stove to help retain some of its original texture.

What should I do if my zucchini turns mushy while cooking?
No worries! If your zucchini becomes mushy during cooking, it might be a sign that it was overcooked or cut too thinly. For the next attempt, try cutting the zucchini into larger chunks to help maintain texture, and avoid overcrowding the skillet. Additionally, cook in batches to ensure even cooking and browning without creating steam.

Are there any dietary considerations, like allergies, for sautéed zucchini?
Yes, indeed! This sautéed zucchini recipe is gluten-free and vegetarian, making it suitable for many diets. However, if you or your guests have a garlic allergy, feel free to omit the garlic, or if you want a milder flavor, consider using garlic-infused oil instead. Always double-check ingredients, especially pre-made seasonings, if allergies are a concern.

How can I repurpose leftover sautéed zucchini?
Great question! If you have any leftover sautéed zucchini, consider adding it to omelets for a delicious breakfast, blending it into soups for added nutrients, or tossing it with pasta dishes or grain bowls for an easy and healthy meal. Think of it as a versatile ingredient that opens many culinary doors!

Sautéed Zucchini

Sautéed Zucchini: Quick, Flavorful, and Guilt-Free Delight

This sautéed zucchini recipe is a quick, low-carb, and flavorful side dish that is perfect for any meal.
Print Recipe Pin Recipe
Prep Time 5 minutes mins
Cook Time 10 minutes mins
Total Time 15 minutes mins
Servings: 4 servings
Course: Dinner
Cuisine: Vegetarian
Calories: 120
Ingredients Equipment Method Nutrition Notes

Ingredients
  

For the Sauté
  • 1 tablespoon Olive Oil Can substitute with avocado oil
  • 2 tablespoons Butter Unsalted or margarine can be used as alternatives
  • 1 medium Yellow Onion Shallots or red onions can be used instead
  • 8 ounces White Button Mushrooms Cremini mushrooms can be substituted for a stronger taste
For the Veggies
  • 2 medium Zucchini Yellow squash can also be a good alternative
  • 2 cloves Garlic Can use garlic powder for a milder taste
For Seasoning
  • 1 teaspoon Italian Seasoning Can substitute with oregano or thyme
  • 1 pinch Red Pepper Flakes Adjust to taste or switch to cayenne pepper
  • to taste Kosher Salt Sea salt or table salt can be used
  • to taste Fresh Ground Black Pepper Adjust according to preference

Equipment

  • Large skillet

Method
 

Step-by-Step Instructions for Sautéed Zucchini
  1. In a large skillet, heat 1 tablespoon of olive oil and 2 tablespoons of butter over medium-high heat until the butter melts and foams.
  2. Add the chopped medium yellow onion and white button mushrooms to the skillet. Sauté for about 5 minutes until the onions are translucent and the mushrooms are browned.
  3. Once the onions and mushrooms are nicely caramelized, carefully plate them and set aside. Add a splash of olive oil if the skillet appears dry.
  4. Add the chopped medium zucchini to the skillet, spreading it in a single layer. Cook undisturbed for about 3 minutes before tossing gently. Sauté for another 5-7 minutes until browned and tender.
  5. Reduce the heat to low, stir in 2 minced garlic cloves, 1 teaspoon of Italian seasoning, and a pinch of red pepper flakes. Cook for an additional minute until garlic becomes fragrant.
  6. Taste the mixture and season with kosher salt and freshly ground black pepper according to preference. Stir everything together and let it sit for 30 seconds to meld the flavors.
  7. Transfer the sautéed zucchini to a serving dish and enjoy promptly.

Nutrition

Serving: 1servingCalories: 120kcalCarbohydrates: 8gProtein: 3gFat: 9gSaturated Fat: 4gPolyunsaturated Fat: 1gMonounsaturated Fat: 4gCholesterol: 15mgSodium: 200mgPotassium: 450mgFiber: 2gSugar: 3gVitamin A: 50IUVitamin C: 15mgCalcium: 40mgIron: 1mg

Notes

Use any leftover sautéed zucchini in omelets, soups, or pasta dishes for a quick flavor boost. Store leftovers in an airtight container in the refrigerator for up to 3 days.

Tried this recipe?

Let us know how it was!

Irresistibly Soft Best Banana Bread Cookies You’ll Love

February 2, 2026 by Grace Snow Leave a Comment

Imagine standing in your kitchen, the warm scent of cinnamon and ripe bananas wafting through the air as you bake a batch of cookies that everyone will rave about—these Simple Paleo Banana Bread Cookies are exactly that kind of magic. Perfect for those overripe bananas sitting on your counter, this gluten-free, vegan treat not only offers a soft and moist texture that closely resembles classic banana bread but is also incredibly easy to whip up on busy days. Whether you're looking for a healthy snack or a delightful breakfast on the go, these cookies are a versatile addition to your repertoire. So, why not gather a few simple ingredients and create a wholesome bite that’s bound to impress? Curious about how these come together? Keep scrolling to find out!

Why Are These Cookies a Must-Try?

Simplicity: With just a few basic ingredients, these cookies come together in no time, requiring minimal effort from your busy schedule.

Versatility: Customize them to your taste! Add chocolate chips, walnuts, or even a swirl of nut butter to make them uniquely yours.

Moist & Flavorful: The overripe bananas create a naturally sweet base, while the cinnamon adds delightful warmth—each bite bursts with flavor.

Diet-Friendly: Gluten-free, vegan, and paleo-friendly, these cookies cater to various dietary needs without sacrificing taste. Perfect for everyone at home!

Crowd-Pleaser: These cookies are sure to be a hit with the whole family, making them perfect for gatherings or as a wholesome snack that even kids will love. Why not pair them with some of your favorite recipes, like Breakfast Banana Split for a delightful brunch experience?

Best Banana Bread Cookies Ingredients

• Wondering what makes these cookies so special? Let's dive into the ingredients that create this delightful treat!

For the Cookie Base

  • Almond Flour – This gluten-free flour gives structure and a nutty flavor, making it the perfect base for these cookies.
  • Baking Soda – Essential for achieving that soft, risen texture reminiscent of classic banana bread.
  • Sea Salt – Balances the sweetness from the bananas and enhances the overall flavors.
  • Cinnamon – A warm spice that adds depth, making each bite feel like a cozy hug.

For Sweetness and Moisture

  • Pure Maple Syrup – A natural sweetener that beautifully complements the bananas; honey can be used as a substitute if you prefer.
  • Mashed Bananas (overripe) – The star of the show! Overripe bananas provide natural sweetness and moisture, about 4 medium ones for 1 1/4 cups when mashed.

Optional Add-ins

  • Egg or Flax Egg – Adds fluffiness; a flax egg is perfect for a vegan version!
  • Chocolate Chips – A delightful addition if you're craving a bit of decadent sweetness.
  • Nut Butter – Choose your favorite (almond, peanut, etc.) for added creaminess and rich flavor.
  • Chopped Nuts – Adds a satisfying crunch and a boost of nutrition.
  • Optionally, add some vanilla extract or a pinch of ground cloves for an extra flavor twist!

With these ingredients, you'll be on your way to baking the best banana bread cookies that everyone will rave about! Enjoy whipping up this healthy homemade treat!

Step‑by‑Step Instructions for Best Banana Bread Cookies

Step 1: Preheat the Oven
Begin by preheating your oven to 350°F (175°C). While waiting for the oven to heat, line a baking sheet with parchment paper, creating a non-stick surface for your cookies. This preparation ensures your Best Banana Bread Cookies will cook evenly and come off the tray easily once baked.

Step 2: Mix Dry Ingredients
In a large mixing bowl, combine 2 cups of almond flour, 1 teaspoon of baking soda, a pinch of sea salt, and 1 teaspoon of cinnamon. Use a whisk to blend these dry ingredients thoroughly, ensuring there are no clumps. This step is crucial as it helps incorporate the leavening agent evenly, contributing to the soft texture of the cookies.

Step 3: Prepare the Bananas
Take your overripe bananas (approximately 4 medium ones) and mash them in a separate bowl until smooth. Aim for a consistently creamy texture, as this will be the star ingredient in your Best Banana Bread Cookies. Once mashed, gently fold the bananas into the dry mixture, ensuring they are evenly distributed.

Step 4: Combine Wet Ingredients
Adding to your banana mixture, stir in 1/4 cup of pure maple syrup and an egg or a flax egg for a vegan option. Mix thoroughly until the batter is well-combined and cohesive. The wet ingredients enhance flavor and moisture, making the cookies delectably soft and rich.

Step 5: Scoop the Dough
Using a 1.5 tablespoon cookie scoop, portion out the dough and drop it onto the prepared baking sheet. Leave about 2 inches of space between each cookie to allow for slight spreading during baking. You want your cookies to maintain their shape, so don't worry too much about perfect rounds.

Step 6: Flatten the Cookies
Gently flatten each cookie mound using the back of a fork or spoon. This helps create a more consistent texture in the final product. It also allows the cookies to bake evenly, giving them that appealing, slightly crisp exterior while keeping the inside moist—just like your favorite banana bread.

Step 7: Bake the Cookies
Place the baking sheet in the oven and bake for 26–30 minutes, or until the centers are set and the edges are lightly golden. Keep an eye on them during the last few minutes; if you’re baking at the 28-minute mark, they’ll achieve the perfect texture for the Best Banana Bread Cookies.

Step 8: Cool and Store
After baking, remove the cookies from the oven and allow them to cool on the baking sheet for about 10 minutes. Once slightly cooled, transfer them to a wire rack to cool completely. Store any leftover cookies in an airtight container in the fridge, where they’ll remain fresh for up to 5 days, perfect for snacking!

Best Banana Bread Cookies Variations

Feel free to get creative with these cookies; each twist can enhance the flavor or cater to your dietary needs!

  • Nut-Free: Substitute almond flour with sunflower seed flour or oat flour for a delicious nut-free alternative. Each swap protects those with nut allergies while keeping the flavor intact.

  • Sweetness Variation: Swap pure maple syrup for agave syrup for a different sweetening option. The change adds a mild sweetness while maintaining that delightful moisture.

  • Spicy Kick: Add a pinch of cayenne pepper for a surprising heat that contrasts beautifully with the sweetness of bananas. A little heat can elevate the flavor profile and add an adventurous twist.

  • Chocolate Lover's Dream: Fold in some dark chocolate chips to the cookie dough for a decadent treat. Each bite combines rich chocolate with the warm banana flavor, creating a dessert that's truly irresistible.

  • Fruity Twist: Incorporate dried fruits like raisins or chopped dates to add natural sweetness and chewy texture. These fruity surprises can make each cookie a unique experience!

  • Coconut Flair: Mix in unsweetened shredded coconut for a tropical touch. The coconut adds both texture and flavor, reminiscent of a sunny beach day.

  • Extra Protein: Stir in a couple of tablespoons of your favorite protein powder to make these cookies a more satisfying snack. You’ll enjoy a tasty treat that's also great for fueling your day.

  • Gourmet Touch: Drizzle the finished cookies with melted dark chocolate for a beautiful presentation and an indulgent finish. This extra step transforms your homemade cookies into a gourmet treat.

Don't forget to check out some delightful pairings with your cookies, like Eggnog Cookies Soft or enjoy a cozy brunch with the Breakfast Banana Split. Happy baking!

How to Store and Freeze Best Banana Bread Cookies

Fridge: Store your cookies in an airtight container for up to 5 days. This will keep them fresh, moist, and ready for snacking anytime.

Freezer: For longer storage, freeze the cookies in a single layer on a baking sheet first, then transfer to a freezer-safe bag. They’ll last for up to 3 months and can be enjoyed right from the freezer or thawed in the fridge.

Reheating: To enjoy warm cookies, reheat them in the oven at 350°F for about 5-7 minutes, or pop them in the microwave for 10-15 seconds. This will revive their soft texture and delightful flavor.

Batch Baking: Consider making a double batch of these cookies, storing half in the freezer for quick homemade treats whenever the craving strikes!

Make Ahead Options

These Simple Paleo Banana Bread Cookies are a fantastic option for meal prep, making busy weeknights a breeze! You can mash the overripe bananas and combine the dry ingredients up to 24 hours in advance, ensuring that you have one less thing to do when you're ready to bake. Store them in an airtight container in the refrigerator to maintain their freshness. When you're ready to enjoy the cookies, simply mix in the wet ingredients, scoop the dough onto a baking sheet, and bake as directed. You can also freeze prepared dough balls for up to 3 months—just thaw overnight in the refrigerator before baking. This way, you'll have a delicious homemade treat at your fingertips, perfect for snacking or breakfast!

What to Serve with Simple Paleo Banana Bread Cookies

Imagine enjoying these delightful cookies fresh out of the oven, paired with warm, comforting companions that elevate your snacking experience to new heights.

  • Creamy Coconut Yogurt: Rich and velvety, coconut yogurt adds a refreshing creaminess that balances the sweetness of the cookies.
  • Fruity Smoothie Bowl: A vibrant blend of your favorite fruits creates a colorful, nutrient-packed bowl that complements the flavors perfectly. Top it with some granola for crunch!
  • Chopped Nut Topping: Sprinkle chopped walnuts or pecans on top for an added crunch and a nutty flavor that harmonizes beautifully with banana.
  • Cinnamon-Spiced Coffee: Pair your cookies with a warm cup of coffee infused with a hint of cinnamon. The spices echo the cinnamon in the cookies, enhancing every bite.
  • Banana-Peanut Butter Toast: Enjoy a slice of whole-grain toast smeared with peanut butter and topped with sliced bananas for a satisfying breakfast or snack. It’s a delicious extension of the cookie comfort!
  • Herbal Iced Tea: A refreshing herbal iced tea can cleanse your palate and provide a cooling contrast, making it a lovely beverage choice for warm afternoons.
  • Fresh Berries: Serve alongside fresh berries for a pop of tartness and color, creating a delightful textural contrast that makes each bite exciting.
  • Chocolate Drizzle: Drizzling melted dark chocolate over the cookies takes your treat to an indulgent level, satisfying any sweet craving without being overly rich.
  • Nutty Granola Bars: Pair with homemade granola bars for a wholesome snack experience that keeps you fueled throughout the day.

Expert Tips for the Best Banana Bread Cookies

  • Choose Ripe Bananas: Ensure that your bananas are overly ripe—think brown and spotty. This will maximize the natural sweetness in your cookies.

  • Don't Overmix: Once you combine the wet and dry ingredients, mix just until incorporated. Overmixing can result in denser cookies that lose their light texture.

  • Keep Baking Times in Check: Baking times can vary by oven; start checking your cookies at 26 minutes to avoid overbaking the best banana bread cookies.

  • Experiment with Flavors: Don't hesitate to add your favorite spices or mix-ins, like chocolate chips or nuts, for extra flavor and crunch.

  • Storage Matters: After cooling, store your cookies in an airtight container in the fridge. This keeps them fresh and delicious for up to five days!

  • Pre-Baking Prep: Use parchment paper on your baking sheet to ensure the cookies lift off easily without sticking, making cleanup a breeze!

Best Banana Bread Cookies Recipe FAQs

How do you select ripe bananas for this recipe?
Absolutely! Overripe bananas are key to achieving the best flavor and moisture in your cookies. Look for bananas that are brown with dark spots all over; these indicate maximum sweetness. If your bananas are still yellow, you might want to let them sit for a few more days until they become nicely speckled.

How should I store leftover cookies?
Very simple! Store your cookies in an airtight container in the fridge for up to 5 days. This will keep them fresh and moist, ready for your snacking pleasure. If you find you won't finish them within that timeframe, freezing is a great option!

Can I freeze these cookies for later?
Definitely! These cookies freeze beautifully. After baking, allow them to cool completely, then place them in a single layer on a baking sheet. Freeze for about 1-2 hours, then transfer them to a freezer-safe bag or container. They can keep in the freezer for up to 3 months. You can thaw them in the fridge overnight or enjoy them straight from the freezer for a cool treat!

What if my cookies are too dry or crumbly?
If your cookies end up dry, it’s usually due to overbaking or not enough moisture from the bananas. Make sure to mash your bananas until smooth and use bananas that are really ripe. Also, check your baking time; ovens vary, and it’s best to pull the cookies at around 28 minutes. If you find your cookies are still crumbly, consider adding a teaspoon of nut butter next time for extra moisture.

Are these cookies safe for my pets?
It's always best to be cautious with human food and pets. These cookies contain ingredients like almond flour and cinnamon which aren’t toxic to dogs, but the sugar content may be unhealthy for them. Always keep treats that contain sweeteners like maple syrup away from your furry friends.

Can I replace almond flour with another flour?
Yes, but with caution! Almond flour works great for this gluten-free recipe, but if you need a nut-free option, you could use sunflower seed flour or oat flour. However, do note that these flours behave differently; you may need to adjust the liquid ingredients slightly.

Best Banana Bread Cookies

Irresistibly Soft Best Banana Bread Cookies You’ll Love

Delight in the best banana bread cookies, soft and sweet—perfect for snacking or breakfast! Ideal for using up ripe bananas.
Print Recipe Pin Recipe
Prep Time 10 minutes mins
Cook Time 30 minutes mins
Cooling Time 10 minutes mins
Total Time 50 minutes mins
Servings: 12 cookies
Course: Dessert
Cuisine: American
Calories: 120
Ingredients Equipment Method Nutrition Notes

Ingredients
  

For the Cookie Base
  • 2 cups Almond Flour Gluten-free flour providing structure.
  • 1 teaspoon Baking Soda Essential for soft texture.
  • 1 pinch Sea Salt Balances sweetness.
  • 1 teaspoon Cinnamon Adds warmth and flavor.
For Sweetness and Moisture
  • 1/4 cup Pure Maple Syrup Natural sweetener.
  • 4 medium Mashed Bananas (overripe) Provides natural sweetness and moisture.
Optional Add-ins
  • 1 each Egg or Flax Egg Flax egg for vegan option.
  • 1 cup Chocolate Chips For added sweetness.
  • Nut Butter Optional for creaminess.
  • Chopped Nuts For crunch and nutrition.
  • Vanilla Extract Optional for flavor.
  • Ground Cloves Optional for extra flavor.

Equipment

  • Oven
  • Mixing Bowl
  • Baking Sheet
  • Whisk
  • Cookie Scoop

Method
 

Step-by-Step Instructions
  1. Preheat your oven to 350°F (175°C) and line a baking sheet with parchment paper.
  2. In a large bowl, mix almond flour, baking soda, sea salt, and cinnamon.
  3. Mash overripe bananas in a separate bowl until smooth, then fold into dry mixture.
  4. Stir in maple syrup and egg/flax egg until well combined.
  5. Scoop dough onto the baking sheet, spacing cookies about 2 inches apart.
  6. Flatten each cookie mound gently for even baking.
  7. Bake for 26–30 minutes until centers are set and edges are golden.
  8. Cool on the baking sheet for 10 minutes, then transfer to a wire rack.

Nutrition

Serving: 1cookieCalories: 120kcalCarbohydrates: 15gProtein: 2gFat: 5gSaturated Fat: 0.5gSodium: 100mgPotassium: 150mgFiber: 2gSugar: 5gVitamin C: 1mgCalcium: 2mgIron: 4mg

Notes

Store cookies in an airtight container; they stay fresh for up to 5 days in the fridge. Freeze for longer storage.

Tried this recipe?

Let us know how it was!

Crispy Healthy Zucchini Fritters Side Dish for Any Meal

February 2, 2026 by Grace Snow Leave a Comment

As I stood in my kitchen, the vibrant green of fresh zucchini caught my eye, reminding me that the best meals often come together in the simplest ways. These Healthy Zucchini Fritters make for the perfect side dish that is not only gluten-free and packed with protein but also incredibly versatile. Whether you’re aiming for a quick snack or something to elevate your brunch table, these fritters deliver on every front while fitting seamlessly into your clean eating goals. With a crispy exterior and tender inside, they’re a delight for both the eyes and the palate. Plus, they’re a breeze to prepare! Let’s dive into how to whip up these scrumptious fritters—what toppings will you choose to bring your own twist to this delicious dish?

Why are Zucchini Fritters a Must-Try?

Crispy Texture: These Healthy Zucchini Fritters boast a perfectly golden exterior that gives way to a tender center, making each bite incredibly satisfying.

Versatile Base: Enjoy them as a side dish, in a brunch spread, or even as a quick snack. They pair wonderfully with Greek yogurt or tzatziki for a flavorful dip.

Diet-Friendly: Gluten-free and low carb, these fritters cater to clean eating enthusiasts without compromising taste, ensuring everyone can enjoy a delicious meal.

Easy Customization: Feel free to play with different herbs or add proteins like shredded chicken for extra heft—each variation offers a new experience!

Quick Preparation: Ready in under 30 minutes, these fritters make whipping up a nutritious meal effortless, perfect for weeknight dinners or surprise guests.

Healthy Zucchini Fritters Ingredients

These delightful fritters come together with simple ingredients that you probably already have at home.

For the Fritters
• Zucchini – Provides moisture and nutrients; essential for the fritter base.
• Eggs – Binds everything together and adds protein; substitute with flaxseed meal mixed with water for a vegan option.
• Oat Flour – Keeps the fritters gluten-free while adding structure; almond flour can be used for a lower-carb choice.
• Parmesan Cheese (optional) – Brings richness and a crispy texture; can be omitted for a dairy-free version.
• Greek Yogurt or Cottage Cheese – Adds creaminess and extra protein; switch to plant-based yogurt for a dairy-free option.
• Garlic – Elevates the flavor profile; adjust per your taste preference.
• Sea Salt & Black Pepper – Essential for seasoning, add according to taste.
• Dried Oregano or Thyme – Provides herbal notes; fresh herbs can enhance flavor further.
• Fresh Parsley or Dill – Brightens and freshens the fritters; swap with basil or mint if desired.
• Olive Oil – For frying, achieves that beautiful golden exterior; use olive oil spray for a lighter option.

Enjoy crafting these Healthy Zucchini Fritters as a side dish that’s both nourishing and delicious!

Step‑by‑Step Instructions for Healthy Zucchini Fritters Side Dish

Step 1: Prep Zucchini
Begin by washing two medium-sized zucchinis thoroughly under cool water. Using a box grater, grate the zucchini into a large mixing bowl. After grating, take a clean kitchen towel and squeeze out as much moisture from the zucchini as possible—this will ensure your Healthy Zucchini Fritters turn out crispy.

Step 2: Combine Ingredients
In the same bowl with the grated zucchini, crack two eggs and add 1/2 cup of oat flour, 1/4 cup of grated Parmesan (if using), 1/2 cup of Greek yogurt, 2 minced garlic cloves, and a sprinkle of dried oregano or thyme. Season with sea salt and black pepper to taste. Mix everything until a thick batter forms, ensuring all ingredients are well incorporated.

Step 3: Heat Skillet
Place a non-stick skillet over medium heat and add about 2 tablespoons of olive oil, swirling it around to coat the surface evenly. Allow the oil to heat for a minute or two until it shimmers slightly. This will create the perfect environment for your Healthy Zucchini Fritters to fry and become beautifully golden.

Step 4: Shape Fritters
Using a spoon, scoop about 2 tablespoons of the batter and shape it into a patty with your hands. Carefully place the patty in the hot skillet, flattening it slightly with the back of the spatula to encourage even cooking. Repeat this process, ensuring the fritters don’t overcrowd the skillet for optimal browning.

Step 5: Cook Fritters
Cook each fritter for 3-4 minutes until the edges turn golden brown and crispy. Gently flip the fritters using a spatula and continue to cook for another 2-3 minutes on the other side. Keep an eye on the heat, adjusting if they brown too quickly, to achieve that perfect crispy texture that makes these Healthy Zucchini Fritters irresistible.

Step 6: Drain and Serve
Once cooked, transfer the fritters to a plate lined with paper towels to drain any excess oil. Serve your Healthy Zucchini Fritters warm, accompanied by a dollop of Greek yogurt or tzatziki, and perhaps a side salad for a delightful meal. Get creative with your toppings for a personalized touch!

What to Serve with Healthy Gluten-Free Zucchini Fritters

These delightful fritters are not just a snack; they create the perfect centerpiece for a wholesome meal bursting with flavor!

  • Crispy Salad: A fresh green salad with avocado and cherry tomatoes adds a crunchy contrast that highlights the fritters’ texture and flavor.
  • Tangy Tzatziki: Serve them with a cool dollop of tzatziki; the refreshing flavor balances the fritters' warmth beautifully.
  • Roasted Sweet Potatoes: Their natural sweetness complements the savory zucchini, providing a hearty side for a fulfilling dinner.
  • Quinoa Pilaf: Light and nutty, quinoa adds a protein-packed base that enhances the nutritional profile of your meal.
  • Garlic Yogurt Dip: A creamy garlic dip elevates your fritters to a whole new level of deliciousness while keeping the meal light.
  • Steamed Broccoli: The slight bitterness of broccoli contrasts perfectly with the richness of the fritters, creating a colorful and wholesome plate.
  • Sparkling Water with Lime: A refreshing, bubbly drink with a splash of lime ties together the meal, cleansing the palate between bites.
  • Fruit Salad: A colorful mix of berries offers a sweet finish that's refreshing and light after savory bites of zucchini fritters.
  • Chocolate Avocado Mousse: For dessert, consider a creamy chocolate mousse; it provides a silky sweet touch without the guilt.

Make Ahead Options

These Healthy Zucchini Fritters are perfect for meal prep enthusiasts looking to save time during busy weeknights! You can grate the zucchini and combine it with the dry ingredients (oat flour, seasoning, and herbs) up to 24 hours in advance. Store this mixture in an airtight container in the refrigerator to maintain freshness. When you're ready to cook, simply add the eggs and yogurt, mix, and fry as directed. For cooked fritters, let them cool completely before refrigerating them in a single layer for up to 4 days. Reheat in a skillet for a few minutes before serving to enjoy their crispy texture once again. Enjoy hassle-free meal planning without sacrificing flavor or quality!

Expert Tips for Healthy Zucchini Fritters

• Moisture is Key: Squeeze out as much liquid from the grated zucchini as possible to avoid soggy fritters. This ensures a crispy exterior.

• Don’t Overcrowd: Cook in batches to avoid steaming. Leave space between fritters in the skillet for even browning and optimal texture.

• Temperature Matters: Maintain a medium heat while cooking. If the skillet is too hot, the fritters might burn before cooking through, leading to an unappetizing result.

• Air Fryer Option: For a healthier twist, cook in an air fryer at 400°F (200°C) for 8-10 minutes. Flip halfway for an evenly crispy finish.

• Season Well: Taste your batter before frying. Adjust salt and spices to ensure your Healthy Zucchini Fritters are flavorful and delicious.

• Customize Your Fritters: Feel free to add proteins or spices that suit your taste. Experiment with herbs for unique flavors in this versatile side dish!

How to Store and Freeze Healthy Zucchini Fritters

Fridge: Store leftover Healthy Zucchini Fritters in an airtight container for up to 4 days. Reheat in a skillet over medium heat for a few minutes, or until warmed through.

Freezer: For longer storage, freeze cooked fritters in a single layer on a baking sheet. Once frozen solid, transfer them to a freezer bag, where they can last for up to 2 months.

Reheating: When ready to enjoy, reheat the frozen fritters directly from the freezer in the oven at 375°F (190°C) for about 15-20 minutes until heated and crispy.

Wrapping: For best results, wrap fritters individually in plastic wrap before freezing to prevent freezer burn and maintain their crispy texture.

Healthy Zucchini Fritters Variations

Feel free to let your creativity shine as you customize these delicious fritters for your taste buds!

  • Dairy-Free: Omit the Parmesan cheese and substitute Greek yogurt with plant-based yogurt for a creamy, guilt-free option.
  • Gluten-Free: Use almond flour instead of oat flour to keep these fritters gluten-free and lower in carbs.
  • Protein-Packed: Add shredded chicken or canned tuna for an extra boost of protein, creating a heartier snack that everyone will love.
  • Spicy Kick: Incorporate red pepper flakes or diced jalapeños to turn up the heat, transforming your fritters into a zesty treat.
  • Herb Variations: Experiment with fresh herbs like basil, mint, or cilantro to create varied flavor profiles; each herb adds its distinct charm.
  • Vegetable Medley: Mix in grated carrots or bell peppers for added color, flavor, and nutrients—this boosts both the nutrition and the crunch!
  • Sweet Option: Swap savory spices for cinnamon and add a touch of honey to create sweet fritters; serve with a drizzle of yogurt or syrup.
  • Topping Adventures: Play with different toppings, like avocado slices or even some savory Succotash Colorful Side, for added flavor and excitement on your plate.

With these delightful variations, your Healthy Zucchini Fritters will never get boring, making them a reliable go-to for every meal!

Healthy Zucchini Fritters Recipe FAQs

What type of zucchini should I use for the fritters?
I recommend using medium-sized zucchinis that feel firm and have a vibrant green color. Avoid ones with dark spots or wrinkles, as they may be overripe and contain excess moisture which can lead to soggy fritters.

How long can I store leftover zucchini fritters?
Store any leftover Healthy Zucchini Fritters in an airtight container in the refrigerator for up to 4 days. When you're ready to enjoy them again, simply reheat them in a skillet over medium heat, which helps regain their crispy texture.

Can I freeze zucchini fritters?
Absolutely! To freeze, arrange cooked fritters in a single layer on a baking sheet and freeze until solid. Transfer the frozen fritters to a freezer bag, where they can be stored for up to 2 months. When you’re ready to eat, bake them directly from frozen at 375°F (190°C) for about 15-20 minutes until heated through and crispy.

What if my fritters are too wet?
If your fritters turn out too wet while cooking, it may mean that there’s still excess moisture in the grated zucchini. To avoid this, it's crucial to squeeze out as much water as you can using a clean kitchen towel before mixing. Additionally, consider adding a tablespoon more of oat flour to help absorb any leftover moisture.

Are these fritters suitable for a gluten-free diet?
Yes, these Healthy Zucchini Fritters are gluten-free when made with oat flour. For alternative flours, you can use almond flour, which also keeps the dish low-carb. Just ensure that all other ingredients, including any added sauces, are also certified gluten-free to meet dietary needs.

How can I customize the flavor of my fritters?
There are so many ways to personalize your Healthy Zucchini Fritters! You can mix in some shredded cheese for a richer flavor, toss in some finely chopped bell peppers for extra crunch, or even add herbs like cilantro or basil to enhance the taste. The more the merrier—with each variation, you create a fresh experience!

Healthy Zucchini Fritters Side Dish

Crispy Healthy Zucchini Fritters Side Dish for Any Meal

These Healthy Zucchini Fritters make a delicious side dish that's gluten-free, versatile, and packed with protein—perfect for any meal.
Print Recipe Pin Recipe
Prep Time 15 minutes mins
Cook Time 15 minutes mins
Total Time 30 minutes mins
Servings: 4 fritters
Course: Snacks
Cuisine: Healthy
Calories: 100
Ingredients Equipment Method Nutrition Notes

Ingredients
  

Fritters
  • 2 medium Zucchini Grated and moisture squeezed out
  • 2 Eggs Can substitute with flaxseed meal mixed with water for vegan
  • 1/2 cup Oat Flour Can substitute almond flour for lower-carb option
  • 1/4 cup Parmesan Cheese Optional, can omit for dairy-free
  • 1/2 cup Greek Yogurt Can substitute plant-based yogurt for dairy-free
  • 2 Garlic Cloves Minced
  • Sea Salt & Black Pepper To taste
  • Dried Oregano or Thyme To taste, can use fresh herbs for extra flavor
  • Fresh Parsley or Dill To taste, can substitute with basil or mint
  • 2 tablespoons Olive Oil For frying, can use olive oil spray for lighter option

Equipment

  • non-stick skillet
  • Box grater
  • Mixing Bowl
  • Spatula
  • Kitchen Towel

Method
 

Preparation
  1. Wash two medium-sized zucchinis thoroughly under cool water. Grate the zucchini into a large mixing bowl.
  2. Squeeze out as much moisture from the zucchini as possible using a clean kitchen towel.
  3. In the same bowl, add two eggs, 1/2 cup oat flour, 1/4 cup grated Parmesan (if using), 1/2 cup Greek yogurt, 2 minced garlic cloves, and a sprinkle of dried oregano or thyme. Season with sea salt and black pepper to taste, mixing until thick batter forms.
  4. Heat a non-stick skillet over medium heat and add about 2 tablespoons of olive oil, allowing it to heat until it shimmers.
  5. Scoop about 2 tablespoons of the batter and shape it into a patty, placing it in the skillet and flattening slightly. Repeat, ensuring fritters aren’t overcrowded.
  6. Cook each fritter for 3-4 minutes until the edges are golden brown. Flip and cook for another 2-3 minutes.
  7. Transfer cooked fritters to a plate lined with paper towels to drain excess oil. Serve warm with Greek yogurt or tzatziki.

Nutrition

Serving: 1fritterCalories: 100kcalCarbohydrates: 10gProtein: 5gFat: 4gSaturated Fat: 1gPolyunsaturated Fat: 1gMonounsaturated Fat: 2gCholesterol: 50mgSodium: 200mgPotassium: 150mgFiber: 2gSugar: 1gVitamin A: 300IUVitamin C: 5mgCalcium: 80mgIron: 1mg

Notes

For best results, ensure to squeeze out moisture from grated zucchini, avoid overcrowding the skillet, and maintain medium heat while frying.

Tried this recipe?

Let us know how it was!

Delicious Shaved Zucchini Salad with Goat Cheese for Summer Bliss

February 2, 2026 by Grace Snow Leave a Comment

As I stood in my garden, the vibrant green of fresh zucchini caught my eye, making me feel inspired to whip up something light and refreshing. Enter the Shaved Zucchini Salad with Goat Cheese—a feast for both the eyes and the palate. This deliciously easy summer salad not only offers a delightful crunch but also stands out as a healthy side dish that can elevate any meal. With its zesty lemon boost and the creamy richness of goat cheese, it's a quick crowd-pleaser that's perfect for those hot days when you want something vibrant and satisfying. Ready to discover how to transform these simple ingredients into a dish that dazzles? Let’s dive in!

Why is this Zucchini Salad a Must-Try?

Refreshingly Unique: The combination of raw zucchini with zesty lemon creates an unparalleled refreshing experience that will tantalize your taste buds.

Quick Preparation: Ready in just 15 minutes, this salad is perfect for those busy days when you want to serve something delicious without spending hours in the kitchen.

Health-Conscious Choice: With nutrient-rich ingredients like goat cheese and pine nuts, you can enjoy a guilt-free indulgence that’s packed with flavor.

Versatile Pairing: This salad is not just a side; it can accompany grilled fish or chicken beautifully, making it a versatile staple for summer meals. For a heartier option, check out recipes like Chicken Salad with Apples or Avocado Egg Salad.

Visual Appeal: Those delicate zucchini ribbons topped with crunchy pine nuts and creamy cheese create a vibrant dish that’s sure to impress guests at your next summer gathering!

Shaved Zucchini Salad Ingredients

For the Salad
• Zucchini – Provides a fresh, crunchy base; younger zucchini offers better flavor, but yellow summer squash works as a great substitute.
• Lemon Zest – Adds bright acidity that enhances the flavors; use fresh lemons for the best taste.
• Lemon Juice – Contributes tanginess and helps marinate the zucchini nicely.
• Extra Virgin Olive Oil – Rich in healthy fats that balance the flavors; a quality oil makes a noticeable difference.
• Kosher Salt – Enhances all flavors; be sure to adjust it to your personal taste preference.
• Freshly Ground Pepper – Adds a touch of heat; opt for freshly ground for the most robust flavor.

For the Toppings
• Pine Nuts – Provide delightful crunch and nuttiness; walnuts or sunflower seeds can easily substitute if needed.
• Goat Cheese – Offers creaminess and depth; feta is a wonderful alternative if you prefer something bolder.
• Microgreens – Gives a fresh, earthy note; sprouts or mixed greens work well as substitutes.

Enjoy the vibrant flavors of this Shaved Zucchini Salad with Goat Cheese and explore various combinations that make it your own!

Step‑by‑Step Instructions for Shaved Zucchini Salad with Goat Cheese

Step 1: Shave the Zucchini
Using a vegetable peeler or mandolin, carefully shave the zucchini into thin ribbons, aiming for about ⅛ inch in thickness. Discard any seeds that may show up as you shave. You'll want around 4 cups of these delicate ribbons, which will provide a fresh, crunchy base for your Shaved Zucchini Salad with Goat Cheese.

Step 2: Marinate the Zucchini
In a mixing bowl, combine the freshly shaved zucchini with the lemon zest, lemon juice, extra virgin olive oil, kosher salt, and freshly ground pepper. Toss gently to ensure each ribbon is well-coated, then let this mixture marinate for about 10 minutes. This process allows the flavors to meld beautifully while the zucchini softens slightly.

Step 3: Plate the Salad
Once marinated, carefully arrange the zucchini ribbons on a serving plate, artfully twisting and layering the strands for visual appeal. The vibrant green from the zucchini will create a stunning display. This is a key moment for your Shaved Zucchini Salad, so take time to craft a beautiful presentation that will catch everyone's eye.

Step 4: Toast Pine Nuts
While plating the salad, heat a non-stick pan over medium heat. Add the pine nuts and toast them for around 5 minutes, stirring frequently, until they are golden brown and fragrant. Be attentive as they can burn quickly! This step adds a lovely crunch and nutty flavor that enhances the overall experience of your salad.

Step 5: Top the Salad
Sprinkle the toasted pine nuts generously over the marinated zucchini ribbons. Crumble the goat cheese atop, allowing its creamy texture to blend with the other ingredients. Finish off by adding microgreens or any desired substitute to create a fresh, earthy note. Your Shaved Zucchini Salad with Goat Cheese is now beautifully topped and ready to shine!

Storage Tips for Shaved Zucchini Salad with Goat Cheese

Fridge: Store in an airtight container; the salad can remain fresh for up to 3 days. To maintain the best texture, keep the pine nuts and microgreens separate until serving.

Freezer: It's not recommended to freeze this salad as the zucchini loses its desirable crunch and texture when thawed. Enjoy fresh!

Reheating: If you have leftover marinated zucchini (without toppings), feel free to toss it in a warm pasta dish or grain bowl for a delicious next-day meal.

Make Ahead Options

Prepping this Shaved Zucchini Salad with Goat Cheese in advance is a game-changer for busy weeknights! You can shave the zucchini and marinate it with lemon zest, lemon juice, olive oil, salt, and pepper up to 24 hours ahead of time. To keep the zucchini fresh and avoid excess moisture, place it in an airtight container and refrigerate. Toast the pine nuts just before serving to retain their crunch and flavor. Additionally, crumble the goat cheese right before plating to ensure it maintains its creamy texture. This way, when you're ready to serve, all you need to do is assemble the ingredients, making dinner stress-free and just as delicious!

What to Serve with Refreshing Shaved Zucchini Salad with Goat Cheese

This delightful salad is the perfect starting point for a bright and satisfying summer meal.

  • Grilled Chicken Breast: Juicy and tender, the savory flavors of grilled chicken pair beautifully with the tangy zucchini salad, making for a balanced dish.
    Serving this salad next to grilled chicken not only enhances the meal but also introduces a satisfying protein component.

  • Quinoa Pilaf: Light and fluffy, quinoa adds a healthy grain option that complements the fresh flavors in the salad.
    This dish creates a well-rounded plate, integrating textures that are sure to please everyone at the table.

  • Tomato Bruschetta: The sweet acidity of ripe tomatoes on crusty bread pairs perfectly with the salad's creamy goat cheese and makes for a satisfying appetizer.
    The burst of flavors from this classic dish brings a touch of Italy to your meal, enhancing the summer vibe.

  • Roasted Asparagus: Tender and slightly charred, roasted asparagus adds a lovely earthy note that contrasts nicely with the lightness of the salad.
    The addition of roasted vegetables not only boosts the nutritional profile but also brings a wonderful variety of flavors to the table.

  • Lemonade or Iced Tea: A refreshing glass of homemade lemonade or iced tea can bring that extra touch of summer to your dining experience.
    These drinks enhance the zesty finish of the salad while keeping you cool and hydrated on hot days.

  • Fresh Berry Tart: A sweet, fruity dessert like a berry tart rounds off the meal beautifully, offering a contrast to the savory and creamy elements of the salad.
    The vibrant colors of this dessert mirror the salad, creating an enticing visual feast that's hard to resist.

Expert Tips for Shaved Zucchini Salad

• Choose Fresh Zucchini: Always select small, firm zucchinis for better flavor. Younger zucchinis have a sweeter taste, perfect for your Shaved Zucchini Salad with Goat Cheese.

• Mind the Marination: Avoid over-mixing during marination; this helps keep the ribbons intact while enhancing flavor without turning mushy.

• Quality Olive Oil Matters: Opt for high-quality extra virgin olive oil as it enhances the salad’s overall taste profile significantly.

• Layer Creatively: For an impressive presentation, twist and layer the zucchini ribbons artfully on your plate, showcasing the lovely colors and textures.

• Separate Ingredients for Storing: To maintain the integrity and crunch of the salad, store components separately—particularly the pine nuts and microgreens—until serving.

Variations & Substitutions for Shaved Zucchini Salad

Feel free to explore these exciting twists and substitutions to make the Shaved Zucchini Salad with Goat Cheese uniquely yours!

  • Dairy-Free: Swap goat cheese for a vegan cheese or cashew cream to maintain creaminess without dairy.

  • Zesty Kick: Add red pepper flakes for a touch of heat that will elevate the salad's flavor profile. Just a pinch can transform your dish into a spicy delight!

  • Herb Infusion: Incorporate fresh herbs like basil, dill, or mint. This adds a burst of freshness that pairs beautifully with the zucchini and lemon.

  • Nutty Alternatives: If you’re nut-sensitive, replace pine nuts with seeds like pumpkin or sunflower seeds for that satisfying crunch while keeping it allergy-friendly.

  • Extra Veggies: Toss in additional vegetables like bell peppers or grated carrots for a pop of color and added nutrition. They contribute a lovely sweetness that complements the zesty elements.

  • Protein Boost: For a more filling option, add grilled chicken or shrimp on top. This turns your salad into a complete meal, perfect for a light lunch or dinner.

  • Dress It Up: Consider a splash of balsamic vinegar or a drizzle of tahini for added depth and creaminess. This flavor enhancement engages all the senses.

  • Flavorful Switch: Replace lemon juice with lime juice for a slight twist in flavor. It brings a different tang that’s just as refreshing!

These variations not only keep the thrill alive in your kitchen but also allow you to cater to different dietary needs and preferences! Whether you're pairing this salad with grilled fish or savoring it standalone, the options are as abundant as the summer days!

Shaved Zucchini Salad with Goat Cheese Recipe FAQs

How do I choose the best zucchini for this salad?
Absolutely! Look for small, firm zucchinis with a vibrant green color. Younger zucchinis tend to be sweeter and have a better flavor profile, perfect for your Shaved Zucchini Salad with Goat Cheese. Avoid zucchinis with dark spots all over, as they can indicate overripeness.

How should I store leftovers of the Shaved Zucchini Salad?
You can store your salad in an airtight container in the refrigerator for up to 3 days. To keep the textures intact, it's best to keep the pine nuts and microgreens separate until you’re ready to serve. This will ensure that everything stays fresh and crunchy!

Can I freeze this salad?
I recommend not freezing this salad since zucchini loses its delightful crunch and texture once thawed. Instead, enjoy the vibrant flavors fresh! If you have extra marinated zucchini, consider tossing it in a warm pasta dish or grain bowl for a delicious next-day meal.

What can I do if my salad turns mushy?
No worries! If your salad becomes mushy, it’s likely due to extended marination or excess mixing. For a quick fix, you can strain the excess liquid and gently toss the salad again. You might also consider tossing in some additional fresh ingredients like microgreens or crunchy nuts to revive that delightful texture.

Is there a way to adapt this salad for different dietary needs?
Very much so! If you're accommodating allergies, you can easily swap out goat cheese for lactose-free options or skip cheese altogether for vegan preferences. Additionally, if someone has a nut allergy, walnuts or sunflower seeds can replace pine nuts, ensuring everyone can enjoy this refreshing dish!

Shaved Zucchini Salad with Goat Cheese

Delicious Shaved Zucchini Salad with Goat Cheese for Summer Bliss

Enjoy a light and refreshing Shaved Zucchini Salad with Goat Cheese, perfect for summer meals.
Print Recipe Pin Recipe
Prep Time 15 minutes mins
Cook Time 5 minutes mins
Total Time 20 minutes mins
Servings: 4 servings
Course: Salads
Cuisine: Mediterranean
Calories: 200
Ingredients Equipment Method Nutrition Notes

Ingredients
  

For the Salad
  • 4 cups Zucchini Shaved into ribbons
  • 1 tablespoon Lemon Zest Use fresh lemons
  • 2 tablespoons Lemon Juice Freshly squeezed
  • 3 tablespoons Extra Virgin Olive Oil Quality oil preferred
  • 1 teaspoon Kosher Salt Adjust to taste
  • 1 teaspoon Freshly Ground Pepper For best flavor
For the Toppings
  • 1/4 cup Pine Nuts Can substitute with walnuts or sunflower seeds
  • 4 ounces Goat Cheese Can substitute with feta
  • 1 cup Microgreens Can substitute with sprouts or mixed greens

Equipment

  • Vegetable Peeler
  • Mixing Bowl
  • Non-Stick Pan

Method
 

Step-by-Step Instructions
  1. Using a vegetable peeler or mandolin, carefully shave the zucchini into thin ribbons, aiming for about ⅛ inch in thickness. Discard any seeds that may show up as you shave.
  2. In a mixing bowl, combine the freshly shaved zucchini with the lemon zest, lemon juice, extra virgin olive oil, kosher salt, and freshly ground pepper. Toss gently to ensure each ribbon is well-coated, then let this mixture marinate for about 10 minutes.
  3. Once marinated, carefully arrange the zucchini ribbons on a serving plate, twisting and layering the strands for visual appeal.
  4. Heat a non-stick pan over medium heat. Add the pine nuts and toast them for around 5 minutes, stirring frequently, until they are golden brown and fragrant.
  5. Sprinkle the toasted pine nuts generously over the marinated zucchini ribbons. Crumble the goat cheese atop and finish with microgreens.

Nutrition

Serving: 1servingCalories: 200kcalCarbohydrates: 9gProtein: 6gFat: 18gSaturated Fat: 5gPolyunsaturated Fat: 2gMonounsaturated Fat: 10gCholesterol: 15mgSodium: 400mgPotassium: 400mgFiber: 2gSugar: 3gVitamin A: 500IUVitamin C: 25mgCalcium: 100mgIron: 1mg

Notes

Store components separately to maintain freshness, particularly the pine nuts and microgreens.

Tried this recipe?

Let us know how it was!

Delicious Zucchini and Bacon Slice for Perfect Quick Meals

February 2, 2026 by Grace Snow Leave a Comment

The aroma of sizzling bacon wafted through my kitchen, instantly lifting my spirits. There's something undeniably comforting about a dish that can wear so many hats, and my Zucchini and Bacon Slice is just that! This versatile recipe is perfect for those busy weeknights when you crave something hearty yet healthy. It’s not only quick to whip up but also a fantastic meal prep companion—enjoy it warm for breakfast, chilled for lunch, or heated for dinner. With simple, wholesome ingredients, you can easily adapt it based on what's lurking in your fridge. Curious to discover how to create this flavorful slice that might just become your new favorite? Let's dive in!

Why is Zucchini and Bacon Slice a Must-Try?

Versatile Delight: This dish effortlessly transitions from breakfast to dinner, making it a great option for any time of the day. Quick and Easy: Perfect for busy weeknights, you can have it ready in under an hour. Wholesome Ingredients: Packed with nutrition, it's a fantastic way to sneak in veggies, especially when paired with other meals like my Chickpea Spinach Curry. Customizable: Swap out ingredients based on your preference—experiment with different veggies or proteins for a unique twist. Crowd-Pleaser: This slice will wow family and friends, making it a perfect dish for entertaining!

Zucchini and Bacon Slice Ingredients

Here’s what you’ll need to make this delicious Zucchini and Bacon Slice:

For the Base

  • Zucchini – Provides moisture and texture; use about 2 cups grated if zucchinis are particularly large.
  • Carrot – Adds sweetness and vibrant color; grate it to integrate easily into the mix.
  • Onion (Brown/Yellow) – Offers aromatic flavor to the base; can be substituted with shallots or omitted for a milder taste.
  • Red Capsicum/Bell Pepper – Adds sweetness and crunch; feel free to substitute with any pepper variant you have on hand.

For the Binders

  • Eggs – Act as the binder to hold the mixture together; for a vegan option, try using flax eggs.
  • Milk – Adds moisture to the slice; almond milk works great for a dairy-free choice.

For the Flavor

  • Bacon (Sliced) – Introduces savory, rich flavor; swap for diced ham or omit for a vegetarian version.
  • Grated Cheddar Cheese – Adds flavor and richness; consider using lower-fat cheese or omitting for fewer calories.
  • Olive Oil – Enhances the dish’s flavor; use extra for sautéing the vegetables.
  • Self-Raising Flour – Provides structure and lightness; all-purpose flour with added baking powder can be an alternative.
  • Salt and Pepper – Essential for enhancing flavor balance; season to taste.

Now that you have all your ingredients ready, let’s move on to whipping up this delightful dish!

Step‑by‑Step Instructions for Zucchini and Bacon Slice

Step 1: Preheat and Prepare
Begin by preheating your oven to 180°C (350°F). While the oven warms up, line a square baking dish (approximately 9x9 inches) with baking paper to prevent sticking. Make sure it’s well-adhered to the sides to catch all that delicious Zucchini and Bacon Slice goodness later on.

Step 2: Grate and Drain Vegetables
Grate the zucchini and carrot into a colander and sprinkle them generously with salt. Let them sit for about 10 minutes to drain excess moisture, which will help avoid a soggy slice. You’ll know they’re ready when a bit of water collects at the bottom of the colander.

Step 3: Sauté Onion and Bacon
In a frying pan, heat 1 tablespoon of olive oil over medium heat. Add the diced onion and bacon, cooking until they’re golden and the bacon is crisp, which will take about 5-7 minutes. Once cooked, remove from heat and allow your mixture to cool slightly before combining it with the rest of the ingredients.

Step 4: Combine Ingredients
Squeeze any remaining moisture from the drained zucchini and carrot, then transfer them to a large mixing bowl. Stir in the diced red capsicum, sautéed onion and bacon, 1 cup of grated cheese, and self-raising flour. Mix everything until combined, creating a colorful and aromatic base for your Zucchini and Bacon Slice.

Step 5: Mix in Binders
Add the whisked eggs, milk, and the remaining olive oil to the mixture. Sprinkle in some salt and pepper to taste, and use a spatula to mix thoroughly until everything is well incorporated. The mixture should be somewhat thick but well-combined, ready to be turned into a delightful slice.

Step 6: Bake the Slice
Pour the mixture into your prepared baking dish, smoothing the top with the back of a spoon or spatula. Sprinkle the reserved ¼ cup of grated cheese over the top for that extra cheesy finish. Place it in the preheated oven and bake for 35-40 minutes, until the edges are golden and the center is set—a delightful sight indicating your Zucchini and Bacon Slice is nearly ready.

Step 7: Cool and Serve
Once baked, remove the dish from the oven and allow it to cool for a few minutes. Carefully slice it into squares while still warm or let it cool completely for cleaner cuts. Whether served warm or cold, this Zucchini and Bacon Slice is perfect for any meal, making it a versatile dish you’ll love sharing!

Zucchini and Bacon Slice Variations

Feel free to play around with this delightful recipe, transforming it into a dish that speaks to your taste buds!

  • Dairy-Free: Substitute milk with almond or oat milk and use a non-dairy cheese option for a creamy, guilt-free slice.

  • Gluten-Free: Use gluten-free flour or nut flour to create a deliciously light and fluffy slice without the gluten.

  • Veggie Boost: Add grated carrots, spinach, or even finely chopped mushrooms for an extra punch of nutrition and color. Your slice will have a garden-fresh flavor that everyone will love!

  • Spicy Version: Mix in finely diced jalapeños or a sprinkle of red pepper flakes for a zesty kick. Adjust the heat level to suit your palate—perfect for spice lovers!

  • Herb Infusion: Toss in fresh or dried herbs like thyme, basil, or parsley to elevate the flavor profile. Herbs add a wonderful aroma and freshness that enhances each bite.

  • Switch Up the Protein: Swap bacon for diced ham or turkey sausage for a different protein twist. These savory alternatives keep the essence of the dish but offer new flavors.

  • Cheese Variation: Experiment with other cheeses like feta or goat cheese for a distinct tangy flavor. Mixing cheeses creates a rich and decadent slice that’s impossible to resist!

  • Meal Prep Friendly: Consider preparing a batch of baked Zucchini and Bacon Slice to freeze for fast meals later. For quick lunches, serve slices with a side of fresh salad or your favorite dipping sauce—a versatile meal that suits any occasion!

This dish can adapt to all your culinary whims, and don’t forget to try it variations like my tasty Cheesy Zucchini Bake or spicy Chipotle Lime Chicken alongside!

Make Ahead Options

These Zucchini and Bacon Slice are perfect for busy home cooks wanting to save time during hectic weekdays! You can grate the zucchini and carrot and let them drain in the colander up to 24 hours in advance, ensuring a firmer slice by removing excess moisture. Additionally, sauté the onions and bacon a day ahead, allowing their flavors to deepen. When you're ready to bake, simply combine the prepped ingredients with the rest, pour into a prepared baking dish, and bake according to the original recipe. This way, you’ll enjoy a fantastic dish that’s just as delicious, all ready in a snap!

Storage Tips for Zucchini and Bacon Slice

  • Fridge: Store slices in an airtight container for up to 5 days. Keeping them sealed will maintain their moisture and flavor, allowing you to enjoy the Zucchini and Bacon Slice at your convenience.

  • Freezer: For longer storage, freeze individual slices wrapped tightly in plastic wrap and then inside a freezer bag for up to 3 months. This will make it easy to pull out just what you need later on.

  • Reheating: When ready to enjoy, reheat slices in the microwave for 1-2 minutes or in a preheated oven at 180°C (350°F) for about 10-15 minutes, until warmed through. This ensures you retain that delightful texture and taste.

  • Serving Suggestions: Enjoy slices warm for breakfast, chilled for lunch, or heated for dinner. Add a dollop of sour cream or tomato relish for an extra burst of flavor!

What to Serve with Zucchini and Bacon Slice?

The perfect accompaniment can elevate your Zucchini and Bacon Slice from a simple dish to an extraordinary meal experience that tantalizes your taste buds.

  • Fresh Garden Salad: A zesty mix of greens, cucumbers, and tomatoes, dressed lightly with vinaigrette, adds brightness and crunch—perfectly complementing the savory slice.

  • Greek Yogurt Dressing: A creamy, tangy yogurt drizzle enhances the rich flavors of the slice, offering a wonderful contrast that brings balance to your meal.

  • Steamed Broccoli: Tender, bright green broccoli provides a delightful textural contrast, while its mild flavor allows the slice to shine on your plate.

  • Roasted Sweet Potatoes: The natural sweetness and hearty texture of roasted sweet potatoes harmonizes beautifully with the savory notes of the Zucchini and Bacon Slice.

  • Quinoa Pilaf: A fluffy quinoa pilaf mixed with herbs and lemon zest adds nutty depth, making this pairing hearty yet light on the palate.

  • Chilled White Wine: A crisp, fruity white wine, like Sauvignon Blanc, enhances the flavors of the dish and adds a touch of indulgence to your meal.

  • Deviled Eggs: These classic bites with creamy filling echo the flavors of the slice, making for a nostalgic, delicious appetizer or side.

  • Fruit Salad: A refreshing blend of seasonal fruits brightens the meal, providing a sweet contrast that balances the savory richness of the slice.

  • Garlic Bread: Crunchy garlic bread is the perfect side to soak up any delicious bits left on your plate, creating a comforting and satisfying dining experience.

Expert Tips for Zucchini and Bacon Slice

  • Drain Well: Ensure zucchini and carrot are well-drained to prevent a soggy slice. A light squeeze after salting usually does the trick.

  • Custom Additions: Feel free to experiment with any leftover vegetables you have on hand. Mushrooms or spinach can add great nutrition and flavor.

  • Cooling Time: Allow the slice to cool completely before cutting for cleaner edges. Hot slices tend to crumble more easily.

  • Mixing Techniques: Don’t over-mix the batter; gently combine ingredients to keep the slice tender and light.

  • Taste Test: Always taste your mixture before baking—this allows you to adjust the seasonings as needed and enhances the final flavor of your Zucchini and Bacon Slice.

Zucchini and Bacon Slice Recipe FAQs

How do I select ripe zucchinis for this recipe?
Absolutely! When choosing zucchinis, look for ones that are firm and shiny, without any dark spots or blemishes. Ideally, they should be medium-sized—about 6 to 7 inches long—as larger zucchinis have tougher skin and larger seeds.

What’s the best way to store leftovers of the Zucchini and Bacon Slice?
Very! To store leftovers, place your Zucchini and Bacon Slice in an airtight container in the refrigerator where it will stay fresh for up to 5 days. Ensure it’s well-sealed to retain moisture and flavor, making it ready for quick meals.

Can I freeze the Zucchini and Bacon Slice?
Absolutely, you can! To freeze, slice the cooled dish into individual portions. Wrap each slice tightly in plastic wrap and then place them in a freezer bag to avoid freezer burn. They can be stored for up to 3 months. When ready to eat, you can reheat them in the microwave for 1-2 minutes or in a preheated oven at 180°C (350°F) for about 10-15 minutes until warmed through.

What if my Zucchini and Bacon Slice turns out soggy?
Very! If your slice is soggy, it may be due to excess moisture. Make sure to drain the grated zucchini and carrot well—after salting, let them sit in a colander for at least 10 minutes and gently squeeze out any extra moisture. Also, make sure not to overload the mixture with too much liquid from the milk or eggs.

Are there any dietary considerations I should keep in mind?
Absolutely! If you have dietary restrictions, you can easily adapt this recipe. For a vegetarian option, simply omit the bacon and replace it with diced mushrooms or extra veggies. You can also use flax eggs instead of regular eggs for a vegan version, and opt for almond milk or other plant-based milks to keep it dairy-free.

Can I use different vegetables in the Zucchini and Bacon Slice?
Very! The beauty of this recipe lies in its versatility. Feel free to substitute with other grated vegetables like carrots, sweet potatoes, or even spinach to cater to your taste and enhance the nutritional value. The more the merrier when it comes to experimenting with ingredients—enjoy the creativity!

Zucchini and Bacon Slice

Delicious Zucchini and Bacon Slice for Perfect Quick Meals

This Zucchini and Bacon Slice is perfect for quick meals, combining savory bacon with wholesome zucchini for a delicious dish.
Print Recipe Pin Recipe
Prep Time 10 minutes mins
Cook Time 40 minutes mins
Cooling Time 5 minutes mins
Total Time 55 minutes mins
Servings: 8 slices
Course: Breakfast
Cuisine: American
Calories: 250
Ingredients Equipment Method Nutrition Notes

Ingredients
  

For the Base
  • 2 cups Zucchini, grated Use if zucchinis are particularly large
  • 1 medium Carrot, grated
  • 1 medium Onion (Brown/Yellow), diced Can be replaced with shallots or omitted
  • 1 medium Red Capsicum/Bell Pepper, diced Any pepper variant can be used
For the Binders
  • 3 Eggs, whisked For a vegan option, use flax eggs
  • 1 cup Milk Almond milk works for a dairy-free choice
For the Flavor
  • 200 grams Bacon, sliced Diced ham can be used or omitted
  • 1 cup Grated Cheddar Cheese Lower-fat cheese can be used
  • 2 tablespoons Olive Oil Use extra for sautéing
  • 1 cup Self-Raising Flour All-purpose flour with baking powder can be an alternative
  • to taste Salt
  • to taste Pepper

Equipment

  • Oven
  • Colander
  • frying pan
  • Mixing Bowl
  • Baking Dish
  • Grater

Method
 

Preparation Steps
  1. Preheat your oven to 180°C (350°F) and line a square baking dish (approx. 9x9 inches) with baking paper.
  2. Grate the zucchini and carrot into a colander, sprinkle with salt, and let sit for 10 minutes to drain excess moisture.
  3. In a frying pan, heat 1 tablespoon of olive oil over medium heat and sauté diced onion and bacon until golden and crisp for 5-7 minutes.
  4. Squeeze any remaining moisture from the drained zucchini and carrot, combine with red capsicum, sautéed onion and bacon, grated cheese, and self-raising flour in a mixing bowl.
  5. Add whisked eggs, milk, and remaining olive oil to the mixture, then season with salt and pepper. Mix until well combined.
  6. Pour the mixture into the prepared baking dish, smooth the top, and sprinkle with reserved grated cheese before baking for 35-40 minutes until golden.
  7. Once baked, let cool for a few minutes before slicing into squares. Serve warm or chilled.

Nutrition

Serving: 1sliceCalories: 250kcalCarbohydrates: 18gProtein: 11gFat: 14gSaturated Fat: 5gPolyunsaturated Fat: 2gMonounsaturated Fat: 6gCholesterol: 70mgSodium: 300mgPotassium: 300mgFiber: 2gSugar: 2gVitamin A: 150IUVitamin C: 15mgCalcium: 200mgIron: 1.5mg

Notes

Ensure zucchini and carrot are well-drained to avoid a soggy slice. Allow the slice to cool completely before cutting for cleaner edges.

Tried this recipe?

Let us know how it was!

Moist Pineapple Banana Bread for a Tropical Breakfast Treat

February 2, 2026 by Grace Snow Leave a Comment

The aroma of fresh baking often wafts through my home, but the moment I combined ripe bananas with crushed pineapple and sweetened coconut, I knew I’d stumbled upon something truly special. This Moist Pineapple Banana Bread delivers a delightful tropical twist on the beloved classic, transforming it into a sunshine-infused treat. Not only does this simple recipe make excellent use of overripe bananas, but it’s also a fantastic pick for a quick breakfast or a sweet snack during the day. With its rich flavor and moist texture, each slice leaves you craving another bite! Who can resist the charm of homemade banana bread taken to new heights? Let’s dive into this joyful journey of flavors together—are you ready to tantalize your taste buds?

Why Is This Bread So Irresistible?

Moisture-packed goodness: This Moist Pineapple Banana Bread is incredibly moist, thanks to the combination of ripe bananas and crushed pineapple, ensuring every bite is a delicious experience.

Tropical flavor twist: The sweetened flaked coconut adds a lovely tropical charm, making it a standout among typical banana bread recipes.

Simple to make: With straightforward instructions and easy-to-find ingredients, you can whip up this delightful loaf in no time—perfect for both novice and seasoned bakers alike!

Perfect for sharing: Whether it’s a casual brunch or a cozy coffee break, this bread is sure to impress guests and loved ones. Pair it with some Cheesy Garlic Bread for a complete meal!

Ultimate comfort food: Who can resist the comforting aroma of banana bread baking? This recipe brings that familiar warmth to the table with a refreshing twist.

Versatile as you like: Make it your own by adding nuts or swapping flavors; feel free to experiment! For a wholesome breakfast option, try serving it warm with butter or as part of a delightful spread alongside a Cornbread Breakfast Casserole.

Moist Pineapple Banana Bread Ingredients

Transform your baking with these simple ingredients!

For the Bread

  • Butter – Adds moisture and richness; substitute with coconut oil for a dairy-free version.
  • Sugar – Sweetens the bread, enhancing flavor; you can reduce the amount for a less sweet loaf.
  • Eggs – Provides structure and helps with leavening; use flax eggs or applesauce for vegan options.
  • Mashed Ripe Banana – Key flavor element and moisture contributor; use overripe bananas for best flavor.
  • Crushed Pineapple – Adds a tropical flavor and moisture; must be well-drained to avoid excess liquid.
  • Sweetened Flaked Coconut – Provides texture and enhances tropical taste; use unsweetened coconut to reduce sugar content.
  • All-Purpose Flour – Provides structure to the bread; substitute with gluten-free flour for gluten-free options.
  • Baking Powder – Helps the bread rise.
  • Baking Soda – Works with acidic ingredients like pineapple.
  • Salt – Enhances flavor.
  • Pineapple Extract (optional) – Intensifies the pineapple flavor for a more tropical experience.

Get ready to indulge in a slice of Moist Pineapple Banana Bread that’s bursting with flavor!

Step‑by‑Step Instructions for Moist Pineapple Banana Bread

Step 1: Preheat the Oven and Prepare the Pan
Begin your delightful journey by preheating your oven to 350°F (175°C). While the oven warms up, take an 8x4 inch loaf pan and generously grease it with butter or cooking spray to ensure easy release after baking. This simple step sets the stage for your Moist Pineapple Banana Bread to come together smoothly.

Step 2: Cream Butter and Sugar
In a large mixing bowl, use a hand mixer or a wooden spoon to cream together the softened butter and sugar until the mixture is light and fluffy—about 3-4 minutes. This step is crucial as it incorporates air, lending a tender texture to the bread. The combination should be pale in color, signaling it’s ready for the next ingredient.

Step 3: Add Eggs and Fruits
Next, beat in the eggs one at a time, thoroughly mixing after each addition to achieve a homogenous batter. Then gently fold in the mashed overripe bananas, well-drained crushed pineapple, and sweetened flaked coconut. The vibrant colors and aromas will create a tropical blend for your bread, marking the essence of this Moist Pineapple Banana Bread.

Step 4: Combine Dry Ingredients
In a separate bowl, whisk together the all-purpose flour, baking powder, baking soda, and salt until evenly mixed. This ensures that your leavening agents are well distributed, promoting a good rise. Take a moment to enjoy the sense of anticipation as you prepare to combine the wet and dry elements of your recipe.

Step 5: Mix Wet and Dry Ingredients
Gradually add the dry mixture to the wet ingredients, stirring gently. Mix just until combined; be careful not to overmix, as this could affect the bread’s tenderness. The batter will have a thick, slightly lumpy consistency, which is perfect for achieving that moist texture in your Pineapple Banana Bread.

Step 6: Transfer to the Loaf Pan
Pour the luscious batter into the prepared loaf pan, using a spatula to smooth the top evenly. This step is essential for ensuring even baking and a beautiful dome shape. Place the pan in the preheated oven, where the magic begins as your Moist Pineapple Banana Bread bakes to perfection.

Step 7: Bake the Bread
Bake your bread for 65-70 minutes, or until the top is golden brown and a toothpick inserted into the center comes out clean. During this time, the delicious aroma will fill your kitchen, tempting everyone around. Keep an eye on it during the last few minutes, as ovens may vary, and you want the final loaf to be just right.

Step 8: Cool and Serve
Once baked, remove the pan from the oven and let it cool for about 10 minutes before transferring the loaf onto a wire rack. Allow it to cool completely to enhance the flavors and ease slicing. With every slice of your Moist Pineapple Banana Bread, enjoy the tropical sweetness that will brighten any meal or snack time!

What to Serve with Moist Pineapple Banana Bread

Indulging in a slice of this moist treat opens the door to many delightful meal pairings that elevate your experience!

  • Creamy Yogurt Parfait: Pairing this tropical banana bread with creamy yogurt and fresh fruits creates a refreshing, balanced breakfast option.

  • Fresh Fruit Salad: A colorful medley of seasonal fruits provides a light and vibrant contrast, adding to the tropical theme.

  • Coffee or Tea: Enjoying the bread alongside a steaming cup of coffee or herbal tea enhances its rich flavors, making each bite even more enjoyable.

  • Coconut Whipped Cream: Topping the bread with coconut-infused whipped cream adds an extra layer of decadence, perfect for a sweet afternoon treat.

  • Granola Crunch: Sprinkle some granola on top of your yogurt parfait or serve it alongside for a delightful crunch that complements the soft texture of the banana bread.

  • Honey Drizzle: A light drizzle of honey over a warm slice enhances the sweetness, making it irresistible for those with a sweet tooth.

  • Cinnamon Butter: Serve it warm with a dollop of cinnamon-infused butter for an extra layer of flavor that harmonizes beautifully with the tropical elements.

  • Caramel Sauce: Drizzling a warm caramel sauce over the bread transforms it into a decadent dessert, perfect for special occasions or simply indulging yourself.

  • Chai Latte: The spiced aromas of a chai latte create a cozy experience, harmonizing beautifully with the tropical hints in your moist pineapple banana bread.

Make Ahead Options

Preparing this Moist Pineapple Banana Bread in advance is a fantastic way to save time, especially on busy mornings! You can mix the wet ingredients, including the butter, sugar, eggs, mashed banana, crushed pineapple, and coconut, up to 24 hours ahead of time; simply refrigerate the mixture in an airtight container. Additionally, the dry ingredients can be combined and stored together for up to 3 days. When you're ready to bake, just add the dry mix to the refrigerated wet ingredients and stir until combined. This method helps maintain quality, ensuring every slice remains moist and delicious while offering you the ultimate time-saving advantage. Enjoy the delightful aroma of freshly baked Moist Pineapple Banana Bread with minimal effort!

How to Store and Freeze Moist Pineapple Banana Bread

Room Temperature: Store wrapped tightly in foil or plastic wrap for up to 3 days for optimal freshness.

Fridge: Keep it in an airtight container in the refrigerator for up to a week, which helps maintain its moisture.

Freezer: For longer storage, freeze slices in a single layer, then transfer to a zip-top bag; it can last for up to 3 months. Thaw before enjoying!

Reheating: To revive the moist pineapple banana bread, warm slices in the microwave for 10–15 seconds or toast lightly for an inviting treat.

Expert Tips for Moist Pineapple Banana Bread

  • Use Ripe Bananas: Ensure your bananas are overripe for maximum sweetness and moisture, which enhances the overall flavor of the moist pineapple banana bread.

  • Drain Pineapple Well: Avoid adding too much liquid by thoroughly draining crushed pineapple; excess moisture can lead to a soggy loaf.

  • Mix Gently: Combine wet and dry ingredients just until they are blended. Overmixing can make your bread tough rather than yielding that delightful, moist texture.

  • Check for Doneness: In the final minutes of baking, use a toothpick to check if the bread is done. It should come out clean for a perfectly baked moist pineapple banana bread.

  • Experiment with Add-Ins: Don’t hesitate to customize your bread! Adding nuts or swapping coconut for chocolate chips can bring a new flavor to your tropical creation.

Moist Pineapple Banana Bread Variations

Feel free to let your creativity shine as you explore these fun twists on this tropical delight!

  • Nutty Crunch: Add chopped walnuts or pecans for a delightful crunch and extra flavor depth. The nutty elements enhance the tropical taste and add texture to every bite.

  • Dairy-Free Delight: Swap butter for coconut oil to make this recipe completely dairy-free. You’ll still enjoy the luscious moisture while embracing a delightful coconut flavor.

  • Whole Wheat Boost: Use whole wheat flour instead of all-purpose flour for a heartier option. This change brings not only a nutty taste but also adds extra fiber to your bread.

  • Fruity Punch: Try replacing crushed pineapple with crushed strawberries or diced mango for a fun fruity twist. Each version brings its unique flavor character that’s equally delicious!

  • Coconut-Free Surprise: If coconut isn’t your thing, skip it altogether or substitute with extra nuts or seeds. You’ll create a rich loaf that still boasts the classic banana bread flavors.

  • Sweetness Adjust: Want it less sweet? Reduce the sugar without sacrificing flavor. This allows for a more balanced taste while still enjoying the natural sweetness of the fruits.

  • Extra Extracts: Boost the tropical essence by adding a splash of vanilla or almond extract. Both options lend a delightful depth to the overall flavor profile of your loaf.

  • Spice It Up: Add a pinch of cinnamon or nutmeg to the batter for an aromatic warmth that complements the banana and pineapple beautifully. These spices can elevate the flavors, making each slice even more inviting.

These variations allow you to personalize each loaf while enjoying the sweetness of a traditional treat. For more inspiration, don’t forget to check out my Breakfast Banana Split or serve it alongside a cozy slice of Cornbread Breakfast Casserole!

Moist Pineapple Banana Bread Recipe FAQs

How do I select ripe bananas for this recipe?
Absolutely! The best bananas for this Moist Pineapple Banana Bread are those that are overripe, with brown spots all over their peel. Not only are they easier to mash, but they also provide the maximum sweetness and moisture, blending perfectly with the tropical flavors.

How should I store leftover banana bread?
I recommend wrapping your Moist Pineapple Banana Bread tightly in foil or plastic wrap for storage at room temperature, where it will stay fresh for up to 3 days. If you want to keep it longer, pop it into an airtight container in the refrigerator for up to a week.

Can I freeze leftovers, and how should I do it?
Very! To freeze your Moist Pineapple Banana Bread, slice it into individual pieces for easy serving. Wrap each slice tightly in plastic wrap and place them in a zip-top freezer bag or an airtight container. It will maintain its delightful flavor in the freezer for up to 3 months! When you’re ready, simply thaw a slice at room temperature or microwave it for 10–15 seconds for that fresh-baked taste.

What can I do if my banana bread is too dry?
If you find that your Moist Pineapple Banana Bread turns out dry, don't worry! This can happen if the mixture is overmixed or baked too long. When mixing, be gentle and only stir until just combined. To remedy a dry loaf post-baking, drizzle some pineapple juice over the surface once it cools. You can also serve it with a dollop of cream cheese or butter to enhance moisture with each bite!

Is this banana bread suitable for people with allergies?
While this recipe is delicious, it does contain common allergens like eggs and gluten. For a vegan version, you can replace eggs with flax eggs (1 tablespoon of ground flaxseed mixed with 2.5 tablespoons of water) or use unsweetened applesauce. If you need it gluten-free, substitute the all-purpose flour with a gluten-free baking mix. Always double-check your specific dietary needs and use alternative ingredients accordingly!

How long does the flavor stay fresh in the refrigerator?
The flavors of your Moist Pineapple Banana Bread will stay fresh in the refrigerator for up to a week. Storing it properly in an airtight container helps maintain its delightful taste and moisture—you'll find the tropical essence just as inviting even days after baking!

Moist Pineapple Banana Bread

Moist Pineapple Banana Bread for a Tropical Breakfast Treat

Moist Pineapple Banana Bread is a delightful and tropical twist on the classic, perfect for breakfast or a sweet snack.
Print Recipe Pin Recipe
Prep Time 15 minutes mins
Cook Time 1 hour hr 10 minutes mins
Cooling Time 10 minutes mins
Total Time 1 hour hr 35 minutes mins
Servings: 8 slices
Course: Breakfast
Cuisine: Tropical
Calories: 200
Ingredients Equipment Method Nutrition Notes

Ingredients
  

For the Bread
  • 1/2 cup Butter or coconut oil for dairy-free
  • 1 cup Sugar reduce for less sweet loaf
  • 2 large Eggs can use flax eggs or applesauce for vegan option
  • 1 cup Mashed Ripe Banana preferably overripe
  • 1 cup Crushed Pineapple well-drained
  • 1/2 cup Sweetened Flaked Coconut use unsweetened for less sugar
  • 2 cups All-Purpose Flour gluten-free flour can be used
  • 1 teaspoon Baking Powder
  • 1/2 teaspoon Baking Soda
  • 1/2 teaspoon Salt
  • 1 teaspoon Pineapple Extract optional

Equipment

  • 8x4-inch loaf pan
  • Mixing Bowl
  • hand mixer

Method
 

Step-by-Step Instructions for Moist Pineapple Banana Bread
  1. Preheat your oven to 350°F (175°C) and grease an 8x4 inch loaf pan.
  2. Cream the softened butter and sugar together until light and fluffy, about 3-4 minutes.
  3. Beat in the eggs one at a time, mixing well after each addition. Fold in the bananas, pineapple, and coconut.
  4. In a separate bowl, whisk together flour, baking powder, baking soda, and salt.
  5. Gradually add the dry ingredients to the wet mixture, stirring gently until just combined.
  6. Pour the batter into the prepared loaf pan and smooth the top.
  7. Bake for 65-70 minutes, or until golden brown and a toothpick inserted comes out clean.
  8. Cool in the pan for about 10 minutes before transferring to a wire rack to cool completely.

Nutrition

Serving: 1sliceCalories: 200kcalCarbohydrates: 30gProtein: 2gFat: 8gSaturated Fat: 5gPolyunsaturated Fat: 1gMonounsaturated Fat: 2gCholesterol: 30mgSodium: 150mgPotassium: 200mgFiber: 1gSugar: 12gVitamin A: 200IUVitamin C: 5mgCalcium: 20mgIron: 1mg

Notes

For best flavor, use overripe bananas and drain the pineapple well. Mix ingredients gently to maintain the bread's moist texture.

Tried this recipe?

Let us know how it was!
  • « Previous Page
  • 1
  • …
  • 31
  • 32
  • 33
  • 34
  • 35
  • …
  • 179
  • Next Page »

Welcome!

Hi, I’m Grace, a Sydney-based home cook with a passion for bold flavors and trending ingredients. Whether you’re a busy beginner or a seasoned foodie, you’ll find dishes here that are fresh, fun, and full of flavor.

More about me

Popular Recipes

  • Cheesy Chicken Garlic Bread Sandwich
    Cheesy Chicken Garlic Bread Sandwich for Cozy Family Moments
  • Easy Chicken Ranch Wraps
    Easy Chicken Ranch Wraps: Quick, Creamy & Totally Satisfying
  • Chicken Caesar Sandwiches
    Delicious Chicken Caesar Sandwiches for Quick Comfort Food
  • best Cuban sandwich
    The Best Cuban Sandwich You’ll Want Every Weeknight!

Footer

↑ back to top

About

  • Privacy Policy
  • Disclaimer
  • Terms & Conditions

Newsletter

  • Sign Up! for emails and updates

Contact

  • About me
  • Contact me

Copyright © 2025 TastyTrendIngredients