tastytrendingredients

  • Home
  • Recipes
    • Appetizers
    • Breakfast
    • Dessert
    • Dinner
    • Drinks
    • Salads
    • Snacks
    • Soups
  • About me
  • Contact me
menu icon
go to homepage
  • Home
  • Recipes
    • Appetizers
    • Breakfast
    • Dessert
    • Dinner
    • Drinks
    • Salads
    • Snacks
    • Soups
  • About me
  • Contact me
search icon
Homepage link
  • Home
  • Recipes
    • Appetizers
    • Breakfast
    • Dessert
    • Dinner
    • Drinks
    • Salads
    • Snacks
    • Soups
  • About me
  • Contact me
×

Zesty Lemon Parmesan Lettuce Salad Ready in 5 Minutes

February 23, 2026 by Grace Snow Leave a Comment

As the aroma of freshly grated parmesan mingles with the zing of citrus, I can't help but feel transported to a sunny Mediterranean terrace, where a refreshing salad is an everyday delight. This Quick & Zesty Lemon Parmesan Lettuce Salad is a breeze to whip up, taking just 5 minutes to elevate your meal with its creamy texture and vibrant flavor. Packed with the crispness of romaine lettuce and a slight kick from crushed red pepper flakes, it’s the ideal side dish for any protein and is easily customizable to suit your taste. Whether you’re rushing to prepare dinner or seeking a light lunch, this salad is a perfect solution that doesn’t compromise on satisfaction. Curious about how this summery dish can brighten your plate today? Let’s dive in!

Why is this Lemon Parmesan Salad Perfect?

Simplicity: This salad is a quick fix, ready in just 5 minutes, making it ideal for busy weeknights or impromptu gatherings.

Zesty Flavor: Combining fresh lemon juice and parmesan cheese creates a fresh, tangy taste that lifts your spirits with every bite.

Customizable: Swap in your favorite greens or try different cheeses like Pecorino Romano to make it uniquely yours.

Versatile Side: Pair it with grilled chicken, fish, or even serve it alongside hard-boiled eggs for a satisfying vegetarian option.

Crowd-Pleaser: With its bright flavors and appealing crunch, your family and friends will be asking for seconds! For more delightful salads, check out our Avocado Egg Salad or Buffalo Tofu with Caesar Salad.

Lemon Parmesan Lettuce Salad Ingredients

• You won't believe how simple this is!

For the Salad
• Romaine Lettuce – A crisp base; use pre-washed for quick prep.
• Red Onion – Adds crunch and a slight bite; substitute with green onions for a milder flavor.
• Parmesan Cheese – Brings creaminess and umami; swap for nutritional yeast for a vegan Lemon Parmesan Lettuce Salad.
• Crushed Red Pepper Flakes – Provides a hint of spice; adjust to your taste or omit for milder enjoyment.

For the Dressing
• Extra Virgin Olive Oil – Acts as a rich dressing base; consider avocado oil for a change.
• Lemon Juice and Zest – Brightens the salad with acidity and flavor vibrancy.
• Honey – Balances acidity with sweetness; agave syrup makes a great vegan substitute.
• Salt and Pepper – Enhance all flavors; season to your liking.

With these ingredients, you're just moments away from enjoying a bright, fresh Lemon Parmesan Lettuce Salad!

Step‑by‑Step Instructions for Lemon Parmesan Lettuce Salad

Step 1: Make the Dressing
In a small bowl, combine 1/4 cup extra virgin olive oil, the juice and zest of one lemon, 1 tablespoon honey, and salt and pepper to taste. Whisk together vigorously until the mixture is well emulsified and creamy, about 30 seconds. The dressing should have a smooth, velvety consistency that showcases the vibrant lemon color.

Step 2: Prepare the Salad Ingredients
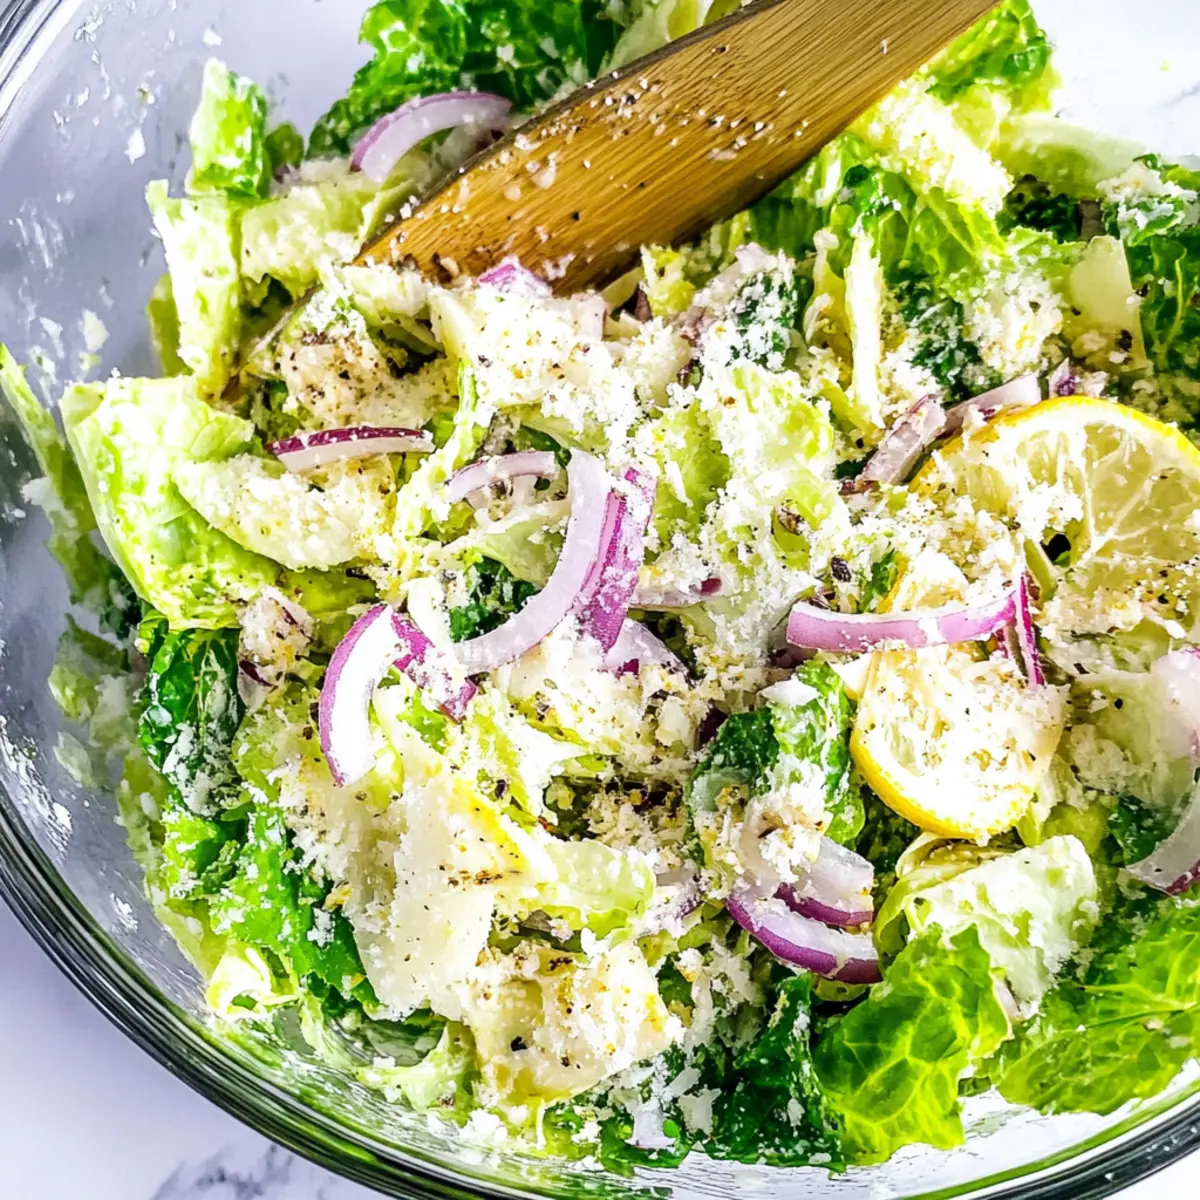
While the dressing rests, chop 4 cups of romaine lettuce into bite-sized pieces. In a salad bowl, add 1/4 cup of thinly sliced red onion and 1/2 cup of freshly grated parmesan cheese. If you like a kick, sprinkle in 1/2 teaspoon of crushed red pepper flakes to add some zest and excitement to your Lemon Parmesan Lettuce Salad.

Step 3: Combine the Salad
Gently toss together the romaine lettuce, sliced red onion, and grated parmesan cheese in the salad bowl using salad tongs. Aim to combine the ingredients evenly, allowing the flavors to mingle beautifully. This process should take just a minute, ensuring a delightful textural contrast from the crispy lettuce and creamy cheese.

Step 4: Dress the Salad
Drizzle the prepared lemon dressing generously over the salad mix. Using your tongs, toss the salad thoroughly until every leaf is coated with the zesty dressing. This step is crucial as it brings out the vibrant flavors in your Lemon Parmesan Lettuce Salad, creating a dish that is both visually appealing and satisfying to the palate.

Step 5: Serve Immediately
To maintain the freshness of the lettuce, serve your salad immediately after dressing. This step is important to prevent any wilting. For added crunch, consider garnishing with extra parmesan or a few additional pepper flakes to make your Lemon Parmesan Lettuce Salad even more enticing for your guests. Enjoy the vibrant flavors and textures while they’re at their best!

Expert Tips for Lemon Parmesan Lettuce Salad

  • Fresh Ingredients: Always use fresh romaine lettuce and high-quality parmesan to enhance flavor. Wilted greens can spoil the salad's appealing crunch.

  • Adjust Seasoning: Taste the dressing before adding too much salt, as parmesan is already salty. This ensures a perfectly balanced Lemon Parmesan Lettuce Salad.

  • Mix Before Serving: Combine the salad only right before serving to keep the lettuce crispy and fresh, avoiding any sogginess.

  • Customize Wisely: Don’t hesitate to substitute ingredients, but remember to maintain the creamy texture and zesty flavor that define a great Lemon Parmesan Lettuce Salad.

  • Chill for Crunch: For extra crisp lettuce, wash and dry the greens, then refrigerate for a bit before assembly. This tip yields a refreshing bite!

What to Serve with Quick & Zesty Lemon Parmesan Lettuce Salad

Elevate your meal experience with these delightful pairings that perfectly complement the vibrant flavors and textures of this refreshing salad.

  • Grilled Chicken: Juicy and succulent, it adds a satisfying protein element that enhances the freshness of the salad.

  • Seared Salmon: The buttery richness of the fish harmonizes beautifully with the zesty citrus notes and creamy parmesan.

  • Quinoa Pilaf: Light yet filling, this nutty grain boosts the meal’s heartiness while providing a pleasing texture contrast.

  • Roasted Vegetables: Caramelized sweetness from seasonal veggies complements the bright flavors of the salad, creating a comforting balance.

  • Homemade Garlic Bread: The crispy exterior paired with its warm, soft inside is a lovely indulgence that adds texture and flavor.

  • Sparkling Water with Lemon: Refreshing and fizzy, this drink enhances the salad's zesty appeal without overwhelming its lightness.

A combination of these pairings will not only create a well-rounded plate but also make every bite of your Lemon Parmesan Lettuce Salad sing!

Make Ahead Options

These Lemon Parmesan Lettuce Salad preparations are perfect for busy cooks looking to save time during hectic weeknights! You can prepare the dressing by whisking together the olive oil, lemon juice, lemon zest, honey, salt, and pepper up to 3 days in advance; store it in an airtight container in the refrigerator. Also, chop your romaine lettuce and red onion 24 hours ahead, ensuring you keep them crisp – refrigerate them in a sealed bag with a paper towel to absorb excess moisture. When it's time to serve, simply combine the salad ingredients and dress them with your prepared dressing, tossing thoroughly to coat, and enjoy your refreshing Lemon Parmesan Lettuce Salad with minimal effort!

How to Store and Freeze Lemon Parmesan Lettuce Salad

Room Temperature: Enjoy your salad immediately for the best taste and texture; it should not be left out for more than 2 hours.

Fridge: Store any leftover salad in an airtight container in the refrigerator for up to 3 days; however, keep the dressing separate until ready to serve to prevent wilting.

Freezer: This Lemon Parmesan Lettuce Salad does not freeze well due to the texture of the lettuce; it’s best enjoyed fresh.

Reheating: No need to reheat this salad; simply toss it with freshly made dressing if it has sat in the fridge for a while before serving.

Lemon Parmesan Lettuce Salad Variations

Feel free to get creative with this recipe and make it your own with these delightful twists!

  • Greens Swap: Replace romaine with arugula, spinach, or mixed greens for a fresh flavor profile. Each green brings its unique bite, enhancing your salad experience.

  • Dairy-Free Delight: Use nutritional yeast in place of parmesan for a creamy, vegan-friendly alternative. It’ll still give that umami kick while keeping your salad guilt-free.

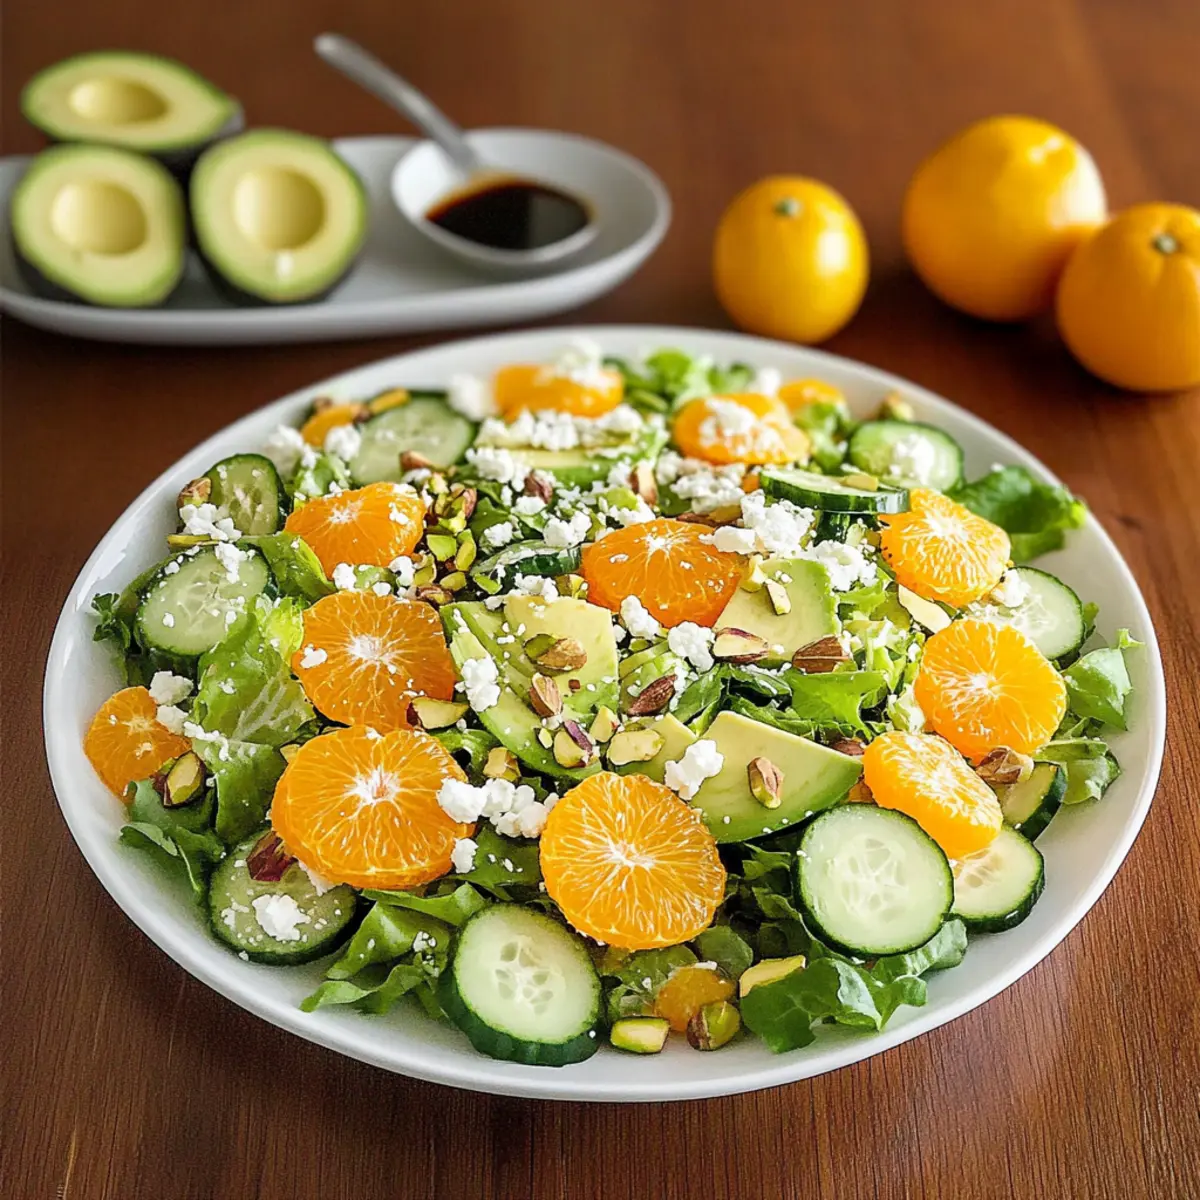
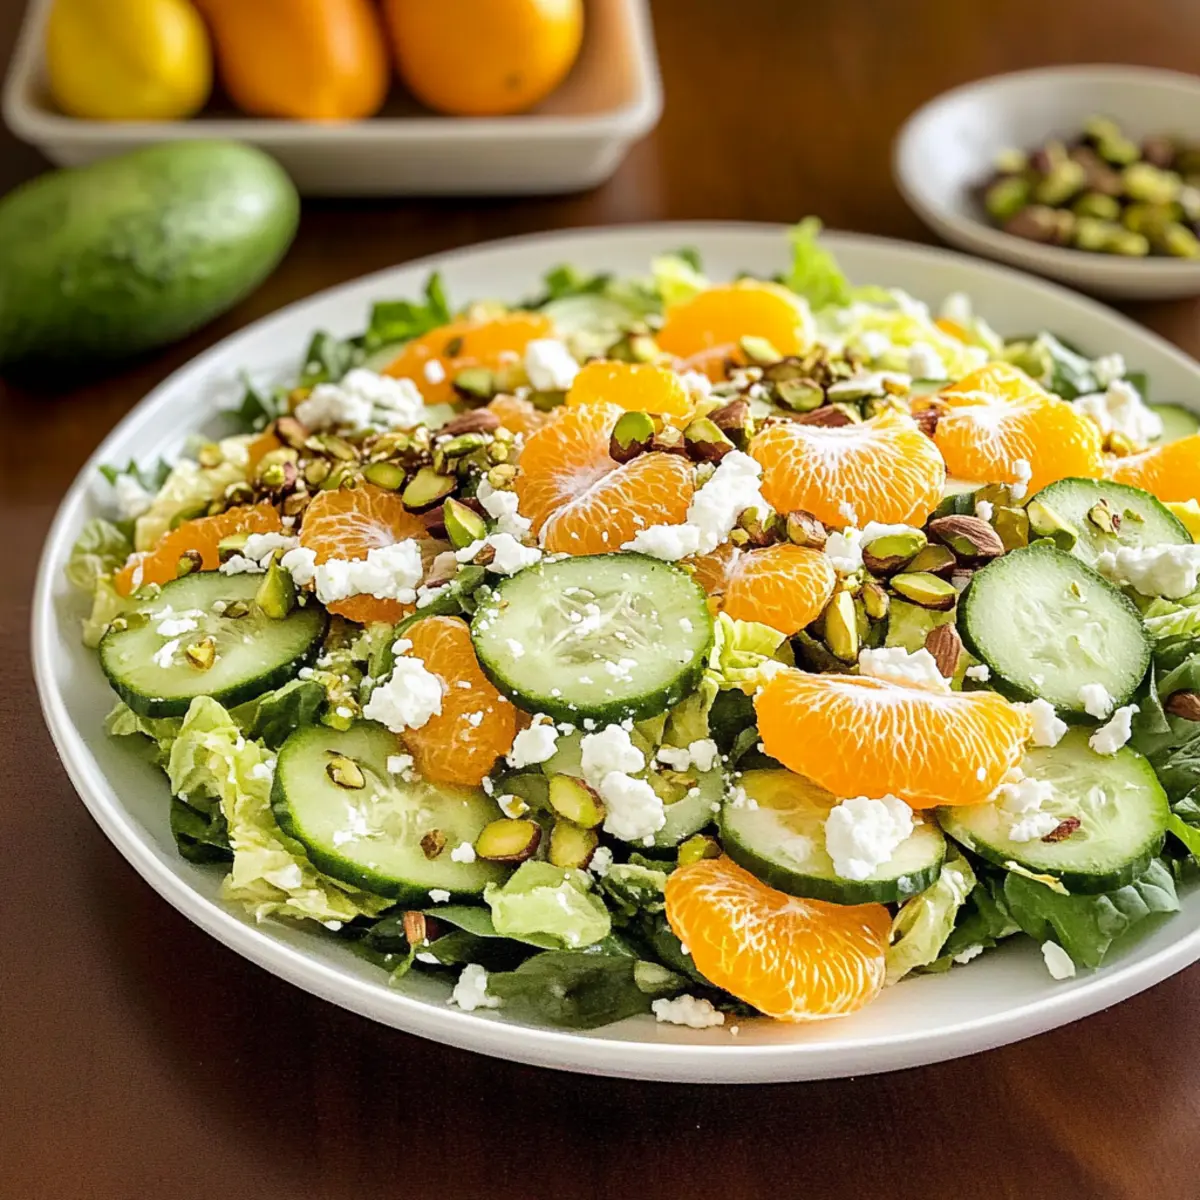
  • Nutty Crunch: Toss in toasted walnuts, almonds, or sunflower seeds for an extra layer of crunch. The nutty flavor pairs beautifully with the zesty dressing and adds a satisfying texture.

  • Herb Infusion: Add fresh herbs like basil, dill, or parsley to elevate the flavor. A handful of chopped herbs will give your salad a garden-fresh aroma and taste.

  • Spicy Kick: For those who love a bit of heat, incorporate jalapeños or add more crushed red pepper flakes. This fiery twist can make your salad sing!

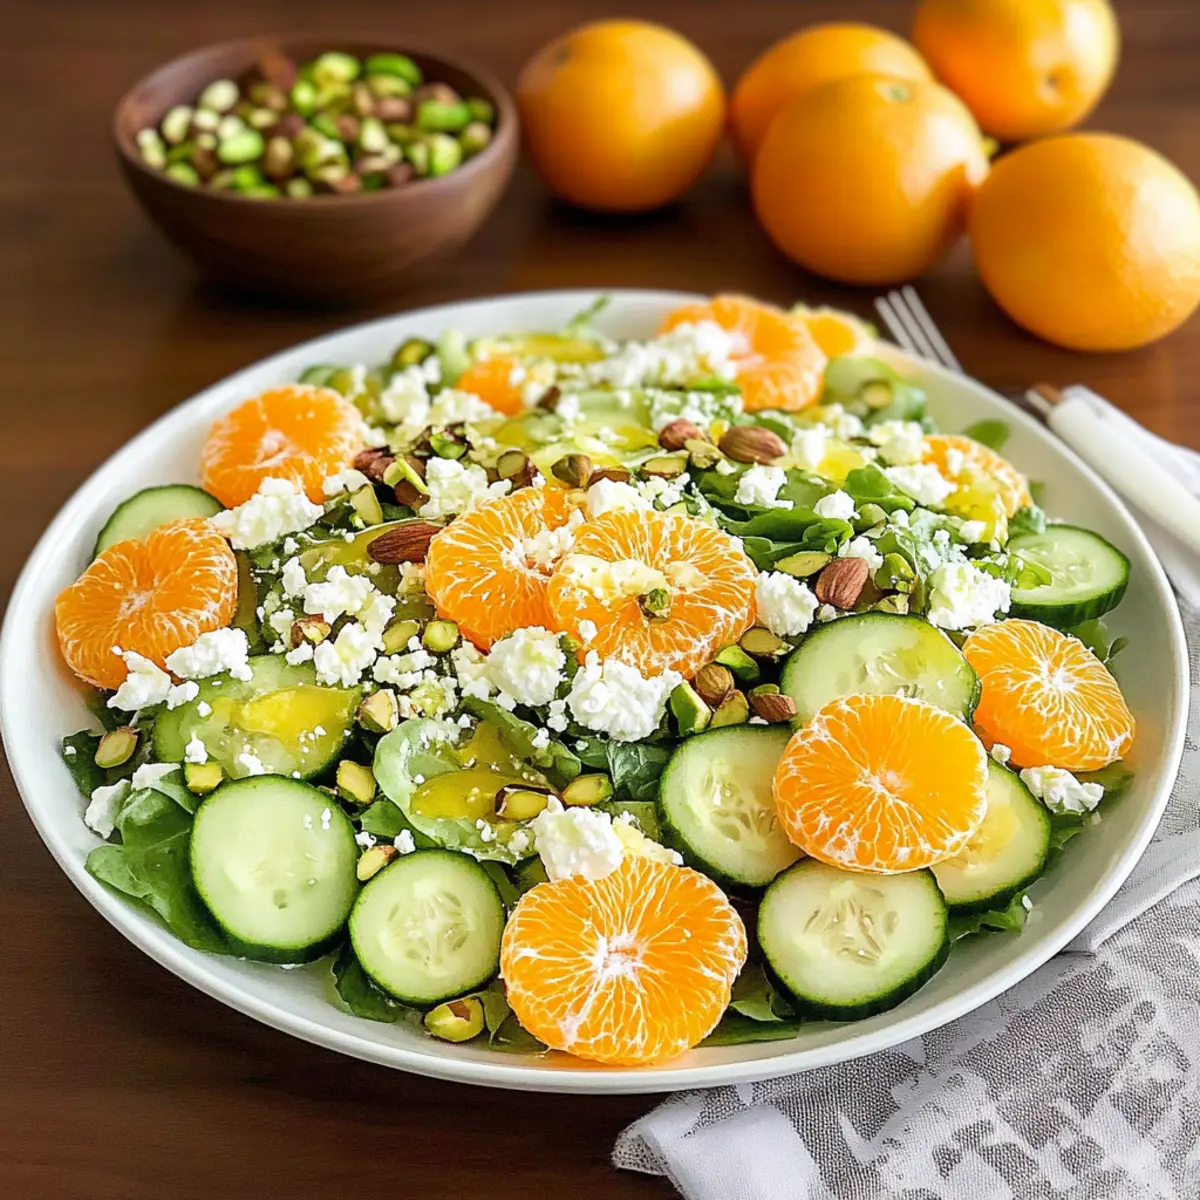
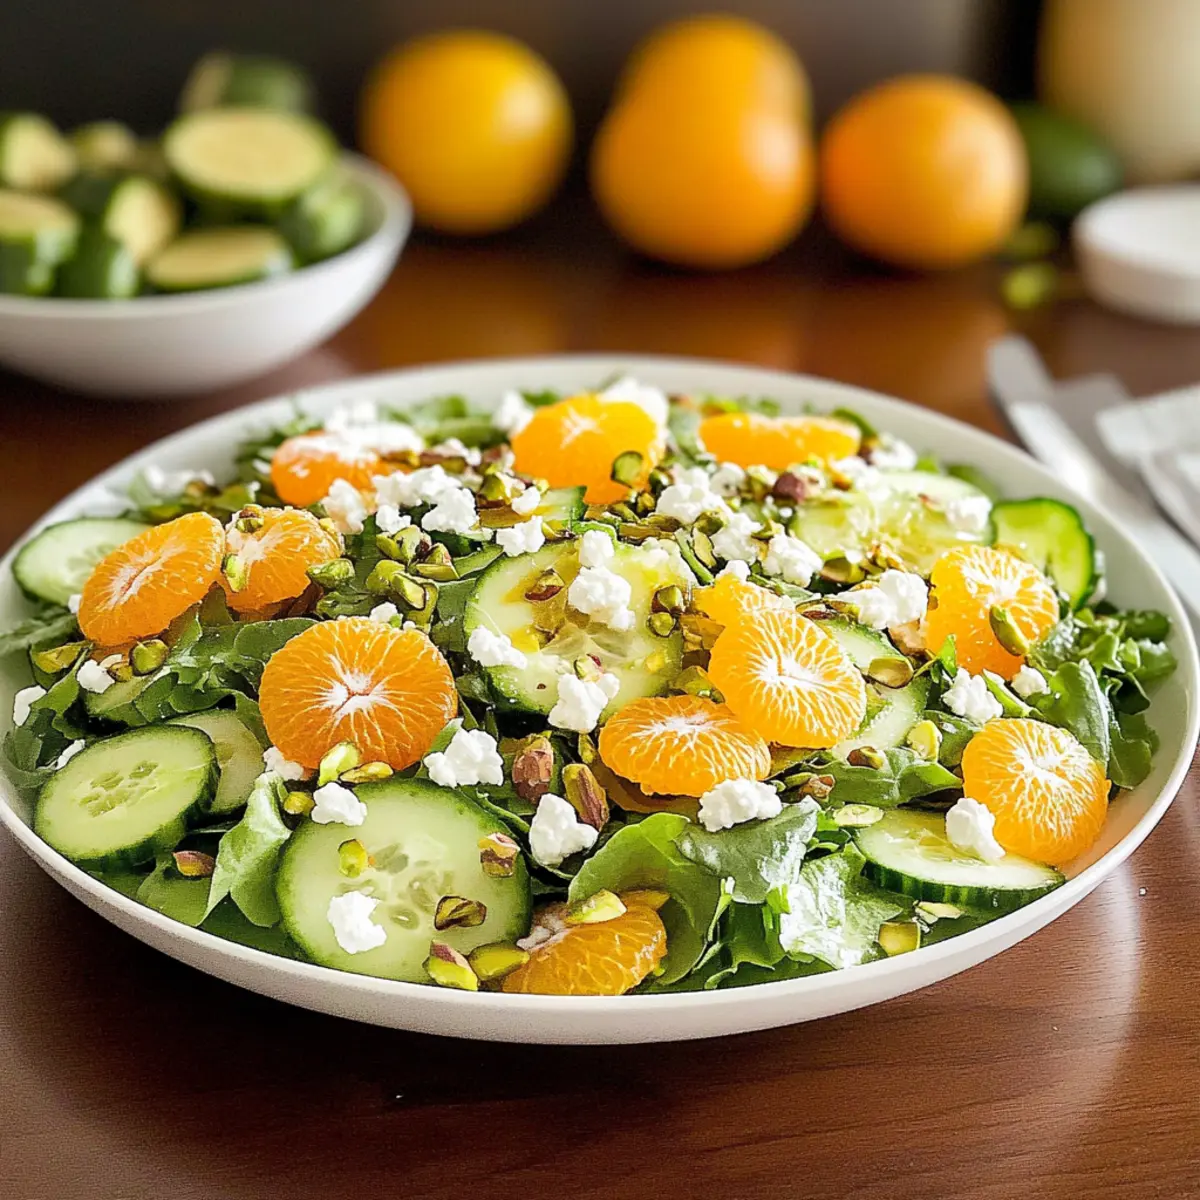
  • Zesty Citrus: Incorporate orange or grapefruit segments for a burst of sweetness and additional acidity. The combination of citrus will brighten up the dish even more.

  • Sweet Touch: Drizzle with a touch of balsamic glaze or maple syrup to balance the acidity of the lemon. This subtle sweetness can create a harmonious flavor balance.

  • Savory Additions: Mix in cooked quinoa or chickpeas for added protein and heartiness. These ingredients turn your salad into a complete meal, great for lunch or dinner!

Feel free to complement your meal with other salads like German Potato Salad or our tasty Chicken Salad with Apples. There’s a world of flavor waiting to be explored in your kitchen!

Lemon Parmesan Lettuce Salad Recipe FAQs

How do I choose the right romaine lettuce?
Absolutely! Look for romaine that is crisp and vibrant green, avoiding heads with dark spots or wilting leaves. If possible, use pre-washed romaine for convenience and maximum freshness!

What is the best way to store leftovers of the Lemon Parmesan Lettuce Salad?
Very! To preserve the best texture, store any leftover salad in an airtight container in the refrigerator for up to 3 days. Remember to keep the dressing separate until you're ready to dig in to prevent wilting.

Can I freeze the Lemon Parmesan Lettuce Salad?
I recommend against freezing this salad! The texture of the lettuce will become mushy once thawed, making it less enjoyable. It's best experienced fresh, so aim to whip it up just before serving.

How can I troubleshoot if my dressing is too salty?
If your dressing turns out saltier than expected, simply whisk in a bit more olive oil or even a splash of lemon juice to balance it out. Taste as you go, and make adjustments until it suits your palate!

Are there any dietary considerations I should keep in mind?
Sure thing! For those with dairy allergies, you can easily substitute parmesan with nutritional yeast to maintain a cheesy flavor in your Lemon Parmesan Lettuce Salad. Additionally, if you're aiming for a vegan option, swap honey for agave syrup.

Lemon Parmesan Lettuce Salad

Zesty Lemon Parmesan Lettuce Salad Ready in 5 Minutes

This Lemon Parmesan Lettuce Salad is a quick and refreshing side dish that's ready in just 5 minutes.
Print Recipe Pin Recipe
Prep Time 5 minutes mins
Total Time 5 minutes mins
Servings: 4 servings
Course: Salads
Calories: 150
Ingredients Equipment Method Nutrition Notes

Ingredients
  

For the Salad
  • 4 cups Romaine Lettuce Chopped into bite-sized pieces
  • 1/4 cup Red Onion Thinly sliced; substitute with green onions if desired
  • 1/2 cup Parmesan Cheese Freshly grated
  • 1/2 teaspoon Crushed Red Pepper Flakes Optional, adjust to taste
For the Dressing
  • 1/4 cup Extra Virgin Olive Oil Can substitute with avocado oil
  • 1 each Lemon Juice and Zest From one lemon
  • 1 tablespoon Honey Can use agave syrup for a vegan version
  • Salt and Pepper To taste

Equipment

  • Bowl
  • Whisk
  • salad tongs

Method
 

Step-by-Step Instructions
  1. In a small bowl, combine extra virgin olive oil, lemon juice, lemon zest, honey, salt and pepper. Whisk until emulsified, about 30 seconds.
  2. Chop romaine lettuce into bite-sized pieces. In a salad bowl, add sliced red onion and grated parmesan cheese with crushed red pepper flakes.
  3. Toss the salad ingredients gently in the bowl to combine.
  4. Drizzle the lemon dressing over the salad and toss thoroughly until each leaf is coated.
  5. Serve immediately to maintain freshness. Garnish with extra parmesan or pepper flakes if desired.

Nutrition

Serving: 1servingCalories: 150kcalCarbohydrates: 8gProtein: 3gFat: 13gSaturated Fat: 3gMonounsaturated Fat: 9gCholesterol: 6mgSodium: 200mgPotassium: 200mgFiber: 2gSugar: 1gVitamin A: 120IUVitamin C: 20mgCalcium: 15mgIron: 1mg

Notes

Use fresh ingredients for the best flavor and keep the dressing separate until serving to avoid wilting of the lettuce.

Tried this recipe?

Let us know how it was!

Fresh Irish Flag Clementine Cucumber Salad for St. Patrick's Day

February 21, 2026 by Grace Snow Leave a Comment

As the sun dips lower on St. Patrick's Day, the vibrant colors of my Irish Flag Clementine Cucumber Salad radiate like a warm welcome at the table. This healthy, festive creation invites everyone to indulge in a delicious medley of fresh greens, sweet clementines, crispy cucumbers, and creamy avocado—all inspired by the hues of the Irish flag. What makes this salad truly special is not just its eye-catching presentation, but it's also a quick and simple recipe, perfect for busy home chefs looking to celebrate in style without sacrificing flavor. It’s versatile enough to accompany any meal or shine as a standalone dish, making it a go-to for gatherings of all sizes. Are you ready to elevate your holiday feasts with this delightful twist?

What makes this salad a festive favorite?

Vibrant Colors: The Irish Flag Clementine Cucumber Salad showcases a beautiful blend of greens, orange, and white, making it a perfect centerpiece for your St. Patrick's Day table.

Healthy Indulgence: Packed with nutrients from fresh ingredients, this salad is a guilt-free treat that satisfies both the heart and taste buds.

Easy to Prepare: With its straightforward steps, this recipe is ideal for home chefs at any skill level, allowing you to whip it up quickly without hassle.

Versatile Pairing: Whether served alongside grilled fish or enjoyed alone, it complements various dishes, making it a year-round staple.

Adaptable Ingredients: Feel free to swap in seasonal fruits or alternate nuts to personalize the flavors, making it perfect for any occasion. For a refreshing twist, also check out my Avocado Egg Salad or Tofu Caesar Salad.

Irish Flag Clementine Cucumber Salad Ingredients

• Note: Gather fresh ingredients for a delightful salad experience!

For the Greens

  • Clean Greens – A mix of spinach, arugula, or romaine adds freshness and texture.

For the Fruit

  • Clementines – Sweet and vibrant, they represent the 'orange' in the Irish flag; you can use oranges or seedless tangerines if needed.

For the Crunch

  • Mini Cucumbers – Crispy and hydrating, symbolizing the 'green,' thinly slice them for the best results.
  • Salted, Roasted Pistachios – Add a delightful crunch and a hint of saltiness, or substitute with almonds or pecans.

For the Creamy Element

  • Avocado – Creamy and rich, adding depth and representing green; ripe mango is a tasty alternative.
  • Goat Cheese – Tangy and creamy, this element elevates the dish; feta or ricotta salata can work well too.

For the Flavor Boost

  • White Onion – Provides a sharp contrast that represents the 'white' in the flag; use jicama or Asian pear for a milder taste.

For the Dressing

  • Honey White Balsamic Dressing – A tangy yet sweet dressing that enhances every ingredient; simply mix the components together in a jar.

Step‑by‑Step Instructions for Irish Flag Clementine Cucumber Salad

Step 1: Prepare the Greens
Begin by washing your fresh greens thoroughly under cold water. Choose a mix of spinach, arugula, or romaine for a delightful blend of textures. Once cleaned, pat them dry with a paper towel to remove excess water. Place the greens in a large bowl or elegantly spread them out on a serving platter, forming the vibrant base of your Irish Flag Clementine Cucumber Salad.

Step 2: Layer Ingredients
Next, slice your clementines in half, then into thin segments, and arrange them evenly over the greens, representing the 'orange' of the flag. Thinly slice the mini cucumbers and sprinkle them over the top for a refreshing crunch. Add generous slices of white onion for a zesty kick, and finally, cut the avocado into slices, ensuring its creamy goodness contributes to the 'green' hue.

Step 3: Dress the Salad
Drizzle 2-3 tablespoons of Honey White Balsamic Dressing evenly over the layered ingredients. To mix the flavors effectively, gently toss the salad with tongs or two large forks, making sure all components are coated. Aim for a vibrant presentation, allowing the bright colors to showcase the theme of the Irish Flag Clementine Cucumber Salad.

Step 4: Finish with Toppings
To elevate the dish, sprinkle crumbled goat cheese generously across the top, adding a creamy, tangy element that enhances each bite. Follow by scattering salted, roasted pistachios for added crunch and a pop of flavor. Finally, season with freshly ground black pepper to taste, completing your festive salad and readying it for serving alongside your favorite meal.

What to Serve with Irish Flag Clementine Cucumber Salad

As you gather around the table, let your taste buds dance with the vibrant and fresh flavors this salad brings, creating a delightful meal harmony.

  • Grilled Salmon: The rich, smoky flavor of grilled salmon complements the crispness of the salad, making for an elegant pairing.
  • Roasted Chicken: Juicy and savory roasted chicken adds a heartiness to the meal, balancing out the salad's freshness beautifully.
  • Quinoa Pilaf: Packed with protein and nutty flavors, quinoa pilaf enhances the meal's nutritional profile while adding texture contrast.
  • Crusty Bread: A warm, crusty baguette or artisan bread is perfect for mopping up the honey balsamic dressing, bringing everything together.
  • Sparkling Water with Lime: Crisp and refreshing, this drink maintains the light feel of the meal while cleansing the palate.
  • Lemon Tart: A zesty lemon tart for dessert provides a sweet yet tangy finish that echoes the bright, citrus notes of the salad.

Pair these options with the Irish Flag Clementine Cucumber Salad to elevate your meal, celebrating the vibrant flavors of the season!

Expert Tips for Irish Flag Clementine Cucumber Salad

  • Freshness Matters: Start with the freshest greens available; they’ll ensure your salad is crisp and flavorful. Avoid wilted leaves!
  • Dressing Wisely: Begin with less dressing to avoid sogginess; you can always add more to suit your taste.
  • Color Contrast: Slice clementines and cucumbers uniformly for an appealing presentation that highlights the festive colors of the Irish Flag Clementine Cucumber Salad.
  • Enjoy Variety: Don’t hesitate to switch out ingredients based on your preferences or what's in season; this salad is adaptable!
  • Serving Size: This salad is best served immediately to keep the greens crunchy; dress it just before serving for optimal texture.

Irish Flag Clementine Cucumber Salad Variations

Feel free to mix and match to create your perfect version of this refreshing salad!

  • Fruit Substitutes: Swap clementines for peaches or nectarines for a delightful summer twist. These alternatives add a juicy sweetness that complements fresh greens beautifully.

  • Herbal Additions: Incorporate fresh herbs like mint or basil for an herbaceous punch. These vibrant flavors not only elevate the experience but also add a refreshing aroma to every bite.

  • Nut Alternatives: Replace pistachios with sunflower seeds or pumpkin seeds for a nut-free crunch. This swap maintains texture while being considerate of allergies, ensuring everyone can enjoy the dish.

  • Creamy Twist: For a twist on creaminess, consider using burrata instead of goat cheese. Its luscious texture adds a luxurious touch that makes each bite irresistible.

  • Spicy Kick: Add a sprinkle of red pepper flakes or a dash of hot sauce for a little heat. This fiery addition brings an exciting contrast to the sweetness of the clementines and the creaminess of the avocado.

  • Dairy-Free Option: For a dairy-free salad, omit the goat cheese and use a sprinkle of nutritional yeast instead. You'll get a cheesy flavor without the dairy, keeping it light and vegan-friendly.

  • Crispy Croutons: Toss in some homemade or store-bought pita chips for an added crunch. The texture brings an engaging element that keeps every mouthful interesting and satisfying.

  • Vegan Dressing: For a vegan-friendly dressing, substitute honey with maple syrup in the Honey White Balsamic Dressing. This keeps the sweetness while ensuring it aligns with dietary preferences.

You might also enjoy refreshing sides like my German Potato Salad or a heartwarming Balsamic Steak Salad to complement your festive meals!

Storage Tips for Irish Flag Clementine Cucumber Salad

Fridge: Store any leftover salad in an airtight container for up to 1 day. The fresher, the better!

Dressing: Keep the Honey White Balsamic Dressing separate in the fridge for optimal taste; it can last up to a week.

Reheating: This salad is best enjoyed cold, so avoid reheating. Instead, enjoy it straight from the fridge for a refreshing treat.

Prepping Ahead: You can prepare the ingredients ahead of time and store them individually. Assemble the Irish Flag Clementine Cucumber Salad just before serving for maximum freshness.

Make Ahead Options

This Irish Flag Clementine Cucumber Salad is perfect for busy home cooks eager to simplify their meal prep! You can wash and chop the greens, slice the clementines, cucumbers, and onions, and prepare the Honey White Balsamic Dressing up to 24 hours in advance. Store each component separately in airtight containers to maintain freshness and prevent sogginess. Assemble the salad just before serving to keep the avocado creamy and the greens crisp. For the best flavor and texture, dress the salad right before it's time to eat, ensuring every bite is just as delicious as when freshly made. Enjoy the time-saving benefits while impressing your guests with this festive dish!

Irish Flag Clementine Cucumber Salad Recipe FAQs

What is the best way to select ripe clementines?
Absolutely! When selecting clementines, look for those that are firm to the touch and have a bright, vibrant skin. Avoid any with dark spots or blemishes, as these can indicate overripeness. Ripe clementines will have a sweet aroma and should feel slightly heavy for their size, indicating juiciness.

How should I store leftover Irish Flag Clementine Cucumber Salad?
Very! Store any leftover salad in an airtight container in the refrigerator for up to 1 day. To keep the greens crisp, keep the dressing separate and add it just before serving. Make sure to consume it quickly, as the ingredients may wilt or lose their freshness.

Can I freeze the Irish Flag Clementine Cucumber Salad?
Not ideal! Freezing this salad is not recommended due to the high water content in cucumbers and avocados, which can change their texture when thawed. Instead, prep the ingredients separately, and assemble the salad fresh to enjoy its delightful crunch.

What common issues might I face while preparing this salad?
You may encounter a few things! If your avocados aren’t ripening fast enough, place them in a paper bag with an apple or banana to speed up the process. Also, be cautious about over-dressing the salad; start with 2 tablespoons of dressing and adjust based on your preference to avoid sogginess.

Are there any dietary considerations for serving this salad to pets or those with allergies?
Yes! This salad contains ingredients like onions and nuts that can be harmful to pets, especially dogs, so keep this dish out of their reach. For guests with allergies, be sure to inform them about the inclusion of nuts and dairy, and consider offering substitutions like sunflower seeds or omitting the cheese entirely to make it dairy-free.

How can I adapt the ingredients for seasonal variations?
Here’s how! Swap clementines for seasonal fruits like peaches or nectarines during warmer months, and consider adding fresh herbs such as mint or basil for a bright, herbal note. You can also experiment with different types of nuts, like sunflower seeds or pumpkin seeds, to accommodate guests with nut allergies and to personalize the flavor profile. Enjoy the process of creativity!

Irish Flag Clementine Cucumber Salad

Fresh Irish Flag Clementine Cucumber Salad for St. Patrick's Day

Celebrate St. Patrick's Day with this vibrant Irish Flag Clementine Cucumber Salad, featuring fresh greens, sweet clementines, and creamy avocado.
Print Recipe Pin Recipe
Prep Time 15 minutes mins
Total Time 15 minutes mins
Servings: 4 servings
Course: Salads
Cuisine: Irish
Calories: 200
Ingredients Equipment Method Nutrition Notes

Ingredients
  

For the Greens
  • 4 cups Clean Greens (spinach, arugula, romaine)
For the Fruit
  • 4 pieces Clementines can substitute with oranges or seedless tangerines
For the Crunch
  • 2 pieces Mini Cucumbers thinly sliced
  • 1 cup Salted, Roasted Pistachios can substitute with almonds or pecans
For the Creamy Element
  • 1 piece Avocado ripe, can substitute with mango
  • 1 cup Goat Cheese can substitute with feta or ricotta salata
For the Flavor Boost
  • 1 small White Onion can substitute with jicama or Asian pear
For the Dressing
  • 2-3 tablespoons Honey White Balsamic Dressing mix components in a jar

Equipment

  • Bowl
  • Knife
  • Tongs
  • Cutting Board
  • jar

Method
 

Preparation Steps
  1. Begin by washing your fresh greens thoroughly under cold water. Choose a mix of spinach, arugula, or romaine for a delightful blend of textures. Once cleaned, pat them dry with a paper towel to remove excess water. Place the greens in a large bowl or elegantly spread them out on a serving platter, forming the vibrant base of your salad.
  2. Slice your clementines in half, then into thin segments, and arrange them evenly over the greens. Thinly slice the mini cucumbers and sprinkle them over the top. Add generous slices of white onion and cut the avocado into slices.
  3. Drizzle the Honey White Balsamic Dressing evenly over the layered ingredients. Gently toss the salad with tongs or large forks, making sure all components are coated.
  4. Sprinkle crumbled goat cheese across the top and scatter salted, roasted pistachios. Finally, season with freshly ground black pepper to taste.

Nutrition

Serving: 1servingCalories: 200kcalCarbohydrates: 22gProtein: 5gFat: 10gSaturated Fat: 2gPolyunsaturated Fat: 1gMonounsaturated Fat: 6gCholesterol: 5mgSodium: 200mgPotassium: 300mgFiber: 5gSugar: 8gVitamin A: 3000IUVitamin C: 50mgCalcium: 80mgIron: 1mg

Notes

This salad is best served immediately to keep the greens crunchy. Dress it just before serving for optimal texture.

Tried this recipe?

Let us know how it was!

Decadent Mint Chocolate Cheesecake with Oreo Crust Delight

February 21, 2026 by Grace Snow Leave a Comment

As the aroma of mint wafts through the kitchen, I can feel the excitement building for this special occasion. My Mint Chocolate Cheesecake with Oreo Crust is not just a dessert; it’s a showstopper that brings joy to every celebration. Crafted with a delectable Oreo base and a creamy mint-infused filling studded with Andes mints, this cheesecake delivers the perfect balance of flavors. What I love most about this recipe is its versatility—the stunning cake can be made ahead of time, ensuring you spend more moments with loved ones and less time in the kitchen. Plus, with a gluten-free option available, it’s a treat that all your guests can enjoy! Are you ready to dive into a slice of this heavenly dessert? Let’s get baking!

Why is this cheesecake a must-try?

Irresistible mint chocolate flavor: This cheesecake brings together the classic combination of mint and chocolate, perfectly balanced in every bite.
Decadent texture: With its creamy filling and luscious chocolate ganache, it offers a rich dessert experience that will impress your guests.
Versatile for any occasion: Perfect for birthdays, holidays, or simply a cozy evening at home, it’s a crowd-pleaser every time.
Gluten-free option: Easily adapted using gluten-free Oreos, making it inclusive for all dietary preferences.
Make-ahead friendly: Prepare this cheesecake ahead of time, giving you the freedom to relax and enjoy your special occasions, just like with my Homemade Hot Chocolate that warms the heart!

Mint Chocolate Cheesecake Ingredients

  • For the Crust
    • 30 Oreo cookies – Base for the crust, providing a sweet and chocolatey flavor; use gluten-free Oreos for a gluten-free version.
    • 1/4 cup unsalted butter, melted – Binds the crust ingredients together, adding richness; substitute with coconut oil for a dairy-free option.

  • For the Filling
    • 32 ounces cream cheese, room temperature – Main component of the cheesecake, providing a creamy texture; ensure it's at room temperature for smooth mixing.
    • 1 cup granulated sugar – Sweetness to balance the rich flavors of the cheesecake.
    • 2/3 cup sour cream, room temperature – Adds tang and creaminess to the batter.
    • 2 teaspoons vanilla extract – Enhances the overall flavor profile.
    • 1 1/2 teaspoons mint or peppermint extract – Provides the signature mint flavor; choose based on preference for flavor intensity.
    • 1/4 teaspoon salt – Balances sweetness and enhances flavors.
    • 4 large eggs, room temperature – Provides structure and stability; add eggs slowly to avoid overmixing.
    • Several drops of green food coloring – Optional for coloring the cheesecake; use gel food coloring for vibrant results.
    • 1 cup finely chopped Andes mints – Adds flavor and texture to the cheesecake; can substitute with mint chocolate chips.

  • For the Ganache
    • 1 cup chocolate chips or chopped chocolate – For ganache, providing a rich chocolate layer.
    • 3/4 cup heavy cream – Used for ganache, adds a creamy texture.

  • For the Whipped Cream
    • 2 tablespoons confectioners' sugar – Sweetens the whipped cream.
    • 2 to 3 drops green food coloring – Optional for whipped cream, to suit desired visual appeal.
    • Andes Chocolate Mints or Oreos for decorating – Optional garnish to enhance presentation.

This Mint Chocolate Cheesecake is not only delectable but perfect for any celebration that calls for a sweet, festive touch!

Step‑by‑Step Instructions for Mint Chocolate Cheesecake

Step 1: Make the crust
Preheat your oven to 350°F (175°C). In a food processor, blend 30 Oreo cookies into fine crumbs and mix them with 1/4 cup melted unsalted butter until well combined. Press this mixture firmly into the bottom and sides of a 9-inch springform pan to form a crust. Bake for 10 minutes, then reduce the oven temperature to 325°F (160°C) to prepare for the cheesecake.

Step 2: Prepare the cheesecake batter
In a large mixing bowl, beat 32 ounces of room temperature cream cheese and 1 cup granulated sugar together until creamy and smooth. Gradually add in 2/3 cup room temperature sour cream, 2 teaspoons vanilla extract, 1 1/2 teaspoons mint extract, and 1/4 teaspoon salt, mixing until fully incorporated. Add 4 room temperature eggs one at a time to avoid overmixing, then mix in several drops of green food coloring and fold in 1 cup chopped Andes mints.

Step 3: Prepare for baking
Wrap the outside of your springform pan in aluminum foil, ensuring it’s well sealed to prevent water from seeping in during baking. Alternatively, you can place the pan inside a larger baking dish. Pour the creamy cheesecake batter into the prepared Oreo crust smoothly, ensuring an even layer across the surface to enhance the final presentation.

Step 4: Bake
Place the springform pan in the larger pan and fill it with hot water, creating a water bath for even baking. Bake in the preheated oven at 325°F (160°C) for about 70 minutes. The edges should be set while the center remains slightly jiggly, indicating it's perfectly baked.

Step 5: Cool
After baking, turn off the oven and let the cheesecake cool inside for 30 minutes with the door slightly ajar. Then remove it from the oven and let it cool on the counter for 1 hour before transferring it to the refrigerator. Chill for at least 4 hours, or preferably overnight, to create a rich texture for your Mint Chocolate Cheesecake.

Step 6: Make the ganache
For the ganache, heat 3/4 cup heavy cream in a microwave-safe bowl until just steaming. Add 1 cup chocolate chips and let them sit for a couple of minutes before stirring until smooth and glossy. Once your cheesecake is fully chilled, pour the chocolate ganache evenly over the top, allowing it to cascade slightly down the sides.

Step 7: Make the whipped cream
In a mixing bowl, whip 1 cup heavy cream with 2 tablespoons confectioners' sugar and a few drops of mint extract until stiff peaks form. If desired, add 2 to 3 drops of green food coloring to enhance its festive look. Pipe or spread the whipped cream over the chilled ganache layer, finishing with a delightful presentation of Andes chocolate mints or Oreos on top for an extra touch.

Expert Tips for Mint Chocolate Cheesecake

  • Room Temperature Ingredients: Ensure your cream cheese, sour cream, and eggs are at room temperature to achieve a smooth and creamy cheesecake batter without lumps.

  • Careful Mixing: Avoid overmixing the batter after adding the eggs. Mix just enough to incorporate them in order to prevent cracks in your Mint Chocolate Cheesecake.

  • Water Bath Method: Using a water bath is crucial for even baking and helps prevent the cheesecake from cracking. Ensure the foil is tight around the springform pan to avoid water seepage.

  • Refrigeration Time: Patience is key! Let your cheesecake chill in the refrigerator for at least 4 hours, or overnight if possible, to develop the best flavor and texture.

  • Decorative Touches: For an impressive finish, add swirls of mint whipped cream and top with Andes mints or crumbled Oreos right before serving. This not only enhances the aesthetic but adds to the delightful taste!

  • Freezing Tips: If you decide to freeze your cheesecake, make sure to remove any garnishes and wrap it securely. It can last for up to 3 months in the freezer.

How to Store and Freeze Mint Chocolate Cheesecake

Fridge: Store your cheesecake in the refrigerator for up to 5 days. Cover it loosely with plastic wrap to prevent it from absorbing any odors while keeping it fresh.

Freezer: To freeze Mint Chocolate Cheesecake, remove any decorative toppings and wrap it securely in plastic wrap followed by aluminum foil. It can be frozen for up to 3 months.

Thawing: When ready to enjoy, transfer the cheesecake from the freezer to the fridge and allow it to thaw overnight. This helps retain its creamy texture.

Reheating: For the best experience, enjoy your cheesecake chilled! If you’d like to warm it slightly, do so in small increments in the microwave, but keep in mind it’s best served cold.

What to Serve with Mint Chocolate Cheesecake

Indulging in a slice of Mint Chocolate Cheesecake opens the door to a world of delightful pairings that elevate your dessert experience.

  • Fresh Berries: The tartness of raspberries or strawberries cuts through the richness, providing a refreshing contrast. Pairing them with a sprinkle of powdered sugar makes for a luxuriously sweet bite.

  • Chocolate Drizzle: A simple drizzle of warm chocolate sauce enhances the chocolate flavor, adding an extra layer of indulgence that chocolate lovers will adore.

  • Coffee or Espresso: A cup of freshly brewed coffee complements the sweet and minty flavors beautifully, while the bitterness of the coffee provides an exquisite balance to this decadent dessert.

  • Mint-Infused Tea: A light mint tea can cleanse the palate between bites, allowing the flavors of the cheesecake to shine, making your indulgence feel even more refreshing.

  • Chocolate Mint Cookies: Serving alongside a few mint-flavored cookies echoes the cheesecake’s flavors, creating a harmonious dessert theme. These delightful treats are sure to please every mint chocolate fan.

  • Vanilla Ice Cream: The creamy sweetness of vanilla ice cream adds a delightful touch. Letting it melt slightly against the cheesecake creates a perfect harmony of flavors and temperatures.

  • Whipped Cream: A dollop of freshly whipped cream on the side not only enhances the visual appeal but adds a rich, airy texture to every bite, making it an irresistible addition.

  • Fizzy Sparkling Water: For a light, refreshing option, serve chilled sparkling water infused with mint or citrus. It refreshes the palate and balances the rich sweetness, making it a perfect companion to this dessert.

  • Dark Chocolate Truffles: A few finely crafted dark chocolate truffles provide another layer of indulgence and sophistication that is utterly delightful alongside your Mint Chocolate Cheesecake.

Make Ahead Options

These Mint Chocolate Cheesecake preparations are ideal for busy home cooks looking to save time! You can prepare the crust and filling up to 24 hours in advance. Simply make the Oreo crust and pack it tightly in the springform pan, then cover it and refrigerate. The cheesecake batter can also be mixed ahead and stored in the fridge. When you’re ready to bake, pour the batter over the chilled crust and follow the baking instructions. After cooling, chill the entire cheesecake for at least 4 hours or overnight, allowing the flavors to meld beautifully. This way, you’ll have a delicious dessert ready whenever you need it, just as delightful as if you made it fresh!

Mint Chocolate Cheesecake Variations

Feel free to mix and match these delightful twists on your Mint Chocolate Cheesecake to make it uniquely yours!

  • Irish Cream: Substitute some heavy cream in the ganache and whipped cream with Irish cream for a festive touch. This adds a warm, cozy flavor perfect for chilly celebrations.
  • Mint Chocolate Chips: Replace Andes mints with mint chocolate chips for a delightful texture difference. The added crunch will build an enjoyable contrast in each creamy bite.
  • Mint Oreos: Use mint-flavored Oreos for an even more robust minty crust. Every slice will hold that delightful taste reminiscent of classic mint chocolate desserts.
  • Nut Crust: Swap the Oreo crust for a blend of ground almonds or pecans mixed with melted butter for a gluten-free and nutty twist. It's a fantastic way to elevate the flavor profile while maintaining a rich texture.
  • Boozy Delight: Add a splash of peppermint schnapps to the cheesecake batter for an exhilarating kick. Just a tiny bit can transform your cheesecake into a party favorite!
  • Dark Chocolate Layer: For those who love a richer flavor, use dark chocolate for the ganache. The deeper notes will beautifully contrast the sweetness of the cheesecake.
  • Fruity Flair: Incorporate a layer of raspberry or strawberry sauce atop the ganache before adding the whipped cream. The fruity acidity will brighten each bite, making it feel festive and fresh.
  • Customization Tip: If you have a favorite chocolate mint treat, consider incorporating it into the cheesecake. Swapping some ingredients for options like Thin Mints could yield a different, nostalgia-filled experience.

Don’t forget that making this cheesecake is about enjoying the process! For more sweet indulgences, check out my delicious German Chocolate Poke Cake that's sure to sweeten your day!

Mint Chocolate Cheesecake Recipe FAQs

How do I choose the right mint extract for this cheesecake?
Absolutely! Choosing between mint and peppermint extract can significantly impact your cheesecake's flavor. Peppermint extract has a stronger and more intense flavor compared to mint extract, which is milder and sweeter. I recommend starting with peppermint extract for that classic mint chocolate taste. If you prefer a subtle hint, you can blend both or stick to mint extract.

How should I store my Mint Chocolate Cheesecake?
Very! Store your cheesecake in the refrigerator for up to 5 days. I suggest covering it loosely with plastic wrap to protect it from absorbing any odors while staying fresh. If you're planning on enjoying it later, freezing is a great option too!

Can I freeze Mint Chocolate Cheesecake, and how should I do it?
Definitely! To freeze your cheesecake, start by removing any decorative toppings like whipped cream or Andes mints. Wrap the cheesecake tightly in plastic wrap followed by aluminum foil to keep it secure. It can last in the freezer for up to 3 months. When you're ready to enjoy, transfer it to the fridge and allow it to thaw overnight.

What can I do if my cheesecake cracks during baking?
Oh no, don’t fret! Cracks can be a common issue, but there are ways to prevent them. Make sure all your ingredients are at room temperature before mixing to create a smooth batter. Avoid overmixing after adding eggs, and remember to use a water bath for even baking. If cracks do appear, don't worry too much! You can always cover them with whipped cream or ganache to conceal any imperfections.

Are there any dietary considerations I should keep in mind with this recipe?
Absolutely! While this Mint Chocolate Cheesecake can be made gluten-free using gluten-free Oreos, it still contains dairy and may not suit vegan diets. If you’re accommodating guests with dietary restrictions, consider using dairy-free cream cheese and coconut yogurt to maintain a creamy texture, or provide alternative dessert options.

How do I know when the cheesecake is properly baked?
Great question! The edges of the cheesecake should be set and slightly puffy while the center remains a bit jiggly when you gently shake the pan. A good rule of thumb is about 70 minutes at 325°F (160°C) during baking. Once cooled, chilling the cheesecake for at least 4 hours or overnight ensures the best flavor and texture.

Mint Chocolate Cheesecake

Decadent Mint Chocolate Cheesecake with Oreo Crust Delight

Enjoy a rich and creamy Mint Chocolate Cheesecake with Oreo crust that delights every occasion.
Print Recipe Pin Recipe
Prep Time 30 minutes mins
Cook Time 1 hour hr 10 minutes mins
Chilling Time 4 hours hrs
Total Time 5 hours hrs 40 minutes mins
Servings: 12 slices
Course: Dessert
Cuisine: American
Calories: 450
Ingredients Equipment Method Nutrition Notes

Ingredients
  

For the Crust
  • 30 cookies Oreo cookies Use gluten-free Oreos for a gluten-free version.
  • 1/4 cup unsalted butter, melted Substitute with coconut oil for a dairy-free option.
For the Filling
  • 32 ounces cream cheese, room temperature Ensure it's at room temperature for smooth mixing.
  • 1 cup granulated sugar
  • 2/3 cup sour cream, room temperature
  • 2 teaspoons vanilla extract
  • 1 1/2 teaspoons mint or peppermint extract Choose based on preference for flavor intensity.
  • 1/4 teaspoon salt
  • 4 large eggs, room temperature Add eggs slowly to avoid overmixing.
  • green food coloring Optional for coloring the cheesecake.
  • 1 cup finely chopped Andes mints Can substitute with mint chocolate chips.
For the Ganache
  • 1 cup chocolate chips or chopped chocolate
  • 3/4 cup heavy cream
For the Whipped Cream
  • 2 tablespoons confectioners' sugar
  • green food coloring Optional for whipped cream.
  • Andes Chocolate Mints or Oreos for decorating Optional garnish.

Equipment

  • Food Processor
  • Mixing Bowl
  • Springform pan
  • Microwave

Method
 

Step‑by‑Step Instructions for Mint Chocolate Cheesecake
  1. Preheat your oven to 350°F (175°C). In a food processor, blend Oreo cookies into fine crumbs and mix with melted unsalted butter until well combined. Press this mixture firmly into the bottom and sides of a 9-inch springform pan. Bake for 10 minutes, then reduce oven temperature to 325°F (160°C).
  2. In a large mixing bowl, beat cream cheese and granulated sugar until creamy. Gradually add sour cream, vanilla extract, mint extract, and salt, mixing until incorporated. Add eggs one at a time, mixing gently. Add a few drops of green food coloring and fold in chopped Andes mints.
  3. Wrap the outside of the springform pan in aluminum foil to prevent water from seeping in. Pour cheesecake batter into the prepared crust.
  4. Place the springform pan in a larger pan filled with hot water for a water bath. Bake at 325°F (160°C) for about 70 minutes until edges are set.
  5. Turn off the oven and let cheesecake cool inside for 30 minutes with door ajar. Remove and cool on the counter for 1 hour before refrigerating. Chill for at least 4 hours or overnight.
  6. For ganache, heat heavy cream until steaming. Add chocolate chips, let sit, then stir until smooth. Pour ganache over the chilled cheesecake.
  7. Whip heavy cream with confectioners' sugar until stiff peaks form. Optionally add green food coloring. Spread whipped cream over ganache and top with Andes mints or Oreos.

Nutrition

Serving: 1sliceCalories: 450kcalCarbohydrates: 30gProtein: 6gFat: 35gSaturated Fat: 20gPolyunsaturated Fat: 1gMonounsaturated Fat: 6gCholesterol: 120mgSodium: 300mgPotassium: 120mgFiber: 2gSugar: 35gVitamin A: 500IUCalcium: 60mgIron: 1mg

Notes

Ensure all ingredients are at room temperature for the best results. Use a water bath for even baking.

Tried this recipe?

Let us know how it was!

Mango Coconut Bread Pudding: A Sweet Tropical Escape

February 20, 2026 by Grace Snow Leave a Comment

Recently, I found myself daydreaming about a sun-soaked beach, swaying palm trees, and, most importantly, the sweet tang of tropical fruit. That moment of bliss inspired me to whip up a comforting dish: Mango Coconut Bread Pudding. This easy-to-make dessert brilliantly marries the lushness of ripe mangoes with the creaminess of coconut milk, creating a delightful treat that transports you to paradise with every bite. Not only is it a crowd-pleaser that’s perfect for gatherings, but it’s also accommodating for various diets, being dairy-free and easily gluten-free. So, why not skip the fast food and treat your taste buds to a little island escape? Curious how to bring this luscious dessert to life? Let’s dive into the recipe!

Why is This Bread Pudding Irresistible?

Tropical Escape: This Mango Coconut Bread Pudding whisks you away to paradise with its vibrant flavors and creamy texture.
Easy to Prepare: Simplifying your dessert-making, it only requires basic ingredients and minimal effort for maximum impact!
Diet-Friendly: Accommodating various dietary needs, this recipe is dairy-free, nut-free, and can easily be made gluten-free—perfect for all your guests.
Impressive Presentation: The beautiful golden top with a sprinkle of shredded coconut makes it a stunning centerpiece for any gathering.
Make Ahead Convenience: Prepare it the night before and bake it fresh before serving—ideal for busy days! Pair it with Cheesy Garlic Bread for a full-on comfort food feast.

Mango Coconut Bread Pudding Ingredients

• Ready to whip up this tropical delight? Here’s what you need!

For the Pudding

  • Stale Bread – 6 cups cut into 1-inch cubes; ensure it’s stale for maximum custard absorption.
  • Ripe Mangoes – 2, peeled and diced; the riper, the sweeter for your Mango Coconut Bread Pudding.
  • Eggs – 4 large; they form the rich custard base for an indulgent texture.
  • Coconut Milk – 1 can (13.5 oz); provides a creamy coconut flavor, or use light coconut milk for a lower-cal option.
  • Granulated Sugar – 1/2 cup; adjust according to your sweetness preference.
  • Vanilla Extract – 1 tsp; pure vanilla is your best bet for a truly aromatic experience.
  • Shredded Coconut – 1/2 cup, plus extra for topping; adds delightful texture and coconut essence.

For Greasing the Dish

  • Butter or Cooking Spray – Use this to grease your baking dish, ensuring easy removal of the warm pudding.

Step‑by‑Step Instructions for Mango Coconut Bread Pudding

Step 1: Preheat & Prepare Dish
Begin by preheating your oven to 350°F (175°C). While the oven heats, take a 9x13-inch baking dish and generously grease it with butter or cooking spray to prevent the delicious Mango Coconut Bread Pudding from sticking. A well-prepared dish ensures an easy release after baking, leaving your pudding intact and ready to serve.

Step 2: Custard Mixture
In a large mixing bowl, crack 4 large eggs and whisk them vigorously until well beaten. Gradually add a can of coconut milk, ½ cup of granulated sugar, and 1 teaspoon of vanilla extract, mixing until the mixture is completely smooth and creamy. This custard base is essential for achieving that rich, velvety texture in your bread pudding.

Step 3: Combine Ingredients
Once your custard is ready, add 6 cups of stale bread cubes and 2 diced ripe mangoes to the bowl. Gently fold everything together, ensuring all the bread pieces are evenly coated with the custard mixture. Allow the mixture to sit for about 10 minutes, letting the bread absorb the delicious flavors and moisture, creating a wonderfully satisfying Mango Coconut Bread Pudding.

Step 4: Bake
Carefully pour the mixture into your prepared baking dish, spreading it out evenly. Sprinkle ½ cup of shredded coconut generously over the top to create a beautiful crust. Place the dish in the preheated oven and bake for 40-45 minutes, or until the top is golden brown and the center is set but still slightly jiggles when gently shaken, signaling that it's done.

Step 5: Cool & Serve
Once baked, remove the Mango Coconut Bread Pudding from the oven and let it cool for about 10 minutes on a wire rack. This cooling period helps it firm up a bit. Serve the pudding warm, optionally topped with a dollop of coconut cream or a scoop of vanilla ice cream for an extra tropical touch, ensuring everyone enjoys this delightful dessert.

Mango Coconut Bread Pudding Variations

Feel free to tweak and personalize this delightful Mango Coconut Bread Pudding to suit your taste buds!

  • Canned Mango: Substitute fresh mango with drained canned mango for convenience. It’s just as sweet and delicious!

  • Mixed Fruits: Add diced pineapple or berries for a burst of color and flavor. This combination elevates the tropical experience!

  • Bread Options: Use brioche or challah instead of regular bread. This twist enhances texture and flavor, making it even more indulgent.

  • Nutty Crunch: Toss in some chopped nuts like pecans or walnuts for a delightful crunch. They add texture and a hint of earthiness.

  • Spiced Up: Sprinkle in a dash of cinnamon or nutmeg to the custard for added warmth. These spices complement the mango and coconut beautifully.

  • Dairy-Free Cream: Swap out coconut milk for almond or cashew milk for a nutty take. This variation makes it a bit lighter yet still creamy.

  • Heat It Up: For an extra kick, add a pinch of cayenne pepper or fresh ginger to the custard mix. This unexpected heat balances the sweetness perfectly.

  • Tropical Topping: Top the pudding with a coconut syrup drizzle or passion fruit puree for a vibrant finishing touch. It’ll make your dessert sparkle with flavor!

Let your imagination run wild with these variations to make your Mango Coconut Bread Pudding uniquely yours! Try pairing it with Coconutty Beans Greens for a delightful meal that transports you straight to the tropics.

Make Ahead Options

These Mango Coconut Bread Pudding preparations are perfect for busy home cooks seeking to simplify their meal planning! You can assemble the entire pudding up to 24 hours in advance—just prepare the custard mixture and combine it with the stale bread and mangoes. Cover the dish tightly and refrigerate it overnight to allow the flavors to meld beautifully. When you're ready to serve, simply bake it straight from the fridge for 40-45 minutes until golden and set. This way, you’ll save precious time while ensuring your dessert is just as delicious as when freshly made. Enjoy the sweet bliss of tropical flavors without the hassle!

How to Store and Freeze Mango Coconut Bread Pudding

Fridge: Store leftovers in an airtight container for up to 3 days. Reheat in the microwave or oven until warmed through, ensuring the pudding remains deliciously soft.

Freezer: If you want to keep it longer, wrap portions tightly in plastic wrap and then in aluminum foil. It can be frozen for up to 3 months; defrost in the fridge overnight before reheating.

Reheating: After thawing, reheat in the oven at 350°F (175°C) for about 15-20 minutes or until warmed through. This will help restore its creamy texture for the best Mango Coconut Bread Pudding experience!

Serving Suggestions: Enjoy warmed, perhaps with a drizzle of coconut cream or a scoop of vanilla ice cream, for a tropical dessert treat any time.

Expert Tips for Mango Coconut Bread Pudding

  • Use Stale Bread: The best results come from stale bread, which soaks up the custard better. If using fresh bread, toast it lightly first.
  • Perfect Baking Time: Keep an eye out for a golden top with a center that jiggles slightly. Underbaking can result in a soggy pudding.
  • Chill Before Baking: For a make-ahead option, assemble the pudding the night before, cover, and refrigerate. Bake it fresh before serving!
  • Mix Bread Varieties: Experiment with different types of bread like brioche or challah for varied texture and flavor in your Mango Coconut Bread Pudding.
  • Add Flavor Enhancements: Consider adding spices like cinnamon or nutmeg to the custard for an extra layer of flavor that complements the mango wonderfully.

What to Serve with Mango Coconut Bread Pudding

Enjoying a delightful dessert is just the start; let's create a full, mouth-watering meal together!

  • Creamy Mashed Potatoes: Their buttery smoothness and comforting flavor provide the perfect contrast to the sweet and fruity notes of the pudding.
  • Grilled Pineapple Skewers: A tropical side that complements the mango perfectly, offering a sweet and smoky balance to every bite.
  • Coconut Cream Topping: Enhance the pudding even more with a dollop of whipped coconut cream; it amplifies the creamy texture and coconut flavor.
  • Tropical Salsa: A fresh mango and lime salsa offers an invigorating zing, perfectly brightening the rich pudding alongside.
  • Coconut Milk Rice: This subtly sweet side dish mirrors the flavors of the bread pudding while adding a lovely texture.
  • Spiced Rum Cocktail: A sip of this tropical drink elevates the meal, bringing a hint of warmth and adventure to each taste.
  • Fresh Fruit Salad: A colorful assortment of seasonal fruits provides a refreshing palate cleanser, enhancing the tropical experience.
  • Chocolate Coconut Macaroons: For those who crave a bit more sweetness, these chewy cookies are a perfect standout dessert.
  • Key Lime Pie: A zesty finish that balances the richness of the pudding, leaving everyone with a satisfied smile.
  • Mint-Infused Iced Tea: This refreshing drink keeps things light and complements the tropical theme of your meal seamlessly.

Mango Coconut Bread Pudding Recipe FAQs

How do I select the best ripe mangoes for this recipe?
Absolutely! When choosing mangoes, look for fruit that feels slightly soft to the touch and has a fragrant aroma. The skin should be mostly yellow with a bit of red blush. Avoid mangoes with dark spots all over, as they may be overripe.

What’s the best way to store leftover Mango Coconut Bread Pudding?
Very! Store any leftover pudding in an airtight container in the fridge for up to 3 days. When you're ready to enjoy it again, simply reheat in the microwave or oven until warmed through, ensuring you preserve its delightful texture.

Can I freeze Mango Coconut Bread Pudding, and if so, how?
Certainly! To freeze this heavenly dessert, wrap portions tightly in plastic wrap, then in aluminum foil to prevent freezer burn. It can be stored for up to 3 months. When you’re ready to indulge, let it thaw in the fridge overnight before reheating in the oven at 350°F (175°C) for about 15-20 minutes—this keeps it nice and creamy!

What can I do if my bread pudding doesn’t set properly after baking?
Don’t worry! If your Mango Coconut Bread Pudding turns out a bit soggy, it may be due to underbaking. Make sure to watch for a golden top and a slightly jiggly center as indicators that it's done. You can return it to the oven for a few additional minutes if it seems too wet; just cover it loosely with foil to prevent over-browning.

Is this recipe suitable for someone with nut allergies?
Absolutely! This Mango Coconut Bread Pudding is nut-free, making it a safe and delicious choice for those with nut allergies. However, always double-check that your ingredients, especially the coconut milk, are processed in a nut-free facility.

Can I make this dessert vegan?
Yes, very easily! To make a vegan version of this delicious pudding, replace the eggs with a mixture of flaxseed meal (1 tablespoon flaxseed meal + 2.5 tablespoons water per egg) and use a non-sweetened plant-based milk instead of coconut milk. Your dessert will still turn out rich and flavorful!

Mango Coconut Bread Pudding

Mango Coconut Bread Pudding: A Sweet Tropical Escape

Mango Coconut Bread Pudding is a delightful dessert that combines tropical flavors and creamy textures, making it perfect for gatherings.
Print Recipe Pin Recipe
Prep Time 10 minutes mins
Cook Time 45 minutes mins
Cooling Time 10 minutes mins
Total Time 1 hour hr 5 minutes mins
Servings: 8 slices
Course: Dessert
Cuisine: Tropical
Calories: 300
Ingredients Equipment Method Nutrition Notes

Ingredients
  

For the Pudding
  • 6 cups stale bread cut into 1-inch cubes
  • 2 ripe mangoes peeled and diced
  • 4 large eggs
  • 1 can (13.5 oz) coconut milk
  • 0.5 cup granulated sugar adjust according to sweetness preference
  • 1 tsp vanilla extract pure vanilla recommended
  • 0.5 cup shredded coconut plus extra for topping
For Greasing the Dish
  • butter or cooking spray to grease the baking dish

Equipment

  • 9x13-inch baking dish
  • Mixing Bowl
  • Whisk
  • Oven

Method
 

Step-by-Step Instructions
  1. Preheat your oven to 350°F (175°C) and grease a 9x13-inch baking dish.
  2. In a large mixing bowl, whisk 4 large eggs and then add coconut milk, sugar, and vanilla extract.
  3. Fold in stale bread cubes and diced mangoes, and let the mixture sit for 10 minutes.
  4. Pour the mixture into the prepared baking dish, sprinkle shredded coconut on top, and bake for 40-45 minutes.
  5. Let it cool for about 10 minutes before serving.

Nutrition

Serving: 1sliceCalories: 300kcalCarbohydrates: 45gProtein: 5gFat: 10gSaturated Fat: 2gCholesterol: 120mgSodium: 150mgPotassium: 250mgFiber: 2gSugar: 15gVitamin A: 600IUVitamin C: 15mgCalcium: 50mgIron: 1mg

Notes

Store leftovers in an airtight container for up to 3 days. Can be prepared the night before and baked fresh before serving.

Tried this recipe?

Let us know how it was!

Soft and Chewy Pistachio Cream Cookies to Satisfy Cravings

February 20, 2026 by Grace Snow Leave a Comment

A delightful aroma fills the kitchen as you mix together the magical ingredients for these Quick and Chewy Pistachio Cream Cookies. The moment you add the smooth pistachio cream, you're embarking on a flavor journey that effortlessly balances nutty richness with just the right touch of sweetness from gooey chocolate chunks. Ready in under 30 minutes, this recipe promises not only an indulgent treat but also a perfect solution for a last-minute gathering or a cozy night in. Plus, these cookies are undeniably soft and chewy, leaving everyone craving more with each delicious bite. Who can resist a cookie that’s both quick to make and a crowd-pleaser? Are you ready to discover your new favorite cookie recipe?

Why Are These Cookies a Must-Try?

Delightful flavors combine in each bite, thanks to the unique pairing of nutty pistachio cream and rich chocolate chunks. Quick and easy, you can whip up these cookies in under 30 minutes, making them ideal for spontaneous cravings or unexpected guests. Soft and chewy texture ensures these treats will fly off the plate, leaving everyone wanting more. Consider pairing with a warm cup of coffee for the ultimate indulgence, or check out our Eggnog Cookies Soft for another delicious option. Versatile enough to allow for nut substitutions, each baking session can result in a new flavor adventure. Perfect for gatherings, the delightful aroma will have friends and family rushing to the kitchen for a taste!

Pistachio Cream Cookies Ingredients

  • For the Batter

  • Pistachio Cream – Adds nutty flavor and moisture; substitute with any unsweetened nut cream or butter if unavailable.

  • Unsalted Butter – Provides richness and tenderness; ensure it's at room temperature for optimal mixing.

  • Granulated Sugar – Sweetens the cookies; adjust the amount based on personal sweetness preference.

  • All-Purpose Flour – Provides structure to the cookies; sift for a light and fluffy texture.

  • Baking Soda – Essential for leavening; ensures the cookies rise to a desirable height.

  • Sea Salt – Balances sweetness and enhances flavor; adjust according to the saltiness of the pistachios.

  • For the Mix-Ins

  • Roasted Pistachios – Adds crunch and enhances the pistachio flavor; use salted or unsalted based on your preference.

  • Chocolate Chunks – Provides sweetness and rich texture; can substitute with chocolate chips.

Step‑by‑Step Instructions for Pistachio Cream Cookies

Step 1: Prepare Dough
In a large mixing bowl, combine the smooth pistachio cream and softened unsalted butter. Using a hand mixer, beat the mixture on medium speed until creamy and well-blended, about 2 minutes. Gradually add the granulated sugar and continue mixing until the mixture is light and fluffy, approximately 3 minutes. The dough should look pale yellow and airy.

Step 2: Incorporate Dry Ingredients
In a separate bowl, sift together the all-purpose flour, baking soda, and sea salt. Slowly incorporate the dry mixture into the wet ingredients, folding gently with a spatula or wooden spoon. Be careful not to overmix; you want the dough to come together without lumps, which should take about 2-3 minutes. The final dough should feel slightly sticky yet cohesive.

Step 3: Add Mix-Ins
Now it’s time to elevate your Pistachio Cream Cookies! Gently fold in the roasted pistachios and chocolate chunks, ensuring they’re evenly distributed throughout the dough. This step should take only about 1-2 minutes. You’ll see bits of green and dark chocolate flecking the light dough, promising delight in every bite.

Step 4: Shape Cookies
Line a baking sheet with parchment paper, which will help prevent sticking. Use a cookie scoop or tablespoon to drop rounded portions of dough onto the baking sheet, spacing them about 2 inches apart. Lightly flatten each ball with the palm of your hand to ensure even baking. This step should take around 5 minutes.

Step 5: Bake
Preheat your oven to 350°F (175°C) while you finish shaping the cookies. Once preheated, bake the cookies for 10-12 minutes. Keep an eye on them; you’re looking for golden edges and soft centers that still appear slightly underbaked. This visual cue ensures that the final texture of your Pistachio Cream Cookies remains soft and chewy.

Step 6: Cool
Once the cookies are baked to perfection, remove them from the oven and allow them to cool on the baking sheet for about 5 minutes. This resting time helps them firm up slightly. After this, transfer the cookies to a wire rack to cool completely. The aroma of freshly baked Pistachio Cream Cookies will fill your kitchen!

Step 7: Serve & Store
After your delicious Pistachio Cream Cookies have cooled, they’re ready to be enjoyed! Pair them with a glass of milk or a warm cup of coffee for the ultimate treat. Store any leftovers in an airtight container, where they will stay fresh for up to a week, making it easy to savor these delightful cookies when cravings hit.

Make Ahead Options

These Pistachio Cream Cookies are perfect for meal prep enthusiasts! You can prepare the dough up to 24 hours in advance by mixing all ingredients and chilling it in the refrigerator. This not only saves time on busy nights but also enhances the flavors as they meld together overnight. Alternatively, you can shape the cookies and freeze unbaked dough balls for up to 3 months. When ready to bake, simply place them on a lined baking sheet and add a couple of extra minutes to the baking time. To maintain that soft and chewy texture, store baked cookies in an airtight container for up to a week. Enjoy the delightful taste of fresh Pistachio Cream Cookies with minimal effort!

What to Serve with Quick and Chewy Pistachio Cream Cookies

There's nothing quite like the experience of enjoying fresh-baked cookies, and pairing them perfectly can elevate your dessert moment to an unforgettable delight.

  • Creamy Vanilla Ice Cream: The velvety texture enhances the soft cookies while the coolness brings out the nutty flavors.
  • Espresso: The rich, bold flavor complements the sweetness of the cookies, creating a delightful balance that coffee lovers will cherish.
  • Fresh Berries: Juicy strawberries or raspberries add a refreshing contrast, cutting through the richness of the pistachios and chocolate.
  • Chocolate Milk: This comforting drink enhances the cookie experience, bringing out the sweet chocolate chunks in every bite.

For a heartwarming finish, consider serving a warm cup of herbal tea alongside your treats. The fragrant warmth wraps around the flavors of the cookies, making each bite even more delightful. After all, nothing says cozy like cookies and tea!

Pistachio Cream Cookies Variations

Feel free to customize these delightful cookies to suit your taste and dietary needs, creating a unique flavor profile!

  • Nut Free: Substitute pistachio cream with sunbutter for a nut-free version that’s equally creamy and delicious.
  • Gluten-Free: Use a 1:1 gluten-free flour blend in place of all-purpose flour for a gluten-free treat everyone can enjoy.
  • Dairy-Free: Replace unsalted butter with coconut oil or a plant-based butter for a dairy-free option that retains richness.
  • Extra Chewy: Add a tablespoon of corn syrup to the dough for an extra chewiness that enhances every bite.
  • Fruity Twist: Fold in dried cranberries or cherries alongside the pistachios for a fruity burst of flavor and a beautiful color contrast.
  • Zesty Kick: Mix in the zest of a lemon or lime to complement the nutty flavor, adding an exciting citrusy twist.
  • Chocolate Lovers: Swap in dark chocolate chunks or even white chocolate for a sweeter treat that satisfies every chocolate craving. Enjoy them alongside our delightful Thumbprint Cookies Melt for more delicious options!
  • Hearty Crunch: Use a combination of chopped dark chocolate and toffee bits for an irresistible caramel crunch in each cookie.

With these variations, you can make your own pistachio cookie masterpiece that perfectly fits your flavor and dietary preferences!

Expert Tips for Pistachio Cream Cookies

  • Mix Carefully: Avoid overmixing the dough; it can lead to dry cookies. Mix just until combined for that perfect soft and chewy texture.

  • Watch the Oven: Keep a close eye while baking. Remove cookies when the edges are golden and the centers are still soft; this ensures they maintain their chewiness.

  • Dough Chilling: If you prefer thicker cookies, chill the dough for at least 30 minutes before baking. This step can enhance their texture and shape.

  • Cookie Size Matters: Use a cookie scoop for uniform sizes. This ensures even baking and consistent softness in all your Pistachio Cream Cookies.

  • Storage Savvy: Store cookies in an airtight container to maintain freshness for up to a week. You can also freeze leftovers for future cravings!

How to Store and Freeze Pistachio Cream Cookies

Room Temperature: Store cookies in an airtight container at room temperature for up to 1 week, keeping them soft and chewy for every delightful bite.

Fridge: For extended freshness, these Pistachio Cream Cookies can be refrigerated in an airtight container for up to 2 weeks without losing their scrumptious flavor.

Freezer: Freeze cookies in a single layer, then transfer to a freezer-safe bag or container for up to 3 months. Thaw at room temperature when craving strikes.

Reheating: If you want that freshly baked taste, warm cookies in the microwave for about 10-15 seconds or in the oven at 350°F (175°C) for a few minutes.

Pistachio Cream Cookies Recipe FAQs

How do I know if my pistachios are ripe for use?
Absolutely! When choosing pistachios, look for those that are bright green and have a nutty aroma. If any shells are closed tightly or if you see dark spots all over the nuts, those may be stale. Fresh pistachios should have a slightly crunchy texture, making them perfect for your cookies.

What’s the best way to store leftover Pistachio Cream Cookies?
For optimal freshness, store your cookies at room temperature in an airtight container for up to 1 week. If you'd like to enjoy them for longer, refrigerate them for up to 2 weeks. Remember, preventing moisture is key to keeping your cookies soft and chewy!

Can I freeze these cookies? If so, how?
Yes, you can easily freeze your Pistachio Cream Cookies! First, allow them to cool completely. Then, place them in a single layer on a baking sheet and freeze until solid. Transfer the frozen cookies to a freezer-safe bag or container, ensuring you remove as much air as possible. They will be good for up to 3 months! To enjoy, simply thaw at room temperature, or warm them in the oven for a delightful, fresh-out-of-the-oven taste.

What should I do if my cookie dough seems too dry or crumbly?
If you find your dough dry, don't worry! This can happen sometimes. Simply add a teaspoon of milk or water to the dough and mix gently until it's just combined. Avoid overmixing, which can lead to drier cookies. It’s important to keep an eye on the texture while mixing to achieve that perfectly soft and chewy result.

Are there any dietary restrictions I should consider with this recipe?
Great question! If you're baking for someone with nut allergies, you can substitute pistachio cream with sunflower seed butter or any nut-free cream. Always check the labels of your ingredients to ensure they are safe for dietary restrictions. Additionally, for anyone avoiding gluten, using a gluten-free flour blend in place of all-purpose flour can work well!

What would you recommend if I want to add additional flavors or variations to the cookies?
The more the merrier! Consider incorporating 1 tablespoon of lemon or orange zest for a refreshing citrus twist. You can also swap out the roasted pistachios for hazelnuts for a different nutty flavor. Even adding a handful of dried cranberries or cherries can provide a delightful fruity contrast that pairs well with the cookie's nuttiness.

Pistachio Cream Cookies

Soft and Chewy Pistachio Cream Cookies to Satisfy Cravings

Indulge in delicious Soft and Chewy Pistachio Cream Cookies, blending nutty richness with chocolate chunks.
Print Recipe Pin Recipe
Prep Time 10 minutes mins
Cook Time 12 minutes mins
Cooling Time 5 minutes mins
Total Time 27 minutes mins
Servings: 12 cookies
Course: Dessert
Cuisine: American
Calories: 120
Ingredients Equipment Method Nutrition Notes

Ingredients
  

For the Batter
  • 1 cup Pistachio Cream Substitute with any unsweetened nut cream or butter if unavailable.
  • 1/2 cup Unsalted Butter Ensure it's at room temperature for optimal mixing.
  • 3/4 cup Granulated Sugar Adjust based on personal sweetness preference.
  • 1 cup All-Purpose Flour Sift for a light and fluffy texture.
  • 1 teaspoon Baking Soda Essential for leavening.
  • 1/4 teaspoon Sea Salt Adjust according to the saltiness of the pistachios.
For the Mix-Ins
  • 1/2 cup Roasted Pistachios Use salted or unsalted based on your preference.
  • 1 cup Chocolate Chunks Can substitute with chocolate chips.

Equipment

  • Mixing Bowl
  • hand mixer
  • Cookie Scoop
  • Baking Sheet
  • Parchment Paper

Method
 

Step-by-Step Instructions
  1. In a large mixing bowl, combine the pistachio cream and softened unsalted butter. Beat on medium speed until creamy and well-blended, about 2 minutes.
  2. Gradually add the granulated sugar and continue mixing until light and fluffy, approximately 3 minutes.
  3. In a separate bowl, sift together the all-purpose flour, baking soda, and sea salt. Slowly incorporate this dry mixture into the wet ingredients, folding gently.
  4. Gently fold in the roasted pistachios and chocolate chunks, ensuring they’re evenly distributed.
  5. Line a baking sheet with parchment paper. Use a cookie scoop to drop rounded portions of dough, spacing them about 2 inches apart.
  6. Preheat your oven to 350°F (175°C). Bake the cookies for 10-12 minutes until golden edges and soft centers visible.
  7. After baking, let the cookies cool on the baking sheet for about 5 minutes before transferring them to a wire rack.
  8. Once cooled, serve your cookies with milk or coffee. Store leftovers in an airtight container.

Nutrition

Serving: 1cookieCalories: 120kcalCarbohydrates: 15gProtein: 2gFat: 6gSaturated Fat: 3gPolyunsaturated Fat: 2gMonounsaturated Fat: 1gCholesterol: 15mgSodium: 50mgPotassium: 50mgFiber: 1gSugar: 8gVitamin A: 50IUCalcium: 10mgIron: 0.5mg

Notes

Avoid overmixing for a soft and chewy texture. Keep an eye on baking time for best results.

Tried this recipe?

Let us know how it was!

Golden Oat Masala Chai Custard Sandwich Cookies to Savor

February 20, 2026 by Grace Snow Leave a Comment

As I brewed my morning chai, the rich aroma of cardamom and ginger danced through my kitchen, instantly sparking excitement. This inspired me to create something truly special—Golden Oat Masala Chai Custard Sandwich Cookies. Combining the heartwarming essence of spicy chai with a creamy custard filling, these cookies offer a delightful twist on traditional desserts. They’re not only a treat for the senses but also quick to whip up, making them a perfect addition to any gathering or a cozy night in. Plus, their chewy texture and unique flavor are sure to impress friends and family alike. Ready to dive into this flavorful adventure? Let's make cookies that are equal parts comforting and exciting!

Why are these cookies a must-try?

Unique Flavor Fusion: These Golden Oat Masala Chai Custard Sandwich Cookies beautifully blend the familiar warmth of chai spices with a creamy custard filling.

Effortless Baking: Even if you're a beginner, the simple steps make these cookies achievable and rewarding.

Perfect for Any Occasion: Whether it’s a tea party or a cozy night in, these cookies bring a touch of indulgence to any gathering.

Versatile Variations: Get creative! Try different spices or fillings, like vanilla buttercream for a fun twist.

Chewy Delight: Experience the robust texture of oats combined with a luscious custard, creating an unforgettable dessert that leaves everyone wanting more!

Pair these cookies with a warm cup of masala chai, and they’ll surely become a favorite in your home.

Golden Oat Masala Chai Custard Sandwich Cookies

• Bring a warm twist to your dessert table!

For the Cookies

  • All-Purpose Flour – Provides structure to the cookies; gluten-free flour can be swapped for a gluten-intolerant option.
  • Quick Cooking Rolled Oats – Adds chewiness and enhances the delightful oaty flavor; instant oats work well in a pinch.
  • Dark Brown Sugar – Contributes moisture and rich sweetness; light brown sugar is a good substitute if needed.
  • White Sugar – Sweetens the cookies; using a blend with brown sugar enhances depth.
  • Salt – Enhances the flavors in your cookies; feel free to adjust to your taste!
  • Unsalted Butter – Adds richness and moisture; vegan butter is a great alternative for dairy-free cookies.
  • Golden Syrup or Honey – Acts as a binder while adding sweetness; maple syrup can also be used effectively.
  • Water – Hydrates the dough; room temperature water is best.
  • Baking Soda – Helps cookies rise; ensure it’s fresh for the best results.

For the Chai Infusion

  • Masala Chai – Provides the signature spiced flavor essential for these cookies; homemade or store-bought varieties are fantastic.
  • Fresh Ginger – Adds a spicy kick to the chai infusion; omit if you prefer a milder taste.

For the Custard Filling

  • Custard Powder – Thickens the filling; cornstarch can be used as a substitute.
  • Egg Yolks – Adds richness and helps thicken the custard; a flax or chia egg can work for vegans.
  • Masala Chai Spices – Infuses the filling with chai flavor; customize according to your preference.
  • Cardamom Pod – Provides an aromatic spice note; ground cardamom can be used if that’s what you have on hand.
  • Ginger Powder, Cinnamon, Black Pepper – Offers warmth and spiciness to the custard, enhancing the overall flavor experience.

With these ingredients at hand, your Golden Oat Masala Chai Custard Sandwich Cookies will be a hit, combining comforting flavors and delightful textures perfect for any dessert lover!

Step‑by‑Step Instructions for GOLDEN OAT MASALA CHAI CUSTARD SANDWICH COOKIES

Step 1: Preheat and Prepare
Preheat your oven to 325°F (160°C) and line two baking sheets with parchment paper. This will ensure that your Golden Oat Masala Chai Custard Sandwich Cookies bake evenly and don’t stick. While the oven heats up, gather all your ingredients, including flour, oats, sugars, and butter, so everything is ready to go.

Step 2: Mix Dry Ingredients
In a large mixing bowl, combine all-purpose flour, quick cooking rolled oats, dark brown sugar, white sugar, and salt. Stir these dry ingredients together until well combined. This step is essential to ensure that the flavors are evenly distributed in your cookie dough, setting the foundation for your delicious cookies.

Step 3: Brown the Butter
In a saucepan over medium heat, melt unsalted butter until it turns golden brown and starts to smell nutty, about 4-5 minutes. Be attentive to avoid burning it. Once browned, take it off the heat and let it cool for a few minutes before mixing in golden syrup and water. This rich, nutty flavor will enhance the taste of your Golden Oat Masala Chai Custard Sandwich Cookies beautifully.

Step 4: Combine Wet and Dry Ingredients
Pour the cooled butter mixture into the bowl with the dry ingredients. Stir until everything is well combined and forms a greasy cookie dough. The dough should be slightly sticky but should hold together. This amalgamation of wet and dry ingredients is crucial for achieving the perfect texture in your cookies.

Step 5: Portion the Dough
Using a cookie scoop, portion out the dough and place it on the prepared baking sheets, leaving at least 2 inches between each scoop. Aim for smooth, rounded shapes for a uniform baking result. This step is key as it allows your Golden Oat Masala Chai Custard Sandwich Cookies to bake evenly, creating a delightful chewy texture.

Step 6: Bake the Cookies
Bake your cookies in the preheated oven for approximately 8 minutes, or until the edges are golden brown and set while the centers remain soft. Keep a close eye on them to prevent overbaking. Once they’re baked to perfection, they will have a lovely golden hue that signals they are ready to cool.

Step 7: Cool on a Rack
Remove the baking sheets from the oven and let the cookies cool on the sheets for about 5 minutes. Then transfer them to a wire rack to cool completely. This cooling process ensures that your cookies set properly and makes them easier to handle before assembling your sandwiches.

Step 8: Prepare the Chai Infusion
To make the chai infusion, brew your favorite masala chai according to package instructions, adding a small piece of fresh ginger for extra flavor. Let it steep for 5-7 minutes, then strain the infusion to remove any solids. Allow it to cool while you prepare the custard filling; this aromatic base will infuse your filling with authentic chai goodness.

Step 9: Make the Custard Filling
In a mixing bowl, combine the egg yolks with the hot sugar mixture (made from part of the brewed chai), and whisk until smooth. Gradually stir in the custard powder along with the masala chai spices, ensuring there are no lumps. This mixture will form the luscious base for your custard filling, delivering that creamy texture you crave in the sandwich cookies.

Step 10: Whip the Butter
Add in the softened butter to your custard mixture and beat until it becomes light and fluffy, about 3-5 minutes. This step is essential for creating a velvety custard filling that complements the chewy texture of your cookies. Once fluffy, your chai-infused filling will be ready to elevate your Golden Oat Masala Chai Custard Sandwich Cookies.

Step 11: Assemble the Cookies
Using a piping bag, pipe a generous dollop of custard onto the base cookie, then gently top it with another cookie to create a sandwich. Press down lightly to seal the edges. The custard filling should be visible around the edges, hinting at the delightful flavor within. This step is where your wonderful cookies come together, creating a perfect bite of comfort and nostalgia.

Step 12: Serve and Savor
Once assembled, let the cookies set for a few minutes before serving. The Golden Oat Masala Chai Custard Sandwich Cookies can be enjoyed fresh or stored in an airtight container. Pair them with a warm cup of masala chai or coffee for a delightful afternoon treat. Whether shared with friends or savored alone, these cookies are sure to bring joy to your day!

What to Serve with Golden Oat Masala Chai Custard Sandwich Cookies

Pairing these delightful cookies with the right complements will enhance their warm, spiced flavors, making for a truly memorable treat.

  • Masala Chai: This aromatic beverage mirrors the flavors of the cookies and elevates the chai experience, creating a cozy afternoon vibe.
  • Vanilla Ice Cream: A scoop of creamy vanilla ice cream adds a cool, creamy texture that beautifully contrasts the chewy cookies.
  • Spiced Coffee: A bold cup of spiced coffee brings out the chai notes, creating a harmonious flavor symphony that’s invigorating and comforting.
  • Coconut Macaroons: Chewy coconut macaroons provide a sweet, tropical twist that complements the chai spices seamlessly. The combination is delightful.
  • Fresh Berries: Juicy raspberries or strawberries offer a refreshing burst of acidity that cuts through the cookie's sweetness, balancing each bite.
  • Chocolate Ganache: Drizzle warm chocolate ganache over the cookies or serve alongside for a rich, indulgent pairing that's sure to please chocolate lovers.

Creating the perfect spread for your Golden Oat Masala Chai Custard Sandwich Cookies can turn a simple dessert into a feast for the senses!

GOLDEN OAT MASALA CHAI CUSTARD SANDWICH COOKIES Variations

Feel free to explore these delightful twists and substitutions for your Golden Oat Masala Chai Custard Sandwich Cookies that cater to your personal tastes!

  • Gluten-Free: Substitute all-purpose flour with a gluten-free flour blend to enjoy the same chewy texture without the gluten. Perfect for those with sensitivities!

  • Vegan: Swap the unsalted butter for vegan butter and replace egg yolks with a flax or chia egg for a plant-based treat. You'll find that the deliciousness remains intact!

  • Flavor Boost: Experiment with different spices like nutmeg or cloves in your masala chai for a unique twist. Each spice adds its character, making every bite a little adventure!

  • Sweetness Swap: Use coconut sugar instead of brown sugars for a deeper, caramel-like sweetness. This alternative can also add a delightful hint of coconut flavor.

  • Custard Variations: Try different fillings like vanilla buttercream or a rich chocolate ganache for a luscious twist. The chocolate option can elevate the dessert experience entirely!

  • Chai Variants: For chai lovers, consider using flavored chai blends like vanilla or caramel chai to customize the taste of your custard. It’s a fun way to mix things up.

  • Nutty Addition: Mix in some finely chopped nuts like pecans or walnuts into the cookie dough for added crunch and flavor. They pair beautifully with the soft custard filling!

  • Chili Heat: If you enjoy a little heat, add a pinch of cayenne pepper to the cookies or custard mix. It creates an intriguing balance with the sweetness and spice of chai.

These variations not only enhance the flavor but also invite creativity into your baking! Whether you’re in the mood for something indulgent or a bit healthier, these swaps will make your Golden Oat Masala Chai Custard Sandwich Cookies uniquely yours. You can also check out these delightful recipes like Matcha Cookies Soft or Thumbprint Cookies Melt for more fun ideas!

Storage Tips for Golden Oat Masala Chai Custard Sandwich Cookies

  • Room Temperature: Keep your cookies in an airtight container at room temperature for up to 1 week to maintain their chewy texture and flavors.

  • Fridge: If you prefer a slightly firmer custard filling, you can store the cookies in the refrigerator for up to 5 days. Just remember to bring them back to room temperature before serving.

  • Freezer: For longer storage, freeze the assembled cookies in a single layer on a baking sheet, then transfer to an airtight container for up to 1 month. Thaw at room temperature for about 30 minutes before enjoying.

  • Reheating: If you enjoy the cookies warm, gently reheat them in a preheated oven at 300°F (150°C) for about 5 minutes to refresh their chewy goodness without compromising the custard filling.

Make Ahead Options

These Golden Oat Masala Chai Custard Sandwich Cookies are ideal for meal prep, allowing you to enjoy homemade treats with minimal last-minute effort. You can make the cookie dough up to 24 hours in advance—simply store it in an airtight container in the refrigerator to keep it fresh. Additionally, you can prepare the chai-infused custard filling up to 3 days in advance; just make sure to refrigerate it and give it a quick stir before using to maintain its creamy texture. When you're ready to bake, simply portion the chilled dough onto baking sheets and proceed with the baking instructions as usual. This way, you can savor delicious cookies without the hassle on busy weeknights!

Expert Tips for Golden Oat Masala Chai Custard Sandwich Cookies

  • Perfect Butter Browning: Watch the butter closely while browning; a rich, nutty flavor enhances your cookies, but burnt butter can ruin the taste.

  • Cooling is Key: Allow the cookies to cool thoroughly before handling them. This helps maintain their structure and prevents breakage when assembling.

  • Piping Precision: If your custard filling is too loose, refrigerate it briefly to firm up. This will make piping easier and keep mess to a minimum.

  • Taste Test Spices: When customizing your masala chai spices, remember to taste as you go. Finding the right balance ensures your Golden Oat Masala Chai Custard Sandwich Cookies shine with flavor.

  • Cookie Shape Matters: For even baking, aim for smooth, rounded cookie shapes. This ensures a consistent texture and delightful chewiness throughout.

  • Storage Savvy: Store cookies in an airtight container to maintain freshness for up to a week, or freeze them for later enjoyment without losing quality.

Golden Oat Masala Chai Custard Sandwich Cookies Recipe FAQs

Can I use regular oats instead of quick cooking rolled oats?
Absolutely! While quick cooking rolled oats add a lovely chewiness, regular rolled oats can definitely be used. Just keep in mind that the texture might be a bit heartier, but it will still deliver that delicious oat flavor!

How should I store these cookies?
Store your cookies in an airtight container at room temperature for up to 1 week to enjoy their chewy texture. If you'd like a firmer custard filling, pop them in the fridge for up to 5 days—just remember to let them come back to room temperature before biting in!

Can I freeze Golden Oat Masala Chai Custard Sandwich Cookies?
Yes! To freeze, place the assembled cookies in a single layer on a baking sheet and freeze until solid. Then, transfer them to an airtight container and store them for up to 1 month. When you're ready to enjoy, simply thaw them at room temperature for about 30 minutes—perfect for a delightful treat any time!

What can I do if my custard filling is too runny?
If your custard is too loose for piping, don't worry! Just refrigerate it for about 10-15 minutes to firm it up. Mixing in a touch more custard powder can help as well, but cooling usually does the trick for perfect piping consistency.

Are these cookies suitable for people with allergies?
For those with dairy allergies, you can replace the unsalted butter with a dairy-free vegan butter, and try a flax or chia egg in place of the egg yolks for the custard filling. Those with gluten sensitivities can also swap the all-purpose flour with a gluten-free flour blend. Always check your ingredients to ensure they meet your dietary needs!

GOLDEN OAT MASALA CHAI CUSTARD SANDWICH COOKIES

Golden Oat Masala Chai Custard Sandwich Cookies to Savor

Enjoy delicious Golden Oat Masala Chai Custard Sandwich Cookies that combine chai flavor with creamy custard for a delightful dessert.
Print Recipe Pin Recipe
Prep Time 30 minutes mins
Cook Time 8 minutes mins
Cooling Time 5 minutes mins
Total Time 43 minutes mins
Servings: 12 cookies
Course: Dessert
Cuisine: Indian
Calories: 180
Ingredients Equipment Method Nutrition Notes

Ingredients
  

For the Cookies
  • 2 cups All-Purpose Flour Gluten-free flour can be swapped for a gluten-intolerant option.
  • 1 cup Quick Cooking Rolled Oats Instant oats work well in a pinch.
  • 1 cup Dark Brown Sugar Light brown sugar is a good substitute.
  • 1/2 cup White Sugar Using a blend with brown sugar enhances depth.
  • 1 teaspoon Salt Feel free to adjust to your taste.
  • 1/2 cup Unsalted Butter Vegan butter is a great alternative.
  • 1/4 cup Golden Syrup or Honey Maple syrup can also be used.
  • 1/4 cup Water Room temperature water is best.
  • 1 teaspoon Baking Soda Ensure it’s fresh.
For the Chai Infusion
  • 1 cup Masala Chai Homemade or store-bought varieties are fantastic.
  • 1 inch Fresh Ginger Omit if you prefer a milder taste.
For the Custard Filling
  • 1/4 cup Custard Powder Cornstarch can be used as a substitute.
  • 3 number Egg Yolks A flax or chia egg can work for vegans.
  • 1 teaspoon Masala Chai Spices Customize according to your preference.
  • 1 number Cardamom Pod Ground cardamom can be used.
  • 1 teaspoon Ginger Powder
  • 1/2 teaspoon Cinnamon
  • 1/2 teaspoon Black Pepper

Equipment

  • Oven
  • Mixing Bowl
  • Saucepan
  • Baking Sheets
  • piping bag

Method
 

Step‑By‑Step Instructions
  1. Preheat your oven to 325°F (160°C) and line two baking sheets with parchment paper.
    GOLDEN OAT MASALA CHAI CUSTARD SANDWICH COOKIES
  2. In a large mixing bowl, combine all-purpose flour, quick cooking rolled oats, dark brown sugar, white sugar, and salt. Stir until well combined.
    GOLDEN OAT MASALA CHAI CUSTARD SANDWICH COOKIES
  3. In a saucepan over medium heat, melt unsalted butter until it turns golden brown, about 4-5 minutes. Let it cool before mixing in golden syrup and water.
    GOLDEN OAT MASALA CHAI CUSTARD SANDWICH COOKIES
  4. Pour the cooled butter mixture into the bowl with the dry ingredients. Stir until everything is well combined.
    GOLDEN OAT MASALA CHAI CUSTARD SANDWICH COOKIES
  5. Using a cookie scoop, portion out the dough and place it on the prepared baking sheets with 2 inches apart.
    GOLDEN OAT MASALA CHAI CUSTARD SANDWICH COOKIES
  6. Bake the cookies for approximately 8 minutes, until the edges are golden brown and set.
    GOLDEN OAT MASALA CHAI CUSTARD SANDWICH COOKIES
  7. Let the cookies cool on the sheets for about 5 minutes, then transfer them to a wire rack to cool completely.
    GOLDEN OAT MASALA CHAI CUSTARD SANDWICH COOKIES
  8. Brew your favorite masala chai and let it steep for 5-7 minutes, then strain and let cool.
    GOLDEN OAT MASALA CHAI CUSTARD SANDWICH COOKIES
  9. In a mixing bowl, combine egg yolks with the hot chai sugar mixture and whisk until smooth. Stir in custard powder and masala chai spices.
    GOLDEN OAT MASALA CHAI CUSTARD SANDWICH COOKIES
  10. Add softened butter to the custard mixture and beat until light and fluffy, about 3-5 minutes.
    GOLDEN OAT MASALA CHAI CUSTARD SANDWICH COOKIES
  11. Using a piping bag, pipe custard onto a cookie and top with another cookie to create a sandwich.
    GOLDEN OAT MASALA CHAI CUSTARD SANDWICH COOKIES
  12. Let the cookies set for a few minutes before serving.
    GOLDEN OAT MASALA CHAI CUSTARD SANDWICH COOKIES

Nutrition

Serving: 1cookieCalories: 180kcalCarbohydrates: 25gProtein: 2gFat: 7gSaturated Fat: 4gPolyunsaturated Fat: 0.5gMonounsaturated Fat: 1.5gCholesterol: 40mgSodium: 120mgPotassium: 60mgFiber: 1gSugar: 10gVitamin A: 200IUCalcium: 20mgIron: 1mg

Notes

Store cookies in an airtight container for up to 1 week or freeze for later enjoyment. These cookies pair wonderfully with a warm cup of masala chai or coffee.

Tried this recipe?

Let us know how it was!

Cheesy Mediterranean Quesadilla: Quick, Flavor-Packed Comfort

February 20, 2026 by Grace Snow Leave a Comment

As I flipped the golden-brown quesadilla, the comforting aroma of melting cheese and earthy spinach wafted through my kitchen, instantly transporting me to a bustling Mediterranean market. Today, I’m excited to share my Cheesy Mediterranean Quesadilla with Spinach & Feta—a dish that effortlessly blends vibrant flavors for a quick dinner that even the kids will adore. Not only is this recipe vegetarian-friendly, but it also packs a nutritious punch with fresh tomatoes and greens, ensuring you can savor a wholesome meal without sacrificing taste. Each bite is a delightful experience, combining crispy tortillas and gooey cheese that feels like a warm hug. Are you ready to toss aside the fast food and whip up something spectacular tonight? Let's dive into this delicious culinary adventure!

Why is this quesadilla a must-try?

Quick and Easy: This Cheesy Mediterranean Quesadilla comes together in just 20 minutes, making it perfect for busy weeknights.

Flavor Explosion: Fresh ingredients like tomatoes, spinach, and zesty feta cheese meld into a mouthwatering filling that’s hard to resist.

Vegetarian Delight: Packed with nutritious veggies, this recipe is not just a meal; it’s a healthy choice that doesn’t skimp on flavor.

Family-Friendly: The melty cheese makes this a favorite among kids, ensuring even the pickiest eaters will be asking for seconds!

Endless Variations: Feel free to customize with your favorite Mediterranean ingredients, such as olives or artichokes, just like in my Cheesy Corn Fritters for even more inspiration.

Crispy and Cheesy: Experience the delightful contrast of crunchy tortillas enveloping gooey cheese—every bite is a satisfying treat!

Cheesy Mediterranean Quesadilla Ingredients

For the Filling
• 1 large tomato – adds freshness and sweetness; use campari or vine-ripened for the best flavor.
• 1/4 cup red onion – provides sharpness and crunch; substitute with green onions for a milder flavor.
• 2 cups spinach – contributes nutrients and color; pat dry or sauté briefly before use to prevent excess moisture.
• 3/4 cup crumbled feta cheese – adds creaminess and tangy flavor; can substitute with goat cheese if preferred.
• 1 cup shredded mozzarella cheese – provides melty texture; blend with other cheeses for a different flavor profile.
• 3 flour tortillas (8-inch) – the base of the quesadilla; whole wheat or burrito-sized tortillas can be used for added fiber.
• 1/2 teaspoon dried oregano – enhances the Mediterranean flavor; fresh oregano can be used but adjust the amount to taste.

Step‑by‑Step Instructions for Cheesy Mediterranean Quesadilla

Step 1: Prep Filling
In a medium bowl, combine the diced tomato, finely chopped red onion, and spinach. Add the crumbled feta and shredded mozzarella cheese along with the dried oregano. Mix gently until everything is well distributed, ensuring to squeeze the spinach gently to remove any excess moisture. The filling should be vibrant and fragrant, ready to pack in those delicious quesadillas.

Step 2: Assemble Quesadillas
On a clean surface, lay out the three flour tortillas. Take about one-third of the prepared filling and place it on one half of each tortilla. Gently fold the other half over to enclose the filling, pressing down lightly to secure it. This step is crucial for keeping the cheesy Mediterranean quesadilla intact when cooking and flipping.

Step 3: Cook
Heat a skillet over medium heat and add just a splash of oil to prevent sticking. Carefully place each folded quesadilla in the skillet, cooking for 3–4 minutes or until golden brown on the bottom. Keep an eye on them for crispness, then flip and cook the other side for another 3–4 minutes, until the cheese is melted and the tortillas are crispy and golden.

Step 4: Rest and Serve
Once cooked, remove the quesadillas from the skillet and allow them to rest on a cutting board for about one minute. This resting period helps the cheese set slightly, making them easier to cut. Slice the cheesy Mediterranean quesadilla into wedges and serve warm, perhaps with a fresh salad or a drizzle of tzatziki for an added burst of flavor.

How to Store and Freeze Cheesy Mediterranean Quesadilla

• Room Temperature: It's best to enjoy your quesadilla fresh. If left out, consume within 2 hours to maintain quality.

• Fridge: Store leftover Cheesy Mediterranean Quesadilla in an airtight container for up to 3 days. Reheat in a skillet for that crispy texture.

• Freezer: To freeze, place cooled quesadillas in a single layer on a baking sheet, then wrap in plastic wrap and store in an airtight bag for up to 2 months.

• Reheating: When ready to enjoy, reheat directly from frozen in a skillet over medium heat for about 5-7 minutes, flipping halfway, until heated through and crispy.

Make Ahead Options

These Cheesy Mediterranean Quesadillas are perfect for meal prep enthusiasts! You can prepare the filling (diced tomatoes, red onion, spinach, feta, mozzarella, and oregano) up to 24 hours in advance. Simply mix all ingredients in a bowl, ensuring to squeeze the spinach dry to prevent excess moisture. Store the filling in an airtight container in the refrigerator. When you’re ready to enjoy your quesadillas, assemble and cook them according to the recipe instructions. This way, you can savor a warm, comforting meal with minimal effort on busy weeknights. Rest assured, the quesadillas will be just as delicious and satisfying, ready to delight your family!

What to Serve with Cheesy Mediterranean Quesadilla

Elevate your dining experience with delicious sides that enhance the vibrant flavors of this crispy delight.

  • Refreshing Cucumber Salad: This cool, crisp salad with a zesty lemon dressing contrasts beautifully with the warm quesadilla, adding a burst of freshness.
  • Creamy Tzatziki Sauce: A smooth, garlicky yogurt dip perfectly complements the Mediterranean spices in the quesadilla and adds a refreshing touch.
  • Roasted Chickpeas: These crunchy, seasoned legumes provide a nutty contrast that balances the melting cheese and soft spinach in each bite.
  • Herbed Quinoa: Fluffy, seasoned quinoa tossed with fresh herbs brings a nutritious and hearty aspect to your meal while being pleasantly filling.
  • Zesty Tomato Salsa: A vibrant, spicy salsa made from ripe tomatoes and cilantro can elevate each bite, offering a zesty kick alongside the quesadilla.
  • Grilled Vegetables: Smoky, charred veggies like zucchini and bell peppers add depth of flavor and a satisfying textural contrast to the cheesy quesadilla.
  • Light Red Wine: A glass of light-bodied red wine, such as Pinot Noir, enhances the flavors of the Mediterranean ingredients and complements the overall meal.
  • Minted Yogurt Dip: This lively yogurt dip infused with fresh mint gives a cooling contrast and pairs wonderfully with the quesadilla’s savory notes.

Expert Tips for Cheesy Mediterranean Quesadilla

• Portion Control: Stick to about 1/3 cup of filling per quesadilla to avoid spillage when flipping.

• Mind the Heat: Cook on medium heat to ensure the cheese melts thoroughly without burning the tortillas.

• Don’t Press Down: Avoid pressing down on the quesadilla while cooking; this helps retain that delicious gooey cheese inside.

• Customize Ingredients: Feel free to add your favorite Mediterranean flavors, like olives or artichokes, to enhance your cheesy Mediterranean quesadilla experience.

• Prevent Sogginess: Sauté spinach briefly or dry it before mixing to prevent excess moisture from making tortillas soggy.

Cheesy Mediterranean Quesadilla Variations

Ready to mix things up with your Cheesy Mediterranean Quesadilla? Here are some delightful twists to enhance your culinary adventure!

  • Spicy Kick: Add sliced jalapeños to the filling for a zesty surprise that’s sure to wake up your taste buds. Mix the heat with the coolness of feta for balance.

  • Extra Tang: Toss in Kalamata olives or marinated artichokes for a burst of Mediterranean flavor. These additions create an exciting flavor profile, transporting you straight to a sunny café by the sea.

  • Cheese Medley: Swap out mozzarella for a blend of provolone and cheddar for a unique taste that still delivers on that melty goodness. Experimenting with cheeses can elevate your quesadilla to gourmet levels!

  • Herb Infusion: Try fresh herbs like basil or dill in place of oregano for a refreshing twist. The fragrant herbs will remind you of warm Mediterranean gardens.

  • Veggie Delight: Load those quesadillas up with thinly sliced bell peppers or zucchini for added crunch and nutrients. The vibrant veggies add a splash of color and crunch to each bite.

  • Whole Grain Goodness: Use whole wheat or spinach tortillas instead of flour for a healthier twist. Not only will they add fiber, but they also boast a lovely earthy flavor that complements the Mediterranean ingredients beautifully.

  • Creamy Avocado: Layer in some mashed avocado or sliced avocado for that creamy richness that contrasts perfectly with the crispy tortillas. It's a fantastic way to make your quesadilla extra satisfying.

And if you're ever craving a more classic cheesy experience, why not try your hand at a delicious Cheesy Garlic Bread alongside your quesadilla? Each of these variations can make your meal feel like a new culinary journey!

Cheesy Mediterranean Quesadilla Recipe FAQs

What kind of tomatoes should I use for the quesadilla?
Absolutely use fresh, flavorful tomatoes like campari or vine-ripened for the best flavor! They add a delightful sweetness and freshness that truly enhances your Cheesy Mediterranean Quesadilla. If you have access to small heirloom varieties, those are also a fantastic option!

How can I store leftover quesadillas?
After you've enjoyed your delicious quesadillas, store any leftovers in an airtight container in the fridge for up to 3 days. To keep them from getting soggy, try to separate them with parchment paper. When you're ready to indulge again, pop them in a skillet over medium heat for a couple of minutes on each side until heated through and crispy!

Can I freeze my Cheesy Mediterranean Quesadilla?
Yes, you can absolutely freeze these quesadillas for later enjoyment! Once cooled, lay them flat on a baking sheet and freeze for about 1–2 hours. Then, wrap each quesadilla tightly in plastic wrap, place them in an airtight freezer bag, and they’ll keep well for up to 2 months. When you're ready to eat, just reheat them directly from frozen in a skillet for about 5-7 minutes, flipping halfway through for that crispy goodness!

What should I do if my tortillas are tearing while I assemble?
If your tortillas are tearing, they might be too cold. Try that classic trick: warm them up briefly in a microwave for about 10-15 seconds, or cover them with a damp paper towel. This makes them more pliable and less likely to tear when you fill and fold them.

Are there any dietary considerations I should be aware of?
Great question! The Cheesy Mediterranean Quesadilla is vegetarian-friendly, making it a great choice for those with meat-free diets. However, if you have dairy allergies or are lactose intolerant, you can substitute the cheeses with plant-based alternatives. Just ensure you check that the tortilla is also dairy-free!

How can I customize my quesadilla filling?
The more the merrier! You can make this dish your own by adding ingredients like sliced jalapeños for spice, sundried tomatoes for a richer flavor, or olives and artichokes for that true Mediterranean flair. Mix and match according to your taste preference!

Cheesy Mediterranean Quesadilla

Cheesy Mediterranean Quesadilla: Quick, Flavor-Packed Comfort

Enjoy a Cheesy Mediterranean Quesadilla packed with spinach and feta, perfect for quick dinners with vibrant flavors that the whole family will love.
Print Recipe Pin Recipe
Prep Time 10 minutes mins
Cook Time 10 minutes mins
Resting Time 1 minute min
Total Time 20 minutes mins
Servings: 3 quesadillas
Course: Dinner
Cuisine: Mediterranean
Calories: 350
Ingredients Equipment Method Nutrition Notes

Ingredients
  

For the Filling
  • 1 large tomato adds freshness and sweetness; use campari or vine-ripened for the best flavor
  • 1/4 cup red onion provides sharpness and crunch; substitute with green onions for a milder flavor
  • 2 cups spinach contributes nutrients and color; pat dry or sauté briefly before use to prevent excess moisture
  • 3/4 cup crumbled feta cheese adds creaminess and tangy flavor; can substitute with goat cheese if preferred
  • 1 cup shredded mozzarella cheese provides melty texture; blend with other cheeses for a different flavor profile
  • 1/2 teaspoon dried oregano enhances the Mediterranean flavor; fresh oregano can be used but adjust the amount to taste

Equipment

  • Skillet

Method
 

Step-by-Step Instructions for Cheesy Mediterranean Quesadilla
  1. In a medium bowl, combine the diced tomato, finely chopped red onion, and spinach. Add the crumbled feta and shredded mozzarella cheese along with the dried oregano. Mix gently until everything is well distributed, ensuring to squeeze the spinach gently to remove any excess moisture.
  2. On a clean surface, lay out the three flour tortillas. Take about one-third of the prepared filling and place it on one half of each tortilla. Gently fold the other half over to enclose the filling, pressing down lightly to secure it.
  3. Heat a skillet over medium heat and add just a splash of oil to prevent sticking. Carefully place each folded quesadilla in the skillet, cooking for 3–4 minutes or until golden brown on the bottom. Flip and cook the other side for another 3–4 minutes, until the cheese is melted and the tortillas are crispy.
  4. Once cooked, remove the quesadillas from the skillet and allow them to rest on a cutting board for about one minute. Slice the cheesy Mediterranean quesadilla into wedges and serve warm.

Nutrition

Serving: 1quesadillaCalories: 350kcalCarbohydrates: 32gProtein: 17gFat: 18gSaturated Fat: 9gPolyunsaturated Fat: 1gMonounsaturated Fat: 8gCholesterol: 45mgSodium: 680mgPotassium: 350mgFiber: 3gSugar: 2gVitamin A: 2050IUVitamin C: 15mgCalcium: 320mgIron: 2.5mg

Notes

Customize your quesadilla with olives or artichokes for additional Mediterranean flavor. Properly sauté spinach to prevent sogginess.

Tried this recipe?

Let us know how it was!

Savor the Flavor: Vegetarian Black Bean Enchiladas Delight

February 20, 2026 by Grace Snow Leave a Comment

As I slid the piping hot Vegetarian Black Bean Enchiladas out of the oven, the kitchen filled with an irresistible aroma that felt like a warm hug. This dish is more than just a meal—it’s a celebration of flavors wrapped in warm tortillas, bringing together spiced black beans, sweet corn, and gooey cheese in a delightful embrace. With the option for a vegan twist and the flexibility to toss in your favorite veggies, these enchiladas are not only quick to prepare but also a wholesome choice for busy weeknights. Best of all, they transform ordinary dinner time into a festive fiesta sure to impress family and friends alike. Are you ready to elevate your weeknight meals?

Why Choose Vegetarian Black Bean Enchiladas?

Versatile: These enchiladas can easily be customized with different veggies or a vegan option, making them a favorite for everyone at the table.

Quick to Prepare: With minimal prep time, you can whip up this delicious meal in no time, perfect for busy weekdays.

Flavor-Packed: The combination of spiced black beans, sweet corn, and zesty chili sauce creates a burst of flavor in every bite, which is sure to satisfy even the pickiest eaters.

Crowd-Pleaser: Whether you're serving a family dinner or hosting friends, these enchiladas are guaranteed to impress, transforming your gathering into a culinary celebration.

For a delightful side, consider pairing them with a fresh salad or a scoop of guacamole. And if you're interested in exploring more delightful vegetarian options, check out my recipes for Sweet Potatoes Black and Tuscan White Bean.

Vegetarian Black Bean Enchiladas Ingredients

For the Filling
• Cooked Black Beans – Your main protein source; use canned for convenience or cook from scratch for extra flavor.
• Corn Kernels – Adds a touch of sweetness and texture; feel free to use fresh, frozen, or canned corn.
• Bell Pepper – Brings crunch and color; any variety will do, so choose your favorite!
• Red Onion – Offers a savory base flavor that enhances the filling; yellow onions can be a great substitute.
• Garlic – Intensifies the flavor profile; fresh garlic is always preferable to powder.
• Ground Cumin – Provides warmth and depth; an essential spice for Mexican dishes.
• Chili Powder – Packs heat and flavor; adjust to your preferred spice level for the perfect kick.
• Rice – Adds bulk and texture; leftover rice works wonderfully in this recipe.

For the Enchiladas
• Corn/Flour Tortillas – The delicious wrap for your filling; opt for corn tortillas for a gluten-free option.
• Enchilada Sauce – Ensures moisture and zest, whether you choose store-bought or homemade.
• Shredded Cheese – Melts beautifully for a creamy topping; go for cheddar, Monterey Jack, or vegan cheese for a dairy-free option.

For Cooking
• Olive Oil – Used for sautéing your veggies; feel free to substitute with another cooking oil of your choice.

For Garnishing
• Fresh Cilantro (optional) – Adds a pop of freshness and color on top of your enchiladas.
• Lime Wedges (optional) – Squeeze over the dish to elevate the flavors even further; a zesty touch that complements the enchiladas beautifully.

These Vegetarian Black Bean Enchiladas are not only easy to make but also versatile enough to cater to your family’s varying tastes, making this dish a go-to in any kitchen!

Step‑by‑Step Instructions for Vegetarian Black Bean Enchiladas

Step 1: Preheat the Oven
Begin by preheating your oven to 375°F (190°C) to ensure it reaches the perfect temperature for baking. This step is crucial as it allows the enchiladas to cook evenly and thoroughly, giving them that comforting bubbly texture. Position the oven rack in the middle while it warms to prepare for your delicious Vegetarian Black Bean Enchiladas.

Step 2: Sauté the Vegetables
In a large skillet, heat a tablespoon of olive oil over medium heat. Add the diced red onion and bell pepper, sautéing for 5 to 7 minutes until softened and fragrant. Stir occasionally to prevent sticking, ensuring they caramelize beautifully, bringing a lovely sweetness to your enchiladas that complements the black beans and corn perfectly.

Step 3: Add Spices and Garlic
Once your vegetables are tender, incorporate minced garlic, ground cumin, and chili powder into the skillet. Cook for an additional minute, stirring continuously until the garlic becomes fragrant and begins to soften. This step infuses the filling for your Vegetarian Black Bean Enchiladas with a depth of flavor that enhances the overall taste.

Step 4: Mix the Filling
Next, add the cooked black beans, corn kernels, and cooked rice to the skillet, stirring well to combine. Heat this mixture through for 2 to 3 minutes, until everything is warmed and the flavors mingle. Remove the skillet from heat, allowing the filling to rest while you prepare the baking dish.

Step 5: Prepare the Baking Dish
Spread a thin layer of enchilada sauce at the bottom of a baking dish, creating a flavorful base for your enchiladas. This layer not only adds moisture but prevents the tortillas from sticking, ensuring that your Vegetarian Black Bean Enchiladas come out perfectly tender and ready to serve.

Step 6: Assemble the Enchiladas
Warm the corn or flour tortillas slightly to make them pliable. Fill each tortilla with a generous scoop of the black bean filling, rolling them tightly and placing them seam-side down in the prepared baking dish. Arrange the enchiladas closely together to maximize flavor and ensure they stay moist during baking.

Step 7: Add Sauce and Cheese
Pour the remaining enchilada sauce evenly over the assembled tortillas, coating them generously. Then sprinkle the shredded cheese of your choice on top, allowing it to melt beautifully during baking. This step is essential for achieving that gooey, cheesy layer that makes vegetarian black bean enchiladas so irresistible.

Step 8: Bake the Enchiladas
Cover the baking dish with foil and place it in the preheated oven. Bake for 20 minutes to allow the flavors to meld and the enchiladas to heat through. After that, remove the foil and continue baking for an additional 10 minutes until the cheese is bubbling and turns a delightful golden color.

Step 9: Cool and Garnish
Once baked to perfection, exit your Vegetarian Black Bean Enchiladas from the oven and allow them to cool for a few minutes. This step helps the filling set, making it easier to serve. Garnish with fresh cilantro for a touch of brightness and flavor, elevating the dish visually as well.

Step 10: Serve and Enjoy
Serve the enchiladas with lime wedges on the side, which add a zesty finish to each bite. Feel free to pair them with a fresh salad or a scoop of guacamole for a complete and satisfying meal. Enjoy the vibrant flavors of your wonderful Vegetarian Black Bean Enchiladas with family and friends!

What to Serve with Vegetarian Black Bean Enchiladas?

Elevate your meal with delightful pairings that balance flavors and textures, turning your veggie fiesta into a complete dining experience.

  • Fresh Garden Salad: A crisp salad adds a refreshing crunch, harmonizing beautifully with the warm, cheesy enchiladas.

  • Guacamole and Tortilla Chips: Creamy guacamole provides a luscious contrast and the crunch of chips adds excitement before the main meal.

  • Mexican Street Corn: This sweet and smoky side enhances the flavor profile, echoing the spices in the enchiladas.

  • Cilantro Lime Rice: Tangy and fragrant, this dish complements the enchiladas while providing a fluffy, filling base to your plate.

  • Pico de Gallo: Bright, fresh salsa brings a zesty kick and tons of color, brightening up every bite.

  • Spicy Black Bean Soup: A warm bowl of soup ties in the black bean theme, adding depth and warmth to the overall meal.

  • Margaritas: A classic pairing, these tangy drinks uplift the festive atmosphere, perfect for a delightful dinner.

  • Churros: Cap off the meal with sweet churros, their cinnamon-sugar dusting contrasting wonderfully with the savory enchiladas.

How to Store and Freeze Vegetarian Black Bean Enchiladas

Fridge: Store baked enchiladas in an airtight container for up to 2 days to maintain freshness and prevent them from drying out.

Refrigerate Before Baking: Assemble your enchiladas ahead of time and refrigerate them unbaked for up to 2 days. Just cover tightly with foil until ready to pop in the oven.

Freezer: To freeze, wrap unbaked enchiladas tightly in plastic wrap and then aluminum foil; they can last up to 1 month in the freezer. Thaw in the fridge overnight before baking.

Reheating: To reheat, place baked enchiladas in a preheated oven at 350°F (175°C) for about 15-20 minutes until heated through, ensuring the Vegetarian Black Bean Enchiladas remain warm and comforting.

Make Ahead Options

These Vegetarian Black Bean Enchiladas are perfect for busy weeknights or meal prep enthusiasts! You can assemble the enchiladas up to 24 hours in advance—just cover the baking dish tightly with foil and refrigerate. If you prefer, you can also prepare the filling and store it in an airtight container for up to 3 days; ensure it cools completely before refrigerating to prevent sogginess. When you’re ready to serve, simply pour the sauce over the tortillas, sprinkle with cheese, and bake right away. This way, you'll enjoy just as delicious enchiladas with minimal effort, making your cooking experience both enjoyable and efficient!

Vegetarian Black Bean Enchiladas Variations

Feel free to unleash your creativity with these delightful variations, adding your personal touch to the enchiladas.

  • Dairy-Free: Swap the cheese for vegan alternatives like cashew cheese or nutritional yeast for a dairy-free delight.
    This switch keeps the flavors vibrant while ensuring everyone at the table can enjoy them guilt-free.

  • Extra Veggies: Toss in diced zucchini, chopped spinach, or roasted sweet potatoes for a nutritional boost.
    These additions not only enhance the filling but also add wonderful textures that your family will love!

  • Spicy Kick: Spice things up with a sprinkle of smoked paprika or a dash of cayenne pepper to elevate the heat.
    Adjust the heat level to suit your taste buds, making the dish perfect for both spice enthusiasts and those who prefer milder flavors.

  • Gluten-Free: Use corn tortillas instead of flour to make the entire dish gluten-free and just as delicious.
    They offer a delightful crunch and are a wonderful option for anyone with gluten sensitivities.

  • Hearty Twist: Incorporate lentils or quinoa alongside the black beans for a heartier filling that packs an extra protein punch.
    This transformation is not only filling but offers an exciting twist on classic enchiladas.

  • Flavor Boosts: Elevate the flavor with fresh herbs like cilantro or a squeeze of lime juice right before serving for a zesty finish.
    These fresh touches can brighten the entire dish and invigorate your taste buds!

  • Sauteéd Veggies: Experiment with sautéing other vegetables, such as mushrooms or carrots, for added depth and variety.
    These ingredients bring earthiness and sweetness to the enchiladas, making each bite a delightful surprise.

Explore additional recipes that resonate with your culinary journey, including my delightful Blackberry Crisp Amp or a hearty Coconutty Beans Greens to round out your meal planning!

Expert Tips for Vegetarian Black Bean Enchiladas

Warm Tortillas: Always warm your tortillas before filling to prevent tearing. This small step ensures a smoother rolling process and keeps your enchiladas intact.

Use Fresh Ingredients: Fresh vegetables and herbs enhance flavor, so opt for fresh garlic and seasonal produce whenever possible. They'll take your Vegetarian Black Bean Enchiladas to the next level.

Layer Sauce Properly: Spread a thin layer of enchilada sauce at the bottom of the baking dish. This not only adds flavor but also prevents sticking, ensuring perfect enchiladas.

Don’t Overstuff: While it’s tempting to fill your tortillas to the brim, overstuffing can lead to messy enchiladas. Aim for a generous but manageable amount of filling for ease of rolling.

Bake with Care: Cover your dish with foil for the initial baking time to keep moisture in, then uncover to achieve that perfect golden, bubbly cheese on top.

Flavor Balance: Adjust the amount of chili powder according to your spice preference. Remember, adding too much can overwhelm the other flavors in your Vegetarian Black Bean Enchiladas.

Vegetarian Black Bean Enchiladas Recipe FAQs

What type of black beans should I use?
You can use either canned black beans for convenience or make your own from scratch. If using canned, rinse and drain them well to reduce sodium content. Freshly cooked beans offer a richer flavor, so go for it if you have the time!

How should I store leftover enchiladas?
Store any leftover baked Vegetarian Black Bean Enchiladas in an airtight container in the fridge for up to 2 days. To keep them fresh and prevent drying out, I recommend placing a layer of plastic wrap directly on top of the enchiladas before sealing the container.

Can I freeze unbaked enchiladas?
Absolutely! To freeze, wrap your unbaked Vegetarian Black Bean Enchiladas tightly in plastic wrap, then in aluminum foil to prevent freezer burn. They can be stored like this for up to 1 month. When you're ready to bake, simply thaw them in the fridge overnight before popping them into the oven.

What if my enchiladas are falling apart after baking?
If your enchiladas are falling apart, it usually happens due to overstuffing or if the tortillas were not warmed adequately. Be sure to warm them first to make them pliable, and don't overload the fillings. If they’re sticking to the dish, spreading some enchilada sauce at the bottom will help.

Are these enchiladas suitable for a gluten-free diet?
Yes! To make gluten-free Vegetarian Black Bean Enchiladas, simply use corn tortillas instead of flour ones. Always check the labels to ensure they are certified gluten-free, and you’re all set to enjoy this delicious dish without worry!

Can my pets eat these enchiladas?
While the vegetable filling may be safe for pets in small quantities, avoid giving them enchiladas with garlic, onion, or cheese, which can be harmful. Always consult with your vet before sharing food to ensure it’s safe for your furry friends.

Vegetarian Black Bean Enchiladas

Savor the Flavor: Vegetarian Black Bean Enchiladas Delight

Delight in the flavors of Vegetarian Black Bean Enchiladas, wrapped in tortillas and bursting with black beans, corn, and cheese.
Print Recipe Pin Recipe
Prep Time 15 minutes mins
Cook Time 30 minutes mins
Cooling Time 5 minutes mins
Total Time 50 minutes mins
Servings: 4 enchiladas
Course: Dinner
Cuisine: Mexican
Calories: 300
Ingredients Equipment Method Nutrition Notes

Ingredients
  

For the Filling
  • 2 cups cooked black beans canned or homemade
  • 1 cup corn kernels fresh, frozen, or canned
  • 1 medium bell pepper any variety
  • 1 medium red onion or yellow onion
  • 2 cloves garlic fresh minced
  • 1 teaspoon ground cumin
  • 1 teaspoon chili powder adjust for spice preference
  • 1 cup cooked rice leftover rice works
For the Enchiladas
  • 8 pieces corn/flour tortillas use corn for gluten-free
  • 2 cups enchilada sauce store-bought or homemade
  • 1 cup shredded cheese cheddar, Monterey Jack, or vegan
For Cooking
  • 1 tablespoon olive oil or another cooking oil
For Garnishing
  • 0.5 cups fresh cilantro optional
  • 2 pieces lime wedges optional for serving

Equipment

  • Skillet
  • Baking Dish
  • Oven

Method
 

Preparation Instructions
  1. Preheat your oven to 375°F (190°C).
  2. In a large skillet, heat olive oil over medium heat. Sauté diced red onion and bell pepper for 5 to 7 minutes until softened.
  3. Add minced garlic, ground cumin, and chili powder. Cook for an additional minute.
  4. Mix in cooked black beans, corn kernels, and cooked rice. Heat through for 2 to 3 minutes.
  5. Spread enchilada sauce at the bottom of a baking dish.
  6. Warm tortillas slightly. Fill each with black bean filling, rolling them seam-side down in the dish.
  7. Pour remaining enchilada sauce over the tortillas and sprinkle shredded cheese on top.
  8. Cover with foil and bake for 20 minutes. Remove foil and bake for an additional 10 minutes until cheese is golden.
  9. Allow to cool for a few minutes, garnish with cilantro, and serve with lime wedges.
  10. Enjoy your Vegetarian Black Bean Enchiladas!

Nutrition

Serving: 1enchiladaCalories: 300kcalCarbohydrates: 45gProtein: 10gFat: 12gSaturated Fat: 5gPolyunsaturated Fat: 2gMonounsaturated Fat: 4gCholesterol: 20mgSodium: 600mgPotassium: 400mgFiber: 7gSugar: 2gVitamin A: 500IUVitamin C: 15mgCalcium: 150mgIron: 3mg

Notes

These Vegetarian Black Bean Enchiladas are customizable to suit individual tastes and dietary preferences.

Tried this recipe?

Let us know how it was!

Fresh Vegetable Spring Rolls with Creamy Peanut Sauce Bliss

February 20, 2026 by Grace Snow Leave a Comment

The crunch of fresh vegetables wraps around your senses, inviting you to dive into a wholesome culinary experience! My Fresh Vegetable Spring Rolls with Creamy Peanut Sauce are the perfect remedy for anyone who craves something light yet satisfying. These vibrant rolls are not only incredibly easy to whip up in just 30 minutes, but they also offer a healthy twist on snacking. Packed with colorful veggies and served alongside a rich peanut sauce, they're a delightful appetizer or a refreshing meal on a warm day. Plus, with the option to make them gluten-free, they cater to various dietary needs without skimping on flavor. Are you ready to roll up some deliciousness together?

Why are Vegetable Spring Rolls So Popular?

Fresh, Vibrant Ingredients: The lively colors of crisp veggies entice your appetite and invite exploration of flavors.

Quick & Easy: With just 30 minutes of prep time, you'll have a delicious, homemade meal without the fuss!

Health-Conscious Delight: These rolls are not just tasty; they’re packed with nutrients, making them an excellent choice for anyone mindful of their diet.

Versatility: Feel free to customize with proteins like shrimp or chicken, or switch up the veggies based on what you have on hand, just like in my Tofu Caesar Salad or Sweet Potatoes Black!

Crowd-Pleasing Appeal: Perfect for gatherings, they serve beautifully as finger food or fresh appetizers, sure to impress guests!

Nut-Free Option: For those with allergies, simply swap the peanut butter for sunflower seed butter in the creamy sauce, making it enjoyable for everyone!

Vegetable Spring Rolls Ingredients

• Here’s what you need to create these delightful Vegetable Spring Rolls with Peanut Sauce.

For the Rolls

  • Rice Paper Wrappers – Use 8 to 10 (10-inch) for the perfect roll; check for gluten-free options.
  • Green Leaf Lettuce – Adds a crunchy texture; substitute with romaine for variety.
  • Fresh Basil Leaves – Enhances flavor with aromatic notes; Thai basil offers a stronger taste if preferred.
  • Fresh Mint Leaves – Introduces a refreshing flavor; feel free to use cilantro if mint isn’t your thing.
  • Chopped Fresh Cilantro – Adds herbal complexity; can be omitted or replaced with extra basil.
  • Matchstick Carrots – Provides sweetness and crunch; shredded carrots work just as well.
  • Shredded Purple Cabbage – Adds vibrant color and texture; green cabbage is a suitable alternative.
  • Red Bell Pepper – Brings sweetness and crunch; any color bell pepper will work fine.
  • English Cucumber – Offers juiciness; standard cucumber is also an option, though it may have more seeds.
  • Avocado – Contributes creaminess; guacamole can be used instead or skip for a lighter version.
  • Kosher Salt and Black Pepper – Basic seasoning to elevate all the flavors.

For the Peanut Sauce

  • Creamy Peanut Butter – The star ingredient for a rich sauce; try sunflower seed butter for a nut-free version.
  • Reduced Sodium Soy Sauce – Adds umami flavor; use tamari for a gluten-free option.
  • Fresh Lime Juice – Brightens up the sauce; lemon juice is a viable substitute if necessary.
  • Brown Sugar – Balances the flavors with sweetness; swap for honey or maple syrup if desired.
  • Chili Garlic Sauce – Infuses spice and heat; Sriracha can be a milder alternative.
  • Freshly Grated Ginger – Adds warmth and depth; ground ginger is a suitable substitute in a pinch.

Get ready to roll into a world of flavor with these delightful ingredients that promise to make your Vegetable Spring Rolls with Peanut Sauce a hit!

Step‑by‑Step Instructions for Vegetable Spring Rolls with Peanut Sauce

Step 1: Prep the Ingredients
Begin by cleaning and slicing all the vegetables. Chop the lettuce into medium pieces, and cut the carrots, bell pepper, and cucumber into matchsticks. Shred the purple cabbage finely and prepare the fresh herbs by plucking the leaves from their stems. Organizing the filling ingredients on a large cutting board will help make assembling the Vegetable Spring Rolls easier and more efficient.

Step 2: Prepare the Rice Paper
Fill a large shallow dish or pie plate with warm water, ensuring it’s deep enough to submerge the rice paper wrappers. Dip each wrapper into the warm water for about 10–15 seconds, or until it becomes soft and pliable. Carefully lift the wrapper and place it on a clean, flat work surface, ready for filling, ensuring the wrapper is still sticky but not overly wet.

Step 3: Fill the Wraps
In the center of each softened rice paper wrapper, layer a piece of green leaf lettuce, followed by fresh basil and mint leaves for aromatic flavor. Next, add a combination of the carrots, shredded cabbage, bell pepper, cucumber, and avocado. Remember to sprinkle a pinch of kosher salt and black pepper over the veggies to enhance the flavors of your Vegetable Spring Rolls.

Step 4: Roll the Wraps
To roll each spring roll, start by folding the bottom edge of the rice paper over the filling. Then, fold in the sides tightly, tucking in the filling as you roll away from you. Continue to roll until you have a snug, secure wrap. Repeat this rolling process for remaining wrappers and filling, ensuring each spring roll is tightly sealed and visually appealing.

Step 5: Store the Spring Rolls
Once all the spring rolls are assembled, arrange them on a serving plate and cover with lightly damp paper towels. This will keep the rolls from drying out while you prepare your peanut sauce or serve immediately. These colorful Vegetable Spring Rolls are best enjoyed fresh, providing a delightful crunch and vibrant flavors.

Step 6: Make the Peanut Sauce
In a medium bowl, whisk together creamy peanut butter, reduced sodium soy sauce, fresh lime juice, brown sugar, chili garlic sauce, and freshly grated ginger. Combine the ingredients until they are smooth and creamy, adjusting the thickness with a small amount of water if desired. This rich and tangy peanut sauce complements the fresh Vegetable Spring Rolls beautifully.

Vegetable Spring Rolls with Peanut Sauce Variations

Feel free to mix things up and make these rolls your own—each twist enhances the delicious experience!

  • Protein Boost: Add cooked shrimp or grilled chicken for a heartier meal. The added protein brings a satisfying richness to every bite.
  • Pickle Twist: Incorporate pickled vegetables like carrots or radishes for a tangy kick. This not only elevates flavor but also adds an irresistible crunch!
  • Nut-Free Delight: Substitute peanut butter with sunflower seed butter for a nut-free version of the sauce. You won’t lose out on creaminess or flavor!
  • Spicy Kick: Mix in some jalapeños or a dash of cayenne pepper for extra heat. This will take your spring rolls to a fiery new level.
  • Fresh Herbs Galore: Try using cilantro and additional herbs like chives or dill for unique flavors. Each herb adds an aromatic twist that invites exploration with every bite!
  • Texture Surprise: Swap avocado for toasted sesame seeds or crushed peanuts to add delightful crunchiness. These toppings will elevate the texture and flavor profile tremendously!
  • Asian Flare: Mix in some cooked, thin rice noodles for a hearty twist. This variation brings a fun element and makes the rolls even more filling.
  • Mango Magic: For a fruity twist, add thin slices of mango for sweetness and a delightful contrast to the savory peanut sauce. This combination is a summer favorite!

Now, roll up your sleeves and get creative with these variations while enjoying the fresh flavors of your Vegetable Spring Rolls with Peanut Sauce!

Make Ahead Options

These Vegetable Spring Rolls with Peanut Sauce are a fantastic choice for meal prep, ensuring that busy weeknights are a breeze! You can prep all the fresh veggies, like matchstick carrots and sliced cucumbers, up to 3 days in advance; simply store them in airtight containers in the refrigerator to maintain freshness. The rice paper wrappers can be kept dry and stored separately until you're ready to assemble. When it's time to serve, just soak the rice paper wrappers in warm water (10-15 seconds) and fill with your prepped veggies and herbs! This way, you’ll enjoy the same crisp and vibrant taste with minimal effort, making healthy eating easier than ever.

What to Serve with Fresh Vegetable Spring Rolls with Creamy Peanut Sauce

The perfect meal pairing enhances the fresh flavors and satisfying crunch of your vibrant spring rolls.

  • Crispy Asian Slaw: A tangy mix of cabbage and carrots adds texture and sharpness, balancing the rich peanut sauce beautifully.
  • Mango Salad: Fresh, juicy mango tossed with cilantro and lime amplifies the tropical feel, making each bite refreshing and sweet.
  • Spicy Edamame: Lightly salted and slightly spicy, these protein-packed edamame are a flavorful finger food that complements the rolls.

For a little something extra, try serving the rolls on a platter surrounded by bright, fresh elements.

  • Chilled Coconut Water: This hydrating drink offers a natural sweetness that pairs perfectly with the savory spring rolls, enhancing the meal experience.
  • Fruit Spring Rolls: Swap traditional ingredients for fruits like strawberries and bananas, wrapped similarly for a sweet contrast.
  • Sesame Dressing: Drizzle over your slaw or serve as an additional dip, its nutty flavor beautifully harmonizes with the spring rolls.

Together, these accompaniments create a vibrant feast that will leave everyone raving!

Expert Tips for Vegetable Spring Rolls

  • Avoid Overfilling: When rolling the wraps, less is more! Overfilling can lead to tears and messy rolls, making your Vegetable Spring Rolls with Peanut Sauce less appealing.

  • ** Keep it Moist:** Cover the spring rolls with a damp cloth if not serving immediately to prevent them from drying out. This helps maintain their fresh texture.

  • Chill Before Serving: For an even crisper bite, refrigerate the rolled spring rolls for about 15 minutes before serving. This enhances the flavors and firm textures.

  • Customize Your Veggies: Feel free to swap any veggies based on what you have on hand. Stay creative while ensuring a colorful balance to your Vegetable Spring Rolls!

  • Perfect Your Sauce: Adjust the thickness of your peanut sauce by adding a little water. Finding the right consistency elevates your dipping experience!

  • Nut-Free Alternative: Use tahini or sunflower seed butter in the sauce for a delicious nut-free sauce without compromising flavor.

How to Store and Freeze Vegetable Spring Rolls

Fridge: Store any leftover Vegetable Spring Rolls in an airtight container in the refrigerator for up to 2 hours. Place damp paper towels between layers to keep them moist.

Freezer: If you want to freeze them, wrap each spring roll individually in plastic wrap and store in a freezer-safe bag for up to 2 months.

Reheating: To enjoy the flavor after freezing, let them thaw in the fridge overnight, then lightly pan-fry or steam to warm up before serving.

Serving Fresh: For best taste and texture, serve your Vegetable Spring Rolls fresh. They’re a delightful treat when consumed immediately after preparation!

Vegetable Spring Rolls with Peanut Sauce Recipe FAQs

How do I choose the right rice paper wrappers?
Absolutely! When selecting rice paper wrappers, look for a package that specifically mentions gluten-free options if you have dietary restrictions. Aim for round (10-inch) wrappers, as they are the perfect size for wrapping up a variety of fillings. If you’re new to using rice paper, select a brand that seems fresh and isn't too brittle, as this will make it easier to work with.

How should I store leftover vegetable spring rolls?
Very simple! Leftover Vegetable Spring Rolls can be stored in an airtight container in the refrigerator for up to 2 hours. To maintain moisture, place damp paper towels between layers of rolls. If you can eat them fresh, that's best, but this method will keep them delicious for a little while longer.

Can I freeze vegetable spring rolls?
Absolutely! Freezing your Vegetable Spring Rolls is a fantastic way to preserve them. Wrap each roll individually in plastic wrap and place them in a freezer-safe bag or container. They can be stored in the freezer for up to 2 months. When you're ready to enjoy, allow them to thaw in the fridge overnight, then pan-fry or steam them to warm up before serving.

What can I do if my spring rolls are tearing?
Oh no, we've all been there! If you find your spring rolls are tearing while rolling, it's most likely due to overfilling or not allowing the rice paper to become pliable enough. To remedy this, be sure to dip the wrappers in warm water for just 10-15 seconds until soft, but not too wet. Use just enough filling to allow easy folding and rolling without strain. If you end up with tears, simply use the pieces as a “sealable patch.”

Are these spring rolls suitable for people with nut allergies?
Yes, and what a great question! For those with nut allergies, you can easily customize the creamy peanut sauce. Simply swap peanut butter for tahini or sunflower seed butter. These alternatives maintain the rich flavor while ensuring the dish is safe for everyone to enjoy!

Can I add protein to my vegetable spring rolls?
Absolutely! Adding protein like cooked shrimp, chicken, or tofu is a wonderful way to make these rolls even more satisfying. For a simple addition, just layer the protein on top of the vegetables before rolling. Keep the fillings balanced to ensure easy rolling and delightful bites!

Vegetable Spring Rolls with Peanut Sauce

Fresh Vegetable Spring Rolls with Creamy Peanut Sauce Bliss

Delightful and healthy Vegetable Spring Rolls with Peanut Sauce for a light yet satisfying meal.
Print Recipe Pin Recipe
Prep Time 30 minutes mins
Total Time 30 minutes mins
Servings: 4 rolls
Course: Appetizers
Cuisine: Asian
Calories: 150
Ingredients Equipment Method Nutrition Notes

Ingredients
  

For the Rolls
  • 8-10 pieces Rice Paper Wrappers Check for gluten-free options
  • 1 cup Green Leaf Lettuce Substitute with romaine if desired
  • 1/4 cup Fresh Basil Leaves Use Thai basil for stronger flavor
  • 1/4 cup Fresh Mint Leaves Substitute with cilantro if preferred
  • 1/4 cup Chopped Fresh Cilantro Can be omitted or replaced with extra basil
  • 1 cup Matchstick Carrots Shredded carrots work too
  • 1 cup Shredded Purple Cabbage Green cabbage is a suitable alternative
  • 1 piece Red Bell Pepper Any color bell pepper works
  • 1 cup English Cucumber Standard cucumber may have more seeds
  • 1 piece Avocado Guacamole can be used or skip for lighter version
  • to taste Kosher Salt
  • to taste Black Pepper
For the Peanut Sauce
  • 1/2 cup Creamy Peanut Butter Try sunflower seed butter for nut-free
  • 2 tablespoons Reduced Sodium Soy Sauce Use tamari for gluten-free option
  • 2 tablespoons Fresh Lime Juice Lemon juice is a viable substitute
  • 1 tablespoon Brown Sugar Swap for honey or maple syrup if desired
  • 1 teaspoon Chili Garlic Sauce Sriracha can be a milder alternative
  • 1 teaspoon Freshly Grated Ginger Ground ginger is a suitable substitute

Equipment

  • Large shallow dish
  • Cutting Board
  • medium bowl

Method
 

Preparation Steps
  1. Clean and slice all the vegetables. Chop the lettuce, and cut the carrots, bell pepper, and cucumber into matchsticks. Shred the purple cabbage finely.
  2. Fill a large shallow dish with warm water and dip each rice paper wrapper for 10–15 seconds until soft and pliable.
  3. On each rice paper wrapper, layer green leaf lettuce, fresh basil and mint leaves, followed by carrots, cabbage, bell pepper, cucumber, and avocado, sprinkling salt and pepper.
  4. Fold the bottom edge of the wrapper over the filling, fold in the sides tightly, and roll away from you until secure. Repeat for remaining wrappers.
  5. Arrange the spring rolls on a serving plate and cover them with lightly damp paper towels.
  6. In a bowl, whisk together peanut butter, soy sauce, lime juice, brown sugar, chili garlic sauce, and ginger until smooth and creamy.

Nutrition

Serving: 1rollCalories: 150kcalCarbohydrates: 20gProtein: 5gFat: 7gSaturated Fat: 1gPolyunsaturated Fat: 3gMonounsaturated Fat: 2gSodium: 300mgPotassium: 250mgFiber: 3gSugar: 5gVitamin A: 500IUVitamin C: 20mgCalcium: 30mgIron: 0.5mg

Notes

Customize with proteins like shrimp or chicken, and keep rolls moist with damp cloth. For a crunchier bite, refrigerate before serving.

Tried this recipe?

Let us know how it was!

Roasted Cauliflower and Broccoli Salad with Tahini Delight

February 20, 2026 by Grace Snow Leave a Comment

As I stared at the vibrant greens waiting to be transformed in my kitchen, the familiar scent of roasting vegetables ignited my culinary spirit. This Roasted Cauliflower and Broccoli Salad is a delightful fusion of earthy flavor and crisp texture that not only looks beautiful on the plate but is also perfectly aligned with low-carb and plant-based diets. Imagine tender, lemon-roasted cauliflower mingling with steamed broccoli, all drizzled with a creamy tahini dressing that brings it all together. It's ideal for those busy nights when you crave something healthy yet satisfying. Plus, it's a fantastic way to sneak more veggies into your diet without feeling deprived. Are you ready to indulge in this nutritious masterpiece?

Why Is This Salad So Amazing?

Incredible Flavor: Roasted cauliflower, kissed by lemon, truly elevates this dish with its savory depth. Creamy tahini dressing adds richness, perfectly complementing the crunch of fresh broccoli and seeds.

Low-Carb Wonder: This salad is a delightful option for those on keto or low-carb diets, helping you feel full with every bite.

Quick Prep: In just a few steps, you can whip up a dish that's ready in under an hour—perfect for busy evenings or last-minute gatherings.

Versatile Add-Ons: Feel free to add extras, like roasted chickpeas or a sprinkle of pomegranate seeds, giving this salad a personal twist.

Crowd Pleaser: Whether served as a main dish or a side, this salad is sure to impress friends and family alike. For more recipe ideas that combine healthy ingredients with fantastic flavors, check out Maple Roasted Sweet or explore the refreshing Avocado Egg Salad.

Roasted Cauliflower and Broccoli Salad Ingredients

Get ready to create a delicious and nutritious meal with these fresh ingredients.

For the Salad

  • Cauliflower – Provides bulk and texture; if unavailable, Brussels sprouts work well too.
  • Broccoli – Main ingredient that adds crunch and nutrients; must be steamed for the best result.
  • Fresh Spinach – A base that adds freshness; any leafy greens like kale can be substituted.
  • Avocado – Offers creaminess and healthy fats; choose ripe avocados for optimal flavor.
  • Seeds (Pumpkin, Sesame, Hemp) – Enhances crunch and nutrition; feel free to swap with your favorite nuts or seeds.

For Roasting

  • Lemon Juice – Adds acidity and brightness; fresh lemon juice is best for true flavor enhancement.
  • Olive or Avocado Oil – Aids in roasting vegetables while enhancing their flavor; any neutral oil can be used as a substitute.
  • Salt and Pepper – Essential for seasoning; adjust these to suit your taste.

For the Tahini Dressing

  • Tahini – Creates a creamy dressing that binds the salad together; almond butter can be used for a nut-based alternative.
  • Garlic Powder – Boosts flavor in the tahini dressing; a little goes a long way.
  • Water – Adjusts the consistency of the dressing; add more for your preferred thickness.

This delightful Roasted Cauliflower and Broccoli Salad is not only a feast for the senses but also perfectly designed to fit into your healthy eating lifestyle!

Step‑by‑Step Instructions for Roasted Cauliflower and Broccoli Salad

Step 1: Preheat Oven
Begin by preheating your oven to 400°F (200°C). This high temperature is essential for achieving that delicious caramelization on the cauliflower. As the oven warms up, you'll create the perfect environment for roasting, enhancing the natural sweetness of the vegetables.

Step 2: Prepare Cauliflower
While the oven heats, chop the cauliflower into bite-sized florets and spread them evenly on a baking sheet. Drizzle the florets with fresh lemon juice, olive oil, salt, and pepper, then use your hands to toss everything together until each piece is well-coated. This ensures the flavors penetrate the cauliflower as it roasts.

Step 3: Roast Cauliflower
Slide the prepared cauliflower into the preheated oven and roast for about 30 minutes. Keep an eye on your veggies, and halfway through, stir them to promote even browning. You'll know they're done when they're tender and have a beautiful golden-brown color, giving off that irresistible roasted aroma.

Step 4: Steam Broccoli
As the cauliflower roasts, prepare the broccoli. In a steamer basket set over simmering water, place your broccoli florets and steam for 4-5 minutes, or until they turn bright green and just tender. Avoid overcooking to preserve their crunch and vibrant color, which will beautifully contrast all the textures in your Roasted Cauliflower and Broccoli Salad.

Step 5: Make Tahini Dressing
In a mixing bowl, whisk together tahini, fresh lemon juice, salt, garlic powder, and enough water to achieve a smooth consistency. Keep adding water until the dressing reaches your desired creaminess, which will beautifully coat the salad ingredients and enhance the flavors without overwhelming them.

Step 6: Assemble Salad
To assemble your Roasted Cauliflower and Broccoli Salad, lay a bed of fresh spinach in serving bowls. Top the greens with the roasted cauliflower, steamed broccoli, creamy avocado slices, and a sprinkle of your favorite seeds for added crunch and nutrition. Drizzle generously with the tahini dressing, making sure each bite is bursting with flavor.

Step 7: Serve
Finally, taste your Roasted Cauliflower and Broccoli Salad and adjust with a splash of hot sauce, more lemon juice, or extra salt and pepper as desired. This colorful, nutrient-packed dish is ready to impress! Serve it immediately while the vegetables are warm and the salad is fresh, ensuring a delightful experience with each bite.

What to Serve with Roasted Cauliflower and Broccoli Salad

Enhance your dining experience with delightful pairings that bring out the flavors of this vibrant salad.

  • Grilled Chicken: Juicy, tender chicken adds a hearty protein that beautifully complements the fresh, earthy notes of the salad.

  • Quinoa Pilaf: Fluffy quinoa with herbs provides a nutty flavor and a slightly chewy texture that harmonizes well with the crunchy vegetables.

  • Hummus-Platter: Serve with a variety of dips like roasted red pepper hummus for a delightful contrast to the salad’s creamy tahini.

  • Crispy Tofu: For a plant-based option, air-fried tofu brings a delicious texture and protein boost to the meal, perfect for a satisfying vegetarian feast.

  • Citrus-Infused Sparkling Water: Brighten the meal with a refreshing drink that balances the savory tones of the salad.

  • Chocolate Avocado Mousse: End on a sweet note with this creamy dessert that mirrors the rich avocado in your salad while maintaining a healthy vibe.

  • Garden Fresh Focaccia: Serve alongside a slice of herb-infused focaccia for a delightful dip between bites, melding flavors and textures seamlessly.

Elevate your meal with these delicious sides and drinks, each carefully crafted to enhance your Roasted Cauliflower and Broccoli Salad experience!

How to Store and Freeze Roasted Cauliflower and Broccoli Salad

  • Fridge: Store the salad in an airtight container for up to 3 days. To maintain freshness, keep the tahini dressing separate until you're ready to serve.
  • Freezer: While it's best enjoyed fresh, you can freeze the roasted cauliflower and broccoli for up to 2 months. Thaw in the fridge before consuming.
  • Reheating: To reheat, simply warm the vegetables gently in a skillet or microwave. Avoid overheating, as this can change their texture.
  • Serving Freshness: For optimal taste, assemble the salad just before serving, drizzling the tahini dressing over the top at the last minute for that perfect Roasted Cauliflower and Broccoli Salad experience.

Roasted Cauliflower and Broccoli Salad Variations

Feel free to get creative with this recipe and make it your own, enjoying the luscious flavors and textures of your unique twist!

  • Protein Boost: Add roasted chickpeas for a satisfying crunch and an extra kick of protein to round out your meal. This will keep you full longer while maintaining a plant-based focus.

  • Nutty Flavor: Swap tahini for almond butter in the dressing to give your salad a unique, nutty flavor that contrasts beautifully with the roasted veggies. You might find that almond butter adds a delightful creaminess you didn’t expect!

  • Sweet Addition: Toss in pomegranate seeds or dried cranberries for a touch of sweetness and a burst of color that makes your salad irresistible. They’ll offer a delightful contrast to the savory roasted vegetables.

  • Leafy Greens Switch: If you're not a fan of spinach, try using kale or arugula as your base for a slightly different taste and texture that packs a punch of nutrients. Each leafy green can give this salad a whole new personality!

  • Spicy Kick: For a spicy twist, sprinkle in some red pepper flakes or drizzle with your favorite hot sauce just before serving to awaken your taste buds. A little heat can transform the flavor profile and make it memorable!

  • Zesty Citrus: Add a splash of orange or lime juice to your tahini dressing for a citrusy brightness that elevates the overall flavor. Your taste buds will dance with the balance of citrus and tahini!

  • Nutty Crunch: Incorporate sunflower seeds instead of pumpkin or sesame to bring a different crunch to the mix while still keeping it healthy. They offer a unique texture and flavor that is simply delightful!

  • Inspired Sides: Serve this salad alongside Roasted Bratwurst Peppers or pair it with a refreshing Avocado Egg Salad for a wholesome meal that your family will love!

Dive into these variations and tailor the salad to match your personal flavor preferences, enjoying a dish that reflects your unique taste!

Expert Tips for Roasted Cauliflower and Broccoli Salad

  • Roasting Perfection: Ensure even roasting by spreading cauliflower florets in a single layer on the baking sheet to avoid steaming.

  • Taste Test: Adjust seasoning before serving to ensure your salad is flavorful. Don't hesitate to add a sprinkle of salt or a dash of lemon juice!

  • Creaminess Matters: For a luscious tahini dressing, gradually add water until you reach the perfect consistency. Too thick? Just whisk in a little more!

  • Prevent Overcooking: Steam broccoli just until bright green and tender-crisp to preserve its vibrant color and nutritional value—it's a common mistake to overcook!

  • Storage Savvy: To maintain freshness, store the salad and dressing separately in sealed containers; enjoy within 3 days for best flavor.

  • Delightful Variations: Experiment with roasted chickpeas for protein or sprinkle with pomegranate seeds for a sweet twist in your Roasted Cauliflower and Broccoli Salad.

Make Ahead Options

These Roasted Cauliflower and Broccoli Salad components are perfect for meal prep, making your busy weeknights smoother! You can roast the cauliflower up to 24 hours in advance; just let it cool completely before storing it in an airtight container in the refrigerator. Additionally, steam the broccoli and prepare the tahini dressing up to 3 days ahead, keeping them in separate containers for the best quality. When you're ready to serve, simply assemble your salad by layering the fresh spinach, roasted cauliflower, steamed broccoli, sliced avocado, and a drizzle of tahini dressing. With these make-ahead steps, you’ll enjoy fresh and delicious meal choices with minimal effort!

Roasted Cauliflower and Broccoli Salad Recipe FAQs

What should I look for when selecting cauliflower and broccoli?
Absolutely! When choosing cauliflower, look for firm, creamy white florets with no dark spots or browning, as these indicate ripeness. For broccoli, ensure the florets are tightly closed and a vibrant green; if they are starting to turn yellow or appear wilted, it's best to pass.

How should I store leftover Roasted Cauliflower and Broccoli Salad?
Very! Store the salad in an airtight container in the fridge for up to 3 days. Keep the tahini dressing separate until you're ready to enjoy the salad to maintain its bright flavors and creamy texture.

Can I freeze the roasted cauliflower and broccoli?
The more the merrier! While fresh is best, you can freeze the roasted cauliflower and broccoli for up to 2 months. To do this, let them cool completely, then spread them out in a single layer on a baking sheet. Freeze until solid, then transfer to freezer bags. Thaw in the fridge overnight when ready to use.

What if my tahini dressing is too thick?
No problem! If your tahini dressing is too thick, simply whisk in a bit more water, a tablespoon at a time, until it reaches your desired consistency. This will ensure your dressing is creamy and easy to drizzle over your salad.

Can I make this salad nut-free?
Definitely! If you need a nut-free alternative to tahini, consider using sunflower seed butter or simply omit it and add a splash of balsamic vinegar for flavor without the nuts. Also, double-check all other ingredients for cross-contamination, particularly if allergies are a concern.

How do I know if my vegetables are cooked perfectly?
Absolutely! You’ll want to roast cauliflower until it's tender and has a golden-brown color, which typically takes about 30 minutes. For broccoli, steam it for just 4-5 minutes until it's bright green and tender-crisp. Keeping an eye on both will help you avoid overcooking and maintain that delicious crunch!

Roasted Cauliflower and Broccoli Salad

Roasted Cauliflower and Broccoli Salad with Tahini Delight

This Roasted Cauliflower and Broccoli Salad is a delightful fusion of earthy flavor and crisp texture, perfect for low-carb and plant-based diets.
Print Recipe Pin Recipe
Prep Time 15 minutes mins
Cook Time 30 minutes mins
Total Time 45 minutes mins
Servings: 4 servings
Course: Salads
Cuisine: Plant-Based
Calories: 250
Ingredients Equipment Method Nutrition Notes

Ingredients
  

For the Salad
  • 1 head Cauliflower chopped into florets
  • 2 cups Broccoli steamed
  • 2 cups Fresh Spinach
  • 1 ripe Avocado sliced
  • 1/4 cup Seeds (Pumpkin, Sesame, Hemp) or your favorite nuts or seeds
For Roasting
  • 2 tablespoons Lemon Juice fresh
  • 2 tablespoons Olive or Avocado Oil or any neutral oil
  • to taste Salt
  • to taste Pepper
For the Tahini Dressing
  • 1/4 cup Tahini
  • 1 clove Garlic Powder or more to taste
  • 2-4 tablespoons Water to adjust consistency

Equipment

  • Oven
  • Baking Sheet
  • Steamer basket
  • Mixing Bowl

Method
 

Instructions
  1. Preheat the oven to 400°F (200°C).
  2. Chop the cauliflower into bite-sized florets and spread them on a baking sheet. Drizzle with lemon juice, olive oil, salt, and pepper, and toss to coat.
  3. Roast the cauliflower for about 30 minutes, stirring halfway through for even browning.
  4. Steam the broccoli in a steamer basket over simmering water for 4-5 minutes until bright green.
  5. In a mixing bowl, whisk together tahini, lemon juice, salt, garlic powder, and water to achieve a smooth dressing.
  6. To assemble, lay a bed of spinach in serving bowls. Top with roasted cauliflower, steamed broccoli, avocado slices, and seeds. Drizzle with tahini dressing.
  7. Adjust seasoning with hot sauce, lemon juice, or more salt as desired and serve immediately.

Nutrition

Serving: 1servingCalories: 250kcalCarbohydrates: 15gProtein: 7gFat: 20gSaturated Fat: 3gPolyunsaturated Fat: 8gMonounsaturated Fat: 9gSodium: 200mgPotassium: 700mgFiber: 6gSugar: 3gVitamin A: 2000IUVitamin C: 90mgCalcium: 80mgIron: 2mg

Notes

Store salad and dressing separately in airtight containers for up to 3 days to maintain freshness. Assemble just before serving.

Tried this recipe?

Let us know how it was!
  • « Previous Page
  • 1
  • …
  • 14
  • 15
  • 16
  • 17
  • 18
  • …
  • 179
  • Next Page »

Welcome!

Hi, I’m Grace, a Sydney-based home cook with a passion for bold flavors and trending ingredients. Whether you’re a busy beginner or a seasoned foodie, you’ll find dishes here that are fresh, fun, and full of flavor.

More about me

Popular Recipes

  • Cheesy Chicken Garlic Bread Sandwich
    Cheesy Chicken Garlic Bread Sandwich for Cozy Family Moments
  • Easy Chicken Ranch Wraps
    Easy Chicken Ranch Wraps: Quick, Creamy & Totally Satisfying
  • Chicken Caesar Sandwiches
    Delicious Chicken Caesar Sandwiches for Quick Comfort Food
  • best Cuban sandwich
    The Best Cuban Sandwich You’ll Want Every Weeknight!

Footer

↑ back to top

About

  • Privacy Policy
  • Disclaimer
  • Terms & Conditions

Newsletter

  • Sign Up! for emails and updates

Contact

  • About me
  • Contact me

Copyright © 2025 TastyTrendIngredients