tastytrendingredients

  • Home
  • Recipes
    • Appetizers
    • Breakfast
    • Dessert
    • Dinner
    • Drinks
    • Salads
    • Snacks
    • Soups
  • About me
  • Contact me
menu icon
go to homepage
  • Home
  • Recipes
    • Appetizers
    • Breakfast
    • Dessert
    • Dinner
    • Drinks
    • Salads
    • Snacks
    • Soups
  • About me
  • Contact me
search icon
Homepage link
  • Home
  • Recipes
    • Appetizers
    • Breakfast
    • Dessert
    • Dinner
    • Drinks
    • Salads
    • Snacks
    • Soups
  • About me
  • Contact me
×

Festive Taco Cheese Ball: The Ultimate Party Appetizer

November 13, 2025 by Grace Snow Leave a Comment

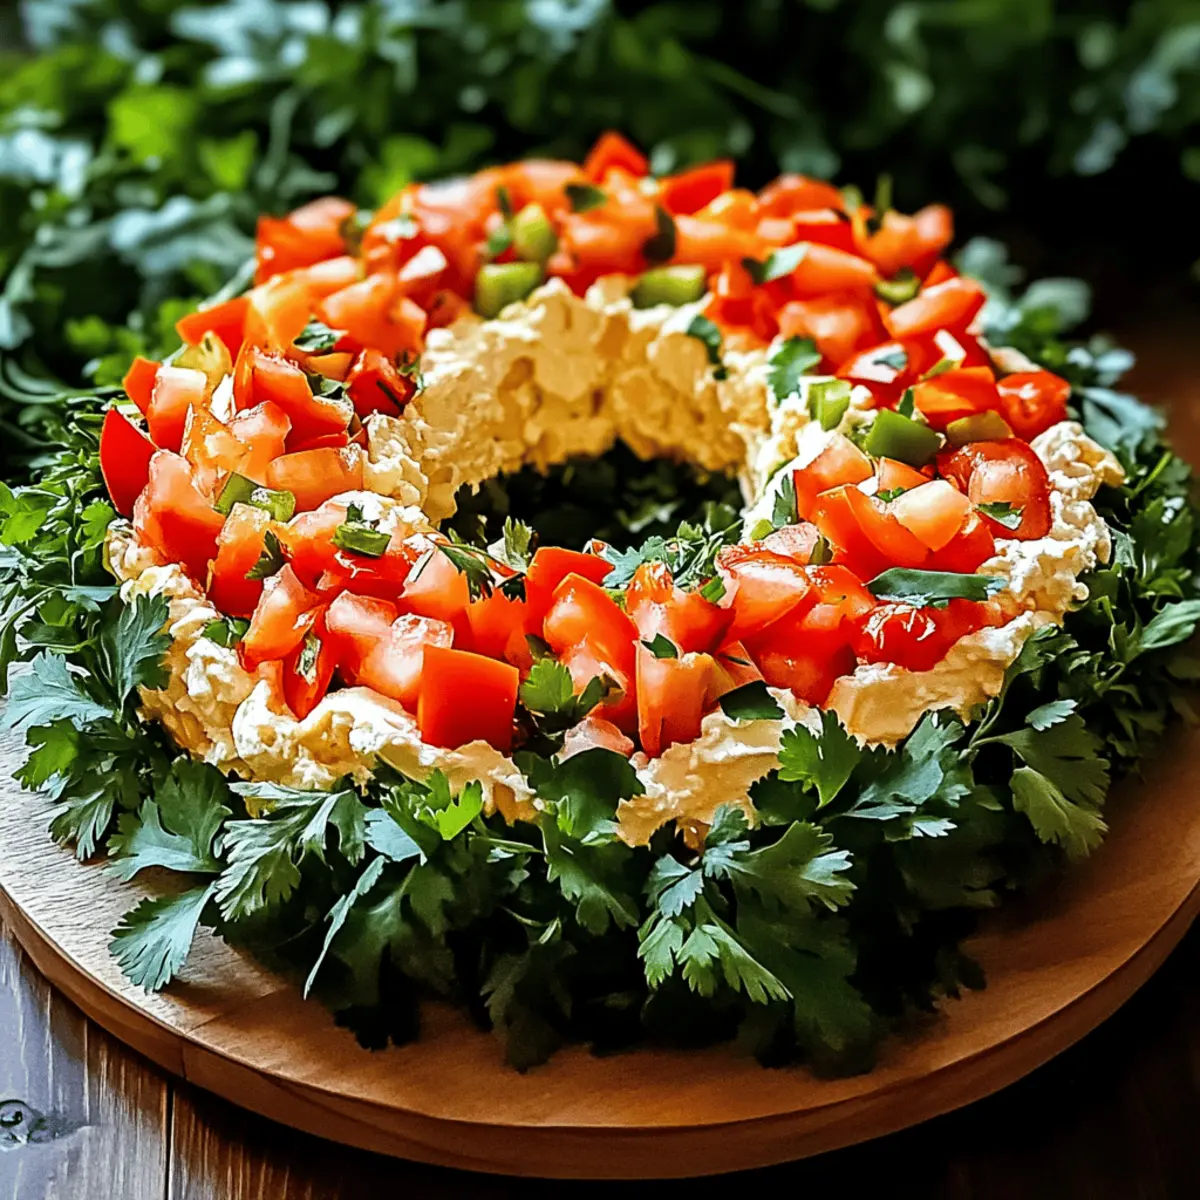
Amid the twinkling lights and cheerful music of the holiday season, I found myself dreaming of the perfect festive appetizer. Enter the Christmas Taco Cheese Ball Wreath—a delightful twist on holiday snacks that promises to wow your guests and keep the conversations flowing. This vegetarian wonder combines creamy cheeses, fresh herbs, and zesty taco seasoning, making it a delicious and visually stunning addition to any gathering. Not only is it quick to prepare, but this eye-catching centerpiece is sure to be a crowd-pleaser, setting the tone for a fun and festive atmosphere. Imagine the smiles as you unveil this colorful creation! Are you ready to impress your family and friends with a holiday appetizer they'll never forget?

Why Choose This Taco Cheese Ball?

Simplicity: This recipe is a breeze to whip up, making it the perfect choice for busy holiday schedules.

Eye-Catching Appeal: With its vibrant colors and festive shape, this Taco Cheese Ball Wreath doubles as a stunning centerpiece for your table.

Flavorful Burst: The creamy cheeses combined with zesty taco seasoning create a mouthwatering flavor that everyone will love.

Versatile Serving Options: Pair it with your favorite crackers, pretzels, or even fresh veggies like in my Fish Taco Bowls for a delightful twist!

Make-Ahead Magic: Prepare this delicious appetizer 1-2 days in advance, allowing the flavors to meld while saving you time on the day of your gathering.

Vegetarian-Friendly: This delightful snack is perfect for guests with dietary preferences, ensuring everyone gets to enjoy a taste of holiday cheer!

Taco Cheese Ball Ingredients

For the Cheese Mixture

• Cream Cheese – 1 package (16 oz) for that creamy base; opt for full-fat to enhance richness.
• Monterey Jack Cheese – 8 oz, shredded; if you're craving more zing, switch to Pepper Jack.

For the Flavor Boost

• Taco Seasoning – 1/2 packet; this adds a zesty kick, and you can make homemade seasoning for an extra fresh flavor.
• Fresh Cilantro – 1 bunch, stems removed for a burst of freshness; parsley can be used for a milder taste.

For the Crunch

• Green Onions – 4, roughly chopped; these provide a mild onion flavor, while yellow or red onions work too.
• Diced Green Chile Peppers – 1 (4 oz can) for a spicy touch; consider using mild green chiles or omit for less heat.
• White Onion – 2 tbsp, finely chopped; enhances flavor; shallots can substitute for a milder kick.

For Color and Juiciness

• Roma Tomato – 1 medium, cored and diced; adds nice color and juiciness, but you can swap it with any fresh variety or omit it.
• Jalapeno Pepper – 1 medium, seeded and finely chopped; brings a spicy element; feel free to skip it for a mild touch or use pickled ones for tanginess.

This Taco Cheese Ball is not only delicious but will also impress your guests with its vibrant look and flavor!

Step‑by‑Step Instructions for Taco Cheese Ball

Step 1: Prepare the Bowl
Start by lining a 16-ounce bowl with plastic wrap, ensuring the wrap extends over the edges for easy unmolding later. This simple step will help you easily remove the Taco Cheese Ball after chilling. Set the bowl aside as you gather the rest of your ingredients and equipment.

Step 2: Mix Cheese Base
In a food processor, combine the softened cream cheese, shredded Monterey Jack cheese, and half a packet of taco seasoning. Pulse the mixture until it's smooth and well-combined, but take care not to over-process it—this keeps the cheese texture creamy and delightful. Aim for a unified blend with no lumps.

Step 3: Add Fresh Ingredients
Next, gently incorporate half of the fresh cilantro, chopped green onions, and diced green chiles into the mixture. Use the pulse function for this step to maintain some visible flecks of color and flavor. This will enhance the visual appeal of your Taco Cheese Ball and ensure a burst of fresh taste.

Step 4: Chill
Transfer the cheese mixture into the prepared bowl, smoothing the surface with a spatula. Cover the bowl with plastic wrap and refrigerate for at least 4 hours, or ideally overnight. Chilling allows the flavors to meld beautifully and helps the mixture solidify, making it easier to shape later into a stunning wreath.

Step 5: Shape the Wreath
Once chilled, carefully unmold the Taco Cheese Ball by lifting the wrapped edges. Place it on a serving platter, and create a hole in the center with a shot glass or spoon to mimic a wreath shape. Smooth the outer edges if needed to retain its beautiful form for your holiday gathering.

Step 6: Garnish
Sprinkle the remaining chopped cilantro generously over the top of the cheese ball for a fresh touch. In a separate bowl, combine the diced Roma tomato, finely chopped white onion, and jalapeno, then arrange this zesty mixture around the wreath. This not only adds flavor but also creates a vibrant presentation that will impress your guests.

Expert Tips for Taco Cheese Ball

  • Proper Lining: Make sure to line your bowl effectively with plastic wrap so that the Taco Cheese Ball unmolds easily and retains its shape.

  • Taste Adjustments: Feel free to modify the amount of jalapeño or green chilies depending on your guests' spice preferences. Start with a small amount and add more as needed.

  • Flavor Infusion: For an extra flavor boost, chill the cheese mixture overnight. This allows the flavors to meld beautifully, enhancing the overall taste.

  • Presentation Matters: When shaping the wreath, create a slight indentation in the center for a more authentic look. Use a shot glass to achieve the perfect shape.

  • Garnishing Secrets: Use a mix of fresh herbs and colorful veggies for garnishing to add both flavor and visual appeal. It will elevate your Taco Cheese Ball into a festive centerpiece!

  • Storage Tip: If you have leftovers, store any unused Taco Cheese Ball in an airtight container in the refrigerator for up to 3 days to preserve its deliciousness.

What to Serve with Christmas Taco Cheese Ball Wreath

Imagine a festive gathering filled with laughter, delicious bites, and a cozy atmosphere that wraps around you like a warm blanket.

  • Fresh Veggie Platter: Crisp vegetables like carrots and bell peppers add crunch and a refreshing contrast to the creamy cheese ball.
  • Assorted Crackers: A mix of textures in crunchy and soft crackers provides the perfect base to scoop up the zesty Taco Cheese Ball, enhancing every bite.
  • Spicy Salsa: The vibrant flavors of salsa pair effortlessly with the taco seasonings and offer a delightful dip that bursts with freshness.
  • Guacamole: Smooth and rich, guacamole balances out the spiciness of the cheese ball, creating a harmonious blend of flavors that guests will love.
  • Warm Tortilla Chips: Crunchy chips provide an irresistible vehicle for the mixture, making it a go-to option for a satisfying bite.
  • Sparkling Cider: A bubbly drink like sparkling cider elevates the festive spirits and makes for a delightful, non-alcoholic pairing.
  • Chili Lime Popcorn: This unique snack brings added flavor and crunch while offering a lighter yet zesty option to enjoy alongside the creamy cheese ball.
  • Mini Stuffed Peppers: Stuffed mini peppers can add another layer of flavor while tying in beautifully with the tortilla and cheese theme.
  • Chocolate Dipped Pretzels: End on a sweet note with these treats; the salty-sweet combination is a delightful contrast to the savory flavors of your main appetizer.

Make Ahead Options

This Christmas Taco Cheese Ball Wreath is perfect for meal prep, making busy holiday gatherings much easier! You can prepare the cheese mixture up to 24 hours in advance. Simply follow the mixing and chilling instructions, then cover the bowl tightly with plastic wrap to maintain freshness. The flavors will meld beautifully while it sits in the refrigerator. When you're ready to serve, unmold the wreath onto a platter, and garnish with the remaining cilantro and optional toppings. This approach saves you time on the day of your party, ensuring your festive appetizer is just as delicious and vibrant as if made fresh!

How to Store and Freeze Taco Cheese Ball

Fridge: Store the Taco Cheese Ball tightly wrapped in plastic wrap or in an airtight container for up to 3 days. This keeps it fresh and ready for your next snacking session.

Freezer: If you need to freeze the Taco Cheese Ball, wrap it securely in plastic wrap, then in aluminum foil. It can be frozen for up to 2 months. Thaw it in the fridge overnight before serving.

Make-Ahead: This appetizer is perfect for preparing 1-2 days ahead of your event. Just assemble it, refrigerate, and it will be ready to impress your guests!

Reheating: There's no need to reheat the Taco Cheese Ball; it's best enjoyed cold or at room temperature. Just garnish before serving for a beautiful presentation.

Variations & Substitutions for Taco Cheese Ball

Feel free to add your personal touch to this delightful appetizer and make it your own!

  • Cheese Swap: Replace Monterey Jack with cheddar or pepper jack for a different flavor profile. This simple swap introduces a bold twist that cheese lovers will truly appreciate.

  • Add-Ins: Toss in chopped black olives or bell peppers for an extra pop of color and delightful crunch. These additions not only enhance texture but also add layers of flavor that make each bite even more exciting.

  • Greek Yogurt Blend: Combine Greek yogurt with cream cheese for a lighter version of this dish. The tangy flavor of Greek yogurt beautifully complements the cheese while maintaining creaminess.

  • Spice Levels: Adjust the heat by substituting regular jalapeños with milder green bell peppers or even sweet peppers. This way, you cater to everyone's spice preferences, ensuring your Taco Cheese Ball remains a hit!

  • Herb Choices: Swap cilantro for fresh parsley if you’re looking for a milder herb flavor. The freshness of parsley still brightens the dish without overpowering the other flavors.

  • Vegetable Remix: Include finely diced red or yellow bell peppers instead of tomatoes for added sweetness and color. The vibrant hues will enhance the wreath's festive presentation!

  • Crunchy Texture: Add some crushed tortilla chips on top for an added crunch. This twist will create a delightful contrast between creamy and crispy textures, perfect for trendy appetizers.

Don’t forget to explore other delicious options like my Taco Bell Crunchwrap or Taco Spaghetti Cheesy to elevate your taco-themed feast!

Christmas Taco Cheese Ball Wreath Recipe FAQs

What type of cheese should I use for the Taco Cheese Ball?
Absolutely, the classic choice is cream cheese combined with shredded Monterey Jack for a mild flavor. If you want to spice things up, opt for Pepper Jack cheese instead!

How long can I store the Taco Cheese Ball in the fridge?
You can keep your Taco Cheese Ball in the refrigerator for up to 3 days. Just wrap it tightly in plastic wrap or place it in an airtight container to maintain its flavors and freshness.

Can I freeze the Taco Cheese Ball?
Yes! To freeze your Taco Cheese Ball, wrap it securely in plastic wrap, followed by aluminum foil. It will last in the freezer for up to 2 months. When you're ready to serve, thaw it in the fridge overnight.

What if my Taco Cheese Ball is too soft?
If your mixture turns out too soft, consider adding more shredded cheese, which can help it firm up. Chilling the mixture longer before shaping it into a wreath can also lead to a sturdier texture.

Is this recipe suitable for my vegetarian friends?
Yes, this Taco Cheese Ball is vegetarian-friendly, making it perfect for gatherings! Just check the taco seasoning to ensure it doesn’t include any animal-derived ingredients.

Can I make this Taco Cheese Ball ahead of time?
Definitely! I often make it 1-2 days in advance. Just assemble, refrigerate, and your flavorful appetizer will be ready to impress your guests when the time comes!

Taco Cheese Ball

Festive Taco Cheese Ball: The Ultimate Party Appetizer

This Taco Cheese Ball is a festive and delicious appetizer that is sure to impress your guests.
Print Recipe Pin Recipe
Prep Time 20 minutes mins
Chilling Time 4 hours hrs
Total Time 4 hours hrs 20 minutes mins
Servings: 10 servings
Course: Snacks
Cuisine: Mexican
Calories: 150
Ingredients Equipment Method Nutrition Notes

Ingredients
  

For the Cheese Mixture
  • 1 package Cream Cheese 16 oz, opt for full-fat for richness
  • 8 oz Monterey Jack Cheese shredded, can substitute with Pepper Jack
For the Flavor Boost
  • 0.5 packet Taco Seasoning adds zesty kick, homemade option available
  • 1 bunch Fresh Cilantro stems removed, can substitute with parsley
For the Crunch
  • 4 Green Onions roughly chopped, yellow or red onions can be used
  • 1 can Diced Green Chile Peppers 4 oz can, can use mild or omit
  • 2 tbsp White Onion finely chopped, can substitute with shallots
For Color and Juiciness
  • 1 Roma Tomato medium, cored and diced
  • 1 Jalapeno Pepper medium, seeded and finely chopped

Equipment

  • Food Processor
  • 16-ounce Bowl
  • plastic wrap
  • Spatula
  • Shot Glass

Method
 

Step-by-Step Instructions for Taco Cheese Ball
  1. Start by lining a 16-ounce bowl with plastic wrap, ensuring the wrap extends over the edges for easy unmolding later.
  2. In a food processor, combine the softened cream cheese, shredded Monterey Jack cheese, and half a packet of taco seasoning. Pulse until smooth.
  3. Gently incorporate half of the chopped cilantro, green onions, and diced green chiles into the cheese mixture.
  4. Transfer the cheese mixture into the prepared bowl and refrigerate for at least 4 hours or overnight.
  5. Carefully unmold the Taco Cheese Ball onto a serving platter, creating a hole in the center to mimic a wreath shape.
  6. Sprinkle the remaining chopped cilantro over the top and arrange diced Roma tomato, finely chopped white onion, and jalapeno around the wreath.

Nutrition

Serving: 1servingCalories: 150kcalCarbohydrates: 4gProtein: 5gFat: 13gSaturated Fat: 8gPolyunsaturated Fat: 0.5gMonounsaturated Fat: 4gCholesterol: 30mgSodium: 300mgPotassium: 100mgSugar: 1gVitamin A: 5IUVitamin C: 15mgCalcium: 15mgIron: 2mg

Notes

Store any leftovers in an airtight container for up to 3 days in the fridge. This appetizer can be made 1-2 days ahead of time.

Tried this recipe?

Let us know how it was!

Savory Pigs in a Blanket: Easy & Irresistibly Delicious!

November 13, 2025 by Grace Snow Leave a Comment

As I rummaged through my kitchen, the delightful aroma of nostalgia enveloped me—reminding me of joyful gatherings filled with laughter and loving hearts. That’s when I decided to whip up a classic favorite: Pigs in a Blanket. These easy snacks are not just quick to prepare; they’re also the perfect crowd-pleaser for any occasion, whether it’s a cozy family lunch or a lively party. Imagine sinking your teeth into flaky crescent rolls wrapping luscious cocktail weenies, paired delightfully with a zesty homemade honey mustard dipping sauce that elevates the flavor to a whole new level. If you’re tired of fast food and looking for something homemade that will bring smiles to both kids and adults, this recipe is your go-to solution. Are you ready to create a delicious memory with these irresistible bites?

Why are Pigs in a Blanket so beloved?

Irresistible Comfort: These Pigs in a Blanket are the ultimate comfort food, bringing warmth and happiness to any gathering.

Super Simple: Just a few ingredients and minimal effort make whipping up these delicious snacks easy—perfect for busy weeknights or last-minute parties.

Crowd-Pleasing: Whether for kids or adults, everyone loves these savory bites, making them a guaranteed hit at family events or game day celebrations.

Customizable: Feel free to experiment! You can swap in different proteins or cheese to create unique flavors that cater to everyone's taste preferences.

Serve Warm: Enjoy them fresh out of the oven with a homemade honey mustard dipping sauce, which takes the experience to a whole new level—talk about a flavor explosion!

Pigs in a Blanket Ingredients

• Dive into the delightful world of Pigs in a Blanket with these essential ingredients!

For the Dough
• Crescent Rolls – The flaky base that creates an inviting, crispy exterior. Substitution: Use crescent roll sheets if you want a seamless dough.

For the Filling
• Cocktail Weenies – Juicy and tender, they’re the heart of this recipe. Substitution: Mini sausages work beautifully as an alternative.

For the Glaze
• Butter (melted) – Enhances richness and promotes a golden, appetizing finish. Tip: Brush generously for that perfect bake.

For the Dipping Sauce
• Dijon Mustard – Infuses the sauce with a tangy kick that pairs wonderfully with the savory bites. Substitution: Yellow mustard can be used for a milder flavor.
• Mayonnaise – Adds creaminess to the dipping sauce, making it irresistible. Tip: Combine with mustard for a rich texture.
• Honey – Sweetens the sauce, harmonizing with the mustard’s tang. Tip: Swap in maple syrup for a unique twist.
• Cayenne Pepper – A pinch introduces a delightful hint of heat to the mixture. Substitution: Omit if you prefer a milder flavor profile.
• Salt – Essential to enhance the overall flavor; adjust to your taste preferences. Tip: Always taste and season as needed.

Step‑by‑Step Instructions for Pigs in a Blanket

Step 1: Preheat and Prepare
Begin by preheating your oven to 375°F (190°C). While the oven heats up, line a baking sheet with parchment paper to prevent sticking and simplify cleanup. This will be the perfect base for your delightful Pigs in a Blanket.

Step 2: Roll Out the Dough
Open the package of crescent rolls and gently roll out the dough onto a clean surface. If using individual triangles, press the seams together firmly to create a seamless sheet. The dough should appear smooth and ready to be cut into triangles for wrapping the cocktail weenies.

Step 3: Cut the Dough
Using a pizza cutter or knife, cut the dough into approximately 7 to 8 equal triangles. Aim for a good size that will wrap snugly around each cocktail weenie. This step ensures you have the perfect portions for your Pigs in a Blanket.

Step 4: Wrap the Weenies
At the wider end of each triangle, place a cocktail weenie. Carefully roll the dough around the weenie, tucking in the edges to secure it. This creates a neat and appetizing bite-sized piece. Repeat until all weenies are wrapped, ensuring a scrumptious outcome.

Step 5: Arrange on Baking Sheet
Place the rolled Pigs in a Blanket on the prepared baking sheet, making sure to leave space between them for even baking. This allows the dough to puff up and achieve that enticing golden-brown finish as they bake.

Step 6: Butter the Tops
Brush the tops of your assembled Pigs in a Blanket with melted butter. This not only adds richness but also promotes a beautifully golden crust. Be generous, as this step is crucial for enhancing flavor and texture.

Step 7: Bake to Perfection
Now, bake in the preheated oven for about 15 minutes. Keep an eye on them as they transform; they should turn a lovely golden brown and puff up enticingly. The aroma will fill your kitchen, building anticipation for these delectable bites.

Step 8: Prepare the Honey Mustard Sauce
While your Pigs in a Blanket bake, whisk together Dijon mustard, mayonnaise, honey, cayenne pepper, and a pinch of salt in a bowl. This simple dipping sauce will complement the savory flavors beautifully. Mix until smooth for a delightful dipping experience.

Step 9: Serve and Enjoy
Once baked, allow the Pigs in a Blanket to cool slightly before transferring them to a serving platter. They are best served warm alongside your homemade honey mustard sauce. Delight in the flakiness of the dough and the juicy flavor within each bite!

Helpful Tricks for Pigs in a Blanket

  • Perfect Spacing: Always leave some space between each Pigs in a Blanket on the baking sheet to prevent them from sticking together during baking.

  • Seamless Dough: If using crescent roll sheets, skip pressing seams together for a smoother process; it saves time and ensures an even bake.

  • Advance Prep: You can wrap the weenies ahead of time and store them in the refrigerator for up to a day. Just pop them in the oven when you’re ready to serve!

  • Leftover Storage: If you have any Pigs in a Blanket left, store them tightly covered in the refrigerator for up to 4-5 days or freeze them for up to 3 months, perfect for quick snacks later!

  • Experiment with Fillings: Don’t hesitate to get creative by adding cheese slices or trying different proteins like turkey or vegetarian sausages—there’s no wrong way to enjoy Pigs in a Blanket!

What to Serve with Easy Pigs in a Blanket

Add a burst of flavor and joy to your gatherings with these delightful pairings that complement your savory bites beautifully.

  • Creamy Coleslaw: The crunchy freshness provides a perfect contrast, balancing the warm and flaky Pigs in a Blanket. This light dish brightens your plate and brings a delightful crunch.

  • Crispy Potato Wedges: Seasoned and baked to perfection, these fluffy on the inside and crispy on the outside wedges make for a comforting side. Their homemade charm enhances the whole meal experience.

  • Garden Salad: A mix of colorful greens and tangy dressings add a refreshing touch to your spread. The bright flavors and textures create a great balance with the savory bites.

  • Mac and Cheese: Creamy and cheesy, this classic comfort food wraps you in warmth just like your Pigs in a Blanket. It’s a nostalgic pairing that’s eagerly craved at any gathering.

  • Fruit Skewers: Fresh fruits drizzled with a hint of honey or citrus add a sweet contrast to the savory tones. This playful presentation is a feast for the eyes as well as the palate.

  • Spicy BBQ Sauce: For those who enjoy a bit of a kick, serve this alongside to elevate the flavor profile. The rich, smoky taste draws out the savory notes of your Pigs in a Blanket beautifully.

  • Sparkling Lemonade: A refreshing drink option that provides a zesty sweetness, brightening up your meal. The effervescence perfectly cuts through the richness, complementing each bite wonderfully.

  • Ice Cream Sundaes: End the meal on a sweet note with this classic dessert. The creamy sweetness of ice cream topped with chocolate or caramel sauce creates a delightful close to your savory feast.

Storage Tips for Pigs in a Blanket

Fridge: Store tightly covered in the refrigerator for up to 4-5 days. This keeps them fresh and ready for quick snacks anytime!

Freezer: For longer storage, freeze your Pigs in a Blanket for up to 3 months. Ensure they are wrapped well to prevent freezer burn.

Reheating: Reheat in the oven at 350°F (175°C) for about 10 minutes to restore that crispy texture, or use the microwave for a quicker option.

Make-Ahead: You can prepare the Pigs in a Blanket ahead of time. Store them raw in the refrigerator and bake just before serving for optimal freshness!

Pigs in a Blanket Variations & Substitutions

Feel free to unleash your culinary creativity with these delightful twists that can elevate your Pigs in a Blanket experience!

  • Vegetarian Option: Swap cocktail weenies for plant-based sausages or roasted veggies for a delicious vegetarian delight.
  • Cheesy Surprise: Place a small slice of cheese inside each blanket before adding the weenie for a gooey, cheesy treat.
  • Bacon-Wrapped Bliss: For an indulgent twist, wrap each cocktail weenie in a slice of bacon before encasing it in dough. Who can resist bacon?
  • Herb Infusion: Add minced fresh herbs like dill or chives to the butter you brush on top for an aromatic boost that elevates the flavor.
  • Spicy Kick: Mix a pinch of jalapeño or sriracha into your honey mustard for a zesty dipping sauce that adds a bit of heat!
  • Sweet Twist: Brush the dough with honey or maple syrup before baking for a sweet and savory flavor that is simply irresistible.
  • Savory Seasoning: Sprinkle garlic powder, onion powder, or Italian seasoning on top of the dough before baking for added depth of flavor.
  • Different Dips: Besides honey mustard, try barbecue sauce or a creamy ranch dip to serve alongside for a variety of flavors that cater to everyone’s palate.

Explore these tantalizing variations to make your Pigs in a Blanket not just a dish, but an exciting culinary adventure! If you’re feeling adventurous, consider pairing them with homemade dipping sauces or adding a side of crispy veggies to make the meal even more appealing. Enjoy crafting your unique flavors!

Make Ahead Options

These Pigs in a Blanket are perfect for meal prep enthusiasts looking to save time during busy weeknights! You can wrap the cocktail weenies in the crescent rolls up to 24 hours in advance; simply keep them tightly covered in the refrigerator to maintain freshness and prevent drying out. This way, all you need to do when it's time to serve is preheat your oven and bake them for about 15 minutes until golden brown. Additionally, you can make the honey mustard dipping sauce ahead of time and refrigerate it in an airtight container for up to 3 days. Just give it a good stir before serving, and you'll enjoy the same delicious flavors with minimal effort!

Pigs in a Blanket Recipe FAQs

What kind of crescent rolls should I use?
Look for refrigerated crescent roll dough, which comes in a tube at your grocery store. For a smoother result, I recommend using crescent roll sheets, as they don't have seams to press together, making it easier to wrap around the cocktail weenies.

How long can I store Pigs in a Blanket leftovers?
You can refrigerate the leftovers for up to 4-5 days. Make sure to store them in an airtight container to maintain freshness. When you're ready to enjoy them again, just pop them in the oven or microwave for quick reheating.

Can I freeze Pigs in a Blanket?
Absolutely! You can freeze Pigs in a Blanket for up to 3 months. To do this, place them on a parchment-lined baking sheet and freeze until solid. Afterward, transfer them to a freezer-safe bag. When you're ready, bake from frozen at 375°F (190°C) for about 20-25 minutes.

What should I do if the dough doesn't roll out easily?
If your dough feels too sticky or difficult to roll out, make sure it's properly chilled. Refrigerate for about 10-15 minutes before rolling. This helps the dough firm up and makes it much easier to work with.

Are there any dietary considerations for Pigs in a Blanket?
When it comes to dietary preferences or allergies, look for gluten-free crescent rolls or sub the cocktail weenies with turkey or vegetarian sausages. Always check labels for potential allergens like soy or dairy in the ingredients, especially when preparing for kids or guests with specific dietary restrictions.

Can I prepare Pigs in a Blanket ahead of time?
Yes, you can absolutely prepare them in advance! Simply wrap the cocktail weenies in the dough, place them in a baking dish covered with plastic wrap, and store them in the refrigerator. When you're ready to bake, just remove the wrap and pop them in the oven. They will be just as delicious and fresh!

Pigs in a Blanket

Savory Pigs in a Blanket: Easy & Irresistibly Delicious!

Pigs in a Blanket are easy snacks that are perfect crowd-pleasers for any occasion, combining flaky crescent rolls and luscious cocktail weenies for irresistible flavor.
Print Recipe Pin Recipe
Prep Time 15 minutes mins
Cook Time 15 minutes mins
Total Time 30 minutes mins
Servings: 8 pieces
Course: Snacks
Cuisine: American
Calories: 150
Ingredients Equipment Method Nutrition Notes

Ingredients
  

For the Dough
  • 1 package Crescent Rolls Use crescent roll sheets for a seamless dough.
For the Filling
  • 1 package Cocktail Weenies Mini sausages can be used as an alternative.
For the Glaze
  • 2 tablespoons Butter Melted, for brushing.
For the Dipping Sauce
  • 1/2 cup Dijon Mustard Yellow mustard can be used for a milder flavor.
  • 1/2 cup Mayonnaise Combine with mustard for a rich texture.
  • 2 tablespoons Honey Maple syrup can be used for a unique twist.
  • 1/4 teaspoon Cayenne Pepper Omit for a milder flavor profile.
  • to taste Salt Always taste and season as needed.

Equipment

  • Oven
  • Baking Sheet
  • Parchment Paper
  • Pizza cutter or knife

Method
 

Step-by-Step Instructions
  1. Preheat your oven to 375°F (190°C) and line a baking sheet with parchment paper.
  2. Open the package of crescent rolls and roll out the dough on a clean surface.
  3. Cut the dough into approximately 7 to 8 equal triangles.
  4. At the wider end of each triangle, place a cocktail weenie and roll it up tightly.
  5. Arrange the wrapped weenies on the prepared baking sheet, leaving space between them.
  6. Brush the tops with melted butter generously.
  7. Bake in the preheated oven for about 15 minutes until golden brown.
  8. Whisk together Dijon mustard, mayonnaise, honey, cayenne pepper, and salt for the dipping sauce.
  9. Allow to cool slightly and serve warm with the honey mustard sauce.

Nutrition

Serving: 1pieceCalories: 150kcalCarbohydrates: 10gProtein: 3gFat: 12gSaturated Fat: 6gPolyunsaturated Fat: 1gMonounsaturated Fat: 4gCholesterol: 20mgSodium: 300mgPotassium: 100mgSugar: 1gCalcium: 1mgIron: 2mg

Notes

Perfect spacing on the baking sheet and seamless dough help in achieving the best results. You can store them in the fridge or freeze for later use.

Tried this recipe?

Let us know how it was!

Tater Tot Appetizer: Crispy, Cheesy Bliss in Every Bite

November 13, 2025 by Grace Snow Leave a Comment

With the crisp air of autumn settling in, there's something magical about the combination of apples and caramel that instantly transports me to cozy gatherings. That’s how my Caramel Apple Bark came to life, a delightful creation that blends layers of crunchy pretzels, creamy chocolate, and tart green apples. This easy-to-make dessert captures the essence of fall, making it a perfect choice for sharing with family and friends or enjoying on a quiet night in. It’s not only a crowd-pleaser but also a fantastic way to indulge your sweet tooth without spending hours in the kitchen. Ready to whip up this charming treat and see why it’s a must-try?

Why is Caramel Apple Bark a Must-Try?

Simplicity at Its Finest: Preparing this delightful treat is incredibly straightforward, allowing you to whip it up without stressing over complicated techniques.

Sweet and Tangy Delight: The blend of tart green apples and gooey caramel ensures every bite bursts with flavor that perfectly embodies fall.

Crowd-Pleasing Appeal: This dessert is perfect for gatherings; its unique combination of textures and flavors will have everyone coming back for more!

Endless Customization: You can easily personalize this recipe by adding nuts or swapping apple varieties for a distinct taste; the possibilities are endless.

Perfect for Any Occasion: Whether it’s a festive gathering or a cozy night in, this Caramel Apple Bark is a sweet indulgence everyone will love. Enjoy it fresh for the best texture, and feel free to explore other easy dessert recipes for your next sweet creation!

Caramel Apple Bark Ingredients

For the Bark

  • Milk Chocolate Chips – Provides sweetness and a smooth, rich chocolate layer; dark chocolate can substitute for a less sweet option.
  • Green Apple – Adds crispness and a tart flavor contrast to the sweetness; always pat dry to minimize moisture.
  • Individual Wrapped Caramels (35 pieces) or 13.5 oz Caramel Dip – Gives that delicious caramel flavor and sticky texture; use caramel dip for a quicker option without unwrapping.
  • Pretzels (16 oz bag) – Contributes crunch and a salty balance to the dessert; choose pretzel sticks or twists based on your preference.

For the Drizzle

  • Remaining Milk Chocolate Chips – Adds a finishing touch of chocolatey goodness; melt and drizzle for that extra flair.

Step‑by‑Step Instructions for Caramel Apple Bark

Step 1: Melt the Chocolate
Start by placing 1¾ cups of milk chocolate chips in a microwave-safe bowl. Heat the chocolate in the microwave on high for 15 seconds at a time, stirring after each interval until the mixture is smooth and glossy, which should take about 1 to 2 minutes. This melted chocolate will serve as the luxurious base of your Caramel Apple Bark.

Step 2: Prepare the Base
Once your chocolate is melted, line a baking sheet with parchment paper. Pour the chocolate onto the parchment and use a spatula to spread it into a rectangular shape, about ¼ inch thick. Aim for an even layer so that your Caramel Apple Bark will have a uniform texture.

Step 3: Layer the Pretzels
Before the chocolate sets, take your pretzels and firmly press them into the melted chocolate, ensuring they are well-coated. Use around half the bag of pretzels and create a pattern that pleases your eyes—this will add crunch and a delightful salty kick to your dessert.

Step 4: Prepare the Apples
Next, take your green apple and dice it into small pieces, about ½ inch. After dicing, use a paper towel to pat the apple pieces dry to minimize moisture; this is crucial for preventing your bark from becoming soggy. Set the apple pieces aside for later.

Step 5: Melt the Caramels
If using individual wrapped caramels, unwrap approximately 35 pieces and place them in a microwave-safe bowl. Microwave the caramels on high for 15-second intervals, stirring between each, until fully melted and creamy, which typically takes about 1 minute. This gooey goodness will bind perfectly with the apple pieces.

Step 6: Combine Apples and Caramel
Once the caramels are melted, add the diced apple pieces into the bowl and mix until they are fully coated with the caramel. Spread this caramel apple mixture evenly over the pretzel layer in your chocolate base, ensuring an even distribution for delightful bites throughout your Caramel Apple Bark.

Step 7: Chill and Drizzle
Refrigerate the assembled bark for about 30 minutes or until the caramel has set. Meanwhile, melt any remaining chocolate chips in the microwave, just as you did prior. Once the bark is chilled, drizzle this melted chocolate over the top for that extra touch of richness.

Step 8: Final Chill and Slice
Place the bark back in the fridge for an additional hour to firm up completely. Once chilled and set, remove it from the fridge, lift it off the parchment, and cut into bite-sized pieces using a sharp knife. Serve immediately or keep refrigerated for the best quality until ready to share!

Tater Tot Appetizer Variations

Feel free to get creative and tailor this recipe to your liking; a little twist can bring out delightful new flavors!

  • Spicy Kick: Add diced jalapeños or a sprinkle of cayenne pepper for a fiery flavor boost. Your taste buds will love the warmth!
  • Cheesy Delight: Swap in pepper jack cheese for a zesty twist that melts deliciously in every bite. It's a cheesy experience you won’t forget!
  • Herb Infusion: Sprinkle fresh herbs like parsley or chives to elevate flavor and color. This adds a refreshing touch and a burst of brightness!
  • Bacon Bits: Introduce crispy bacon pieces for a smoky crunch that perfectly complements the tater tots’ fluffy texture. Who doesn’t love bacon?
  • Veggie Medley: Incorporate finely chopped bell peppers or broccoli for added texture and color, turning your appetizer into a mini veggie feast!
  • Sweet Treat: Drizzle with a hint of honey or maple syrup for a unique sweet and savory contrast. Trust me, you'll want to savor every bite!
  • Gourmet Sauce: Serve with a creamy ranch or zesty garlic aioli for dipping; it transforms your appetizer into an irresistible snack!
  • Seasoned Stars: Experiment with seasoning blends like ranch or taco seasoning to enhance the classic flavor profile in a new way. Your guests will be impressed!

For more inspiration, check out these easy appetizer ideas that will surely please a crowd!

Make Ahead Options

These Caramel Apple Bark delights are perfect for meal prep enthusiasts! You can prepare the chocolate base and layer the pretzels up to 24 hours in advance, allowing you to have a head start on creating this delicious treat. Simply store the chocolate-covered pretzels in an airtight container at room temperature to maintain their crunch. You can also dice and dry the apples ahead of time, keeping them in a sealed bag in the refrigerator to prevent browning. When you’re ready to serve, melt the caramels, combine them with the apples, and spread the mixture over the pretzels. Finish by chilling for an hour, and you'll have an effortless, crowd-pleasing dessert ready to impress!

How to Store and Freeze Caramel Apple Bark

Fridge: Store leftover Caramel Apple Bark in an airtight container in the refrigerator for up to 2 days to retain its delightful crunch and flavor.

Freezer: For longer storage, you can freeze the bark wrapped tightly in plastic wrap and then in foil for up to 1 month. Thaw in the fridge before enjoying.

Room Temperature: If serving at a gathering, you can keep the bark at room temperature for a few hours without compromising quality, but avoid direct sunlight to maintain freshness.

Reheating: There’s no need to reheat this treat; simply enjoy it chilled or at room temp for the best experience!

What to Serve with Caramel Apple Bark

Create a delightful spread that complements the sweet, crunchy goodness of this fall-inspired dessert!

  • Vanilla Ice Cream: The creamy and cool texture pairs beautifully with the warm flavors of caramel and apples, adding a refreshing contrast.
  • Hot Chocolate: Rich and chocolatey, this drink enhances the dessert's sweetness and invokes cozy vibes perfect for autumn.
  • Cinnamon Sugar Tortilla Chips: The crispy, sweet chips introduce an extra crunch and a hint of spice, perfectly matching the bark's flavors.
  • Caramel Drizzle: A generous drizzle of caramel on the side elevates the indulgence, inviting you to dip as you please.
  • Spiced Apple Cider: The warm apple notes tie in beautifully, wrapping you in a cozy hug with every sip alongside the bark.
  • Pecan Pie Bars: For a heartier dessert combo, these bars bring in nutty sweetness that complements the bark’s textures.

Mix and match these delightful pairings for an unforgettable dessert experience!

Expert Tips for Caramel Apple Bark

Serve Fresh: Make sure to enjoy your Caramel Apple Bark the same day it's made to keep the pretzels crunchy and the apples firm.

Chocolate Watch: Keep a close eye on the melting chocolate; it can burn quickly. Adjust the microwave time as needed to achieve that smooth finish.

Moisture Control: Always pat the diced apples dry to prevent extra moisture from ruining the bark's texture. This ensures a delightful crunch in every bite!

Customize Easily: Add your favorite nuts for added crunch, or swap apples for a different fruit. This simple tweak makes each batch uniquely yours.

Storage Know-How: If you have leftovers, store them in an airtight container in the refrigerator for up to two days to maintain their deliciousness!

Caramel Apple Bark Recipe FAQs

What type of apples should I use for Caramel Apple Bark?
Absolutely! For the best contrast in flavors, I recommend using tart green apples like Granny Smith. Their crispness and tanginess provide a delightful balance against the sweetness of caramel and chocolate. Just remember to pat them dry before adding to prevent excess moisture, which could make the bark soggy.

How should I store leftover Caramel Apple Bark?
You can store leftover Caramel Apple Bark in an airtight container in the refrigerator for up to 2 days. This way, you’ll maintain its crunchy texture and delicious flavors. If you need to keep it longer, wrap it tightly in plastic wrap and foil, then freeze it for up to a month. Thaw it in the fridge before savoring it again.

Can I freeze Caramel Apple Bark?
Yes! Freezing is a great option if you want to enjoy this treat later. Wrap the bark tightly in plastic wrap and then in foil to protect it from freezer burn. When you're ready to enjoy, simply thaw it in the refrigerator overnight. This way, you'll have a delightful treat ready when you're craving something sweet!

What can I do if my chocolate is burning while melting?
If you notice your chocolate starting to burn, immediately stop microwaving it. Instead, add a teaspoon of vegetable oil to the chocolate and stir it—this can help smoothen it out. Remember, melting chocolate in short intervals (15 seconds) while stirring in between is key to achieving a smooth finish. Keeping a close eye will prevent unwanted burning!

Is Caramel Apple Bark suitable for kids or people with allergies?
While Caramel Apple Bark is a delightful treat, if you're serving kids or guests with allergies, it's essential to check your ingredients. The recipe includes chocolate, pretzels, and caramel, which may contain allergens like nuts or gluten. Always opt for allergy-safe brands, and consider making your version using allergen-free alternatives if needed.

What toppings can I add to customize my Caramel Apple Bark?
The more the merrier! Feel free to get creative by adding toppings like chopped nuts for extra crunch, or you can try a drizzle of white chocolate for a visually appealing contrast. Dried fruits or sprinkles also make for fun additions, so don't hesitate to experiment and make this Caramel Apple Bark your own!

Tater Tot Appetizer

Tater Tot Appetizer: Crispy, Cheesy Bliss in Every Bite

This Tater Tot Appetizer is a delicious, crowd-pleasing treat packed with crispy, cheesy goodness.
Print Recipe Pin Recipe
Prep Time 15 minutes mins
Cook Time 30 minutes mins
Chilling Time 30 minutes mins
Total Time 1 hour hr 15 minutes mins
Servings: 8 pieces
Course: Appetizers
Cuisine: American
Calories: 220
Ingredients Equipment Method Nutrition Notes

Ingredients
  

For the Bark
  • 1.75 cups Milk Chocolate Chips Dark chocolate can substitute for a less sweet option.
  • 1 medium Green Apple Always pat dry to minimize moisture.
  • 35 pieces Individual Wrapped Caramels Use caramel dip for a quicker option without unwrapping.
  • 16 oz Pretzels Choose pretzel sticks or twists based on your preference.
For the Drizzle
  • 1.75 cups Remaining Milk Chocolate Chips Melt and drizzle for that extra flair.

Equipment

  • Microwave
  • Baking Sheet
  • Parchment Paper
  • Spatula
  • Knife
  • Microwave-safe bowl

Method
 

Step‑by‑Step Instructions for Caramel Apple Bark
  1. Melt the chocolate by placing 1¾ cups of milk chocolate chips in a microwave-safe bowl, heating on high for 15 seconds at a time until smooth, about 1 to 2 minutes.
  2. Line a baking sheet with parchment paper, pour the melted chocolate onto it, and spread it into a rectangular shape, approximately ¼ inch thick.
  3. Press pretzels into the melted chocolate before it sets, using around half the bag to create an appealing pattern.
  4. Dice the green apple into small pieces, about ½ inch, and pat them dry with a paper towel to minimize moisture.
  5. Unwrap around 35 caramels, place in a microwave-safe bowl, and microwave on high for 15-second intervals until fully melted and creamy.
  6. Mix the diced apple pieces with the melted caramels until fully coated, then spread this mixture evenly over the pretzel layer.
  7. Refrigerate the bark for about 30 minutes until the caramel sets, then melt any remaining chocolate chips and drizzle over the top.
  8. Return the bark to the fridge for an hour to firm up completely, then cut into bite-sized pieces.

Nutrition

Serving: 1pieceCalories: 220kcalCarbohydrates: 30gProtein: 3gFat: 10gSaturated Fat: 5gPolyunsaturated Fat: 0.5gMonounsaturated Fat: 4.5gCholesterol: 5mgSodium: 150mgPotassium: 100mgFiber: 1gSugar: 18gVitamin A: 200IUVitamin C: 5mgCalcium: 30mgIron: 1mg

Notes

Enjoy the Caramel Apple Bark the same day for the best crunch and flavor. Store leftovers in an airtight container in the refrigerator for up to 2 days.

Tried this recipe?

Let us know how it was!

Tater Tot Appetizer: Crispy, Cheesy Bliss in Every Bite

November 13, 2025 by Grace Snow Leave a Comment

With the crisp air of autumn settling in, there's something magical about the combination of apples and caramel that instantly transports me to cozy gatherings. That’s how my Caramel Apple Bark came to life, a delightful creation that blends layers of crunchy pretzels, creamy chocolate, and tart green apples. This easy-to-make dessert captures the essence of fall, making it a perfect choice for sharing with family and friends or enjoying on a quiet night in. It’s not only a crowd-pleaser but also a fantastic way to indulge your sweet tooth without spending hours in the kitchen. Ready to whip up this charming treat and see why it’s a must-try?

Why is Caramel Apple Bark a Must-Try?

Simplicity at Its Finest: Preparing this delightful treat is incredibly straightforward, allowing you to whip it up without stressing over complicated techniques.

Sweet and Tangy Delight: The blend of tart green apples and gooey caramel ensures every bite bursts with flavor that perfectly embodies fall.

Crowd-Pleasing Appeal: This dessert is perfect for gatherings; its unique combination of textures and flavors will have everyone coming back for more!

Endless Customization: You can easily personalize this recipe by adding nuts or swapping apple varieties for a distinct taste; the possibilities are endless.

Perfect for Any Occasion: Whether it’s a festive gathering or a cozy night in, this Caramel Apple Bark is a sweet indulgence everyone will love. Enjoy it fresh for the best texture, and feel free to explore other easy dessert recipes for your next sweet creation!

Caramel Apple Bark Ingredients

For the Bark

  • Milk Chocolate Chips – Provides sweetness and a smooth, rich chocolate layer; dark chocolate can substitute for a less sweet option.
  • Green Apple – Adds crispness and a tart flavor contrast to the sweetness; always pat dry to minimize moisture.
  • Individual Wrapped Caramels (35 pieces) or 13.5 oz Caramel Dip – Gives that delicious caramel flavor and sticky texture; use caramel dip for a quicker option without unwrapping.
  • Pretzels (16 oz bag) – Contributes crunch and a salty balance to the dessert; choose pretzel sticks or twists based on your preference.

For the Drizzle

  • Remaining Milk Chocolate Chips – Adds a finishing touch of chocolatey goodness; melt and drizzle for that extra flair.

Step‑by‑Step Instructions for Caramel Apple Bark

Step 1: Melt the Chocolate
Start by placing 1¾ cups of milk chocolate chips in a microwave-safe bowl. Heat the chocolate in the microwave on high for 15 seconds at a time, stirring after each interval until the mixture is smooth and glossy, which should take about 1 to 2 minutes. This melted chocolate will serve as the luxurious base of your Caramel Apple Bark.

Step 2: Prepare the Base
Once your chocolate is melted, line a baking sheet with parchment paper. Pour the chocolate onto the parchment and use a spatula to spread it into a rectangular shape, about ¼ inch thick. Aim for an even layer so that your Caramel Apple Bark will have a uniform texture.

Step 3: Layer the Pretzels
Before the chocolate sets, take your pretzels and firmly press them into the melted chocolate, ensuring they are well-coated. Use around half the bag of pretzels and create a pattern that pleases your eyes—this will add crunch and a delightful salty kick to your dessert.

Step 4: Prepare the Apples
Next, take your green apple and dice it into small pieces, about ½ inch. After dicing, use a paper towel to pat the apple pieces dry to minimize moisture; this is crucial for preventing your bark from becoming soggy. Set the apple pieces aside for later.

Step 5: Melt the Caramels
If using individual wrapped caramels, unwrap approximately 35 pieces and place them in a microwave-safe bowl. Microwave the caramels on high for 15-second intervals, stirring between each, until fully melted and creamy, which typically takes about 1 minute. This gooey goodness will bind perfectly with the apple pieces.

Step 6: Combine Apples and Caramel
Once the caramels are melted, add the diced apple pieces into the bowl and mix until they are fully coated with the caramel. Spread this caramel apple mixture evenly over the pretzel layer in your chocolate base, ensuring an even distribution for delightful bites throughout your Caramel Apple Bark.

Step 7: Chill and Drizzle
Refrigerate the assembled bark for about 30 minutes or until the caramel has set. Meanwhile, melt any remaining chocolate chips in the microwave, just as you did prior. Once the bark is chilled, drizzle this melted chocolate over the top for that extra touch of richness.

Step 8: Final Chill and Slice
Place the bark back in the fridge for an additional hour to firm up completely. Once chilled and set, remove it from the fridge, lift it off the parchment, and cut into bite-sized pieces using a sharp knife. Serve immediately or keep refrigerated for the best quality until ready to share!

Tater Tot Appetizer Variations & Substitutions

Feel free to explore these delightful twists and ideas, customizing the recipe to satisfy cravings and spark joy!

  • Vegetarian Option: Omit any meat and load up on roasted vegetables like bell peppers or zucchini for a fresh, vibrant flavor.

  • Cheesy Delight: Swap in pepper jack cheese for a spicy kick or add a blend of your favorite cheeses to amplify that gooey goodness.

  • Bacon Bits: Crumble crispy bacon on top for a salty crunch that pairs wonderfully with the rich flavors—perfect for bacon lovers!

  • Dipping Sauces: Serve with a variety of dips like spicy ranch, BBQ sauce, or a zesty salsa to elevate your game day experience.

  • Sweet Heat: Add a hint of crushed red pepper or jalapeños for a spicy kick to make your tater tots even more exciting!

  • Pesto Drizzle: Finish with a drizzle of fresh pesto for a gourmet touch, adding fragrant herbs that bring a burst of flavor.

  • Herb Infusion: Mix in chopped fresh herbs like chives or parsley to add a refreshing burst of color and flavor that complements the crispy bites.

  • Baked Variation: For a healthier approach, consider baking your tater tots. This allows for a crispy texture without all the frying fuss.

Don't forget, if you're preparing for a gathering, check out these flavorful ideas for Tater Tot Appetizer that will catch everyone's eye and taste buds!

Expert Tips for Caramel Apple Bark

Serve Fresh: Make sure to enjoy your Caramel Apple Bark the same day it's made to keep the pretzels crunchy and the apples firm.

Chocolate Watch: Keep a close eye on the melting chocolate; it can burn quickly. Adjust the microwave time as needed to achieve that smooth finish.

Moisture Control: Always pat the diced apples dry to prevent extra moisture from ruining the bark's texture. This ensures a delightful crunch in every bite!

Customize Easily: Add your favorite nuts for added crunch, or swap apples for a different fruit. This simple tweak makes each batch uniquely yours.

Storage Know-How: If you have leftovers, store them in an airtight container in the refrigerator for up to two days to maintain their deliciousness!

Make Ahead Options

These Caramel Apple Bark pieces are perfect for meal prep enthusiasts! You can prepare the chocolate layer and allow it to set up to 24 hours in advance. Just melt the chocolate, spread it on parchment, and let it chill. Additionally, you can dice and pat dry the green apple pieces and store them in an airtight container in the refrigerator for up to 3 days—this will prevent moisture from affecting their crispness. When you're ready to enjoy, simply melt and combine the caramels with the prepped apples, spread them over the hardened chocolate, drizzle with more chocolate, and chill again. This way, you’ll enjoy the delightful crunch and gooeyness of your Caramel Apple Bark with minimal last-minute effort!

What to Serve with Caramel Apple Bark

Satisfy your sweet cravings with a delightful array of pairings that elevate your Caramel Apple Bark experience.

  • Vanilla Ice Cream: A scoop of creamy vanilla ice cream adds a refreshing contrast to the sweet bark, creating a delightful flavor combination.
  • Hot Caramel Sauce: Drizzling warm caramel sauce over your bark intensifies that rich caramel flavor, making each bite even more indulgent.
  • Chilled Apple Cider: Enhance the apple essence by serving a glass of chilled apple cider, which complements the fruity notes of the bark beautifully.
  • Roasted Nuts: A handful of seasoned roasted nuts introduces a salty crunch, balancing the sweetness of your Caramel Apple Bark for a satisfying snack.
  • Dark Chocolate Drizzle: Elevate your dessert by adding a dark chocolate drizzle; its rich bitterness perfectly contrasts the sweet layers, creating depth.
  • Peppermint Hot Chocolate: Warm up with a cozy mug of peppermint hot chocolate; its festive flavors harmonize well with the fall-inspired bark.
  • Cheese Platter: A selection of creamy Brie or tangy goat cheese introduces an unexpected savory element that pairs nicely with the sweet treats.
  • Fruity Smoothie: A fresh fruit smoothie with greens offers a light, refreshing note that brightens your dessert table while keeping things healthy.

How to Store and Freeze Caramel Apple Bark

Fridge: Store leftover Caramel Apple Bark in an airtight container in the refrigerator for up to 2 days to retain its delightful crunch and flavor.

Freezer: For longer storage, you can freeze the bark wrapped tightly in plastic wrap and then in foil for up to 1 month. Thaw in the fridge before enjoying.

Room Temperature: If serving at a gathering, you can keep the bark at room temperature for a few hours without compromising quality, but avoid direct sunlight to maintain freshness.

Reheating: There’s no need to reheat this treat; simply enjoy it chilled or at room temp for the best experience!

Caramel Apple Bark Recipe FAQs

How do I choose ripe apples for the Caramel Apple Bark?
When selecting green apples, look for smooth skin with no dark spots or blemishes. The apples should feel firm to the touch, indicating freshness. Crispness is key for that delightful texture contrast in your bark, so avoid any apples that seem soft or mealy.

How should I store leftover Caramel Apple Bark?
To preserve its crunchy texture, store your Caramel Apple Bark in an airtight container in the refrigerator for up to 2 days. If you must keep it longer, you can freeze it. Just remember to separate layers with parchment paper to prevent sticking and maintain texture.

Can I freeze Caramel Apple Bark?
Absolutely! To freeze, place your Caramel Apple Bark in an airtight container, ensuring layers are separated by parchment paper to avoid sticking. It can be stored in the freezer for up to 1 month. When you're ready to enjoy, thaw it overnight in the refrigerator to maintain its delightful crunch!

What if my melted chocolate is clumpy when making the bark?
If you find your chocolate isn’t melting smoothly, it may have been heated too quickly. Try stirring it more frequently during melting, and if it's still clumpy, add a teaspoon of vegetable oil to help smooth it out. Just remember, it's important to keep a close eye on the microwave time to prevent burning!

Is this Caramel Apple Bark suitable for those with nut allergies?
Yes, this recipe can be tailored to be nut-free! If you're serving guests with nut allergies, simply omit any nuts you might wish to add. It remains delicious without them, letting the chocolate, caramel, and apples shine as the stars of the treat, ensuring everyone can enjoy this delightful dessert!

What’s the best way to ensure my pretzels stay crunchy in the bark?
To keep pretzels crunchy, serve the Caramel Apple Bark the same day it’s made. Additionally, make sure to dry the diced apples thoroughly with a paper towel before mixing them with the caramel, as moisture can lead to sogginess. This will help the pretzels maintain their delightful crunch!

Tater Tot Appetizer

Tater Tot Appetizer: Crispy, Cheesy Bliss in Every Bite

Tater Tot Appetizer is a deliciously crispy and cheesy treat perfect for gatherings or cozy nights in.
Print Recipe Pin Recipe
Prep Time 15 minutes mins
Cook Time 20 minutes mins
Chilling Time 30 minutes mins
Total Time 1 hour hr 5 minutes mins
Servings: 8 pieces
Course: Appetizers
Cuisine: American
Calories: 150
Ingredients Equipment Method Nutrition Notes

Ingredients
  

For the Chocolate Layer
  • 1.75 cups Milk Chocolate Chips Substitution: Dark chocolate can be used for a less sweet option.
For the Apple Layer
  • 1 medium Green Apple Always pat dry to minimize moisture.
For the Caramel Layer
  • 35 pieces Individual Wrapped Caramels Use caramel dip for a quicker option, without unwrapping individual pieces.
  • 13.5 oz Caramel Dip
For the Crunch
  • 16 oz Pretzels Choose pretzel sticks or twists based on preference.

Equipment

  • Microwave-safe bowl
  • Baking tray
  • Spatula
  • Sharp Knife
  • Parchment Paper

Method
 

Step-by-Step Instructions for Caramel Apple Bark
  1. Begin by microwaving 1¾ cups of milk chocolate chips in a large, microwave-safe bowl. Heat the chocolate in 15-second intervals, stirring vigorously between each interval until fully melted and smooth, which should take about 1-2 minutes total.
  2. Once the chocolate is melted, pour it onto a sheet of parchment paper laid out on a baking tray. Using a spatula, spread the chocolate into a rectangle shape, about ¼ inch thick.
  3. Press pretzels firmly into the melted chocolate, covering the surface evenly. Ensure the pretzels are partially submerged in the chocolate.
  4. Dice a green apple into small, bite-sized pieces and pat the diced apples dry with a paper towel.
  5. In a separate microwave-safe bowl, combine 35 individually wrapped caramels or 13.5 ounces of caramel dip. Microwave the caramels in 15-second intervals, stirring well until completely melted and creamy.
  6. Spread the caramel-apple mixture evenly over the pretzel layer and chill for about 30 minutes. Melt additional milk chocolate chips to drizzle over the top and chill again for an hour.
  7. Remove your Caramel Apple Bark from the refrigerator and use a sharp knife to cut it into bite-sized pieces.

Nutrition

Serving: 1pieceCalories: 150kcalCarbohydrates: 20gProtein: 1gFat: 7gSaturated Fat: 4gPolyunsaturated Fat: 0.5gMonounsaturated Fat: 2.5gCholesterol: 5mgSodium: 150mgPotassium: 50mgFiber: 1gSugar: 10gVitamin A: 2IUVitamin C: 5mgCalcium: 2mgIron: 2mg

Notes

Serve your Caramel Apple Bark the day it's made to ensure crunchy pretzels and fresh apples. Feel free to add chopped nuts or drizzle with white chocolate for extra flair and flavor.

Tried this recipe?

Let us know how it was!

Irresistible Stuffed Mushrooms with Creamy Cheese Delight

November 13, 2025 by Grace Snow Leave a Comment

As the holiday season approaches, the warm scent of garlic and herbs fills the air, promising something special for our festive gatherings. These Savory Keto Stuffed Mushrooms with Creamy Cheese Filling are not just a treat; they're a heartfelt nod to the joy of sharing delicious food with loved ones. In just 35-45 minutes, you can whip up these crowd-pleasers that are perfect for anyone watching their carbs. The beauty of this recipe lies in its make-ahead nature, allowing you to prepare them in advance and enjoy hassle-free hosting. Imagine the smiles on your guests' faces as they savor each bite of these tender mushrooms, filled with a delightful mix of creamy cheese and crunchy pecans. Ready to indulge your family and friends with this irresistible holiday appetizer?

Why Will You Adore Stuffed Mushrooms?

Irresistible: These stuffed mushrooms transform simple ingredients into a fabulous holiday appetizer that feels gourmet with minimal effort.
Make-Ahead Magic: Prep them in advance—just fill and refrigerate for up to 24 hours, baking just before serving to save you time on busy days.
Crowd-Pleaser: Their creamy cheese filling and earthy flavors appeal to both keto enthusiasts and traditional food lovers alike, making them a perfect addition to any festive table.
Flavor Explosion: Each bite is a delightful mix of savory creamy cheese, fresh herbs, and a satisfying crunch from the pecans, creating a memorable taste experience.
Customizable: Feel free to experiment! Swap in your favorite herbs or add ingredients like spinach or sausage for a personalized touch.
Don’t forget to check out my recipes for Grilled Mushrooms Savory or Herby Ricotta Stuffed for more amazing flavor combinations!

Stuffed Mushrooms Ingredients

• Discover the essential components for delightful stuffed mushrooms.

For the Filling

  • Baby Bella Mushrooms – These provide a meaty texture; white button mushrooms are a good substitute.
  • Cream Cheese – The creamy base adds richness; ensure it's at room temperature for easy mixing.
  • Butter – Adds a rich flavor to the filling; can substitute with olive oil for a vegan option.
  • Garlic – Fresh garlic enhances flavor dramatically; avoid using powdered garlic.
  • Onion – Sweetens and deepens the filling; shallots can be used for a milder taste.
  • Parmesan Cheese – Offers a savory umami flavor; nutritional yeast works as a dairy-free alternative.
  • Pecans – Crunchy texture that complements the filling; omit for a nut-free version or use breadcrumbs instead.
  • Fresh Parsley – Adds freshness and color; feel free to swap it with chives or dill.
  • Salt and Pepper – Essential for seasoning; adjust according to your taste preferences.

For Baking

  • Olive Oil – For greasing the baking sheet and ensuring mushrooms don't stick.

These stuffed mushrooms burst with flavor and are perfect for any festive gathering—your friends and family won't be able to resist!

Step‑by‑Step Instructions for Stuffed Mushrooms

Step 1: Preheat the Oven
Begin by preheating your oven to 400°F (200°C). While the oven heats up, grab a baking sheet and lightly grease it with olive oil to prevent the stuffed mushrooms from sticking. This simple step ensures a perfectly baked mushroom base, setting the stage for a delicious creation.

Step 2: Prepare the Mushrooms
Carefully rinse the baby bella mushrooms under cold water, making sure to dry them gently with a towel. Next, remove the stems from each mushroom cap and finely chop them. This preparation not only maximizes flavor but also ensures the stuffing includes that lovely earthy mushroom essence.

Step 3: Sauté the Filling
In a skillet, melt a tablespoon of butter over medium heat, then add the chopped mushroom stems. Sauté for about 5 minutes until the moisture evaporates and the mixture turns slightly golden, releasing a wonderful aroma. This process intensifies the flavor, making your stuffed mushrooms irresistible when baked.

Step 4: Add Aromatics
Once the mushroom stems are ready, toss in the diced onion and minced garlic along with a pinch of salt and pepper. Cook for an additional 1-2 minutes, stirring occasionally, until the onions soften and become translucent. This fragrant mixture adds depth and enhances the savory goodness of your stuffed mushrooms.

Step 5: Mix the Filling
Transfer the sautéed mixture to a mixing bowl and allow it to cool slightly for a couple of minutes. Then, stir in the room-temperature cream cheese, most of the grated Parmesan, fresh parsley, and chopped pecans. Blend until everything is well combined, creating a rich and creamy filling that will delight every guest.

Step 6: Stuff the Mushrooms
Time to fill those mushroom caps! Using a spoon, gently scoop the creamy cheese filling into each mushroom cap, packing it generously. Once filled, sprinkle the remaining Parmesan and a few extra chopped pecans on top for an added crunch. The combination of textures will create a memorable bite-sized treat.

Step 7: Bake to Perfection
Arrange the stuffed mushrooms on the prepared baking sheet and place them in the preheated oven. Bake for about 20-25 minutes or until the tops are golden brown and the mushrooms have softened slightly. Keep an eye on them to prevent overcooking; you want that perfect melt-in-your-mouth experience.

Step 8: Garnish & Serve
Once baked, remove your stuffed mushrooms from the oven and let them cool for a few minutes. Before serving, garnish with a sprinkle of fresh parsley for a pop of color and flavor. Now, enjoy these mouthwatering stuffed mushrooms as a delightful appetizer, sharing the warm holiday spirit with family and friends.

What to Serve with Savory Keto Stuffed Mushrooms?

Indulging in these creamy stuffed mushrooms is just the beginning; let’s create a full meal experience that delights the senses.

  • Fresh Garden Salad: A light, crisp salad with mixed greens and a tangy vinaigrette balances the rich flavors of the mushrooms beautifully.
  • Garlic Bread Sticks: Warm, buttery breadsticks with a hint of garlic provide a comforting crunch that pairs perfectly with the savory filling.
  • Classic Cheese Platter: Serve a selection of sharp, creamy cheeses alongside crackers and fruits for a delightful appetizer spread that invites mingling.
  • Roasted Vegetables: Sweet, caramelized roasted veggies add vibrant colors and textures, enhancing the meal’s overall warmth and heartiness.
  • Grilled Chicken Skewers: Juicy, marinated chicken skewers offer a protein-packed complement, adding a savory contrast to the creamy mushrooms.
  • Crisp White Wine: A chilled glass of Sauvignon Blanc or Pinot Grigio brings out the earthiness of the mushrooms and adds a refreshing touch to the meal.
  • Chocolate Mousse: Finish on a sweet note with a light and airy chocolate mousse, which contrasts the savory flavors of the stuffed mushrooms delightfully.
  • Sparkling Water with Citrus: Keep it refreshing with sparkling water infused with lemon or lime, cleansing the palate between bites for an invigorating meal experience.

How to Store and Freeze Stuffed Mushrooms

Fridge: Place any leftovers in an airtight container and store them in the fridge for up to 3 days. These stuffed mushrooms can still taste delicious after a quick reheat!

Freezer: If you want to prepare them in advance, you can freeze the uncooked stuffed mushrooms. Just wrap them tightly in plastic wrap, then place in a freezer bag. They can be frozen for up to 3 months.

Reheating: To reheat the baked stuffed mushrooms, place them in a preheated oven at 350°F (175°C) for about 10-15 minutes, or until warmed through. Enjoy them warm for the best taste experience!

Make-Ahead: You can assemble the stuffed mushrooms up to 24 hours in advance, covering them with plastic wrap or foil and storing them in the fridge before baking. This allows for stress-free entertaining!

Stuffed Mushrooms: Fun Variations Await

Feel free to explore delightful twists on these stuffed mushrooms that will excite your taste buds!

  • Add Meat: Incorporate crab meat or Italian sausage for a heartier, protein-packed filling that brings flavor to new heights. Imagine the savory notes balancing beautifully with every bite!
  • Nut-Free Option: Replace pecans with gluten-free breadcrumbs or crushed crackers. Both options maintain that lovely crunch while catering to nut allergies.
  • Spinach Addition: Toss in some fresh spinach for a nutritious boost. The leafy green adds vibrant color and extra flavor, making these even more irresistible.
  • Spice It Up: For an added kick, sprinkle red pepper flakes within the filling. Adjust the heat level to your liking while enhancing the overall flavor profile.
  • Vegan Delight: Swap cream cheese for a dairy-free alternative and use olive oil instead of butter. Enjoy a deliciously creamy filling without compromising on taste!
  • Cheese Alternatives: Experiment with different cheeses like feta or gouda for a unique flavor twist. Their distinct taste can elevate the mushrooms to new culinary heights.
  • Herb Variations: Use fresh chives, dill, or thyme instead of parsley for a fresh flavor burst. Customized herb selections create an entirely new experience with each batch.
  • Try Different Mushrooms: Opt for larger Portobello mushrooms for a more substantial appetizer or mini button mushrooms for bite-sized elegance. Each variety brings its own unique flair!

Looking for more flavor ideas? Check out my recipes for Grilled Mushrooms Savory or Herby Ricotta Stuffed to inspire your culinary creativity!

Expert Tips for Stuffed Mushrooms

  • Choose Uniform Sizes: Use mushrooms of similar size for even cooking. This ensures that all your stuffed mushrooms bake perfectly and have the same delightful texture.

  • Cool the Filling: Allow the filling to cool slightly before stuffing to prevent the cream cheese from melting prematurely. A cooler filling helps maintain the shape of each stuffed mushroom.

  • Fresh Herbs Rule: For maximum flavor, opt for fresh herbs over dried ones. They will elevate the taste and aroma of your stuffed mushrooms significantly.

  • Soften the Cream Cheese: Make sure the cream cheese is fully softened before mixing. This allows for a smooth and creamy filling that will delight your guests.

  • Experiment with Ingredients: Don’t hesitate to customize your filling! Swap in your favorite nuts or add a touch of spice to your stuffed mushrooms to suit your taste preferences.

Make Ahead Options

These Savory Keto Stuffed Mushrooms are perfect for meal prep enthusiasts! You can prepare the filling and stuff the mushrooms up to 24 hours in advance. To do this, simply complete steps 1-6 as outlined in the recipe, then cover the stuffed mushrooms tightly with plastic wrap or transfer them to an airtight container and refrigerate. This not only saves you time on a busy day but also allows the flavors to meld beautifully! When you're ready to serve, just bake them as instructed in step 7, and watch as they emerge a golden delight—just as delicious as if made fresh!

Stuffed Mushrooms Recipe FAQs

What kind of mushrooms should I use for stuffed mushrooms?
For stuffed mushrooms, I recommend using baby bella (cremini) mushrooms, as they offer a meaty texture and earthy flavor. However, if you can't find them, white button mushrooms work just fine as a suitable substitute!

How do I store leftover stuffed mushrooms?
Leftover stuffed mushrooms can be stored in an airtight container in the refrigerator for up to 3 days. When you're ready to enjoy them again, simply reheat in the oven at 350°F (175°C) for 10-15 minutes until warmed through. They'll taste delicious!

Can I freeze stuffed mushrooms?
Absolutely! To freeze stuffed mushrooms, it's best to prepare them uncooked. Wrap each stuffed mushroom tightly in plastic wrap and then place them in a freezer-safe bag. They can be frozen for up to 3 months. When you're ready to bake, no need to thaw; just pop them straight into the preheated oven and add a few extra minutes to the cooking time.

What if my stuffing is too wet or dry?
If your filling turns out too wet, consider adding a bit of breadcrumbs or crushed pecans to absorb excess moisture. On the other hand, if the stuffing is too dry, stir in a little more cream cheese or melted butter until you achieve the desired consistency. It should be creamy but firm enough to hold its shape!

Are these stuffed mushrooms suitable for a gluten-free diet?
Yes, these stuffed mushrooms can easily be made gluten-free! Just substitute any gluten-containing ingredients—like regular breadcrumbs—with gluten-free alternatives. Additionally, you can simply omit the pecans and use crushed gluten-free crackers if you prefer added crunch.

Can I prepare stuffed mushrooms ahead of time?
Yes, you can prepare these stuffed mushrooms up to 24 hours in advance. Simply stuff the mushrooms and place them on a baking sheet, cover them with plastic wrap, and refrigerate. When you're ready to serve, just bake them as directed! This makes hosting stress-free and enjoyable.

Stuffed Mushrooms

Irresistible Stuffed Mushrooms with Creamy Cheese Delight

Delightful stuffed mushrooms filled with creamy cheese, perfect for gatherings and keto-friendly diets.
Print Recipe Pin Recipe
Prep Time 15 minutes mins
Cook Time 25 minutes mins
Total Time 40 minutes mins
Servings: 8 mushrooms
Course: Appetizers
Cuisine: American
Calories: 120
Ingredients Equipment Method Nutrition Notes

Ingredients
  

For the Filling
  • 16 ounces Baby Bella Mushrooms White button mushrooms are a good substitute.
  • 8 ounces Cream Cheese Ensure it's at room temperature.
  • 1 tablespoon Butter Can substitute with olive oil.
  • 2 cloves Garlic Minced.
  • 1 medium Onion Diced; shallots can be used.
  • 1/2 cup Parmesan Cheese Grated.
  • 1/2 cup Pecans Chopped; omit for nut-free.
  • 1/4 cup Fresh Parsley Chopped; can substitute with chives or dill.
  • to taste Salt
  • to taste Pepper
For Baking
  • 1 tablespoon Olive Oil For greasing the baking sheet.

Equipment

  • Baking Sheet
  • Skillet
  • Mixing Bowl
  • Spoon
  • Oven

Method
 

Step-by-Step Instructions for Stuffed Mushrooms
  1. Preheat your oven to 400°F (200°C) and grease the baking sheet with olive oil.
  2. Rinse the mushrooms, dry them, and remove the stems, chopping them finely.
  3. Melt butter in a skillet, sauté the chopped mushroom stems for about 5 minutes.
  4. Add diced onion and minced garlic, cook for 1-2 minutes until softened.
  5. Mix sautéed ingredients with cream cheese, parmesan, parsley, and pecans.
  6. Stuff each mushroom cap with the filling, sprinkle extra parmesan and pecans on top.
  7. Bake for 20-25 minutes, until golden brown and mushrooms are softened.
  8. Garnish with fresh parsley and serve warm.

Nutrition

Serving: 1mushroomCalories: 120kcalCarbohydrates: 4gProtein: 3gFat: 10gSaturated Fat: 5gPolyunsaturated Fat: 1gMonounsaturated Fat: 3gCholesterol: 20mgSodium: 150mgPotassium: 200mgFiber: 1gSugar: 1gVitamin A: 200IUVitamin C: 2mgCalcium: 80mgIron: 1mg

Notes

These stuffed mushrooms can be prepared up to 24 hours in advance and baked just before serving.

Tried this recipe?

Let us know how it was!

Savory Scalloped Sweet Potatoes with Buttery Brown Sugar Bliss

November 13, 2025 by Grace Snow Leave a Comment

As I stood in my kitchen, the sweet, earthy aroma of baking sweet potatoes enveloped me like a warm hug. Scalloped Sweet Potatoes have become my secret weapon for holiday feasts, transforming ordinary gatherings into cherished moments. This recipe features tender layers of sweet potatoes drenched in a rich brown sugar sauce, perfectly melding with spices like cinnamon and nutmeg to create irresistible comfort on your plate. Not only is this dish a visual delight, topped with gooey marshmallows and crunchy pecans, but it also boasts a quick prep time that lets you focus on the joyous occasion. Whether you're looking to impress your guests or simply savor the warmth of homemade food during Thanksgiving or Christmas, these scalloped sweet potatoes are bound to steal the show. So, are you ready to add a touch of sweetness to your holiday table?

Why are Scalloped Sweet Potatoes a must-try?

Irresistible Flavor: Indulge in the divine combination of brown sugar and warm spices that create a sweet yet savory delight.

Crowd-Pleaser: Perfect for any gathering, these scalloped sweet potatoes are sure to impress guests during Thanksgiving or Christmas celebrations.

Visual Appeal: With their stunning layers topped with gooey marshmallows and crunchy pecans, they add a festive touch to your holiday table.

Quick & Easy: This recipe is a breeze to prepare, leaving you more time to enjoy the company of friends and family.

Versatile Dish: Serve them alongside spiral ham or roasted turkey, or even enjoy them as a comforting solo dish. Trust me, once you experience these scalloped sweet potatoes, they’ll become a beloved staple in your home.

Scalloped Sweet Potatoes Ingredients

For the Sweet Potatoes
• Sweet Potatoes – The star of the dish; peel and slice into thin medallions for even cooking.

For the Buttery Sauce
• Unsalted Butter – Adds richness; you can use salted butter but reduce added salt.
• Brown Sugar – Provides that caramelized sweetness; light or dark both work wonders.
• Water – Helps blend the sauce to the right consistency.
• Ground Cinnamon, Cloves, and Nutmeg – Essential spices that infuse warm flavors into the dish.
• Salt – Enhances all the delightful flavors in your scalloped sweet potatoes.

For the Topping
• Chopped Pecans (or Walnuts) – Adds a lovely crunch and nutty flavor that pairs perfectly with the sweetness.
• Mini Marshmallows – Creates that classic gooey topping that contrasts beautifully with the savory elements of the dish.

Step‑by‑Step Instructions for Savory Scalloped Sweet Potatoes with Buttery Brown Sugar Bliss

Step 1: Preheat the Oven
Start by preheating your oven to 400°F (200°C). This ensures a perfectly baked dish right from the beginning. While the oven warms up, gather your tools — a sharp knife, cutting board, and a baking dish for the scalloped sweet potatoes.

Step 2: Prepare the Sweet Potatoes
Peel the sweet potatoes and slice them into thin medallions, about 1/8-inch thick to ensure even cooking. Arrange the slices in overlapping layers inside your baking dish, creating a beautiful, colorful display. Don’t worry too much about perfection; the deliciousness will make up for it!

Step 3: Make the Buttery Brown Sugar Sauce
In a small saucepan, combine unsalted butter, brown sugar, water, cinnamon, cloves, nutmeg, and salt. Place over medium heat and stir until the mixture is smooth and bubbly, about 3-5 minutes. The aroma will be heavenly as the sugar dissolves and the spices meld together, creating the rich sauce for your scalloped sweet potatoes.

Step 4: Brush the Sauce on Sweet Potatoes
Once your sauce is ready, generously brush about three-quarters of it over the arranged sweet potato slices in the baking dish. Make sure each slice gets a good coat for maximum flavor. This sticky goodness will caramelize beautifully while baking, enhancing the dish's taste and texture.

Step 5: Cover and Bake
Cover the baking dish tightly with foil to trap steam and help the sweet potatoes soften. Place it in the preheated oven and bake for 45-50 minutes. The sweet potatoes should be tender and easily pierced with a fork when done. Keep an eye on them to ensure they’re cooking perfectly!

Step 6: Add the Toppings
After baking, carefully remove the foil and let the steam escape. Drizzle the remaining buttery brown sugar sauce over the tender sweet potatoes. Sprinkle chopped pecans or walnuts on top for crunch, and then pile mini marshmallows high for that irresistible gooey topping.

Step 7: Broil for Extra Gooeyness
Switch your oven to broil and return the dish to the oven, watching closely for about 1-2 minutes. The mini marshmallows will bubble and turn a lovely golden brown. Keep a close watch to prevent burning; you want them toasted, not charred!

Step 8: Cool and Serve
Once the marshmallows are toasted to perfection, remove the dish from the oven and allow it to cool for 10-15 minutes. This little resting time helps the flavors settle, making your scalloped sweet potatoes even more delicious. Now, gather your loved ones and serve this beautiful dish at your holiday table!

Make Ahead Options

These Scalloped Sweet Potatoes are perfect for busy home cooks looking to save time during the holiday rush! You can slice the sweet potatoes up to 24 hours in advance; simply submerge them in cold water to prevent browning. When you're ready to bake, prepare the buttery brown sugar sauce as instructed and brush it over the potatoes. If you're feeling particularly organized, you can assemble the entire dish (without the marshmallows) and refrigerate it for up to 3 days. Before serving, bake covered as directed, and then add the toppings, broiling them for that gooey finish. This prep method not only saves time but also allows the flavors to meld beautifully, ensuring delicious results with minimal effort!

How to Store and Freeze Scalloped Sweet Potatoes

Fridge: Store any leftovers in an airtight container for up to 3-5 days. This helps maintain the sweet flavors and prevent spoilage.

Freezer: For long-term storage, freeze the scalloped sweet potatoes in a freezer-safe container for up to 2 months. Wrap well to prevent freezer burn.

Reheating: When ready to enjoy again, thaw overnight in the fridge and reheat in the oven at 350°F (175°C) until warmed through, about 20-25 minutes.

Make-Ahead: You can prepare scalloped sweet potatoes a day ahead by assembling them and refrigerating without baking. Just add extra baking time if straight from the fridge!

Expert Tips for Scalloped Sweet Potatoes

  • Uniform Slices: Use a mandoline slicer to achieve even potato medallions for consistent cooking. This prevents unevenly cooked pieces that can detract from the experience.

  • Proper Butter Use: If you choose salted butter, skip the additional salt in the recipe to avoid an overly salty dish. Balance is key for the sweet sauce!

  • Watch the Broil: Keep a careful eye while broiling the mini marshmallows. They can go from beautifully toasted to burnt in just a blink, so stay close!

  • Make Ahead: Prep the sweet potatoes a day in advance by soaking sliced potatoes in water to prevent browning. Just warm up the sauce when you're ready to bake for easy prep.

  • Storage Tips: Store any leftovers in an airtight container in the fridge for up to 3-5 days. Reheat gently in the microwave to keep the flavors intact.

What to Serve with Buttery Brown Sugar Scalloped Sweet Potatoes?

Elevate your holiday feast by pairing these luscious scalloped delights with complementary sides that enhance their sweet and buttery charm.

  • Spiral Ham: The savory, smoky notes of spiral ham balance beautifully with the sweetness of the scalloped sweet potatoes, creating a delightful contrast.

  • Roasted Turkey: Juicy roasted turkey adds a classic touch to your holiday table, perfectly complementing the rich flavors of the scalloped sweet potatoes.

  • Corn Casserole: This creamy, cheesy side brings a comforting texture that harmonizes with the velvety layers of the sweet potatoes, making each bite irresistible.

  • Garlic Mashed Potatoes: Fluffy mashed potatoes infused with garlic offer a savory base that pairs perfectly with the sweet notes of the scalloped sweet potatoes.

  • Roasted Brussels Sprouts: Their slightly bitter crunch beautifully counteracts the richness of the sweet potatoes, providing a fresh, earthy taste that brightens the plate.

  • Cranberry Sauce: A bright, tangy cranberry sauce introduces a vibrant flavor, cutting through the sweetness and adding a festive flair to your meal.

  • Homemade Dinner Rolls: Soft, warm dinner rolls are ideal for scooping up saucy bites, providing a comforting touch that’s sure to please family and friends at your table.

  • Apple Cider: Serve freshly warmed apple cider as a delightful drink pairing that echoes the warmth and sweetness of the sweet potatoes while adding a festive touch to your holiday gathering.

Scalloped Sweet Potatoes Variations & Substitutions

Feel free to get creative and make these scalloped sweet potatoes your own, infusing them with flavors and textures that your family will love!

  • Nutty Twist: Substitute walnuts for pecans if you prefer a different nutty flavor. Walnuts add a rich, earthy tone that complements the sweetness beautifully.

  • Coconut Crunch: Mix in shredded coconut with the marshmallows for a tropical twist. The toasted coconut adds a delightful crunch and a hint of paradise to your dish.

  • Extra Sweetness: Add more mini marshmallows on top for a sweeter topping. They’ll get beautifully toasted in the oven, making every bite feel like a dessert.

  • Spice It Up: Incorporate a touch of cayenne pepper to the brown sugar sauce for a little heat. The balance of sweet and spicy makes for a tantalizing flavor profile.

  • Gluten-Free Option: Ensure all ingredients are certified gluten-free to cater to your gluten-sensitive friends or family. Sweet potatoes naturally fit this dietary need, making this dish a great choice!

  • Creamy Addition: Stir in some heavy cream into the brown sugar sauce for an ultra-rich texture. This creates a velvety finish that envelops the sweet potatoes in luxurious comfort.

  • Herb Infusion: Add a sprinkle of fresh rosemary or thyme for an aromatic twist. These herbs bring an unexpected depth of flavor that elevates the entire dish.

  • Maple-Glazed: Replace brown sugar with maple syrup for a different sweetener. The warm, maple flavor will add a lovely complexity and a cozy feeling, perfect for holiday gatherings.

For even more ways to enjoy sweet potatoes, check out Smoky Sweet Potatoes or try a comforting Sweet Potato Casserole for your next celebration!

Scalloped Sweet Potatoes Recipe FAQs

What type of sweet potatoes should I use for scalloped sweet potatoes?
I recommend using firm, smooth sweet potatoes without any dark spots or blemishes. Look for medium to large-sized ones, as they tend to be sweeter and cook evenly.

How should I store leftover scalloped sweet potatoes?
Store any leftovers in an airtight container in the fridge for up to 3-5 days. This helps maintain their delightful flavor and prevents spoilage. Simply reheat in the microwave or oven when you're ready to enjoy them again!

Can I freeze scalloped sweet potatoes?
Absolutely! To freeze scalloped sweet potatoes, allow the dish to cool completely, then transfer them to a freezer-safe container. They can be stored for up to 2 months. When you're ready to serve, thaw them overnight in the refrigerator, then reheat in the oven at 350°F (175°C) for about 20-25 minutes until heated through.

What should I do if my scalloped sweet potatoes are coming out too watery?
If your dish ends up too watery, it might be due to excess moisture from the sweet potatoes. To prevent this, slice the potatoes thinly so they cook evenly. If needed, you can also add a touch of cornstarch to thicken the sauce. Make sure to let them bake uncovered near the end to help evaporate extra liquid.

Are scalloped sweet potatoes suitable for different dietary needs?
Yes! For a gluten-free option, just ensure all your ingredients are certified gluten-free. If you’re concerned about allergies, substitute nuts in the recipe or eliminate them entirely. Always check ingredient labels for hidden allergens, especially if serving guests with dietary restrictions.

Can I prepare scalloped sweet potatoes ahead of time?
Certainly! You can assemble the dish a day in advance by slicing the sweet potatoes and layering them in the baking dish. Just cover and refrigerate without baking. When ready to serve, warm your sauce and bake directly, adding a few extra minutes to the baking time if the dish is cold from the fridge.

Scalloped Sweet Potatoes

Savory Scalloped Sweet Potatoes with Buttery Brown Sugar Bliss

Delicious Scalloped Sweet Potatoes featuring layers of sweet potatoes with brown sugar sauce, warm spices, and topped with marshmallows and pecans.
Print Recipe Pin Recipe
Prep Time 15 minutes mins
Cook Time 50 minutes mins
Cooling Time 15 minutes mins
Total Time 1 hour hr 20 minutes mins
Servings: 8 servings
Course: Dinner
Cuisine: American
Calories: 250
Ingredients Equipment Method Nutrition Notes

Ingredients
  

For the Sweet Potatoes
  • 3 lbs Sweet Potatoes Peel and slice into thin medallions
For the Buttery Sauce
  • 1/2 cup Unsalted Butter Can use salted butter but reduce added salt
  • 1 cup Brown Sugar Light or dark
  • 1/2 cup Water To blend the sauce
  • 1 teaspoon Ground Cinnamon
  • 1/2 teaspoon Ground Cloves
  • 1/2 teaspoon Ground Nutmeg
  • 1 teaspoon Salt
For the Topping
  • 1 cup Chopped Pecans Or walnuts
  • 2 cups Mini Marshmallows For topping

Equipment

  • Oven
  • Baking Dish
  • Saucepan
  • Mandoline Slicer
  • Cutting Board
  • Sharp Knife

Method
 

Step-by-Step Instructions
  1. Preheat your oven to 400°F (200°C) and gather your tools.
    Scalloped Sweet Potatoes
  2. Peel and slice the sweet potatoes into thin medallions, then arrange them in overlapping layers in a baking dish.
    Scalloped Sweet Potatoes
  3. In a saucepan, combine butter, brown sugar, water, cinnamon, cloves, nutmeg, and salt. Cook over medium heat until the mixture is smooth and bubbly, about 3-5 minutes.
    Scalloped Sweet Potatoes
  4. Brush three-quarters of the buttery brown sugar sauce over the sweet potato slices in the baking dish.
    Scalloped Sweet Potatoes
  5. Cover the baking dish tightly with foil and bake for 45-50 minutes until the sweet potatoes are tender.
    Scalloped Sweet Potatoes
  6. Remove the foil, drizzle with remaining sauce, and sprinkle with chopped pecans or walnuts and mini marshmallows.
    Scalloped Sweet Potatoes
  7. Switch the oven to broil and broil for 1-2 minutes until marshmallows are bubbly and golden brown.
    Scalloped Sweet Potatoes
  8. Allow to cool for 10-15 minutes before serving to let the flavors settle.
    Scalloped Sweet Potatoes

Nutrition

Serving: 1servingCalories: 250kcalCarbohydrates: 45gProtein: 3gFat: 10gSaturated Fat: 6gPolyunsaturated Fat: 1gMonounsaturated Fat: 3gCholesterol: 20mgSodium: 150mgPotassium: 300mgFiber: 4gSugar: 10gVitamin A: 18000IUVitamin C: 25mgCalcium: 30mgIron: 1.5mg

Notes

Use a mandoline slicer for uniform potato slices. Replace salted butter with unsalted if preferred and skip adding extra salt. Make-ahead options are available by preparing a day in advance and refrigerating.

Tried this recipe?

Let us know how it was!

Savory Apple and Sage Turkey Meatballs for Cozy Dinners

November 13, 2025 by Grace Snow Leave a Comment

As the aroma of sautéing sage wafted through the kitchen, I couldn't help but smile at my latest culinary experiment. Enter Apple and Sage Turkey Meatballs, a delightful fusion that transforms comfort food into a healthy indulgence. Within just 15 minutes of prep and a quick bake, you can have these juicy, tender bites ready to serve, making them perfect for a busy weeknight or an impressive appetizer. Packed with flavor and coming in at around 350 calories per serving, they remind us that healthy eating doesn’t have to be boring. Whether you're a seasoned home chef or just want to escape the fast-food rut, these savory meatballs are a delicious twist on a classic dish. How will you enjoy yours—over a bed of greens, with a side of roasted veggies, or perhaps dipped in a tangy sauce?

Why Choose Apple and Sage Meatballs?

Healthy Indulgence: These meatballs provide a flavorful experience without the guilt, coming in at just 350 calories per serving.

Quick and Easy: With only 15 minutes of prep time, you can whip these up for a busy weeknight meal or a casual gathering.

Unique Flavor Combination: The fusion of turkey, apple, and sage creates a savory dish that’s unlike any meatball you've had before.

Versatile Serving Options: Pair them with quinoa, a fresh salad, or even a scrumptious cranberry sauce for a delightful twist. They’re perfect for elevating your dinner routine!

Crispy and Tender: Experience the perfect balance of textures with a crispy exterior and juicy, moist interior. You can also try these alongside Chickpea Spinach Curry for a hearty meal.

Apple and Sage Turkey Meatballs Ingredients

• Get ready to create something unforgettable with these savory meatballs!

For the Meatballs

  • Ground Turkey – A lean protein source that ensures moistness in each bite.
  • Grated Apple – Adds a subtle sweetness and moisture; go for tart apples like Granny Smith for a flavor kick.
  • Breadcrumbs – These help bind the mixture together, providing just the right texture to maintain shape.
  • Parmesan Cheese – Brings nutty depth; feel free to substitute it with any hard cheese you prefer.
  • Egg – Essential for binding, keeping your meatballs tender and moist.
  • Fresh Sage – Infuses an earthy aroma that complements the other ingredients; dried sage can also work in a pinch.

For Seasoning

  • Salt and Black Pepper – Basic yet vital seasonings to boost the overall flavor; adjust according to your taste.
  • Olive Oil – Used for searing; creates a crispy exterior while keeping the inside juicy; any cooking oil can be used here as well.

Step‑by‑Step Instructions for Apple and Sage Turkey Meatballs

Step 1: Preheat Your Oven
Begin by preheating your oven to 400°F (200°C). This temperature is key for achieving those perfectly baked Apple and Sage Turkey Meatballs that are crispy on the outside and juicy on the inside. Prepare a parchment-lined baking sheet so you’re ready to transfer the meatballs later.

Step 2: Combine the Ingredients
In a large mixing bowl, combine the ground turkey, grated apple, breadcrumbs, Parmesan cheese, egg, chopped fresh sage, salt, and pepper. Use your hands to mix gently until everything is just combined, taking care not to overmix to maintain tenderness. The mixture should be moist and hold together well for shaping.

Step 3: Shape the Meatballs
With your hands, scoop out portions of the turkey mixture and shape them into meatballs about 1 to 1.5 inches in diameter, resembling golf balls. Aim for uniform sizes to ensure even cooking. Place the formed Apple and Sage Turkey Meatballs on a plate or tray, ready to sear them to perfection.

Step 4: Sear the Meatballs
Heat a skillet over medium-high heat and add a drizzle of olive oil, letting it shimmer. Once hot, carefully add the meatballs, making sure not to crowd the pan. Sear them for about 3-4 minutes until they develop a beautiful golden brown crust on all sides, which enhances the delicious flavor of the meatballs.

Step 5: Transfer to Baking Sheet
After searing, use tongs to transfer the browned meatballs to your prepared parchment-lined baking sheet. Make sure to leave some space between each meatball; this allows hot air to circulate while baking, yielding even cooking and a delightful texture.

Step 6: Bake to Perfection
Place the baking sheet in the preheated oven and bake the Apple and Sage Turkey Meatballs for 15-20 minutes. They are ready when they reach an internal temperature of 165°F (74°C). This step ensures the meatballs are thoroughly cooked while remaining moist and flavorful.

Step 7: Rest and Serve
Once baked, remove the meatballs from the oven and let them rest for a few minutes. This step allows the juices to redistribute, enhancing the overall flavor. Serve your savory Apple and Sage Turkey Meatballs warm, either on their own or paired with a side of fresh salad or roasted vegetables for a wholesome meal.

How to Store and Freeze Apple and Sage Turkey Meatballs

Fridge: Store cooked meatballs in an airtight container in the refrigerator for up to 4 days. Reheat gently in the oven or microwave to maintain their juicy texture.

Freezer: Freeze uncooked meatballs in a single layer on a baking sheet. Once frozen, transfer them to a freezer bag for up to 3 months. Increase cooking time when baking from frozen.

Reheating: To reheat cooked meatballs, place them in a preheated oven at 350°F (175°C) for about 10-15 minutes until warmed through, or use a microwave for a quicker option.

Serving Leftovers: Enjoy leftover apple and sage turkey meatballs as a hearty addition to salads or grain bowls, making meal prep a breeze!

Expert Tips for Apple and Sage Turkey Meatballs

  • Don’t Overmix: Mixing too much can lead to tough meatballs. Gently combine ingredients to retain a tender texture.

  • Use a Thermometer: To avoid dryness, use a meat thermometer to ensure the meatballs reach 165°F (74°C) internally.

  • Prep Ahead: If you're in a hurry, shape the meatballs in advance and refrigerate for up to 24 hours or freeze uncooked for future meals.

  • Choose the Right Apple: Opt for tart apples like Granny Smith for a nice contrast to the savory turkey; avoid overly sweet varieties.

  • Crispy Finish: For an extra crispy exterior, consider broiling the meatballs for a minute or two after baking—just watch them closely!

  • Serve Creatively: These Apple and Sage Turkey Meatballs can elevate any dish. Try them with a tangy dipping sauce or over whole grains for a satisfying meal.

What to Serve with Apple and Sage Turkey Meatballs

These meatballs are a deliciously versatile dish that pairs beautifully with a range of sides, creating a delightful and satisfying meal.

  • Creamy Mashed Potatoes: The buttery texture provides a soothing contrast to the seasoned meatballs, making every bite a creamy delight.
  • Quinoa Salad: A fresh quinoa salad adds a nutty flavor and fluffy goodness, perfectly balancing the savory taste of the meatballs. The grains soak up any sauce beautifully!
  • Roasted Vegetables: Seasonal roasted veggies like carrots and Brussels sprouts add a sweet and earthy note, enhancing the meal's overall depth of flavor.
  • Cranberry Sauce: A tangy cranberry sauce brings an enjoyable burst of acidity, cutting through the richness of the meatballs for a well-rounded experience.
  • Garlic Bread: With crispy edges and a soft interior, this classic side provides a delightful texture contrast, perfect for mopping up meatball juices or sauce.
  • Fresh Green Salad: A crisp salad with vinaigrette adds a refreshing crunch that elevates the whole plate, making it a balanced meal full of nutrients for your body and soul.
  • Grilled Asparagus: Lightly charred asparagus adds an elegant touch, its slight bitterness complementing the sweet apple in the meatballs beautifully.
  • Red Wine: A glass of medium-bodied red wine, like Pinot Noir, enhances the meal's savory richness, creating a wonderful dining experience.
  • Apple Crisp: For dessert, serve a warm apple crisp to echo the flavors of the meatballs while concluding the meal on a comforting note.

Make Ahead Options

These Apple and Sage Turkey Meatballs are perfect for meal prep enthusiasts looking to save time on busy weeknights! You can shape the meatballs up to 24 hours in advance and refrigerate them. Simply mix the ingredients as directed and form the meatballs, then let them rest on a plate covered with plastic wrap in the fridge. For longer storage, freeze uncooked meatballs for up to 3 months; they can go directly from the freezer to the oven, although you may need to add a few extra minutes to the baking time. When ready to cook, simply sear and bake as instructed, and enjoy restaurant-quality results with minimal effort!

Apple and Sage Turkey Meatballs Variations

Feel free to play with these options to suit your taste and dietary needs!

  • Chicken Swap: Substitute ground chicken for turkey for a different flavor profile, while still keeping it lean and delicious.
  • Herb Mix: Try using fresh thyme or oregano instead of sage for a unique twist; these herbs lend a fragrant aroma to your meatballs.
  • Veggie Boost: Add grated zucchini or carrots to the mixture for extra moisture and a hidden nutritional punch; they will blend seamlessly with the other flavors.
  • Cheesy Delight: Swap parmesan for feta or goat cheese for a tangy, creamy variation that enhances the overall taste profile.
  • Gluten-Free: Use gluten-free breadcrumbs or ground oats to keep the meatballs gluten-free without sacrificing texture.
  • Spicy Kick: Incorporate red pepper flakes or a dash of cayenne for those who love a little heat; it will amp up the flavor.
  • Pesto Infusion: Mix in a tablespoon of basil pesto to create a burst of flavor; it complements the apple and sage beautifully.
  • Sautéed Onion: Sauté finely chopped onions before mixing them in for an added layer of sweetness and depth.

You can explore even more delightful options to pair these meatballs with, like a refreshing salad or a sweet cranberry sauce to heighten the enjoyment of your dish!

Apple and Sage Turkey Meatballs Recipe FAQs

What kind of apples should I use for the meatballs?
I recommend using tart apples like Granny Smith for a nice balance of flavor, as their acidity enhances the savory turkey. Sweet varieties like Fuji can also work if you prefer a milder sweetness, but avoid overly sweet apples that can overpower the dish.

How can I store cooked Apple and Sage Turkey Meatballs?
Store your cooked meatballs in an airtight container in the refrigerator for up to 4 days. Reheat gently in the oven or microwave, ensuring you don’t dry them out. They’re perfect for quick meals throughout the week!

Can I freeze the meatballs? If so, how?
Absolutely! To freeze uncooked Apple and Sage Turkey Meatballs, place them on a baking sheet in a single layer and freeze until solid. Then, transfer them to a freezer bag, where they can last up to 3 months. When you’re ready to cook them, just bake straight from the freezer, adding an extra few minutes to the cooking time.

What should I do if my meatballs are falling apart?
If your meatballs are crumbling, it might be due to under-binding. Try adding a bit more egg or breadcrumbs to the mixture. Additionally, ensure you’re not overmixing—it’s best to combine the ingredients gently to keep them tender!

Are these meatballs suitable for my gluten-free diet?
Yes! You can make these Apple and Sage Turkey Meatballs gluten-free by using gluten-free breadcrumbs, which can be found at most grocery stores. Just keep an eye on other ingredients to ensure no gluten is present, and enjoy without worry!

Can my pets enjoy these meatballs?
While turkey meatballs can be a tasty treat for dogs, ensure you omit the ingredients like onions and excessive salt, which can be harmful. Always check with your veterinarian before introducing new foods into your pet’s diet.

Apple and Sage Turkey Meatballs

Savory Apple and Sage Turkey Meatballs for Cozy Dinners

Delightful Apple and Sage Turkey Meatballs make for a healthy indulgence and quick weeknight meal.
Print Recipe Pin Recipe
Prep Time 15 minutes mins
Cook Time 20 minutes mins
Resting Time 5 minutes mins
Total Time 40 minutes mins
Servings: 4 meatballs
Course: Dinner
Cuisine: American
Calories: 350
Ingredients Equipment Method Nutrition Notes

Ingredients
  

For the Meatballs
  • 1 pound Ground Turkey A lean protein source
  • 1 cup Grated Apple Use tart apples like Granny Smith
  • 1/2 cup Breadcrumbs For binding
  • 1/4 cup Parmesan Cheese Can substitute with any hard cheese
  • 1 large Egg For binding
  • 2 tablespoons Fresh Sage Chopped; dried sage can work too
For Seasoning
  • 1 teaspoon Salt Adjust according to taste
  • 1 teaspoon Black Pepper Adjust according to taste
  • 1 tablespoon Olive Oil For searing

Equipment

  • Mixing Bowl
  • Skillet
  • Baking Sheet
  • Meat Thermometer

Method
 

Step-by-Step Instructions
  1. Preheat your oven to 400°F (200°C) and prepare a parchment-lined baking sheet.
  2. In a large mixing bowl, combine the ground turkey, grated apple, breadcrumbs, Parmesan cheese, egg, chopped fresh sage, salt, and pepper. Mix gently until combined.
  3. Scoop out portions of the mixture and shape them into meatballs about 1 to 1.5 inches in diameter. Place on a plate or tray.
  4. Heat a skillet over medium-high heat, add olive oil, and sear the meatballs for 3-4 minutes until golden brown.
  5. Transfer the browned meatballs to the prepared baking sheet, leaving some space between each.
  6. Bake the meatballs in the preheated oven for 15-20 minutes until they reach an internal temperature of 165°F (74°C).
  7. Let the meatballs rest for a few minutes before serving them warm.

Nutrition

Serving: 3meatballsCalories: 350kcalCarbohydrates: 20gProtein: 28gFat: 18gSaturated Fat: 5gPolyunsaturated Fat: 1gMonounsaturated Fat: 10gCholesterol: 95mgSodium: 500mgPotassium: 500mgFiber: 2gSugar: 4gVitamin A: 200IUVitamin C: 4mgCalcium: 100mgIron: 2mg

Notes

Serve with a side of fresh salad or roasted vegetables for a wholesome meal.

Tried this recipe?

Let us know how it was!

Crispy Parmesan Crusted Baby Potatoes for Effortless Elegance

November 13, 2025 by Grace Snow Leave a Comment

The scent of roasting garlic and cheese can transport me to cozy family dinners spent around the table, sharing stories over crispy sides. That’s why I’m excited to introduce you to my Crispy Parmesan Crusted Baby Potatoes—a dish that effortlessly combines crispy exteriors with fluffy interiors, making it an unforgettable addition to any meal. Whipping these up is a breeze, taking just 40 minutes from start to finish, perfect for busy weeknights or casual get-togethers. Plus, they’re gluten-free and completely customizable; you can easily swap in your favorite herbs or cheeses to make them uniquely yours. Ready to elevate your dining experience? Keep scrolling to discover how to make this delicious side dish that will impress everyone at your table!

Why Are These Potatoes So Special?

Crispy Perfection: Get ready to savor the delightful crunch that makes these potatoes irresistible! Quick to Prepare: Perfect for busy nights, this recipe is ready in just 40 minutes. Customization Galore: Switch up the spices and cheese to match your taste—experiment with some Smoky Sweet Potatoes for a twist! Gluten-Free Option: Enjoy a delicious side dish without worries about gluten—it’s a win for everyone! Plus, they pair beautifully with any main course, whether you’re serving up herb-crusted lamb or tender roasted chicken.

Crispy Parmesan Crusted Baby Potatoes Ingredients

• For the Potatoes

  • Baby Potatoes – These tender gems provide a creamy interior and create the perfect base for our crispy coating.
  • Olive Oil – Adds richness and facilitates the golden crust; feel free to swap it out for melted butter if you desire a different flavor.

• For the Crust

  • Grated Parmesan Cheese – This is what gives the potatoes their signature crispy crust; Grana Padano or Pecorino Romano can be used as substitutes for a different taste.
  • Garlic Powder – Enhances the savory flavor; swapping in fresh minced garlic will elevate the dish with a vibrant aroma.
  • Onion Powder – Adds a lovely earthiness; you can omit it for a more delicate flavor.
  • Dried Oregano – Infuses the dish with herbaceous notes; consider using Italian seasoning for a flavorful twist.
  • Paprika – Provides a subtle smokiness; for a kick, substitute with cayenne pepper.
  • Salt & Pepper – Essential for balancing flavors; always adjust to suit your taste preferences.

Feel free to gather these ingredients so you can dive right into making your Crispy Parmesan Crusted Baby Potatoes that are guaranteed to impress!

Step‑by‑Step Instructions for Crispy Parmesan Crusted Baby Potatoes

Step 1: Preheat the Oven
Begin by preheating your oven to 400°F (200°C). This temperature is crucial for achieving the perfect crispy texture on your Crispy Parmesan Crusted Baby Potatoes. While the oven heats up, gather your ingredients and line a baking sheet with parchment paper for easy cleanup.

Step 2: Prepare the Potatoes
Wash and dry about a pound of baby potatoes thoroughly. Slice each potato in half lengthwise and place them in a medium mixing bowl. This ensures each potato half can absorb the flavorful coatings and cook evenly, resulting in a fluffy interior and a crispy exterior.

Step 3: Coat the Potatoes
Drizzle a generous amount of olive oil over the halved potatoes in the bowl. Sprinkle grated Parmesan cheese, garlic powder, onion powder, dried oregano, paprika, salt, and pepper over the top. Toss all the ingredients together until each potato half is well-coated with the mixture, which will create a delicious crust when baked.

Step 4: Arrange for Baking
Transfer the coated potato halves to the lined baking sheet, placing them cut-side down in a single layer. Make sure to leave spaces between them for even cooking. This arrangement helps them to develop that irresistible crispy finish without steaming, ensuring each bite of the Crispy Parmesan Crusted Baby Potatoes is satisfying.

Step 5: Bake the Potatoes
Slide the baking sheet into your preheated oven and bake the potatoes for 25-30 minutes. Halfway through the baking time, carefully flip the potato halves to achieve an even golden-brown crust on both sides. Keep an eye on them, and they should be perfectly golden and crispy when done.

Step 6: Serve and Enjoy
Once baked, allow the Crispy Parmesan Crusted Baby Potatoes to cool for a few minutes. For an elegant touch, garnish with freshly chopped parsley before serving them warm. These potatoes make a wonderful side dish, enhancing any meal with their delightful crunch and flavor!

What to Serve with Crispy Parmesan Crusted Baby Potatoes

These delightful potatoes are just the beginning of a cozy, satisfying meal that brings family and friends together around the table.

  • Roasted Chicken: Juicy, herb-infused chicken pairs beautifully, enhancing the potatoes' crispy texture with savory flavors that create a comforting dining experience.

  • Grilled Vegetables: A medley of seasonal veggies adds vibrant color and freshness, balancing the richness of the parmesan crust with their natural sweetness and crunch.

  • Garlic Butter Shrimp: The succulent, garlicky shrimp provide a luscious contrast to the crispy potatoes, creating a delightful combination that's hard to resist.

  • Mixed Green Salad: A light, tangy salad brings a refreshing zing to the meal, providing a perfect contrast to the hearty potatoes while keeping the dining experience vibrant.

  • Beef Tenderloin: Pairing these crispy potatoes with a perfectly cooked steak results in a luxurious dish that combines textures and flavors, elevating your dinner to special occasion levels.

  • Chardonnay: A chilled glass of this crisp white wine complements the savory notes of the parmesan while enhancing your meal’s overall elegance.

  • Chocolate Mousse: For dessert, a rich, velvety mousse serves as a decadent finish, balancing the crispy savory flavors with sweetness, rounding out your delightful dining experience.

Expert Tips for Crispy Parmesan Crusted Baby Potatoes

  • Choose the Right Potatoes: Opt for small, even-sized baby potatoes for consistent cooking. Larger potatoes can lead to uneven results; slice them evenly if using.

  • Oil Generously: Don’t skimp on the olive oil! Proper coating helps achieve that crispy texture you crave with your Crispy Parmesan Crusted Baby Potatoes.

  • Single Layer Baking: Ensure potatoes are in a single layer on the baking sheet. Overcrowding can cause steaming rather than roasting, making them soft instead of crispy.

  • Flip for Even Crispiness: Remember to flip the potatoes halfway through baking. This guarantees that every side gets that perfect golden-brown crust.

  • Serving Hot is Key: Serve these potatoes right after baking for maximum crispiness. Letting them sit too long can diminish their delightful crunch.

How to Store and Freeze Crispy Parmesan Crusted Baby Potatoes

Fridge: Store any leftover Crispy Parmesan Crusted Baby Potatoes in an airtight container for up to 3 days. This preserves their flavor while keeping them fresh.

Freezer: If you want to keep them longer, freeze the potatoes in a single layer on a baking sheet until solid, then transfer to a freezer-safe bag. They can last up to 2 months.

Reheating: For the best texture, reheat in a preheated oven at 375°F (190°C) for about 10-15 minutes until warmed through and crispy. Avoid the microwave, as it can make them soggy.

Note: Keeping the potatoes well-coated and properly stored will help them retain their delicious flavor and crispy quality for as long as possible!

Make Ahead Options

These Crispy Parmesan Crusted Baby Potatoes are perfect for meal prep enthusiasts! You can wash, dry, and slice the baby potatoes up to 24 hours in advance, storing them in a bowl of water to prevent browning. Additionally, you can mix the olive oil and spices for the coating up to 3 days ahead and keep it in an airtight container in the fridge. When you're ready to finish the recipe, simply combine the prepped potatoes and seasoned oil, arrange them on the baking sheet, and bake as directed for 25-30 minutes. This way, you'll have a delicious, restaurant-quality side dish with minimal effort on busy weeknights!

Crispy Parmesan Crusted Baby Potatoes Variations

Feel free to let your culinary creativity shine with these delightful twists on your Crispy Parmesan Crusted Baby Potatoes!

  • Herb-Infused: Add fresh thyme or rosemary for fragrant earthy notes. These herbs elevate the dish, making it feel gourmet with minimal effort.

  • Spicy Kick: Mix red pepper flakes or diced jalapeños into your coating for a heated surprise. It’s perfect for those who love a fiery flavor!

  • Cheesy Twist: Substitute Parmesan with aged Gouda or sharp cheddar for a different cheesy profile. This swap adds a rich, buttery layer that won't disappoint.

  • Vegan Option: Use nutritional yeast instead of cheese and olive oil for a plant-based twist. This variation still delivers bold flavors while meeting dietary needs.

  • Crispy Tex-Mex: Top with crushed tortilla chips instead of Parmesan. This crunchy layer adds a delightful crunch, pairing wonderfully with tacos or burritos!

For a heartwarming side, these potatoes perfectly complement dishes like German Potato Salad or Fish Taco Bowls. Enjoy customizing each batch, and make every meal shine with your personal touch!

Crispy Parmesan Crusted Baby Potatoes Recipe FAQs

How do I choose ripe baby potatoes?
Absolutely! When selecting baby potatoes, look for ones that are firm with smooth, unblemished skin. Avoid potatoes with dark spots or wrinkles, as they may be signs of aging. Aim for a size that's uniform to ensure even cooking—about 1-2 inches in diameter is ideal!

What’s the best way to store leftover Crispy Parmesan Crusted Baby Potatoes?
Very! To store any leftovers, place them in an airtight container in the refrigerator. They will keep well for up to 3 days. When you're ready to enjoy them again, reheat the potatoes in a preheated oven at 375°F (190°C) for about 10-15 minutes to restore their crispiness. This method helps maintain that delightful crunch!

Can I freeze these potatoes for later?
Of course! To freeze your Crispy Parmesan Crusted Baby Potatoes, first, arrange them in a single layer on a baking sheet and freeze until solid. Then transfer them to a freezer-safe bag or container. They can last for up to 2 months. When you're ready to eat, simply bake them straight from the freezer at 375°F (190°C) for about 20-25 minutes, flipping halfway through to ensure they crisp up nicely.

What should I do if my potatoes aren’t getting crispy?
Don't fret! If your potatoes aren’t achieving that perfect crispiness, here are a few tips: ensure that they are sufficiently coated in olive oil; this is crucial for the crunchy texture. Also, make sure they are arranged in a single layer on the baking sheet. Overcrowding can cause steaming instead of roasting, which will lead to soft potatoes. Lastly, flipping them halfway through baking is essential to ensure all sides get nicely browned!

Are these potatoes safe for my gluten-free diet?
Absolutely! These Crispy Parmesan Crusted Baby Potatoes are naturally gluten-free, making them suitable for those with gluten sensitivities or Celiac disease. Just ensure that any substitution ingredients, like any flavored cheese or seasonings, are also labeled gluten-free before use. Enjoy safely!

Crispy Parmesan Crusted Baby Potatoes

Crispy Parmesan Crusted Baby Potatoes for Effortless Elegance

Crispy Parmesan Crusted Baby Potatoes bring together crunchy exteriors and fluffy interiors for a delightful side dish.
Print Recipe Pin Recipe
Prep Time 10 minutes mins
Cook Time 30 minutes mins
Total Time 40 minutes mins
Servings: 4 potatoes
Course: Dinner
Cuisine: American
Calories: 200
Ingredients Equipment Method Nutrition Notes

Ingredients
  

For the Potatoes
  • 1 pound Baby Potatoes washed and halved
  • 2 tablespoons Olive Oil or melted butter
For the Crust
  • 1 cup Grated Parmesan Cheese or substitutes like Grana Padano or Pecorino Romano
  • 1 teaspoon Garlic Powder or fresh minced garlic
  • 1 teaspoon Onion Powder optional
  • 1 teaspoon Dried Oregano or Italian seasoning
  • 1 teaspoon Paprika or cayenne pepper for heat
  • to taste Salt
  • to taste Pepper

Equipment

  • Oven
  • Baking Sheet
  • Mixing Bowl

Method
 

Step-by-Step Instructions
  1. Preheat your oven to 400°F (200°C) and line a baking sheet with parchment paper.
  2. Wash and dry the baby potatoes, then slice each potato in half lengthwise.
  3. Drizzle olive oil over the potatoes and add Parmesan cheese, garlic powder, onion powder, oregano, paprika, salt, and pepper. Toss until well coated.
  4. Arrange the potato halves cut-side down on the baking sheet, spacing them evenly.
  5. Bake for 25-30 minutes, flipping halfway through for even cooking until golden brown.
  6. Let cool for a few minutes, garnish with parsley, and serve warm.

Nutrition

Serving: 1cupCalories: 200kcalCarbohydrates: 30gProtein: 4gFat: 8gSaturated Fat: 2gMonounsaturated Fat: 6gCholesterol: 5mgSodium: 350mgPotassium: 600mgFiber: 3gSugar: 1gVitamin A: 500IUVitamin C: 15mgCalcium: 100mgIron: 1mg

Notes

Serve immediately for best texture, as letting them sit too long can diminish crispiness.

Tried this recipe?

Let us know how it was!

Crispy Loaded Hasselback Potato Bites to Wow Your Guests

November 13, 2025 by Grace Snow Leave a Comment

As I sliced into those small potatoes, a sense of nostalgia washed over me, reminding me of cozy gatherings filled with laughter and delicious bites. My Crispy Loaded Hasselback Potato Bites transform humble spuds into a stunning appetizer that’s sure to impress friends and family alike. These little beauties are not only super easy to prepare, but they also deliver that delightful crispiness and gooey cheese we all crave—perfect for game day or a fun weeknight side! Plus, they’re loaded with flavors that will have everyone asking for the recipe. Ready to discover how to make this unexpected twist on a cherished classic? Keep reading!

Why Try These Potato Bites?

Ultimate Comfort Food: These Crispy Loaded Hasselback Potato Bites blend crunchy textures with gooey cheese for a cozy treat.

Effortless Preparation: With just a few ingredients and simple steps, you can whip these up quickly—perfect for busy weeknights or last-minute gatherings.

Crowd-Pleasing Appeal: Ideal for game day or parties, they’re an appetizer that everyone will love, making them a go-to for entertaining.

Customization Galore: Want a Mediterranean vibe? Swap in feta. Craving a kick? Toss on some jalapeños! The possibilities are endless.

Show-Stopping Presentation: The artistic Hasselback cut not only looks stunning but also enhances flavor by allowing toppings to seep into every crevice.

For more delicious ideas, don’t miss my Sweet Potato Casserole or Crispy Parmesan Artichoke Hearts!

Crispy Loaded Hasselback Potato Bites Ingredients

For the Potato Bites
• Small Potatoes – Red or Yukon potatoes are ideal for a tender interior with a crispy skin.
• Olive Oil – Helps achieve a beautiful golden color; can substitute with vegetable oil if needed.
• Kosher Salt – Enhances the flavor; you can also use sea salt for a subtle difference.

For the Toppings
• Sliced Cheese (Colby Jack) – Melts beautifully, adding creamy goodness; cheddar or pepper jack will also work well.
• Light Sour Cream – A creamy topping that balances the richness; Greek yogurt is a great healthier alternative.
• Cooked Bacon – Adds a crispy, savory touch; swap for turkey bacon or leave out for a vegetarian option.
• Sliced Green Onions – Freshness and color are provided by these; they're a perfect finishing touch for garnish.

Remember, these ingredients come together to create mouthwatering Crispy Loaded Hasselback Potato Bites that will enchant your guests!

Step‑by‑Step Instructions for Crispy Loaded Hasselback Potato Bites

Step 1: Preheat the Oven
Start by preheating your oven to 400°F (200°C) to ensure it's hot enough for perfect baking. While the oven warms up, grab a baking sheet and line it with aluminum foil for easy cleanup later. This step is essential for achieving the crispy exterior of your Crispy Loaded Hasselback Potato Bites.

Step 2: Prepare the Potatoes
Wash and dry your small potatoes thoroughly. Using a sharp knife, carefully make several thin cuts across the top of each potato, taking care not to slice all the way through. These cuts will create the Hasselback style, allowing the flavors to penetrate, so aim for evenly spaced cuts about every 1/4 inch apart.

Step 3: Season the Potatoes
Place your prepared potatoes on the lined baking sheet. Drizzle them generously with olive oil, using your hands to coat them evenly. Sprinkle kosher salt over each potato, ensuring they are well-seasoned. This will enhance the flavor and help achieve that delicious crispy layer as the potatoes roast.

Step 4: Bake the Potatoes
Slide the baking sheet into your preheated oven and allow the potatoes to bake for about 30 minutes. Keep an eye out for them to become fork-tender and start to crisp on the edges. This step is crucial to developing that soft, fluffy interior characteristic of Crispy Loaded Hasselback Potato Bites.

Step 5: Add the Cheese
Once the potatoes are tender, remove them from the oven and insert cheese squares into some of the cuts you made earlier. This is where the magic happens! Return them to the oven for an additional 5-10 minutes, watching closely for the cheese to melt and bubble, creating a gooey, irresistible topping.

Step 6: Cool and Top the Potatoes
After the cheese is beautifully melted, take the baking sheet out of the oven and let the potatoes cool for about 10 minutes. This cooling period will make them easier to handle while you add your favorite toppings.

Step 7: Serve and Enjoy
Finally, complete your Crispy Loaded Hasselback Potato Bites by adding generous dollops of light sour cream, crumbled cooked bacon, and freshly sliced green onions on top. These delightful bites are ready to be served warm or at room temperature, offering a stunning and delicious appetizer sure to impress your guests!

What to Serve with Crispy Loaded Hasselback Potato Bites

Elevate your meal experience by pairing these delightful bites with harmonious sides and drinks that will round out your gathering beautifully!

  • Creamy Mashed Potatoes: A comforting classic, these velvety mashed potatoes provide a soft contrast to the crunchy texture of the potato bites. The creaminess is a perfect match!

  • Garlic Butter Green Beans: Fresh and vibrant, these garlic butter green beans add a splash of color and a delightful crunch, complementing the richness of the loaded bites.

  • Fresh Garden Salad: A light, crisp salad with mixed greens and vinaigrette will refresh the palate and balance the savory flavors of the potatoes. Toss in some cherry tomatoes for a burst of sweetness!

  • Classic Coleslaw: Crunchy and tangy, coleslaw brings a refreshing crunch and a hint of acidity that cuts through the cheese's richness. It makes a lively accompaniment!

  • BBQ Chicken Wings: Let’s get the party going! Tender and smoky, BBQ chicken wings enhance the game-day vibe. The interplay of flavors will be a hit among your guests.

  • Spicy Jalapeño Poppers: A flavor-packed side! These spicy, cheesy bites will mirror the loaded potato bites while adding a fiery kick that spice lovers will adore.

  • Chilled Beer or Sparkling Cider: Pair with a cold beer or sparkling cider for the ultimate refreshment. The bubbles cleanse the palate between bites, enhancing every delicious mouthful!

Each of these options perfectly complements your Crispy Loaded Hasselback Potato Bites, creating a meal that truly delivers comfort and satisfaction. Enjoy!

Crispy Loaded Hasselback Potato Bites Variations

Feel free to let your imagination run wild and customize these delicious bites to suit your palate!

  • Cheese Swap: Use feta cheese for a Mediterranean flair or try blue cheese for a sharp kick. Both add unique character to the dish.

  • Spicy Kick: For those who enjoy a little heat, add sliced jalapeños as a topping or opt for spicy pepper jack cheese. It will elevate the flavor profile wonderfully.

  • Herb Infusion: Toss in fresh herbs like chives, dill, or rosemary with your toppings for a fragrant and flavorful twist. A sprinkle of herbs creates a bright contrast.

  • Smoky Flavor: Incorporate smoked paprika into the olive oil before drizzling it over the potatoes. This adds a rich, smoky flavor that pairs beautifully with bacon.

  • Bacon Alternatives: Try crispy turkey bacon for a leaner option or omit entirely for a delightful vegetarian version. You won’t miss the meat at all!

  • Vegetable Mix-In: Add sautéed mushrooms or spinach on top for a healthy boost and added texture. These veggies not only taste great but also enhance the overall look.

  • Gourmet Touch: Drizzle a balsamic reduction over the finished bites for a touch of elegance. This sweet-tangy addition elevates the dish for special occasions.

For more creative food ideas, how about pairing these yummy bites with a refreshing Fish Taco Bowl or savoring some smoky flavors with Smoky Sweet Potatoes?

Storage Tips for Crispy Loaded Hasselback Potato Bites

Room Temperature: Allow leftovers to cool completely before storing them in an airtight container. They can be kept at room temperature for up to 2 hours.

Fridge: Store your Crispy Loaded Hasselback Potato Bites in an airtight container in the fridge for up to 3 days. Reheat in the oven to help restore their crispiness.

Freezer: For longer storage, freeze the potato bites individually on a baking sheet before transferring them to a freezer-safe container. They can be kept for up to 2 months.

Reheating: Reheat from frozen in the oven at 375°F (190°C) for about 20-25 minutes, or until heated through and crispy.

Make Ahead Options

These Crispy Loaded Hasselback Potato Bites are fantastic for meal prep, saving you valuable time during busy weeknights or party preparations. You can prepare the potatoes (sliced but unseasoned) up to 24 hours in advance; simply store them in a bowl of cold water in the refrigerator to prevent browning. Additionally, you can slice and pre-cook the bacon up to 3 days ahead, keeping it refrigerated. When you’re ready to serve, drain the potatoes, season them with olive oil and salt, bake until tender, add cheese for a melty finish, then top with sour cream, bacon, and onions. This ensures your bites are just as delicious, with minimal last-minute effort!

Expert Tips for Crispy Loaded Hasselback Potato Bites

• Even Cuts Matter: Consistent cuts in the potatoes promote even cooking and ensure every bite is perfectly crispy.

• Broil for Extra Crispiness: For that ultimate crunch, consider broiling the potatoes for an additional 2-3 minutes after baking.

• Potato Size Consistency: Use uniform-sized potatoes to ensure they all cook evenly and reach that delectable tender state.

• Experiment with Cheese: Feel free to swap the cheese for personal preference; just remember that different varieties can change the melting texture of your Crispy Loaded Hasselback Potato Bites.

• Add Flavor Layers: Enhance taste by adding spices or herbs into the olive oil before coating, providing extra flavor depth with minimal effort.

Crispy Loaded Hasselback Potato Bites Recipe FAQs

How do I choose the right potatoes for this recipe?
Absolutely! For the Crispy Loaded Hasselback Potato Bites, small red or Yukon potatoes work wonderfully. Look for firm potatoes with smooth skin—avoid any with dark spots or blemishes. These varieties yield a tender interior with a delightful crispy skin, taking your appetizer to the next level.

How should I store leftovers?
Very well! Once cooled, keep any leftovers in an airtight container at room temperature for up to 2 hours. For longer storage, shift them to the refrigerator, where they’ll last up to 3 days. When you're ready to enjoy them again, reheat in the oven to restore their delightful crispiness.

Can I freeze the Crispy Loaded Hasselback Potato Bites?
Of course! To freeze these potato bites, first, arrange them in a single layer on a baking sheet and freeze them for a couple of hours until solid. Then, transfer the frozen bites into a freezer-safe container or bag, where they can last for up to 2 months. When you’re ready to enjoy, reheat directly from frozen at 375°F (190°C) for 20-25 minutes.

What if my potatoes aren’t cooking evenly?
Ah, that can happen! Ensure your cuts in the potatoes are consistent, around 1/4 inch apart, as this allows for even cooking. If you find some potatoes are still firm, you can cover them with foil and bake a little longer. Additionally, broiling for the last 2-3 minutes can help achieve that crispy finish.

Are there any dietary considerations for this recipe?
Indeed! This recipe can easily cater to different dietary needs. If you're cooking for vegetarians, simply omit the bacon or substitute it with turkey bacon. For those watching their calories, using light sour cream and reduced-fat cheese can help without sacrificing flavor. Always check for any specific allergies related to cheese or other ingredients you might use!

How should I reheat my potato bites after freezing?
To reheat, preheat your oven to 375°F (190°C). Place the frozen Crispy Loaded Hasselback Potato Bites on a baking sheet and heat for about 20-25 minutes. This method helps regain their crispy texture, so they taste almost as good as freshly made!

These FAQs should help you make the most out of your delicious Crispy Loaded Hasselback Potato Bites—enjoy!

Crispy Loaded Hasselback Potato Bites

Crispy Loaded Hasselback Potato Bites to Wow Your Guests

Crispy Loaded Hasselback Potato Bites transform humble spuds into a stunning appetizer that impresses guests with delightful crispiness and gooey cheese.
Print Recipe Pin Recipe
Prep Time 15 minutes mins
Cook Time 40 minutes mins
Cooling Time 10 minutes mins
Total Time 1 hour hr 5 minutes mins
Servings: 4 bites
Course: Appetizers
Cuisine: American
Calories: 220
Ingredients Equipment Method Nutrition Notes

Ingredients
  

For the Potato Bites
  • 1 pound small potatoes (Red or Yukon)
  • 2 tablespoons olive oil can substitute with vegetable oil
  • 1 teaspoon kosher salt or sea salt
For the Toppings
  • 1 cup sliced cheese (Colby Jack) or cheddar or pepper jack
  • 1/2 cup light sour cream or Greek yogurt
  • 1/2 cup cooked bacon or turkey bacon for vegetarian option
  • 1/4 cup sliced green onions for garnish

Equipment

  • Oven
  • Baking Sheet
  • Sharp Knife
  • Aluminum Foil

Method
 

Step-by-Step Instructions
  1. Preheat your oven to 400°F (200°C) and line a baking sheet with aluminum foil.
  2. Wash and dry the small potatoes, then make several thin cuts across the top of each potato.
  3. Place the potatoes on the baking sheet, drizzle with olive oil, and sprinkle with kosher salt.
  4. Bake the potatoes for about 30 minutes until fork-tender and starting to crisp.
  5. Remove from the oven, insert cheese squares into the cuts, and bake for another 5-10 minutes until melted.
  6. Let the potatoes cool for about 10 minutes before adding toppings.
  7. Top with light sour cream, crumbled bacon, and sliced green onions before serving.

Nutrition

Serving: 2bitesCalories: 220kcalCarbohydrates: 30gProtein: 6gFat: 10gSaturated Fat: 4gPolyunsaturated Fat: 2gMonounsaturated Fat: 3gCholesterol: 15mgSodium: 300mgPotassium: 450mgFiber: 3gSugar: 1gVitamin A: 500IUVitamin C: 12mgCalcium: 150mgIron: 1mg

Notes

Even cuts promote even cooking; for extra crispiness, broil for 2-3 minutes after baking. Store leftovers in an airtight container for up to 3 days or freeze for up to 2 months.

Tried this recipe?

Let us know how it was!

Taco Ranch Bites That Will Wow Your Guests Every Time

November 13, 2025 by Grace Snow Leave a Comment

As I stood in my kitchen contemplating what to whip up for my friends’ spontaneous gathering, a lightbulb moment struck—Taco Ranch Bites! These delightful little morsels combine the flavors of juicy ground beef, zesty taco seasoning, and melty cheddar cheese, all nestled in perfectly crisp phyllo shells. What makes these Taco Ranch Bites such a game-changer is their quick prep time and impressive crowd-pleasing appeal; anyone can whip them up and become the star of the evening! Whether you’re hosting a get-together, tailgating, or simply craving a delicious snack, these appetizers deliver comfort and excitement in every crunchy bite. Want to learn how to create a dish that will leave your guests raving? Let’s dive into this delicious recipe!

Why Are Taco Ranch Bites a Must-Try?

Crowd-Pleaser: These Taco Ranch Bites are sure to impress, making them perfect for any occasion—game day, parties, or just a cozy night in.

Quick Prep Time: With simple ingredients and easy steps, you can whip these up in no time, leaving you free to enjoy your guests' company.

Flavor Explosion: The combination of savory ground beef, zesty taco seasoning, and rich cheddar cheese creates a mouthwatering flavor that everyone will crave.

Versatile Options: Feel free to customize with different cheeses or even create a vegetarian version using black beans and corn for a delightful twist. You can also explore other delicious appetizers like Fish Taco Bowls or Taco Spaghetti Cheesy.

Light Yet Satisfying: The crispy phyllo shells give these bites a unique texture that contrasts beautifully with the cheesy filling, making them both satisfying and light.

Make-Ahead Friendly: Prep and freeze for future gatherings, ensuring you’re always ready to impress with minimal effort!

Taco Ranch Bites Ingredients

For the Filling
• Ground Beef – Provides the main protein; opt for lean meat to reduce fat content.
• Taco Seasoning – Adds essential flavor; store-bought is convenient, but homemade can elevate taste.
• Diced Tomatoes and Green Chiles – Introduces moisture and a kick of spice; canned works best for ease.
• Cheddar Cheese – Gives a creamy, rich texture; use freshly shredded for optimal melting.
• Ranch Dressing – Adds creaminess and tang; choose premium bottled or make your own for the best taste.

For the Shells
• Phyllo Tart Shells – The perfect base for these bites; pick up frozen ones for convenience or try homemade for an artisanal touch.

Step‑by‑Step Instructions for Taco Ranch Bites

Step 1: Preheat Your Oven
Begin by preheating your oven to 350ºF (175ºC). Take a moment to enjoy the anticipation of delicious Taco Ranch Bites bubbling in the oven! A well-preheated oven ensures that your phyllo shells turn golden and crisp, providing the perfect vessel for the savory filling you’re about to create.

Step 2: Brown the Ground Beef
In a large skillet over medium heat, add the ground beef and cook for about 5-7 minutes until it is nicely browned and no pink remains. Make sure to break up any large clumps with a spatula. Once fully cooked, drain any excess fat to keep your Taco Ranch Bites light and delicious.

Step 3: Season the Beef
Return the skillet to the heat, and add taco seasoning along with diced tomatoes and green chiles. Stir well to combine the ingredients, allowing the flavors to meld. Let this simmer for 5 minutes until the mixture is heated through and slightly thickened, creating a flavor-packed filling for your Taco Ranch Bites.

Step 4: Mix the Cheese and Dressing
In a separate mixing bowl, combine the freshly shredded cheddar cheese with the ranch dressing. This mixture will add a creamy texture and a delightful tang to your filling. Carefully fold in the cooked beef mixture until everything is thoroughly combined, ensuring every bite is bursting with flavor.

Step 5: Assemble the Taco Ranch Bites
Now it’s time to fill the phyllo tart shells! Spoon the cheesy beef mixture generously into each shell, allowing them to be heaping full for maximum flavor. If you're planning to freeze them for later, this is the perfect spot to do so. Just place them on a tray and freeze before transferring to a bag.

Step 6: Bake for Perfection
Place the assembled Taco Ranch Bites on a baking sheet and insert them into the preheated oven. Bake for 8-10 minutes until the shells are crispy and golden, and the filling is hot and bubbly. For frozen bites, extend the baking time by an additional 2-3 minutes for a perfect warm treat.

How to Store and Freeze Taco Ranch Bites

Fridge: Store cooled Taco Ranch Bites in an airtight container for up to 3-4 days to maintain their crispy texture and flavor.

Freezer: Freeze unbaked Taco Ranch Bites for up to 3 months. Place them on a tray to freeze individually before transferring to a zip-top bag to prevent sticking.

Reheating: To enjoy frozen bites, bake from frozen at 350ºF for an additional 2-3 minutes, ensuring they are hot throughout for optimal taste.

What to Serve with Taco Ranch Bites

Elevate your gathering with delightful sides that complement the bold flavors of these crispy, cheesy bites.

  • Fresh Guacamole: Creamy and rich, guacamole balances the savory spice of the Taco Ranch Bites while adding a refreshing touch. It's always a crowd favorite!

  • Salsa Verde: This tangy green sauce adds a splash of zest that enhances every bite. The herby notes bring a new depth and brighten up your plate.

  • Mexican Street Corn: Sweet corn finished with lime, cotija cheese, and chili powder creates a satisfying crunch and complements the savory filling perfectly.

  • Crispy Potato Wedges: Seasoned and golden brown, these hearty wedges provide a satisfying texture contrast, making your appetizer spread feel more complete.

  • Zesty Coleslaw: A crunchy, colorful slaw infused with lime and cilantro adds a refreshing crunch that cuts through the richness of the bites. It’s a delightful balance!

  • Classic Margaritas: Pair your Taco Ranch Bites with a chilled margarita for a refreshing drink that embodies the spirit of Mexican cuisine and adds a festive flair.

  • Mini Churros: For dessert, serve these sweet treats sprinkled with cinnamon sugar. Their warm, doughy sweetness is a delightful way to round out your meal.

Expert Tips for Taco Ranch Bites

• Meat Choice Matters: Use lean ground beef to reduce grease and enhance flavor without the heaviness.

• Rest the Beef: Allow seasoned beef to rest before filling the shells; this helps the flavors deepen and meld.

• Shell Handling: If using frozen phyllo tart shells, handle gently to avoid tearing. Allow them to thaw slightly for more ease in filling.

• Cheese Selection: Freshly shredded cheddar melts better and creates a creamier texture in your Taco Ranch Bites.

• Freezing Tips: If freezing assembled bites, lay them on a tray first to avoid sticking together, then transfer to a zip-top bag for convenient storage.

Make Ahead Options

These Taco Ranch Bites are perfect for meal prep, allowing you to save time and serve deliciousness on busy weeknights! You can assemble the bites and keep them in the refrigerator for up to 24 hours before baking. Alternatively, prepare them and freeze for up to 3 months—just lay them flat on a tray to freeze initially, then transfer to a zip-top bag once solid to prevent sticking. When you're ready to serve, bake directly from the freezer, adding an extra 2-3 minutes to the bake time. This ensures you’ll have fresh and crispy Taco Ranch Bites that are just as delightful as if they were made that day!

Taco Ranch Bites Variations & Substitutions

Feel free to get creative and customize these Taco Ranch Bites to satisfy any craving or dietary need!

  • Meat Alternatives: Substitute ground turkey or chicken for a lighter protein option. This twist still delivers incredible flavor without the extra fat.
  • Vegetarian Version: Swap meat for black beans, corn, and diced bell peppers to create a vibrant, plant-based delight. Each bite bursts with color, making it as appealing to the eyes as it is to the palate.
  • Cheese Choices: Use Monterey Jack or Pepper Jack instead of cheddar for a spicy kick. Experimenting with different cheeses elevates the flavor profile, bringing new dimensions to your bites.
  • Dressing Alternatives: Try spicy ranch or cilantro-lime dressing for a refreshing twist. These variations can transition your Taco Ranch Bites from classic to adventurous in moments!
  • Shell Alternatives: If you can’t find phyllo shells, corn tortillas can be baked into cups for a gluten-free alternative. The added corn flavor pairs nicely with the filling, creating a wholesome experience.
  • Heat Level: Add jalapeños or diced green chiles into the filling for those who enjoy a little more heat. This simple addition can transform the dish, making it a hit for spice lovers at the table.
  • Flavor Boost: Incorporate lime juice and zest into the beef mixture for a zesty brightness. Just a hint brings out those beloved taco flavors and pairs beautifully with the cheese.
  • Make it a Meal: Serve over a salad base with fresh greens, tomatoes, and avocado for a wholesome meal option. The crunchy bites on a bed of veggies create a deliciously satisfying dining experience.

These variations ensure you can keep things exciting while making your Taco Ranch Bites even more delectable. Plus, if you're looking for more tasty taco-inspired dishes, check out Taco Bell Crunchwrap for a fun twist, or indulge in the delicious flavors of Shrimp Tacos Zesty.

Taco Ranch Bites Recipe FAQs

What type of ground beef should I use for Taco Ranch Bites?
Opt for lean ground beef to reduce excess fat while still providing great flavor. It helps keep the Taco Ranch Bites light and prevents them from becoming greasy.

How can I store leftover Taco Ranch Bites?
Store cooled Taco Ranch Bites in an airtight container in the fridge for 3-4 days. This way, they maintain their crispy texture and delicious flavor, making for a perfect snack later.

Can I freeze Taco Ranch Bites?
Absolutely! You can freeze unbaked Taco Ranch Bites for up to 3 months. To do this, assemble the bites, lay them out on a tray, and freeze until solid before transferring them to a zip-top bag to prevent sticking.

What if my Taco Ranch Bites come out soggy?
If your bites turn out soggy, it could be due to excess moisture in the filling. Make sure to drain any liquids from the beef mixture well. Additionally, ensure the phyllo shells are fully baked until crispy. Consider baking them a bit longer if needed.

Are Taco Ranch Bites suitable for kids?
Very much! Taco Ranch Bites are a fun and tasty option for kids. You can adjust the spice level by using mild taco seasoning or omitting the green chiles for a gentler flavor. Plus, they're great for teaching kids how to assemble their food!

Is there a vegetarian version of Taco Ranch Bites?
Yes! To make a vegetarian-friendly option, substitute the ground beef with black beans, corn, and diced bell peppers. This creates a hearty and flavor-packed filling that everyone will enjoy!

Taco Ranch Bites

Taco Ranch Bites That Will Wow Your Guests Every Time

Taco Ranch Bites are a crowd-pleasing appetizer that combines ground beef, taco seasoning, and cheddar cheese in crispy phyllo shells.
Print Recipe Pin Recipe
Prep Time 15 minutes mins
Cook Time 20 minutes mins
Total Time 35 minutes mins
Servings: 8 bites
Course: Appetizers
Cuisine: Mexican
Calories: 250
Ingredients Equipment Method Nutrition Notes

Ingredients
  

For the Filling
  • 1 lb ground beef opt for lean meat
  • 1 packet taco seasoning store-bought or homemade
  • 1 can diced tomatoes and green chiles canned for ease
  • 1 cup cheddar cheese freshly shredded
  • 1/4 cup ranch dressing premium bottled or homemade
For the Shells
  • 12 pieces phyllo tart shells frozen for convenience

Equipment

  • Large skillet
  • Mixing Bowl
  • Baking Sheet

Method
 

Step-by-Step Instructions for Taco Ranch Bites
  1. Preheat your oven to 350ºF (175ºC).
  2. In a large skillet over medium heat, add the ground beef and cook for 5-7 minutes until browned.
  3. Return the skillet to heat, add taco seasoning and diced tomatoes, and stir, simmering for 5 minutes.
  4. In a mixing bowl, combine cheddar cheese and ranch dressing, then fold in the cooked beef mixture.
  5. Fill each phyllo tart shell with the cheesy beef mixture.
  6. Bake for 8-10 minutes until the shells are crispy and the filling is hot.

Nutrition

Serving: 2bitesCalories: 250kcalCarbohydrates: 15gProtein: 12gFat: 16gSaturated Fat: 7gCholesterol: 40mgSodium: 450mgPotassium: 300mgFiber: 2gSugar: 1gVitamin A: 500IUVitamin C: 5mgCalcium: 150mgIron: 2mg

Notes

Perfect for parties, can be prepped and frozen for future gatherings.

Tried this recipe?

Let us know how it was!
  • « Previous Page
  • 1
  • …
  • 107
  • 108
  • 109
  • 110
  • 111
  • …
  • 180
  • Next Page »

Welcome!

Hi, I’m Grace, a Sydney-based home cook with a passion for bold flavors and trending ingredients. Whether you’re a busy beginner or a seasoned foodie, you’ll find dishes here that are fresh, fun, and full of flavor.

More about me

Popular Recipes

  • Butter Pecan Cookies
    Irresistibly Soft Butter Pecan Cookies for Cozy Moments
  • Decadent Turtle Bars
    Decadent Turtle Bars: Indulge in Sweet Gooey Perfection
  • Salted Caramel Butter Bars
    Decadent Salted Caramel Butter Bars You Can't Resist
  • Easy Italian Pasta Salad
    Easy Italian Pasta Salad: A Summer Delight to Share

Footer

↑ back to top

About

  • Privacy Policy
  • Disclaimer
  • Terms & Conditions

Newsletter

  • Sign Up! for emails and updates

Contact

  • About me
  • Contact me

Copyright © 2025 TastyTrendIngredients