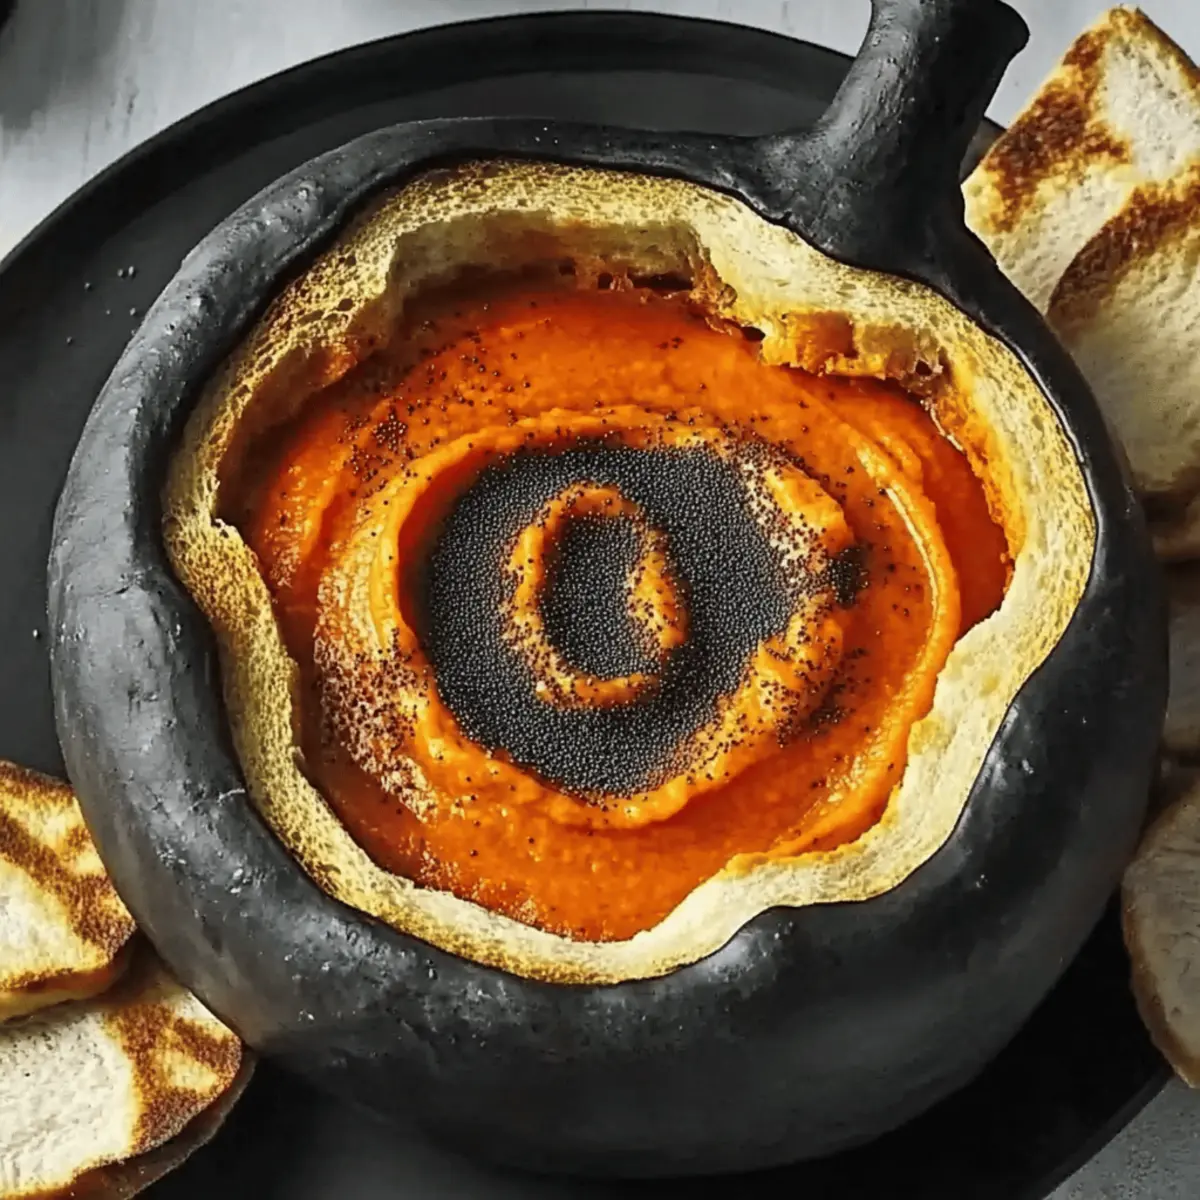
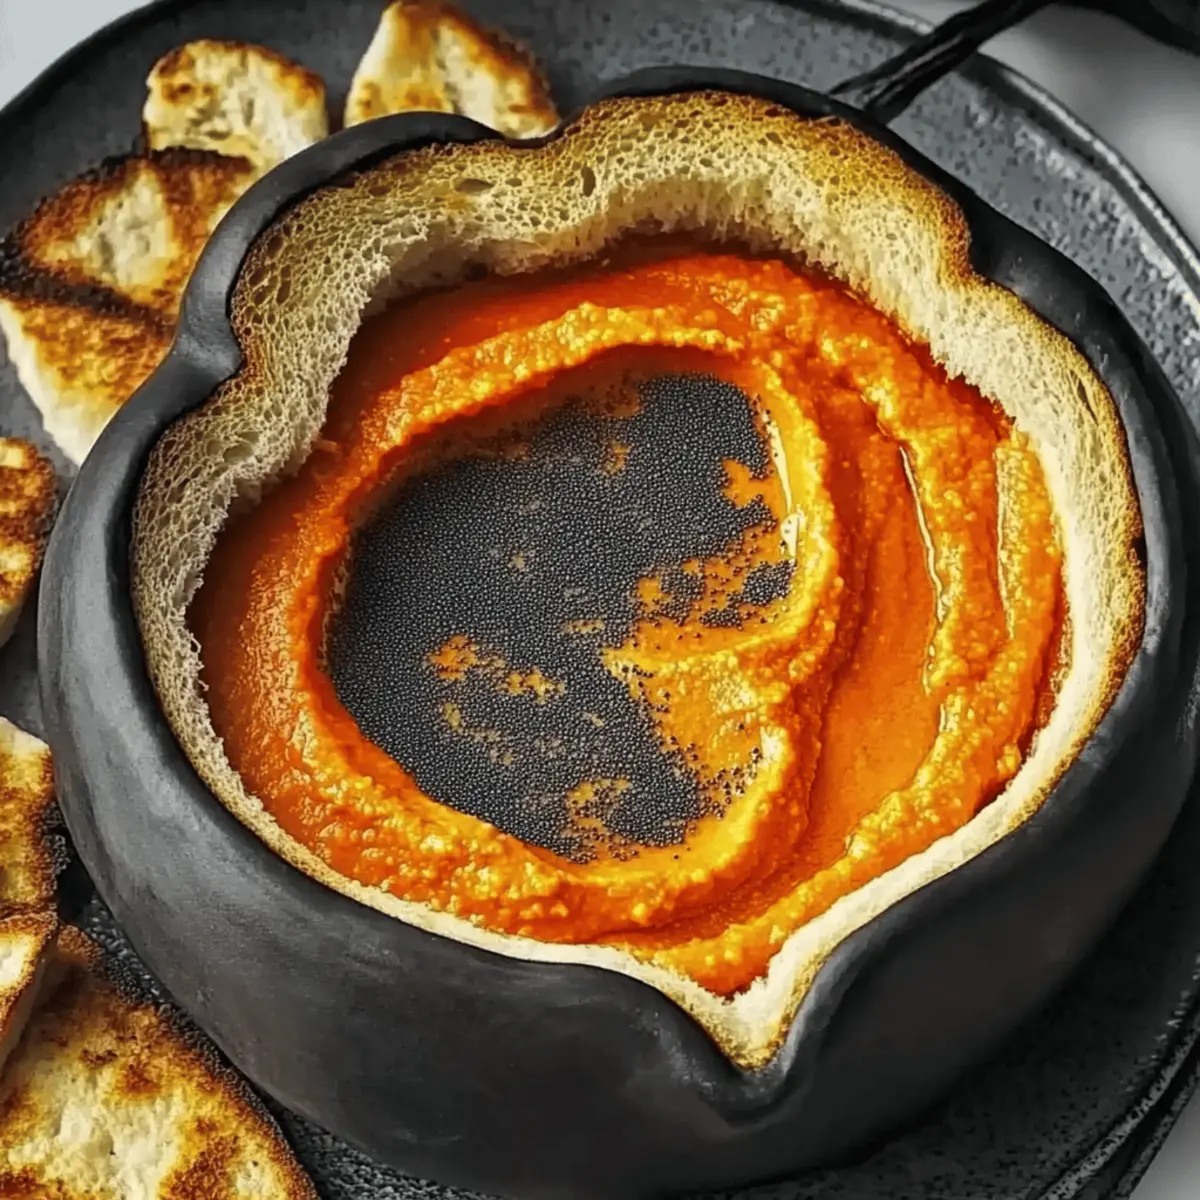
tastytrendingredients

  • Home
  • Recipes
    • Appetizers
    • Breakfast
    • Dessert
    • Dinner
    • Drinks
    • Salads
    • Snacks
    • Soups
  • About me
  • Contact me
menu icon
go to homepage
  • Home
  • Recipes
    • Appetizers
    • Breakfast
    • Dessert
    • Dinner
    • Drinks
    • Salads
    • Snacks
    • Soups
  • About me
  • Contact me
search icon
Homepage link
  • Home
  • Recipes
    • Appetizers
    • Breakfast
    • Dessert
    • Dinner
    • Drinks
    • Salads
    • Snacks
    • Soups
  • About me
  • Contact me
×

Funnel Cake Bites: Sweet, Crispy Mini Treats You'll Love

August 23, 2025 by Grace Snow Leave a Comment

As I stood in my kitchen, I couldn't help but crave the sweet, nostalgic taste of summer fairs and the joy they bring. That’s when my eyes landed on the perfect solution: Funnel Cake Bites. These delightful, bite-sized treats provide the ultimate comfort with their crispy exteriors and soft, tender interiors, allowing you to recreate that carnival magic right at home. Not only are they ridiculously easy to whip up without the fuss of a deep fryer, but they’re also the perfect crowd-pleaser—ideal for parties or satisfying those late-night cravings. Plus, with tempting variations like Cinnamon Twist or Chocolate Lover’s Delight, there’s a flavor for everyone to enjoy! Curious to dive into this scrumptious adventure? Let’s get cooking!

Why are Funnel Cake Bites irresistible?

Crispy and Golden: These Funnel Cake Bites boast a perfectly crispy exterior, making every bite a delightful crunch.

Nostalgic Flavor: Enjoying these treats brings back the joy of summer fairs right in your kitchen, providing comfort food at its best.

Fun Variations: With options like Cinnamon Twist and Berry Delight, there's a flavor to satisfy every craving—perfect for mixing things up!

Easy to Make: Skip the deep fryer and create these bites with just a frying pan, ensuring a mess-free experience.

Crowd Favorite: Whether for a party or a cozy night in, these treats are sure to impress guests and loved ones alike—pair them with a scoop of ice cream for a real indulgence!

Funnel Cake Bites Ingredients

For the Batter

  • Milk – Essential for a smooth batter; use whole milk for the best creamy texture.
  • Egg – Adds richness and binds the ingredients together effectively.
  • Vanilla Extract – Infuses sweetness and enhances flavor complexity.
  • All-Purpose Flour – Provides structure and gives Funnel Cake Bites their signature texture.
  • Salt – Balances the sweetness, ensuring a well-rounded flavor.
  • Baking Soda – Helps the batter rise, creating light and airy bites.
  • Sugar – Sweetens the batter, making these treats irresistible.
  • Melted Butter – Introduces richness and a delightful buttery flavor.

For Frying

  • Vegetable Oil – Necessary for frying until perfectly golden; can be substituted with canola oil.

For Dusting

  • Powdered Sugar – Adds a finishing touch of sweetness and makes these bites look irresistible.

Optional Toppings

  • Whipped Cream – Perfect for added indulgence, especially with berry variations.
  • Fresh Fruit – A refreshing addition, especially delightful with the Berry Delight variation.
  • Chocolate Sauce – A must for chocolate lovers; drizzle generously for decadent flavor.
  • Caramel Sauce – For a rich, sweet twist, caramel makes these bites even more special.

Get ready to enjoy these Funnel Cake Bites made from these delicious ingredients that capture the essence of carnival fun!

Step‑by‑Step Instructions for Funnel Cake Bites

Step 1: Mix Wet Ingredients
In a mixing bowl, whisk together 1 cup of whole milk, 1 large egg, 1 teaspoon of vanilla extract, and 2 tablespoons of melted butter until the mixture is smooth and well combined. Take a moment to appreciate the rich aroma as you mix. This will create the foundation for your Funnel Cake Bites.

Step 2: Combine and Fold
Next, gently stir in 1/2 teaspoon of salt, 1 teaspoon of baking soda, and 2 tablespoons of sugar to the wet mixture. Gradually fold in 1 cup of all-purpose flour, stirring until the batter is lump-free and creamy. Be careful not to overmix; a few small lumps are perfectly fine. This fluffy batter is essential for your delicious bites.

Step 3: Prepare Frying Oil
In a frying pan, heat about 1/2 inch of vegetable oil over high heat for 2 minutes, then reduce to medium. To test if the oil is ready, drop in a small bit of batter; it should sizzle and bubble immediately. The right temperature is crucial for creating that perfect golden-brown color for your Funnel Cake Bites.

Step 4: Fry Bites
Once the oil is hot, take a Ziplock bag, fill it with the batter, and cut a small hole in one corner. Squeeze out the batter into the hot oil, forming 1-2 inch spiral shapes. Fry each bite for about 1-2 minutes on each side or until they achieve a beautiful golden brown. Flip carefully with tongs to ensure even cooking.

Step 5: Drain and Serve
Using a slotted spatula, carefully remove the cooked Funnel Cake Bites from the oil, allowing excess oil to drip back into the pan. Place them on a paper towel-lined plate to absorb any remaining oil. Once drained, dust generously with powdered sugar and serve immediately while warm, adding any desired toppings to elevate your delightful treat!

What to Serve with Funnel Cake Bites?

Discover delightful pairings that elevate your Funnel Cake Bites from sweet snacks to a full culinary experience.

  • Vanilla Ice Cream: A classic combo, adding creamy richness that contrasts beautifully with the warm, crispy bites.

  • Fresh Berries: Strawberries or blueberries offer a burst of freshness and color, ensuring every bite is vibrant and refreshing.

  • Whipped Cream: Light and airy, whipped cream makes an indulgent topping that complements the sweetness of the bites perfectly.

  • Chocolate Sauce: Drizzling melty chocolate over your Funnel Cake Bites adds decadence and a sweet twist that chocolate lovers will adore.

  • Cinnamon Sugar: Dust with this warm blend for a cozy flavor, perfect for those chilly evenings or when you're craving something familiar.

  • Caramel Sauce: Putting caramel on the side for dipping creates a satisfyingly sweet sting that balances with the doughy bites.

  • Sparkling Lemonade: The fizzy citrus notes help cut through the richness and provide a refreshing balance alongside your sweet treats.

  • Coffee: A warm cup of coffee enhances the flavors while giving you that comforting feeling, making for the perfect afternoon treat.

Let your creativity shine while enjoying these sweet delights, knowing they can be complemented in so many scrumptious ways!

Expert Tips for Funnel Cake Bites

  • Oil Temperature Check: Always test the oil with a small piece of batter before frying. If it sizzles too quickly, the oil is too hot, resulting in burned bites.

  • Use a Slotted Spatula: This tool makes it easy to lift the Funnel Cake Bites from the oil without retaining excess grease, ensuring a lighter final product.

  • Gluten-Free Option: Substitute all-purpose flour with a gluten-free flour blend to make these delightful bites accessible for anyone with dietary restrictions.

  • Don’t Overmix: When folding in the flour, a few lumps are perfectly fine. Overmixing can lead to dense bites, sacrificing that light and airy texture.

  • Serve Immediately: For the best taste experience, serve the Funnel Cake Bites warm, dusted with powdered sugar and topped with your favorite sauces or fruits shortly after frying.

Funnel Cake Bites Variations & Substitutions

Feel free to let your creativity shine as you customize these scrumptious Funnel Cake Bites to suit your taste!

  • Cinnamon Twist: Dust with a mix of cinnamon and sugar for a warm, spiced flavor that dances on your tongue.
    The aroma will fill your kitchen, making it feel like a cozy autumn afternoon!

  • Chocolate Lover’s Delight: Top with warm melted chocolate and sprinkle in mini chocolate chips for a decadent treat.
    A drizzle of chocolate sauce can elevate these bites to a whole new level of indulgence!

  • Berry Delight: Serve with a medley of fresh berries and a dollop of whipped cream for a refreshing finish.
    The bright colors and flavors will brighten up your dessert table and satisfy your fruit cravings.

  • Gluten-Free Option: Swap out all-purpose flour with a gluten-free blend to enjoy these delicious bites everyone can savor.
    It’s a great way to include those with dietary restrictions without sacrificing flavor.

  • Nutty Flavor Boost: Incorporate finely chopped nuts, like pecans or almonds, into the batter for a delightful crunch.
    The nuttiness pairs beautifully with the sweet batter and adds an extra layer of texture to each bite.

  • Spicy Kick: Mix in a pinch of cayenne pepper or chili powder for those who crave heat in their sweets.
    That unexpected kick will surprise and delight adventurous palates!

  • Caramel Drizzle: Drizzle with warm caramel sauce to achieve a sweet and rich accompaniment.
    The gooey texture will elevate your bites, making them even harder to resist.

  • Vanilla-Almond Twist: Substitute regular vanilla extract with almond extract for a slightly nutty and fragrant twist.
    The unique flavor will offer a delightful surprise and elevate your Funnel Cake Bites to something extraordinary.

These variations are perfect for sharing with family or friends at get-togethers or cozy nights in. Not only that, but they can also be a delightful enhancement to your experience when paired with creamy treats like chocolate pudding cake or a slice of the classic German chocolate poke cake. Enjoy your culinary adventure with these tasty bites!

How to Store and Freeze Funnel Cake Bites

Room Temperature: Keep Funnel Cake Bites in an airtight container at room temperature for up to 2 days. This helps maintain their delightful texture.

Fridge: If you prefer, you can store them in the refrigerator for up to 3 days. Be sure to wrap them well to prevent them from drying out.

Freezer: For longer storage, freeze the bites for up to 2 months. Place them in a single layer on a baking sheet to freeze individually, then transfer to an airtight container.

Reheating: To enjoy your frozen Funnel Cake Bites, reheat them in a preheated oven at 350°F for 5-7 minutes. This will restore their crispiness while warming them through.

Make Ahead Options

These Funnel Cake Bites are perfect for busy home cooks looking to save time without sacrificing flavor! You can prepare the batter up to 24 hours in advance—simply mix all wet ingredients and dry ingredients, then store in an airtight container in the refrigerator. When you're ready to fry up your treats, let the batter sit at room temperature for about 15 minutes to ensure the best texture. For the freshest results, avoid frying the bites ahead of time, as they are most delicious served warm and crispy. Just remember, a quick dusting of powdered sugar before serving keeps them looking amazing, guaranteeing that each bite is just as delightful as if they were made fresh!

Funnel Cake Bites Recipe FAQs

What type of milk should I use for Funnel Cake Bites?
Absolutely! For the best results, I recommend using whole milk. It keeps the batter smooth and contributes to the tender texture of the Funnel Cake Bites. If you're in a pinch, you can use 2% milk, but avoid non-dairy options as they might alter the final product's taste and texture.

How should I store leftover Funnel Cake Bites?
After you savor your Funnel Cake Bites, if you have any leftovers (which is rare!), store them in an airtight container at room temperature for up to 2 days. If you prefer your bites a little firmer, they can also be kept in the fridge for up to 3 days; just ensure they're well wrapped to avoid drying out!

Can I freeze Funnel Cake Bites? How do I do that?
Yes, you can freeze these delightful treats! Start by placing the Funnel Cake Bites in a single layer on a baking sheet and freeze them until firm. Once they've had a moment to solidify, transfer them to an airtight container or a freezer bag, where they can stay good for up to 2 months. When you're ready to enjoy them, simply reheat in a preheated oven at 350°F for 5-7 minutes until they're warm and crispy again.

What should I do if my Funnel Cake Bites turn out greasy?
Very! If you find that your Funnel Cake Bites are greasy, it usually means the oil temperature was too low during frying. Make sure your oil is properly heated before adding the batter—if it’s too hot, they’ll burn, and if it’s too cool, they’ll soak up too much oil. A little test with a small piece of batter can help you find that sweet spot for perfect frying!

Are Funnel Cake Bites safe for people with gluten allergies?
Definitely! If you or your guests have gluten allergies, simply substitute all-purpose flour with a gluten-free flour blend. Many brands offer great alternatives that can still give you those crispy, delicious bites without compromising on taste! Just be sure to check the packaging for any cross-contamination warnings, ensuring it suits your needs.

How can I make my Funnel Cake Bites even more delicious?
The more the merrier! Elevate your Funnel Cake Bites by adding exciting toppings or variations. Try dusting them with cinnamon sugar for a spiced twist, or drizzle melted chocolate and sprinkle mini chocolate chips for a Chocolate Lover’s Delight. Serving them with fresh berries and whipped cream takes the flavor to a new level of indulgence—perfect for sweetening up your next gathering!

Funnel Cake Bites

Funnel Cake Bites: Sweet, Crispy Mini Treats You'll Love

Funnel Cake Bites are sweet, crispy mini treats that bring the nostalgic taste of summer fairs right into your kitchen.
Print Recipe Pin Recipe
Prep Time 15 minutes mins
Cook Time 10 minutes mins
Total Time 25 minutes mins
Servings: 6 bites
Course: Snacks
Cuisine: American
Calories: 180
Ingredients Equipment Method Nutrition Notes

Ingredients
  

For the Batter
  • 1 cup whole milk Essential for a smooth batter.
  • 1 large egg Adds richness and binds the ingredients together.
  • 1 teaspoon vanilla extract Infuses sweetness and enhances flavor.
  • 2 tablespoons melted butter Introduces richness and buttery flavor.
  • 1/2 teaspoon salt Balances the sweetness.
  • 1 teaspoon baking soda Helps the batter rise.
  • 2 tablespoons sugar Sweetens the batter.
  • 1 cup all-purpose flour Provides structure and texture.
For Frying
  • 2 cups vegetable oil Necessary for frying.
For Dusting
  • 1 cup powdered sugar Adds sweetness and presentation.
Optional Toppings
  • 1 cup whipped cream For added indulgence.
  • 1 cup fresh fruit Refreshing addition.
  • 1/2 cup chocolate sauce For chocolate lovers.
  • 1/2 cup caramel sauce For a rich twist.

Equipment

  • Mixing Bowl
  • frying pan
  • slotted spatula
  • Ziplock bag

Method
 

Step-by-Step Instructions
  1. Mix wet ingredients: whisk together whole milk, egg, vanilla extract, and melted butter until smooth.
  2. Combine and fold: stir in salt, baking soda, and sugar, then fold in all-purpose flour until creamy.
  3. Prepare frying oil: heat vegetable oil in frying pan for 2 minutes on high, then reduce to medium.
  4. Fry bites: fill a Ziplock bag with batter, cut a small hole, and squeeze into hot oil, frying until golden brown.
  5. Drain and serve: remove cooked bites, let excess oil drip, dust with powdered sugar, and serve warm.

Nutrition

Serving: 2bitesCalories: 180kcalCarbohydrates: 22gProtein: 2gFat: 8gSaturated Fat: 4gPolyunsaturated Fat: 1gMonounsaturated Fat: 3gCholesterol: 30mgSodium: 150mgPotassium: 100mgFiber: 1gSugar: 4gVitamin A: 200IUCalcium: 50mgIron: 1mg

Notes

Serve immediately for best taste. Dust with powdered sugar and add preferred toppings after frying.

Tried this recipe?

Let us know how it was!

Flavor-Packed Vegetable Fritters with Chickpeas You’ll Love

August 22, 2025 by Grace Snow Leave a Comment

There's nothing quite like the satisfaction of sinking your teeth into a crispy, golden fritter, especially when you know it’s loaded with wholesome ingredients. This recipe for Crispy Vegetable Fritters with Chickpeas combines the savory flavors of fresh broccoli, zucchini, and sweet carrots, all held together by protein-packed chickpeas. Not only are these fritters a breeze to whip up, but they also offer a delightful gluten-free, dairy-free snack that everyone will love. Perfect for sneaking in more veggies while satisfying your cravings, they can be served warm as a fun appetizer or a quick lunch. Plus, they’re utterly versatile—feel free to customize with whatever veggies you have on hand! Ready to indulge in a healthier twist on comfort food? Let's get cooking!

Why Try These Vegetable Fritters?

Uniquely Delicious: These Crispy Vegetable Fritters are not just tasty but also packed with nutritious ingredients that excite the palate.

Quick & Easy: Whip them up in under 30 minutes, making them perfect for busy days or a spontaneous snack a hit at lunches.

Versatile Ingredients: Swap out veggies as you like! Whether you prefer spinach or bell peppers, the options are endless. Pair with a refreshing dipping sauce for extra flair—just like with our Cheesy Corn Fritters!

Gluten-Free Goodness: Made without flour, these fritters allow everyone to enjoy a delightful crunch, making them suitable for many dietary needs.

Crowd-Pleaser: From family gatherings to casual get-togethers, these fritters will wow your guests and have them asking for the recipe!

Vegetable Fritters with Chickpeas Ingredients

• For an unforgettable snack or meal!

For the Fritters

  • Zucchini – Adds moisture and structure; shred or spiralize, then salt and drain excess water for best results.
  • Broccoli – Contributes fiber and freshness; chop finely or pulse in a food processor to break it down easily.
  • Carrot – Provides natural sweetness and vibrant color; grate to incorporate smoothly into the mix.
  • Chickpeas – A protein-packed base; use canned or cooked, mashed or whole, for desired texture.
  • Oil – Essential for frying or baking; olive or vegetable oil enhances crispiness beautifully.
  • Salt – Boosts flavor; adjust according to your dietary preferences.
  • Pepper – Seasoning with a kick; can be replaced with your favorite spices for extra zest.

For the Creamy Dill Sauce

  • Fresh Dill – Imparts a bright flavor; swap with dried dill or coriander if needed.
  • Lemon Juice – Brightens up the sauce; vinegar can be used as an alternative for tangy notes.

Get ready to create these delightful Vegetable Fritters with Chickpeas that everyone will love!

Step‑by‑Step Instructions for Vegetable Fritters with Chickpeas

Step 1: Prep the Vegetables
Start by preparing the zucchini, which is key for the Vegetable Fritters with Chickpeas. Shred the zucchini using a grater, then sprinkle it with salt and allow it to drain in a colander for 20-25 minutes. This step is crucial to remove excess moisture for crispier fritters. After draining, wrap the zucchini in a clean cloth and squeeze out any remaining water for best results.

Step 2: Mix the Ingredients
In a large mixing bowl, combine the drained zucchini, finely chopped broccoli, grated carrot, and chickpeas. You can mash the chickpeas slightly for better texture or leave them whole for a hearty bite. Add salt, pepper, and any additional herbs you prefer. Mix everything thoroughly until well combined, ensuring the colors are vibrant and the mixture feels cohesive.

Step 3: Heat the Oil
Next, heat about ½ inch of oil in a non-stick or cast iron pan over medium-high heat. You want the oil hot enough to create that perfect crispy texture on the fritters, so wait until it shimmers. This should take around 3-5 minutes. To test the oil's readiness, drop a small spoonful of the mixture; it should sizzle immediately.

Step 4: Fry the Fritters
Once the oil is hot, scoop ⅓ cup of the vegetable mixture and carefully place it in the pan. Flatten it slightly with a spatula. Fry for about 3 minutes or until golden brown on the underside. Gently flip the fritter and cook for an additional 3 minutes, ensuring both sides are crispy and a beautiful golden brown.

Step 5: Bake Option
If you prefer a healthier alternative, preheat your oven to 400°F (204°C). Line a baking sheet with parchment paper and scoop the vegetable mixture, flattening each fritter before placing them on the sheet. Bake for 10 minutes on each side, checking for golden crispness. For an extra crunch, broil them for an additional 2-3 minutes at the end, monitoring closely to avoid burning.

Step 6: Serve with Sauce
Once your Vegetable Fritters with Chickpeas are done, serve them warm with a side of creamy dill sauce or your favorite dipping sauce. Their delightful crunch and savory flavors make them an irresistible snack or appetizer, perfect for any gathering or simply for a cozy night in.

What to Serve with Crispy Vegetable Fritters with Chickpeas

These delightful fritters are perfect for a cozy gathering or a light weeknight dinner, bringing together textures and flavors that dance on your taste buds.

  • Creamy Dill Sauce: A must-have dip that enhances the fritters' flavors and adds a tangy freshness. Perfect for those who appreciate a herbaceous touch!
  • Simple Green Salad: Light and refreshing, a salad with mixed greens, cucumbers, and a zesty vinaigrette complements the fritters beautifully.
  • Roasted Sweet Potatoes: Their natural sweetness contrasts wonderfully with the savory fritters, creating a satisfying meal combination.
  • Hummus Platter: Offering a variety of hummus flavors with pita and crunchy veggies makes for a fun and healthy side that resonates with the chickpeas in the fritters.
  • Quinoa Pilaf: Nutty and rich, quinoa adds a protein boost to your meal while providing a neutral balance to the bold flavors of the fritters.
  • Sparkling Lemonade: A bubbly drink with citrusy notes refreshes the palate, making it a wonderful complement to the fritters’ crunchiness.
  • Chocolate Avocado Mousse: For dessert, this silky treat rounds out the meal with a sweet finish, providing a delightful contrast to the savory fritters.

Expert Tips for Vegetable Fritters with Chickpeas

  • Crispy Texture: For the best crispiness, ensure not to overcrowd the pan while frying. This allows hot air to circulate around each fritter.
  • Moisture Control: Salt the zucchini and let it drain well to remove excess moisture, as this is crucial for achieving crispy Vegetable Fritters with Chickpeas.
  • Thickness Matters: Experiment with the thickness of your fritters. Thinner fritters cook more evenly and become crispier, while thicker ones may be soft inside.
  • Flip with Care: Use a wide spatula to flip the fritters gently, preventing any breakage and ensuring they maintain their shape.
  • Baking Tip: If baking, keep an eye on the fritters under the broiler to avoid burning, as they can go from golden to charred quickly.
  • Flavor Enhancements: Don’t be afraid to mix different herbs or spices into the batter. They can elevate the flavor of your fritters tremendously!

How to Store and Freeze Vegetable Fritters

  • Room Temperature: Let the fritters cool completely before storing them at room temperature for up to 1 hour to avoid sogginess.
  • Fridge: Store leftover Vegetable Fritters in an airtight container in the refrigerator for up to 3 days. Reheat in the oven or air fryer for best results.
  • Freezer: Freeze fritters in a single layer on a baking sheet for 1 hour, then transfer to a zip-top bag and store for up to 2 months. Reheat directly from frozen until hot and crispy.
  • Reheating: For optimal crunch, reheat the frozen fritters in the oven at 400°F (204°C) for about 15 minutes, flipping halfway through. Enjoy the crispy delight!

Make Ahead Options

These Vegetable Fritters with Chickpeas are perfect for meal prep enthusiasts! You can prepare the vegetable mixture (zucchini, broccoli, carrot, and chickpeas) up to 24 hours in advance, simply store it in an airtight container in the refrigerator. Make sure to drain the zucchini thoroughly to prevent excess moisture, keeping the fritters crispy when cooked. When you're ready to enjoy them, just scoop the mixture, shape it into fritters, and fry or bake as directed. This way, you can have a delicious homemade snack or meal on the table in no time, perfect for busy weeknights!

Vegetable Fritters with Chickpeas Variations

Feel free to breathe some creative life into this recipe with these tasty twists!

  • Gluten-Free Alternative: Swap all-purpose flour for almond flour or gluten-free breadcrumbs for a gluten-friendly option.

  • Protein Boost: Replace chickpeas with canned lentils or black beans for a delightful change in texture.

  • Spice it Up: Add crushed red pepper flakes or cayenne for a spicy kick that livens up every bite.

  • Herb Swap: Substitute fresh dill with parsley or cilantro for a different herby flavor profile. Each brings its own unique character!

  • Cheesy Touch: Mix in shredded cheese like feta or parmesan for a savory depth. It melts beautifully, adding richness.

  • Sweet Addition: Toss in a handful of sweet corn to introduce a delightful burst of sweetness, reminiscent of summer picnics.

  • Baking Method: For a lighter version, consider baking instead of frying. Simply coat lightly with oil and bake until golden.

Don't forget to enjoy these fritters hot with a creamy dipping sauce—just like our Pan Fried Shrimp or a zesty aioli—they're a perfect pair!

Vegetable Fritters with Chickpeas Recipe FAQs

How do I choose the best vegetables for the fritters?
Absolutely! When choosing vegetables, look for zucchini that is firm and without dark spots. Fresh broccoli should have bright, vibrant florets, and select carrots that are crisp. If using frozen vegetables, make sure they are thawed and drained well of excess moisture for the best texture.

How should I store leftover fritters?
Leftover fritters can be stored in an airtight container in the refrigerator for up to 3 days. Make sure they have cooled completely before storing. For reheating, I recommend using the oven or air fryer to retain their crunchiness—just pop them back in at 375°F (190°C) for about 10 minutes!

Can I freeze these vegetable fritters?
Certainly! To freeze, first let the fritters cool completely. Then, place them in a single layer on a baking sheet and freeze for about 1 hour. Once firm, transfer them to a zip-top bag, storing for up to 2 months. To reheat, cook them directly from frozen in the oven at 400°F (204°C) for about 15 minutes, flipping halfway through, to bring back that crispy texture.

What if my fritters are too soggy?
If you find your fritters soggy, it’s usually due to excess moisture—especially from the zucchini. Next time, salt and drain the zucchini properly, allowing it to sit for 20-25 minutes. Also, be sure not to overcrowd the pan while frying, as this can trap steam and lead to sogginess.

Are there any dietary restrictions I should consider?
These Vegetable Fritters with Chickpeas are excellent for gluten-free and dairy-free diets. However, if you have specific allergies, always check your ingredient labels. For example, ensure the chickpeas are canned in water without additives, and if serving to pets, remember that seasonings and certain oils can be harmful, so always stick with plain vegetables when sharing.

What can I dip these fritters in?
Oh, the possibilities are endless! A creamy dill sauce pairs beautifully, but you can also serve them with a dollop of hummus, tzatziki, or even a spicy aioli. Feel free to get creative; the right dip can elevate your Vegetable Fritters with Chickpeas experience!

Vegetable Fritters with Chickpeas

Flavor-Packed Vegetable Fritters with Chickpeas You’ll Love

These crispy Vegetable Fritters with Chickpeas are loaded with nutrients and flavor, making them a delightful gluten-free and dairy-free snack.
Print Recipe Pin Recipe
Prep Time 30 minutes mins
Cook Time 10 minutes mins
Total Time 40 minutes mins
Servings: 4 fritters
Course: Snacks
Cuisine: Vegetarian
Calories: 150
Ingredients Equipment Method Nutrition Notes

Ingredients
  

For the Fritters
  • 1 cup Zucchini Shred or spiralize, then salt and drain excess water.
  • 1 cup Broccoli Chop finely or pulse in a food processor.
  • 1 cup Carrot Grate to incorporate smoothly.
  • 1 cup Chickpeas Canned or cooked, mashed or whole.
  • ½ cup Oil For frying or baking.
  • ½ teaspoon Salt Adjust according to dietary preferences.
  • ¼ teaspoon Pepper Can be replaced with favorite spices.
For the Creamy Dill Sauce
  • 2 tablespoons Fresh Dill Can swap with dried dill or coriander.
  • 1 tablespoon Lemon Juice Vinegar can be used as an alternative.

Equipment

  • Mixing Bowl
  • Grater
  • Non-Stick Pan
  • Colander
  • Spatula
  • Baking Sheet

Method
 

Preparation Steps
  1. Start by preparing the zucchini. Shred the zucchini using a grater, then salt and drain excess water in a colander for 20-25 minutes.
  2. In a large mixing bowl, combine the drained zucchini, finely chopped broccoli, grated carrot, and chickpeas. Add salt, pepper, and any additional herbs. Mix thoroughly.
  3. Heat about ½ inch of oil in a pan over medium-high heat until shimmering (about 3-5 minutes). Test by dropping a spoonful of mixture; it should sizzle.
  4. Scoop ⅓ cup of the mixture into the pan and flatten slightly. Fry for about 3 minutes until golden brown, then flip and cook for another 3 minutes.
  5. For baking, preheat the oven to 400°F (204°C). Place fritters on a parchment-lined baking sheet and bake for 10 minutes on each side.
  6. Serve warm with creamy dill sauce or your favorite dipping sauce.

Nutrition

Serving: 1fritterCalories: 150kcalCarbohydrates: 20gProtein: 5gFat: 7gSaturated Fat: 1gPolyunsaturated Fat: 1gMonounsaturated Fat: 5gSodium: 250mgPotassium: 300mgFiber: 3gSugar: 2gVitamin A: 500IUVitamin C: 15mgCalcium: 30mgIron: 1mg

Notes

Adjust spices and vegetables based on personal preference for added variety.

Tried this recipe?

Let us know how it was!

Smashed Chickpea Avocado Sandwich: Creamy & Wholesome Delight

August 22, 2025 by Grace Snow Leave a Comment

The moment I scooped the smooth, ripe avocado from its skin, I knew I was about to create something special. My Smashed Chickpea Avocado Sandwich is not just a meal; it’s a delightful experience that combines creamy texture and hearty plant protein in every bite. With just seven simple ingredients, this recipe makes sticking to healthy eating effortless, perfect for those days when you're craving quick and easy comfort food. Plus, it's wonderfully versatile—whether on your favorite gluten-free bread or crunchy crackers, you can easily customize it to suit any taste. Imagine taking a break from busy days with this nourishing delight; it’s “fast food” redefined. Curious about how to elevate your lunchtime with this tasty twist? Let’s dive into the recipe!

Why is this sandwich a game changer?

Deliciously Easy: With just 7 ingredients and under 20 minutes of prep time, your lunchtime is about to get a delicious upgrade!

Creamy Texture: The smooth avocado merges perfectly with hearty chickpeas, creating a filling that’s both satisfying and nutritious.

Quick & Versatile: Whether you’re on gluten-free bread or crispy crackers, this dish adapts to your dietary needs and personal preferences.

Colorful Variations: Add a splash of creativity—toppings like sliced tomatoes or a kick from diced jalapeños make each sandwich special.

Health-Conscious Choice: Rich in plant protein and healthy fats, it's a delightful option for those looking to nourish without sacrificing flavor.

For a refreshing side, serve this with some fresh fruit or veggie sticks, making your meal complete. You might also enjoy trying things like the delightful Avocado Egg Salad or a comforting Chickpea Spinach Curry alongside!

Smashed Chickpea Avocado Sandwich Ingredients

For the Filling
• Chickpeas – Packed with plant protein and adds a hearty texture; canned chickpeas make prep a breeze.
• Avocado – Provides creaminess and healthy fats; ensure it’s ripe for the best flavor.
• Everything But the Bagel Seasoning – Adds a unique flavor profile; feel free to substitute with your go-to seasoning blend if needed.

For Assembly
• Bread (or gluten-free crackers) – Acts as the base; opt for whole grain or gluten-free options to suit your dietary needs.
• Spinach – Introduces freshness and nutrients; you can swap it for arugula if desired.
• Cucumber – Contributes a nice crunch and hydration; bell peppers work well as an alternative.
• Lemon Juice (optional) – Brightens the filling’s flavors; lime juice can be used for a different zesty twist.

This Smashed Chickpea Avocado Sandwich is a fantastic choice for anyone seeking a nutritious and fulfilling meal that doesn’t cut corners on flavor!

Step‑by‑Step Instructions for Smashed Chickpea Avocado Sandwich

Step 1: Prepare the Avocado
Begin by slicing a ripe avocado in half, removing the pit, and scooping the flesh into a mixing bowl. Use a fork to mash the avocado until it reaches a smooth, creamy consistency—about 1 to 2 minutes. This luscious base adds both flavor and healthy fats to your Smashed Chickpea Avocado Sandwich.

Step 2: Add the Chickpeas
Next, drain and rinse one can of chickpeas. Carefully add them to the bowl, mashing them gently with the fork until roughly half of the chickpeas are broken down, creating a delightful blend of textures. This step should take about 2 to 3 minutes; the combination of creamy avocado and hearty chickpeas forms the sandwich's wholesome filling.

Step 3: Season the Mixture
Sprinkle in a generous amount of Everything But the Bagel Seasoning, or your favorite spice blend, and stir the mixture thoroughly. This should take about 1 minute. The seasoning will elevate the flavor of your filling, transforming it into a delicious centerpiece for the Smashed Chickpea Avocado Sandwich. Taste and adjust the seasoning to your preference.

Step 4: Fold in Fresh Ingredients
To add freshness, fold in a handful of spinach and diced cucumber into the chickpea and avocado mixture. Use a spatula to gently combine everything, ensuring that the flavors meld together without over-mixing. This step adds crunch and nutrients and will enhance the overall taste of your sandwich.

Step 5: Assemble the Sandwich
Choose your favorite bread or gluten-free crackers as the base. Spoon a generous portion of the creamy chickpea and avocado filling onto one slice of bread, then top with another slice or more crackers. Gently press to secure the layers, ensuring that your Smashed Chickpea Avocado Sandwich is ready to enjoy.

Step 6: Serve and Enjoy
Finally, slice the sandwich in half for easy handling and a pretty presentation. Serve immediately alongside fresh fruit or veggie sticks for a light yet satisfying meal. The beautiful contrast of colors and textures will make your Smashed Chickpea Avocado Sandwich not only delicious but visually appealing as well!

Make Ahead Options

These Smashed Chickpea Avocado Sandwiches are perfect for meal prep enthusiasts! You can prepare the chickpea and avocado filling up to 2 days in advance by storing it in an airtight container in the refrigerator. To prevent browning, drizzle a little lemon juice over the filling before sealing. However, it's best to assemble the sandwiches just before serving to maintain the bread's texture and prevent sogginess. When ready to enjoy, simply spread the filling on your choice of bread or crackers, add the fresh toppings like spinach and cucumber, and you'll have a delicious sandwich in minutes, making your busy day a little easier!

Smashed Chickpea Avocado Sandwich Variations

Feel free to play with this recipe, making it your own with delightful twists and tasty substitutes!

  • Gluten-Free Bread: Opt for your favorite gluten-free bread to cater to dietary needs and still enjoy the creamy filling.

  • Avocado Replacement: For a lighter option, swap avocado with hummus to create a different flavor profile while keeping it creamy.

  • Add Crunch: Include sliced radishes or pickles for extra crunch and a tangy bite that complements the sandwich beautifully.

  • Herb Boost: Fresh herbs like basil or parsley can brighten up the sandwich, adding more fragrance and freshness with every bite.

  • Spice It Up: For those who love heat, mix in sliced jalapeños or a dash of sriracha to elevate the flavor to new heights!

  • Try Different Greens: Experiment with different leafy greens like arugula or kale in place of spinach; each adds a unique texture and flavor.

  • Creamy Variation: For a richer filling, stir in a dollop of vegan mayonnaise or Greek yogurt; this adds creaminess without compromising nutrition.

  • Open-Faced Delight: Serve the filling on a toasted slice of bread as an open-faced sandwich, then top with sliced tomatoes for a colorful presentation.

Whether you prefer a classic taste or a zesty twist, your Smashed Chickpea Avocado Sandwich can be as unique as you are! You might also enjoy a delicious side of Lime Chicken Avocado or a hearty Chickpea Spinach Curry to round out your meal beautifully.

What to Serve with Smashed Chickpea Avocado Sandwich

Elevate your mealtime with delightful sides and refreshing drinks that perfectly complement this creamy creation.

  • Crispy Sweet Potato Fries: These golden, crispy fries add a sweet contrast, enhancing the sandwich's creamy filling while creating an irresistible crunch.

  • Garden Salad with Lemon Vinaigrette: A fresh salad with a zesty dressing brings brightness and crispness, offering a refreshing balance to the rich sandwich.

  • Chilled Cucumber Soup: Light and cool, this soup pairs beautifully with the sandwich, echoing its creamy texture while introducing a refreshing flavor.

  • Roasted Vegetables: Caramelized and tender veggies offer earthy depth that pairs well with the lightness of the avocado and chickpeas, making every bite satisfying.

  • Fresh Fruit Salad: A mix of seasonal fruits provides a sweet finish that contrasts wonderfully with the savory aspects of the sandwich, leaving you feeling refreshed.

  • Sparkling Water with Citrus Slices: This effervescent drink cleanses the palate and adds a hint of citrus, enhancing the overall lightness of the meal.

  • Chocolate Avocado Mousse: For dessert, this rich yet healthy mousse mirrors the avocado's creamy delight and provides a sweet end to your meal without being overly decadent. Enjoy the journey of flavors!

Expert Tips for the Best Smashed Chickpea Avocado Sandwich

  • Choose Ripe Avocado: Make sure your avocado is ripe; it should slightly give when gently squeezed for optimal creaminess.

  • Texture Control: Use a fork or potato masher to achieve the desired consistency—mashing some chickpeas leaves a delightful texture.

  • Seasoning Balance: Taste your filling before serving; adjusting the seasoning can transform your Smashed Chickpea Avocado Sandwich into a flavor explosion.

  • Bread Selection: Opt for sturdy bread or gluten-free crackers to hold up against the creamy filling; this prevents sogginess.

  • Prep Ahead: The filling can be made in advance and stored in the refrigerator for up to two days—just assemble the sandwich when ready to enjoy!

Storage Tips for Smashed Chickpea Avocado Sandwich

Refrigerator: Store any leftover filling in an airtight container for up to 2 days. This keeps the flavors fresh and your sandwich ready to go!

Freezer: If you want to freeze the filling, place it in a freezer-safe container, removing as much air as possible. It can last for up to 3 months; just thaw in the fridge overnight before use.

Assembling: For best results, assemble the Smashed Chickpea Avocado Sandwich just before serving to maintain the bread's integrity and texture.

Reheating: If using frozen filling, let it thaw completely in the refrigerator, then stir well before using. It's best when served chilled or at room temperature but won't hurt if warmed slightly in the microwave.

Smashed Chickpea Avocado Sandwich Recipe FAQs

What type of avocado should I use for this sandwich?
Absolutely! Choose a ripe avocado for the best flavor and creaminess. It should give slightly when gently squeezed, indicating it's perfect for mashing. Avoid avocados with dark spots all over, as they can be overripe and may taste bitter.

How long can I store the filled sandwich in the fridge?
The filled Smashed Chickpea Avocado Sandwich is best enjoyed fresh, but if you have leftovers, you can store it in the refrigerator for up to 2 days. To maintain the bread's freshness, consider storing the filling separately and assembling the sandwich just before serving.

Can I freeze the chickpea and avocado filling?
Yes, absolutely! To freeze the filling, place it in a freezer-safe container, removing as much air as possible. It will last for up to 3 months. When you're ready to use it, thaw the container in the refrigerator overnight and give it a good stir before spreading on your bread or crackers.

What should I do if the filling is too thick or dry?
If you find that your filling is too thick, you can add a splash of water or lemon juice to loosen it up, making it easier to spread. Mix it well until you reach your desired consistency. Tasting as you go is key, so don’t hesitate to adjust flavors to suit your preference!

Is this sandwich suitable for people with allergies?
Always be cautious! This Smashed Chickpea Avocado Sandwich is naturally gluten-free if you use compatible bread or crackers. However, ensure to check the labels of all ingredients, especially the seasoning, as they can sometimes contain allergens. If allergies are a concern, it’s always best to prepare meals from scratch to control ingredients.

Can I customize the toppings on my sandwich?
Very much so! The beauty of this Smashed Chickpea Avocado Sandwich lies in its versatility. Feel free to add toppings like sliced tomatoes, radishes, or even a handful of sprouts for added crunch. If you want a spicy twist, consider mixing in diced jalapeños or a dash of hot sauce for an exciting flavor boost!

Smashed Chickpea Avocado Sandwich

Smashed Chickpea Avocado Sandwich: Creamy & Wholesome Delight

Smashed Chickpea Avocado Sandwich is a delightful experience that combines creamy texture and hearty plant protein in every bite.
Print Recipe Pin Recipe
Prep Time 15 minutes mins
Total Time 15 minutes mins
Servings: 2 sandwiches
Course: Snacks
Cuisine: American
Calories: 350
Ingredients Equipment Method Nutrition Notes

Ingredients
  

For the Filling
  • 1 can Chickpeas drained and rinsed
  • 1 Avocado ripe
  • 2 tablespoons Everything But the Bagel Seasoning
For Assembly
  • 2 slices Bread or gluten-free crackers
  • 1 handful Spinach or arugula
  • 1/2 cup Cucumber diced
  • 1 tablespoon Lemon Juice optional

Equipment

  • Mixing Bowl
  • Fork
  • Spatula

Method
 

Preparation Steps
  1. Slice a ripe avocado in half, remove the pit, and scoop the flesh into a mixing bowl. Mash until smooth.
  2. Drain and rinse the chickpeas, then add them to the bowl. Mash gently until half are broken down.
  3. Sprinkle in the Everything But the Bagel Seasoning and stir until well combined.
  4. Fold in the spinach and diced cucumber into the mixture.
  5. Choose your bread or crackers and spoon the filling onto one slice. Top with another slice and press.
  6. Slice the sandwich in half and serve immediately with fresh fruit or veggie sticks.

Nutrition

Serving: 1sandwichCalories: 350kcalCarbohydrates: 35gProtein: 12gFat: 20gSaturated Fat: 3gPolyunsaturated Fat: 1gMonounsaturated Fat: 15gSodium: 400mgPotassium: 700mgFiber: 10gSugar: 2gVitamin A: 25IUVitamin C: 30mgCalcium: 4mgIron: 15mg

Notes

For best results, assemble the sandwich just before serving to maintain bread texture.

Tried this recipe?

Let us know how it was!

Crispy Smashed Potatoes: The Perfect Easy Side Dish

August 22, 2025 by Grace Snow Leave a Comment

There’s something exhilarating about transforming humble potatoes into a dish that’s both crispy and irresistible. I stumbled upon this recipe for Crispy Smashed Potatoes one evening when I craved comfort food that didn’t compromise on health. These gems are not only simple to whip up, but they also give you that satisfying crunch along with a fluffy interior that’s sure to impress any guest at your table. Drizzled with creamy tahini sauce and sprinkled with fresh herbs, they offer a delightful twist that makes them stand out in the best way. Plus, being vegan and gluten-free means everyone can partake in this savory goodness without a second thought. Ready to dive into this crispy adventure? Let’s get smashing!

Why are Crispy Smashed Potatoes a Must-Try?

Crispy perfection: These potatoes boast a crunchy exterior while remaining fluffy inside, making every bite a joy.
Quick & easy: With just a few simple steps, you can elevate a regular potato dish into something extraordinary in no time!
Versatile toppings: Whether drizzled with creamy tahini sauce or garnished with fresh herbs, you can customize them to match any meal or preference.
Crowd-pleaser: Their irresistible flavor and texture make them a hit at gatherings or family dinners, ensuring your guests return for seconds!
Health-conscious choice: Vegan and gluten-free, these potatoes offer a delicious alternative to traditional sides like Smoky Sweet Potatoes or German Potato Salad, catering to diverse dietary needs without sacrificing taste.

Crispy Smashed Potatoes Ingredients

Get ready to create a scrumptious side!

For the Potatoes
• Potatoes – Choose starchy varieties like Russets for maximum fluffiness and crispiness.
• Olive Oil – Adds richness and aids in achieving that coveted crispy texture. Omit for an oil-free version.
• Salt – Essential for enhancing the flavor; feel free to adjust to your liking.

For the Tahini Sauce
• Tahini – This provides creaminess and a delightful nutty flavor; can be swapped with other nut or seed butters.
• Lemon Juice – Fresh juice brightens the sauce beautifully; opt for fresh for the best taste.
• Garlic Powder – This gives the sauce depth; swap it for fresh garlic for a bolder flavor.
• Water – Use to adjust the sauce thickness according to your preference.

For Garnishing
• Fresh Herbs (e.g., green onions, cilantro) – Adds a pop of fresh flavor and color; other options include parsley or dill.

Step‑by‑Step Instructions for Crispy Smashed Potatoes

Step 1: Boil Potatoes
Fill a large pot with water and add a pinch of salt before bringing it to a rolling boil. Carefully add the starchy potatoes and boil them for 15–20 minutes, or until they are fork-tender. You’ll know they’re ready when you can easily pierce them with a knife.

Step 2: Preheat Oven
While the potatoes are boiling, preheat your oven to 400°F (204°C). This temperature is perfect for achieving that golden crunch on your Crispy Smashed Potatoes.

Step 3: Steam Dry
Once the potatoes are tender, drain them and let them sit in the colander or on a kitchen towel for 5 minutes. This steam-drying step helps remove excess moisture, ensuring a crispier texture during baking.

Step 4: Smash Potatoes
Place the potatoes on a greased baking sheet, ensuring they have enough space. Using the bottom of a glass or your palm, gently smash each potato to about ½ inch thick. For extra crispiness, you can make them a bit thinner; just be careful not to break them.

Step 5: Season
Drizzle the smashed potatoes with olive oil (if using) and generously sprinkle with salt. Make sure each potato is well-coated to enhance the flavor and achieve that delicious crispy exterior.

Step 6: Bake
Slide the baking sheet into the preheated oven and bake the potatoes for 40 minutes, flipping them halfway through. You'll know they’re done when they’re golden brown and exude that irresistible crispy aroma.

Step 7: Prepare Tahini Sauce
While the potatoes are baking, prepare the creamy tahini sauce by mixing tahini, fresh lemon juice, garlic powder, salt, and water in a bowl. Stir until the mixture is smooth and creamy, adjusting the water as needed to reach your desired consistency.

Step 8: Serve
Once the Crispy Smashed Potatoes are beautifully golden, remove them from the oven. Arrange them on a serving plate, drizzle with your luscious tahini sauce, and sprinkle with fresh herbs to add a bright touch. Enjoy this delightful combination!

Storage Tips for Crispy Smashed Potatoes

Fridge: Store leftover Crispy Smashed Potatoes in an airtight container for up to 3 days to keep them fresh while preventing moisture loss.

Freezer: For longer storage, freeze them in a single layer on a baking sheet until solid, then transfer to a freezer bag for up to 1 month to maintain quality.

Reheating: To re-crisp your potatoes, preheat the oven to 425°F (218°C) and bake for 10-15 minutes. This will help revive their delightful crunch.

Avoid Room Temperature: Keep any leftovers refrigerated or frozen; don’t leave them out at room temperature longer than 2 hours to ensure food safety.

Expert Tips for Crispy Smashed Potatoes

  • Choose the Right Potatoes: Use starchy potatoes like Russets for that perfect fluffy interior and crispy exterior. Avoid waxy types that don’t crisp well.
  • Steam Drying Is Key: Allowing the potatoes to steam dry for about 5 minutes after boiling helps achieve that coveted crunch in your Crispy Smashed Potatoes.
  • Uniform Thickness: Smashing potatoes to a consistent thickness ensures even cooking and crispiness; aim for about ½ inch, but go thinner for extra crunch!
  • Don't Overcrowd the Pan: Space the potatoes evenly on the baking sheet; overcrowding can steam them instead of crisping them up, leading to disappointing results.
  • Flipping for Even Crispiness: Flip the potatoes halfway through baking to ensure both sides get perfectly golden and crispy—double the crunch, double the delight!
  • Serve Fresh: These potatoes are best enjoyed immediately after baking for their maximum crunch; they can be stored but may lose their texture when reheated.

Crispy Smashed Potatoes Variations & Substitutions

Feel free to tailor these Crispy Smashed Potatoes to your liking with exciting flavors and textures!

  • Nut-Free: Substitute tahini with sunflower seed butter for a creamy alternative without nuts. This offers a deliciously nutty flavor that's safe for those with nut allergies.

  • Extra Crunch: Top with crispy fried onions for a delightful crunchy layer. They add a savory sweetness that elevates the texture and flavor significantly!

  • Herb Variations: Experiment with fresh herbs like dill or basil instead of just green onions or cilantro. Each herb brings its own unique flavor profile, making this dish versatile and vibrant.

  • Spicy Kick: Sprinkle crushed red pepper flakes or drizzle with sriracha for a spicy twist. This is perfect for those who crave a little heat in every bite.

  • Creamy Alternative: Swap the tahini sauce for a creamy avocado dressing by blending ripe avocado with lemon juice, garlic, and water. It's a deliciously rich option that still keeps things light!

  • Cheesy Flavor: Sprinkle nutritional yeast on the potatoes before baking for a cheesy flavor without dairy. This adds a delightful umami taste that everyone will love.

  • Savory Topper: Add caramelized onions or sautéed mushrooms for an umami-packed garnish. This adds a deeper flavor that pairs perfectly with the crispy potatoes.

  • Sweet & Spicy: Drizzle with a mixture of honey (or agave for vegan) and hot sauce for a sweet and spicy finish that dances on your palate, enhancing the overall dish even more.

If you really enjoy elevating simple dishes, consider pairing these crispy beauties with other fabulous sides like Roasted Sweet Potatoes or savory Parmesan Artichoke Hearts to create a memorable meal everyone will adore!

What to Serve with Crispy Smashed Potatoes

Looking to create a full meal that complements those perfectly crispy bites?

  • Creamy Vegan Mushroom Gravy: This rich, savory sauce adds a luscious layer that enhances the potatoes' texture and flavor beautifully.

  • Steamed Green Beans: Crisp-tender green beans bring a bright, fresh element to your plate, making for a lovely color contrast and taste balance.

  • Roasted Brussels Sprouts: The caramelized sweetness of Brussels sprouts provides a delightful contrast to the crunchy potatoes, creating a harmonious flavor experience.

  • Chickpea Salad: A zesty chickpea salad with lemon, herbs, and veggies adds protein and a refreshing crunch that pairs well with the buttery flavor of tahini.

  • Grilled Veggie Skewers: Colorful skewers of grilled vegetables, lightly brushed with olive oil and herbs, complement the potatoes' earthiness and make for a vibrant presentation.

  • Chilled White Wine: A crisp, chilled white wine, like Sauvignon Blanc, refreshes your palate and enhances your meal with a light, fruity note.

  • Chocolate Avocado Mousse: For dessert, this creamy, rich mousse provides a delightful end to your meal, balancing sweetness with a hint of bitterness.

Let your taste buds dance with these perfect pairings that make your Crispy Smashed Potatoes shine even brighter!

Make Ahead Options

These Crispy Smashed Potatoes are perfect for meal prep enthusiasts! You can boil and smash the potatoes up to 24 hours in advance, storing them in the refrigerator covered tightly to prevent moisture loss. When you’re ready to serve, simply drizzle with olive oil, season, and bake them directly from the fridge for 40 minutes at 400°F (204°C) for that golden crispiness. Additionally, prepare the creamy tahini sauce up to 3 days in advance and store it in an airtight container in the refrigerator. Just give it a good stir before drizzling over the baked potatoes, ensuring they’re just as delicious and satisfying as when made fresh! This way, you save time while still delighting your family with a tasty side dish.

Crispy Smashed Potatoes Recipe FAQs

What type of potatoes should I use for the best results?
I recommend using starchy potatoes like Russets for the most delicious crispy outside and fluffy inside. Waxy potatoes won't get as crispy, so stick to starchy ones for that perfect texture.

How can I store leftover Crispy Smashed Potatoes?
Store any leftover Crispy Smashed Potatoes in an airtight container in the refrigerator for up to 3 days. For optimal taste, reheat them in the oven at 425°F (218°C) for about 10-15 minutes to restore their crunch.

Can I freeze Crispy Smashed Potatoes?
Absolutely! To freeze, lay the smashed potatoes in a single layer on a baking sheet and place them in the freezer until solid. After that, transfer them to a freezer bag and store for up to 1 month. When you're ready to enjoy, simply bake from frozen at 425°F until heated through and crispy.

What should I do if my potatoes are not getting crispy?
Ah, the quest for crunch! If your potatoes aren’t crisping up, ensure you’ve steam-dried them properly after boiling and that you’re not overcrowding the baking sheet. Also, remember to flip them halfway through baking for even crispiness. If they seem thick after smashing, try smashing them a bit thinner next time!

Is there a substitute for tahini in the sauce?
Yes, if you don’t have tahini, other nut or seed butters like almond or peanut can work well too! Just keep in mind that they will bring their own unique flavor to the sauce, so choose one you enjoy. Simply follow the same mixing instructions to achieve a creamy consistency.

Are there any dietary considerations for this recipe?
This recipe is vegan and gluten-free, making it a fantastic option for those with dietary restrictions. Just double-check any ingredients and potential allergies—especially with the tahini or other nut butter substitutes!

Crispy Smashed Potatoes

Crispy Smashed Potatoes: The Perfect Easy Side Dish

Crispy Smashed Potatoes are a vegan and gluten-free side dish that combines a crunchy exterior with a fluffy interior.
Print Recipe Pin Recipe
Prep Time 15 minutes mins
Cook Time 40 minutes mins
Total Time 55 minutes mins
Servings: 4 potatoes
Course: Snacks
Cuisine: Vegan
Calories: 180
Ingredients Equipment Method Nutrition Notes

Ingredients
  

For the Potatoes
  • 2 pounds starchy potatoes (like Russets) Choose for maximum fluffiness and crispiness.
  • 3 tablespoons olive oil Omit for an oil-free version.
  • to taste teaspoon salt Essential for flavor enhancement.
For the Tahini Sauce
  • 1/4 cup tahini Can be swapped with other nut or seed butters.
  • 2 tablespoons lemon juice Fresh juice is recommended.
  • 1 teaspoon garlic powder Alternatively use fresh garlic.
  • 1/4 cup water Adjust thickness of the sauce.
For Garnishing
  • to taste fresh herbs (e.g., green onions, cilantro) Add flavor and color.

Equipment

  • Large pot
  • Baking Sheet
  • Colander
  • glass

Method
 

Step-by-Step Instructions for Crispy Smashed Potatoes
  1. Fill a large pot with water and add a pinch of salt. Bring to a rolling boil.
  2. Carefully add the starchy potatoes and boil for 15–20 minutes until fork-tender.
  3. Drain the potatoes and let them steam-dry in a colander for 5 minutes.
  4. Place the potatoes on a greased baking sheet and gently smash each potato to about ½ inch thick.
  5. Drizzle with olive oil and generously sprinkle with salt.
  6. Bake at 400°F (204°C) for 40 minutes, flipping halfway through.
  7. Prepare tahini sauce by mixing tahini, lemon juice, garlic powder, salt, and water until smooth.
  8. Once done, drizzle with tahini sauce and sprinkle with fresh herbs before serving.

Nutrition

Serving: 1potatoCalories: 180kcalCarbohydrates: 30gProtein: 3gFat: 6gSaturated Fat: 1gPolyunsaturated Fat: 2gMonounsaturated Fat: 3gSodium: 250mgPotassium: 600mgFiber: 3gSugar: 1gVitamin C: 20mgCalcium: 2mgIron: 8mg

Notes

These potatoes are best enjoyed immediately after baking for maximum crunch. Can be stored but may lose texture when reheated.

Tried this recipe?

Let us know how it was!

Cheese and Olive Quick Bread: Your New Favorite Comfort Food

August 20, 2025 by Grace Snow Leave a Comment

In a cozy kitchen filled with the alluring aroma of freshly baked bread, I found myself wrestling with the desire to create something unique yet familiar. Enter the Savory Cheese and Olive Quick Bread—a delightful fusion that marries the rich tang of cheese with the briny pops of olives. This recipe is not just straightforward and quick to whip up, it’s also completely customizable, allowing you to play with different cheese and olive combinations that suit your palate. Perfect for casual brunches or a comforting snack, this fluffy loaf with its golden crust is bound to elevate any occasion. Who’s ready to knead their way to comfort and flavor? Let’s dive into the details!

Why is this Cheese and Olive Quick Bread special?

Flavorful combinations bring the best of both worlds—tangy cheese meets savory olives for a burst of taste in every bite. Customizable to fit any mood, you can swap in your favorite cheeses and olives for a personalized twist. Quick and easy preparation means you can indulge in homemade goodness without hours in the kitchen. Perfectly paired with soups or as a part of a brunch spread, this bread is sure to impress guests or satisfy a craving. If you adore comforting, flexible recipes, this Savory Cheese and Olive Quick Bread will become a beloved staple in your kitchen.

Cheese and Olive Quick Bread Ingredients

For the Batter

  • All-Purpose Flour – Provides structure and texture; can substitute with whole wheat flour for added fiber.
  • Baking Powder – Acts as a leavening agent to help the bread rise.
  • Salt – Enhances the flavor of the quick bread.
  • Black Pepper – Adds mild heat and depth to the flavor profile.
  • Cayenne Pepper (optional) – Introduces a spicy kick; omit if you prefer a milder taste.
  • Shredded Cheese – Contributes moisture and flavor; cheddar or mozzarella work well, but feel free to explore other cheeses like gouda or feta.
  • Whole Milk – Moistens the dough and adds a richer flavor; almond milk can be a great dairy-free alternative.
  • Olive Oil – Adds moisture and a rich flavor; you can substitute with melted butter if desired.
  • Eggs – Provide structure and bind the ingredients together.
  • Pitted Olives – Adds a savory flavor; consider mixing green and black olives for variety or include sun-dried tomatoes for a fun twist.
  • Fresh Thyme/Dried Thyme (optional) – Provides lovely herbal notes; if fresh thyme is unavailable, use dried at one-third of the amount.

For Greasing

  • Butter/Non-Stick Cooking Spray – Used for greasing the pan to ensure easy release of your delicious bread.

Step‑by‑Step Instructions for Cheese and Olive Quick Bread

Step 1: Preheat and Prepare
Begin by preheating your oven to 375°F (190°C). Grease a 9x5 inch loaf pan with butter or non-stick cooking spray to ensure your savory Cheese and Olive Quick Bread releases smoothly once baked. Set the prepared pan aside as you move on to mixing the dry ingredients.

Step 2: Mix Dry Ingredients
In a large mixing bowl, whisk together 2 cups of all-purpose flour, 1 tablespoon of baking powder, 1 teaspoon of salt, ½ teaspoon of black pepper, and, if desired, a pinch of cayenne pepper for an extra kick. Make sure the mixture is well combined and no lumps remain, allowing the flavors to mingle and ensuring your bread rises beautifully in the oven.

Step 3: Combine Wet Ingredients
In a separate bowl, whisk together 1 cup of whole milk, ¼ cup of olive oil, and 2 large eggs until fully incorporated. The wet ingredients help create a tender dough, so give them a good mix to blend the flavors. Once combined, gradually incorporate this mixture into your dry ingredients, stirring gently to combine.

Step 4: Mix to Form Batter
Using a spatula or wooden spoon, gently fold the wet mixture into the dry ingredients until just combined; be careful not to overmix. You want to achieve a thick batter without any dry flour pockets, as overmixing can lead to denser bread. The key is a bit of lumpiness; it ensures your Cheese and Olive Quick Bread remains fluffy and light.

Step 5: Fold in Flavorful Add-ins
Now it’s time to add the star ingredients! Fold in 1 cup of shredded cheese and ¾ cup of pitted olives into the batter, along with optional fresh or dried thyme for a fragrant touch. Be sure to distribute the cheese and olives evenly throughout the batter so that each bite bursts with flavor in your delightful quick bread.

Step 6: Pour Batter into Pan
Carefully pour the batter into your greased loaf pan, spreading it evenly with the spatula. Smooth the top so the bread bakes uniformly, creating a lovely golden crust. As the batter settles, you’ll notice the delicious combinations already melding, making your kitchen smell inviting, even before the baking begins.

Step 7: Bake to Perfection
Place the loaf pan in your preheated oven and bake for 45-50 minutes, or until the top is golden brown and a wooden skewer inserted into the center comes out clean. This is an essential step in achieving a fluffy texture and that delightful crispy, golden crust we all love in a perfect Cheese and Olive Quick Bread.

Step 8: Cool and Serve
Once baked, remove the bread from the oven and let it cool in the pan for 10-15 minutes. This resting period allows the bread to firm up a bit for easier slicing. Afterward, carefully transfer it to a wire rack to cool completely. Slice and serve your warm, flavorful Cheese and Olive Quick Bread, and enjoy the tempting aroma wafting through your home!

Cheese and Olive Quick Bread Variations

Feel free to get creative with this recipe and make it your own, adding unique flavors that tickle your taste buds!

  • Vegetable-Loaded: Add sun-dried tomatoes or chopped spinach for an extra burst of color and flavor.
    These additions not only enhance the taste but also contribute beautiful visual appeal to your bread.

  • Spicy Kick: Toss in some jalapeños or crushed red pepper flakes for a fiery twist.
    This little addition can transform your quick bread into a flavor-packed experience that'll warm you up from the inside out.

  • Herb Infusion: Swap out thyme with fresh rosemary or oregano for an aromatic surprise.
    These fragrant herbs will bring a delightful freshness to your cheese and olive bread with each slice.

  • Nutty Addition: Incorporate chopped walnuts or pecans for added crunch and flavor.
    The nuttiness will complement the cheese and olives perfectly, making each bite interesting.

  • Cheese Variety: Mix different cheeses like feta, gouda, or even a sharp blue cheese for great complexity.
    The unique twists in flavor will keep your palate excited every time you bake a loaf.

  • Olive Mix: Experiment with kalamata, green olives, or even a blend of stuffed olives for a flavor adventure.
    Each mix offers a unique taste experience that can transport you to a Mediterranean getaway.

  • Garlic Lovers: Add minced garlic or garlic powder to the batter for those who crave extra flavor.
    This little twist can create a savory garlic bread experience that pairs splendidly with soups or salads.

  • Sweet Touch: For a contrasting flavor, think about adding a touch of honey or maple syrup to your batter.
    The subtle sweetness can create a delightful balance, especially if served with a cheese platter or charcuterie board.

Don’t forget, if you’re in need of some tasty side dishes, this bread pairs beautifully with a warm bowl of Cornbread Breakfast Casserole or is delicious alongside Fried Shrimp Cabbage for a delightful brunch! Let your imagination soar, and enjoy the baking journey!

Make Ahead Options

These Savory Cheese and Olive Quick Bread are perfect for meal prep enthusiasts! You can prepare the dry ingredients (flour, baking powder, salt, black pepper, and cayenne) up to 24 hours in advance. Simply store them in an airtight container to maintain freshness. The wet ingredients (milk, olive oil, and eggs) can also be combined and refrigerated for up to 3 days. When you’re ready to bake, mix the wet and dry ingredients, fold in your desired cheese and olives, and then pour the batter into the greased pan. This makes your cooking process seamless, ensuring just as delicious results with minimal effort!

Expert Tips for Cheese and Olive Quick Bread

  • Avoid Overmixing: Gently fold the wet and dry ingredients to keep the bread light and fluffy. Overmixing can create a dense texture that isn't ideal for a Cheese and Olive Quick Bread.
  • Cheese Choices: Experiment with different cheeses like feta or gouda for a unique flavor profile. Each cheese will alter the taste, giving you plenty of choices to explore!
  • Fresh is Best: Serve your quick bread fresh for maximum flavor. If you have leftovers, store them in an airtight container or freeze for later enjoyment.
  • Herb Infusion: Adding fresh thyme or other herbs can elevate the flavor. If using dried thyme, remember to use only one-third of the amount for a balanced taste.
  • Flavor Combinations: Don’t hesitate to mix up the olives! Combining green and black olives or adding sun-dried tomatoes can create fun variations you’ll love.

How to Store and Freeze Cheese and Olive Quick Bread

  • Room Temperature: Store the cooled Cheese and Olive Quick Bread in an airtight container for up to 3 days to maintain its freshness and prevent it from drying out.
  • Fridge: For longer storage, wrap the bread in plastic wrap and place it in the fridge. It can last up to a week, but the texture may change slightly.
  • Freezer: To freeze, wrap the bread tightly in plastic wrap followed by aluminum foil to prevent freezer burn. It can be frozen for up to 3 months.
  • Reheating: For the best results, slice the frozen bread and toast it in a skillet or toaster until warm and crispy. Enjoy the delightful flavors once again!

What to Serve with Cheese and Olive Quick Bread?

Savor the joy of pairing this delicious bread with dishes that complement its rich flavors and textures.

  • Creamy Tomato Soup: The acidity of the soup enhances the cheesy goodness while adding warmth to your meal. A classic pairing that warms both heart and stomach.

  • Garden Salad: Fresh greens topped with a tangy vinaigrette balance the richness of the bread. The crisp textures and vibrant flavors create a refreshing contrast.

  • Mediterranean Antipasto Platter: Serve with olives, cheeses, and cured meats for a full flavor experience. This combination makes for a delightful appetizer spread that friends will love.

  • Roasted Vegetables: Sweet roasted carrots, zucchini, or bell peppers bring a satisfying array of flavors and nutrients, grounding the dish with their earthy essence.

  • Herbed Butter: Spread a bit of herbed butter on warm slices. The richness of the butter, coupled with fragrant herbs, elevates every bite of bread.

  • Olive Oil Dipping Sauce: A simple mix of high-quality olive oil, balsamic vinegar, and Italian herbs creates a perfect dipping sauce that highlights the bread's flavor.

  • Sparkling Wine: Pairing this bread with a light sparkling wine adds a celebratory touch to any gathering. The effervescence cuts through the richness, making each sip refreshing.

  • Fruit Jam or Chutney: A sweet jam or spicy chutney on the side complements the savory notes delightfully. The contrast adds another layer of flavor excitement.

Cheese and Olive Quick Bread Recipe FAQs

What type of cheese works best for Cheese and Olive Quick Bread?
Absolutely! While cheddar and mozzarella are popular choices for a rich, creamy texture, you can customize your Cheese and Olive Quick Bread by using gouda for a smoky flavor or feta for a tangy twist. Experiment with your favorites to discover unique flavor combinations!

How should I store Cheese and Olive Quick Bread?
To keep your delicious Cheese and Olive Quick Bread fresh, store it in an airtight container at room temperature for up to 3 days. If you want to keep it longer, wrap it tightly in plastic wrap and place it in the fridge where it can last up to a week, though the texture may change. For the best preservation, use the freezer method!

Can I freeze Cheese and Olive Quick Bread?
Very much so! To freeze, wrap the cooled bread tightly in plastic wrap followed by aluminum foil to prevent freezer burn. It can be stored in the freezer for up to 3 months. When you’re ready to indulge again, simply slice and toast the frozen bread in a skillet or toaster for a warm, crispy treat!

What should I do if my bread is too dense?
If your Cheese and Olive Quick Bread turns out dense, it’s likely due to overmixing the batter. Next time, gently fold the wet and dry ingredients until just combined, keeping some lumps. Also, ensure your baking powder is fresh to achieve a good rise, giving your bread that fluffy texture we all love.

Can I make this recipe gluten-free?
Absolutely! You can substitute the all-purpose flour with a gluten-free flour blend. I recommend using a blend that includes xanthan gum to mimic the structure of wheat flour. Just make sure to measure accurately, as gluten-free flours can absorb moisture differently. Enjoy your delicious gluten-free Cheese and Olive Quick Bread!

Are there any allergy considerations for this recipe?
Yes, if you or your guests have dietary restrictions, be mindful of the dairy in this recipe. You can easily make it dairy-free by using almond milk and substituting cheese with dairy-free alternatives available on the market. Always check ingredient labels to ensure they fit your needs!

Cheese and Olive Quick Bread Recipe FAQs.

Cheese and Olive Quick Bread

Cheese and Olive Quick Bread: Your New Favorite Comfort Food

This Cheese and Olive Quick Bread is a quick, customizable recipe that combines tangy cheese and savory olives, perfect for any occasion.
Print Recipe Pin Recipe
Prep Time 15 minutes mins
Cook Time 50 minutes mins
Cooling Time 15 minutes mins
Total Time 1 hour hr 20 minutes mins
Servings: 10 slices
Course: Snacks
Cuisine: Baked Goods
Calories: 180
Ingredients Equipment Method Nutrition Notes

Ingredients
  

For the Batter
  • 2 cups all-purpose flour can substitute with whole wheat flour for added fiber
  • 1 tablespoon baking powder acts as a leavening agent
  • 1 teaspoon salt enhances flavor
  • 0.5 teaspoon black pepper adds depth to flavor
  • 0.25 teaspoon cayenne pepper optional for spice
  • 1 cup shredded cheese cheddar or mozzarella recommended
  • 1 cup whole milk almond milk for dairy-free option
  • 0.25 cup olive oil can substitute with melted butter
  • 2 large eggs binds ingredients
  • 0.75 cup pitted olives consider mixing green and black olives
  • 1 tablespoon fresh thyme or 1 teaspoon dried thyme as substitute
For Greasing
  • 1 tablespoon butter for greasing the pan

Equipment

  • Loaf pan
  • Mixing bowls
  • Whisk
  • Spatula

Method
 

Step-by-Step Instructions
  1. Preheat your oven to 375°F (190°C) and grease a 9x5 inch loaf pan.
  2. Whisk together the dry ingredients in a mixing bowl.
  3. In a separate bowl, whisk together the wet ingredients until fully incorporated.
  4. Gently fold the wet mixture into the dry ingredients until just combined.
  5. Fold in the shredded cheese and pitted olives.
  6. Pour the batter into the greased loaf pan and smooth the top.
  7. Bake for 45-50 minutes until golden brown and a skewer comes out clean.
  8. Cool in the pan for 10-15 minutes before transferring to a wire rack.

Nutrition

Serving: 1sliceCalories: 180kcalCarbohydrates: 22gProtein: 6gFat: 7gSaturated Fat: 3gPolyunsaturated Fat: 0.5gMonounsaturated Fat: 3gCholesterol: 50mgSodium: 350mgPotassium: 120mgFiber: 1gSugar: 1gVitamin A: 500IUCalcium: 100mgIron: 1mg

Notes

Avoid overmixing to keep the bread light and fluffy. Experiment with cheese and olive combinations for unique flavors.

Tried this recipe?

Let us know how it was!

Ultimate Veggie Sandwich: Your Customizable Lunch Delight

August 19, 2025 by Grace Snow Leave a Comment

A bright, colorful plate brings back fond memories of summer picnics and lazy afternoons spent savoring homemade delights. That's exactly what my Ultimate Veggie Sandwich embodies—a deliciously fresh experience that’s perfect for any meal. Not only can this sandwich be whipped up in just 15 minutes, but it also offers endless customization options to cater to every dietary preference and craving. Packed with nutrient-rich ingredients, this is the ideal go-to for lunch or a satisfying snack that will leave you feeling refreshed and energized. Curious about how to craft your very own masterpiece? Let’s dive in!

What makes the Ultimate Veggie Sandwich special?

Vibrant colors and fresh flavors come together in this sandwich to create a feast for both the eyes and palate. Endless customization means you can tailor each layer to your liking, whether you're craving something creamy or crispy. Nutritious ingredients, like avocado and sprouts, ensure every bite is packed with vitamins. Quick preparation (just 15 minutes!) makes it a no-fuss option for busy days. Plus, it’s a crowd-pleaser, perfect for gatherings—or simply enjoying with a side of sweet potato fries or a light salad.

Ultimate Veggie Sandwich Ingredients

For the Bread
• Whole Grain Bread – A sturdy foundation, and you can use gluten-free bread if you need a substitute.

For the Spread
• Hummus – Adds creamy texture and flavor; guacamole is a great alternative for a twist.
• Pesto – Infuses an herby kick; feel free to use store-bought or homemade.

For the Crunch
• Carrots (shredded) – Contributes a delightful crunch; radishes can offer a spicier alternative.
• Red Onion (thinly sliced) – Delivers a sharp bite; swap with green onions for a milder taste.
• Red Bell Pepper (thinly sliced) – Offers sweetness and crunch; cucumbers can add a refreshing aspect instead.
• Cucumber or Pickles – Bring in freshness; opt for dill pickles for a tangy touch.
• Sprouts or Microgreens – Provide a nutritious boost and extra crunch; any leafy greens like arugula work well.
• Romaine Lettuce – Adds crispness and volume; kale is a great leafy substitute.

For the Sweetness
• Apple (thinly sliced) – Adds a natural sweetness; pears can be used for a different flavor profile.
• Avocado (sliced) – Infuses richness and creaminess; you can also use more hummus if you prefer.

For the Crunchy Topping
• Pepitas, Sunflower Seeds, or Roasted Chickpeas – Adds delightful texture; any nuts or seeds will do.

Seasoning
• Salt and Pepper – Essential for enhancing flavors in your Ultimate Veggie Sandwich!

Step‑by‑Step Instructions for Ultimate Veggie Sandwich

Step 1: Prepare the Bread
Start by laying out two slices of whole grain bread on a clean cutting board. Using a butter knife, generously spread a layer of hummus on one side of each slice, making sure to reach the edges for maximum flavor. If desired, add pesto on top of the hummus for an herby kick. This tasty base helps hold your Ultimate Veggie Sandwich together and adds a creamy texture.

Step 2: Layer the Leaves
Next, place a couple of romaine lettuce leaves on one slice of bread, covering the hummus evenly. This crisp layer acts as a barrier to prevent moisture from soaking into the bread. Feel free to overlap the leaves slightly for better coverage. The vibrant green of the lettuce adds color and a satisfying crunch to your Ultimate Veggie Sandwich.

Step 3: Add Heavier Ingredients
Add your chosen heavier ingredients next, starting with sliced avocado and shredded carrots on top of the lettuce. These add richness and a lovely crunch. Gently press down to slightly compact the layers. Follow with additional toppings like thinly sliced red onion and red bell pepper, as they provide a delightful balance of crunch and sweetness for your Ultimate Veggie Sandwich.

Step 4: Include Crunchy Freshness
Layer on your fresh toppings by adding cucumber slices or dill pickles. For extra flair, sprinkle a handful of sprouts or microgreens on top. These elements not only enhance the flavor but also contribute refreshing textures. Try to maintain a neat stack as you build, making it easy to enjoy every bite of your Ultimate Veggie Sandwich.

Step 5: Finish with Sweetness
Now it's time to add a touch of natural sweetness. Arrange thin apple slices over the top of the sprouts, or swap them for sliced pears if you prefer. The contrasting flavors of sweet and savory will elevate your Ultimate Veggie Sandwich to new heights. Once you’re satisfied with your layers, prepare for seasoning.

Step 6: Season to Perfection
Lightly sprinkle salt and pepper over the assembled ingredients to enhance their flavors. This simple step elevates your Ultimate Veggie Sandwich, ensuring each bite is irresistibly tasty. Feel free to adjust the seasoning to suit your palate, and don't forget to take a moment to admire your colorful creation before wrapping it up.

Step 7: Wrap and Serve
Once everything is perfectly layered, place the second slice of bread on top, hummus side down, forming a complete sandwich. If you're on the go, wrap your Ultimate Veggie Sandwich tightly in parchment paper to keep it fresh. Cut it in half to showcase the vibrant layers, and serve immediately for a delightful and nutritious meal!

What to Serve with Ultimate Veggie Sandwich

Enhance your culinary experience by pairing this delightful creation with sides that complement its fresh and vibrant flavors.

  • Crispy Sweet Potato Fries: These offer a satisfying crunch and a hint of sweetness, perfectly balancing the sandwich’s savory notes.

  • Chilled Gazpacho: A refreshing tomato-based soup that brings a burst of flavor, adding a delightful contrast to your hearty sandwich experience.

  • Garden Salad: A mix of greens, cherry tomatoes, and cucumbers drizzled with a light vinaigrette elevates the freshness, enhancing the veggie theme.

  • Fruit Salad: A colorful assortment of seasonal fruits adds a sweet, juicy element that pairs wonderfully while keeping the meal light and refreshing.

  • Roasted Chickpeas: Their crunchy texture and satisfying crunch provide an extra protein boost and crunch to balance the creaminess of the sandwich.

  • Herbal Iced Tea: A refreshing beverage with mint or basil infuses a bit of sophistication, making your meal feel like a café getaway in your own kitchen.

Expert Tips for the Ultimate Veggie Sandwich

  • Layering Matters: Start with crispy lettuce to create a moisture barrier, preventing your sandwich from getting soggy. This ensures every bite of your Ultimate Veggie Sandwich is fresh.

  • Prep Smart: To save time, prep your ingredients ahead of time and store them in the refrigerator. This makes assembling your sandwich a quick breeze when hunger strikes.

  • Mix It Up: Don’t be afraid to experiment with seasonal veggies for variety. Using what’s fresh not only enhances the flavor but also keeps your Ultimate Veggie Sandwich exciting.

  • Cool Your Crunch: Refrigerate ingredients like cucumbers and bell peppers before assembly for an extra crisp texture. This elevates the freshness of your sandwich and adds that perfect crunch.

  • Customize Wisely: Remember, each layer adds flavor and texture—balance heavier ingredients like avocado with lighter ones like sprouts for the best overall mouthfeel in your Ultimate Veggie Sandwich.

Make Ahead Options

These Ultimate Veggie Sandwiches are perfect for busy home cooks looking to save time without sacrificing flavor! You can prepare the veggies—like shredded carrots, thinly sliced cucumbers, and bell peppers—up to 3 days in advance by storing them in airtight containers in the refrigerator to preserve freshness and crunch. Additionally, you can spread the hummus and pesto on the bread up to 24 hours before assembly. To maintain quality, keep moist ingredients, such as cucumbers, separate until just before serving to prevent sogginess. When ready to assemble, simply layer the prepped ingredients on the bread, season, and enjoy a gourmet sandwich in minutes!

Ultimate Veggie Sandwich Variations

Feel free to explore creative twists and substitutions to personalize your Ultimate Veggie Sandwich experience!

  • Dairy-Free: Swap out hummus and use your favorite vegan cream cheese for a rich, creamy base.

  • Gluten-Free: Use gluten-free bread or even large lettuce leaves to create a wrap, making it perfect for gluten-sensitive pals.

  • Extra Protein: Add chickpeas or roasted tofu slices to boost the protein content and make it more filling. This adds a lovely texture and heartiness to your sandwich.

  • Spicy Kick: Toss in sliced jalapeños or drizzle with sriracha for a bit of heat. This is perfect for fire lovers who enjoy a good kick in their meals.

  • Flavorful Pesto: For a zesty touch, blend in some sun-dried tomatoes with your pesto. This adds a beautiful umami flavor that makes each bite a little more exciting.

  • Crunchy Textures: Replace sliced cucumbers with crispy apple chips for a sweet crunch that contrasts beautifully with the savory elements.

  • Seasonal Swaps: In summer, use thinly sliced zucchini in place of cucumbers for a fresh, seasonal twist. This keeps your recipe in tune with the seasons.

  • Satisfying Sides: Pair your sandwich with a side of Spicy Miso Tuna or add a simple salad to enhance your meal's nutritional value.

Experimentation is part of the fun, and remember, it’s your sandwich—make it your own!

Storage Tips for Ultimate Veggie Sandwich

Fridge: Store any leftover sandwich in an airtight container in the fridge for up to 3 days. To maintain freshness, separate moist ingredients like cucumbers until ready to eat.

Freezer: If you want to freeze your Ultimate Veggie Sandwich, wrap it tightly in plastic wrap and aluminum foil, ensuring no air gets in. It can last up to 1 month, but fresh ingredients are best enjoyed immediately.

Reheating: When ready to enjoy, thaw in the fridge overnight and reassemble fresh toppings before serving. If already sliced, you can reheat the sandwich in a skillet for a couple of minutes or until warmed through.

Make-Ahead Meal: For busy days, prep ingredients like sliced veggies and toppings in individual containers. This way, assembling your Ultimate Veggie Sandwich becomes quick and easy, perfect for a nutritious lunch on the go!

Ultimate Veggie Sandwich Recipe FAQs

How do I choose the best vegetables for my Ultimate Veggie Sandwich?
Absolutely! The best veggies are those that are fresh and vibrant. Look for bright colors and firm textures; avoid any that show signs of wilting or have dark spots all over. Seasonal vegetables are always a fantastic choice as they offer peak flavor and freshness. Don't hesitate to experiment based on what looks good in your market!

How should I store leftover Ultimate Veggie Sandwich?
To keep your sandwich fresh, wrap it tightly in plastic wrap or store it in an airtight container. It can stay in the fridge for up to 3 days. For best results, consider storing moist ingredients separately, like cucumbers or tomatoes, to prevent sogginess until you're ready to enjoy it again.

Can I freeze the Ultimate Veggie Sandwich?
Yes, you can freeze your Ultimate Veggie Sandwich! Here’s how: wrap it tightly in plastic wrap and then in aluminum foil to keep out air. It can last for up to 1 month in the freezer. When you're ready to eat, thaw it in the fridge overnight and reassemble fresh toppings for the best texture and flavor.

What if my sandwich ingredients are too soggy?
Very! If you find that your ingredients are too moist, try using a moisture barrier, like lettuce, at the bottom of the sandwich. Additionally, store moist ingredients separately until you’re ready to eat. If things get too soggy, you can always pat the vegetables dry with a paper towel before layering. Trust me, it keeps the sandwich from becoming a mushy mess!

Can my pets eat any of the ingredients in the Ultimate Veggie Sandwich?
While many components are safe, it’s important to know that some, like onions and avocado, can be harmful to pets. Stick to veggies like carrots, cucumbers, and bell peppers, which are safe for your furry friends. Always consult with your vet if you’re unsure about what may be harmful to your pets.

How can I ensure my Ultimate Veggie Sandwich is nutritious?
To maximize nutrition, focus on incorporating a variety of colorful vegetables while being mindful of portions. Adding protein sources like chickpeas or tofu can boost its health benefits, along with healthy fats from avocado or hummus. This way, each sandwich won’t just taste great—it’ll fuel your body beautifully!

Ultimate Veggie Sandwich

Ultimate Veggie Sandwich: Your Customizable Lunch Delight

The Ultimate Veggie Sandwich is a customizable lunch delight packed with fresh ingredients and vibrant flavors, perfect for any meal and ready in just 15 minutes.
Print Recipe Pin Recipe
Prep Time 15 minutes mins
Total Time 15 minutes mins
Servings: 1 sandwiches
Course: Snacks
Cuisine: American
Calories: 450
Ingredients Equipment Method Nutrition Notes

Ingredients
  

For the Bread
  • 2 slices Whole Grain Bread Use gluten-free bread if needed.
For the Spread
  • 2 tablespoons Hummus Or guacamole for a twist.
  • 1 tablespoon Pesto Store-bought or homemade.
For the Crunch
  • 1/2 cup Carrots (shredded) Radishes can be a spicier alternative.
  • 1 small Red Onion (thinly sliced) Swap with green onions for a milder taste.
  • 1 small Red Bell Pepper (thinly sliced) Cucumbers can add a refreshing aspect.
  • 1/2 cup Cucumber or Pickles Dill pickles for a tangy touch.
  • 1/4 cup Sprouts or Microgreens Any leafy greens like arugula work well.
  • 2 leaves Romaine Lettuce Kale is a great leafy substitute.
For the Sweetness
  • 1 small Apple (thinly sliced) Or pears for a different flavor profile.
  • 1/2 medium Avocado (sliced) More hummus may be used instead.
For the Crunchy Topping
  • 2 tablespoons Pepitas, Sunflower Seeds, or Roasted Chickpeas Any nuts or seeds will do.
Seasoning
  • to taste Salt
  • to taste Pepper

Equipment

  • Butter knife
  • Cutting Board

Method
 

Step-by-Step Instructions
  1. Start by laying out two slices of whole grain bread on a clean cutting board. Spread a layer of hummus on one side of each slice, reaching the edges. Add pesto on top if desired.
  2. Place a couple of romaine lettuce leaves on one slice of bread, covering the hummus. Overlap the leaves slightly for better coverage.
  3. Add sliced avocado and shredded carrots on top of the lettuce. Press down gently. Follow with thinly sliced red onion and red bell pepper.
  4. Layer on cucumber slices or dill pickles. Sprinkle with sprouts or microgreens.
  5. Arrange thin apple slices over the top or swap for pears. Adjust seasoning as desired.
  6. Place the second slice of bread on top, hummus side down. Wrap in parchment paper if on the go and serve immediately.

Nutrition

Serving: 1sandwichCalories: 450kcalCarbohydrates: 50gProtein: 12gFat: 20gSaturated Fat: 3gPolyunsaturated Fat: 5gMonounsaturated Fat: 10gSodium: 500mgPotassium: 800mgFiber: 10gSugar: 5gVitamin A: 100IUVitamin C: 30mgCalcium: 50mgIron: 2mg

Notes

Layer crispy lettuce to prevent sogginess. Prepare ingredients ahead to save time. Experiment with seasonal veggies for variety and flavor.

Tried this recipe?

Let us know how it was!

Fresh Watermelon Popsicles: Blissful Summer in Every Bite

August 13, 2025 by Grace Snow Leave a Comment

As summer heat swathes the sun-drenched afternoon, there's nothing quite like the cool burst of flavor from a refreshing watermelon popsicle. With just two simple ingredients—juicy watermelon and tangy lime juice—this recipe is not only a super easy way to beat the heat but also a health-conscious choice, perfect for anyone looking to ditch the sugary store-bought treats. These vegan and gluten-free popsicles are a delightful snack that can be whipped up in a flash, ensuring you spend less time in the kitchen and more time basking in the sunshine. So, are you ready to make these icy delights that will leave you craving more? Let’s dive in!

Why are Watermelon Popsicles a Must-Try?

Simplicity at its Best: This recipe requires just two ingredients, making it a hassle-free option for those busy afternoons.

Vibrant, Refreshing Flavor: The sweet watermelon paired with zesty lime juice creates a flavor explosion that's perfect for summer.

Guilt-Free Indulgence: With no added sugars or artificial flavors, these popsicles are a healthy treat you can feel good about enjoying.

Endless Customization: Feel free to experiment with variations by adding mint or mixing in other fruits, making them fun for everyone.

Perfect for Gatherings: Serve these popsicles at summer parties or family BBQs to impress guests and keep them cool!

Watermelon Popsicle Ingredients

• • Line 1:

For the Popsicles

  • Watermelon – The star ingredient that gives these popsicles their natural sweetness and hydrating qualities; use ripe, seedless watermelon for the best flavor.
  • Fresh Lime Juice – This zesty ingredient balances the watermelon’s sweetness with a bright, fresh acidity; if you prefer a different taste, fresh lemon juice is a great substitute.

Feel the joy of making Watermelon Popsicles with these simple, healthy ingredients that bring summertime bliss to your home!

Step‑by‑Step Instructions for Watermelon Popsicles

Step 1: Prepare the Watermelon
Begin by cubing approximately 6 cups of ripe, seedless watermelon, ensuring there are no seeds left behind. Place the watermelon cubes into a high-powered blender. Blend on high speed for about 30 seconds until the mixture is completely smooth, with no visible chunks. This will create a delightful, juicy base for your Watermelon Popsicles.

Step 2: Add the Lime Juice
Once the watermelon is blended smoothly, add 2 tablespoons of fresh lime juice directly into the blender. Blend again for another 10 seconds, allowing the lime to integrate fully with the watermelon, creating a balanced flavor. The mixture should appear vibrant and uniform, ready to be poured into molds for your refreshing Watermelon Popsicles.

Step 3: Pour into Molds
Carefully pour the blended watermelon and lime mixture into your popsicle molds. Fill each mold, leaving about half an inch of space at the top to allow for expansion while freezing. This ensures your popsicles come out just right and will have a perfect shape once set. Ensure you have a steady hand to avoid any spills during this process!

Step 4: Insert Sticks and Freeze
If your molds require popsicle sticks, cover them with the lids first, and then insert the sticks into the center of each filled mold. Place the molds in the freezer, making sure they’re upright and stable. Freeze for at least 4 hours or overnight until the popsicles are completely solid and ready to serve, providing that satisfying icy texture.

Step 5: Release and Serve
Once frozen, remove the popsicles from the molds by briefly running warm water over the outside of the molds. This will help loosen any stubborn popsicles. Gently pull on the sticks to release the Watermelon Popsicles. Serve them immediately for a delightful summer treat that’s as refreshing as it is healthy—perfect for those hot days!

How to Store and Freeze Watermelon Popsicles

Fridge: If you plan to enjoy your watermelon popsicles within the next couple of days, store them in the refrigerator, but they are best kept in the freezer to maintain texture.

Freezer: For longer storage, place leftover popsicles in an airtight container or wrap them tightly in plastic wrap. They can be stored in the freezer for up to 2 weeks without losing flavor or texture.

Reheating: Watermelon popsicles are best served frozen. If they become too solid, let them sit at room temperature for a few minutes before enjoying for the perfect bite!

Presentation: For serving at gatherings, prepare a platter and thaw a few popsicles slightly beforehand for easier handling and a premium look that will impress your guests.

Watermelon Popsicles Variations & Substitutions

Feel free to unleash your creativity and switch things up in this recipe for a unique twist that tantalizes your taste buds!

  • Minty Fresh: Add a handful of fresh mint leaves to the blender for a refreshing herbal flavor. The combination of mint and watermelon is a match made in summer heaven!

  • Berry Blast: Blend in a cup of strawberries or raspberries for a fruity explosion. The added berries will not only deepen the flavor but also provide a vibrant pink hue.

  • Coconut Creamy: Swap out some of the watermelon for coconut water or add coconut milk for a creamy, tropical twist. This will create a rich texture that feels like a beach getaway in every bite!

  • Cucumber Cooler: Toss in a few slices of cucumber for a hydrating and refreshing addition. This brings a surprisingly delightful crunch that complements the sweetness of watermelon.

  • Spicy Kick: If you love a little heat, add a pinch of cayenne pepper or some finely chopped jalapeño to the mixture. This adds a surprising depth and warmth to your frozen treat.

  • Sweeten Up: For those with a sweet tooth, incorporate a splash of agave syrup or honey. Just be cautious, as it will increase the calorie count but make for a deliciously sweet treat.

  • Citrus Burst: Instead of lime juice, experiment with freshly squeezed orange or grapefruit juice for a different citrus angle. Each fruit brings a unique twist that wonderfully complements the watermelon.

  • Creamy Variations: For a creamier popsicle, blend in some Greek yogurt or silken tofu. This addition not only enhances creaminess but also boosts the nutritional value.

Feel inspired? With these variations, you can personalize your Watermelon Popsicles to suit your taste, ensuring every bite is just as refreshing and satisfying! Enjoy experimenting and discovering your favorite combinations. If you're looking for more fun ideas, check out our Fruit-Infused Water and Vegan Smoothie Bowls to round out your summer treats!

What to Serve With Watermelon Popsicles

As the sun blazes and the heat swells, these vibrant treats are the perfect centerpiece for a blissful summer gathering.

  • Crispy Fruits Salad: A mix of seasonal fruits like berries and mango complements the popsicles with extra juiciness and texture. The contrast between the icy popsicle and fresh salad creates a refreshing bite.

  • Grilled Pineapple Slices: Sweet and smoky, grilled pineapple adds a warm element to your cooling popsicles, enhancing the tropical vibes at your summer bash.

  • Minty Lime Sparkler: This refreshing drink made with sparkling water and fresh mint pairs beautifully with the popsicles, providing a zesty, effervescent lift that delights the palate.

  • Savory Guacamole: The creamy, rich texture of guacamole contrasts nicely with the icy popsicles, while the tangy lime flavor connects the two for a delicious experience.

  • Chocolate-Covered Almonds: A handful of crunchy, chocolate-covered almonds offers a delightful sweet-n-salty contrast that perfectly complements the fruity sweetness of watermelon.

  • Fresh Herb Salad: A light salad of arugula, mint, and cilantro enhances flavor profiles with fresh herbaceous notes, creating balance and freshness alongside the cool popsicles.

  • Coconut Water: This hydrating drink not only refreshes but also shares a hint of tropical sweetness that pairs wonderfully with the watermelon popsicles, making for a satisfying end to any summer meal.

  • Creamy Yogurt Dip: Serve a yogurt dip flavored with lime zest for a refreshing contrast alongside the popsicles. It beautifully enhances the overall summer experience with its cool creaminess.

  • Ice Cream Sandwiches: For those who want a touch of extra indulgence, the combination of a fruit popsicle and crispy cookies creates a delightful summer treat that’s sure to impress.

Make Ahead Options

These Watermelon Popsicles are perfect for meal prep enthusiasts! You can blend the watermelon and lime juice mixture up to 24 hours in advance and store it in an airtight container in the refrigerator. This not only saves time but also allows the flavors to meld beautifully. To maintain quality, give the mixture a quick stir before pouring it into the molds to prevent any separation. When ready to serve, simply pour the prepared mixture into popsicle molds, insert sticks, and freeze for at least 4 hours or overnight until solid. Enjoy these refreshing treats with minimal effort on those busy summer days!

Expert Tips for Watermelon Popsicles

  • Blend Smoothly: Ensure the watermelon is blended until completely smooth to avoid a gritty texture in your Watermelon Popsicles.

  • Avoid Separation: If your mixture starts to separate, give it a quick remix before pouring into molds to maintain even consistency.

  • Choose Ripe Melon: Use ripe, seedless watermelon for the best natural sweetness and hydration. If using other melons, ensure they are also sweet and ripe.

  • Experiment with Flavors: Feel free to add fresh mint or other fruits to create unique flavors, but remember to keep the ingredient list simple for the healthiest option.

  • Storage Matters: Store leftovers in an airtight container to prevent freezer burn and maintain freshness for up to two weeks.

Watermelon Popsicles Recipe FAQs

What kind of watermelon should I use for popsicles?
I recommend using ripe, seedless watermelon for the best results. Look for melons that feel heavy for their size with a uniform, vibrant skin. Avoid watermelons with dark spots all over, as this may indicate overripeness. If you'd like to switch things up, other melons, such as honeydew or cantaloupe, can provide a delightful twist.

How do I store leftover watermelon popsicles?
To store your delicious Watermelon Popsicles, place them in an airtight container in the freezer. They can maintain their delightful flavor and texture for up to 2 weeks. This prevents freezer burn and keeps them ready for when you need a cool treat!

Can I freeze watermelon popsicles for longer than 2 weeks?
While the popsicles are best consumed within 2 weeks for optimal flavor and texture, you can freeze them for up to 3 months. Just ensure they are well-wrapped in plastic wrap or stored in a freezer-safe airtight container to maintain their quality. When ready to enjoy, thaw them in the refrigerator overnight for best results.

What should I do if my watermelon popsicle mixture separates?
If you notice separation in your watermelon popsicle mixture, don’t worry! Simply give it a quick remix in the blender before pouring it into the molds. Make sure the mixture is thoroughly blended to avoid any gritty texture. This will help keep everything evenly combined and smooth.

Are watermelon popsicles suitable for my child with allergies?
Absolutely! These Watermelon Popsicles are vegan and gluten-free, making them a great choice for kids with dietary restrictions. However, if your child has specific fruit allergies, be cautious with any additional fruits you choose to mix in. Always check labels if you include sweeteners, such as honey, to ensure there are no allergens present.

How can I enhance the flavor of my watermelon popsicles?
To really elevate the flavor, consider adding a handful of fresh mint during blending for a refreshing twist. Alternatively, mix in other fruits like strawberries or cucumbers for unique combinations. Just remember to keep it simple for a truly healthy treat! Enjoy the creative process!

Watermelon Popsicles

Fresh Watermelon Popsicles: Blissful Summer in Every Bite

Enjoy the refreshing taste of Watermelon Popsicles, a guilt-free summer treat made with just two simple ingredients.
Print Recipe Pin Recipe
Prep Time 10 minutes mins
Cook Time 4 hours hrs
Total Time 4 hours hrs 10 minutes mins
Servings: 6 popsicles
Course: Snacks
Cuisine: Vegan
Calories: 50
Ingredients Equipment Method Nutrition Notes

Ingredients
  

For the Popsicles
  • 6 cups ripe, seedless watermelon cubed
  • 2 tablespoons fresh lime juice or fresh lemon juice as substitute

Equipment

  • High-powered blender
  • Popsicle molds

Method
 

Step-by-Step Instructions
  1. Begin by cubing approximately 6 cups of ripe, seedless watermelon, ensuring there are no seeds left behind. Place the watermelon cubes into a high-powered blender. Blend on high speed for about 30 seconds until completely smooth.
  2. Once the watermelon is blended smoothly, add 2 tablespoons of fresh lime juice directly into the blender. Blend again for another 10 seconds to integrate the lime with the watermelon, creating a balanced flavor.
  3. Carefully pour the blended watermelon and lime mixture into your popsicle molds, leaving about half an inch of space at the top.
  4. If your molds require sticks, cover them with the lids first, then insert the sticks into the filled molds. Freeze for at least 4 hours or overnight.
  5. Once frozen, remove the popsicles from the molds by running warm water over the outside, then gently pull on the sticks to release. Serve immediately.

Nutrition

Serving: 1popsicleCalories: 50kcalCarbohydrates: 13gProtein: 1gSodium: 1mgPotassium: 150mgSugar: 10gVitamin A: 10IUVitamin C: 15mgIron: 1mg

Notes

Store leftovers in an airtight container to maintain freshness for up to two weeks. Serve slightly thawed for easier handling at gatherings.

Tried this recipe?

Let us know how it was!

Hello world!

August 1, 2025 by admin 1 Comment

Welcome to WordPress. This is your first post. Edit or delete it, then start writing!

frzfzrrzberb

  • « Previous Page
  • 1
  • …
  • 10
  • 11
  • 12

Welcome!

Hi, I’m Grace, a Sydney-based home cook with a passion for bold flavors and trending ingredients. Whether you’re a busy beginner or a seasoned foodie, you’ll find dishes here that are fresh, fun, and full of flavor.

More about me

Popular Recipes

  • Mushroom Crostini
    Deliciously Easy Mushroom Crostini for Your Next Gathering
  • Mini Phyllo Feta Bites
    Mini Phyllo Feta Bites for Effortless Entertaining
  • Onion Boil
    Savory Onion Boil Recipe: A Flavorful Vegan Delight
  • Sweet Potato Fondant with Smoked Almond Cream & Rosemary Oil
    Savory Sweet Potato Fondant with Smoked Almond Cream Delight

Footer

↑ back to top

About

  • Privacy Policy
  • Disclaimer
  • Terms & Conditions

Newsletter

  • Sign Up! for emails and updates

Contact

  • About me
  • Contact me

Copyright © 2025 TastyTrendIngredients