tastytrendingredients

  • Home
  • Recipes
    • Appetizers
    • Breakfast
    • Dessert
    • Dinner
    • Drinks
    • Salads
    • Snacks
    • Soups
  • About me
  • Contact me
menu icon
go to homepage
  • Home
  • Recipes
    • Appetizers
    • Breakfast
    • Dessert
    • Dinner
    • Drinks
    • Salads
    • Snacks
    • Soups
  • About me
  • Contact me
search icon
Homepage link
  • Home
  • Recipes
    • Appetizers
    • Breakfast
    • Dessert
    • Dinner
    • Drinks
    • Salads
    • Snacks
    • Soups
  • About me
  • Contact me
×

Mouthwatering Vegetarian Lasagna Bursting with Flavor

September 6, 2025 by Grace Snow Leave a Comment

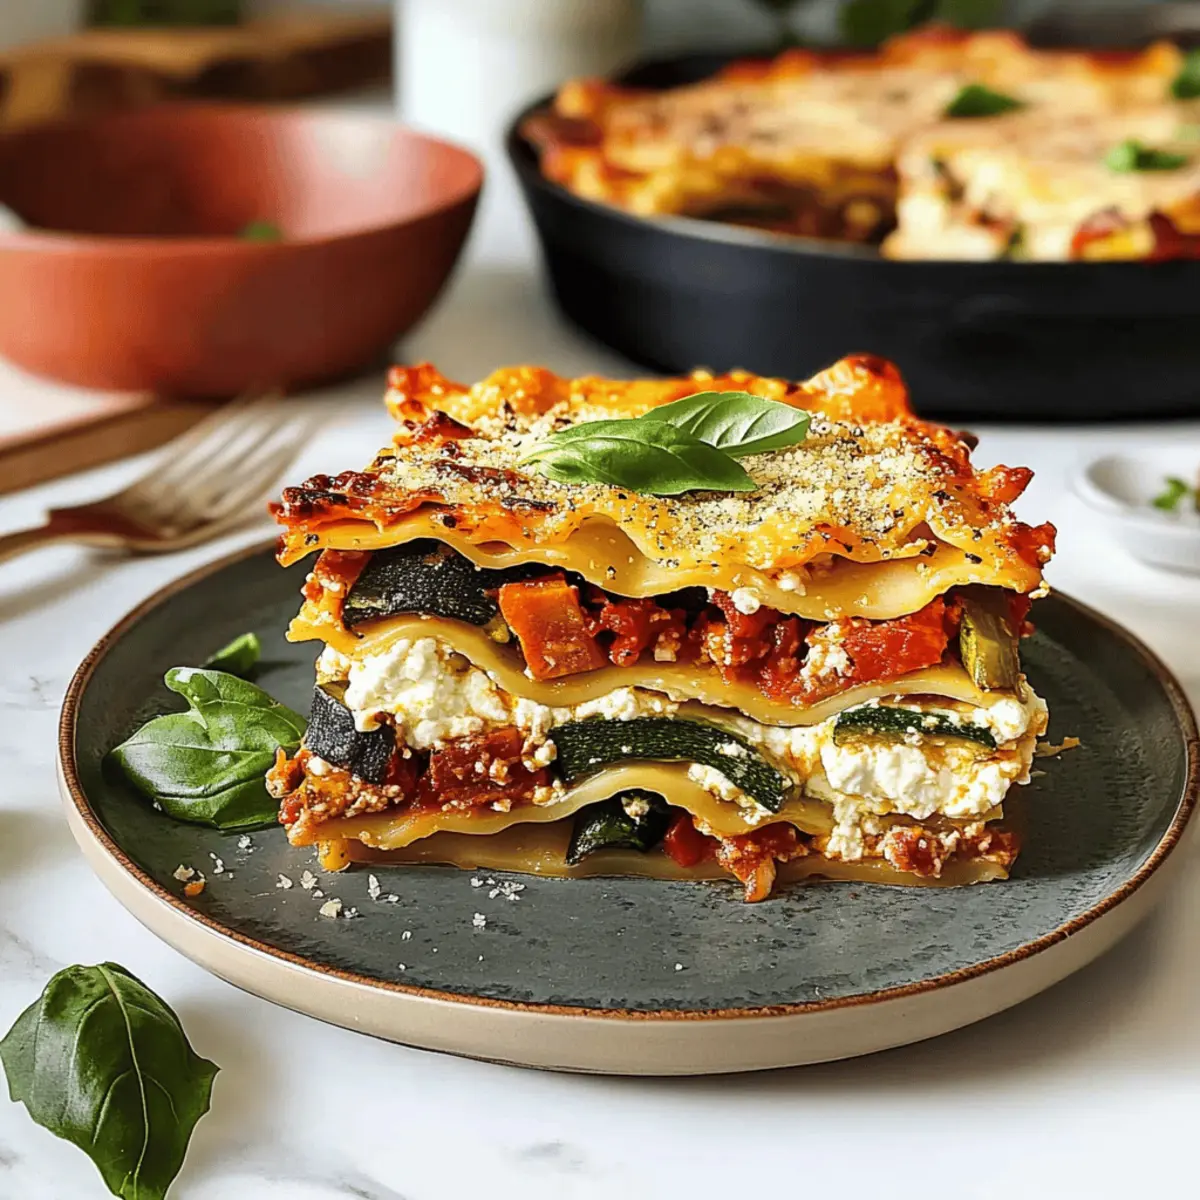
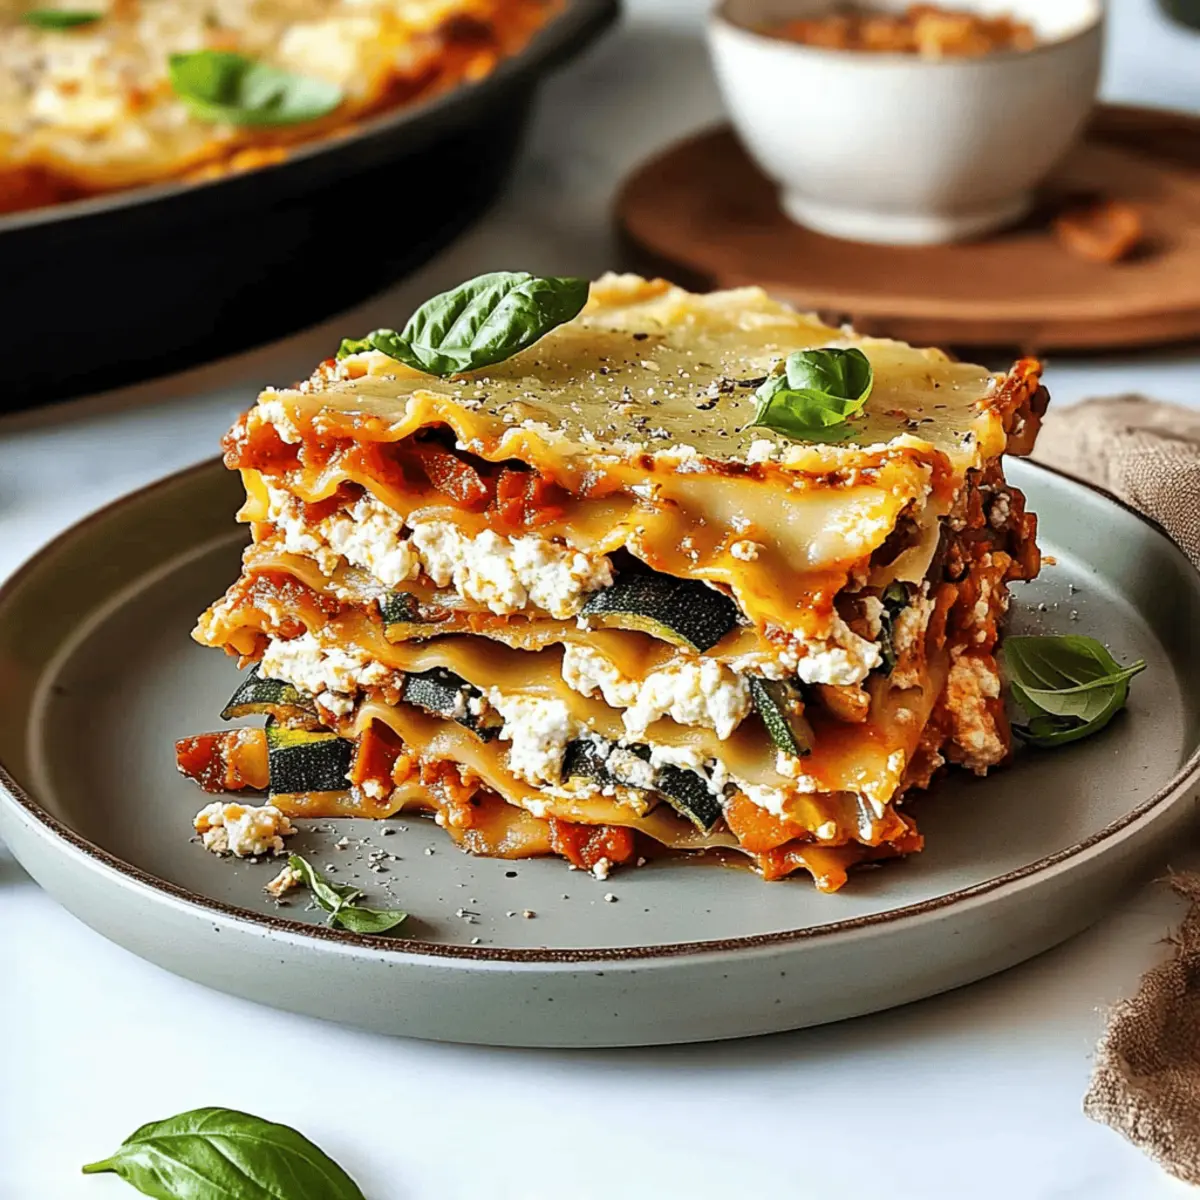
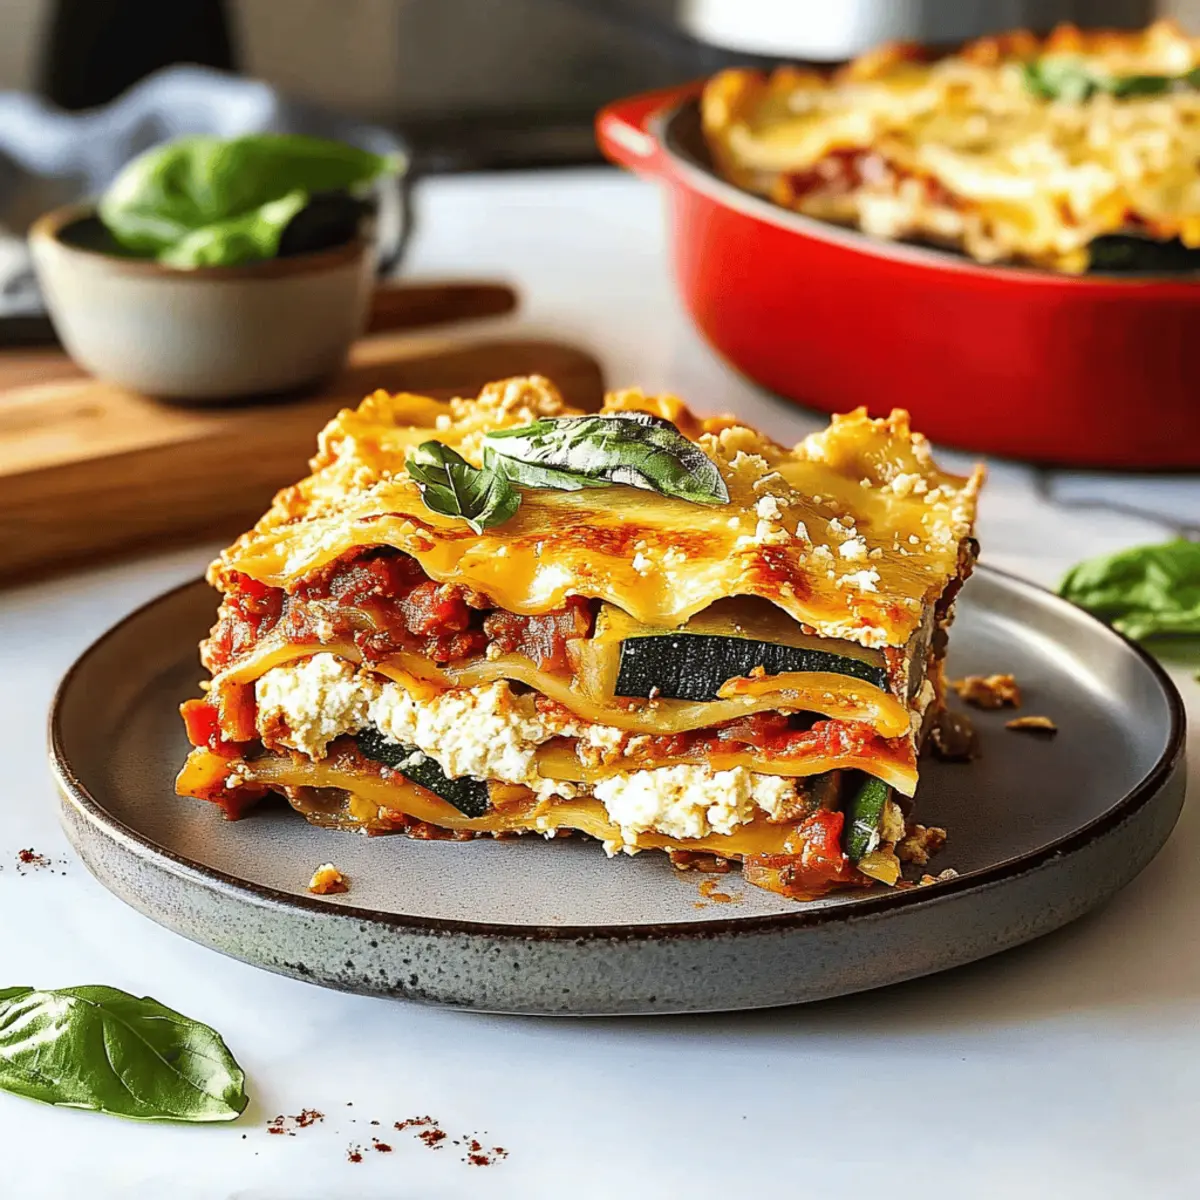
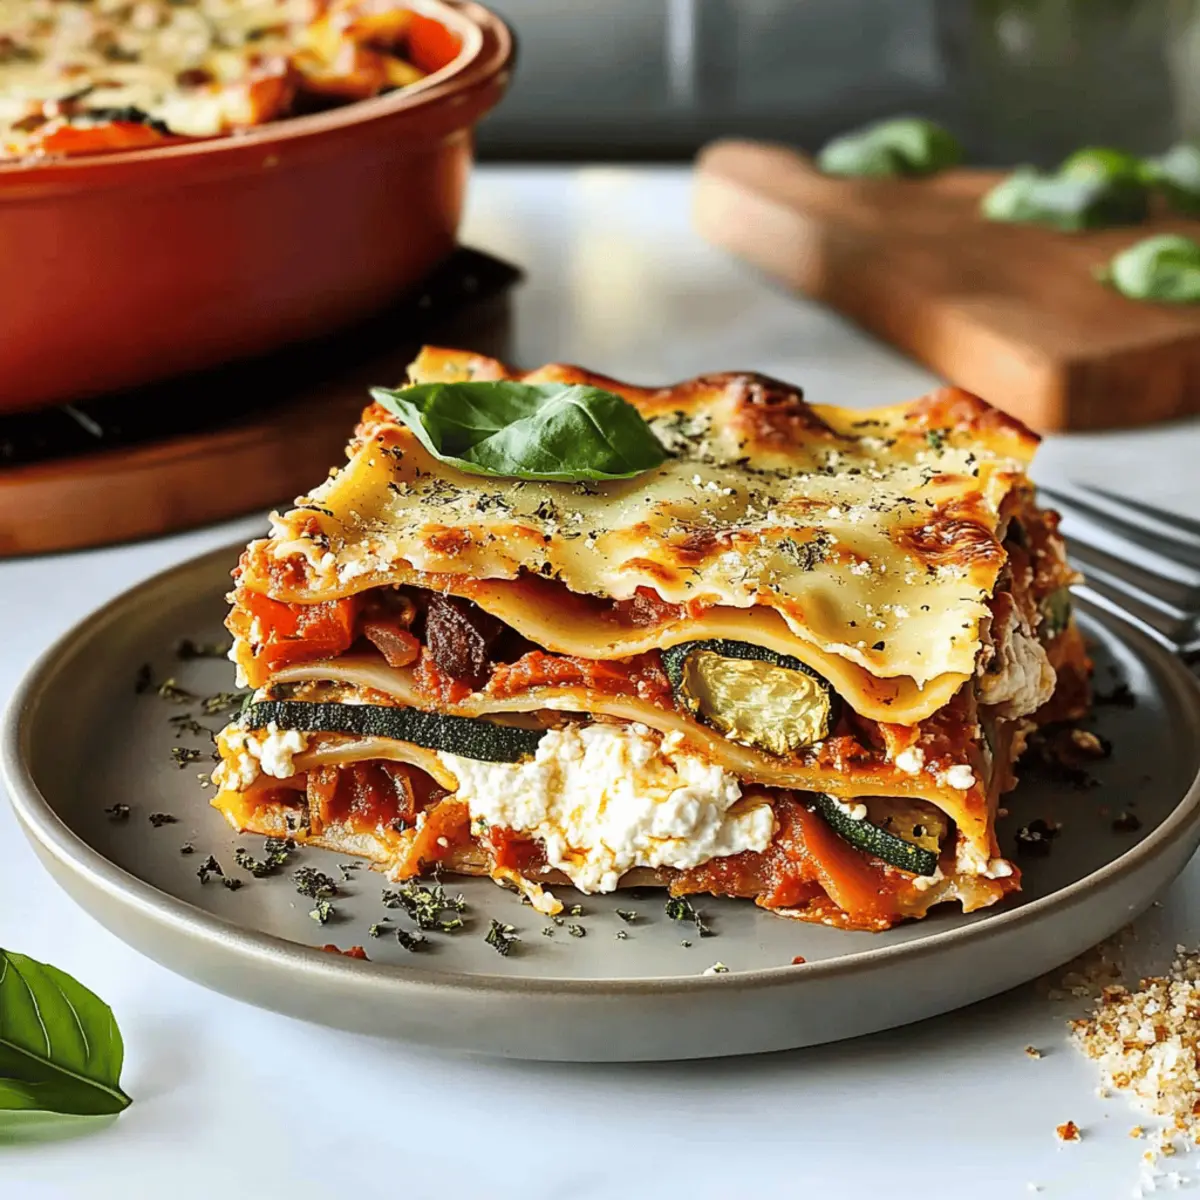
A whiff of bubbling cheese and roasted vegetables hits me as I pull my vegetarian lasagna from the oven, instantly warming my heart and home. This recipe for Savory Vegetarian Lasagna Loaded with Roasted Veggies and Creamy Ricotta is the ultimate comfort food alternative that keeps me excited about cooking, even in the busiest weeks. With its rich layers of roasted veggies and smooth ricotta, this dish delivers a satisfying meal that everyone will rave about, proving that homemade can effortlessly outshine takeout. Plus, there’s a vegan version to accommodate all palates and a gluten-free option for those avoiding traditional noodles. It’s hard to resist diving into this cozy, vibrant recipe that promises delicious leftovers too! What do you say—are you ready to transform your dinner plans?

Why is this lasagna a must-try?

Comforting, this vegetarian lasagna wraps you in warm layers of flavor that rival any takeout dish. Quick and easy, it only requires basic cooking skills and simple ingredients, perfect for weeknight meals. Customizable, whether you're vegan or gluten-sensitive, you can easily adapt this recipe to suit your dietary needs. Crowd-pleasing, it's guaranteed to impress family and friends at gatherings; everyone will be coming back for seconds! Plus, you'll savor the fantastic leftovers, making it a meal that keeps on giving. Dive into this delicious, guilt-free comfort food recipe and enjoy a taste of home!

Vegetarian Lasagna Ingredients

• This savory vegetarian lasagna will elevate your dinner game!

For the Roasted Vegetables

  • Extra-virgin olive oil – Provides moisture and richness when roasting; substitute with any neutral oil if needed.
  • 8 ounces cremini mushrooms – Adds earthy flavor; can use button mushrooms as a substitute.
  • 1 red bell pepper – Provides sweetness and vibrant color; any color bell pepper works.
  • 1 medium zucchini – Gives moisture and mild flavor; yellow squash makes a great alternative.
  • ½ medium yellow onion – Enhances base flavor with sweetness; can replace with shallots or green onions.
  • Sea salt and freshly ground black pepper – Essential for seasoning; adjust per taste.

For the Lasagna

  • 15 lasagna noodles – Forms the structure of the dish; regular noodles are recommended, or opt for gluten-free noodles as necessary.
  • 3 cups marinara sauce – Adds moisture and robust flavor; homemade or store-bought is fine; can substitute with other sauces for variety.
  • 3 cups fresh spinach – Contributes nutrients and color; kale or Swiss chard can work as substitutes.

For the Cheese Filling

  • 2 cups grated low-moisture, part-skim mozzarella cheese – Provides creaminess and melty texture; substitute with fresh mozzarella or dairy-free cheese for a vegan option.
  • ½ cup grated pecorino cheese – Adds sharpness and depth of flavor; Parmesan cheese can be used instead.
  • Fresh basil leaves or chopped fresh parsley – For garnish, enhancing both appearance and flavor.

Gather these ingredients for a delicious vegetarian lasagna that will impress everyone around the table!

Step‑by‑Step Instructions for Vegetarian Lasagna

Step 1: Preheat the Oven
Begin by preheating your oven to 425°F (220°C). As it warms up, take out a 9x13 inch baking dish and coat it lightly with extra-virgin olive oil, ensuring the bottom is well-greased. This will help prevent the lasagna from sticking and make cleanup easier later on.

Step 2: Roast the Vegetables
In a mixing bowl, combine the cremini mushrooms, red bell pepper, zucchini, and yellow onion with a generous drizzle of olive oil, sea salt, and freshly ground black pepper. Toss until the vegetables are thoroughly coated. Spread them out evenly on a baking sheet and roast in the preheated oven for 20-25 minutes, or until they're tender and slightly caramelized, adding depth to your delicious vegetarian lasagna.

Step 3: Cook the Noodles
While the vegetables are roasting, bring a large pot of salted water to a boil. Carefully add the lasagna noodles and cook until al dente, usually about 8-10 minutes depending on the brand. Once cooked, drain the noodles in a colander and drizzle a little olive oil over them to prevent sticking. Set aside while you prepare the ricotta filling.

Step 4: Prepare the Ricotta Filling
In a medium mixing bowl, combine the ricotta cheese with grated garlic, lemon zest, a pinch of salt, and freshly ground black pepper. Stir until the mixture is smooth and well blended. This creamy filling will add a luscious layer to your vegetarian lasagna, balancing the roasted vegetables beautifully.

Step 5: Assemble the Lasagna
Spread a thin layer of marinara sauce across the bottom of the greased baking dish. Start layering with lasagna noodles, followed by a portion of the ricotta mixture, a handful of fresh spinach, roasted vegetables, and more marinara sauce. Repeat the layering process until all ingredients are used, finishing with a final layer of noodles topped with remaining marinara and a generous sprinkle of mozzarella and pecorino cheeses.

Step 6: Bake the Lasagna
Cover the assembled vegetarian lasagna with aluminum foil and place it in the oven, reducing the temperature to 400°F (200°C). Bake for 30 minutes, then remove the foil to allow the cheese to brown and bubble for an additional 10-15 minutes. Once golden and fragrant, your lasagna is ready to be taken out and cooled briefly.

Step 7: Let It Rest
Before serving, let your mouthwatering vegetarian lasagna rest for at least 20 minutes. This allows the layers to set, making it easier to slice and serve. The enticing aroma will fill your kitchen, and patience will reward you with perfect slices to delight your family and friends.

Make Ahead Options

This savory vegetarian lasagna is an excellent candidate for meal prep, saving you time on busy weeknights! You can roast the vegetables and prepare the ricotta filling up to 24 hours in advance, storing them separately in the refrigerator to maintain freshness. Additionally, you can assemble the entire lasagna beforehand and keep it in the fridge for up to 3 days. To do this, layer your ingredients as per the recipe, cover with foil, and store until you’re ready to bake. Just remember to add a few extra minutes to the baking time if you're cooking it straight from the fridge. Your vegetarian lasagna will come out just as delicious, with perfectly layered flavors ready for your family to savor!

How to Store and Freeze Vegetarian Lasagna

  • Fridge: Store leftover vegetarian lasagna in an airtight container for up to 4 days. This will keep the flavors fresh and preserve the creamy texture.

  • Freezer: To freeze, assemble the lasagna in a baking dish, tightly cover it with foil, and store for up to 3 months. This makes for an easy meal prep solution!

  • Reheating: When ready to enjoy, thaw in the refrigerator overnight, then bake covered at 350°F for about 20 minutes or until heated through and bubbly.

  • Portioning: Consider portioning the lasagna into individual servings before freezing; that way, you can enjoy a quick, comforting meal anytime!

Expert Tips for Vegetarian Lasagna

  • Roast Evenly: Ensure all vegetables are cut to similar sizes for even roasting, enhancing flavors that are crucial in your vegetarian lasagna.

  • Noodle Choices: If using no-boil noodles, prepare ¾ of a box and cover with foil initially to retain moisture during baking.

  • Layering Technique: Start with a layer of marinara sauce at the bottom to prevent sticking and maintain moisture; this makes for a delicious, gooey finish.

  • Resting Time: Allow the lasagna to rest for 20 minutes before slicing. This helps it maintain its shape and makes serving easier.

  • Customizable Filling: Feel free to swap the ricotta with your favorite cheese, or try a vegan cheese option to accommodate different dietary needs and elevate flavor.

What to Serve with Savory Vegetarian Lasagna

Indulge your senses with delightful pairings that elevate your vegetarian lasagna night into an unforgettable dining experience.

  • Garlic Bread: The warm, buttery crunch of garlic bread complements the lasagna's rich layers, perfect for soaking up every bit of sauce.

  • Mixed Green Salad: A fresh salad with vibrant greens and a light vinaigrette adds a refreshing crunch that beautifully contrasts the hearty lasagna.

  • Crispy Garlic Roasted Potatoes: The crispy exterior and soft interior create a satisfying bite, bringing a rustic charm to your meal that pairs wonderfully with the lasagna.

  • Grilled Asparagus: Light and slightly charred, grilled asparagus provides a smoky flavor and vibrant color, making a delightful side that enhances your veggie feast.

  • Antipasto Platter: A colorful array of olives, cheeses, and roasted peppers adds complexity and texture, inviting everyone to nibble while the lasagna bakes.

  • Red Wine: A glass of bold red wine, like Chianti or Merlot, enhances the flavors of the lasagna, creating a cozy atmosphere that speaks to Italian tradition.

  • Zucchini Noodles: For extra veggies, serve spiralized zucchini on the side as a light, gluten-free option that perfectly mirrors the lasagna's flavors.

Add these elements to your table, and watch as the savory vegetarian lasagna becomes the star of a vibrant and fulfilling meal!

Vegetarian Lasagna Variations & Substitutions

Feel free to get creative with this vegetarian lasagna recipe—your taste buds will thank you for it!

  • Vegan Option: Replace ricotta with vegan ricotta and skip the cheese on top for a plant-based delight.
    You'll still enjoy a creamy texture while keeping it animal-product-free.

  • Gluten-Free: Use gluten-free lasagna noodles to cater to dietary needs without losing flavor.
    Just make sure to follow the package instructions for the best results.

  • Extra Veggies: Add layers of thinly sliced eggplant or roasted butternut squash for a flavor boost and more nutrients.
    Not only do these options enhance taste, but they'll also add delightful texture!

  • Herb-Infused: Mix fresh herbs like oregano, thyme, or rosemary into your marinara sauce for an aromatic twist.
    The extra fragrant elements elevate each bite to a whole new level of deliciousness.

  • Spicy Kick: Add crushed red pepper flakes to the marinara sauce to give your lasagna a spicy edge.
    Just a sprinkle can turn this comforting dish into a fiery treat that will warm your soul.

  • Cheesy Variations: Swap in a mix of mozzarella and provolone for a richer cheesy flavor that tantalizes your palate.
    The melting qualities of provolone take this classic to the next level of indulgence.

  • Nutty Flavor: For an added crunch, sprinkle some toasted pine nuts or walnuts between layers to introduce unexpected texture.
    They not only taste amazing but also add a depth of flavor that's simply irresistible.

  • Sauce Swap: Trade marinara for a creamy Alfredo sauce for a different, yet equally comforting, lasagna experience.
    This decadent twist transforms your lasagna into a truly luxurious meal!

So whether you choose to experiment with texture, flavor, or dietary needs, these simple substitutions will make your vegetarian lasagna uniquely yours. If you're eager to explore more delicious ideas, check out my recipe for creamy vegan ricotta cheese or enhance your marinara with some fresh herbs for a delightful kick!

Vegetarian Lasagna Recipe FAQs

What vegetables are best for roasting in this lasagna?
Absolutely! The best choices for roasting include cremini mushrooms, red bell peppers, zucchini, and yellow onions as used in this recipe. They add a fantastic depth of flavor and a pleasant texture. Feel free to experiment with seasonal vegetables like eggplant or asparagus for variation; just be sure they're chopped to a similar size for even roasting.

How should I store leftover vegetarian lasagna?
Once you've indulged in this mouthwatering vegetarian lasagna, store any leftovers in an airtight container in the refrigerator for up to 4 days. This helps maintain its delicious flavors and creamy texture—perfect for lunch the next day!

Can I freeze vegetarian lasagna?
Very! To freeze, prepare the lasagna in a suitable baking dish, cover tightly with aluminum foil, and place it in the freezer for up to 3 months. When you're ready to enjoy, simply defrost it overnight in the refrigerator. Before baking, cover it with foil and heat in a preheated oven at 350°F for 20-30 minutes until it’s bubbling and heated through.

What if my lasagna turns out runny?
No need to worry! If your lasagna ends up runny, it's often due to excess moisture from the roasted vegetables or the sauce. To troubleshoot, ensure you drain any excess liquid from the veggies after roasting and use a thicker marinara sauce. Another tip is to let the lasagna rest for 20 minutes after baking to give the layers a chance to set, leading to perfect slices.

Can I make this vegetarian lasagna gluten-free?
Absolutely! You can substitute the regular lasagna noodles with gluten-free lasagna noodles, which are readily available in most grocery stores. When using gluten-free noodles, you may need to adjust the cooking time according to the package instructions, but the rest of the recipe stays the same.

Is this vegetarian lasagna safe for pets or allergens?
It's generally safe for humans but not suitable for pets, especially those sensitive to dairy or certain vegetables. Always check for potential allergens in your ingredients, particularly the cheese, to ensure that they align with your dietary needs or those of your guests. For a vegan option, replace the cheese with plant-based alternatives to accommodate various dietary restrictions!

Vegetarian Lasagna

Mouthwatering Vegetarian Lasagna Bursting with Flavor

This Vegetarian Lasagna is a comforting dish filled with rich layers of roasted veggies and creamy ricotta, perfect for weeknight meals.
Print Recipe Pin Recipe
Prep Time 30 minutes mins
Cook Time 55 minutes mins
Resting Time 20 minutes mins
Total Time 1 hour hr 45 minutes mins
Servings: 8 slices
Course: Dinner
Cuisine: Vegetarian
Calories: 350
Ingredients Equipment Method Nutrition Notes

Ingredients
  

For the Roasted Vegetables
  • 2 tablespoons extra-virgin olive oil Provides moisture and richness when roasting; substitute with any neutral oil if needed.
  • 8 ounces cremini mushrooms Adds earthy flavor; can use button mushrooms as a substitute.
  • 1 red bell pepper Provides sweetness and vibrant color; any color bell pepper works.
  • 1 medium zucchini Gives moisture and mild flavor; yellow squash makes a great alternative.
  • ½ medium yellow onion Enhances base flavor with sweetness; can replace with shallots or green onions.
  • sea salt and freshly ground black pepper Essential for seasoning; adjust per taste.
For the Lasagna
  • 15 pieces lasagna noodles Forms the structure of the dish; regular noodles are recommended, or opt for gluten-free noodles as necessary.
  • 3 cups marinara sauce Adds moisture and robust flavor; homemade or store-bought is fine; can substitute with other sauces for variety.
  • 3 cups fresh spinach Contributes nutrients and color; kale or Swiss chard can work as substitutes.
For the Cheese Filling
  • 2 cups grated low-moisture, part-skim mozzarella cheese Provides creaminess and melty texture; substitute with fresh mozzarella or dairy-free cheese for a vegan option.
  • ½ cup grated pecorino cheese Adds sharpness and depth of flavor; Parmesan cheese can be used instead.
  • fresh basil leaves or chopped fresh parsley For garnish, enhancing both appearance and flavor.

Equipment

  • 9x13-inch baking dish
  • Mixing Bowl
  • Baking Sheet
  • Large pot

Method
 

Preparation Steps
  1. Preheat your oven to 425°F (220°C). Lightly coat a 9x13 inch baking dish with olive oil.
  2. In a mixing bowl, combine mushrooms, red bell pepper, zucchini, and yellow onion with olive oil, sea salt, and pepper. Toss to coat, then spread on a baking sheet and roast for 20-25 minutes.
  3. Bring a large pot of salted water to a boil. Cook lasagna noodles until al dente, approximately 8-10 minutes. Drain and drizzle with olive oil.
  4. In a bowl, mix ricotta cheese with grated garlic, lemon zest, salt, and pepper until smooth.
  5. Layer marinara sauce, noodles, ricotta mixture, spinach, roasted vegetables, and more marinara in the baking dish, repeating until all ingredients are used.
  6. Cover with foil and bake for 30 minutes at 400°F (200°C). Remove the foil and bake for an additional 10-15 minutes until golden.
  7. Let the lasagna rest for at least 20 minutes before slicing to allow layers to set.

Nutrition

Serving: 1sliceCalories: 350kcalCarbohydrates: 40gProtein: 15gFat: 15gSaturated Fat: 7gPolyunsaturated Fat: 2gMonounsaturated Fat: 5gCholesterol: 30mgSodium: 600mgPotassium: 400mgFiber: 4gSugar: 5gVitamin A: 25IUVitamin C: 30mgCalcium: 20mgIron: 10mg

Notes

This vegetarian lasagna is customizable; feel free to swap the ricotta with your favorite cheese or try a vegan cheese option.

Tried this recipe?

Let us know how it was!

Irresistible Spiced Nuts Recipe for Your Next Gathering

September 6, 2025 by Grace Snow Leave a Comment

As the aroma of spices wafts through my kitchen, I can’t help but feel a wave of excitement—today, I’m preparing Crunchy Spiced Nuts, the ultimate party snack that never fails to impress. With a delightful crunch and an irresistible balance of sweet, savory, and just the right amount of spice, these nuts are perfect for grazing tables or cozy nights in. One of the best parts? They’re incredibly easy to whip up, making them a go-to for last-minute entertaining. Plus, they store beautifully, so you can prepare a batch ahead of time and bring them out when friends come over. Fancy a twist? You can use any nut you love, creating a unique flavor profile every time. Ready to elevate your snacking experience? Let’s dive in!

Why You'll Love Spiced Nuts

Irresistible Flavor: Each handful bursts with a delicious mix of sweet, spicy, and savory notes, perfect for any palate.

Easy to Make: With minimal prep and just a short baking time, you can create a snack that looks and tastes gourmet.

Customizable: Use a variety of nuts or add unique spices, resembling my favorites like Matcha Baked Doughnuts for fun variations!

Perfect for Sharing: Spice these nuts up for your next gathering, or have them on hand as a beloved alternative to fast food—just like my Skillet Pasta with Sun-Dried Tomatoes, Walnuts, and Feta!

Great for Storage: They keep well in an airtight container, making them ready for impromptu parties or cozy nights in!

Spiced Nuts Ingredients

• Dive into creating these irresistible spiced nuts that your guests will crave!

For the Nuts

  • Nuts (Pecans, Walnuts, Peanuts, Almonds) – Choose any blend of nuts you adore; you can easily swap in cashews or hazelnuts for a different taste sensation!
  • Granulated Sugar – This magic ingredient brings sweetness and helps form that lovely crunchy coating.

For the Spices

  • Cinnamon – Adds a warm, cozy flavor that perfectly complements the sweetness of the sugar.
  • Chili Powder – Introduces a mild heat that elevates the overall flavor, giving a delightful kick without overwhelming.
  • Cayenne Pepper – This optional spicy addition allows you to customize the heat level; use more for an extra zing in your spiced nuts!

For Binding

  • Egg White – This is the secret ingredient that helps the spices and sugar stick beautifully to the nuts, creating a glossy finish you’ll love.

Step‑by‑Step Instructions for Crunchy Spiced Nuts

Step 1: Preheat the Oven
Start by preheating your oven to 325°F (163°C). This temperature is essential for achieving that perfect golden-brown color and crispy texture in your spiced nuts. Allow the oven some time to heat evenly while you prepare the nut mixture.

Step 2: Combine Ingredients
In a large bowl, combine your choice of nuts—such as pecans, walnuts, and almonds—with granulated sugar, egg white, cinnamon, chili powder, and cayenne pepper. Stir well until all nuts are thoroughly coated with the sticky mixture, ensuring every nut glistens with the spice blend.

Step 3: Prepare the Baking Sheet
Line a baking sheet with parchment paper for easy cleanup. Spread the nut mixture evenly in a single layer on the prepared baking sheet. This arrangement allows the nuts to bake evenly and achieve a delightful crunch without overcrowding.

Step 4: Bake the Nuts
Place the baking sheet in the preheated oven and bake your spiced nuts for about 30 minutes. Remember to stir the mixture halfway through to promote even cooking and avoid burning. You’ll know they’re done when they turn a lovely golden brown and your kitchen fills with a mouthwatering aroma.

Step 5: Cool Completely
Once baked, remove the spiced nuts from the oven and allow them to cool completely on the baking sheet. This cooling period is crucial for reaching that satisfying crunch. Trust me, the glossy finish will set beautifully as they cool.

Step 6: Store and Enjoy
After they've cooled, transfer the crunchy spiced nuts to an airtight container. They can be stored at room temperature for up to two weeks, making them a perfect snack ready for impromptu gatherings. These spiced nuts are sure to be a hit at your next party!

Make Ahead Options

These Crunchy Spiced Nuts are perfect for meal prep, saving you precious time during busy weeks or last-minute gatherings! You can prepare the nut mixture (nuts, sugar, spices, and egg white) up to 24 hours in advance. Simply combine all the ingredients in a bowl, cover it, and refrigerate until you're ready to bake. This prepped mixture not only saves time but keeps the flavors melded together beautifully. When you’re ready to serve, just spread the mixture on a baking sheet and bake as directed. Allow them to cool completely before storing in an airtight container, so they remain just as delicious and crunchy as the day you made them!

What to Serve with Crunchy Spiced Nuts

These delightful spiced nuts make any occasion more festive, perfectly complementing a variety of dishes that burst with flavor and excitement.

  • Cheese Board: A selection of cheeses like brie and aged cheddar contrast beautifully with the spiced nuts' sweetness, creating a balance of textures and flavors.
  • Fresh Fruit Platter: The bright, juicy notes of fruits like apples and grapes provide a refreshing offset to the rich, warm flavors of the nuts.
  • Charming Charcuterie: Pair with cured meats, olives, and artisanal crackers to elevate your snacking experience and entice your guests with diverse tastes.
  • Savory Salads: Add the crunchy spiced nuts atop mixed greens or quinoa salads. Their unique texture and flavor will surely enhance each bite.
  • Cocktails and Wines: Serve with a light, crisp white wine or a refreshing cocktail to complement the spice without overpowering the palate.
  • Mini Desserts: Delight in mini desserts like chocolate-covered strawberries or bite-sized pastries, which can harmonize well with the sweet notes in the nuts.
  • Homemade Dips: Enjoy alongside creamy dips such as hummus or tzatziki for a satisfying and flavorful grazing table for your guests.
  • Vegetable Platter: Crisp vegetables like bell peppers and cucumbers offer a nice crunch and refreshing contrast to the richness of the spiced nuts.

How to Store and Freeze Spiced Nuts

Room Temperature: Keep your spiced nuts in an airtight container at room temperature for up to 2 weeks to maintain their delightful crunch and flavor.

Fridge: If you prefer, you can store them in the fridge for an extra layer of freshness, but ensure they are sealed tightly to avoid moisture.

Freezer: For longer storage, freeze your spiced nuts in a freezer-safe bag or container for up to 3 months. Just remember to let them thaw at room temperature before enjoying!

Reheating: If you want to refresh your spiced nuts, simply spread them on a baking sheet and warm them in a preheated oven at 300°F (150°C) for about 10 minutes.

Expert Tips for Spiced Nuts

  • Watch the Bake: Keep a close eye on your nuts while baking; remove them from the oven as soon as they reach a golden brown to prevent burning.

  • Ensure Even Coating: Stir the nut mixture well before baking, ensuring each nut is evenly coated with sugar and spices for maximum flavor.

  • Cool Before Storing: Allow the spiced nuts to cool completely on the baking sheet. This step is key for maintaining their delightful crunch.

  • Experiment with Nuts: Don’t hesitate to try different nuts, like cashews or hazelnuts, for a unique spin on your spiced nuts recipe!

  • Storage Tips: Store your nuts in an airtight container at room temperature for up to two weeks, or freeze for extended freshness.

Spiced Nuts Variations & Substitutions

Feel free to let your creativity shine in the kitchen and customize these spiced nuts to your heart’s desire!

  • Nut Variety: Swap out pecans for cashews or hazelnuts for a completely new flavor experience.
  • Savory Herbs: Add chopped rosemary or thyme to give your nuts a delightful savory twist; it’s a flavor combination that’s simply exquisite!
  • Sweetener Swap: Use brown sugar or maple syrup instead of granulated sugar for a richer, deeper sweetness that complements the spices beautifully.
  • Add Some Zest: Incorporate citrus zest from oranges or lemons for a refreshing hint that brightens each bite.
  • Dried Fruits: Toss in some dried cranberries or raisins after baking for a chewy and fruity contrast to the crunchy nuts.
  • Spicy Kick: Amp up the heat by adding more cayenne pepper, or even a dash of your favorite hot sauce to the egg white mixture.
  • Nut-Free Option: For a nut-free snack, try this recipe with sunflower seeds or pumpkin seeds; the flavors will still shine brightly!
  • Asian Flair: Infuse some sesame oil or a sprinkle of five-spice powder for an Asian-inspired twist that will take your taste buds on an adventure.

These crunchy delights can be enjoyed alongside my delicious Eggnog Cookies or as a topping on salads like my vibrant Skillet Pasta with Sun-Dried Tomatoes, Walnuts, and Feta. Happy snacking!

Spiced Nuts Recipe FAQs

How do I choose the best nuts for my spiced nuts?
Absolutely! When selecting nuts, look for fresh, high-quality options. If possible, choose unsalted nuts for a better balance of flavors. Avoid those with dark spots or a rancid smell, as these can point to spoilage. I often mix pecans, walnuts, and almonds for a delightful texture and taste, but feel free to experiment with your favorites!

How should I store my spiced nuts for freshness?
To keep your spiced nuts fresh, store them in an airtight container at room temperature for up to 2 weeks. If you prefer an extra amount of freshness, you can refrigerate them, but ensure they’re tightly sealed to prevent moisture. I personally enjoy them straight out of the pantry, but the fridge is a good alternative!

Can I freeze my spiced nuts, and if so, how?
Yes, you can freeze your spiced nuts! For optimal results, place them in a freezer-safe bag or a tightly sealed container. They can be stored in the freezer for up to 3 months. When you're ready to enjoy them, simply let them thaw at room temperature. If you want to refresh their crunch, warm them in the oven at 300°F (150°C) for about 10 minutes.

What should I do if my spiced nuts don't get crispy?
Very! If you find your spiced nuts aren't as crispy as you'd like, a few adjustments can help. Ensure the nut mixture is spread out in a single layer on the baking sheet for efficient baking. If they come out soft, after cooling, you can try baking them again at a lower temperature for a bit longer. Watching them closely is key; they should be golden brown and fragrant!

Are there any dietary considerations for pets or allergies?
It’s essential to be cautious! While spiced nuts can be a delicious snack for people, many nuts are not safe for pets. For example, macadamia nuts are toxic to dogs. Additionally, for those with nut allergies, use seeds (like pumpkin or sunflower) or omit nuts altogether and enjoy the spices! Always consider your guests' dietary preferences, and perhaps label the nut blends clearly.

Can I adjust the spice levels in my recipe?
Absolutely! If you like a bit more heat, you can increase the cayenne pepper up to 1 teaspoon or add your favorite spices, like smoked paprika for a smoky flavor. On the other hand, if you're sensitive to heat, feel free to reduce or omit chili powder altogether. The more the merrier when customizing your spiced nuts!

Spiced Nuts

Irresistible Spiced Nuts Recipe for Your Next Gathering

A delightful mix of sweet, savory, and spicy notes, these Spiced Nuts are the perfect snack for any gathering.
Print Recipe Pin Recipe
Prep Time 10 minutes mins
Cook Time 30 minutes mins
Cooling Time 15 minutes mins
Total Time 55 minutes mins
Servings: 8 servings
Course: Snacks
Cuisine: American
Calories: 200
Ingredients Equipment Method Nutrition Notes

Ingredients
  

For the Nuts
  • 2 cups Nuts (Pecans, Walnuts, Peanuts, Almonds) Choose any blend of nuts you adore
  • 1/2 cup Granulated Sugar For sweetness and crunch
For the Spices
  • 1 teaspoon Cinnamon Adds warm flavor
  • 1/2 teaspoon Chili Powder For mild heat
  • 1/4 teaspoon Cayenne Pepper Optional for extra zing
For Binding
  • 1 large Egg White Helps spices and sugar stick to nuts

Equipment

  • Baking Sheet
  • Parchment Paper
  • large bowl

Method
 

Preparation Steps
  1. Preheat your oven to 325°F (163°C).
  2. In a large bowl, combine your choice of nuts with granulated sugar, egg white, cinnamon, chili powder, and cayenne pepper. Stir well to coat.
  3. Line a baking sheet with parchment paper. Spread the nut mixture evenly in a single layer.
  4. Bake for about 30 minutes, stirring halfway through.
  5. Allow to cool completely on the baking sheet.
  6. Transfer to an airtight container and enjoy!

Nutrition

Serving: 1cupCalories: 200kcalCarbohydrates: 10gProtein: 5gFat: 15gSaturated Fat: 1gPolyunsaturated Fat: 5gMonounsaturated Fat: 9gSodium: 50mgPotassium: 200mgFiber: 2gSugar: 4gCalcium: 5mgIron: 6mg

Notes

These spiced nuts can be stored at room temperature for up to 2 weeks. Feel free to experiment with different types of nuts and spices to create your favorite flavor profile.

Tried this recipe?

Let us know how it was!

Delicious Pumpkin Pie Bars Perfect for Fall Gatherings

September 6, 2025 by Grace Snow Leave a Comment

As the leaves begin to crunch beneath my feet and the air turns crisp, I can’t help but think of cozy gatherings filled with laughter and, of course, delicious desserts. Enter my Cozy Pumpkin Pie Bars! This delightful recipe transforms the classic flavors of pumpkin pie into a portable treat that everyone will love. With a buttery brown sugar crust and a silky pumpkin filling, they bring warmth to any fall gathering. Not only are these bars easy to bake, making them perfect for busy weekends, but they also deliver a satisfying balance of textures, especially when topped with a tangy sour cream whip. Trust me, there’s nothing like sharing them with friends and family when the chill sets in. So, are you ready to bring the taste of autumn to your kitchen?

Why are Pumpkin Pie Bars a must-try?

Irresistible Comfort: These Pumpkin Pie Bars offer the traditional warmth of pumpkin pie, reimagined into a delectable, easy-to-eat format perfect for sharing.

Quick and Simple: With straightforward steps, even novice bakers can whip up these treats with just a handful of ingredients.

Delightful Flavor: The combination of creamy pumpkin spice filling and buttery crust creates a rich, festive profile that resonates with the essence of fall.

Versatile Options: Feel free to customize by adding chocolate chips or swapping sour cream for a dollop of whipped cream for varied presentations. You can also enjoy them alongside a slice of Pumpkin Cinnamon Roll for a truly indulgent experience!

Perfect for Gatherings: Whether at family dinners or friend get-togethers, these bars are a hit, ensuring there's never a crumb left behind!

Pumpkin Pie Bars Ingredients

For the Crust

  • Butter – Provides richness and flavor for the crust; can be substituted with margarine or a dairy-free alternative.
  • Light Brown Sugar – Adds sweetness and a deep caramel flavor to the crust; can be replaced with dark brown sugar for a more intense flavor.
  • All-Purpose Flour – Forms the structure of the crust; whole wheat flour can be used for a nuttier taste.
  • Salt – Enhances flavor; optional to reduce for low-sodium diets.

For the Filling

  • Pumpkin Puree – The main ingredient for the filling that adds moisture and flavor; fresh pumpkin can be used as a substitute.
  • Eggs – Provide binding and help set the filling; flax eggs can be used as a vegan alternative.
  • Pumpkin Spice – Offers classic fall flavors; can be substituted with a mix of cinnamon and nutmeg.

For the Topping

  • Sour Cream (optional) – Adds creaminess and a slight tang; can be swapped with Greek yogurt for a lower-fat option.
  • Confectioners’ Sugar – Sweetens the sour cream whip; can be replaced with maple syrup for a lower-sugar option.

Step‑by‑Step Instructions for Pumpkin Pie Bars

Step 1: Preheat the Oven and Prepare the Pan
Begin by preheating your oven to 350°F (175°C), setting the stage for your delicious Pumpkin Pie Bars. While the oven warms, grab a 9" x 13" baking pan and lightly grease it with butter or non-stick spray. For extra ease, line the bottom and sides with parchment paper, allowing for easy removal of the bars once baked.

Step 2: Make the Crust Mixture
In a large mixing bowl, cream together ½ cup of softened butter and 1 cup of light brown sugar until the mixture is smooth and well combined—this should take about 2-3 minutes. Next, sprinkle in 1 ¾ cups of all-purpose flour and a pinch of salt, mixing until the dough appears crumbly yet holds together when pressed. This forms the base of your luscious Pumpkin Pie Bars.

Step 3: Press the Crust into the Pan
Transfer the crust mixture into the prepared baking pan, using your fingers or a spatula to evenly press it down into the bottom. Make sure to create a snug, compact layer for even baking. Once pressed, take a fork and poke holes throughout the crust—this will help it bake evenly and avoid puffing up.

Step 4: Bake the Crust
Place the pan in your preheated oven and bake the crust for 28-32 minutes, or until it turns golden brown and slightly firm to the touch. Keep an eye on it, as the aroma of Pumpkin Pie Bars fills your kitchen! Once baked, remove the pan and allow it to cool slightly while you prepare the filling.

Step 5: Prepare the Pumpkin Filling
In a separate mixing bowl, whisk together 1 cup of pumpkin puree, 2 large eggs, ¾ cup of granulated sugar, and 1 tablespoon of pumpkin spice until well blended and smooth. The filling should have a velvety texture, ensuring a delightful experience when layered over the crust of your Pumpkin Pie Bars.

Step 6: Pour the Filling Over the Crust
Carefully pour the prepared pumpkin filling over the slightly cooled crust, spreading it evenly with a spatula. This contrast of the rich filling on the golden crust is simply irresistible! Gently tap the pan on the counter to release any air bubbles trapped in the filling, ensuring a silky result.

Step 7: Bake the Bars
Return the pan to the oven and bake the Pumpkin Pie Bars for an additional 32-35 minutes. You’ll know they're done when the filling is set and has a slight jiggle in the center; it should also take on a beautiful golden hue. Watch closely to prevent overbaking, as the filling should remain creamy.

Step 8: Cool and Cut the Bars
Once baked, remove the pan from the oven and let it cool on a wire rack for at least 30 minutes, allowing the flavors to meld beautifully. Carefully lift the bars out using the parchment paper, and place them on a cutting board. Cut into squares or rectangles, and feel the excitement build for serving your delightful Pumpkin Pie Bars.

Step 9: Serve with a Topping
For an extra touch, whip up a sour cream topping by mixing 1 cup of sour cream with ¼ cup of confectioners’ sugar until smooth. Serve your Pumpkin Pie Bars with a dollop of this topping on each slice or sprinkle them with a dash of pumpkin spice for that festive flair. Enjoy the cozy flavors of fall with every bite!

Make Ahead Options

These Pumpkin Pie Bars are a fantastic option for meal prep! You can make them up to 24 hours in advance, which saves you time for busy weeknights or gatherings. To prep ahead, bake the crust and let it cool, then prepare the pumpkin filling and pour it over the crust—wrap the pan tightly with plastic wrap and refrigerate until you’re ready to bake. When you're ready to serve, simply bake the bars as directed. For optimal flavor and texture, cool the bars completely before slicing; they’ll be just as delicious, providing you with a delightful treat effortlessly!

How to Store and Freeze Pumpkin Pie Bars

Fridge: Store leftover Pumpkin Pie Bars covered in plastic wrap or in an airtight container for up to 5 days to keep them fresh and moist.

Freezer: For longer storage, wrap individual bars tightly in plastic wrap and place them in a freezer-safe bag. They can be frozen for up to 3 months; just thaw overnight in the fridge before enjoying.

Reheating: Warm bars in the microwave for about 10-15 seconds or in a preheated oven at 350°F (175°C) for 5-10 minutes to revive their buttery texture and flavor.

Serving Suggestions: Incorporate a dash of pumpkin spice while serving; this enhances the cozy autumn flavor, making every bite even more delightful!

What to Serve with Pumpkin Pie Bars

As autumn's cozy embrace invites gatherings around the table, these delicious bars deserve the perfect companions to match their warm, flavorful essence.

  • Vanilla Ice Cream: A scoop melts perfectly atop the warm bars, providing a delightful contrast of temperature and rich creaminess to each bite.

  • Spiced Apple Cider: This warm, cinnamon-infused drink enhances the fall flavor profile, making it a comforting match for family and friends.

  • Whipped Cream: A dollop on top adds airiness and sweetness, complementing the dense pumpkin filling while enhancing the nostalgic vibe of classic desserts.

  • Chai Tea: With its spiced warmth, chai tea complements the pumpkin spice flavors beautifully and creates a relaxing atmosphere for autumn gatherings.

  • Ginger Snap Cookies: These crunchy treats bring a delightful spiciness and texture that harmonizes with the soft, creamy texture of the Pumpkin Pie Bars.

  • Fresh Fruit Salad: A refreshing mix of seasonal fruits, like pears and apples, adds a juicy brightness, balancing the richness of the bars.

Pumpkin Pie Bars Variations & Substitutions

Customize your Pumpkin Pie Bars to suit your taste and dietary needs—let your creativity flow with these delightful twists!

  • Dairy-Free: Use coconut oil instead of butter and almond milk yogurt in place of sour cream for a creamy texture without dairy.

  • Gluten-Free: Swap all-purpose flour with a gluten-free blend to cater to those with gluten sensitivities while maintaining that satisfying crust.

  • Vegan: Replace eggs with a flax egg (1 tablespoon flaxseed meal mixed with 2.5 tablespoons water) and use a dairy-free alternative for other ingredients.

  • Spice it Up: Try adding a dash of cayenne or black pepper to the pumpkin filling for those who enjoy a hint of heat in their desserts. This unexpected twist can surprise and delight your taste buds!

  • Nutty Flavor: Incorporate finely chopped pecans or walnuts into the crust to enhance the texture and add a delightful crunch.

  • Chocolate Lovers: Mix in a cup of semi-sweet chocolate chips into the filling for a rich and decadent variation—who can resist chocolate and pumpkin combined?

  • Fruit Fusion: Swap half of the pumpkin puree with unsweetened applesauce; this adds a natural sweetness while keeping the bars moist and flavorful.

  • Sweet Topping: Instead of sour cream, top with a dollop of whipped cream or vanilla ice cream for a delightful finish. You could even drizzle a little caramel sauce for an extra special treat! Explore more indulgent flavors like Pumpkin Brownies Decadent for your gatherings!

Expert Tips for Pumpkin Pie Bars

Even Crust: Ensure you press the crust mixture evenly into the pan to avoid uneven baking, resulting in perfectly golden bars.

Monitor Baking: Watch the bars closely during the final bake; the filling should be set but slightly jiggly in the center to ensure a creamy texture.

Cool Completely: Always let the Pumpkin Pie Bars cool fully before cutting; this helps achieve clean edges and prevents them from crumbling.

Use Room Temperature Ingredients: Bring your eggs and butter to room temperature for smoother mixing, which leads to a better overall texture in your bars.

Test for Doneness: Use a toothpick to test the filling; it should come out mostly clean, indicating that your bars are baked to perfection while maintaining that luscious filling.

Pumpkin Pie Bars Recipe FAQs

What is the best way to select pumpkin puree?
When choosing pumpkin puree, look for pure canned pumpkin without added sugars or spices. If opting for fresh pumpkin, pick a sugar pumpkin or pie pumpkin as they have a sweeter taste and smoother texture. Ensure it feels firm and heavy for its size, with no dark spots or wrinkles on the skin.

How should I store leftover Pumpkin Pie Bars?
To store leftover Pumpkin Pie Bars, cover them with plastic wrap or place them in an airtight container. They can be kept in the refrigerator for up to 5 days. For best texture, allow them to cool completely before storing to avoid excess moisture buildup.

Can I freeze Pumpkin Pie Bars?
Absolutely! To freeze your Pumpkin Pie Bars, wrap each bar tightly in plastic wrap and place them in a freezer-safe bag. They can be kept in the freezer for up to 3 months. When you’re ready to enjoy them, simply thaw overnight in the fridge, then reheat in the microwave or oven as needed.

How can I troubleshoot a watery filling?
If your filling turns out watery, it might be due to excess moisture in the pumpkin puree. Always drain fresh pumpkin before using it, or if using canned puree, choose a brand that is labeled "pure pumpkin." Additionally, make sure to measure the ingredients accurately; too much liquid can affect texture.

Can I modify this recipe for dietary restrictions?
Certainly! For a dairy-free version, substitute butter with margarine or coconut oil, and use plant-based sour cream or yogurt. If you’re avoiding eggs, flax eggs (1 tablespoon ground flaxseed mixed with 2.5 tablespoons water per egg) work well as a binding agent. Always ensure that other ingredients are free from allergens based on personal dietary needs.

How long do pumpkin bars typically last?
When stored properly, Pumpkin Pie Bars can last up to 5 days in the refrigerator, and up to 3 months in the freezer. For optimal freshness and flavor, consume them within these timeframes to enjoy the delightful taste of pumpkin spice at its best.

Pumpkin Pie Bars

Delicious Pumpkin Pie Bars Perfect for Fall Gatherings

These Pumpkin Pie Bars are a delightful and portable treat that captures the essence of fall in every bite.
Print Recipe Pin Recipe
Prep Time 30 minutes mins
Cook Time 1 hour hr 5 minutes mins
Cooling Time 30 minutes mins
Total Time 2 hours hrs 5 minutes mins
Servings: 12 bars
Course: Dessert
Cuisine: American
Calories: 200
Ingredients Equipment Method Nutrition Notes

Ingredients
  

For the Crust
  • 0.5 cups Butter softened
  • 1 cups Light Brown Sugar
  • 1.75 cups All-Purpose Flour
  • 1 teaspoon Salt optional
For the Filling
  • 1 cups Pumpkin Puree
  • 2 large Eggs
  • 0.75 cups Granulated Sugar
  • 1 tablespoon Pumpkin Spice
For the Topping
  • 1 cups Sour Cream optional
  • 0.25 cups Confectioners’ Sugar

Equipment

  • 9" x 13" baking pan
  • Mixing bowls
  • Spatula
  • Whisk
  • Parchment Paper

Method
 

Step‑by‑Step Instructions for Pumpkin Pie Bars
  1. Preheat the oven to 350°F (175°C) and prepare a 9" x 13" baking pan.
  2. In a large mixing bowl, cream together ½ cup butter and 1 cup brown sugar until smooth. Add 1.75 cups flour and a pinch of salt, mixing until crumbly.
  3. Press the crust mixture evenly into the prepared pan and poke holes with a fork.
  4. Bake the crust for 28-32 minutes until golden brown.
  5. In a separate bowl, whisk together 1 cup pumpkin puree, 2 eggs, ¾ cup granulated sugar, and 1 tablespoon pumpkin spice.
  6. Pour the pumpkin filling over the slightly cooled crust and spread evenly.
  7. Bake the bars for an additional 32-35 minutes until the filling is set.
  8. Let the bars cool on a wire rack for at least 30 minutes before cutting.
  9. For topping, mix 1 cup sour cream with ¼ cup confectioners’ sugar until smooth.

Nutrition

Serving: 1barCalories: 200kcalCarbohydrates: 28gProtein: 2gFat: 9gSaturated Fat: 5gCholesterol: 40mgSodium: 150mgPotassium: 150mgFiber: 2gSugar: 12gVitamin A: 100IUVitamin C: 2mgCalcium: 2mgIron: 6mg

Notes

These bars can be customized with chocolate chips or enjoyed with a slice of Pumpkin Cinnamon Roll. Monitor baking closely to ensure a creamy texture.

Tried this recipe?

Let us know how it was!

Delicious Pear and Almond Cake: A Simple Elegant Delight

September 6, 2025 by Grace Snow Leave a Comment

There’s something magical about the combination of juicy pears and nutty almonds that transports me to a cozy afternoon in a sun-dappled kitchen. This Pear and Almond Cake is not only a feast for the senses but is also an effortlessly elegant dessert that anyone can master, whether you’re a seasoned pro or just starting out in the world of baking. With a rich texture and a delightful sweetness from the fresh pears, this cake is the perfect solution for those looking to elevate their dessert game without spending hours in the kitchen. Plus, it’s gluten-free, making it a fabulous choice for a variety of dietary needs. Ready to impress your family and friends? Let’s dive into this simple yet irresistible recipe that will leave you craving seconds!

Why Is Pear and Almond Cake So Special?

Simplicity: This recipe is a breeze, requiring minimal ingredients and straightforward steps.

Rich, Nutty Flavor: The blend of almond extract and fresh pears creates a beautifully balanced taste that tantalizes your palate.

Versatile: Tailor it to your liking! Swap pears for apples or add a sprinkle of cinnamon for a seasonal twist.

Guilt-Free Indulgence: This cake is not just delicious but also caters to gluten-free needs, so everyone can enjoy a slice.

Crowd-Pleaser: Whether it's a family gathering or a special occasion, this cake promises to impress with its elegant appearance and delightful flavors. Imagine serving it with a scoop of vanilla ice cream or a dollop of whipped cream—it’s a guaranteed hit! If you’re interested in more delightful desserts, check out this Chocolate Pudding Cake for another simple yet indulgent treat.

Pear and Almond Cake Ingredients

• Discover the perfect mix of flavors!

For the Cake Base

  • Almond Flour – Provides a rich, buttery texture; substitute with all-purpose flour for a non-gluten-free version.
  • All-Purpose Flour – Adds structure to the cake; can be replaced with a gluten-free flour mix if needed.
  • Baking Powder – Acts as a leavening agent to help the cake rise; make sure it's fresh for best results.
  • Salt – Enhances flavor; never skip this crucial component for a balanced taste.
  • Sugar – Sweetens the cake; consider using brown sugar for a richer flavor.
  • Butter – Creates a tender crumb; unsalted butter is recommended to control sweetness.
  • Eggs – Provides moisture and structure; using room temperature eggs ensures even mixing.
  • Almond Extract – Adds distinctive almond flavor; vanilla extract can be used as a substitute.

For the Topping

  • Pears – Fresh fruit adds moisture and sweetness; apples can be used as a substitute if desired.
  • Lemon Juice – Balances the pears' sweetness; always opt for fresh lemon juice for the best result.

For Serving

  • Confectioners’ Sugar – For dusting before serving; optional but enhances the presentation beautifully.

Step‑by‑Step Instructions for Pear and Almond Cake

Step 1: Preheat the Oven and Prepare the Pan
Begin by preheating your oven to 350°F (175°C). While it heats, take a 9-inch round cake pan and line the bottom with parchment paper. Lightly butter the sides of the pan to prevent sticking. This preparation ensures your Pear and Almond Cake comes out perfectly shaped and ready for baking.

Step 2: Mix the Dry Ingredients
In a medium mixing bowl, sift together the almond flour, all-purpose flour, baking powder, and salt. Whisk these ingredients until well combined, allowing the baking powder to distribute evenly for optimal rise. This mixture lays the foundation for a light and fluffy Pear and Almond Cake, so take your time to get it just right.

Step 3: Cream the Butter and Sugar
In a stand mixer, combine the butter and sugar, beating them together on medium speed for about 2 minutes, or until the mixture is light and fluffy. You’ll know it’s ready when it has a pale color and a creamy texture. This step is crucial as it creates the cake's tender crumb and helps to incorporate air into your Pear and Almond Cake batter.

Step 4: Incorporate the Eggs and Almond Extract
Add the eggs one at a time to the creamed butter and sugar, mixing well after each addition. Then, pour in the almond extract and combine until everything is fully incorporated. This process not only adds moisture but also infuses your batter with that delicious almond flavor that makes the Pear and Almond Cake so special.

Step 5: Combine Dry and Wet Ingredients
Gradually add the dry ingredient mixture to the wet ingredients. Mix on low speed until just combined, being careful not to overmix; the batter should be smooth but slightly lumpy. Scrape down the sides of the bowl to ensure everything is well incorporated. This step creates the perfect texture for your Pear and Almond Cake.

Step 6: Transfer the Batter to the Cake Pan
Pour the batter into your prepared cake pan, using a spatula to spread it evenly across the bottom. This ensures that the cake will bake uniformly, giving you a beautiful rise and even texture. The rich mix of almond and pear will soon transform into a delightful treat.

Step 7: Prepare the Pear Topping
Chop your fresh pears and toss them gently with lemon juice and a pinch of salt. This not only enhances their flavor but also prevents browning. Distribute the pear mixture evenly over the cake batter, ensuring that each slice of your Pear and Almond Cake will be bursting with juicy sweetness.

Step 8: Sprinkle and Bake
Sprinkle a light layer of granulated sugar over the top of the pears. Place the cake in the preheated oven and bake for 40 to 45 minutes, or until a toothpick inserted into the center comes out clean. The cake should have a lovely golden color, indicating it’s baked through.

Step 9: Cool the Cake
Once baked, remove the Pear and Almond Cake from the oven and let it cool in the pan for about 20 minutes. Afterward, take it out of the pan and transfer it to a wire rack to cool completely. This cooling period helps set the cake's structure, ensuring perfect slices when you’re ready to serve.

Step 10: Final Touch and Serve
Before serving, dust the cooled cake with confectioners' sugar for an elegant finish. The light coating contrasts beautifully with the juicy pears and almond flavor. Your Pear and Almond Cake is now ready to be enjoyed—consider pairing it with a dollop of whipped cream or a scoop of vanilla ice cream for an extra special treat!

What to Serve with Pear and Almond Cake

Indulging in this luscious cake is just the beginning; the perfect accompaniments will elevate your dessert experience to new heights!

  • Whipped Cream: A dollop of freshly whipped cream adds a light, airy touch, beautifully balancing the richness of the cake with its creamy texture.

  • Vanilla Ice Cream: Serve with a scoop of classic vanilla ice cream for a delightful contrast of temperatures that enhances the sweet almond and pear flavors.

  • Fresh Berries: Bright, juicy berries provide a tart zing that cuts through the sweetness, adding a vibrant aesthetic to your dessert spread.

  • Chocolate Sauce: Drizzling a bit of warm chocolate sauce over the cake brings a luxurious decadence, taking your taste buds on a delightful journey.

  • Spiced Chai Tea: A warm cup of spiced chai tea complements the cake wonderfully, as the aromatic spices enhance the almond and pear notes.

  • Sliced Almonds: Scatter toasted almond slivers on top for an extra nutty crunch; their toasty flavor pairs beautifully with this elegant dessert.

  • Caramel Drizzle: A touch of caramel sauce adds a rich and buttery sweetness that works in harmony with the cake’s moist texture.

  • Cinnamon-Dusted Pears: Serve alongside lightly sautéed pears sprinkled with cinnamon to echo the cake’s flavors and boost the fruit's natural sweetness.

Storage Tips for Pear and Almond Cake

Room Temperature: Keep your leftover Pear and Almond Cake wrapped in plastic wrap or stored in an airtight container at room temperature for up to 3 days. This helps maintain its delightful texture and taste.

Fridge: If you wish to extend its freshness, store the cake in the fridge for up to a week. Ensure it's tightly wrapped to prevent it from drying out and absorbing any odors.

Freezer: For longer storage, freeze the cake by slicing it and wrapping each slice in plastic wrap, then placing them in a freezer-safe bag. It can be frozen for up to 3 months.

Reheating: To enjoy your frozen Pear and Almond Cake, simply thaw overnight in the fridge. Reheat in the oven at 350°F for about 10 minutes, or until warmed through, to bring back its lovely texture.

Variations & Substitutions for Pear and Almond Cake

Feel free to explore creative twists and adaptations of the Pear and Almond Cake to suit your preferences and pantry staples!

  • Dairy-Free: Substitute butter with coconut oil or vegan butter for a delightful dairy-free version.

  • Gluten-Free: Use almond flour exclusively or a gluten-free flour blend to create a cake everyone can enjoy.

  • Fruit Swap: Replace pears with apples or even peaches for a fresh take; each fruit brings its unique sweetness!

  • Nutty Addition: Fold in some chopped walnuts or pecans for an extra crunch that complements the tender cake beautifully.

  • Spice It Up: Add a touch of cinnamon or nutmeg to the batter for a warm, inviting flavor profile, perfect for cozy gatherings.

  • Chocolate Lovers: For a decadent twist, swirl melted chocolate or cocoa powder into the batter, transforming it into a rich chocolate-pear delight.

  • Zesty Touch: Incorporate lemon or orange zest into the batter for a refreshing citrusy flavor that brightens the cake.

  • Icing Finish: Elevate your cake with a thin layer of cream cheese frosting or a light glaze made from powdered sugar and almond milk for added sweetness.

Each variation offers the chance to personalize your Pear and Almond Cake experience. If you’re seeking additional dessert ideas, I recommend checking out this irresistible Chocolate Pudding Cake for another sweet delight!

Make Ahead Options

These Pear and Almond Cake preparations are perfect for busy home cooks looking to save time! You can prepare the cake batter up to 24 hours in advance by mixing the dry and wet ingredients separately, then combining them just before you're ready to bake. The chopped pears can also be prepped ahead; toss them with lemon juice and store them in the refrigerator for up to 3 days. To maintain quality, keep the batter covered tightly to prevent it from drying out. When you're ready to bake, simply pour the batter into the prepared pan, add the prepped pears, and follow the baking instructions for delightful, fresh results that taste just as good as if made on the spot!

Expert Tips for Pear and Almond Cake

  • Room Temperature Ingredients: Ensure all ingredients, especially eggs and butter, are at room temperature to achieve a smooth batter and even texture.

  • Avoid Overmixing: Mix the batter until just combined. Overmixing can result in a tough cake rather than a light and tender Pear and Almond Cake.

  • Freshness Matters: Use fresh baking powder to ensure the cake rises properly. Stale baking powder can result in a dense cake that lacks fluffiness.

  • Peel Pears Carefully: Peel and chop pears evenly to ensure they cook properly and distribute sweetness throughout the cake.

  • Cooling is Key: Allow the cake to cool completely before dusting with confectioners' sugar; warm cakes can cause the sugar to melt, diminishing visual appeal.

Pear and Almond Cake Recipe FAQs

What type of pears should I use for the Pear and Almond Cake?
I recommend using ripe but firm pears such as Bartlett or Bosc, as they add moisture and sweetness without falling apart during baking. If you see any dark spots, it's time to use them before they spoil. If pears aren't available, apples can serve as a delicious alternative.

How should I store leftover Pear and Almond Cake?
Store your leftover cake wrapped in plastic wrap or an airtight container at room temperature for up to 3 days. If you'd like to keep it longer, the cake can be refrigerated for up to a week; just be sure it's tightly wrapped to prevent drying out.

Can I freeze the Pear and Almond Cake?
Absolutely! For freezing, slice the cake and individually wrap each slice in plastic wrap, then place them into a freezer-safe bag. It can be frozen for up to 3 months. When you're ready to enjoy, simply thaw it overnight in the fridge and reheat in the oven at 350°F for about 10 minutes to restore its wonderful texture.

What should I do if my cake turns out too dense?
If your Pear and Almond Cake is dense, it may be due to overmixing the batter. Mixing until just combined is key to a light texture. Ensure your baking powder is fresh as well, as stale leavening agents can contribute to a heavy cake.

Is this Pear and Almond Cake suitable for gluten-free diets?
Yes! You can easily make this cake gluten-free by substituting the all-purpose flour with a gluten-free flour blend. Just ensure all your other ingredients, especially the baking powder, are certified gluten-free to accommodate dietary preferences.

Can my pets enjoy any part of this Pear and Almond Cake?
While dogs can have small amounts of plain cake, it’s best to keep them away from this recipe since it includes sugar and almond extract, which are not suitable for pets. Always consult with your vet if you're unsure about sharing human food with your furry friends.

Pear and Almond Cake

Delicious Pear and Almond Cake: A Simple Elegant Delight

Enjoy the delightful combination of juicy pears and nutty almonds in this Pear and Almond Cake, a simple and elegant gluten-free dessert.
Print Recipe Pin Recipe
Prep Time 15 minutes mins
Cook Time 45 minutes mins
Cooling Time 20 minutes mins
Total Time 1 hour hr 20 minutes mins
Servings: 8 slices
Course: Dessert
Cuisine: Gluten-Free
Calories: 280
Ingredients Equipment Method Nutrition Notes

Ingredients
  

For the Cake Base
  • 2 cups Almond Flour Can substitute with all-purpose flour for non-gluten-free
  • 1 cup All-Purpose Flour Can be replaced with a gluten-free flour mix
  • 2 teaspoons Baking Powder Ensure freshness for best results
  • 1/4 teaspoon Salt Enhances flavor
  • 1 cup Sugar Consider brown sugar for richer flavor
  • 1/2 cup Butter Unsalted butter recommended
  • 3 large Eggs Room temperature recommended
  • 1 teaspoon Almond Extract Vanilla extract can be a substitute
For the Topping
  • 2 cups Pears Fresh, can substitute with apples
  • 2 tablespoons Lemon Juice Use fresh for best results
For Serving
  • 1 cup Confectioners’ Sugar Optional for dusting before serving

Equipment

  • 9-inch round cake pan
  • medium mixing bowl
  • Whisk
  • Stand Mixer
  • Spatula

Method
 

Step-by-Step Instructions
  1. Preheat your oven to 350°F (175°C) and prepare the cake pan with parchment paper and butter.
  2. Sift together almond flour, all-purpose flour, baking powder, and salt in a mixing bowl.
  3. Cream the butter and sugar in a stand mixer on medium speed until light and fluffy.
  4. Incorporate the eggs one at a time followed by the almond extract until fully mixed.
  5. Gradually add the dry ingredients to the wet ingredients and mix until just combined.
  6. Transfer the batter to the prepared cake pan and spread evenly.
  7. Chop the pears and toss them with lemon juice and a pinch of salt, then distribute over the cake batter.
  8. Sprinkle sugar over the top of the pears and bake for 40-45 minutes until a toothpick comes out clean.
  9. Cool the cake in the pan for 20 minutes, then transfer to a wire rack to cool completely.
  10. Dust with confectioners' sugar before serving and enjoy with cream or ice cream.

Nutrition

Serving: 1sliceCalories: 280kcalCarbohydrates: 30gProtein: 5gFat: 15gSaturated Fat: 5gPolyunsaturated Fat: 2gMonounsaturated Fat: 8gCholesterol: 40mgSodium: 150mgPotassium: 200mgFiber: 2gSugar: 20gVitamin A: 300IUVitamin C: 5mgCalcium: 50mgIron: 1mg

Notes

Ensure all ingredients are at room temperature. Avoid overmixing to maintain cake's texture. Use fresh baking powder for best results.

Tried this recipe?

Let us know how it was!

Sweet Potato Gnocchi: Fluffy Comfort for a Cozy Dinner

September 6, 2025 by Grace Snow Leave a Comment

As the vibrant hues of autumn begin to fill our plates, the aroma of sweet potato gnocchi dances through my kitchen, and I can’t help but feel cozy and nostalgic. This delightful gluten-free dish brings together the rich, earthy sweetness of sweet potatoes and a fluffy texture that melts in your mouth. Best of all, the simplicity of this recipe means you can whip up a comforting meal in no time while impressing friends and family at the same time. Whether you’re enjoying a quiet weeknight dinner or celebrating a special gathering, these homemade dumplings are sure to be a hit. Curious to see just how easy it is to create your own fluffy sweet potato gnocchi? Let's dive right in!

Why is Sweet Potato Gnocchi a Must-Try?

Comforting and Cozy: This dish wraps you in warmth, perfect for chilly nights.
Gluten-Free Goodness: Made with sweet potatoes and gluten-free flour, it caters to dietary needs without sacrificing flavor.
Quick and Easy: With just a few ingredients and steps, you’ll have a homemade meal that feels gourmet.
Versatile and Customizable: Pair with your favorite sauces, like sage brown butter or a simple marinara, to match your mood.
Crowd-Pleasing Delight: Impress friends and family with these fluffy dumplings that are sure to please even picky eaters.

Whether you're diving into a comforting plate at home or serving up something special for a gathering, this sweet potato gnocchi is a delicious addition to your recipe repertoire. If you're looking for more cozy options, check out my Smoky Sweet Potatoes or a classic Sweet Potato Casserole!

Sweet Potato Gnocchi Ingredients

• • Line 1: ## Essential Sweet Potato Gnocchi Ingredients

For the Gnocchi:

  • Sweet Potatoes – The foundation of this dish, offering natural sweetness and beautiful color. Note: Choose medium sweet potatoes for the best texture.
  • Egg – Acts as a binder to keep your gnocchi together and adds moisture. Substitution: For vegan gnocchi, use a flax egg (1 tablespoon ground flaxseed mixed with 2.5 tablespoons of water).
  • Parmesan Cheese – Provides richness and depth of flavor to the dumplings. Tip: Freshly grated Parmesan melts beautifully; replace with nutritional yeast for a dairy-free option.
  • King Arthur Unbleached All-Purpose Flour – Creates the structure of the gnocchi. Note: Reserve extra flour for dusting and rolling to prevent sticking.

For Cooking:

  • Butter – Used for frying the gnocchi until golden and crispy. Substitution: Olive oil works well for a dairy-free alternative.

By gathering these ingredients, you're well on your way to creating delightful sweet potato gnocchi that will impress everyone at the dinner table!

Step‑by‑Step Instructions for Sweet Potato Gnocchi

Step 1: Cook Sweet Potatoes
Start by cooking the sweet potatoes until they are tender. You can microwave them for about 8-9 minutes or roast them at 425°F for 45-60 minutes, until soft. Once cooked, let them cool slightly before handling, so you can scoop out the flesh easily. This sweet base is crucial for creating fluffy sweet potato gnocchi.

Step 2: Prepare Dough
In a large bowl, mash the cooled sweet potato flesh until it’s smooth. Mix in one beaten egg and gradually add a blend of flour and freshly grated Parmesan cheese. Stir until just combined, avoiding overmixing to keep the dough light and fluffy. A well-made dough is the key to achieving perfect sweet potato gnocchi.

Step 3: Rest Dough
Cover the dough with plastic wrap and let it rest for about 20 minutes. This short resting period helps the flour hydrate and makes it easier to shape the gnocchi. Meanwhile, bring a large pot of salted water to a gentle boil, which will be used to cook your delightful sweet potato gnocchi later.

Step 4: Shape Gnocchi
Once your dough has rested, dust your work surface with flour to prevent sticking. Divide the dough into manageable pieces and roll each piece into ½-inch thick strips. Cut the strips into 1-inch pieces, then use a fork or a gnocchi board to create grooves on each piece, which will help sauce cling beautifully when serving.

Step 5: Cook Gnocchi
Carefully drop the shaped sweet potato gnocchi into the boiling water. Cook them in batches for about 1-2 minutes; they are done when they float to the top. Using a slotted spoon, transfer the gnocchi to a plate and let them rest while you prepare a skillet for the final touch.

Step 6: Fry Gnocchi
In a large skillet, melt some butter over medium heat. Add the cooked gnocchi and sauté until they turn golden and crispy on both sides, which should take about 3-5 minutes. This step adds a deliciously crispy exterior that complements the fluffy texture of your sweet potato gnocchi perfectly.

Step 7: Serve
Remove the skillet from heat and plate your golden, crispy sweet potato gnocchi. You can garnish with additional Parmesan cheese or drizzle your favorite sauce on top. Enjoy these delightful little dumplings hot for the best experience, sharing the warmth and joy of homemade comfort food with family and friends.

Storage Tips for Sweet Potato Gnocchi

Fridge: Store leftover sweet potato gnocchi in an airtight container for up to 3 days to maintain freshness and flavor.

Freezer: For uncooked gnocchi, freeze on a parchment-lined baking sheet until firm, then transfer to a freezer bag for up to 2 months. Cook directly from frozen—no thawing needed!

Reheating: To reheat leftover cooked gnocchi, sauté in a skillet with a little butter or olive oil over medium heat until heated through and crisped to your liking.

Wrapping: For ultimate freshness, wrap uncooked gnocchi in plastic wrap before freezing to prevent freezer burn and retain that delightful texture.

Sweet Potato Gnocchi: Creative Twists

Get your taste buds ready to explore the endless possibilities of sweet potato gnocchi with these fun variations.

  • Butternut Squash: Swap sweet potatoes for roasted butternut squash for a slightly nutty and rich flavor.
  • Herb-Infused: Add fresh herbs like sage or basil into the dough for a fragrant touch that elevates every bite.
  • Spinach Delight: Incorporate finely chopped cooked spinach into the dough for a vibrant color and added nutrition.
  • Spicy Kick: Toss in a pinch of red pepper flakes to the dough for those who enjoy a bit of heat with their comfort food.
  • Creamy Sauce: Serve with a rich, creamy Alfredo sauce for a decadent twist that complements the sweetness beautifully.
  • Nutty Flavor: Sprinkle some toasted pine nuts on top for a delightful crunch that contrasts the softness of the gnocchi.
  • Honey Drizzle: For a sweet finish, drizzle a touch of honey or maple syrup over the finished dish to highlight the sweet potatoes.
  • Mushroom Medley: Top your gnocchi with a sauté of mushrooms and garlic for an earthy, umami bomb that’s simply irresistible.

By trying these variations, your sweet potato gnocchi will never get boring! If you’re looking for more delightful potato dishes, I recommend exploring my recipes for Roasted Sweet Potatoes and German Potato Salad.

Make Ahead Options

Sweet Potato Gnocchi are perfect for meal prep enthusiasts, allowing you to savor homemade comfort without the last-minute rush. You can prepare the gnocchi dough up to 24 hours in advance by shaping the gnocchi and placing them on a parchment-lined baking sheet. Pop them in the fridge, covered lightly with plastic wrap to prevent drying out. If you want to go a step further, uncooked gnocchi can also be frozen for up to 2 months; just make sure to freeze them in a single layer before tossing them into a bag. When you're ready to serve, cook the gnocchi directly from frozen in boiling water for about 2-3 minutes before frying them in butter for that perfect golden finish. With this preparation, you'll have delicious Sweet Potato Gnocchi ready with minimal effort, keeping family mealtime stress-free and delightful!

Expert Tips for Sweet Potato Gnocchi

Perfect Cooking: Ensure sweet potatoes are thoroughly cooked: This prevents dense gnocchi—aim for light, fluffy flesh before mashing.

Gentle Mixing: Avoid over-kneading the dough: Overworking toughens the gnocchi; mix just until combined for the best texture.

Flour Control: Keep your surface floured: This prevents sticking while shaping the dough, allowing for easy handling of your sweet potato gnocchi.

Cook in Batches: Don’t overcrowd the pot: Cooking gnocchi in smaller batches ensures they float properly and cook evenly.

Gnocchi Grooves: Use a fork for texture: Creating grooves helps sauce cling better, enriching each bite with flavor.

What to Serve with Sweet Potato Gnocchi

As you prepare to enjoy this delightful dish, consider some delicious accompaniments that will elevate your meal experience.

  • Garlic Bread: Warm, buttery garlic bread is the perfect crispy and savory side that enriches your dining experience.
  • Mixed Greens Salad: A fresh salad with a tangy vinaigrette balances the richness of the gnocchi and adds a refreshing crunch.
  • Sage Brown Butter Sauce: Drizzle this aromatic sauce over your gnocchi for an earthy flavor that complements the sweet potatoes beautifully.
  • Roasted Brussels Sprouts: Their slight bitterness contrasts nicely with the sweetness of the gnocchi, offering a delightful layer of flavor.
  • Creamy Polenta: Serve alongside soft polenta for a comforting, luxurious meal that keeps the cozy vibes flowing.
  • Mushroom Risotto: This creamy, earthy side dish pairs well with the subtle sweetness of sweet potato gnocchi, creating a harmonious dining experience.
  • Wine Pairing: A crisp white wine, like Sauvignon Blanc, cleanses the palate and enhances the dish's vibrant flavors.
  • Chocolate Mousse: For dessert, indulge in a rich chocolate mousse to round off your meal on a sweet note.
  • Fresh Herb Garnish: Sprinkle with fresh chives or parsley for a touch of brightness that adds both color and freshness to your plate.

Sweet Potato Gnocchi Recipe FAQs

How do I choose the right sweet potatoes?
Absolutely! When selecting sweet potatoes, look for ones that are firm and free of dark spots or blemishes. Medium-sized sweet potatoes are ideal for this gnocchi recipe, as they provide the best texture and flavor. If you see any soft spots or wrinkles, it's best to avoid those.

How should I store leftover sweet potato gnocchi?
For sure! Place any leftover sweet potato gnocchi in an airtight container in the fridge. They should stay fresh for up to 3 days. If you're concerned about moisture, you can layer them with parchment paper to avoid sticking.

Can I freeze uncooked sweet potato gnocchi? How?
Absolutely, freezing is a great option! To do this, first, shape your gnocchi as directed, then lay them out on a parchment-lined baking sheet in a single layer. Freeze until solid, about 1-2 hours. Once firm, transfer them to a freezer bag and store for up to 2 months. There's no need to thaw them; just boil straight from the freezer!

What should I do if my gnocchi dough is too sticky?
Very often, sticky dough indicates too much moisture. If that happens, simply knead in a little more flour, a tablespoon at a time, until it reaches a workable consistency. Remember, gentle handling is the key to keeping your gnocchi light and airy!

Is this sweet potato gnocchi suitable for gluten-free diets?
Yes, indeed! This sweet potato gnocchi recipe is gluten-free when made with King Arthur Unbleached All-Purpose Gluten-Free Flour. Ensure any other ingredients, like cheese, are also gluten-free if you're serving someone with dietary restrictions. Just be cautious and check for allergens!

Sweet Potato Gnocchi

Sweet Potato Gnocchi: Fluffy Comfort for a Cozy Dinner

Sweet potato gnocchi is a delightful gluten-free dish that combines rich flavors and a fluffy texture, perfect for cozy dinners.
Print Recipe Pin Recipe
Prep Time 30 minutes mins
Cook Time 15 minutes mins
Resting Time 20 minutes mins
Total Time 1 hour hr 5 minutes mins
Servings: 4 servings
Course: Dinner
Cuisine: Italian
Calories: 200
Ingredients Equipment Method Nutrition Notes

Ingredients
  

Essential Sweet Potato Gnocchi Ingredients
  • 2 medium Sweet Potatoes Choose medium sweet potatoes for the best texture.
  • 1 large Egg For vegan, use a flax egg.
  • 1 cup Parmesan Cheese Freshly grated for best melting.
  • 1 cup King Arthur Unbleached All-Purpose Flour Reserve extra for dusting.
  • 2 tablespoons Butter Substitution: Olive oil for dairy-free.

Equipment

  • Large pot
  • large bowl
  • slotted spoon
  • Skillet
  • plastic wrap

Method
 

Step‑by‑Step Instructions for Sweet Potato Gnocchi
  1. Cook the sweet potatoes until they are tender—microwave for about 8-9 minutes or roast at 425°F for 45-60 minutes. Let cool slightly.
  2. Mash the cooled sweet potato flesh until smooth. Mix in one beaten egg and add flour and Parmesan, stirring until just combined.
  3. Cover the dough with plastic wrap and let it rest for about 20 minutes.
  4. Dust a work surface with flour, divide and roll the dough into strips, then cut into 1-inch pieces, creating grooves with a fork or gnocchi board.
  5. Drop the gnocchi into boiling salted water. Cook for 1-2 minutes or until they float.
  6. In a skillet, melt butter over medium heat. Add the gnocchi and sauté until golden and crispy, around 3-5 minutes.
  7. Plate the gnocchi, garnish with Parmesan, and serve hot.

Nutrition

Serving: 1cupCalories: 200kcalCarbohydrates: 30gProtein: 6gFat: 7gSaturated Fat: 4gMonounsaturated Fat: 3gCholesterol: 80mgSodium: 300mgPotassium: 300mgFiber: 3gSugar: 5gVitamin A: 2000IUVitamin C: 20mgCalcium: 150mgIron: 1mg

Notes

Ensure sweet potatoes are thoroughly cooked for a light texture. Avoid overmixing the dough to prevent tough gnocchi.

Tried this recipe?

Let us know how it was!

Cinnamon Roll Focaccia: Your New Favorite Sweet Treat

September 6, 2025 by Grace Snow Leave a Comment

“Just wait until you catch a whiff of this enchanting creation!” my friend whispered with a gleam in their eye as they pushed open the oven door. That’s when I knew I was about to unveil a delightful masterpiece—the Big and Bubbly Cinnamon Roll Focaccia. This recipe transforms classic comfort food into a fluffy, sweet indulgence that’s perfect for any occasion, whether it be brunch with friends or a cozy family gathering. The tender dough is crowned with a crunchy brown sugar topping and a luscious glaze, ensuring every bite is a treat. One of the best parts? This Cinnamon Roll Focaccia not only dazzles the taste buds but also leaves room for creativity—any leftovers can be morphed into a delicious French toast the next day! Ready to dive into this culinary adventure? Let’s get started!

Why is Cinnamon Roll Focaccia a Must-Try?

Deliciously Unique: This recipe beautifully merges classic cinnamon rolls with the airy charm of focaccia, creating an unexpected yet irresistible flavor combination.
Effortlessly Prepare: With simple ingredients and straightforward steps, you’ll impress guests without spending all day in the kitchen.
Perfectly Versatile: Whether as a brunch centerpiece or dessert, it fits any occasion, delighting friends and family alike.
Tasty Leftovers: Transform any extra into decadent French toast the next morning—what’s not to love?
Visual Appeal: A golden, bubbly rise topped with a sweet crust makes this dish as delightful to look at as it is to enjoy.
This Cinnamon Roll Focaccia is not only a must-have in your recipe arsenal but also offers endless possibilities for enjoyment—from serving warm straight out of the oven to reinventing leftovers. For more twists on traditional favorites, check out our Pumpkin Cinnamon Roll recipes to keep the inspiration flowing!

Cinnamon Roll Focaccia Ingredients

For the Dough

  • Flour – Provides structure and creates the base of the focaccia; consider using all-purpose or bread flour for best results.
  • Salt – Enhances flavor in the dough while balancing the sweetness.
  • Yeast – Acts as a leavening agent for a delightful rise; ensure it's fresh for optimal results.
  • Sugar – Sweetens the dough and helps activate the yeast; brown sugar is perfect for topping to boost sweetness.
  • Water – Hydrates the flour and activates the yeast for a lovely texture.
  • Olive Oil – Enhances flavor and improves dough pliability, making it easier to work with.

For the Sweet Filling

  • Cinnamon Sweet Bits – Adds sweet cinnamon pockets throughout the focaccia; don’t skip this crucial ingredient for full flavor.

For the Topping

  • Brown Sugar – Creates a crunchy topping that contrasts beautifully with the fluffy dough; the caramelization adds extra richness.
  • Butter – Adds moisture and flavor to the topping; melted butter can intensify that comforting taste.
  • Cinnamon – Sprinkled on top to enhance flavor; think of it as a warm hug in every bite.

For the Glaze

  • Glaze Ingredients – These will add a sweet, shiny finish to your Cinnamon Roll Focaccia, making it extra special.

Gather these ingredients, and you're on your way to creating a jaw-dropping Cinnamon Roll Focaccia that will enchant everyone around your table!

Step‑by‑Step Instructions for Cinnamon Roll Focaccia

Step 1: Prepare the Dough
In a large bowl, whisk together 4 cups of flour, 1 teaspoon of salt, 1 packet of fresh yeast, and 1/4 cup of sugar. Gradually mix in 1 1/2 cups of warm water and 1/4 cup of olive oil until a smooth dough forms. Cover the bowl with a damp cloth and let the dough rest for 15 minutes, allowing it to relax and begin hydrating.

Step 2: Bowl Folds
After the 15-minute rest, perform a series of bowl folds to develop the gluten structure. Grab one side of the dough, stretch it up, and fold it over to the center. Rotate the bowl and repeat this folding process four times, allowing 15 minutes of rest between each fold. Incorporate the Cinnamon Sweet Bits into the dough during the folds for an evenly distributed flavor.

Step 3: First Rise
Once you’ve completed the bowl folds, cover the dough again and let it rise in a warm place until it nearly doubles in size. This will take about 1 hour. You’ll know it’s ready when the dough looks puffy and full of air bubbles, indicating that the yeast has done its job successfully.

Step 4: Prepare the Pan
While the dough rises, prepare a 9" square focaccia pan by spraying it with nonstick spray and lining it with parchment paper. Once the dough has risen, gently transfer it into the prepared pan, being careful not to deflate the airy structure. Drizzle a bit more olive oil over the top to help it stay moist during the next rise.

Step 5: Second Rise
Cover the dough in the pan with a clean dish towel and let it rise again until very puffy, which should take about 1 to 1.5 hours. Keep an eye on it; the dough should swell substantially, creating a soft and airy texture that will bake beautifully into your Cinnamon Roll Focaccia.

Step 6: Add Topping
Once the dough has puffed up, use oiled fingers to gently create dimples across the top of the dough. In a small bowl, mix together 1/3 cup of brown sugar, 1/4 cup of melted butter, and 1 tablespoon of cinnamon. Sprinkle this mixture evenly over the dough, ensuring that it gets into the dimples and distributes throughout the dough.

Step 7: Bake
Preheat your oven to 450°F (230°C). Once the oven is hot, bake the Cinnamon Roll Focaccia for 15-20 minutes, or until it turns golden brown. The top should look caramelized and crunchy while the interior remains light and fluffy. Keep an eye on it toward the end to prevent over-browning.

Step 8: Cool and Glaze
Once baked, transfer the Cinnamon Roll Focaccia to a cooling rack. While it’s still warm, drizzle your favorite sweet glaze over the top to add a glossy finish. Allow the glaze to set for a few minutes before slicing into this delightful creation, showcasing the fluffy texture and sweet topping you’ve made.

Make Ahead Options

These Big and Bubbly Cinnamon Roll Focaccia are perfect for meal prep, allowing you to save time on busy weekends! You can prepare the dough through the first rise, then refrigerate it for up to 24 hours. This method not only enhances the flavor but also allows you to bake fresh focaccia whenever you’re ready. Just follow the first few steps, then cover the dough tightly with plastic wrap and refrigerate. When you’re ready to bake, simply take it out, let it rise in the pan for 1 to 1.5 hours, add the topping, and follow the baking instructions. Your warm, fluffy cinnamon roll focaccia will be just as delicious as if made fresh that day!

Cinnamon Roll Focaccia Variations

Feel inspired to take your Cinnamon Roll Focaccia to the next level with these delightful twists!

  • Chocolate Chip Focaccia: Swap the Cinnamon Sweet Bits for chocolate chips for a decadent dessert twist that’s sure to satisfy your sweet tooth.

  • Citrus Zest Boost: Add the zest of one orange or lemon to the dough for a refreshing citrus flavor that brightens up the sweet profile.

  • Nutty Delight: Incorporate chopped nuts such as pecans or walnuts into the dough for an extra layer of crunch and richness, enhancing the texture beautifully.

  • Dried Fruit Surprise: Replace Cinnamon Sweet Bits with dried cranberries or raisins for a fruity contrast that complements the cinnamon perfectly.

  • Cream Cheese Glaze: Instead of your standard glaze, whip up a cream cheese frosting for a richer, more indulgent topping that delivers a sweet surprise.

  • Spicy Twist: Add a dash of cayenne pepper or chili powder to the brown sugar topping for a warm, spicy kick that’ll intrigue your taste buds.

  • Savory Spin: Experiment with savory cheese inserts—think sharp cheddar or goat cheese—for a unique take that’s perfect for brunch or snacking.

  • Pumpkin Spice Focaccia: For a seasonal flavor, mix in pumpkin puree along with spices like nutmeg and ginger, transforming this into your favorite autumn delight. For more pumpkin-inspired treats, check out our Pumpkin Cinnamon Roll recipes!

No matter how you choose to customize your Cinnamon Roll Focaccia, each variation is a delicious adventure waiting to be explored!

What to Serve with Big and Bubbly Cinnamon Roll Focaccia

Imagine a delightful spread that elevates your dining experience, complementing the sweet, fluffy allure of this comforting focaccia.

  • Creamy Mashed Potatoes: The buttery richness of mashed potatoes brings a cozy, creamy contrast that balances the sweet cinnamon flavor.

  • Fresh Fruit Salad: Bright, juicy fruits offer a refreshing burst that cleanses the palate, enhancing the overall meal experience.

  • Rich Coffee Brew: The bold notes of coffee perfectly pair with the sweet glaze, making it an inviting choice for brunch or dessert.

  • Classic Bacon Strips: Crispy, salty bacon introduces a savory crunch that delights against the fluffy focaccia, creating a wonderful flavor balance.

  • Whipped Cream or Cream Cheese Frosting: Slathering a dollop of creamy frosting adds an extra layer of sweetness, ideal for dessert lovers.

  • Maple Syrup Drizzle: A hint of warm maple syrup brings a delightful sweetness that marries beautifully with the cinnamon notes.

  • Chai Tea: The warm spices in chai create a lovely harmony with the cinnamon, making for a comforting beverage alongside your focaccia.

  • Vanilla Ice Cream: The cool, creamy texture of vanilla ice cream offers a decadent pairing, transforming your focaccia into an indulgent treat.

Serving these wonderful additions will not only complement the Big and Bubbly Cinnamon Roll Focaccia but also create a delightful dining experience your loved ones will remember fondly.

How to Store and Freeze Cinnamon Roll Focaccia

Room Temperature: Enjoy your Cinnamon Roll Focaccia fresh for up to 3 days. Wrap it tightly in foil or parchment paper to maintain its delightful texture and flavor.

Fridge: If you need to store it longer, place the wrapped focaccia in the refrigerator for up to a week. Just keep in mind that refrigeration may slightly alter its fluffy texture.

Freezer: To freeze, slice the focaccia and wrap each piece individually in plastic wrap, then place them in an airtight container. It can be stored for up to 3 months. Thaw at room temperature before reheating.

Reheating: For the best taste, reheat slices in an oven preheated to 350°F for about 5-10 minutes, restoring that fresh-baked warmth and making it perfect for a comforting treat!

Expert Tips for Cinnamon Roll Focaccia

  • Yeast Matters: Always check the freshness of your yeast; expired yeast won't rise properly, ruining the dough's fluffy texture.

  • Perfect Temperature: Use warm water (around 110°F) to help activate the yeast without killing it. Too hot and you’ll risk a flat focaccia!

  • Puff Power: For an airy focaccia, ensure each rise is done in a warm environment. Draft-free spaces work wonders for dough expansion.

  • Dimple Delight: When creating dimples, be gentle. This not only enhances texture but helps the topping melt into the dough for full flavor in every bite.

  • Keep an Eye: Monitor the baking closely; every oven is different. If the top starts to brown too quickly, cover it lightly with foil.

  • Enjoy Fresh: While storing leftovers is an option, this Cinnamon Roll Focaccia is best enjoyed fresh. Reheat briefly in the oven to restore its yummy fluffiness!

Cinnamon Roll Focaccia Recipe FAQs

How do I select the best ingredients for my Cinnamon Roll Focaccia?
Absolutely! When choosing flour, look for all-purpose or bread flour with a high protein content, around 12-14%. For the best flavor, use fresh yeast; check the expiration date to ensure it's active. Cinnamon should be fragrant, and brown sugar should be soft without lumps to maximize sweetness in your focaccia.

How should I store my Cinnamon Roll Focaccia?
You can store it at room temperature wrapped tightly in foil or parchment paper for up to 3 days. If you plan on keeping it longer, refrigerate it in an airtight container for up to a week. Just remember, refrigeration may make the focaccia slightly denser, so try to enjoy it fresh!

Can I freeze my Cinnamon Roll Focaccia?
Yes! To freeze, slice the focaccia and wrap each piece in plastic wrap, then place them in an airtight container. This method preserves its deliciousness for up to 3 months. When you're ready to enjoy, thaw at room temperature and reheat in the oven at 350°F for about 5-10 minutes for that fresh-baked feel.

What should I do if my dough doesn't rise?
If your dough isn’t rising as expected, check the yeast freshness first—expired yeast leads to flat dough! Make sure your water temperature is warm but not hot—around 110°F is ideal. If you're in a cold environment, try placing the dough in a warm, draft-free spot or consider using your oven with the light on to create a cozy rising environment.

Are there any dietary considerations for Cinnamon Roll Focaccia?
While this recipe doesn’t contain specific allergens, it does include gluten and dairy from the butter. If making it for someone with allergies, consider using gluten-free flour and dairy-free butter alternatives for a delicious, inclusive treat. Always double-check the labels on your ingredients to ensure safety!

How can I make the most of leftover Cinnamon Roll Focaccia?
Very! Leftovers can be transformed into delightful French toast. Simply slice, dip in an egg mixture with milk and cinnamon, then cook on a skillet until golden brown. Serve with syrup or fruit for a delightful breakfast that feels like a dessert!

Cinnamon Roll Focaccia

Cinnamon Roll Focaccia: Your New Favorite Sweet Treat

Discover the enchanting Cinnamon Roll Focaccia, a delightful blend of cinnamon rolls and focaccia, perfect for brunch or dessert!
Print Recipe Pin Recipe
Prep Time 45 minutes mins
Cook Time 20 minutes mins
Resting Time 30 minutes mins
Total Time 1 hour hr 35 minutes mins
Servings: 12 slices
Course: Breakfast
Cuisine: American
Calories: 250
Ingredients Equipment Method Nutrition Notes

Ingredients
  

For the Dough
  • 4 cups flour can use all-purpose or bread flour
  • 1 teaspoon salt enhances flavor
  • 1 packet yeast fresh for best results
  • 1/4 cup sugar helps activate the yeast
  • 1 1/2 cups water warm water to activate yeast
  • 1/4 cup olive oil enhances flavor and pliability
For the Sweet Filling
  • 1 cup Cinnamon Sweet Bits adds sweet cinnamon pockets
For the Topping
  • 1/3 cup brown sugar creates a crunchy topping
  • 1/4 cup butter melted for flavor
  • 1 tablespoon cinnamon for added flavor
For the Glaze
  • Glaze Ingredients for sweet, shiny finish

Equipment

  • large bowl
  • focaccia pan
  • Whisk

Method
 

Step‑by‑Step Instructions for Cinnamon Roll Focaccia
  1. In a large bowl, whisk together flour, salt, fresh yeast, and sugar. Gradually mix in warm water and olive oil until a smooth dough forms. Cover and let rest for 15 minutes.
  2. Perform a series of bowl folds after the rest: stretch the dough, fold to the center, and rotate the bowl. Repeat four times with 15 minutes of rest between each fold, adding Cinnamon Sweet Bits into the dough.
  3. Cover and let the dough rise in a warm place until nearly doubled in size, approximately 1 hour.
  4. Prepare a 9" square focaccia pan by spraying with nonstick spray and lining with parchment. Transfer the risen dough to the pan and drizzle with more olive oil.
  5. Cover with a towel and let rise again until very puffy, about 1 to 1.5 hours.
  6. Create dimples in the puffed dough using oiled fingers. Mix together brown sugar, melted butter, and cinnamon, then sprinkle over the dough.
  7. Preheat oven to 450°F (230°C) and bake for 15-20 minutes until golden brown.
  8. Transfer to a cooling rack and drizzle with glaze while still warm. Let set before slicing.

Nutrition

Serving: 1sliceCalories: 250kcalCarbohydrates: 35gProtein: 4gFat: 10gSaturated Fat: 3gPolyunsaturated Fat: 1gMonounsaturated Fat: 5gCholesterol: 15mgSodium: 150mgPotassium: 200mgFiber: 1gSugar: 10gVitamin A: 200IUCalcium: 50mgIron: 1mg

Notes

Best enjoyed fresh, but can be stored for up to 3 days at room temperature. Reheat briefly before serving for optimal fluffiness.

Tried this recipe?

Let us know how it was!

Easy Olive Tapenade Recipe for Ultimate Flavor Happiness

September 6, 2025 by Grace Snow Leave a Comment

As I whisked together the vibrant ingredients of my 5-Minute Mediterranean Olive Tapenade, the aromas transported me straight to a sun-soaked terrace overlooking the azure sea. This quick and satisfying vegan delight not only takes just five minutes to whip up, but it’s also the perfect accompaniment for those breezy summer evenings or cozy gatherings with loved ones. Imagine spreading this briny, savory concoction over fresh-baked bread or crostini—it's a game-changer for any appetizer spread! With a combination of rich olives and zesty capers, you’ll find that each bite packs a bold punch of flavor, making it an ideal choice for anyone looking to elevate their cooking game with minimal effort. Ready to dive into a taste of the Mediterranean? Let's get started on this savory adventure!

Why is this Olive Tapenade a Must-Try?

Simplicity and Speed: Whip up this flavorful tapenade in just 5 minutes—perfect for busy days or unexpected guests!

Vegan-Friendly Twist: It's 100% vegan and easily adaptable, ensuring everyone can enjoy its rich taste.

Bursting with Flavor: The earthy blend of olives and capers creates an unforgettable savory experience that'll have your taste buds dancing.

Endless Versatility: Use it as a dip, spread, or even a drizzle over grilled veggies; the possibilities are endless!

Great for Entertaining: Impress your friends and family with a dish that looks fancy but is incredibly easy to make. Take your appetizer spread to the next level with this delightful vegan Olive Tapenade that embodies the essence of Mediterranean cuisine!

Olive Tapenade Ingredients

For the Tapenade
• Olives – A mix of Kalamata and ripe black olives provides a well-rounded flavor; feel free to use Kalamatas alone for simplicity.
• Capers – These tiny, salty gems add a tangy kick that amplifies the overall taste.
• Anchovy Paste (optional) – This adds depth and umami; skip it for a vegan version and adjust salt accordingly.
• Olive Oil – Extra virgin is best for blending, helping achieve that perfect, creamy consistency.
• Garlic – Fresh garlic enriches the tapenade with a savory aroma and depth.

For Variations
• Green Olives – Substitute Kalamatas for green olives for a milder, yet still delicious, flavor.
• Sun-Dried Tomatoes – Toss in some chopped sun-dried tomatoes for an added sweet and tangy dimension.

Indulge in the robust world of Olive Tapenade and enjoy its vibrant burst of Mediterranean-inspired flavors!

Step‑by‑Step Instructions for Olive Tapenade

Step 1: Prep Ingredients
Begin by gathering all your ingredients: a mix of Kalamata and ripe black olives, capers, olive oil, garlic, and optionally, anchovy paste. Ensure your olives are pitted to achieve a smooth texture in your Olive Tapenade. Take a moment to measure out your ingredients, as having everything ready will streamline the blending process.

Step 2: Blend
In a food processor, add the prepared olives, capers, anchovy paste (if using), and peeled garlic cloves. Pour in a splash of olive oil to help with blending. Pulse the mixture until it reaches a chunky, spreadable consistency, around 15-20 seconds. You want your Olive Tapenade to retain some texture, so be careful not to over-process.

Step 3: Adjust Consistency
After blending, check the texture of your tapenade. If it seems too thick, gradually add more olive oil—about a teaspoon at a time—while pulsing, until you achieve your desired smoothness. This step will help your Olive Tapenade reach that perfect creamy consistency while enhancing its rich flavor.

Step 4: Taste and Season
Once you’re happy with the texture, taste your Olive Tapenade. If it's lacking in flavor, consider adding a pinch of salt or adjusting the anchovy paste for a deeper umami taste. Sample it on a small piece of bread to ensure the seasoning is spot on for your palette before serving.

Step 5: Serve and Enjoy
Transfer your vibrant Olive Tapenade to a serving dish, garnishing with a drizzle of extra virgin olive oil if you like. This delicious spread is perfect for dipping with crusty bread or as a flavorful topping on crostini, bringing a taste of the Mediterranean to your table. Serve immediately or let it chill for a bit to enhance flavors.

Make Ahead Options

These Olive Tapenade preparations are tailor-made for busy cooks looking to save time! You can easily prepare the tapenade up to 3 days in advance by blending all the ingredients together and storing it in an airtight container in the refrigerator. This allows the flavors to meld beautifully, making the tapenade even more delicious when you go to serve it. Just remember to give it a quick stir and a taste before serving, as the flavors may intensify over time. For optimal quality, ensure it’s well-contained to prevent drying out or absorbing other odors. When it’s time to enjoy, simply plate it and indulge in your bold, savory creation, ready to impress your guests!

Expert Tips for Olive Tapenade

  • Choose Quality Olives: Select high-quality olives for the best flavor; cheaper varieties can be overly salty and lack depth.

  • Mind the Saltiness: Always taste your olives and capers first to avoid an overly salty tapenade—adjust anchovy paste accordingly if needed.

  • Customize Texture: For a chunkier spread, pulse the mixture less; for a smoother texture, blend longer but avoid puréeing completely.

  • Enhance Flavor: Let the Olive Tapenade sit for 30 minutes before serving to allow the flavors to meld beautifully.

  • Storage Perfection: Keep leftovers in an airtight container in the refrigerator for up to a week. Allow reaching room temperature before serving again.

  • Experiment Freely: Don’t be afraid to mix in additional spices or herbs—like fresh basil or parsley—for a unique twist on your Olive Tapenade!

Olive Tapenade Variations & Substitutions

Feel free to get creative and make this Olive Tapenade your own with these exciting variations!

  • Green Olives: Swap Kalamata olives for green olives for a mild and bright twist. This minor change brings a fresh flavor profile that can be surprisingly delightful.

  • Sun-Dried Tomatoes: Add 2 tablespoons of chopped sun-dried tomatoes for an unexpected sweetness that beautifully balances the salty olives. Imagine the vibrant color and delightful taste they lend to your tapenade!

  • Dairy-Free Creaminess: Blend in a tablespoon of nutritional yeast for a cheesy flavor without the dairy, perfect for those who are vegan or lactose-intolerant. You'll love this nutritious boost!

  • Spicy Kick: Toss in a pinch of red pepper flakes or a diced jalapeño for an added layer of heat. This simple adjustment takes the tapenade to a whole new level, perfect for spice lovers!

  • Herb Infusion: Incorporate fresh herbs like basil or parsley for a fragrant touch that brightens the dish. Not only does it enhance the flavor, but it also adds an inviting pop of color to your spread!

  • Citrusy Zest: Add a splash of fresh lemon juice or a teaspoon of lemon zest to brighten the flavors, providing a zesty enhancement that keeps it fresh. This small tweak can make a huge difference in elevating your tapenade!

  • Nutty Texture: For a unique twist, fold in some finely chopped walnuts or pistachios for added texture and richness. The nuttiness creates a delightful contrast to the olives and enhances the overall experience.

  • Garlic Variations: Substitute roasted garlic for fresh garlic for a milder, sweeter flavor. This switch can completely transform the overall profile of your tapenade, offering a more nuanced taste that’s deeply satisfying.

With these variations, you can easily personalize your homemade Olive Tapenade to suit any occasion or preference!

What to Serve with 5-Minute Mediterranean Olive Tapenade?

Pair your savory tapenade with delightful accompaniments that enhance its Mediterranean flair and make every bite a celebration.

  • Crusty Baguette: The perfect vehicle for your tapenade, its chewy crust and soft interior provide a wonderful texture balance.

  • Grilled Vegetables: Charred zucchini, bell peppers, and eggplant add a smoky depth to your appetizer spread that plays beautifully against the tapenade's brininess.

  • Cheese Platter: A variety of creamy cheeses offer a rich contrast to the salty tapenade, making for a well-rounded and indulgent snacking experience.

  • Chickpea Salad: Fresh herbs, juicy tomatoes, and a lemony dressing bring a refreshing brightness that harmonizes with the savory notes of the tapenade.

  • Sparkling Wine: A crisp and bubbly sipper cleanses the palate beautifully, enhancing the rich flavors of your Olive Tapenade while elevating the evening's festivities.

  • Stuffed Peppers: Mini bell peppers filled with a herby cream cheese provide a creamy contrast, creating a delightful bite when enjoyed alongside your spread.

  • Olives Variety: Offering an assortment of marinated olives can enrich the platter, enriching the Mediterranean theme while adding layers of flavor.

  • Dark Chocolate: For those who enjoy a unique twist, dark chocolate adds a surprising sweetness that rounds out your savory experience perfectly.

Storage Tips for Olive Tapenade

Fridge: Store your Olive Tapenade in an airtight container in the refrigerator for up to 1 week. This helps to preserve its vibrant flavors while keeping it fresh.

Freezer: For longer storage, freeze the tapenade in small portions using ice cube trays. It will last up to 3 months. Thaw overnight in the fridge for later use.

Room Temperature: If serving, allow the Olive Tapenade to sit at room temperature for about 20 minutes before enjoying, as this enhances the flavors and aroma.

Reheating: There’s no need to reheat the tapenade, but if desired, gently warm it in a pan over low heat for a few minutes.

Olive Tapenade Recipe FAQs

What type of olives should I use for my Olive Tapenade?
Absolutely! I recommend a mix of Kalamata and ripe black olives for a well-rounded flavor. However, if you prefer simplicity, using only Kalamata olives will give you a delicious tapenade too!

How should I store leftover Olive Tapenade?
Store your Olive Tapenade in an airtight container in the refrigerator for up to 1 week. Make sure to let the tapenade reach room temperature for about 20 minutes before serving it again to enhance its flavors.

Can I freeze Olive Tapenade, and how do I do it?
Yes, you can freeze Olive Tapenade! Portion it into ice cube trays or small containers and freeze for up to 3 months. To use, simply thaw it overnight in the fridge. Enjoy the convenience of having a vibrant Mediterranean spread ready when you need it!

What if my Olive Tapenade turns out too salty?
If your tapenade ends up too salty, that could be from the saltiness of the olives or capers. To balance it, try adding a bit more olive oil or blending in a few extra olives to dilute the saltiness. Taste as you go—you want that perfect blend of salty and savory!

Are there any dietary considerations for pets or allergies with this recipe?
Definitely! Keep in mind that while Olive Tapenade is vegan and vegetarian-friendly, if you’re using anchovy paste, be cautious if serving to someone with seafood allergies. Additionally, since olives can be high in sodium, it’s better to avoid offering this to pets. Always double-check ingredients if you're cooking for someone with specific dietary needs!

Olive Tapenad

Easy Olive Tapenade Recipe for Ultimate Flavor Happiness

This easy Olive Tapenade recipe brings a burst of Mediterranean flavors to your table in just 5 minutes.
Print Recipe Pin Recipe
Prep Time 5 minutes mins
Total Time 5 minutes mins
Servings: 4 servings
Course: Appetizers
Cuisine: Mediterranean
Calories: 70
Ingredients Equipment Method Nutrition Notes

Ingredients
  

For the Tapenade
  • 1 cup Kalamata olives pitted
  • 1 cup ripe black olives pitted
  • 2 tablespoons capers
  • 1 teaspoon anchovy paste optional for umami
  • 1/4 cup extra virgin olive oil
  • 2 cloves garlic peeled
For Variations
  • 1 cup green olives optional, substitute for Kalamatas
  • 1/2 cup sun-dried tomatoes chopped, optional

Equipment

  • Food Processor

Method
 

Step-by-Step Instructions for Olive Tapenade
  1. Gather all your ingredients: a mix of Kalamata and ripe black olives, capers, olive oil, garlic, and optionally, anchovy paste. Ensure your olives are pitted.
  2. In a food processor, add the prepared olives, capers, anchovy paste (if using), and peeled garlic cloves. Pour in a splash of olive oil and pulse until chunky, about 15-20 seconds.
  3. Check the texture of your tapenade and add more olive oil if too thick, about a teaspoon at a time, while pulsing until desired smoothness is achieved.
  4. Taste your Olive Tapenade and adjust salt or anchovy paste if needed. Serve on a small piece of bread to check seasoning.
  5. Transfer the tapenade to a serving dish, garnishing with a drizzle of olive oil if desired. Serve with crusty bread or crostini.

Nutrition

Serving: 1tablespoonCalories: 70kcalCarbohydrates: 5gProtein: 1gFat: 6gSaturated Fat: 1gMonounsaturated Fat: 5gSodium: 150mgPotassium: 40mgFiber: 1gCalcium: 2mgIron: 1mg

Notes

Store leftovers in an airtight container in the fridge for up to 1 week. Allow it to sit at room temperature for about 20 minutes before serving to enhance flavors.

Tried this recipe?

Let us know how it was!

Ultimate Cheese Board: Impress with Flavorful Combinations

September 5, 2025 by Grace Snow Leave a Comment

As I strolled through the bustling market, vibrant cheese wheels caught my eye, each promising a delightful journey of flavors. With the right combinations, creating the Ultimate Cheese Board can transform any gathering into a culinary masterpiece. This recipe isn't just a feast for the eyes; it’s a hassle-free way to please your guests with a variety of textures and tastes, making it perfect for both casual get-togethers and sophisticated soirées. The beauty of this cheese board lies in its flexibility—whether you require gluten-free options or want a vegetarian delight, I’ve mapped out everything you need. So, why settle for ordinary snacks when you can impress and delight with something extraordinary? Ready to dive into the art of cheese board crafting? Let’s explore!

Why is the Ultimate Cheese Board a Must-Try?

Versatility: You can customize the Ultimate Cheese Board to cater to various dietary preferences, ensuring everyone at your gathering is included.

Elegant Presentation: With vibrant colors and textures, your cheese board will not only taste amazing but also look incredibly inviting, making it the centerpiece of any table.

Quick and Easy: No complicated cooking steps! Just choose your ingredients, arrange them beautifully, and you're ready to serve. It’s the perfect solution for those last-minute invitations.

Flavor Exploration: Each combination of cheese and accompaniments creates a unique tasting experience that invites guests to explore different pairings—pair with some light wines to elevate the flavor!

Crowd-Pleasing: Who doesn’t love cheese? This board is sure to be a hit, offering something for everyone; it's a guaranteed conversation starter! Explore more pairing ideas with a spicy miso casserole or an elegant potato blue cheese pizza.

Ultimate Cheese Board Ingredients

For the Cheeses

  • Soft Cheese – Adds creaminess; Brie or Camembert can be substituted for a more luscious texture.
  • Mild Slicing Cheese – Offers an easy-to-eat option; consider using mild cheddar or gouda for a balanced flavor.
  • Aged Crumbly Cheese – Introduces depth of flavor and texture; aged manchego or blue cheese are intriguing alternatives.
  • Wild Card Cheese – Choose according to what's available or your preference; goat cheese or a flavored cheese can bring variety.

For the Accompaniments

  • Crostini or Crackers – Provides the crunchy base for all your delicious toppings; gluten-free crackers are ideal for gluten-free options.
  • Spicy Mustard – Contributes a tangy kick; feel free to swap it for hummus if you're looking for a creamy dip alternative.
  • Jellies or Preserves – Adds a touch of sweetness; fig or apricot preserves pair perfectly with cheeses.
  • Fresh Fruits (grapes, apples) – Freshness that balances the rich and savory notes.
  • Dried or Fresh Figs – Introduces a chewy texture along with an additional sweetness.
  • Mixed Pickles and Olives – Offers a savory contrast; marinated vegetables work as a wonderful substitute.
  • Salted Nuts – Provides a satisfying crunch; Marcona almonds or walnuts add a lovely flavor.
  • Marinated Artichokes/Peppadews – Brings unique, tangy flavors that enhance the overall experience.

Note: With these ingredients for the Ultimate Cheese Board, you’ll ensure a delightful spread that mesmerizes your guests!

Step‑by‑Step Instructions for Ultimate Cheese Board

Step 1: Choose Your Cheeses
Start by selecting four cheeses that vary in texture and flavor for your Ultimate Cheese Board. Aim for a soft cheese like Brie, a mild slicing cheese such as gouda, an aged crumbly cheese like manchego, and a wild card cheese of your choice. Allow the cheeses to sit at room temperature for about 30 minutes prior to serving, which enhances their flavors and makes them easier to slice.

Step 2: Prepare Accompaniments
While your cheeses are warming up, prepare an assortment of accompaniments. Slice fresh fruits like apples and grapes, and arrange them on the board. Get the crostini or crackers ready, and if you choose to use spreads, place small bowls for mustard, jellies, or hummus. Aim for a colorful and diverse mix that complements the cheeses, ensuring your Ultimate Cheese Board pops visually.

Step 3: Arrange the Cheeses
Begin to assemble your Ultimate Cheese Board by positioning the cheeses on a large wooden board or platter. Space them out to avoid overcrowding, allowing guests easy access to each cheese while creating an inviting presentation. You might want to cut a few slices from each cheese to encourage sampling and showcase their enticing textures.

Step 4: Fill Gaps with Accompaniments
Next, fill the spaces around the cheeses with your choice of crackers, fruits, nuts, and spreads. This step is essential in crafting a beautiful layout as well as providing a balanced array of flavors and textures. Be playful in your arrangement—let colors and shapes guide you to create a visually stunning display that invites conversation.

Step 5: Add Finishing Touches
For the finishing touch on the Ultimate Cheese Board, sprinkle salted nuts for added crunch and include marinated artichokes or olives to introduce tangy elements. If you have fresh herbs or edible flowers, consider placing them in the center for an artistic touch. Once everything is arranged, cover the board with plastic wrap if you are preparing ahead of time, and refrigerate until ready to serve.

Step 6: Serve and Enjoy
When it's time to serve, take the board out of the refrigerator about 15 minutes beforehand. This allows the cheeses to return to room temperature for optimal flavor. Present your Ultimate Cheese Board as the centerpiece of your gathering, and don’t forget to provide cheese knives for each cheese to ensure guests can easily serve themselves without mixing flavors.

Make Ahead Options

Creating the Ultimate Cheese Board ahead of time is a fantastic way to save precious moments on the day of your gathering! You can prepare many components, such as slicing fresh fruits, arranging nuts, and portioning spreads, up to 24 hours in advance. For the best quality, keep the cheeses in their original packaging until you're ready to serve. When you’re ready to impress your guests, simply arrange the cheeses on your board and fill in with the prepped accompaniments, giving it a fresh touch as you lay everything out. Allow the board to sit at room temperature for about 15 minutes before serving to enhance the flavors. With these prep-ahead strategies, you’ll enjoy a beautiful cheese board with minimal last-minute fuss!

How to Store and Freeze Ultimate Cheese Board

Fridge: Store any leftover components of your Ultimate Cheese Board in an airtight container. Soft cheeses and cut fruits should be used within 3 days for the best taste and freshness.

Room Temperature: If serving again within an hour or so, you can leave the remaining cheeses and accompaniments out at room temperature. Just avoid direct sunlight to maintain quality.

Freezer: While it's best to avoid freezing most cheeses for texture reasons, you can freeze certain hard cheeses if necessary. Wrap them tightly in plastic wrap and foil, using within 3 months for flavor conservation.

Reheating: Refrain from reheating cheeses; it's best enjoyed at room temperature. Bring any refrigerated items out about 15 minutes prior to serving to enhance flavors.

Ultimate Cheese Board Variations

Customize your Ultimate Cheese Board with these delightful twists that elevate your appetizer game!

  • Gluten-Free Options: Use gluten-free crackers or crostini to ensure everyone can enjoy this impressive spread.

  • Spicy Kick: Add sliced jalapeños or spiced nuts to introduce some heat and an exciting flavor contrast.

  • Fruit Infusion: Mix in seasonal fruits like pears or berries for a burst of freshness. Their sweetness beautifully complements the rich cheeses.

  • Nuts Variety: Swap salted nuts for spiced or honey-roasted varieties for an extra crunch and depth of flavor.

  • Bolder Cheeses: Choose strong-flavored cheeses such as Roquefort or aged Cheddar for a richer tasting experience. The complexity will surely impress!

  • Flavorful Spreads: Incorporate unique spreads like truffle honey or herbed olive oil to enrich your board with exciting notes. These elegant touches can leave a lasting impression.

  • Vegetarian Delight: Focus on plant-based cheeses made from nuts for a delicious dairy-free alternative. It's a wonderful way to cater to vegetarian guests.

  • Charcuterie Touch: For meat lovers, add thinly sliced cured meats such as prosciutto or salami. This addition will transform your cheese board into a charcuterie masterpiece!

Enhance your cheeseboard experience with these personalized touches and explore additional ideas like pairing with a delightful chocolate poke cake or a hearty spicy miso casserole.

Expert Tips for the Ultimate Cheese Board

  • Cheese Variety: Aim for a good mix of textures and flavors; balance creamy, crumbly, and aged cheeses for an inviting experience.

  • Presentation Matters: Invest time in the arrangement; a well-spread cheese board captivates and attracts guests. Avoid overcrowding to allow easy access.

  • Freshness is Key: Prepare items like cut fruits or toasted crackers just before serving; this ensures vibrant flavors and a delightful crunch.

  • Avoid Flavor Mixing: Provide a separate cheese knife for each cheese to keep flavors distinct and enhance the tasting experience.

  • Seasonal Touches: Incorporate seasonal fruits or local specialties; this not only adds freshness but also sparks conversation around your Ultimate Cheese Board.

  • Wine Pairing: Suggest light wines or craft beers that complement the cheeses to elevate the overall flavors and dining experience.

What to Serve with Ultimate Cheese Board

Imagine the delightful crunch of flavorful accompaniments and refreshing bites that heighten your cheese board experience.

  • Fresh Baguette Slices: Perfect for piling on cheese, these crusty slices add warmth and texture, enhancing the overall experience.
  • Honey Drizzle: A touch of sweet honey brings out the flavors in aged cheeses, creating a delightful contrast that elevates every bite.
  • Roasted Vegetables: Add a savory element with caramelized roasted veggies; their earthiness beautifully complements the cheeses.
  • Sparkling Wine: A chilled glass of bubbly enhances the cheese’s creaminess, making your gathering feel even more festive and luxurious.
  • Seasonal Fruits: Incorporating fruits like figs or pears brightens the board, offering a refreshing contrast to the richness of cheese.
  • Chocolate Truffles: Add a decadent touch to your pairing; the rich sweetness balances savory notes and invites indulgence.
  • Olive Tapenade: Swirl this savory spread onto your crackers for a burst of Mediterranean flavors that pairs beautifully with the cheeses.
  • Craft Beer: Consider pairing with a light IPA; it complements the board’s richness and refreshes the palate for another bite.
  • Nuts & Dried Fruits: Crunchy nuts and chewy dried fruits present an additional textural layer, enticing guests with varied flavors.
  • Herb-Infused Olive Oil: A drizzle of this aromatic oil brings a burst of freshness and enhances the flavor profile of the cheeses.

Ultimate Cheese Board Recipe FAQs

What types of cheeses should I include for the Ultimate Cheese Board?
Absolutely! Aim for a delightful mix by selecting four types of cheese. For a well-rounded experience, include a soft cheese like Brie or Camembert, a mild slicing cheese such as gouda or mild cheddar, an aged crumbly cheese like manchego or blue cheese, and a wild card cheese that fits your taste, like goat cheese or a flavored option. This variety will create engaging textures and flavors!

How should I store leftovers from my Ultimate Cheese Board?
Very good question! To keep your Ultimate Cheese Board fresh, store any leftover components in an airtight container in the fridge. Ideally, soft cheeses and cut fruits should be consumed within 3 days. When storing, it’s best to cover cheeses with plastic wrap to avoid them drying out or absorbing other odors.

Can I freeze any components of my Ultimate Cheese Board?
The more the merrier! While most cheeses don't freeze well due to texture changes, hard cheeses can be frozen if necessary. Wrap them tightly in plastic wrap and then in foil. Use these within 3 months for the best flavor. Just remember to thaw them in the refrigerator instead of at room temperature to maintain their quality.

What if I need gluten-free options for my cheese board?
No worries at all! Simply substitute crostini or regular crackers with gluten-free crackers. There are plenty of options available today that maintain delicious crunch without gluten. Additionally, you can incorporate other crunchy elements like nuts or even veggie sticks to keep it tasty and varied!

How can I elevate the flavor of my cheese board?
Absolutely, here’s how! Pair your cheeses with complementary accompaniments like fruity jams or spicy mustards to enhance the flavors. Fresh herbs, edible flowers, or a drizzle of local honey adds a gorgeous touch. Suitable wine or craft beer pairings could also enhance the experience, guiding guests on flavorful adventures as they sample each element.

What should I do if my cheese starts to sweat or get too warm?
That's a great observation! If you notice your cheeses sweating or softening too much, it may be time to move them to a cooler area. Ideally, keep the board out of direct sunlight and serve in a climate-controlled environment. If you’re hosting outside, consider placing the board on a cooling tray or surrounded by ice to keep everything chill and fresh longer.

Ultimate Cheese Board

Ultimate Cheese Board: Impress with Flavorful Combinations

Create the Ultimate Cheese Board for a delightful gathering, featuring cheese varieties and perfect accompaniments.
Print Recipe Pin Recipe
Prep Time 15 minutes mins
Resting Time 30 minutes mins
Total Time 45 minutes mins
Servings: 8 servings
Course: Appetizers
Cuisine: International
Calories: 350
Ingredients Equipment Method Nutrition Notes

Ingredients
  

Cheeses
  • 1 round Brie or Camembert soft cheese, adds creaminess
  • 1 block Mild cheddar or gouda mild slicing cheese
  • 1 block Aged manchego or blue cheese aged crumbly cheese
  • 1 round Goat cheese or flavored cheese wild card cheese
Accompaniments
  • 1 box Crostini or crackers gluten-free options available
  • 1 jar Spicy mustard can swap for hummus
  • 1 jar Fig or apricot preserves
  • 1 cup Fresh fruits (grapes, apples)
  • 1 cup Dried or fresh figs
  • 1 cup Mixed pickles and olives marinated vegetables work well
  • 1 cup Salted nuts Marcona almonds or walnuts
  • 1 cup Marinated artichokes or Peppadews

Equipment

  • Cutting Board
  • Cheese knives

Method
 

Steps
  1. Choose four cheeses that vary in texture and flavor: soft cheese, mild slicing cheese, aged crumbly cheese, and wild card cheese. Allow them to sit at room temperature for 30 minutes before serving.
  2. Prepare an assortment of accompaniments, slicing fresh fruits and arranging them on the board. Get crostini or crackers ready, placing bowls for spreads.
  3. Arrange cheeses on a large wooden board or platter, spacing them to avoid overcrowding. Cut some slices to encourage sampling.
  4. Fill gaps with crackers, fruits, nuts, and spreads, creating a visually stunning display while ensuring a balanced array of flavors.
  5. Add finishing touches like salted nuts and marinated artichokes. Cover with plastic wrap if preparing ahead of time and refrigerate until serving.
  6. Serve after taking the board out of the refrigerator 15 minutes beforehand. Provide cheese knives for each cheese.

Nutrition

Serving: 1servingCalories: 350kcalCarbohydrates: 30gProtein: 15gFat: 25gSaturated Fat: 10gPolyunsaturated Fat: 5gMonounsaturated Fat: 5gCholesterol: 60mgSodium: 500mgPotassium: 300mgFiber: 3gSugar: 5gVitamin A: 200IUVitamin C: 5mgCalcium: 400mgIron: 2mg

Notes

This cheese board is great for any occasion, providing flexibility for dietary preferences and seasonal touches.

Tried this recipe?

Let us know how it was!

Healthy Apple Nachos That Will Make Snacking Fun Again

September 5, 2025 by Grace Snow Leave a Comment

There's something magical about transforming everyday ingredients into a fun, shareable treat. That's exactly what these Healthy Apple Nachos deliver! With crisp apple slices topped with a creamy yogurt drizzle and crunchy nuts, this easy-to-make snack is perfect for both kids and adults alike. Not only does this recipe offer a quick and satisfying solution for those hungry moments, but it's also a guilt-free way to indulge in a nutritious bite. You can easily personalize it with your favorite toppings, making it a crowd-pleaser for parties or a delightful dessert alternative for those trying to eat healthier. Ready to take your snacking game to the next level? Let's dive into the world of Apple Nachos!

Why Are Apple Nachos So Irresistible?

Flavorful and Fun: These Apple Nachos are a delightful twist on traditional snacking, transforming healthier options into a playful treat.
Versatile Toppings: Create your own masterpiece with options like granola or chocolate chips, ensuring everyone finds their favorite combination.
Quick and Easy: With minimal prep time, this recipe is perfect for busy individuals or families wanting a swift yet satisfying snack.
Nutritious Delight: Packed with vitamins from apples and protein from yogurt, Apple Nachos are a guilt-free indulgence.
Kid-Approved: This playful and colorful dish is sure to be a hit with kids, making healthy eating an enjoyable experience for the whole family.
For other healthy snacking ideas, check out Chicken Salad Apples.

Apple Nachos Ingredients

For the Base

  • Apples – Choose sweet varieties like Fuji or Honeycrisp for a refreshing and crunchy foundation.
  • Yogurt – Adds a creamy flavor and protein boost; opt for Greek yogurt for extra thickness or vegan yogurt for a plant-based option.

For the Crunch

  • Almonds – Provide a delightful crunch and nutty flavor; feel free to substitute with peanuts, walnuts, or leave them out for a nut-free version.

For the Extras

  • Optional Toppings – Get creative by adding granola, chocolate chips, or dried fruit to elevate your Apple Nachos with extra flavor and texture!

Step‑by‑Step Instructions for Apple Nachos

Step 1: Slice Apples
Begin by washing your chosen sweet apples, such as Fuji or Honeycrisp, thoroughly under cool water. Using a sharp knife, core and slice the apples into thin wedges, keeping the skin on for extra texture. Aim for uniform thickness of about 1/4 inch to ensure even distribution of toppings and ease of handling. Arrange the slices on a large plate for the next step.

Step 2: Prepare Drizzle
In a mixing bowl, combine your yogurt of choice—Greek or vegan—with any sweeteners like honey or a sprinkle of cinnamon, depending on your flavor preference. Stir until the mixture is smooth and well-blended. This creamy yogurt drizzle will complement the fresh apple slices beautifully, adding a delightful richness to your Apple Nachos.

Step 3: Assemble
Take your arranged apple slices and start drizzling the prepared yogurt mixture generously over them. Use a spoon or a squeeze bottle for precision, ensuring each slice gets a lovely coating of the creamy treat. This step makes your Apple Nachos look appealing and brings out their fresh flavors, setting the stage for the next exciting addition.

Step 4: Top with Nuts
Sprinkle your choice of chopped almonds or other nuts, such as peanuts or walnuts, over the drizzled apples for that perfect crunch. Aim for an even distribution to ensure every bite has some nutty goodness. The nuts not only add texture but also a boost of healthy fats, enhancing the overall appeal of your Apple Nachos.

Step 5: Add Optional Toppings
Now, get creative with optional toppings! Consider sprinkling granola, chocolate chips, or dried fruit over your Apple Nachos for extra flair and flavor. These additions can elevate the dish, giving it a unique twist that caters to everyone’s taste preferences. This step makes your snack not only nutritious but also visually stunning.

Step 6: Serve Immediately
Serve the Apple Nachos right away to enjoy their freshness and crispness. If you need to store them, cover the plate with plastic wrap and place it in the refrigerator, but try to consume within 2 hours for the best texture. Present these delightful Apple Nachos at your next gathering or enjoy them as a quick, healthy snack at home—either way, they’re sure to impress!

Expert Tips for Apple Nachos

  • Choose Crisp Apples: Select firm types like Fuji or Honeycrisp for the best texture; avoid soft apples to prevent sogginess in your Apple Nachos.
  • Prep Ahead: If making in advance, toss apple slices in lemon juice to prevent browning; this keeps them looking fresh longer.
  • Customize Toppings: Feel free to mix and match toppings; be cautious with sweet additions like chocolate chips to maintain a healthy balance.
  • Correct Portion Sizes: Aim for thin apple wedges (about 1/4 inch) to make them easy to handle and dip, ensuring every bite is delightful.
  • Serve Fresh: For best texture and flavor, serve Apple Nachos immediately after assembling; if necessary, store in an airtight container for no more than 2 hours.

What to Serve with Healthy Apple Nachos

Transform your Apple Nachos into a vibrant meal that delights the senses with complementary dishes and beverages.

  • Crispy Pita Chips: These crunchy, salty chips provide a delightful contrast to the sweetness of apple nachos, perfect for dipping into yogurt.
  • Mixed Green Salad: A refreshing side that balances sweetness with crisp greens and a tangy vinaigrette, elevating the overall meal experience.
  • Fruit Salad: A colorful blend of seasonal fruits will harmonize with the apple flavor, adding variety and additional nutrients to your snack.
  • Cheese Platter: Pairing with a selection of cheeses like sharp cheddar or creamy brie offers a delightful contrast in flavors and textures.
  • Nut Butter Dips: A bowl of peanut or almond butter creates a creamy dip that adds richness and pairs excellently with the apple’s crunch.
  • Sparkling Water: A refreshing drink option that cleanses the palate, making it an ideal choice to accompany the sweet and tangy flavors of the apple nachos.
  • Dark Chocolate Dipped Strawberries: These add a touch of indulgence and naturally complement the fruitiness of apple nachos for a sweet finish.
  • Homemade Trail Mix: Craft a mix with nuts, seeds, and dried fruits that mirrors the toppings on your nachos, providing an exciting crunch alongside.
  • Vitamin-Boosting Smoothie: A smoothie with spinach and banana pairs well, as it adds nutrients, making your snack feel complete without feeling heavy.

Apple Nachos: Exciting Variations Await!

Feel free to get creative and customize your Apple Nachos to match your tastes and dietary needs!

  • Nut-Free: Omit the almonds and replace them with sunflower seeds for added crunch without the nuts.

  • Vegan Twist: Use coconut yogurt instead of traditional yogurt for a delightful plant-based option that still packs flavor.

  • Dessert Delight: Drizzle a bit of melted dark chocolate over the toppings for a decadent twist, perfect for satisfying sweet cravings.

  • Berry Boost: Top your Apple Nachos with mixed berries like strawberries or blueberries for an additional layer of freshness and nutrition.

  • Spicy Kick: Add a sprinkle of cayenne pepper or chili powder to the yogurt mix for a surprising and delightful heat contrast.

  • Snack on Granola: Instead of nuts, use your favorite granola for a chewy texture that offers a delicious hidden crunch.

  • Chocolate Hazelnut: Swap out the yogurt drizzle entirely for a luscious layer of chocolate hazelnut spread to create an indulgent dessert version.

  • Cinnamon Sugar: Dust the finished dish with a light sprinkle of cinnamon sugar for an extra touch of sweetness that complements the apples beautifully.

For more inspiration, check out how to elevate your snack game with other fun ingredients like those in Chicken Salad Apples. Enjoy these delicious variations as you create your perfect Apple Nachos!

Storage Tips for Apple Nachos

Fridge: Store any leftovers in an airtight container for up to 2 hours to maintain freshness and crunch; the apples will brown if left longer.

Room Temperature: Best enjoyed immediately after preparation; if left out, consume within 30 minutes for optimal taste and texture.

Reheating: If the yogurt drizzle becomes too thick in the fridge, simply mix in a little extra yogurt before serving to restore its creamy consistency; avoid reheating the apple slices to keep them crisp.

Pro Tip: To prolong the life of leftover apple slices, spritz them with lemon juice before storing them; this can help maintain their vibrant color and crunch in your delicious Apple Nachos.

Make Ahead Options

Apple Nachos are perfect for meal prep, allowing you to enjoy a quick and healthy snack at any time! You can slice your apples and toss them with lemon juice to prevent browning up to 24 hours in advance. Store the apple slices in an airtight container in the refrigerator to maintain their freshness. Additionally, you can prepare the yogurt drizzle by mixing it with sweeteners and refrigerating it for up to 3 days. When it's time to serve, simply arrange your apples on a plate, drizzle with yogurt, and top with nuts and your choice of optional toppings for a delightful treat that’s just as delicious as when freshly made!

Apple Nachos Recipe FAQs

What kind of apples should I use for Apple Nachos?
Absolutely! You can use sweet varieties like Fuji or Honeycrisp, as they provide the perfect balance of sweetness and crunch. Avoid softer apples, as they may become mushy and unappealing in your Apple Nachos.

How should I store leftover Apple Nachos?
For the best crunch and flavor, store any leftovers in an airtight container in the refrigerator for up to 2 hours. If left out, try to consume them within 30 minutes to prevent the apples from browning and becoming soggy.

Can I freeze Apple Nachos?
While it’s best to consume Apple Nachos fresh, you can freeze the individual ingredients for later use. Slice apples and toss them in lemon juice to prevent browning, then freeze them in a single layer on a baking sheet for about 1-2 hours. Once frozen, transfer them to a freezer bag. They can be stored for up to 3 months; however, the texture may change upon thawing, so it’s ideal to prepare the yogurt and toppings fresh when you're ready to enjoy.

What if I want to make Apple Nachos nut-free?
Very! You can simply omit the almonds or substitute them with seeds like pumpkin or sunflower seeds for that delightful crunch without the nuts. Additionally, consider using a nut-free yogurt to keep the recipe allergy-friendly.

What can I use as a substitute for yogurt in Apple Nachos?
If you’re looking for alternatives, you can use a dairy-free yogurt, or even try a drizzle of honey or maple syrup if you prefer a sweeter bite. For a creamy texture without yogurt, consider blending a banana with a splash of almond milk and drizzling that over your apple slices!

How do I prevent the apples from browning after slicing?
I often recommend using lemon juice to prevent browning. After slicing your apples, toss them in a mixture of water and 1-2 tablespoons of lemon juice. This simple step keeps them looking fresh and crisp for your Apple Nachos!

Apple Nachos

Healthy Apple Nachos That Will Make Snacking Fun Again

Delightful Healthy Apple Nachos are a fun, nutritious treat perfect for snacking.
Print Recipe Pin Recipe
Prep Time 15 minutes mins
Total Time 15 minutes mins
Servings: 4 servings
Course: Snacks
Cuisine: American
Calories: 180
Ingredients Equipment Method Nutrition Notes

Ingredients
  

For the Base
  • 3 medium Apples (Fuji or Honeycrisp) Choose sweet varieties for best flavor.
  • 1 cup Yogurt Greek or vegan yogurt for a creamy drizzle.
For the Crunch
  • 1/2 cup Almonds Can substitute with peanuts or walnuts.
For the Extras
  • 1/4 cup Optional Toppings Granola, chocolate chips, or dried fruit.

Equipment

  • Knife
  • Mixing Bowl
  • Spoon
  • Plate
  • squeeze bottle

Method
 

Step-by-Step Instructions for Apple Nachos
  1. Slice the apples into thin wedges after washing them. Aim for uniform thickness of about 1/4 inch.
  2. In a mixing bowl, combine yogurt with sweeteners and stir until smooth.
  3. Drizzle the yogurt mixture generously over the sliced apples.
  4. Sprinkle chopped almonds or other nuts over the drizzled apples.
  5. Add optional toppings like granola or chocolate chips for extra flavor.
  6. Serve immediately to enjoy freshness; store covered in the fridge if needed.

Nutrition

Serving: 1servingCalories: 180kcalCarbohydrates: 30gProtein: 5gFat: 6gSaturated Fat: 1gPolyunsaturated Fat: 0.5gMonounsaturated Fat: 4gSodium: 50mgPotassium: 200mgFiber: 5gSugar: 15gVitamin A: 200IUVitamin C: 10mgCalcium: 100mgIron: 1mg

Notes

Best texture and flavor achieved when served immediately. Spritz apples with lemon juice if prepping ahead to prevent browning.

Tried this recipe?

Let us know how it was!

Delicious Pumpkin Smoothie for a Cozy Fall Morning

September 5, 2025 by Grace Snow Leave a Comment

As I sipped my latest creation, the earthy notes of pumpkin blended harmoniously with the warmth of spices, transporting me straight to a cozy autumn day. This Creamy Pumpkin Smoothie captures the essence of fall, offering a healthy twist on your favorite dessert with its rich flavors and smooth texture. Packed with protein from Greek yogurt and naturally sweetened with ripe bananas, this smoothie is not just a treat; it's a delightful addition to your brunch table or a quick breakfast option on those bustling mornings. Plus, with a simple swap for vegan yogurt, it embraces a variety of dietary preferences without sacrificing taste. Are you ready to indulge in a fall favorite that feels both comforting and nurturing?

Why is this Pumpkin Smoothie special?

Comforting and Creamy: This smoothie is like wrapping yourself in a warm blanket on a chilly day, with its thick, velvety texture reminiscent of pumpkin pie filling.
Healthy Indulgence: Packed with protein from Greek yogurt and natural sweetness from bananas, it’s a guilt-free treat that nourishes both body and soul.
Versatile Options: Easily transform it into a vegan-friendly delight by substituting the yogurt and milk, ensuring everyone can enjoy this fall favorite!
Quick and Easy: Ready in under 10 minutes, this recipe is perfect for busy mornings or spontaneous brunch gatherings.
Crowd-Pleasing Flavor: Rich in warm spices that evoke autumn, serve it at your next get-together and watch it disappear! Perfect with a sprinkle of cinnamon, this smoothie is your ticket to cozy vibes this season.

Pumpkin Smoothie Ingredients

• Perfect for cozy fall mornings!

For the Smoothie

  • Pumpkin Puree – Provides the main flavor and deliciously smooth texture; use canned or roasted fresh for added depth.
  • Greek Yogurt – Adds creaminess and protein; swap for vegan yogurt to create a dairy-free pumpkin smoothie.
  • Banana – Contributes natural sweetness and an indulgent creamy texture; choose ripe bananas for maximum flavor.
  • Maple Syrup – Enhances sweetness and complements the spices perfectly; adjust according to your taste preference.
  • Pumpkin Pie Spices – Infuses the smoothie with classic fall flavors; feel free to mix with cinnamon, nutmeg, or ginger for that cozy vibe.
  • Milk (Cow’s or Plant-Based) – Achieves your desired consistency; substitute almond or oat milk to keep it vegan-friendly.

Step‑by‑Step Instructions for Pumpkin Smoothie

Step 1: Blend Ingredients
In a blender, combine ½ cup pumpkin puree, 1 cup Greek yogurt, 1 ripe banana, 1 tablespoon maple syrup, and 1 teaspoon pumpkin pie spices. Blend on medium speed for about 30–45 seconds until the mixture is smooth and well combined. You'll want to see a creamy, uniform texture with no lumps.

Step 2: Add Milk
Gradually pour in ½ cup of your choice of milk—cow's or plant-based—while the blender is running. Blend for another 15–30 seconds until you achieve your desired consistency. The smoothie should be creamy but pourable, so adjust the milk as needed to reach the perfect thickness.

Step 3: Blend Until Smooth
Continue blending the pumpkin smoothie for an additional 15–20 seconds. Stop to scrape down the sides with a spatula, ensuring that all ingredients are fully incorporated. Look for a velvety texture that resembles a thick milkshake; this indicates it’s ready for tasting.

Step 4: Taste & Adjust
Once blended, taste the smoothie to ensure that it meets your flavor preferences. If you feel it needs a little more sweetness, add a touch more maple syrup or additional pumpkin pie spices. Blend for a few more seconds to integrate any adjustments effectively.

Step 5: Serve
Pour the creamy pumpkin smoothie into festive glasses, making sure to fill them to the brim for a vibrant presentation. If desired, garnish with a sprinkle of cinnamon on top for an extra touch of autumn flair. Serve chilled for a refreshing experience that captures the essence of fall.

How to Store and Freeze Pumpkin Smoothie

Fridge: Store your pumpkin smoothie in an airtight container for up to 24 hours. Give it a good stir before serving, as separation may occur.

Freezer: For longer storage, freeze the smoothie in individual portions using freezer-safe bags or containers. It can last up to 3 months; just blend again after thawing to restore its creamy texture!

Serving Tips: Always allow the frozen smoothie to thaw overnight in the fridge for optimal flavor and consistency. Enjoy it as a quick morning treat or a healthy snack!

Ingredient Freshness: To maintain the best taste, consume your pumpkin smoothie as soon as possible, especially if using fresh ingredients.

Pumpkin Smoothie Variations & Substitutions

Want to make this pumpkin smoothie your own? Let your creativity shine in the kitchen with these delightful twists!

  • Vegan Option: Replace Greek yogurt with your favorite plant-based yogurt for a creamy, dairy-free delight.
  • Sweetener Swap: Experiment with agave nectar, honey, or stevia to customize your sweetness level.
  • Green Boost: Add a handful of spinach or kale for a nutritious green twist—don't worry, the pumpkin flavor still shines through!
  • Nutty Flavor: Stir in a tablespoon of almond or peanut butter for a delicious, nutty depth that pairs beautifully with pumpkin.
  • Spice It Up: Play with different spice combinations, like cardamom or allspice, to give your smoothie a unique flair.
  • Chill Factor: For an extra cool treat, freeze your banana slices beforehand or toss in some ice cubes while blending.
  • Chocolate Twist: Blend in a spoonful of cocoa powder or chocolate protein powder for a rich, dessert-like experience.
  • Tropical Vibes: Substitute half the pumpkin puree with ripe mango for a sweet, tropical version that still captures fall flavors.

If you’re looking for more fall-inspired recipes, check out my decadent Pumpkin Brownies Decadent or whip up a bright and refreshing Pitaya Smoothie Bowl. The possibilities are endless!

Expert Tips for Pumpkin Smoothie

  • Use Fresh Pumpkin: Fresh roasted pumpkin adds a depth of flavor that canned puree can't match. Just ensure it's well-puréed for optimal texture.
  • Choose Ripe Bananas: Ripe bananas not only lend sweetness but also make your pumpkin smoothie creamier. Underripe bananas can lead to a less flavorful result.
  • Adjust Consistency: If your smoothie is too thick, gradually add extra milk until you reach your desired consistency. Avoid dumping in a lot at once to prevent it from becoming too runny.
  • Customize Spices: While pumpkin pie spices are key, don't hesitate to adjust them based on your taste. A dash of allspice or a hint of cloves can elevate your flavor profile!
  • Garnish for Flair: A sprinkle of cinnamon or a dollop of yogurt on top can enhance not just the look but also the flavor of your pumpkin smoothie, making it inviting and delicious.
  • Vegan Substitutions: For a fantastic vegan pumpkin smoothie, substitute Greek yogurt with your favorite plant-based yogurt and opt for almond or oat milk.

Make Ahead Options

These Pumpkin Smoothies are perfect for meal prep enthusiasts! You can prepare all the ingredients (pumpkin puree, Greek yogurt, banana, maple syrup, and spices) up to 24 hours in advance by measuring and storing them in an airtight container in the refrigerator. To keep the banana from browning, consider adding a few drops of lemon juice. When you're ready to enjoy your smoothie, simply blend the prepped ingredients with the milk until smooth. This approach saves you valuable time during busy mornings; you can have a delicious and nutritious Pumpkin Smoothie ready in just a few minutes! Just remember to stir well if it’s been sitting in the fridge.

What to Serve with Creamy Pumpkin Smoothie?

Indulge in the cozy flavors of fall by pairing this delightful smoothie with accompaniments that elevate your snacking experience.

  • Crunchy Granola: Adds a satisfying crunch and nuttiness, making each sip of the smoothie even more delicious.
  • Spiced Oatmeal Cookies: The warm spices in cookies mirror the flavors of the smoothie, creating a delightful combination of textures and tastes.
  • Cinnamon Toast: A crunchy, buttery slice of cinnamon toast beautifully complements the creamy nature of the smoothie and brings the warmth of fall.
  • Autumn Fruit Salad: Fresh apples, pears, and pomegranates add a refreshing burst of sweetness and a pop of color on your brunch table.
  • Chai Latte: The spiced, aromatic notes of a chai latte harmonize perfectly with the pumpkin flavors and create the ultimate cozy beverage pairing.
  • Warm Muffins: From blueberry to bran, warm muffins add a delicious contrast to the cold smoothie, making it an ideal breakfast companion.
  • Almond Milk Latte: Velvet-smooth almond milk coffee adds a nutty flavor that beautifully contrasts with the richness of the pumpkin smoothie.
  • Pumpkin Scones: These sweet treats echo the flavors of the smoothie while providing a flaky texture that’s simply irresistible with a cup of tea.
  • Maple Syrup Drizzle Dipped Pretzels: A unique twist! The salty pretzels with a sweet maple touch make for a perfect palate cleanser between sips.
  • Gingerbread Biscotti: These crunchy cookies offer a delightful crunch and seasonal spiciness that complements the smooth, creamy pumpkin goodness.

Pumpkin Smoothie Recipe FAQs

What types of pumpkin puree should I use?
Absolutely! You can use either canned pumpkin puree or homemade fresh pumpkin puree. If you opt for fresh, roast pumpkin until tender, then blend until smooth for a richer flavor. Just ensure there are no lumps for the best texture.

How should I store my pumpkin smoothie?
To keep your pumpkin smoothie fresh, store it in an airtight container in the fridge for up to 24 hours. If you notice separation, simply give it a good stir before serving to reincorporate the ingredients.

Can I freeze pumpkin smoothie for later use?
Very! Freeze your pumpkin smoothie in individual portions using freezer-safe bags or containers. It will stay fresh for up to 3 months. To enjoy, thaw it overnight in the fridge and give it a quick blend to restore its creamy goodness.

What if my smoothie is too thick?
If you find your smoothie is a bit thicker than desired, don't worry! Gradually add extra milk—either cow's or plant-based—while blending until you reach your desired consistency. Mixing in more liquid a little at a time helps prevent it from becoming too runny.

Are there any dietary restrictions to consider when making this smoothie?
Absolutely! This pumpkin smoothie is versatile. For those with dairy allergies, simply substitute Greek yogurt with a plant-based yogurt and choose almond or oat milk. It's also gluten-free and can be enjoyed as a vegan treat.

What if I want to enhance the flavor with more spices?
For an even warmer flavor profile, feel free to customize your spices! Adding a dash of allspice or a hint of cloves can bring an exciting twist to the pumpkin smoothie. Just start with a small amount and adjust to your taste preference—it's all about inviting those lovely fall flavors!

Pumpkin Smoothie

Delicious Pumpkin Smoothie for a Cozy Fall Morning

This Pumpkin Smoothie is a creamy, healthy treat perfect for autumn mornings.
Print Recipe Pin Recipe
Prep Time 10 minutes mins
Total Time 10 minutes mins
Servings: 2 glasses
Course: Breakfast
Cuisine: American
Calories: 250
Ingredients Equipment Method Nutrition Notes

Ingredients
  

For the Smoothie
  • 1/2 cup pumpkin puree canned or roasted fresh
  • 1 cup Greek yogurt or vegan yogurt for dairy-free
  • 1 ripe banana for maximum flavor
  • 1 tablespoon maple syrup adjust according to taste
  • 1 teaspoon pumpkin pie spices or mix with cinnamon, nutmeg, or ginger
  • 1/2 cup milk cow’s or plant-based

Equipment

  • Blender

Method
 

Step-by-Step Instructions
  1. In a blender, combine pumpkin puree, Greek yogurt, ripe banana, maple syrup, and pumpkin pie spices. Blend on medium speed for about 30–45 seconds until smooth.
  2. Gradually pour in your choice of milk while blending. Blend for another 15–30 seconds until you achieve your desired consistency.
  3. Continue blending for an additional 15–20 seconds, and scrape down the sides to ensure all ingredients are fully incorporated.
  4. Taste the smoothie and adjust sweetness with more maple syrup or spices if needed. Blend again for a few seconds.
  5. Pour the smoothie into glasses, garnish with cinnamon if desired, and serve chilled.

Nutrition

Serving: 1glassCalories: 250kcalCarbohydrates: 45gProtein: 10gFat: 4gSaturated Fat: 1gPolyunsaturated Fat: 0.5gMonounsaturated Fat: 2gCholesterol: 5mgSodium: 100mgPotassium: 450mgFiber: 5gSugar: 20gVitamin A: 3500IUVitamin C: 10mgCalcium: 150mgIron: 1mg

Notes

Store in an airtight container for up to 24 hours or freeze in portions for up to 3 months.

Tried this recipe?

Let us know how it was!
  • « Previous Page
  • 1
  • …
  • 153
  • 154
  • 155
  • 156
  • 157
  • …
  • 179
  • Next Page »

Welcome!

Hi, I’m Grace, a Sydney-based home cook with a passion for bold flavors and trending ingredients. Whether you’re a busy beginner or a seasoned foodie, you’ll find dishes here that are fresh, fun, and full of flavor.

More about me

Popular Recipes

  • Cheesy Chicken Garlic Bread Sandwich
    Cheesy Chicken Garlic Bread Sandwich for Cozy Family Moments
  • Easy Chicken Ranch Wraps
    Easy Chicken Ranch Wraps: Quick, Creamy & Totally Satisfying
  • Chicken Caesar Sandwiches
    Delicious Chicken Caesar Sandwiches for Quick Comfort Food
  • best Cuban sandwich
    The Best Cuban Sandwich You’ll Want Every Weeknight!

Footer

↑ back to top

About

  • Privacy Policy
  • Disclaimer
  • Terms & Conditions

Newsletter

  • Sign Up! for emails and updates

Contact

  • About me
  • Contact me

Copyright © 2025 TastyTrendIngredients