tastytrendingredients

  • Home
  • Recipes
    • Appetizers
    • Breakfast
    • Dessert
    • Dinner
    • Drinks
    • Salads
    • Snacks
    • Soups
  • About me
  • Contact me
menu icon
go to homepage
  • Home
  • Recipes
    • Appetizers
    • Breakfast
    • Dessert
    • Dinner
    • Drinks
    • Salads
    • Snacks
    • Soups
  • About me
  • Contact me
search icon
Homepage link
  • Home
  • Recipes
    • Appetizers
    • Breakfast
    • Dessert
    • Dinner
    • Drinks
    • Salads
    • Snacks
    • Soups
  • About me
  • Contact me
×

Cozy Up with Tomato Soup and Fluffy Cheese Dumplings

October 28, 2025 by Grace Snow Leave a Comment

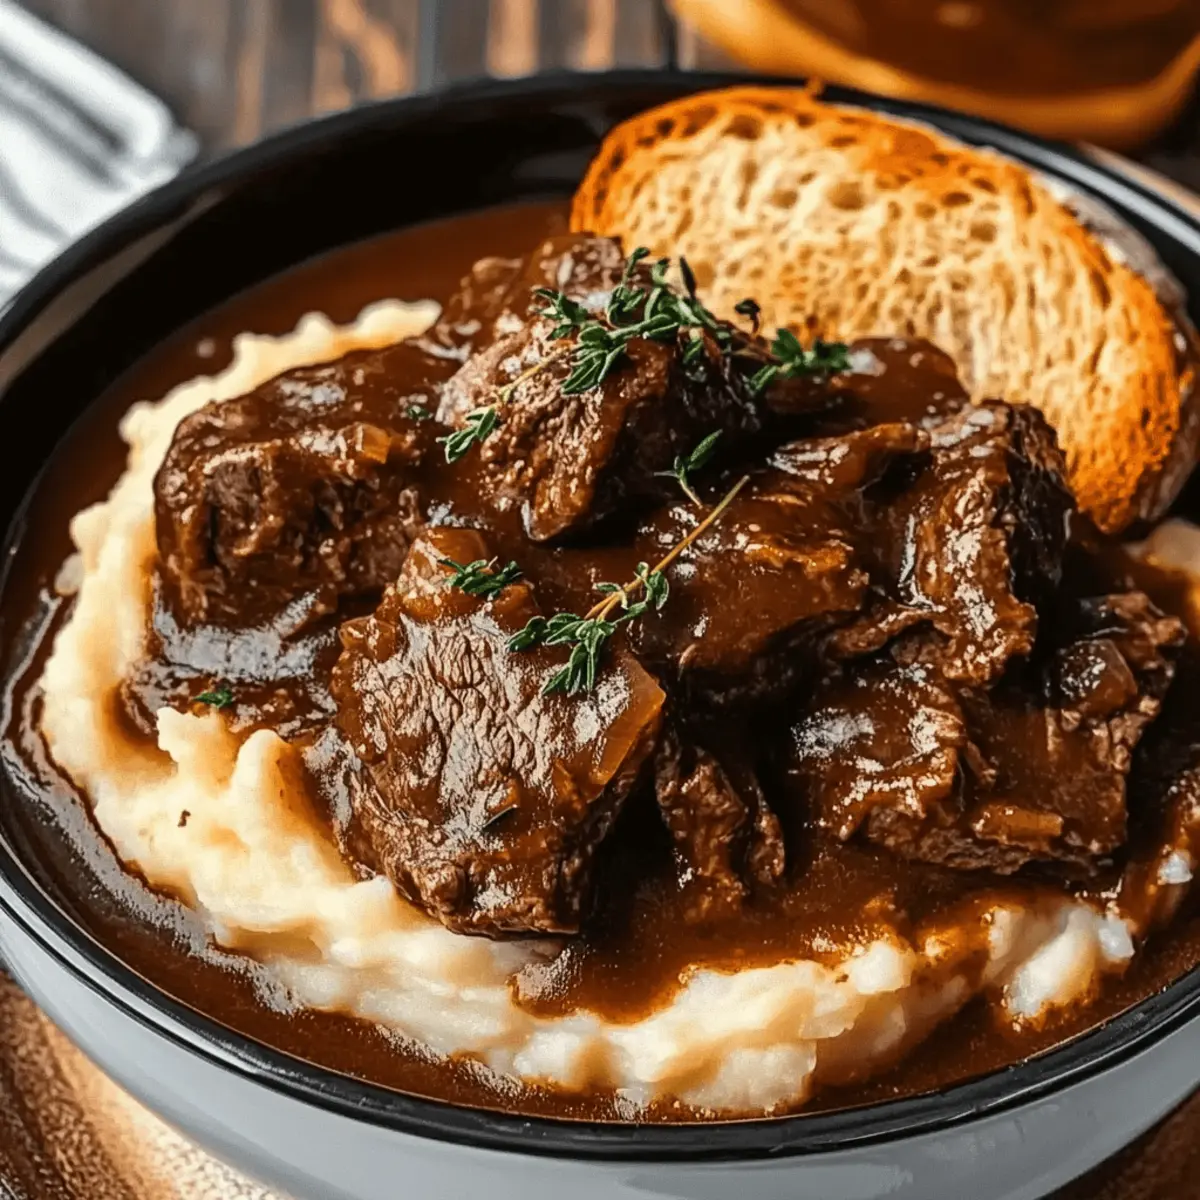
As I stood by the stove, the tantalizing aroma of simmering tomatoes filled my kitchen, instantly transporting me back to my childhood home. The comfort of a bowl of Tomato Soup with Cheese Dumplings was often my cozy retreat on chilly days, and I can’t help but share this delightful recipe with you. This dish not only warms you from the inside out but also offers a simple yet elegant twist with fluffy cheese dumplings that are a breeze to make. Perfect for family gatherings or a quiet evening in, this vegetarian comfort food ensures a hug in every spoonful. Are you ready to whip up a dish that brings back those sweet memories? Let’s dive in!

Why is This Tomato Soup a Must-Try?

Comforting Warmth: This recipe offers a heartwarming bowl of creamy tomato soup that brings nostalgia and warmth to chilly days. Fluffy Dumplings are the perfect companion, elevating this dish to a cozy classic loved by all. Quick to Prepare: With minimal prep time, you can enjoy a flavorful experience in under an hour. Versatile Ingredients: Feel free to customize with different cheeses or herbs, just like in our Potato Blue Cheese recipe! Crowd-Pleasing Appeal: Ideal for family dinners or cozy get-togethers, this dish will leave everyone asking for seconds.

Tomato Soup with Cheese Dumplings Ingredients

For the Soup

  • Ripe Tomatoes – Provides natural sweetness and base flavor. Substitutions: Canned tomatoes can be used for convenience without sacrificing taste.
  • Onion – Adds depth and savory flavor.
  • Garlic – Enhances aroma and adds a punch of flavor; use fresh for the best results.
  • Vegetable Broth – Forms the soup base; using low-sodium helps control saltiness.
  • Cream – Imparts a luxurious, velvety texture.
  • Pepper and Salt – Essential for seasoning and flavor enhancement.

For the Dumplings

  • Cheese (Cheddar or Parmesan) – Melts perfectly into dumplings for added richness.
  • Flour – Binds dumpling ingredients together.
  • Baking Powder – Ensures dumplings rise and become fluffy.
  • Fresh Basil or Oregano – Adds refreshing herbaceous notes.

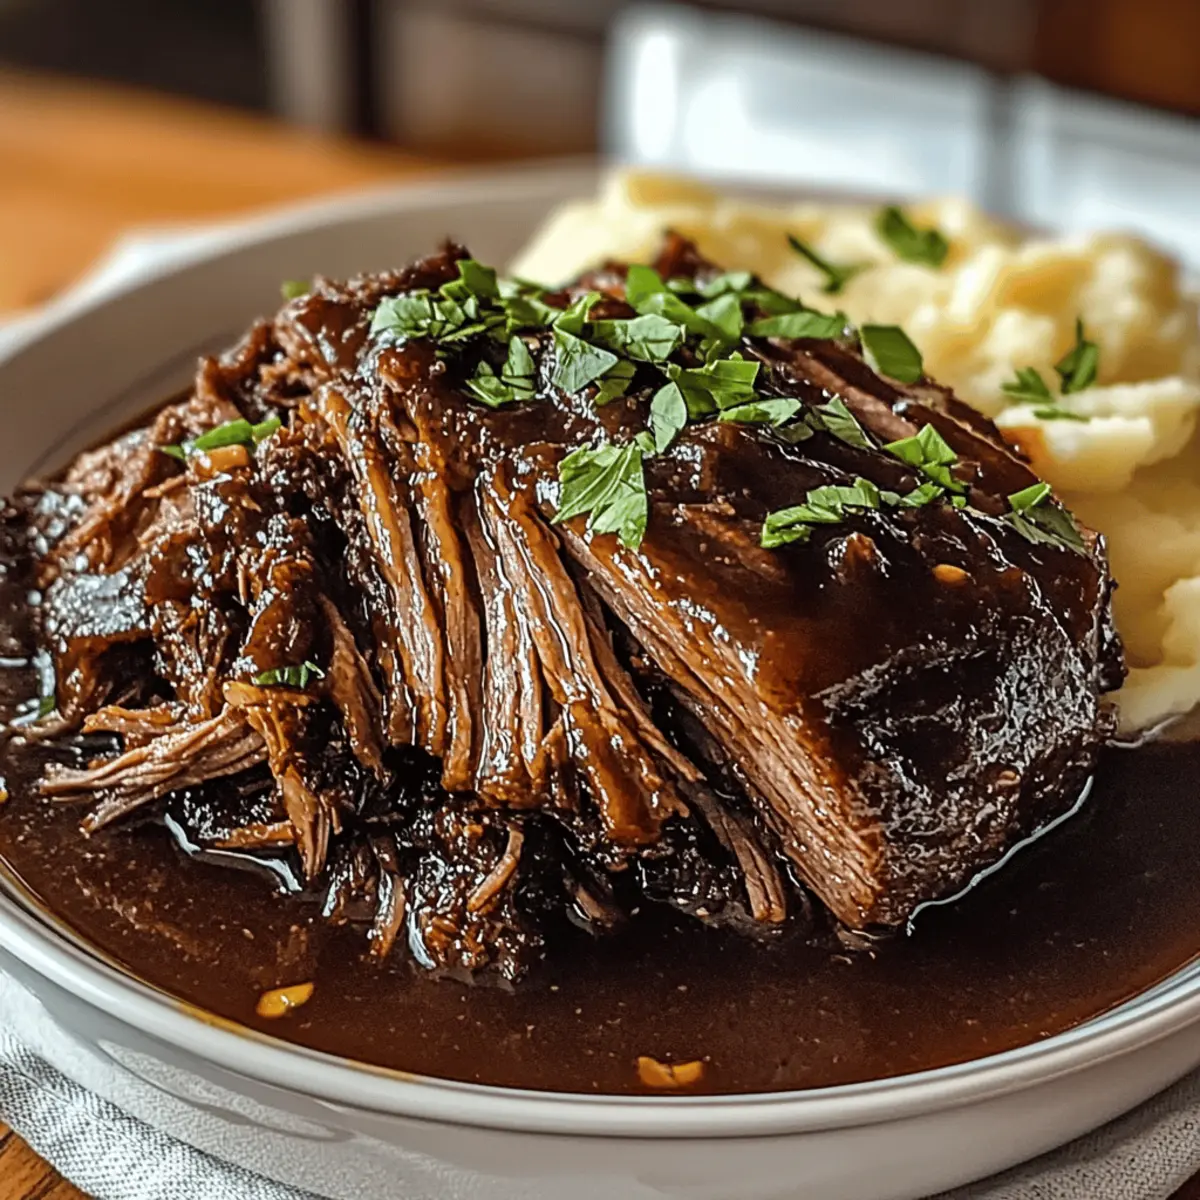
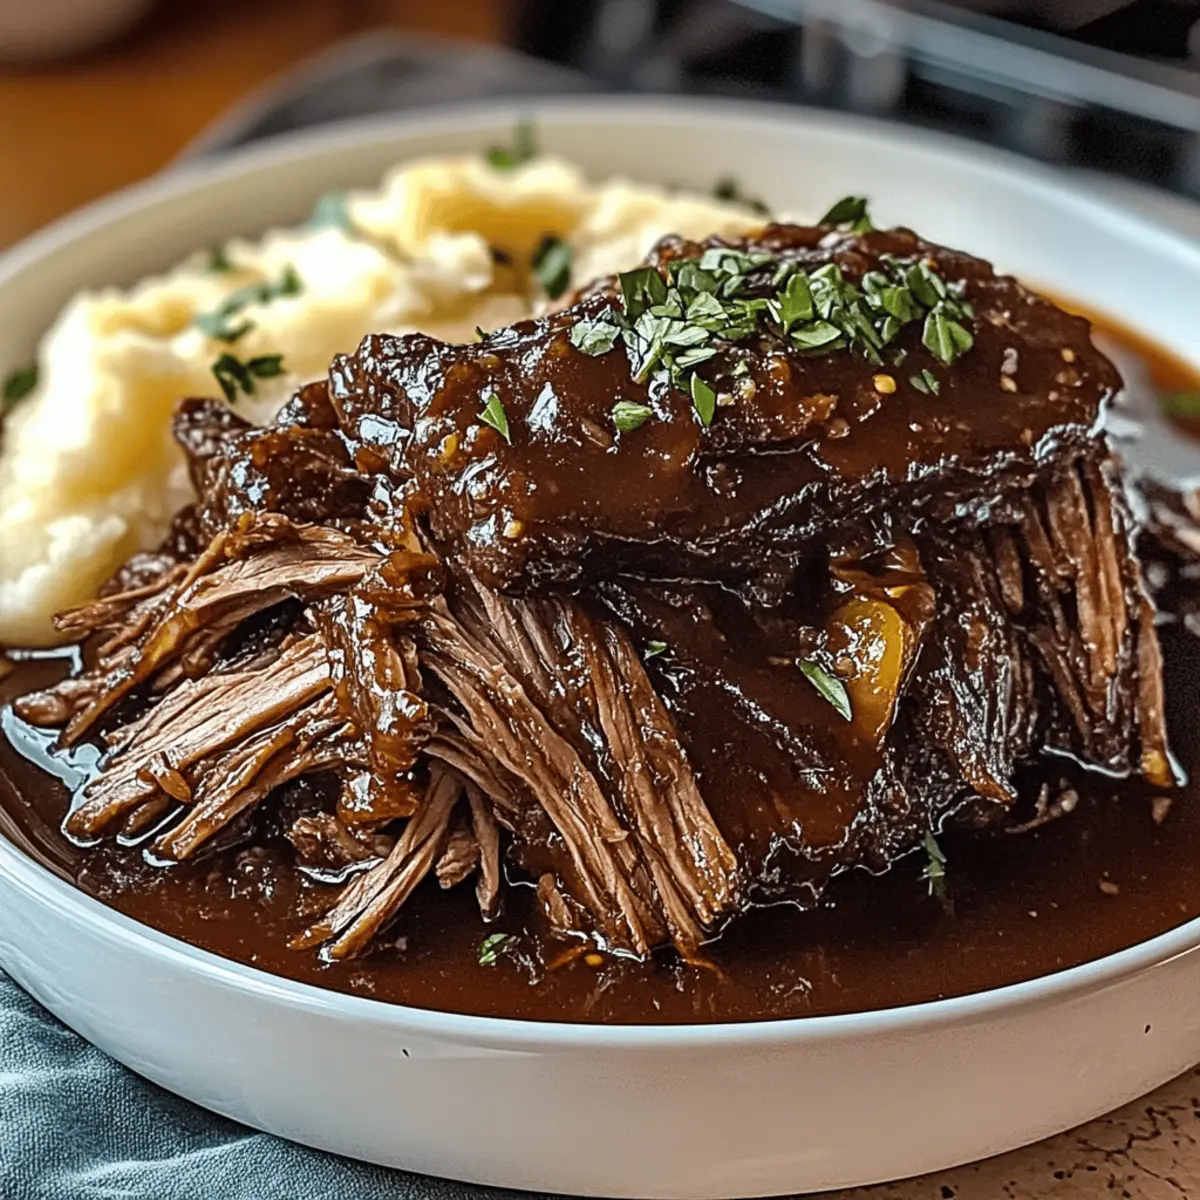
Enjoy this comforting bowl of Tomato Soup with Cheese Dumplings that will surely warm your heart and soul!

Step‑by‑Step Instructions for Tomato Soup with Cheese Dumplings

Step 1: Create the Base Soup
Heat 2 tablespoons of olive oil in a large pot over medium heat. Sauté 1 chopped onion until it becomes translucent, about 5 minutes. Add 2 minced garlic cloves and stir for another minute, allowing the aromatic blend to fill your kitchen. This fragrant base is essential for a rich Tomato Soup with Cheese Dumplings.

Step 2: Add Tomatoes and Broth
Stir in 4 cups of chopped ripe tomatoes (fresh or canned) along with 4 cups of vegetable broth. Season generously with salt and pepper to enhance the flavors. Bring the mixture to a gentle simmer and let it cook uncovered for about 20 minutes. You’ll know it’s ready when the tomatoes soften and the flavors meld beautifully.

Step 3: Blend Until Smooth
Using an immersion blender, carefully puree the soup until smooth and creamy. If you don’t have an immersion blender, transfer the soup in batches to a blender, securing the lid tightly. Once blended, return the soup to low heat and stir in 1 cup of heavy cream. The soup should now have a velvety consistency, ideal for your Tomato Soup with Cheese Dumplings.

Step 4: Prepare Cheese Dumplings
In a mixing bowl, combine 1 cup of flour, 1 tablespoon of baking powder, a pinch of salt, and 1 cup of shredded cheese (Cheddar or Parmesan). Mix thoroughly, then gradually add about 1/2 cup of water, stirring until you achieve a soft dough consistency. Gently fold in some fresh herbs, like basil or oregano, to boost the flavor of your dumplings.

Step 5: Add Dumplings to Soup
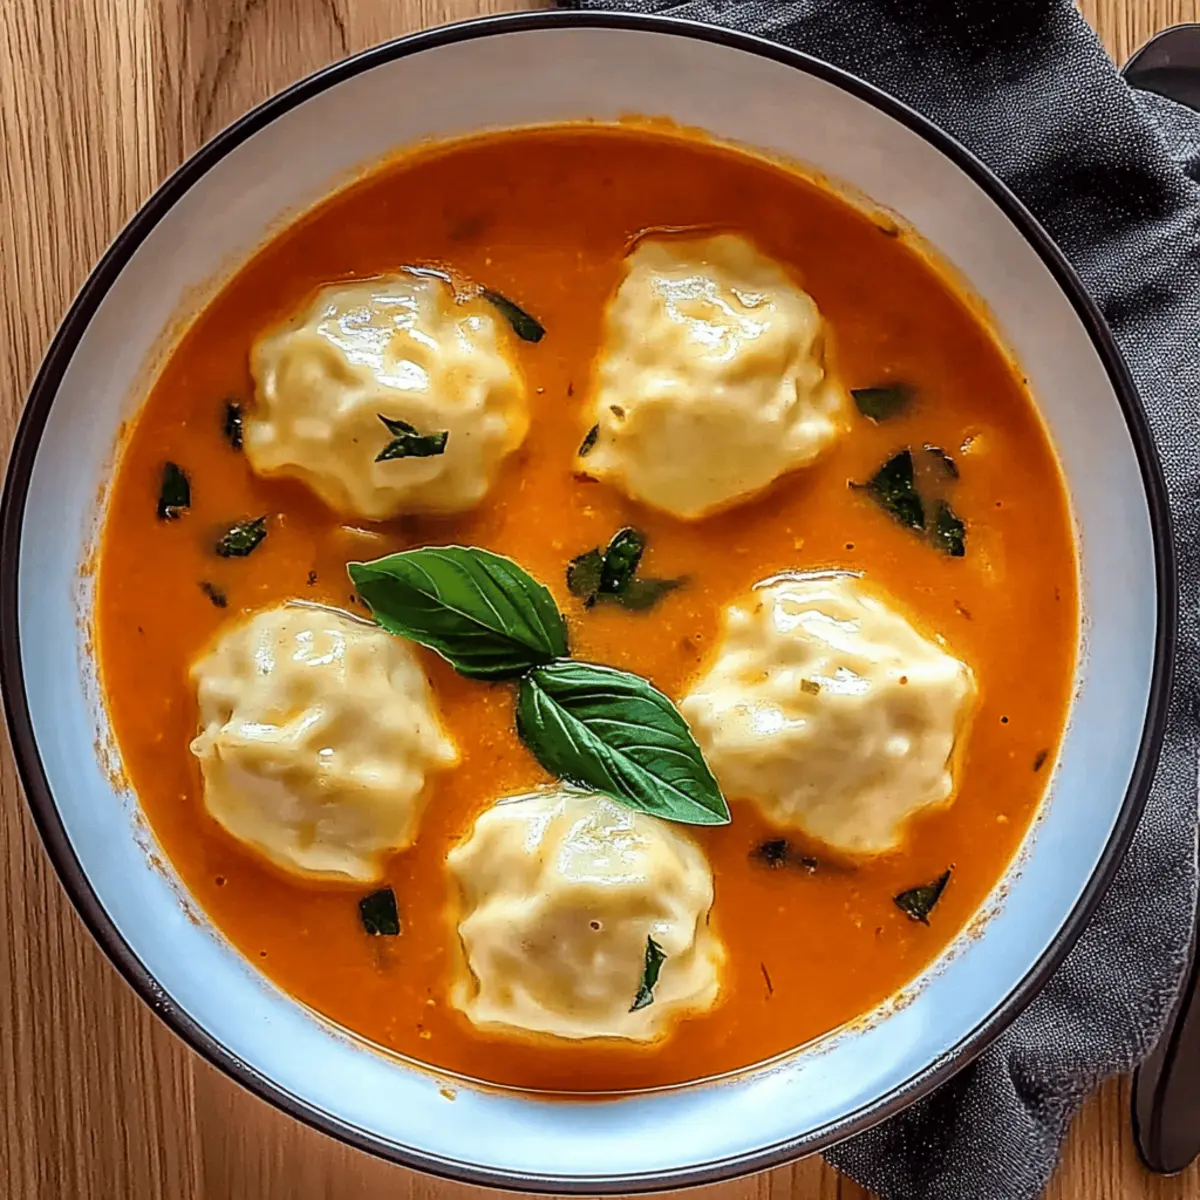
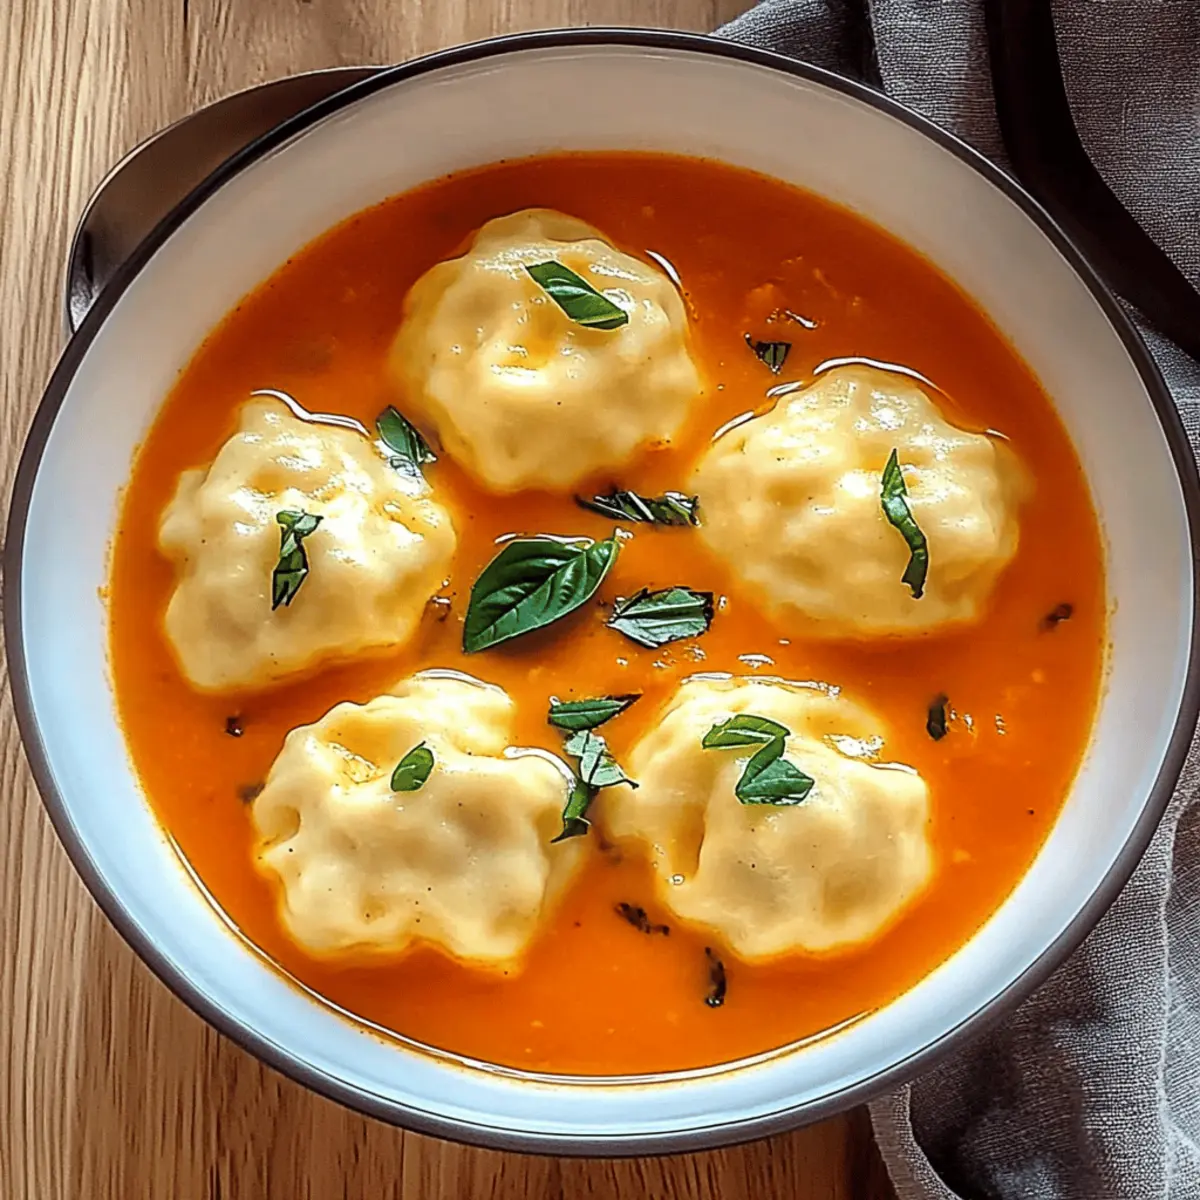
Carefully drop spoonfuls of the dumpling mixture into the gently simmering soup. Cover the pot with a lid and steam the dumplings for 10-15 minutes. You’ll know they are done when they puff up and double in size, becoming fluffy little clouds resting atop your comforting Tomato Soup.

Step 6: Serve
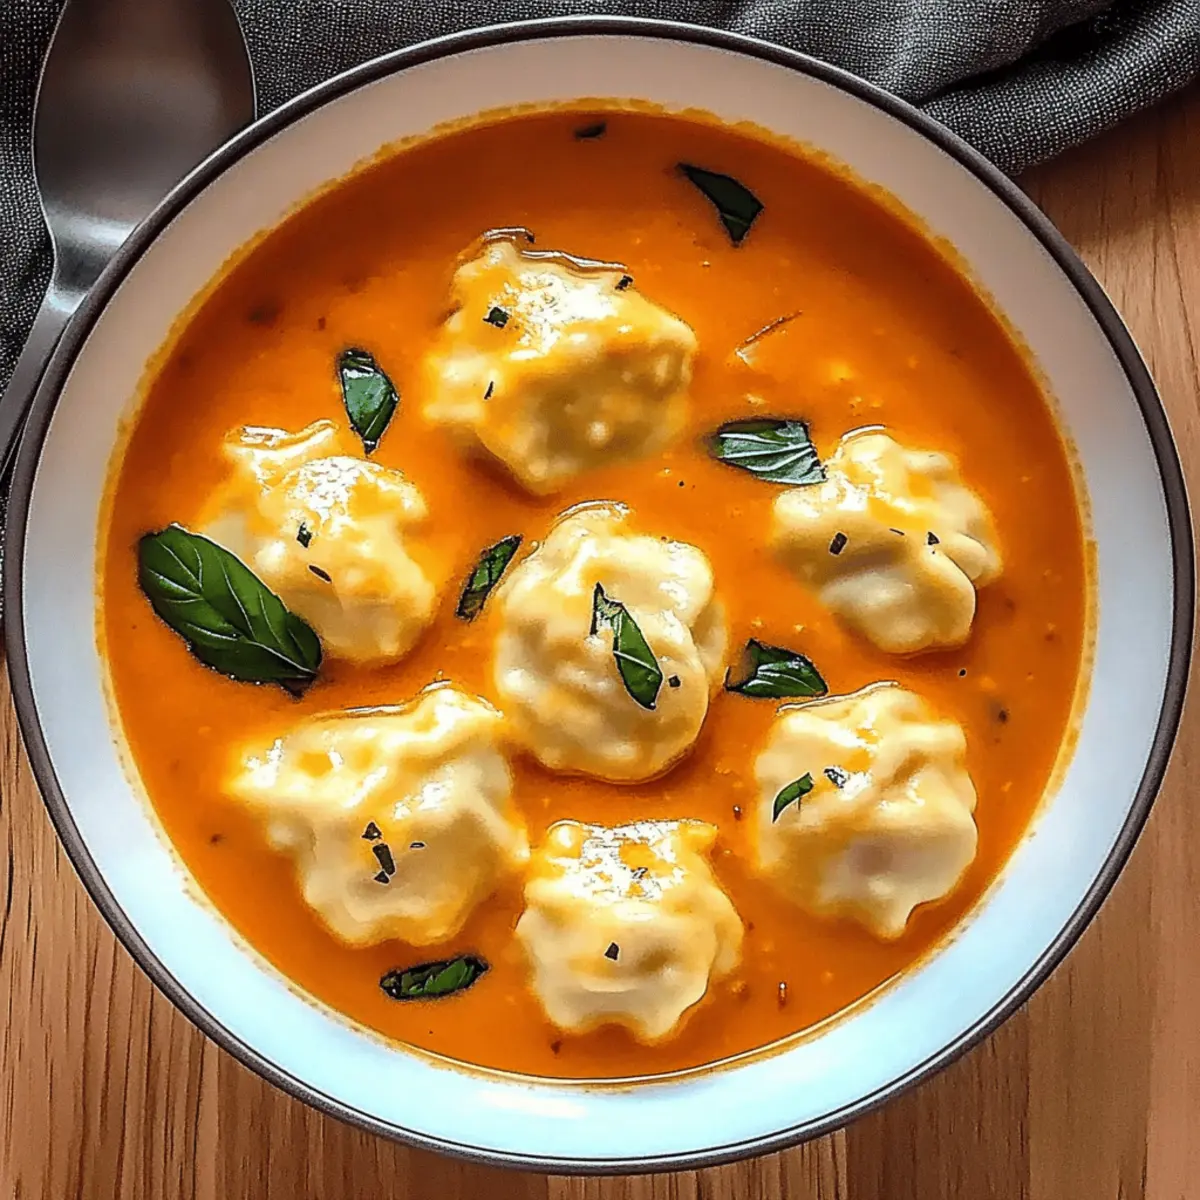
Ladle the soup into bowls, making sure to include a generous portion of fluffy cheese dumplings. Garnish with fresh basil or additional cheese if desired. The warm, inviting colors of your Tomato Soup with Cheese Dumplings will beckon everyone to gather around the table and enjoy this heartwarming dish.

Expert Tips for Tomato Soup with Cheese Dumplings

  • Choose Fresh Tomatoes: Use ripe, in-season tomatoes for the best flavor. If fresh tomatoes aren’t available, opt for high-quality canned tomatoes as a substitute.

  • Control Texture: Avoid over-blending the soup; a little texture can make it more inviting. Pulse briefly if you prefer some chunks in your Tomato Soup with Cheese Dumplings.

  • Dumpling Consistency: Ensure the dumpling dough is soft but not too sticky. Gradually adding water will help you achieve the perfect fluffy texture.

  • Steam Coverage: Cover the pot while steaming dumplings for even cooking. This also keeps the heat trapped inside, helping your dumplings puff up beautifully.

  • Season Carefully: As you add salt and pepper, remember that the cheese will also contribute saltiness. Taste as you go to avoid over-seasoning.

  • Leftover Storage Tips: Store any leftover soup without dumplings to maintain their fluffy texture. Reheat gently before serving to enjoy a warm, comforting bowl again!

What to Serve with Tomato Soup with Cheese Dumplings

There’s nothing quite like a cozy meal that brings comfort to the table and warms the heart.

  • Crusty Bread: Perfect for dipping, the crunchy exterior and soft interior pair beautifully with the creamy soup, creating a delightful contrast.
  • Garden Salad: A fresh side salad bursting with vibrant greens and colorful veggies provides a crisp, refreshing element to balance the rich flavors of the soup.
  • Grilled Cheese Sandwich: The gooey melted cheese between golden, crispy bread complements the flavors in the soup and gives you that nostalgic comfort.
  • Roasted Vegetables: Savory and caramelized, these bring depth to the meal, adding hearty textures that harmonize with the soft dumplings.
  • Garlic Bread: Warm and buttery, this aromatic addition is perfect for scooping up both soup and dumplings, enhancing your dining experience.
  • Chardonnay or Pinot Grigio: A crisp glass of these white wines can enhance the overall meal, bringing out the flavors of both the tomato soup and the cheese dumplings.
  • Apple Crisp: For dessert, indulge in this sweet contrast; the warm, spiced apples with a crunchy topping are a delightful finish to your comforting meal.
  • Herbal Tea: End the meal with a soothing cup of herbal tea; its gentle warmth can mirror the comfort offered by the soup.

Each of these pairings adds its unique charm to the cozy experience of enjoying Tomato Soup with Cheese Dumplings!

Make Ahead Options

These comforting Tomato Soup with Cheese Dumplings are perfect for meal prep enthusiasts! You can make the soup base up to 3 days in advance. Simply prepare your Tomato Soup by following the first three steps and allow it to cool before transferring it to an airtight container to refrigerate. The dumpling mixture can also be prepared a day ahead and stored in the fridge; just keep a cover over it to prevent drying. When you’re ready to enjoy your meal, reheat the soup gently on the stove, stir in the dumplings, and steam for about 10-15 minutes until fluffy. This way, you’ll have a delicious, homemade meal ready to savor on busy weeknights with minimal effort!

Storage Tips for Tomato Soup with Cheese Dumplings

Fridge: Store leftover soup in an airtight container in the fridge for up to 3 days. Avoid adding dumplings until ready to reheat for best texture.

Freezer: If you want to extend the life of your tomato soup, freeze it without dumplings in a freezer-safe container for up to 3 months.

Reheating: When ready to enjoy, reheat on the stovetop over low heat until warmed through. If using frozen soup, thaw overnight in the fridge before reheating.

Dumpling Storage: Prepare dumplings fresh for best results. Store any cooked dumplings in the fridge for up to 2 days; they can lose their fluffy texture if reheated.

Tomato Soup with Cheese Dumplings Variations

Feel free to tailor this comforting Tomato Soup with Cheese Dumplings to suit your tastes and dietary preferences!

  • Cheese Options: Use mozzarella or goat cheese for a creamier, richer flavor. Each cheese brings its unique twist that your family will love.

  • Broth Choice: Substitute chicken broth for a non-vegetarian twist without losing depth of taste. The flavor will be robust and full-bodied.

  • Herb Boost: Incorporate thyme or rosemary for an earthy aroma, enhancing the soup's richness. Fresh herbs add an aromatic dimension, bringing warmth to every spoonful.

  • Cream Alternatives: Swap heavy cream with coconut milk or cashew cream for a dairy-free option. You'll achieve a luscious creaminess that's both vegan and delicious.

  • Spicy Kick: Add a pinch of red pepper flakes or a dash of hot sauce to ramp up the heat level. A little spice can transform the entire dish into a cozy delight.

  • Dumpling Variations: Mix in spinach or kale into the dumpling dough for added nutrition and color. These greens bring both vibrancy and health benefits while keeping the dumplings fluffy!

  • Roasted Veggies: Consider adding roasted red peppers or carrots to the soup for extra sweetness and texture. The addition of roasted veggies creates a delightful medley of flavors.

To explore other comforting recipes, try our Zuppa Toscana Soup or enjoy the heartiness of Chicken Dumplings Cozy. Customize it to your heart's content!

Tomato Soup with Cheese Dumplings Recipe FAQs

What kind of tomatoes should I use for the soup?
Absolutely! Using ripe, in-season tomatoes will provide the best flavor and natural sweetness for your soup. If fresh tomatoes aren't available, high-quality canned tomatoes can be a convenient substitute without sacrificing taste.

How long can I store the leftover soup?
Leftover tomato soup can be stored in an airtight container in the fridge for up to 3 days. It's best to keep the dumplings separate until you’re ready to reheat to maintain their fluffy texture. Enjoy this comforting dish again by gently reheating it on the stovetop!

Can I freeze tomato soup with cheese dumplings?
Yes! To freeze the soup, be sure to do it without the dumplings. Store in a freezer-safe container for up to 3 months. When you're ready to enjoy it, thaw overnight in the fridge and then reheat on the stovetop. If you want, you can make fresh dumplings to add just before serving.

What should I do if my dumplings turn out dense?
If your dumplings become dense, it could be due to a few factors. Make sure you're using the right flour measurements and adding enough moisture. Mixing the dumpling dough just until combined is crucial — overmixing can lead to tough dumplings. Aim for a soft but not sticky dough for fluffier results.

Are there any dietary considerations for this recipe?
Very! This recipe can easily be adjusted to be vegetarian or vegan by using dairy-free cheese and cream alternatives. Always check for allergies or sensitivities to specific ingredients like cheese or gluten, and feel free to customize the recipe further by choosing gluten-free flour for the dumplings!

How can I tell when the dumplings are perfectly cooked?
To ensure your dumplings are fluffy and cooked through, cover the pot after adding the dumpling mixture and steam for 10-15 minutes. They’re ready when they’ve puffed up and doubled in size. If you’re unsure, take one out and cut it in half — it should be light and airy inside!

Tomato Soup with Cheese Dumplings

Cozy Up with Tomato Soup and Fluffy Cheese Dumplings

This Tomato Soup with Cheese Dumplings is a heartwarming vegetarian dish that offers cozy comfort on chilly days.
Print Recipe Pin Recipe
Prep Time 20 minutes mins
Cook Time 30 minutes mins
Total Time 50 minutes mins
Servings: 4 bowls
Course: Soups
Cuisine: Vegetarian
Calories: 350
Ingredients Equipment Method Nutrition Notes

Ingredients
  

For the Soup
  • 4 cups chopped ripe tomatoes fresh or canned
  • 1 medium onion chopped
  • 2 cloves garlic minced
  • 4 cups vegetable broth low-sodium recommended
  • 1 cup cream heavy cream for velvety texture
  • pepper to taste
  • salt to taste
For the Dumplings
  • 1 cup cheese (Cheddar or Parmesan) shredded
  • 1 cup flour
  • 1 tablespoon baking powder
  • fresh basil or oregano to taste

Equipment

  • Large pot
  • Immersion blender
  • Mixing Bowl

Method
 

Step-by-Step Instructions
  1. Heat 2 tablespoons of olive oil in a large pot over medium heat. Sauté 1 chopped onion until it becomes translucent, about 5 minutes. Add 2 minced garlic cloves and stir for another minute.
  2. Stir in 4 cups of chopped ripe tomatoes along with 4 cups of vegetable broth. Season generously with salt and pepper. Bring to a gentle simmer and let it cook uncovered for about 20 minutes.
  3. Using an immersion blender, carefully puree the soup until smooth and creamy. Stir in 1 cup of heavy cream and return the soup to low heat.
  4. In a mixing bowl, combine 1 cup of flour, 1 tablespoon of baking powder, a pinch of salt, and 1 cup of shredded cheese. Gradually add about 1/2 cup of water, stirring until you achieve a soft dough.
  5. Carefully drop spoonfuls of the dumpling mixture into the gently simmering soup. Cover and steam the dumplings for 10-15 minutes until they puff up.
  6. Ladle the soup into bowls and garnish with fresh basil or additional cheese.

Nutrition

Serving: 1bowlCalories: 350kcalCarbohydrates: 30gProtein: 10gFat: 20gSaturated Fat: 10gCholesterol: 50mgSodium: 800mgPotassium: 800mgFiber: 5gSugar: 8gVitamin A: 20IUVitamin C: 35mgCalcium: 15mgIron: 10mg

Notes

Store leftover soup in an airtight container in the fridge for up to 3 days. For best texture, do not add dumplings until ready to reheat.

Tried this recipe?

Let us know how it was!

Vegan Buddha Bowl: A Flavorful Journey to Healthy Eating

October 28, 2025 by Grace Snow Leave a Comment

There’s nothing like the vibrant colors of a fresh Vegan Buddha Bowl to brighten up your day. This dish, brimming with crispy roasted chickpeas and a rainbow of seasonal vegetables, instantly transforms simple ingredients into a delightful meal. What I love most is how customizable it is—you can easily adapt the grains and veggies based on what’s in your pantry or what’s currently in season. This Vegan Buddha Bowl not only makes for a nourishing comfort food option, but it’s also a fun way to meal prep for busy days ahead. Whether you're rushing home after work or planning a cozy weekend dinner, you’ll find satisfaction in the flavors and textures that come together beautifully in just minutes. Are you ready to craft your own colorful bowl?

Why is the Vegan Buddha Bowl special?

Customizable: You can easily adapt this recipe to fit your taste and current ingredients in your pantry, ensuring a fresh experience every time.
Nutrient-dense: Packed with protein-rich quinoa and vibrant veggies, each bowl is a powerhouse of essential nutrients to fuel your body.
Meal Prep Friendly: Perfect for busy lifestyles, you can prepare components ahead of time for effortless assembly throughout the week. Pair it with Vegan Sushi Indulge for a delightful variety.
Deliciously Satisfying: The crispy roasted chickpeas add a satisfying crunch, while the creamy tahini dressing ties everything together beautifully.
Crowd-Pleasing Appeal: Whether you’re serving family or hosting friends, this colorful dish is sure to impress everyone at your table!

Vegan Buddha Bowl Ingredients

For the Base
• Quinoa – Provides a protein-packed, fluffy foundation; rinse before cooking to remove bitterness.

For the Protein
• Chickpeas – Adds crunchy texture and protein; use canned and drained for quick prep, or swap for lentils for a different taste.

For the Vegetables
• Seasonal Vegetables – Choose a colorful mix (like sweet potatoes, bell peppers, and broccoli) for nutrients; roast or steam to enhance flavors.
• Avocado – Adds creaminess and healthy fats; slice fresh just before serving to preserve its texture.

For the Dressing
• Tahini Dressing – A rich and creamy topping that elevates flavors; combine tahini with lemon juice, garlic, and spices for best results. Use sunflower seed butter for a nut-free alternative.

This Vegan Buddha Bowl is a beautiful way to enjoy nourishing comfort food with endless customization options!

Step‑by‑Step Instructions for Vegan Buddha Bowl

Step 1: Cook Quinoa
Rinse 1 cup of quinoa under cold water until the water runs clear to remove bitterness. In a medium saucepan, combine the rinsed quinoa with 2 cups of water or vegetable broth. Bring it to a boil over medium-high heat, then reduce to a simmer, covering the pot. Cook for 15 minutes until all the liquid is absorbed, then let it sit, covered, for an additional 5 minutes for fluffiness.

Step 2: Prepare Chickpeas
Preheat your oven to 425°F (220°C) to get it nice and hot. While the oven heats, rinse and thoroughly dry 1 can of chickpeas using a clean kitchen towel. Toss the dried chickpeas in a bowl with olive oil and your choice of spices until well-coated. Spread them evenly on a baking sheet and roast for 25-30 minutes, shaking the tray halfway through until the chickpeas are golden and crispy.

Step 3: Cook Seasonal Vegetables
If you’re roasting your vegetables, lower the oven temperature to 400°F (200°C) after removing the chickpeas. Chop a colorful mix of seasonal vegetables like sweet potatoes, bell peppers, and broccoli, then toss them with olive oil and seasonings. Arrange them on a separate baking sheet and roast for 20-25 minutes until tender and slightly caramelized; alternatively, steam them briefly to maintain vibrant color and crunch.

Step 4: Assemble the Bowl
Start building your Vegan Buddha Bowl by placing a generous scoop of the fluffy quinoa as your base. Layer on the crispy roasted chickpeas, followed by a hearty serving of your roasted or steamed seasonal vegetables. Add fresh avocado slices on top for creaminess, drizzling everything generously with the creamy tahini dressing. Finish with a sprinkle of herbs or seeds for added texture and flair, and enjoy your nourishing creation!

Expert Tips for the Best Vegan Buddha Bowl

  • Perfectly Crispy Chickpeas: Ensure chickpeas are thoroughly dried after rinsing to achieve maximum crispiness while roasting. Wet chickpeas will steam rather than crisp up.

  • Texture Variety: Aim to mix textures in your bowl by combining crunchy chickpeas, creamy avocado, and tender roasted vegetables. This delightful combination makes every bite exciting!

  • Meal Prep Buddy: For ease during the week, store components in airtight containers separately. This way, you can enjoy fresh flavors without compromising quality over time.

  • Freshness is Key: Use seasonal vegetables for the best taste and nutrition. Not only will it enhance the visual appeal of your Vegan Buddha Bowl, but it will also support local farmers and sustainability.

  • Dressing Adjustments: Feel free to play with the tahini dressing! Add a hint of sweetness with maple syrup or a touch of heat with chili flakes to keep things interesting.

Make Ahead Options

These Vegan Buddha Bowls are perfect for those busy weeknights! You can prepare the quinoa and roasted chickpeas up to 3 days in advance. Simply cook the quinoa and store it in an airtight container in the fridge. Roast your chickpeas and let them cool completely before transferring to a separate container. For the best quality, keep the vegetables uncooked until you're ready to serve—chop them and store in a sealed bag, so they stay fresh. When it’s time to eat, reheat the quinoa and chickpeas, assemble your bowl with fresh veggies and avocado, and drizzle with tahini dressing for a delicious meal that feels effortlessly put together!

How to Store and Freeze Vegan Buddha Bowl

Fridge: Store the assembled Vegan Buddha Bowl in an airtight container in the fridge for up to 3 days to keep the ingredients fresh and flavorful.

Components Storage: Store cooked quinoa, roasted chickpeas, and vegetables in separate airtight containers in the fridge for up to 4 days to maintain their crispness and texture.

Freezer: For longer storage, freeze cooked quinoa and roasted chickpeas for up to 3 months. Allow them to cool completely before placing them in freezer-safe bags.

Reheating: To reheat, simply thaw in the fridge overnight, then warm quinoa and chickpeas in the microwave, adding a splash of water to retain moisture.

Variations & Substitutions for Vegan Buddha Bowl

Feel free to elevate your Vegan Buddha Bowl experience with these exciting twists and swaps that will tantalize your taste buds!

  • Grain Alternatives: Swap quinoa for brown rice or farro to experiment with different textures and flavors. Both options can bring a satisfying chew to your bowl.

  • Roasted Veggies: Use any seasonal vegetables available, like zucchini or kale, as delightful substitutes. Mixing in colorful veggies not only enhances visual appeal but also adds refreshing nuances to each bite.

  • Protein Options: If you prefer a different protein source, try edamame or roasted tofu for a savory twist. Tofu, especially when marinated, can add a unique flavor dimension.

  • Spicy Kick: For those who love a bit of heat, add chili flakes or a drizzle of sriracha on top of your bowl. This subtle addition can transform the dish into a zesty delight!

  • Nut-Free Dressing: Substitute tahini with sunflower seed butter or a creamy avocado dressing for a nut-free alternative that still packs a punch. These swaps provide a rich mouthfeel without compromising on flavor.

  • Flavor Boosts: Stir in some nutritional yeast or a sprinkle of smoked paprika to your tahini dressing for an umami flavor infusion. This simple addition can make your sauce sing with depth.

  • Herbs & Garnishes: Enhance freshness by adding chopped fresh herbs like cilantro or basil. A garnish of toasted pumpkin seeds can provide a delightful crunch, complementing the creamy elements beautifully.

Ready to take your Vegan Buddha Bowl to new heights? You could even pair it with a side of Crispy Fish Taco Bowls for a perfect complementary meal!

What to Serve with Customizable Vegan Buddha Bowl

Elevate your meal experience by adding delightful sides that complement the vibrant flavors of this nourishing bowl.

  • Crunchy Side Salad: A fresh salad with mixed greens, cherry tomatoes, and a zesty lemon vinaigrette adds a refreshing crunch.
  • Savory Garlic Bread: Warm, crusty garlic bread offers a satisfying contrast, perfect for sopping up the creamy tahini dressing.
  • Roasted Vegetable Platter: Serve a variety of roasted seasonal vegetables as a side for extra color and nutrition; it's a delicious way to enhance your meal.
  • Refreshing Fruit Salad: A bright fruit salad with seasonal fruits like melon and berries provides a sweet balance to the savory flavors.
  • Creamy Soup: Pair with a silky vegan soup for a comforting duo that's warm and inviting, like roasted red pepper or butternut squash.
  • Herbal Tea: Enjoy a soothing cup of herbal tea post-meal to cleanse your palate and wind down your dining experience.

Vegan Buddha Bowl Recipe FAQs

How do I choose the right ripeness of vegetables for my Vegan Buddha Bowl?
Absolutely! Pick seasonal vegetables that are colorful and firm to the touch—look for bright skins and no dark spots or blemishes. For instance, sweet potatoes should feel heavy and have smooth skins, while bell peppers should be vibrant and crisp. If you can, shop at local markets to find the freshest picks!

How long can I store my Vegan Buddha Bowl in the fridge?
You can store your assembled Vegan Buddha Bowl in an airtight container in the fridge for up to 3 days. However, I recommend keeping the components separate (like quinoa, chickpeas, and veggies) in airtight containers for optimal freshness and texture, which can last up to 4 days.

Can I freeze components of my Vegan Buddha Bowl?
Very! For longer storage, you can freeze cooked quinoa and roasted chickpeas for up to 3 months. Just allow them to cool completely, and then transfer them to freezer-safe bags. When you're ready to enjoy, thaw them in the fridge overnight and warm them in the microwave, adding a splash of water to avoid dryness.

What do I do if my chickpeas aren't crispy after roasting?
If your roasted chickpeas are chewy rather than crispy, it's likely they weren’t dried thoroughly before roasting. Always rinse and dry chickpeas well, and consider increasing the roasting time to 35-40 minutes if needed, checking for crispness. Ensure they're spaced evenly on your baking sheet to promote even cooking.

Are there any common allergens I should be aware of in the Vegan Buddha Bowl?
It's important to consider dietary restrictions! This Vegan Buddha Bowl is plant-based, but be mindful if you're serving it to guests with allergies. Tahini is made from sesame seeds, which can be a concern for those with nut allergies. For a nut-free alternative, you can swap tahini with sunflower seed butter. Always double-check ingredient labels for any hidden allergens!

Can I make this Vegan Buddha Bowl nut-free?
Definitely! To enjoy a nut-free Vegan Buddha Bowl, simply replace the tahini dressing with a creamy sunflower seed butter or a simple lemon and olive oil vinaigrette. This way, you're still delivering on the creamy texture while keeping it safe for those with nut allergies!

Vegan Buddha Bowl: A Flavorful Journey to Healthy Eating

Discover the vibrant Vegan Buddha Bowl, rich in flavors and customizable for a healthy meal that's perfect for any occasion.
Print Recipe
Prep Time 10 minutes mins
Cook Time 40 minutes mins
Resting Time 5 minutes mins
Total Time 55 minutes mins
Servings: 2 bowls
Course: Salads
Cuisine: Vegan
Calories: 500
Ingredients Equipment Method Nutrition Notes

Ingredients
  

For the Base
  • 1 cup Quinoa Rinse before cooking to remove bitterness.
For the Protein
  • 1 can Chickpeas Canned and drained for quick prep.
For the Vegetables
  • 2 cups Seasonal Vegetables A mix of sweet potatoes, bell peppers, and broccoli.
  • 1 medium Avocado Slice fresh just before serving.
For the Dressing
  • 1/4 cup Tahini Dressing Combine tahini with lemon juice, garlic, and spices.

Equipment

  • Medium saucepan
  • Baking Sheet
  • Oven
  • Mixing Bowl
  • Clean kitchen towel

Method
 

Step-by-Step Instructions for Vegan Buddha Bowl
  1. Rinse quinoa under cold water until the water runs clear. Combine with 2 cups of water or vegetable broth in a saucepan and bring to a boil. Reduce to a simmer, cover, and cook for 15 minutes.
  2. Preheat oven to 425°F. Rinse and dry chickpeas. Toss with olive oil and spices. Roast on a baking sheet for 25-30 minutes until golden and crispy.
  3. Prepare vegetables by chopping and tossing with olive oil. Roast at 400°F for 20-25 minutes or steam briefly.
  4. Assemble the bowl: Start with quinoa, add roasted chickpeas, vegetables, avocado, and drizzle with tahini dressing. Top with herbs or seeds.

Nutrition

Serving: 1bowlCalories: 500kcalCarbohydrates: 60gProtein: 15gFat: 25gSaturated Fat: 4gPolyunsaturated Fat: 1gMonounsaturated Fat: 18gSodium: 400mgPotassium: 800mgFiber: 12gSugar: 5gVitamin A: 2000IUVitamin C: 60mgCalcium: 150mgIron: 3mg

Notes

Store components separately for meal prep and freshness. Adjust dressing for personal taste with sweetness or spice.

Tried this recipe?

Let us know how it was!

Comforting American Goulash: Easy One-Pot Family Favorite

October 27, 2025 by Grace Snow Leave a Comment

As I stirred the pot, a warm aroma filled my kitchen, instantly transporting me back to family dinner nights that felt like a cozy hug. This Hearty One-Pot American Goulash is the ultimate comfort food, blending tender elbow macaroni with seasoned ground beef and a richly spiced tomato sauce. It’s the kind of dish that effortlessly brings everyone to the table, perfect for those busy weeknights or when I want to prepare a delicious meal ahead of time. The beauty of this recipe lies in its customization—feel free to swap in your favorite veggies or adjust the spices to suit your family's tastes. Are you ready to create a nostalgic feast that will warm the hearts of everyone around your table?

Why is American Goulash a Must-Try?

Ease of Preparation: This one-pot dish comes together quickly, making it a no-fuss choice for busy nights.

Comforting Aroma: The rich blend of spices and simmering tomatoes fills your kitchen with a nostalgic scent that’s hard to resist.

Customizable Delights: Whether you prefer a vegetarian version with assorted veggies or a flavorful twist with ground sausage, the options are endless.

Family-Friendly Appeal: Kids and adults alike love the combination of pasta and beef, ensuring everyone leaves the table satisfied.

Meal Prep Friendly: Leftovers keep well in the fridge or freezer, allowing you to enjoy this hearty meal even on your most hectic days.

Dive into this cozy dish and check out my tips on adding more vegetables for a healthier touch!

American Goulash Ingredients

For the Base
• Olive Oil – Ideal for sautéing and adds a hint of flavor; substitute with any neutral oil if needed.
• Onion – The key to aromatic depth; yellow or white onions work best.
• Garlic – Freshly minced ensures maximum flavor; don’t skimp on this essential ingredient.
• Ground Beef – The main protein source; opt for lean to keep it light, or swap for ground turkey for a healthier choice.
• Beef Broth – Adds richness to the sauce; vegetarians can swap with vegetable broth.
• Elbow Macaroni – Traditional and perfect for soaking up flavors; feel free to use other short pasta types if you prefer.
• Tomato Sauce – The hearty base for American goulash; high-quality canned sauce elevates the dish.
• Diced Tomatoes – Adds texture and acidity; use canned with juices for the best results.
• Worcestershire Sauce – Infuses umami; can be omitted for a vegetarian twist.
• Italian Seasoning – Provides a blend of herbs; dried oregano or basil can be excellent substitutes.
• Bay Leaf – Adds a subtle depth of flavor; don't forget to remove it before serving!
• Salt & Pepper – Essential seasonings; adjust to your taste.
• Crushed Red Pepper (optional) – Spice it up with this optional kick; omit for a milder version.

For Garnish
• Fresh Parsley – Brightens the dish with a pop of color; basil or cilantro make great alternatives.
• Shredded Cheddar Cheese (optional) – For that creamy finish; freshly grated melts beautifully!

Whether you're cozying up on a chilly night or bringing family together around the dinner table, the delightful taste of this American goulash will surely satisfy everyone’s cravings!

Step‑by‑Step Instructions for American Goulash

Step 1: Sauté the Aromatics
Heat 2 tablespoons of olive oil in a large pot over medium-high heat. Once shimmering, add 1 chopped onion and sauté for about 3-4 minutes until they become translucent. The aroma of the onions fills the kitchen, setting the stage for your hearty American goulash. Stir occasionally to ensure even cooking.

Step 2: Add Garlic
Add in 2 minced garlic cloves, cooking for an additional 30 seconds until fragrant. The garlic will complement the onion's sweetness and bring a wonderful depth to your dish. Keep stirring to prevent the garlic from burning, as it can quickly change flavor if overcooked.

Step 3: Brown the Beef
Stir in 1 pound of ground beef, using a wooden spoon to break it apart. Cook until browned, about 5-7 minutes, and drain any excess grease if necessary. The meat should be well-cooked and crumbly, adding its savory richness to the base of your American goulash.

Step 4: Combine Ingredients
Add 15 ounces of tomato sauce, 14.5 ounces of diced tomatoes (with juice), 1 tablespoon of Worcestershire sauce, and 1 tablespoon of Italian seasoning. Season with salt and pepper to taste. Stir until everything is well combined and you achieve a harmonious mixture of flavors and colors.

Step 5: Simmer the Sauce
Pour in 2 cups of beef broth and bring the mixture to a simmer, uncovered, over medium heat. Allow it to cook for 15-20 minutes. You'll notice the sauce thickening and the flavors melding beautifully—a perfect base for your comforting goulash.

Step 6: Cook the Pasta
Add 2 cups of uncooked elbow macaroni directly into the pot, stirring to incorporate. Cover and let it cook for 10-12 minutes, or until the pasta is al dente. Keep an eye on it, as you'll want the pasta to absorb the sauce without becoming mushy, ensuring the heartiness of your American goulash.

Step 7: Final Touches
Once the pasta reaches your desired texture, remove the bay leaf that was added for flavor. Taste the dish and adjust the seasoning if needed. The American goulash should be fragrant and full of flavor, ready to be served.

Step 8: Serve with Garnishes
Ladle the goulash into bowls and garnish with freshly chopped parsley for a pop of color. If desired, sprinkle shredded cheddar cheese on top to add a creamy finish. Serve hot and enjoy this delightful family favorite that is sure to please everyone gathered around the table.

What to Serve with Hearty One-Pot American Goulash

Dive into a comforting meal that’s sure to ignite warm conversations and satisfied smiles around your table.

  • Crusty Garlic Bread: Perfect for mopping up the rich sauce, adding a delightful crunch that complements the soft macaroni. It’s not just a side; it’s an invitation to savor every bite.

  • Fresh Green Salad: A crisp, vibrant salad brings a refreshing contrast, balancing the warm, hearty goulash. Toss mixed greens with cherry tomatoes and a light vinaigrette for a zesty touch.

  • Steamed Broccoli: Its bright green color and tender crunch provide a nutritious element, while soaking up the delicious goulash sauce. A delightful pairing that's both healthy and satisfying.

  • Cheesy Biscuit Bites: Soft and chewy, these cheesy treats add a playful touch to your meal as you enjoy the goulash. They’re perfect for sharing, pulling apart, and savoring with every spoonful.

  • Wine Pairing: A medium-bodied red wine, like a Merlot, enhances the flavors of the dish beautifully, providing a smooth finish that complements the richness of the goulash.

  • Chocolate Chip Cookies: End on a sweet note! The warm, gooey texture of these homemade cookies offers a delightful contrast to the savory goulash, creating a cozy and satisfying dining experience.

American Goulash Variations & Substitutions

Feel free to get creative with this comforting dish and adapt it to your taste buds!

  • Gluten-Free Pasta: Swap elbow macaroni for gluten-free pasta like brown rice or quinoa pasta to suit dietary needs.
  • Ground Turkey: Choose lean ground turkey instead of beef for a lighter twist without sacrificing flavor.
  • Spicy Sausage: Mix in ground sausage for a zesty kick. The natural spices in the sausage will add complexity to the dish.
  • Vegetarian Style: Use beans or lentils instead of meat for a hearty vegetarian goulash, making it protein-packed and satisfying.
  • Veggie Upgrade: Stir in diced zucchini, bell peppers, or corn for an additional nutritional boost. These colorful vegetables enhance both flavor and texture!
  • Herbs & Spices: Boost the flavor by including fresh basil or thyme. These herbs can elevate the aroma and taste, giving your goulash a fresh twist.
  • Creamy Variations: Stir in a dollop of cream cheese or sour cream right before serving for a velvety texture and rich flavor.
  • Add Heat: Sprinkle in cayenne pepper or diced jalapeños for an extra layer of heat if you enjoy a spicy meal!

Every variation contributes its own unique flair! Enjoy making this dish truly yours, and don't forget to check out my tips for a veggie boost in your recipe.

Expert Tips for American Goulash

  • Perfect Pasta: To ensure al dente texture, slightly undercook the macaroni during the initial phase. It’ll soak up flavors while avoiding mushiness.

  • Veggie Boost: Add colored bell peppers, mushrooms, or spinach to the mix for added nutrition and vibrant colors in your American goulash.

  • Flavor Depth: For an extra umami kick, consider adding a splash of balsamic vinegar or a bit of soy sauce to the skillet before simmering.

  • Make-Ahead Magic: This dish freezes beautifully! Simply undercook the pasta slightly and store in airtight containers for quick heat-and-eat meals later.

  • Season to Taste: Always taste and adjust the salt and pepper before serving. A little adjustment can elevate your American goulash to perfection!

Make Ahead Options

These American goulash preparations are a true lifesaver for busy weeknights! You can cook the entire recipe up to 3 days in advance, allowing the flavors to meld beautifully in the refrigerator. To prep, simply follow the recipe up to the point before adding the elbow macaroni—allow everything to cool, then store it in an airtight container. When you’re ready to serve, reheat in a pot, add a splash of beef broth, and stir in the uncooked macaroni; cover and cook until the pasta is al dente. This approach ensures your goulash remains just as delicious, saving you time without sacrificing flavor on those hectic evenings!

How to Store and Freeze American Goulash

Fridge: Store leftovers in airtight containers for up to 4 days. Make sure to cool the goulash completely before sealing to maintain freshness.

Freezer: This comforting American goulash freezes well for up to 3 months. Portion into freezer-safe containers or bags, leaving some space for expansion.

Reheating: To reheat, thaw overnight in the fridge if frozen, then gently heat in a pot over low heat, adding a splash of beef broth or water to restore moisture.

Avoiding Texture Issues: Slightly undercook the macaroni if you plan to freeze, as it will continue to absorb liquid when reheating, helping to maintain the perfect texture.

American Goulash Recipe FAQs

What type of pasta should I use for American goulash?
I recommend using elbow macaroni, as it's the traditional choice that absorbs the sauce beautifully. However, you can substitute it with other short pasta like shells or penne if you choose. Just avoid long pasta types, which don’t blend as well with the sauce.

How long can I store leftover American goulash in the fridge?
Store your leftovers in airtight containers, and they’ll stay fresh for up to 4 days. It’s a comforting dish that keeps well, making it perfect for lunches or dinners throughout the week!

Can I freeze American goulash? How should I do it?
Absolutely! American goulash freezes beautifully. To freeze, slightly undercook the macaroni when you first make it. After it has cooled, portion it into airtight, freezer-safe containers or bags, leaving space for expansion. It will keep well for up to 3 months. When you’re ready to enjoy it again, simply thaw it overnight in the fridge and then reheat gently, adding a splash of broth or water to keep it moist.

What can I do if my goulash turns out too dry?
If your goulash is too dry, no worries! You can add a bit more beef broth or even a splash of water while reheating. Mix it well and let it simmer for a few minutes until the goulash absorbs the added moisture. This should restore that delicious, comforting consistency.

Can I make American goulash vegetarian?
Yes, you can! Substitute ground beef with plant-based meat alternatives or simply use more vegetables for a hearty veggie version. Make sure to use vegetable broth instead of beef broth and skip the Worcestershire sauce for a completely vegetarian dish. You can include ingredients like lentils, mushrooms, zucchini, or bell peppers for a delightful mix of flavors.

Is American goulash a good option for meal prep?
Definitely! This dish is fantastic for meal prep due to its easy storage and reheating options. Just make sure to store it in individual portions. You can enjoy it for quick lunches and dinners throughout the week, so you can spend less time cooking and more time enjoying your meals!

American goulash

Comforting American Goulash: Easy One-Pot Family Favorite

This American goulash combines tender elbow macaroni, seasoned ground beef, and a spiced tomato sauce for a comforting family meal.
Print Recipe Pin Recipe
Prep Time 10 minutes mins
Cook Time 30 minutes mins
Total Time 40 minutes mins
Servings: 6 servings
Course: Dinner
Cuisine: American
Calories: 350
Ingredients Equipment Method Nutrition Notes

Ingredients
  

For the Base
  • 2 tablespoons Olive Oil or any neutral oil
  • 1 medium Onion chopped
  • 2 cloves Garlic minced
  • 1 pound Ground Beef or ground turkey
  • 2 cups Beef Broth or vegetable broth for vegetarians
  • 2 cups Elbow Macaroni uncooked
  • 15 ounces Tomato Sauce high-quality canned
  • 14.5 ounces Diced Tomatoes with juices
  • 1 tablespoon Worcestershire Sauce omit for vegetarian
  • 1 tablespoon Italian Seasoning or dried oregano/basil
  • 1 leaf Bay Leaf remove before serving
  • to taste Salt
  • to taste Pepper
  • optional Crushed Red Pepper omit for milder version
For Garnish
  • to taste Fresh Parsley chopped
  • to taste Shredded Cheddar Cheese optional

Equipment

  • Large pot

Method
 

Step‑by‑Step Instructions
  1. Heat 2 tablespoons of olive oil in a large pot over medium-high heat. Add 1 chopped onion and sauté for about 3-4 minutes until translucent.
  2. Add in 2 minced garlic cloves, cooking for an additional 30 seconds until fragrant.
  3. Stir in 1 pound of ground beef, cooking for about 5-7 minutes until browned.
  4. Add 15 ounces of tomato sauce, 14.5 ounces of diced tomatoes, 1 tablespoon of Worcestershire sauce, and 1 tablespoon of Italian seasoning. Season with salt and pepper.
  5. Pour in 2 cups of beef broth, bring to a simmer and cook for 15-20 minutes.
  6. Add 2 cups of uncooked elbow macaroni, cover, and cook for 10-12 minutes or until pasta is al dente.
  7. Remove the bay leaf, taste and adjust seasoning as needed.
  8. Serve hot garnished with freshly chopped parsley and optional shredded cheddar cheese.

Nutrition

Serving: 1bowlCalories: 350kcalCarbohydrates: 45gProtein: 20gFat: 10gSaturated Fat: 3gPolyunsaturated Fat: 1gMonounsaturated Fat: 6gCholesterol: 50mgSodium: 800mgPotassium: 400mgFiber: 4gSugar: 6gVitamin A: 500IUVitamin C: 10mgCalcium: 150mgIron: 3mg

Notes

This American goulash is a family favorite that can be customized with vegetables and perfect for meal prep.

Tried this recipe?

Let us know how it was!

Slow Cooker Beef Manhattan: Warm Up with This Cozy Classic

October 27, 2025 by Grace Snow Leave a Comment

"Have you ever craved that cozy, home-cooked meal that wraps you in nostalgia? My Slow Cooker Beef Manhattan delivers just that, bringing the heart of the Midwest right to your table. This dish features juicy, fork-tender beef nestled in a savory broth and served over fluffy mashed potatoes and crispy toasted bread, drenched in silky brown gravy. What makes this recipe truly special? It’s not only a low-effort crowd-pleaser perfect for family dinners on a chilly evening, but it also allows the flavors to develop beautifully while you go about your day. Ready to dive into a delicious, hearty meal that will make everyone feel at home? Let’s get started!"

Why is this dish a must-try?

Simplicity, this Slow Cooker Beef Manhattan requires minimal prep, making it perfect for busy weeknights. Hearty flavors come together effortlessly, enveloping tender beef in a rich broth that warms the soul. Nostalgic appeal invites memories of comforting meals shared with loved ones. Versatile options allow for seasonal veggies or substitutions like chicken, keeping mealtime exciting. Crowd-pleaser qualities guarantee satisfied smiles, and the recipe yields leftovers ideal for meal prepping, making it a time-saving win. Celebrate cozy cooking by pairing it with a fresh salad or a deliciously light side from my Ground Beef Enchiladas for balanced meal nights!

Slow Cooker Beef Manhattan Ingredients

Here’s everything you need to make your Slow Cooker Beef Manhattan!

For the Beef

  • Beef Roast (2 pounds) – Use chuck or round roast for the best tenderness and flavor.
  • Onion (1 medium, sliced) – Adds sweetness and depth; shallots work as a milder substitute.
  • Beef Broth (2 cups) – Liquid base for cooking; low-sodium options are great for less salt.
  • Worcestershire Sauce (2 tablespoons) – Infuses umami and richness; soy sauce can be a substitute, but adjust salt levels.
  • Soy Sauce (1 tablespoon) – Elevates savory notes; tamari can be used for gluten-free cooking.
  • Garlic Powder (1 teaspoon) – Adds depth; fresh minced garlic can offer a stronger punch.

For Seasoning

  • Onion Powder (1 teaspoon) – Boosts the overall onion flavor.
  • Dried Thyme (1 teaspoon) – Imparts herbal notes; you can swap with oregano if needed.
  • Black Pepper (1 teaspoon) – Adds a hint of heat; adjust according to your taste.
  • Salt (1/2 teaspoon) – Provides simple seasoning; reduce if using salted broth.

For Gravy and Serving

  • Cornstarch (2 tablespoons) + Cold Water (2 tablespoons, for slurry) – Thickens the gravy; arrowroot powder is a good alternative.
  • Bread (6 slices) – Acts as the base layer; Texas toast or whole grain offers a delightful crunch.
  • Mashed Potatoes (4 cups) – Creamy balance for the dish; homemade is best, but store-bought is fine too.

Step‑by‑Step Instructions for Slow Cooker Beef Manhattan

Step 1: Prepare the Base
Start by placing the sliced onion evenly at the bottom of your slow cooker. This will create a flavorful base for your Slow Cooker Beef Manhattan. A medium onion, sliced thinly, adds sweetness to the dish as it cooks. Lay the onions so they cover the entire bottom, setting the stage for the tender beef roast to come.

Step 2: Add the Beef Roast
Next, take your beef roast, about two pounds of chuck or round, and place it directly on top of the onions. This way, as the roast cooks, it will soak up the rich flavors. Make sure to position it nicely to allow for even cooking. The beef should be seared to a deep brown if you have time, as this enhances the flavor.

Step 3: Pour in the Liquids
Now, carefully pour in the beef broth, two cups in total, which will provide moisture and flavor as it cooks. Add two tablespoons of Worcestershire sauce and one tablespoon of soy sauce to deepen the savory taste of your dish. Ensure that the liquids cover the beef, creating the perfect cooking environment inside the slow cooker.

Step 4: Season the Roast
It's time to season your beef roast! Sprinkle one teaspoon each of garlic powder, onion powder, dried thyme, and black pepper over the meat. Finish with half a teaspoon of salt. These spices will enhance the overall flavor profile of your Slow Cooker Beef Manhattan as it slowly simmers.

Step 5: Cook to Perfection
Cover the slow cooker securely with its lid and set it to cook on LOW for 8 hours or HIGH for 4 to 5 hours. You'll know your beef is done when it's fork-tender and shreds easily. The aroma of your cooking beef will fill your kitchen, making it hard to resist peeking!

Step 6: Shred the Beef
Once your cooking time is complete, carefully remove the lid and, using two forks, shred the beef directly in the slow cooker. It should be tender and fall apart easily. Set aside the beef and strain the onions from the broth for a smoother gravy experience.

Step 7: Make the Gravy
In a small bowl, mix two tablespoons of cornstarch with two tablespoons of cold water to create a slurry. Stir this mixture into the warm broth in the slow cooker to thicken it into a glossy gravy. Allow it to cook for a few more minutes until it reaches your desired thickness.

Step 8: Serve Your Dish
To assemble your Slow Cooker Beef Manhattan, take a slice of bread and place it on a plate as the base. Next, add a generous scoop of fluffy mashed potatoes on top of the bread. Finally, pile on the shredded beef and drizzle with the rich, thick gravy. This comforting dish is now ready for your family to enjoy!

Storage Tips for Slow Cooker Beef Manhattan

  • Fridge: Store leftovers in an airtight container for up to 3 days. Ensure the beef and gravy are completely cooled before sealing to maintain freshness.

  • Freezer: If you want to enjoy this comforting dish later, freeze it in a well-sealed container for up to 2 months. Thaw overnight in the fridge before reheating.

  • Reheating: Reheat on the stovetop over low heat, stirring occasionally until warmed through, or microwave in short intervals, ensuring even heating. Add a splash of broth if needed to moisten.

  • Leftover Usage: Transform any remaining beef Manhattan into a delicious sandwich or wrap for a quick meal, bringing new life to this slow cooker classic!

Slow Cooker Beef Manhattan Variations

Feel free to make this Slow Cooker Beef Manhattan your own with these delightful twists and swaps!

  • Vegetable Boost: Add chopped carrots, peas, or green beans in the last hour of cooking for added nutrition and color. The veggies will soak up the delicious broth, turning your dish into a heartier meal.
  • Poultry Option: Swap the beef for chicken or turkey. This lighter version offers a different flavor while keeping the same comforting vibes. Just adjust the cooking time slightly as poultry cooks faster than beef!
  • Cauliflower Mash: Substitute traditional mashed potatoes with cauliflower mash for a low-carb alternative. This creamy option will delight everyone at the table, and it's a fantastic way to enjoy more veggies.
  • Spicy Kick: Add a dash of hot sauce or crushed red pepper flakes to introduce some heat to your dish. This simple addition elevates the flavor and adds a fun twist for spice lovers.
  • Herb Variation: Experiment with herbs by swapping thyme for rosemary or adding a bay leaf during cooking for aromatic depth. These variations can create exciting new flavor profiles while keeping it cozy.
  • Barbecue Twist: For a sweet and tangy flavor, mix barbecue sauce with your broth instead of Worcestershire sauce. This gives your dish a unique flair and is a sure-fire hit for those who love BBQ.
  • Bread Variety: Use different types of bread, like garlic bread or whole-grain instead of white, for a nutritious spin. The crispy base adds a delightful texture that contrasts beautifully with the rich gravy.

These variations promise to spice up your Slow Cooker Beef Manhattan experience. Happy cooking!

What to Serve with Slow Cooker Beef Manhattan

Elevate your meal with delightful accompaniments that perfectly balance the comforting richness of this hearty dish.

  • Creamy Mashed Potatoes: The fluffy, buttery texture pairs beautifully with the savory gravy, enhancing each soggy bite with richness.

  • Buttery Corn on the Cob: This sweet, crunchy side adds a refreshing contrast, providing a delightful pop of flavor against the meaty dish.

  • Garlic Green Beans: Crisp-tender green beans sautéed with garlic offer a vibrant touch, bringing a burst of freshness and color alongside your main meal.

  • Homemade Coleslaw: A crisp, tangy slaw gives a welcome crunch and acidity, cutting through the richness of the beef and gravy.

  • Mixed Greens Salad: Drizzled with a light vinaigrette, a fresh salad introduces a bright atmosphere, making each bite feel light and balanced.

  • Sweet Potato Fries: Crispy on the outside and tender on the inside, the sweet and salty flavors of fries provide a satisfying companion to your beef classic.

  • Red Wine: A warm glass of red wine enhances heartiness, adding an element of sophistication that pairs beautifully with rich beef flavors.

  • Chocolate Cake: End your meal on a sweet note with a slice of chocolate cake; its rich, creamy frosting complements the savory aspects of the dish.

Expert Tips for Slow Cooker Beef Manhattan

  • Sear for Flavor: Searing the beef roast before adding it to the slow cooker enhances the overall flavor. Don’t skip this step if you can!

  • Warm Shredding: Shred the beef while it's warm for easier handling and better texture. Cold meat can be tough to pull apart.

  • Gravy Thickness: Adjust the cornstarch slurry based on your preference for gravy thickness. Start with the suggested amount, then add more if needed.

  • Cook Time Matters: Cooking on LOW for 8 hours yields the most tender beef. If you're in a hurry, use the HIGH setting, but the flavor may not develop as richly.

  • Use Quality Broth: Opt for homemade or high-quality beef broth for the best flavor in your Slow Cooker Beef Manhattan. It makes a tasty difference!

Make Ahead Options

For busy home cooks, preparing Slow Cooker Beef Manhattan ahead of time can be a real lifesaver! You can slice the onions and season the beef roast up to 24 hours in advance, storing them in the fridge. Additionally, you can cook the entire dish and refrigerate the leftovers for up to 3 days. To maintain quality, store the shredded beef, gravy, and mashed potatoes separately in airtight containers. When you're ready to enjoy your meal, simply reheat everything on the stovetop or in the microwave until warmed through. Serve it over toasted bread, and you'll have a delicious, comforting dish with minimal effort on your busy weeknight.

Slow Cooker Beef Manhattan Recipe FAQs

What kind of beef roast should I use for the best flavor?
For a truly satisfying Slow Cooker Beef Manhattan, I recommend using a chuck or round roast. These cuts provide excellent tenderness and flavor when slow-cooked, making them perfect for this dish. Chuck roast is especially good because it has a nice marbling of fat that adds richness to your broth.

How should I store leftovers of my Slow Cooker Beef Manhattan?
Absolutely! You can store leftovers in an airtight container in the fridge for up to 3 days. Be sure the beef and gravy have cooled down completely before sealing to keep everything fresh. If you have any remaining mashed potatoes, I'd store them separately to maintain their texture.

Can I freeze my Slow Cooker Beef Manhattan?
Yes, you can freeze this dish for later enjoyment! Portion the beef and gravy into well-sealed containers or freezer bags and store for up to 2 months. When you're ready to enjoy it, simply thaw overnight in the fridge before reheating.

What if my gravy isn’t thick enough?
If you find your gravy isn't to your liking, no worries at all! To thicken it, mix an additional tablespoon of cornstarch with cold water to make a slurry. Stir this into the simmering gravy and cook for a few minutes until you achieve your desired consistency. Feel free to adjust based on your thickness preference!

Are there any dietary considerations I should be aware of?
Definitely! If you're making this Slow Cooker Beef Manhattan for someone with dietary restrictions, consider using gluten-free soy sauce or tamari in place of regular soy sauce. Also, if you're serving this to pets, remember that certain ingredients like onion can be harmful. Always double-check any allergies in your household before serving!

How can I enhance the flavor of the beef as it cooks?
For extra flavor, you can sear the beef roast in a hot skillet before placing it in the slow cooker. This step caramelizes the meat, providing a richer taste. Don’t skip it if you have the time! Additionally, using homemade beef broth will elevate the dish to new heights of comfort food goodness.

Slow Cooker Beef Manhattan

Slow Cooker Beef Manhattan: Warm Up with This Cozy Classic

Enjoy a nostalgic meal with Slow Cooker Beef Manhattan featuring tender beef in savory broth served over mashed potatoes.
Print Recipe Pin Recipe
Prep Time 15 minutes mins
Cook Time 8 hours hrs
Total Time 8 hours hrs 15 minutes mins
Servings: 6 servings
Course: Dinner
Cuisine: American
Calories: 650
Ingredients Equipment Method Nutrition Notes

Ingredients
  

For the Beef
  • 2 pounds Beef Roast Use chuck or round roast for best tenderness
  • 1 medium Onion sliced; shallots work as substitute
  • 2 cups Beef Broth low-sodium options are great
  • 2 tablespoons Worcestershire Sauce infuses umami
  • 1 tablespoon Soy Sauce tamari can be used for gluten-free
  • 1 teaspoon Garlic Powder or use fresh minced garlic
For Seasoning
  • 1 teaspoon Onion Powder boosts overall flavor
  • 1 teaspoon Dried Thyme swap with oregano if needed
  • 1 teaspoon Black Pepper adjust according to taste
  • 1/2 teaspoon Salt reduce if using salted broth
For Gravy and Serving
  • 2 tablespoons Cornstarch thickens the gravy
  • 2 tablespoons Cold Water for slurry
  • 6 slices Bread Texas toast or whole grain
  • 4 cups Mashed Potatoes homemade is best

Equipment

  • Slow Cooker

Method
 

Step-by-Step Instructions
  1. Start by placing the sliced onion evenly at the bottom of your slow cooker.
  2. Next, take your beef roast and place it directly on top of the onions.
  3. Now, carefully pour in the beef broth, Worcestershire sauce, and soy sauce.
  4. Sprinkle the garlic powder, onion powder, dried thyme, black pepper, and salt over the roast.
  5. Cover the slow cooker and cook on LOW for 8 hours or HIGH for 4 to 5 hours.
  6. Once done, shred the beef directly in the slow cooker.
  7. In a small bowl, mix cornstarch with cold water to create a slurry and stir into the broth.
  8. To serve, layer the bread, mashed potatoes, and then the shredded beef topped with gravy.

Nutrition

Serving: 1servingCalories: 650kcalCarbohydrates: 45gProtein: 50gFat: 30gSaturated Fat: 12gPolyunsaturated Fat: 4gMonounsaturated Fat: 10gTrans Fat: 1gCholesterol: 120mgSodium: 800mgPotassium: 900mgFiber: 5gSugar: 3gVitamin A: 200IUVitamin C: 5mgCalcium: 60mgIron: 3mg

Notes

Searing the beef enhances flavor. Opt for high-quality broth for the best result.

Tried this recipe?

Let us know how it was!

Gingerbread Cake with Molasses Frosting for Cozy Nights

October 27, 2025 by Grace Snow Leave a Comment

As I pulled that warm gingerbread cake from the oven, the cozy aroma of spices filled my kitchen, wrapping me in a blanket of holiday cheer. This Moist Gingerbread Cake with Molasses Frosting is the ultimate comfort dessert, effortlessly combining traditional flavors with a modern twist. It’s moist and tender, making it perfect for any occasion, especially when friends and family gather around the table. Plus, its irresistible molasses frosting adds a rich, buttery finish that is sure to impress your guests. Whether you're celebrating the season or just need a sweet treat to brighten your day, this recipe is easy to whip up and guaranteed to be a hit! So, are you ready to get baking?

Why Bake Gingerbread Cake Now?

Comforting, Cozy Vibes: There's something special about the aroma of this gingerbread cake filling your home, making it perfect for holiday gatherings or cozy nights in.

Irresistible Flavor: The blend of spices and rich molasses creates a depth of flavor that dances on your palate, ensuring every bite is a delight.

Simple Preparation: No need to be a baking expert! This recipe is straightforward and perfect for both seasoned bakers and beginners alike.

Adaptable Delight: Feel free to switch things up! With options for adding nuts or chocolate chips, you can easily customize this cake to your taste.

Crowd-Pleaser: Whether served as a festive centerpiece or a sweet treat, this cake is bound to impress family and friends alike. Don't forget to check out my Ice Cream Cake for another delicious dessert option!

Gingerbread Cake Ingredients

• Perfect for holiday baking!

For the Cake Base

  • All-Purpose Flour – Forms the structure; consider using gluten-free flour for a gluten-free option.
  • Baking Soda & Baking Powder – These leavening agents ensure a delightful rise; make sure they're fresh for best results.
  • Ground Cinnamon, Ginger, Cloves, Nutmeg – These warm spices create that classic gingerbread flavor; adjust according to your spice preference.
  • Salt – Essential in enhancing the overall flavor; balances the sweetness beautifully.
  • Unsalted Butter – Adds richness and moisture; substitute with coconut oil for a dairy-free version.
  • Dark Brown Sugar – Delivers deep flavor and moisture; light brown sugar works for a milder cake.
  • Granulated Sugar – Sweetens and helps with cake structure; you can replace some with coconut sugar for a healthier option.
  • Eggs – Binds everything together; flax eggs offer a vegan alternative.
  • Unsulfured Molasses – The star ingredient giving that signature gingerbread taste; don't swap without considering its unique properties.
  • Buttermilk – Provides moisture; use almond milk mixed with vinegar as a dairy-free substitute.
  • Hot Water – Ensures a smooth batter while adding moisture for that lovely crumb.

For the Molasses Frosting

  • Unsalted Butter – Adds a creamy texture to the frosting; vegan butter can be used if needed.
  • Powdered Sugar – Sweetens the frosting; sift before adding to avoid lumps for a perfect finish.
  • Unsulfured Molasses – Deepens the flavor profile; try different types of molasses for varied taste experiences.
  • Milk or Heavy Cream – Adjusts the frosting’s consistency; almond milk is a great dairy-free option.
  • Vanilla Extract – Elevates the flavors; it's optional if you prefer a simpler taste.
  • Pinch of Salt – Balances sweetness and enhances flavor—don’t skip this step!

Step‑by‑Step Instructions for Gingerbread Cake Molasses Frosting

Step 1: Preheat and Prepare
Begin by preheating your oven to 350°F (175°C). Grease a 9x13 inch baking pan with a little butter or baking spray, ensuring it's well coated to prevent sticking. This is crucial for your gingerbread cake to come out perfectly.

Step 2: Mix Dry Ingredients
In a large mixing bowl, whisk together the all-purpose flour, baking soda, baking powder, ground cinnamon, ginger, cloves, nutmeg, and salt. This step will help distribute the leavening agents and spices evenly, creating a well-balanced flavor in your gingerbread cake.

Step 3: Cream Butter and Sugars
In another bowl, cream the softened unsalted butter with dark brown and granulated sugars using an electric mixer on medium speed for about 3-5 minutes. You want the mixture to become light and fluffy, indicating that air has been incorporated, which is essential for a soft and moist cake.

Step 4: Add Eggs and Molasses
Add eggs to the creamed mixture one at a time, beating well after each addition. Then, mix in the unsulfured molasses until fully combined. The molasses will add that characteristic rich flavor of gingerbread cake, as well as moisture to the batter.

Step 5: Combine Wet and Dry Ingredients
Alternately add the dry ingredient mixture and the buttermilk into the butter and sugar mixture, starting and ending with the dry. Mix until just combined to ensure your gingerbread cake stays tender and moist; overmixing can lead to a dense texture.

Step 6: Add Hot Water
Stir in the hot water gradually until the batter is smooth and well combined. This step enhances the moisture of your gingerbread cake, ensuring each bite is delectable and fluffy. The batter should be a little thinner, but still hold a good consistency.

Step 7: Bake the Cake
Pour the batter into your prepared baking pan and spread it evenly. Bake in the preheated oven for about 30-35 minutes, or until a skewer inserted into the center comes out clean. The edges should be slightly pulling away from the sides of the pan, indicating it's done.

Step 8: Cool the Cake
Once baked, let the cake cool in the pan for about 10 minutes. Then, carefully transfer it to a wire rack to cool completely. Cooling is essential before frosting; if frosted too soon, the icing could melt and lose its structure.

Step 9: Prepare the Molasses Frosting
While the cake cools, start on the molasses frosting. In a bowl, cream the softened unsalted butter until smooth. Gradually add the sifted powdered sugar, along with the unsulfured molasses and vanilla extract, mixing until creamy. Adjust the consistency with milk if needed for a silky finish.

Step 10: Frost the Cake
Once the gingerbread cake has cooled completely, spread the molasses frosting evenly over the top using a spatula or knife. Feel free to decorate as desired—sprinkle some extra spices or edible decorations to make your cake visually appealing!

Make Ahead Options

These Gingerbread Cake with Molasses Frosting recipes are perfect for meal prep enthusiasts! You can prepare the cake batter and store it in the refrigerator for up to 24 hours. This way, the flavors meld beautifully and cooking can be done right before serving. Additionally, you can frost the cooled cake as needed, ensuring it’s fresh and just as delicious. If you prefer, you can also bake the cake a day in advance and keep it in an airtight container at room temperature for up to 3 days. Just frost it when you're ready to serve, and you'll have a warm, cozy dessert that feels like it just came out of the oven!

How to Store and Freeze Gingerbread Cake

Room Temperature: Keep the gingerbread cake in an airtight container at room temperature for up to 3 days to maintain its moist texture and flavor.

Fridge: If you want to extend its life, store the cake in the refrigerator for up to 5 days. Ensure it's well-wrapped to avoid drying out.

Freezer: For longer storage, freeze individual slices or the whole cake wrapped tightly in plastic wrap and aluminum foil. It can last for up to 3 months.

Reheating: To enjoy your gingerbread cake again, thaw it in the fridge overnight, then reheat gently in the microwave for a few seconds or in the oven at 350°F (175°C) for about 10-15 minutes. Enjoy this delightful gingerbread cake with molasses frosting warm or chilled!

What to Serve with Gingerbread Cake with Molasses Frosting

Sharing a slice of this spiced cake magically transforms cozy evenings into a warm gathering filled with delightful flavors.

  • Vanilla Ice Cream: The creamy texture beautifully balances the cake's spices, offering a refreshing contrast to its warmth.

  • Whipped Cream: A cloud of whipped cream adds a light, airy element that enhances each rich bite of gingerbread.

  • Hot Spiced Apple Cider: The cinnamon and clove notes in the cider complement the gingerbread, creating a festive beverage pairing.

  • Coffee: A rich cup of coffee enhances the cake's flavors, making it the perfect companion for your afternoon treat.

  • Dark Chocolate Drizzle: A drizzle of melted dark chocolate adds a hint of bitterness that pairs wonderfully with the sweetness of the molasses frosting.

  • Pecans or Walnuts: Crunchy nuts provide a delightful texture contrast, and their earthiness can deepen the overall flavor experience.

  • Cream Cheese Frosting Alternative: For a tangy twist, consider a cream cheese frosting, which contrasts beautifully with the gingerbread’s sweetness.

  • Fresh Berries: A scattering of raspberries or blueberries can brighten the plate, adding a pop of freshness that cuts through the richness.

  • Chai Tea: This spiced tea harmonizes beautifully with the cake, creating a cozy moment that feels like a warm hug on a chilly day.

Expert Tips for Gingerbread Cake

  • Room Temperature Ingredients: Ensure all ingredients are at room temperature for better emulsification and a smoother batter.

  • Avoid Overmixing: Mix until just combined to avoid a dense texture. Overmixing can lead to a heavy gingerbread cake rather than a light, moist delight.

  • Cool Before Frosting: Allow the cake to cool completely before applying the molasses frosting to prevent it from melting and losing its shape.

  • Adjust Spice Levels: Feel free to tweak the spice quantities to suit your taste preferences; sometimes a little extra cinnamon can add that perfect touch to your gingerbread cake.

  • Frosting Consistency: Adjust the thickness of the frosting with milk; aim for a spreadable but not runny consistency for the best results.

Gingerbread Cake Molasses Frosting Variations

Feel free to get creative with your gingerbread cake by exploring these delightful variations that will add a personal touch to your baked masterpiece!

  • Nutty Crunch: Add chopped walnuts or pecans into the batter for a satisfying crunch and additional flavor harmony. The nuts will complement the warm spices beautifully!

  • Chocolate Surprise: Incorporate semi-sweet chocolate chips seamlessly into the batter for a comforting twist on the classic gingerbread flavor. Chocolate pairs wonderfully with the molasses—your taste buds will thank you!

  • Cupcake Transformation: Turn your batter into delightful gingerbread cupcakes, adjusting the baking time to around 18-20 minutes for perfectly portioned treats. These make for adorable presentation and easy serving at gatherings.

  • Tangy Frosting Swap: Try a tangy cream cheese frosting instead of molasses frosting for a delicious balance of flavors. Simply whip together cream cheese with powdered sugar and a touch of vanilla for a delightful twist!

  • Citrusy Drizzle: For a fresh take, drizzle a lemon glaze over the frosted cake. The zesty citrus will brighten the rich flavors of the gingerbread, creating a lovely contrast.

  • Spiced Apple Addition: Add diced apples and a sprinkle of cinnamon for a fruity twist. The added moisture from the apples makes this cake even more tender!

For more inspiration on delicious desserts, consider trying my Chocolate Pudding Cake or German Chocolate Poke Cake for a sweet finish to any occasion!

Gingerbread Cake with Molasses Frosting Recipe FAQs

What type of flour should I use for the gingerbread cake?
I recommend using all-purpose flour for the best structure in your gingerbread cake. If you're looking for a gluten-free option, you can substitute it with a gluten-free flour blend. Make sure to check the blend’s recommended measurements as they can vary.

How should I store the leftover gingerbread cake?
To keep your gingerbread cake moist, store it in an airtight container at room temperature for up to 3 days. If you want to extend its freshness, place it in the refrigerator, where it can last for up to 5 days. Just ensure it's well-wrapped to prevent drying out.

Can I freeze gingerbread cake?
Absolutely! To freeze your gingerbread cake, slice it into individual portions or wrap the whole cake tightly in plastic wrap, followed by aluminum foil. This prevents freezer burn! You can freeze it for up to 3 months. When you're ready to enjoy it, thaw it overnight in the fridge before reheating.

What if my gingerbread cake turns out dense?
If your gingerbread cake is dense, it may be due to overmixing the batter. When incorporating the wet and dry ingredients, mix until just combined. Also, ensure your leavening agents (baking soda and baking powder) are fresh—they should not be expired! If the cake appears too dry, it could be due to not enough moisture; next time, consider adding an extra tablespoon of buttermilk or hot water.

Is there a dairy-free option for this recipe?
Yes, you can easily make this gingerbread cake dairy-free! Use coconut oil instead of unsalted butter and substitute buttermilk with almond milk mixed with a tablespoon of vinegar or lemon juice. These alterations still yield a moist and delicious cake with all the rich flavors.

Can I make this cake with pets in mind?
It's best to avoid feeding any gingerbread cake to pets, as ingredients like sugar, molasses, and certain spices may not be safe for them. Always check with your vet if you're unsure about sharing human food with your furry friends!

Gingerbread Cake Molasses Frosting

Gingerbread Cake with Molasses Frosting for Cozy Nights

This Gingerbread Cake with Molasses Frosting is a delightful dessert that combines traditional flavors with a modern twist, perfect for cozy nights.
Print Recipe Pin Recipe
Prep Time 20 minutes mins
Cook Time 35 minutes mins
Cooling Time 10 minutes mins
Total Time 1 hour hr 5 minutes mins
Servings: 12 slices
Course: Dessert
Cuisine: American
Calories: 350
Ingredients Equipment Method Nutrition Notes

Ingredients
  

For the Cake Base
  • 3 cups All-Purpose Flour Consider using gluten-free flour for a gluten-free option.
  • 1 teaspoon Baking Soda Ensure it's fresh for best results.
  • 1 teaspoon Baking Powder Ensure it's fresh for best results.
  • 1 teaspoon Ground Cinnamon Adjust according to your spice preference.
  • 1 teaspoon Ground Ginger Adjust according to your spice preference.
  • 1 teaspoon Ground Cloves Adjust according to your spice preference.
  • 1 teaspoon Ground Nutmeg Adjust according to your spice preference.
  • 1 teaspoon Salt Balances the sweetness beautifully.
  • 1 cup Unsalted Butter Substitute with coconut oil for a dairy-free version.
  • 1 cup Dark Brown Sugar Light brown sugar works for a milder cake.
  • 1/2 cup Granulated Sugar Replace some with coconut sugar for a healthier option.
  • 2 large Eggs Flax eggs offer a vegan alternative.
  • 1 cup Unsulfured Molasses Don't swap without considering its unique properties.
  • 1 cup Buttermilk Use almond milk mixed with vinegar as a dairy-free substitute.
  • 1 cup Hot Water Ensures a smooth batter.
For the Molasses Frosting
  • 1/2 cup Unsalted Butter Vegan butter can be used if needed.
  • 2 cups Powdered Sugar Sift before adding to avoid lumps.
  • 1/2 cup Unsulfured Molasses Try different types of molasses for varied taste experiences.
  • 1 tablespoon Milk or Heavy Cream Almond milk is a great dairy-free option.
  • 1 teaspoon Vanilla Extract Optional if you prefer a simpler taste.
  • 1 pinch Salt Balances sweetness.

Equipment

  • 9x13-inch baking pan
  • Mixing bowls
  • Electric mixer
  • Whisk
  • Spatula
  • wire rack

Method
 

Gingerbread Cake
  1. Preheat your oven to 350°F (175°C) and grease a 9x13 inch baking pan.
  2. In a large mixing bowl, whisk together the all-purpose flour, baking soda, baking powder, ground cinnamon, ginger, cloves, nutmeg, and salt.
  3. Cream the softened unsalted butter with dark brown and granulated sugars using an electric mixer on medium speed for about 3-5 minutes.
  4. Add eggs to the creamed mixture one at a time, beating well after each addition. Then, mix in the unsulfured molasses until fully combined.
  5. Alternately add the dry ingredient mixture and the buttermilk into the butter and sugar mixture, starting and ending with the dry.
  6. Stir in the hot water gradually until the batter is smooth and well combined.
  7. Pour the batter into your prepared baking pan and bake in the preheated oven for about 30-35 minutes.
  8. Let the cake cool in the pan for about 10 minutes, then transfer it to a wire rack to cool completely.
Molasses Frosting
  1. Cream the softened unsalted butter until smooth, then gradually add the sifted powdered sugar, unsulfured molasses, and vanilla extract, mixing until creamy.
  2. Adjust the frosting’s consistency with milk if needed, then frost the cooled gingerbread cake evenly over the top.

Nutrition

Serving: 1sliceCalories: 350kcalCarbohydrates: 55gProtein: 4gFat: 15gSaturated Fat: 9gPolyunsaturated Fat: 1gMonounsaturated Fat: 4gCholesterol: 30mgSodium: 200mgPotassium: 150mgFiber: 2gSugar: 25gVitamin A: 5IUCalcium: 4mgIron: 6mg

Notes

Ensure all ingredients are at room temperature for better emulsification. Adjust the thickness of the frosting with milk when necessary.

Tried this recipe?

Let us know how it was!

Taco Pizza Magic: The Ultimate Comfort Food Delight

October 27, 2025 by Grace Snow Leave a Comment

As I pulled the golden crescent dough from the oven, a delightful aroma wafted through my kitchen, instantly sparking nostalgia for family gatherings filled with laughter and scrumptious food. This Taco Pizza Appetizer beautifully marries the zesty, savory essence of tacos with the comfort of a fresh pizza. It's an effortless option that's customizable, making it perfect for accommodating your guests’ taste preferences, whether you’re hosting a lively game day or enjoying a cozy night in. The crispy crust and creamy base give it a satisfying texture that will have everyone reaching for seconds. With this recipe, you’ll serve up a crowd-pleaser that’s not only easy to prepare but also gluten-free as an option! Ready to discover how to whip up this flavorful dish that’s sure to impress? Let’s dive in!

Why is Taco Pizza a Must-Try?

Irresistible Flavor Fusion: This Taco Pizza Appetizer combines classic taco spices with a gooey cheese topping, creating an explosion of flavor in every bite.
Easy to Customize: From extra veggies to alternative proteins, everyone can build their perfect slice. Think about trying it with a twist using Shrimp Tacos Zesty for a seafood option!
Family-Friendly Fun: It's a dish that appeals to both kids and adults, making it a surefire hit at any gathering.
Quick Preparation: Whipped up in no time, it’s the perfect last-minute dish for unexpected guests or spontaneous parties.
Gluten-Free Option: With the right dough, this appetizer can cater to gluten sensitivities, so no one misses out on the fun!

Taco Pizza Ingredients

For the Crust

  • Crescent Roll Dough – Provides a quick and tasty flaky base; store-bought dough enhances convenience.

For the Creamy Base

  • Cream Cheese – Adds a rich, creamy texture; Neufchâtel can be a lighter alternative.
  • Sour Cream – Offers a delicious tanginess; Greek yogurt works well as a healthier substitute.

For the Filling

  • Ground Beef (or Ground Turkey) – The main protein seasoned for that signature taco flavor; turkey is a leaner option.
  • Taco Seasoning – Key for authentic taco taste; try homemade to lower sodium content.

For the Toppings

  • Shredded Cheddar and Mozzarella Cheese – Melt together beautifully for a rich topping; feel free to mix and match your favorite melty cheeses.
  • Diced Tomatoes – Contributes freshness and moisture; fresh salsa can substitute if desired.
  • Shredded Lettuce – Provides a satisfying crunch; spinach can be an excellent alternative for a twist.
  • Optional Toppings – Customize with jalapeños, olives, or a variety of veggies to suit all tastes.

This delightful Taco Pizza offering will not only satisfy your cravings but also spotlight its customizable nature, inviting everyone to dive into their flavor journey!

Step‑by‑Step Instructions for Taco Pizza

Step 1: Prepare the Crescent Roll Crust
Preheat your oven to 375°F (190°C) and line a cookie sheet with parchment paper. Unroll the crescent roll dough and press it into a continuous sheet to form a crispy crust. Bake in the preheated oven for about 10 minutes until golden brown, then remove and allow it to cool completely before adding the creamy base.

Step 2: Make the Creamy Base
In a mixing bowl, combine softened cream cheese and sour cream, blending until smooth and creamy. Once thoroughly mixed, spread the creamy base evenly over the cooled crescent crust, ensuring a generous layer. Refrigerate for at least 15 minutes to allow the flavors to meld and the base to firm up nicely.

Step 3: Cook the Ground Beef
In a skillet over medium heat, add your ground beef (or ground turkey), cooking it for about 5-7 minutes while breaking it apart as it browns. Stir occasionally, ensuring all sides cook evenly. Once browned, drain any excess fat, then add taco seasoning to the meat, mixing well until all pieces are coated in that delicious flavor. Remove from heat and let the mixture cool.

Step 4: Assemble Taco Pizza
After your taco meat has cooled, spread it evenly over the creamy base, making certain to cover it completely. Next, sprinkle a generous amount of shredded cheddar and mozzarella cheese on top, allowing the cheeses to melt beautifully. Finally, add diced tomatoes and shredded lettuce, layering on colorful toppings that will enhance both the visual appeal and flavor of your Taco Pizza.

Step 5: Slice and Serve
Once everything is assembled, use a sharp knife to cut your Taco Pizza into eight tantalizing slices. Serve it fresh, and revel in the delightful contrast of gooey cheese and crispy crust. This vibrant appetizer is best enjoyed warm, so gather your family and friends. Dive in and savor the rich, hearty flavors of this incredible Taco Pizza!

How to Store and Freeze Taco Pizza

  • Fridge: Keep leftover Taco Pizza in an airtight container for up to 3 days. Reheat in the oven to maintain the crispy crust.
  • Freezer: For longer storage, wrap slices in plastic wrap and foil, then freeze for up to 2 months. Thaw overnight in the fridge before reheating.
  • Reheating: To enjoy the Taco Pizza again, preheat the oven to 350°F (175°C) and bake for about 10-15 minutes, ensuring the cheese is melted and toppings are warm.
  • Assembly Tip: If preparing in advance, you can assemble Taco Pizza but bake it fresh to enjoy out of the oven when ready!

Make Ahead Options

These Taco Pizza Appetizers are perfect for busy home cooks looking to save time without sacrificing flavor! You can prepare the crescent roll crust and make the creamy base up to 24 hours in advance. Simply bake the crust, let it cool, and then spread the cream cheese mixture over it before refrigerating. You can also brown and season the ground beef (or ground turkey) up to 3 days ahead; just ensure it cools before storing it in an airtight container. When you’re ready to serve, simply layer the taco meat and toppings on the prepared base and bake until everything is warmed through and the cheese is melted. This way, your Taco Pizza will be just as delicious with minimal effort!

Expert Tips for Taco Pizza

  • Meat Management: Make sure to drain the meat well to prevent a greasy pizza. This keeps every bite deliciously balanced.
  • Cool It Down: Allow the crescent crust to cool completely before spreading the creamy base. This prevents the cheese from melting prematurely.
  • Taste the Seasoning: Adjust the taco seasoning based on your preference. Adding a pinch of cayenne or extra herbs can really elevate your Taco Pizza.
  • Layer Wisely: Start with cream cheese before the meat to create a creamy barrier that enhances flavor and texture.
  • Creative Toppings: Don’t shy away from experimenting! Try different cheeses, proteins, or fresh herbs to tailor the Taco Pizza to your family’s tastes.

Taco Pizza Variations & Substitutions

Feel free to play with flavors and textures to craft your perfect Taco Pizza experience!

  • Veggie-Packed: Add diced bell peppers and onions for some crunchy freshness. These veggies break up the richness while adding a pop of color!
  • Spicy Twist: Top with sliced jalapeños or a drizzle of spicy hot sauce for an extra kick of heat. It's like inviting a fiesta to your taste buds!
  • Meat-Free: Swap ground beef for a blend of black beans and lentils to create a hearty vegetarian option. It’s nutritious, flavorful, and full of delightful surprises.
  • Dairy-Free: Use dairy-free cream cheese and cheese alternatives for a lactose-free option. It’s amazing how creamy and indulgent it can still taste!
  • BBQ Variant: Replace taco seasoning with a smoky BBQ sauce and shredded chicken for a different flavor profile. It’s a delicious pairing that adds a whole new layer of fun.
  • Crunchy Toppings: For added texture, include crushed tortilla chips or crispy onions on top just before serving. They provide a satisfying crunch that's hard to resist!
  • Mediterranean Remix: Try using feta cheese, olives, and artichoke hearts instead of traditional toppings for a Mediterranean flair. It’s like a pizza vacation for your palate!
  • For the Kids: Keep it simple and sprinkle on just cheese and mild salsa as toppings. Kid-approved and super easy for picky eaters!

Don’t forget to check out my recipes for Blue Cheese Pizza and Fish Taco Bowls for more flavorful inspiration in your kitchen!

What to Serve with Taco Pizza Appetizer

Elevate your meal with these delightful pairings that enhance the vibrant flavors of this scrumptious appetizer.

  • Fresh Guacamole: Creamy and rich, it adds a perfect cooling balance to the spice of the taco pizza. Don’t forget the lime for that zesty kick!
  • Crispy Tortilla Chips: The ideal crunchy companion, these are perfect for scooping up any toppings. Dip them in salsa for a flavor explosion!
  • Zesty Salsa: Bursting with fresh ingredients, salsa enhances the taco experience, complementing the flavors beautifully while adding a refreshing twist.
  • Mexican Street Corn Salad: This sweet and smoky salad brings a vibrant mix of flavors and textures, bringing a festive touch to your meal.
  • Savory Mexican Rice: Fluffy and flavorful, this dish provides a nice base to balance the richness of the taco pizza. Plus, it’s a great way to soak up any extra toppings!
  • Chilled Margarita: A classic pairing, the tartness of the margarita cuts through the heaviness of the cheese, creating a balanced and refreshing sip.
  • Iced Tea with Lime: A simple yet effective beverage choice that adds a touch of sweetness while keeping you cool and refreshed.
  • Creamy Coleslaw: Its crunch and tang provide a delightful contrast to the warm, cheesy pizza, making each bite more exciting.
  • Chocolate Flan: End your meal on a sweet note with this rich and creamy dessert that’s a delightful way to wrap up your taco-themed feast.

Dive into these pairings and watch your Taco Pizza transform into a full fiesta!

Taco Pizza Recipe FAQs

What kind of crescent roll dough should I use?
Absolutely, you can opt for store-bought crescent roll dough, which is incredibly convenient and gives you the flaky crust you want! If you prefer to make your own, you can use a homemade dough recipe designed for a similar texture.

How do I store leftover Taco Pizza?
Store leftover Taco Pizza in an airtight container in the fridge for up to 3 days. When you're ready to enjoy it again, reheat in the oven at 350°F (175°C) for about 10-15 minutes. This will keep the crust crispy and the toppings warm.

Can I freeze Taco Pizza?
Very! To freeze Taco Pizza, wrap individual slices in plastic wrap and then in aluminum foil. This helps prevent freezer burn. You can keep it in the freezer for up to 2 months. When you're ready to eat, thaw overnight in the fridge, then reheat in the oven.

What should I do if my crust is too soft?
If your crust turns out too soft, it might need a bit more baking time at the beginning. Make sure the crust is golden brown and completely cooled before adding the toppings. This helps it maintain its structure and avoids sogginess.

Are there any dietary considerations I should be aware of?
Of course! This Taco Pizza recipe can easily accommodate gluten-free needs by using gluten-free crescent roll dough. Additionally, pay attention to the taco seasoning if you have sodium restrictions—consider making a homemade blend to suit your dietary preferences!

Can I customize the toppings for a healthier option?
Absolutely! You can load it up with colorful veggies like bell peppers or zucchini, use ground turkey instead of beef for a leaner meat option, or even go meatless with beans for added fiber. The more the merrier when it comes to personalization!

Taco Pizza

Taco Pizza Magic: The Ultimate Comfort Food Delight

Taco Pizza Appetizer beautifully combines zesty taco flavors with comforting pizza, customizable for all tastes, making it perfect for gatherings.
Print Recipe Pin Recipe
Prep Time 15 minutes mins
Cook Time 10 minutes mins
Cooling Time 15 minutes mins
Total Time 40 minutes mins
Servings: 8 slices
Course: Appetizers
Cuisine: Mexican
Calories: 300
Ingredients Equipment Method Nutrition Notes

Ingredients
  

For the Crust
  • 1 roll Crescent Roll Dough Store-bought enhances convenience.
For the Creamy Base
  • 8 oz Cream Cheese Neufchâtel can be a lighter alternative.
  • 1 cup Sour Cream Greek yogurt works well as a healthier substitute.
For the Filling
  • 1 lb Ground Beef (or Ground Turkey) Turkey is a leaner option.
  • 1 packet Taco Seasoning Try homemade to lower sodium content.
For the Toppings
  • 1 cup Shredded Cheddar and Mozzarella Cheese Mix and match your favorite melty cheeses.
  • 1 cup Diced Tomatoes Fresh salsa can substitute if desired.
  • 1 cup Shredded Lettuce Spinach can be an excellent alternative.
  • Optional Toppings Customize with jalapeños, olives, or other veggies.

Equipment

  • Oven
  • Skillet
  • Mixing Bowl
  • Cookie Sheet
  • Parchment Paper
  • Knife

Method
 

Step-by-Step Instructions for Taco Pizza
  1. Preheat your oven to 375°F (190°C) and line a cookie sheet with parchment paper. Unroll the crescent roll dough and press it into a continuous sheet to form a crispy crust. Bake in the preheated oven for about 10 minutes until golden brown, then remove and allow it to cool completely before adding the creamy base.
  2. In a mixing bowl, combine softened cream cheese and sour cream, blending until smooth and creamy. Once thoroughly mixed, spread the creamy base evenly over the cooled crescent crust, ensuring a generous layer. Refrigerate for at least 15 minutes to allow the flavors to meld and the base to firm up nicely.
  3. In a skillet over medium heat, add your ground beef (or ground turkey), cooking it for about 5-7 minutes while breaking it apart as it browns. Stir occasionally, ensuring all sides cook evenly. Once browned, drain any excess fat, then add taco seasoning to the meat, mixing well until all pieces are coated in that delicious flavor. Remove from heat and let the mixture cool.
  4. After your taco meat has cooled, spread it evenly over the creamy base, making certain to cover it completely. Next, sprinkle a generous amount of shredded cheddar and mozzarella cheese on top, allowing the cheeses to melt beautifully. Finally, add diced tomatoes and shredded lettuce, layering on colorful toppings that will enhance both the visual appeal and flavor of your Taco Pizza.
  5. Once everything is assembled, use a sharp knife to cut your Taco Pizza into eight tantalizing slices. Serve it fresh, and revel in the delightful contrast of gooey cheese and crispy crust. Enjoy warm with family and friends!

Nutrition

Serving: 1sliceCalories: 300kcalCarbohydrates: 20gProtein: 15gFat: 18gSaturated Fat: 9gPolyunsaturated Fat: 0.5gMonounsaturated Fat: 2gCholesterol: 50mgSodium: 600mgPotassium: 350mgFiber: 2gSugar: 3gVitamin A: 600IUVitamin C: 3mgCalcium: 200mgIron: 2mg

Notes

Store leftovers in an airtight container for up to 3 days. Reheat in the oven to maintain the crispy crust. For longer storage, freeze for up to 2 months.

Tried this recipe?

Let us know how it was!

Lobster Pot Pie: Comforting Seafood Delight in Every Bite

October 27, 2025 by Grace Snow Leave a Comment

The aroma of savory seafood wafts through the kitchen, and suddenly, I'm back to that cozy seaside bistro where I first tasted Lobster Pot Pie. With its buttery crust and rich filling, this dish is comfort food redefined—a sumptuous, home-cooked meal you can whip up in no time. The Ultimate Lobster Pot Pie combines tender lobster meat with fresh vegetables, enveloped in a flaky crust that's not just delicious but also deceptively simple to create. It's a go-to for impressing family and friends or satisfying an adventurous craving. Plus, it makes for a wonderful weeknight dinner or celebratory dish, making any meal feel special. Are you ready to dive into this seafood masterpiece? Let's embark on this culinary journey together!

Why is Lobster Pot Pie a must-try?

Comforting, decadent flavors: This Lobster Pot Pie is your ticket to a warm, indulgent meal that brings the flavors of the sea straight to your kitchen. Quick and easy: With a streamlined process, you’ll impress guests without spending hours in the kitchen. Crowd-pleaser: Perfect for seafood lovers, this dish will dazzle at any gathering, alongside options like Tamale Pie Hearty or Crock Pot Chicken. Versatile ingredients: Feel free to customize by swapping lobster for crab or shrimp! Gourmet experience: Those tender bites of lobster in a creamy filling create a restaurant-quality meal you can prepare at home. Dive into this incredible comfort food and elevate your next dinner!

Lobster Pot Pie Ingredients

For the Filling

  • Lobster Meat – Provides delightful seafood flavor; substitute with crab or shrimp if necessary.
  • Heavy Cream – Adds richness and creaminess; can be replaced with half-and-half for a lighter version.
  • Chicken or Seafood Stock – Contributes depth of flavor; homemade or store-bought options work well.
  • Olive Oil – Used for sautéing aromatics; can substitute with butter for added flavor.
  • Onion – Base flavor for the filling; optional to use shallots for a milder taste.
  • Garlic – Enhances overall savoriness; fresh garlic is recommended but garlic powder can suffice in a pinch.
  • Carrots – Add texture and sweetness; integral for the traditional pot pie flavor.
  • Celery – Offers crunch and freshness; can be swapped with parsnips or bell peppers.
  • Frozen Peas – Adds color and pops of sweetness; fresh peas are a great alternative.
  • Fresh Thyme – Imparts herbal notes; can be replaced with dried thyme (use less, about 1/3 amount).
  • Lemon Juice – Brightens the dish; can use vinegar as a substitute.
  • Salt & Black Pepper – Essential for seasoning; adjust to taste.

For the Crust

  • Pre-made Pie Crusts – Provides the outer layer; homemade crust is encouraged for a personal touch.
  • Egg (for egg wash) – Gives the crust a golden finish; optional if desired.

Step‑by‑Step Instructions for Lobster Pot Pie

Step 1: Preheat the Oven
Begin by preheating your oven to 400°F (200°C). This ensures that when it’s time to bake the Lobster Pot Pie, the crust will turn beautifully golden and flaky. While the oven warms up, gather your ingredients and prepare your workspace for a smooth cooking experience.

Step 2: Sauté Aromatics
In a large skillet, heat 2 tablespoons of olive oil over medium heat. Add 1 chopped onion and 2 minced garlic cloves, sautéing them for about 3-4 minutes until the onion becomes translucent and aromatic. This base will infuse the pot pie filling with delicious flavors. Stir occasionally to prevent browning.

Step 3: Add Vegetables
Once your aromatics are ready, stir in 1 cup of diced carrots and 1 cup of diced celery, sautéing for another 5 minutes. You want the vegetables to soften slightly but still retain some crunch for texture in your Lobster Pot Pie. Keep stirring to ensure even cooking.

Step 4: Make the Filling
Pour in 1 cup of heavy cream and 1 cup of either chicken or seafood stock, mixing everything well. Allow the mixture to gently simmer for about 5 minutes, letting the flavors meld together. You should see it thicken slightly, becoming creamy and inviting—perfect for enveloping that tender lobster.

Step 5: Combine Lobster and Peas
Add in 2 cups of cooked lobster meat and 1 cup of frozen peas, stirring to combine. Let the filling simmer for an additional 5 minutes, ensuring the lobster warms through. This is where the magic happens as the flavors combine; you’ll want the mixture bubbling softly around the edges.

Step 6: Season the Filling
Remove the skillet from heat and stir in 1 teaspoon of fresh thyme, 1 tablespoon of lemon juice, and a pinch of salt and black pepper to taste. Taste the filling and adjust the seasoning if needed. This step elevates the flavor profile and gives the Lobster Pot Pie its signature zest.

Step 7: Prepare the Crust
Place one pre-made pie crust into a 9-inch pie dish, ensuring it fits snugly along the edges. Carefully pour the lobster filling into the crust, spreading it out evenly for a gorgeous presentation. This foundational layer will hold all that deliciousness, so make sure it’s well-distributed.

Step 8: Top with Crust
Lay the second pie crust over the top, gently crimping the edges to seal in the filling. Cut several slits in the top crust to create steam vents—this will prevent it from puffing up while baking. Take a moment to admire how beautiful your Lobster Pot Pie is starting to look!

Step 9: Egg Wash
In a small bowl, whisk together one egg and a splash of water to create an egg wash. Using a pastry brush, gently brush the top of the crust with this mixture. This final touch will give your lobster pot pie a lovely golden finish that will shine bright and appetizing when it comes out of the oven.

Step 10: Bake
Place the assembled Lobster Pot Pie in the oven and bake for 30-35 minutes or until the crust is golden brown and flaky. You’ll know it’s ready when you can see the filling bubbling through the slits and the aroma fills your kitchen with warmth.

Step 11: Cool Down
Once baked, remove the pot pie from the oven and allow it to cool for 10-15 minutes. This resting period helps the filling set and makes it easier to slice. Keep your kitchen surroundings filled with excitement for the delicious Lobster Pot Pie that’s about to make an appearance at your table!

Expert Tips for Lobster Pot Pie

  • Proper Lobster Cooking: Ensure the lobster meat is fully cooked before adding it to the filling. Use a thermometer to verify that the internal temperature reaches 165°F (74°C) during baking.

  • Avoid Overcooking: Be cautious not to overcook the filling after adding the lobster. This helps keep the meat tender and juicy, enhancing your Lobster Pot Pie.

  • Cool Before Serving: Always let the pot pie cool for 10-15 minutes before cutting. This prevents burns and allows the flavors to set perfectly.

  • Even Crust Cooking: To achieve a crispy crust, make sure to cut slits in the top crust for steam to escape. This will keep your Lobster Pot Pie looking and tasting fabulous.

  • Homemade vs. Store-Bought: While pre-made pie crusts save time, making your own can elevate the dish further, giving it a personal touch that friends and family will love.

  • Season to Taste: Adjust the seasoning in the filling as you'll want it to shine through. A little more lemon juice or a pinch of salt can make a big difference in your Lobster Pot Pie!

How to Store and Freeze Lobster Pot Pie

Fridge: Store any leftovers in an airtight container for up to 3 days. Make sure it's completely cooled before placing it in the fridge to preserve freshness.

Freezer: If you want to freeze the Lobster Pot Pie, it can be wrapped tightly in plastic wrap and aluminum foil. Enjoy it within 2 months for the best flavor and texture.

Reheating: When ready to serve, thaw in the fridge overnight. Reheat in the oven at 350°F (175°C) for about 20-25 minutes until heated through, ensuring your comfort food remains deliciously creamy.

Make-Ahead: The pot pie can be assembled a day in advance. Just cover it with foil and refrigerate before baking; adjust the baking time to accommodate the cold filling.

Lobster Pot Pie Variations & Substitutions

Feel free to get creative with this Lobster Pot Pie recipe and make it your own! Your kitchen journey can burst with flavor and excitement.

  • Seafood Swap: Replace the lobster with crab or shrimp for a different seafood experience that still delights.

  • Lighter Crust: Use a puff pastry for a lighter, flakier crust that adds an airy touch to each bite.

  • Cheesy Delight: Mix in some cheese, like cheddar or Gruyère, to the filling for a rich, gooey surprise. It's a game changer, trust me!

  • Veggie Boost: Add in extra vegetables such as bell peppers or sweet corn for a pop of color and flavor. This makes the pot pie not only heartier but also more nutritious!

  • Gluten-Free Option: Use a gluten-free pie crust to ensure everyone can join in on the deliciousness. It's an easy swap that keeps the joy intact!

  • Herb Infusion: Experiment with different fresh herbs, like dill or parsley, instead of thyme for a unique aromatic twist. Your kitchen will smell divine!

  • Zingy Seasoning: Add a dash of hot sauce or cayenne for a kick of heat that takes the comfort food to a vibrant level. Spice it up your way!

  • Creamy Twist: Substitute heavy cream with coconut milk for a dairy-free version that brings a mild sweetness. Your palate will thank you for this delightful twist!

Each variation opens the door to new tastes and experiences, making your Lobster Pot Pie a dish that can be cherished time and again. If you're looking for more incredible seafood inspiration, check out One Pot Salmon or try out my hearty Crock Pot Chicken for comforting family favorites!

What to Serve with Lobster Pot Pie?

A comforting Lobster Pot Pie deserves delectable companions to enhance your dining experience and make your meal memorable.

  • Crisp Mixed Green Salad: A refreshing salad with vinaigrette complements the rich filling, providing a light and crunchy contrast to the hearty pie. The fresh greens add color and balance the meal beautifully.

  • Buttery Garlic Bread: This warm, crispy bread is perfect for mopping up any creamy filling that spills from the pie. Its delightful garlic aroma and buttery flavor make every bite of the Lobster Pot Pie shine even brighter.

  • Roasted Asparagus: The slight bitterness of roasted asparagus elevates the dish with a sophisticated touch. With a dash of olive oil and a sprinkle of salt, this green vegetable sidesteps easily into your meal.

  • Creamy Coleslaw: The crunch of coleslaw adds a delightful textural contrast while its creamy dressing offers a refreshing palate cleanser between bites. This pairing is perfect for those who enjoy a little tang with their seafood.

  • Champagne or Sparkling Wine: Elevate your dining experience with a glass of bubbly. The effervescence and acidity of champagne cut through the richness of the Lobster Pot Pie, creating an elegant balance.

  • Lemon Sorbet: A light dessert, lemon sorbet cleanses the palate after the savory pie. Its bright, citrusy flavor perfectly echoes the lemon notes baked into the pot pie, leaving a cheerful finish to your meal.

Make Ahead Options

These Lobster Pot Pies are perfect for busy cooks looking to save time without sacrificing flavor! You can prepare the entire filling up to 24 hours in advance, allowing it to cool before transferring it to an airtight container in the refrigerator. This not only speeds up your prep time on the day of baking but also enhances the flavors as they meld overnight. When you’re ready to bake, simply fill your pie crusts with the chilled filling, cover with the top crust, and brush with the egg wash. Bake as directed, noting that you may need to add a few extra minutes to ensure it’s heated through. Enjoy restaurant-quality results with minimal effort!

Lobster Pot Pie Recipe FAQs

What type of lobster meat should I use?
Absolutely! For the best flavor, use fresh cooked lobster meat. If unavailable, you can substitute with crab or shrimp for a similar texture and taste. Just ensure the seafood is pre-cooked before adding it to the filling.

How should I store leftovers?
To keep your Lobster Pot Pie fresh, store any leftovers in an airtight container in the fridge for up to 3 days. Make sure the pie is completely cooled before refrigerating to preserve its delicious flavor and texture.

Can I freeze Lobster Pot Pie?
Yes, you can freeze it! Wrap the pie tightly in plastic wrap and then in aluminum foil to prevent freezer burn. It’s best enjoyed within 2 months. When ready to eat, simply thaw it in the fridge overnight, and reheat in the oven at 350°F (175°C) for about 20-25 minutes until fully warmed through.

What if my filling is too runny?
If you find that your filling is too runny, don’t worry! The solution is simple. You can thicken it by adding a tablespoon of cornstarch blended with a little cold water, then return it to the heat until it simmers and thickens. This will ensure your Lobster Pot Pie has a rich, creamy consistency without being soupy.

Is this recipe suitable for my dietary needs?
Great question! If you have specific dietary considerations, it’s easy to adjust this Lobster Pot Pie. For a dairy-free option, use coconut milk instead of cream and earth balance or similar products in place of butter. Always double-check any allergies with ingredients such as shellfish.

Lobster Pot Pie

Lobster Pot Pie: Comforting Seafood Delight in Every Bite

This Lobster Pot Pie brings comforting flavors of the sea and a flaky crust to your dinner table.
Print Recipe Pin Recipe
Prep Time 30 minutes mins
Cook Time 35 minutes mins
Cooling Time 15 minutes mins
Total Time 1 hour hr 20 minutes mins
Servings: 6 slices
Course: Dinner
Cuisine: Seafood
Calories: 400
Ingredients Equipment Method Nutrition Notes

Ingredients
  

Filling
  • 2 cups Lobster Meat Substitute with crab or shrimp if necessary.
  • 1 cup Heavy Cream Can be replaced with half-and-half for a lighter version.
  • 1 cup Chicken or Seafood Stock Homemade or store-bought options work well.
  • 2 tablespoons Olive Oil Can substitute with butter for added flavor.
  • 1 medium Onion Optional to use shallots for a milder taste.
  • 2 cloves Garlic Fresh garlic is recommended but garlic powder can suffice.
  • 1 cup Carrots Diced, integral for the traditional pot pie flavor.
  • 1 cup Celery Diced, can be swapped with parsnips or bell peppers.
  • 1 cup Frozen Peas Fresh peas are a great alternative.
  • 1 teaspoon Fresh Thyme Can be replaced with dried thyme (use less, about 1/3 amount).
  • 1 tablespoon Lemon Juice Can use vinegar as a substitute.
Crust
  • 2 pre-made Pie Crusts Homemade crust is encouraged for a personal touch.
  • 1 egg Egg (for egg wash) Optional if desired.

Equipment

  • Large skillet
  • 9-inch pie dish
  • Whisk
  • Pastry brush

Method
 

Preparation
  1. Preheat your oven to 400°F (200°C).
  2. In a large skillet, heat olive oil over medium heat. Add chopped onion and minced garlic, sauté for about 3-4 minutes until onion is translucent.
  3. Stir in diced carrots and celery, sauté for another 5 minutes until soft but still crunchy.
  4. Pour in heavy cream and either chicken or seafood stock, mixing well. Let it simmer for about 5 minutes.
  5. Add in cooked lobster meat and frozen peas, stirring to combine. Let it simmer for another 5 minutes.
  6. Season the filling with fresh thyme, lemon juice, salt, and black pepper. Adjust seasoning to your taste.
  7. Place one pie crust into a 9-inch pie dish and pour the lobster filling evenly.
  8. Lay the second pie crust over the top, crimp the edges, and cut slits for steam vents.
  9. Whisk together egg and water for egg wash, and brush over the top crust.
  10. Bake for 30-35 minutes or until the crust is golden brown and filling is bubbling.
  11. Allow to cool for 10-15 minutes before slicing.

Nutrition

Serving: 1sliceCalories: 400kcalCarbohydrates: 30gProtein: 25gFat: 20gSaturated Fat: 10gPolyunsaturated Fat: 5gMonounsaturated Fat: 4gCholesterol: 75mgSodium: 800mgPotassium: 500mgFiber: 2gSugar: 3gVitamin A: 15IUVitamin C: 10mgCalcium: 8mgIron: 15mg

Notes

Serve with a side salad or crusty bread for a complete meal. Adjust seasoning as desired for the best flavor profile.

Tried this recipe?

Let us know how it was!

Caramelized Pulled Beef Brisket: Melt-in-Your-Mouth Delight

October 27, 2025 by Grace Snow Leave a Comment

As I stood in the kitchen, the aroma of caramelizing beef danced through the air, making my mouth water and my stomach rumble—who knew dinner could summon such anticipation? Today, I’m excited to share my recipe for Caramelized Pulled Beef Brisket, a dish that transforms a humble cut of beef into a tender, smoky masterpiece through slow cooking. Perfect for meal prep or a satisfying weekend feast, this recipe not only delivers on flavor but requires surprisingly little hands-on time. Whether you savor it in sandwiches, tacos, or paired with creamy mashed potatoes, you’ll find it effortlessly versatile and completely crowd-pleasing. Ready to elevate your dinner game? Let’s dive in!

Why is This Recipe a Must-Try?

Tender, Juicy Perfection: The slow-cooked beef brisket becomes irresistibly soft, practically melting in your mouth.
Unique Flavor Profile: With a delightful blend of smoked paprika, garlic, and delicious barbecue sauce, each bite is bursting with smoky richness.
Versatile Serving Options: Whether you choose to pile it on a toasted brioche bun or serve it in lettuce wraps for a low-carb delight, the choices are endless!
Minimal Hands-On Time: Once you set the brisket to simmer, it does all the work, making it perfect for busy weeknights or special occasions.
Crowd-Pleasing Delight: This dish is sure to impress friends and family, making it your new go-to for gatherings. Try pairing it with complementary sides like creamy mashed potatoes or roasted vegetables for a complete meal!

Caramelized Pulled Beef Brisket Ingredients

• To create this melt-in-your-mouth dish, gather the following delicious ingredients.

For the Brisket

  • Beef Brisket – A tough cut that becomes juicy and tender when slow-cooked; use beef chuck roast for a leaner alternative.
  • Olive Oil – Used for searing the brisket to enhance flavor through browning.
  • Salt & Black Pepper – Basic seasoning to elevate the meat's taste.
  • Smoked Paprika – Adds a smokiness that complements the brisket's flavor.
  • Garlic Powder & Onion Powder – Provide aromatic depth and savory notes.
  • Chili Powder – Optional, adds heat for those who enjoy a spicy kick.

For the Cooking Liquid

  • Beef Broth – Keeps the brisket moist during cooking and enhances overall flavor; low-sodium or homemade is best.
  • Barbecue Sauce – Adds sweetness and smokiness; feel free to use homemade or store-bought.
  • Worcestershire Sauce – Provides umami depth with tangy complexity.
  • Dijon Mustard – Adds a hint of sharpness to the braising liquid.
  • Brown Sugar – Crucial for the caramelization step, creating a sticky, golden crust.
  • Onion (sliced) & Garlic (minced) – Additional aromatics for flavor infusion during cooking.

For Caramelization

  • Butter – Used in the caramelization process for richness.
  • Beef Drippings – Enhances flavor in the caramelization sauce.

With these incredible ingredients, your Caramelized Pulled Beef Brisket will be a showstopper at the dinner table—tender, smoky, and bursting with flavor in every bite!

Step‑by‑Step Instructions for Caramelized Pulled Beef Brisket

Step 1: Prepare the Brisket
Begin by patting the beef brisket dry with paper towels to help the seasoning stick. In a bowl, mix together the salt, black pepper, smoked paprika, garlic powder, onion powder, and chili powder. Rub this seasoning mixture all over the brisket, ensuring every inch is coated to infuse it with flavor throughout the slow cooking process.

Step 2: Sear the Brisket
Heat a large skillet over medium-high heat and add a drizzle of olive oil. Once hot, carefully place the seasoned brisket into the skillet, searing it for 2-3 minutes on each side until a beautiful golden-brown crust develops. This step enhances the rich flavor of your Caramelized Pulled Beef Brisket and helps to lock in moisture, so don’t skip it!

Step 3: Combine Ingredients in Slow Cooker
Transfer the brisket to a slow cooker, and add the beef broth, barbecue sauce, Worcestershire sauce, Dijon mustard, and brown sugar. Toss in the sliced onion and minced garlic to amp up the flavor profile. Set the slow cooker to low and let it cook for 6-8 hours, or until the beef is fork-tender and easily shreds apart, filling your kitchen with mouthwatering aromas.

Step 4: Rest and Shred the Brisket
Once cooking is complete, carefully remove the brisket from the slow cooker and let it rest on a cutting board for about 10 minutes. This resting period is crucial as it allows the juices to redistribute within the meat, ensuring every bite of your Caramelized Pulled Beef Brisket remains juicy. After resting, use two forks to shred the brisket into tender pieces and reserve the cooking liquid for later.

Step 5: Caramelization Process
In a skillet over medium heat, melt a few tablespoons of butter, then add the reserved cooking liquid, brown sugar, and a splash of Worcestershire sauce. Stir to combine and allow the mixture to simmer slightly until it thickens. Toss the shredded brisket into the caramelization sauce, mixing until all pieces are well coated and caramelized, which enhances the heavenly flavor of your dish.

Storage Tips for Caramelized Pulled Beef Brisket

  • Fridge: Store leftover Caramelized Pulled Beef Brisket in an airtight container for up to 4 days. This helps keep it moist and flavorful for your next meal.
  • Freezer: To keep the brisket for longer, freeze portions in airtight bags for up to 3 months. For optimal taste and texture, ensure all air is removed from the bags.
  • Thawing: When you're ready to enjoy your frozen brisket, thaw it overnight in the fridge before reheating. This maintains its delicious flavor and juicy texture.
  • Reheating: Gently reheat in a skillet over medium heat with a splash of reserved cooking liquid, or cover and warm in the oven for irresistibly tender results.

Make Ahead Options

Caramelized Pulled Beef Brisket is a fantastic choice for meal prep, making your busy weeknights a breeze! You can season and sear the brisket up to 24 hours in advance (this allows the flavors to penetrate the meat deeply). Simply wrap it tightly and refrigerate. The cooking process can also be done up to 3 days ahead; just shred the brisket and reserve the cooking liquid, then refrigerate in an airtight container. To maintain quality, keep the brisket covered with its juices to prevent drying out. When you're ready to serve, just reheat in a skillet over medium heat, and toss with the caramelization sauce for that irresistible finish—your dinner will be just as delicious as if it were freshly made!

Expert Tips for Caramelized Pulled Beef Brisket

  • Resting is Key: Allow the brisket to rest for 10 minutes after cooking. This helps retain moisture, ensuring your Caramelized Pulled Beef Brisket is juicy and tender.

  • Don't Skip the Sear: Searing the brisket before slow cooking adds rich flavor and a beautiful crust. It's a key step to avoid bland and chewy results.

  • Mind the Cooking Time: Overcooking can lead to dry meat. Ensure you check for fork-tenderness after the recommended cooking time for the best texture.

  • Store Wisely: Keep leftovers in an airtight container with some cooking juices to retain moisture. This keeps the brisket flavorful for your next meal!

  • Heat Gently: When reheating, do so over medium heat in a skillet or covered in the oven. Quick reheating can dry out the meat, making it less enjoyable.

What to Serve with Caramelized Pulled Beef Brisket

A comforting and flavorful meal is just a pairing away; let’s enhance the experience of your beef brisket feast.

  • Creamy Mashed Potatoes: These buttery, smooth potatoes soak up the savory juices from the brisket, creating a perfect marriage of flavors.

  • Tangy Coleslaw: Fresh and crunchy, coleslaw adds a refreshing contrast to the rich brisket, cutting through the richness while balancing textures.

  • Toasted Brioche Buns: Soft and slightly sweet, these buns cradle the pulled beef beautifully, making for a delightful sandwich that enhances each bite.

  • Roasted Seasonal Vegetables: Colorful, caramelized squash, carrots, or bell peppers provide both visual appeal and complementary sweetness, rounding out your meal beautifully.

  • Creamy Mac and Cheese: Rich, cheesy goodness pairs wonderfully with the smoky brisket, offering a comforting side dish that is always a crowd-pleaser.

  • Fluffy Rice Pilaf: Light yet flavorful, this side absorbs the brisket’s delicious juices while adding subtle notes of herbs and spices, making every mouthful a delight.

  • Craft Beer or Red Wine: A cold beer or a glass of red wine can beautifully complement the deep flavors of the brisket, making for an elevated dining experience.

  • Chocolate Chip Cookies: End your meal on a sweet note with warm, gooey cookies that contrast the savory meat, providing the perfect dessert to cherish.

Caramelized Pulled Beef Brisket Variations

Feel free to make this delicious dish your own with these creative adaptations!

  • Honey Swap: Replace brown sugar with honey for a natural sweetness. This gives a unique flavor that enhances the brisket beautifully.
  • Low-Carb Lettuce Wraps: Serve the shredded brisket in crispy lettuce wraps instead of traditional buns for a fresh and healthy twist!
  • Taco Night: Layer the brisket in warm corn tortillas, topped with pico de gallo and avocado for a delightful taco night.
  • Smoky Chipotle Kick: Add a teaspoon of chipotle powder for a spicy, smoky flavor that elevates your brisket to new heights.
  • BBQ Variations: Experiment with different barbecue sauces; a tangy vinegar-based sauce can add a fun twist to the traditional profile.
  • Vegetarian Style: For a vegetarian option, use jackfruit as a brisket substitute, seasoned similarly for a meaty texture.
  • Asian-Inspired: Include soy sauce and ginger in your cooking liquid for an enticing Asian flavor that pairs perfectly with steamed rice.
  • Savory Sides: Serve with creamy coleslaw or homemade pickles to create a delightful contrast with the smoky beef.

By exploring these variations, you'll keep your Caramelized Pulled Beef Brisket exciting and fresh every time! And don’t forget to try out Ground Beef Enchiladas for another flavorful family meal or mix it with some barbecue sauce to really up the ante!

Caramelized Pulled Beef Brisket Recipe FAQs

What is the best way to select beef brisket for this recipe?
Absolutely! When selecting beef brisket, look for a cut with good marbling and a bright red color. Avoid cuts with dark spots or excessive fat, as these can affect flavor and texture. If you're looking for a leaner option, you can substitute with beef chuck roast, which also works wonderfully in slow cooking.

How should I store leftover Caramelized Pulled Beef Brisket?
Very! Store your leftover brisket in an airtight container and refrigerate it for up to 4 days. This keeps it moist and flavorful. If you want to save it for a longer period, you can freeze portions in airtight freezer bags for up to 3 months. Remember to remove as much air as possible from the bags to prevent freezer burn!

Can I freeze Caramelized Pulled Beef Brisket? If so, how?
Definitely! To freeze your brisket, ensure it has cooled completely after cooking. Then, portion it out and place it in freezer-safe bags or containers, making sure to include some of the cooking juices to maintain moisture. Lay the bags flat in the freezer to save space. When ready to eat, simply thaw overnight in the fridge and reheat gently!

What should I do if my brisket turns out dry?
Oh no! If your brisket ends up dry, there are a couple of things you can do. First, ensure your brisket has cooked for the full recommended time until it’s fork-tender; the slow cooker or oven temperature may be a factor. When reheating leftovers, add a splash of beef broth or the reserved cooking liquid, covering the dish while warming to keep it moist. This will help restore some moisture and flavor.

Are there any dietary considerations I should keep in mind?
Absolutely! If cooking for guests or family with dietary restrictions, be mindful of potential allergens. While the recipe is naturally gluten-free, check the ingredients—like barbecue sauce and Worcestershire sauce—for gluten if needed. You can also substitute brown sugar for honey or coconut sugar if you're looking for a healthier alternative! Always inquire about specific allergies before serving.

Caramelized Pulled Beef Brisket

Caramelized Pulled Beef Brisket: Melt-in-Your-Mouth Delight

This Caramelized Pulled Beef Brisket is a tender, smoky dish that transforms a humble cut of beef into a melt-in-your-mouth delight.
Print Recipe Pin Recipe
Prep Time 15 minutes mins
Cook Time 7 hours hrs
Resting Time 10 minutes mins
Total Time 7 hours hrs 25 minutes mins
Servings: 6 servings
Course: Dinner
Cuisine: American
Calories: 350
Ingredients Equipment Method Nutrition Notes

Ingredients
  

For the Brisket
  • 3 pounds Beef Brisket or beef chuck roast for a leaner option
  • 2 tablespoons Olive Oil for searing
  • 1 tablespoon Salt
  • 1 teaspoon Black Pepper
  • 2 teaspoons Smoked Paprika
  • 1 teaspoon Garlic Powder
  • 1 teaspoon Onion Powder
  • 1 teaspoon Chili Powder optional
For the Cooking Liquid
  • 2 cups Beef Broth low-sodium or homemade
  • 1 cup Barbecue Sauce homemade or store-bought
  • 2 tablespoons Worcestershire Sauce
  • 1 tablespoon Dijon Mustard
  • 1 tablespoon Brown Sugar for caramelization
  • 1 medium Onion sliced
  • 4 cloves Garlic minced
For Caramelization
  • 3 tablespoons Butter
  • 1 cup Beef Drippings

Equipment

  • Skillet
  • Slow Cooker
  • Cutting Board

Method
 

Preparation and Cooking
  1. Pat the beef brisket dry with paper towels and rub the seasoning mixture all over the brisket.
  2. Heat olive oil in a large skillet over medium-high heat and sear the brisket for 2-3 minutes on each side.
  3. Transfer the brisket to a slow cooker, add all cooking liquid ingredients, and cook on low for 6-8 hours.
  4. After cooking, let the brisket rest for about 10 minutes before shredding it into tender pieces.
  5. In a skillet, melt butter and add the cooking liquid; mix with shredded brisket until well coated.

Nutrition

Serving: 1servingCalories: 350kcalCarbohydrates: 15gProtein: 45gFat: 14gSaturated Fat: 6gPolyunsaturated Fat: 1gMonounsaturated Fat: 7gCholesterol: 120mgSodium: 800mgPotassium: 600mgFiber: 1gSugar: 8gVitamin C: 2mgCalcium: 2mgIron: 15mg

Notes

This dish is perfect for meal prep and can be enjoyed in various ways, including sandwiches or tacos.

Tried this recipe?

Let us know how it was!

Taco Pizza: Your New Favorite Easy Appetizer Delight

October 27, 2025 by Grace Snow Leave a Comment

Crisp air, laughter echoing around the kitchen, and the scent of spices filling the room—it’s a moment many of us cherish. My Taco Pizza Appetizer effortlessly brings that festive vibe home, combining the beloved flavors of a taco with the comforts of pizza. This dish features a flaky crescent roll crust and a creamy base, making it an easy appetizer that is destined to impress any crowd. You’ll love how quickly it comes together, allowing you to spend less time cooking and more time enjoying your company. Plus, it’s entirely customizable—mix and match your favorite toppings to reflect your mood or satisfy your guests’ preferences. Are you ready to elevate your appetizer game? Let’s dive into this delicious fusion!

Why Is Taco Pizza So Appealing?

Easy and Quick: This recipe comes together in no time, making it a perfect choice for last-minute gatherings or busy weeknights.

Flavor Explosion: The combination of creamy cheeses, seasoned meat, and fresh toppings creates a taste experience that will keep everyone coming back for more.

Endless Customization: Tailor it to your taste! Swap out toppings, experiment with different proteins, or adjust spice levels—make it your own!

Crowd-Pleaser: Whether it's a family dinner or a party, this Taco Pizza is guaranteed to impress and satisfy all your guests. Serve it with some guacamole or salsa for an ultimate taco lover's experience! For more inspiration, check out my delicious Shrimp Tacos Zesty or Crispy Fish Taco Bowls catalog!

Taco Pizza Ingredients

• Get ready for a flavorful adventure!

For the Crust

  • Crescent Roll Dough – This forms the perfect crispy base; you can also use pizza dough or gluten-free dough for a different twist.

For the Creamy Base

  • Cream Cheese – Adds a rich, creamy texture; Greek yogurt can be a lighter alternative.
  • Sour Cream – Provides moisture and tanginess; substitute with dairy-free options if needed.

For the Filling

  • Ground Beef – Offers hearty flavor; ground turkey works well for a leaner option, or textured vegetable protein for a vegan substitute.
  • Taco Seasoning – Infuses that signature taco taste; homemade spice mix can substitute store-bought seasoning.

For the Toppings

  • Shredded Cheddar Cheese – Melts beautifully for a gooey topping; try Monterey Jack or dairy-free cheese if you prefer.
  • Shredded Mozzarella Cheese – Adds stretchy creaminess; any melty cheese will do!
  • Diced Tomatoes – Bring freshness and juiciness; use canned or fresh depending on what you have.
  • Shredded Lettuce – Adds a crunchy finish; arugula or spinach can elevate the flavor profile.
  • Optional toppings (e.g., jalapeños, sliced olives) – Personalize your pizza's heat and flavor—add according to preference!

Crafting your taco pizza with these ingredients will not just be a meal but an exhilarating culinary experience for everyone enjoying it!

Step‑by‑Step Instructions for Taco Pizza

Step 1: Prepare the Crust
Preheat your oven to 375°F (190°C) and line a cookie sheet with parchment paper. Unroll the crescent roll dough onto the sheet, ensuring to press the seams together firmly to create a seamless crust. Bake for 10 minutes until the dough is golden brown and fragrant, then remove from the oven and let it cool completely.

Step 2: Make the Base
While the crust cools, prepare the creamy base for your Taco Pizza. In a mixing bowl, blend the softened cream cheese and sour cream together using a hand mixer or a whisk until the mixture is smooth and creamy. Once combined, spread this delightful mixture evenly over the cooled crust, and place it in the refrigerator to chill and firm up for about 15 minutes.

Step 3: Cook the Meat
Next, heat a skillet over medium heat, and add the ground beef. Cook for 5-7 minutes, breaking it apart with a spatula until it's browned and no longer pink. Once cooked, drain any excess fat, then sprinkle the taco seasoning over the meat. Stir well and cook for an additional 2-3 minutes, allowing the flavors to meld beautifully, while the savory aroma fills your kitchen.

Step 4: Assemble the Pizza
Now it’s time to put your Taco Pizza together. Take the creamy base out of the fridge and spread the seasoned ground beef evenly over it. Sprinkle a generous layer of shredded cheddar and mozzarella cheese on top, followed by diced tomatoes and shredded lettuce. Feel free to get creative and add any optional toppings like jalapeños or olives for extra flair.

Step 5: Slice and Serve
Once you’ve beautifully assembled your Taco Pizza, use a sharp knife or pizza cutter to slice it into 8 equal pieces. Serve immediately to your eager guests, so they can experience the delightful combination of crunchy, creamy, and savory flavors while everything is still fresh and warm.

Make Ahead Options

These Taco Pizza Appetizers are perfect for busy home cooks looking to save time without compromising taste! You can prepare the crescent roll crust and the creamy base up to 24 hours in advance. Simply bake the crust, let it cool, and then spread the cream cheese and sour cream mixture over it. Cover and refrigerate until you’re ready to assemble. When it’s time to serve, warm the crust slightly in the oven if needed, then add the cooked meat and toppings before slicing. This way, you'll enjoy all the fresh flavors of Taco Pizza while reducing your prep time significantly!

How to Store and Freeze Taco Pizza

Fridge: Keep any leftovers in an airtight container in the fridge for up to 3 days. Reheat slices in the microwave or oven until warmed through.

Freezer: For longer storage, wrap individual pieces tightly in plastic wrap and then in aluminum foil. Freeze for up to 2 months.

Reheating: Thaw in the fridge overnight before reheating in the oven at 350°F (175°C) for about 10-15 minutes until warmed and crispy again.

Assembling Ahead: You can prepare the crust and creamy base a day in advance. Just assemble the toppings right before serving to keep the freshness and texture intact.

Tips for the Best Taco Pizza

  • Crispy Crust: Ensure the crescent roll dough is pressed tightly to form a uniform base; uneven seams can lead to a soggy pizza.

  • Chill the Base: Allow the cream cheese and sour cream mixture to chill for at least 15 minutes to achieve a firmer texture, making it easier to slice.

  • Season the Meat: Don’t skip draining the ground beef; excess grease can make your taco pizza heavy and less enjoyable.

  • Layer Wisely: Start with the creamy base followed by meat, then cheese, and lastly toppings. This layering helps everything stay in place without sliding off when served.

  • Customize It: Experiment with toppings based on your favorites or what you have on hand—think avocado, corn, or even hot sauce to elevate your taco pizza experience!

What to Serve with Taco Pizza Appetizer

Elevate your next gathering with a delightful spread that complements the vibrant flavors of your Taco Pizza.

  • Guacamole: The creamy, buttery texture of guacamole adds a rich contrast that enhances the taco flavor profile beautifully.

  • Fresh Salsa: A zesty, homemade salsa bursts with freshness and bright flavors, perfect for dipping and balancing the gooey cheese.

  • Tortilla Chips: Serve crunchy tortilla chips alongside for that satisfying texture contrast—great for scooping up every last bite.

  • Mexican Street Corn Salad: This sweet and savory corn salad brings a burst of flavor and a hint of sweetness to round out the meal.

  • Refried Beans: Velvety refried beans add a creaminess that pairs wonderfully with the crispy pizza, enhancing the overall experience.

  • Crispy Jalapeño Poppers: For those who love a little heat, these crunchy bites offer a fiery kick that complements the mildness of the pizza.

  • Cucumber Lime Water: Refreshing and light, this drink cleanses the palate and adds a bright, citrusy flair to the savory meal.

  • Flan or Churros: End your meal with a sweet touch—celebrate the flavors of Mexico with a traditional dessert that balances the savory delights of your meal.

Variations & Substitutions for Taco Pizza

Feel free to get creative with your Taco Pizza and explore these delicious variations that will tantalize your taste buds!

  • Vegetarian: Substitute ground beef with black beans or grilled veggies for a colorful, plant-based delight.

  • Gluten-Free: Use a gluten-free pizza dough or make a cauliflower crust for a lighter, gluten-free option. This way, everyone can enjoy the taco pizza fun!

  • Spicy Twist: Mix diced jalapeños into the meat or use pepper jack cheese for an extra kick. If you're feeling adventurous, try drizzling some hot sauce over the final result.

  • Herbed Cream Cheese: Blend in fresh herbs like chives or cilantro into the cream cheese for an aromatic infusion. This adds a fresh depth to the creamy layer that complements the taco flavors beautifully.

  • Savory Seafood: For a seafood twist, replace the beef with shrimp or crab meat, and enjoy a beachy vibe with every bite. Your guests will be blown away by this unique take!

  • Cheese Lovers: Use a combination of cheeses like feta or gouda to elevate the flavor profile. Experimenting with different cheese can really create a mouthwatering experience that keeps you guessing.

  • Flatbread Base: Swap crescent dough for a thin naan or lavash for a lovely, extra-crispy base—perfect for those who enjoy a crunchier bite!

  • Taco Sauce Drizzle: Drizzle taco sauce over the top before serving for an extra layer of flavor. This melds the taco essence into every slice even further.

With these variations, your Taco Pizza can become an exciting dish suitable for any palate. Serve it alongside some delicious Taco Bell Crunchwrap or refreshing Roasted Corn Tacos to create an unforgettable fiesta!

Taco Pizza Appetizer Recipe FAQs

How do I select ripe tomatoes for my Taco Pizza?
Absolutely! When choosing tomatoes, look for ones that are firm but slightly yielding to the touch. The skin should be smooth, and the color should be vibrant. Avoid tomatoes with dark spots or wrinkles, as they’re past their prime. Vine-ripened tomatoes are often the most flavorful option!

What’s the best way to store leftover Taco Pizza?
Very! To store, place any leftovers in an airtight container in the fridge, and they’ll stay fresh for up to 3 days. When you’re ready to enjoy it again, reheat slices in the microwave or oven at 350°F (175°C) until warmed through!

Can I freeze Taco Pizza for later?
Absolutely! To freeze, wrap individual slices tightly in plastic wrap and then in aluminum foil. This method prevents freezer burn. You can enjoy your Taco Pizza for up to 2 months. When ready to eat, thaw in the fridge overnight and reheat in the oven at 350°F (175°C) for about 10-15 minutes.

What should I do if my crust is soggy?
Oh no! If your crust turns out soggy, there are a few tricks! First, ensure the crescent roll dough is pressed tightly to prevent moisture from seeping in. Bake the crust longer than recommended if necessary, checking for a nice golden-brown color. If it’s already assembled, try reheating it briefly in the oven to crisp it up again.

Can I make this Taco Pizza vegetarian or vegan?
Very! To create a vegetarian Taco Pizza, simply substitute ground beef with textured vegetable protein or mushrooms. For a vegan version, swap the cream cheese and sour cream with vegan alternatives and use a plant-based cheese. Customize to your taste while enjoying that delicious fusion!

What are some allergy considerations for this recipe?
Absolutely! Always check with your guests regarding allergies. If dairy is a concern, using vegan cheese and yogurt can easily accommodate such needs. For gluten-free guests, a gluten-free dough option is a great alternative. Be sure to select taco seasonings and toppings that are free of potential allergens.

Taco Pizza

Taco Pizza: Your New Favorite Easy Appetizer Delight

Taco Pizza combines the flavors of a taco with pizza for a quick and customizable appetizer, perfect for any gathering.
Print Recipe Pin Recipe
Prep Time 15 minutes mins
Cook Time 10 minutes mins
Chilling Time 15 minutes mins
Total Time 40 minutes mins
Servings: 8 slices
Course: Appetizers
Cuisine: Mexican
Calories: 280
Ingredients Equipment Method Nutrition Notes

Ingredients
  

For the Crust
  • 1 package Crescent Roll Dough Can substitute with pizza dough or gluten-free dough.
For the Creamy Base
  • 8 oz Cream Cheese Can substitute with Greek yogurt for a lighter option.
  • 1 cup Sour Cream Dairy-free options can be used.
For the Filling
  • 1 lb Ground Beef Can substitute with ground turkey or textured vegetable protein.
  • 1 packet Taco Seasoning Homemade spice mix can substitute store-bought seasoning.
For the Toppings
  • 1 cup Shredded Cheddar Cheese Monterey Jack or dairy-free cheese can be used.
  • 1 cup Shredded Mozzarella Cheese Any melty cheese will work.
  • 1 cup Diced Tomatoes Use canned or fresh depending on availability.
  • 1 cup Shredded Lettuce Arugula or spinach can be used for additional flavor.
  • Optional toppings (e.g., jalapeños, sliced olives) Customize according to preference.

Equipment

  • Oven
  • Mixing Bowl
  • Skillet
  • Parchment Paper
  • Knife or pizza cutter

Method
 

Preparation Steps
  1. Preheat your oven to 375°F (190°C) and line a cookie sheet with parchment paper. Unroll the crescent roll dough onto the sheet, pressing the seams together to create a seamless crust. Bake for 10 minutes until golden brown, then let cool completely.
  2. In a mixing bowl, blend softened cream cheese and sour cream until smooth. Spread evenly over the cooled crust and refrigerate for about 15 minutes.
  3. In a skillet over medium heat, cook ground beef for 5-7 minutes until browned. Drain excess fat and mix in taco seasoning, cooking for an additional 2-3 minutes.
  4. Spread the seasoned ground beef over the creamy base, and top with shredded cheddar and mozzarella cheese, diced tomatoes, and shredded lettuce.
  5. Slice the Taco Pizza into 8 pieces and serve immediately.

Nutrition

Serving: 1sliceCalories: 280kcalCarbohydrates: 22gProtein: 12gFat: 18gSaturated Fat: 9gPolyunsaturated Fat: 1gMonounsaturated Fat: 5gCholesterol: 45mgSodium: 610mgPotassium: 200mgFiber: 2gSugar: 2gVitamin A: 10IUVitamin C: 4mgCalcium: 15mgIron: 6mg

Notes

Customize toppings based on your favorites or available ingredients. Serve with guacamole or salsa for extra flavor.

Tried this recipe?

Let us know how it was!

Cheesy Pizza Pockets: Your New Favorite Homemade Snack

October 27, 2025 by Grace Snow Leave a Comment

As I rolled out the dough, the aroma of buttery warmth filled my kitchen, instantly transporting me to childhood days of indulging in handheld delights. These Homemade Easy Cheesy Pizza Pockets capture that same joyful spirit, but with a creative twist that makes them perfect for any occasion. What I love about these cheesy treasures is how customizable they are—load them up with your favorite ingredients, and they transform into a meal tailored just for you. Plus, they’re freezer-friendly, ensuring a quick go-to option for busy nights or surprise guests. Crispy on the outside and gooey on the inside, these delicious pockets are bound to become a family favorite. Ready to dive into a world of cheesy bliss? Let’s get started!

Why Are Cheesy Pizza Pockets Amazing?

Customizable Options: The beauty of these pizza pockets lies in their versatility—mix and match your favorite cheeses and toppings to create a dish that suits any palate.
Quick & Easy: With simple steps and minimal prep time, you can whip these up for a last-minute snack or meal.
Kid-Friendly: Perfect for little hands, these pockets make a fun and tasty lunchbox treat or after-school snack.
Make Ahead: Freeze uncooked pockets for those busy days when you need a homemade meal in a snap! Try pairing them with our Cheesy Garlic Bread for a delightful spread.
Satisfying Texture: Enjoy the delightful contrast of a flaky crust with a gooey, cheesy filling that satisfies every craving!

Cheesy Pizza Pockets Ingredients

For the Dough
• Dough – Choose crescent or pizza dough for the perfect texture.

For the Filling
• Mozzarella Cheese – This provides that classic gooey melt; feel free to mix in some cheddar for extra flavor.
• Marinara Sauce – Use this as your flavor base—it keeps the filling moist and delicious; substitute with pesto for a fresh twist.
• Toppings – Get creative! Add pepperoni, spinach, or mushrooms to personalize your cheesy pizza pockets.

For the Finish
• Egg – An egg wash gives your pockets a beautiful golden finish; this is optional if you're keeping it lighter.

Now that you have the essentials, let’s craft those delightful cheesy pizza pockets that promise to be your new favorite homemade snack!

Step‑by‑Step Instructions for Cheesy Pizza Pockets

Step 1: Prepare the Dough
Start by rolling out your chosen dough on a lightly floured surface. If using crescent dough, gently press the seams together to create a single sheet. For pizza dough, stretch it until it’s about ¼ inch thick. This will serve as the foundation for your cheesy pizza pockets, so ensure it’s evenly rolled out for consistent cooking.

Step 2: Assemble the Filling
In a mixing bowl, combine the mozzarella cheese with marinara sauce and any additional toppings you desire. Stir until everything is well mixed, creating a cohesive filling that will bring the cheesy pizza pockets to life. Aim for a balance of flavors—don’t shy away from adding your favorite ingredients like pepperoni or vegetables for extra taste!

Step 3: Form the Pockets
Using a sharp knife or pizza cutter, cut the dough into squares, about 4 inches per side. In the center of each square, place a generous spoonful of the cheese filling. Carefully fold the dough over to form triangles or rectangles, then pinch and seal the edges firmly with your fingers or a fork to prevent any filling from escaping during baking.

Step 4: Apply Egg Wash
To achieve that golden, glossy finish on your cheesy pizza pockets, whisk an egg in a small bowl and use a pastry brush to gently coat the tops of each pocket. This step is optional, but it adds a beautiful touch to your culinary creation, making them look as good as they taste. Make sure to get an even layer for consistent coloring.

Step 5: Bake
Preheat your oven to 375°F (190°C) to ensure it’s nice and hot before baking. Arrange the pizza pockets on a baking sheet lined with parchment paper, making sure they are spaced apart. Bake in the preheated oven for about 15 minutes or until they turn a lovely golden brown. Keep an eye on them as they cook to ensure they don’t overbake.

Step 6: Serve
Once your cheesy pizza pockets are perfectly baked, remove them from the oven and allow them to cool for a few minutes. This will help the cheesy filling set slightly and make them easier to handle. Serve them warm with extra marinara sauce on the side for dipping, enhancing the delightful experience of your homemade snack.

Make Ahead Options

These Homemade Easy Cheesy Pizza Pockets are perfect for meal prep enthusiasts! You can easily prepare the filling (cheese, marinara, and toppings) up to 3 days in advance and store it in an airtight container in the refrigerator. For even more convenience, you can form the pizza pockets and refrigerate them for up to 24 hours; just make sure to cover them well to prevent drying out. When you’re ready to bake, simply preheat your oven and add a few extra minutes to the cooking time to ensure they’re heated through. This way, you’ll have delicious, gooey cheesy pizza pockets ready in no time, perfect for busy weeknights or unexpected guests!

Expert Tips for Cheesy Pizza Pockets

  • Dough Choice: Use refrigerated crescent or homemade pizza dough for the best texture; both offer different levels of flakiness.
  • Sealing Edges: Be sure to pinch or press the edges firmly; this prevents any cheese from leaking out during baking, ensuring your cheesy pizza pockets stay intact.
  • Filling Amount: Avoid overfilling each pocket; use about 1-2 tablespoons of filling to ensure they seal well and cook evenly.
  • Baking Time: Keep an eye on the baking time; if they start browning too quickly, reduce the oven temperature slightly to avoid burning the crust.
  • Freezing Tips: Prepare uncooked pockets and freeze them on a baking sheet; once frozen solid, transfer them to a freezer bag for easy later baking.

How to Store and Freeze Cheesy Pizza Pockets

Fridge: Store cooked cheesy pizza pockets in an airtight container for up to 3 days. Reheat in the oven or microwave to maintain their crispy texture.

Freezer: Uncooked pizza pockets can be frozen for up to 2 months. After assembling, freeze them on a baking sheet, then transfer to a freezer bag. Bake directly from frozen, increasing cooking time by a few minutes.

Reheating: To reheat cooked pizza pockets, place them in a preheated oven at 350°F (175°C) for about 10-15 minutes or until heated through. This keeps the crust crispy while warming the gooey filling.

What to Serve with Homemade Easy Cheesy Pizza Pockets

Imagine the comforting aroma of your kitchen as you enjoy the delightful crunch of pizza pockets alongside these perfect pairings.

  • Crispy Side Salad: A fresh and colorful salad adds a delightful crunch and brightness, balancing the richness of the cheesy pockets.
  • Garlicky Breadsticks: Soft and chewy with a hint of garlic, these make for a fantastic dipping companion with marinara sauce.
  • Creamy Coleslaw: The creamy texture and tangy flavor create a refreshing contrast to the warm, cheesy pockets, enhancing the overall meal experience.
  • Seasoned Potato Wedges: Crispy potato wedges sprinkled with herbs and spices bring a hearty element that complements the pizza pockets beautifully.
  • Roasted Veggies: Add nutritional value and vibrant color with roasted zucchini, bell peppers, or asparagus; their caramelization pairs perfectly with cheesy goodness.
  • Marinara Dipping Sauce: Serve extra marinara for dipping; it enhances each bite and invites a burst of flavor that keeps you coming back for more!
  • Sparkling Lemonade: A refreshing glass of sparkling lemonade’s citrusy notes cuts through the richness of the cheese, leaving you refreshed after every bite.
  • Chocolate Chip Cookies: End your meal on a sweet note; warm cookies provide satisfaction that mirrors the joy of the cheesy pockets.

Cheesy Pizza Pockets Variations & Substitutions

Feel free to get creative as you whip up your cheesy pizza pockets—there are endless ways to personalize this recipe!

  • Dairy-Free: Use dairy-free cheese alternatives for a vegan version, ensuring everyone can enjoy the gooey goodness.
  • Different Dough: Substitute crescent dough with whole wheat or gluten-free pizza dough for a different flavor and texture experience.
  • Savory Sauces: Swap the marinara sauce for BBQ sauce or ranch dressing; each will impart a unique twist to your filling.
  • Zesty Add-ins: Toss in some diced jalapeños or crushed red pepper flakes for a delightful kick that will awaken your taste buds!
  • Breakfast Style: Transform these into breakfast pockets by adding scrambled eggs, cheese, and crumbled sausage or veggies—a great way to start your day.
  • Extra Flavor: Add herbs like oregano and basil to the cheese filling for an aromatic and flavorful boost, reminiscent of classic Italian pizza.
  • Crunchy Coating: For an added crunch, sprinkle the tops with breadcrumbs before baking; it creates a delightful texture contrast.
  • Pizza Dough: If you want a chewier crust, try using homemade pizza dough or store-bought for a contrasting texture to the smooth filling.

Ready for more cheesy delights? Pair your pizza pockets with our Cheesy Garlic Bread for a perfect snack combo, or explore our Cheesy Zucchini Bake for another creative way to enjoy cheese!

Cheesy Pizza Pockets Recipe FAQs

How do I choose the right dough for my pizza pockets?
Absolutely! For a softer texture, I recommend using crescent dough. If you prefer a chewier bite, opt for traditional pizza dough. Both options yield delicious results, so choose based on your personal preference for that perfect cheesy pizza pockets experience!

What’s the best way to store leftover cheesy pizza pockets?
Cooked cheesy pizza pockets can be stored in an airtight container in the fridge for up to 3 days. To reheat, simply pop them in a preheated oven at 350°F (175°C) for about 10-15 minutes to restore their crispy texture. You can also use the microwave, but the oven is best for keeping that delightful crunch!

Can I freeze cheesy pizza pockets?
Certainly! You can freeze uncooked pizza pockets for up to 2 months. After assembling, place them on a baking sheet lined with parchment paper and freeze until solid. Then, transfer the frozen pockets to a freezer bag. When ready to bake, you can pop them straight from the freezer into the oven, simply adding a few extra minutes to the baking time.

How can I prevent my pizza pockets from leaking during baking?
Very good question! To avoid leaks, ensure the edges of your pizza pockets are sealed very well. After placing the filling in the center, pinch the edges firmly together or use the tines of a fork to press and seal them tightly. Additionally, be cautious not to overfill, using just 1-2 tablespoons of filling per pocket should do the trick!

Are these pizza pockets gluten-free?
If you're following a gluten-free diet, you can certainly make these cheesy pizza pockets by using gluten-free pizza dough or wraps. Just make sure to read the ingredient labels to ensure they comply with your dietary needs. Also, be cautious about cross-contamination if allergies are a concern!

Can I serve these pizza pockets to my kids’ friends?
Absolutely! These cheesy pizza pockets are very kid-friendly and make for a fantastic snack or lunch option. Kids love the fun, handheld shape and the gooey cheese filling, plus you can customize them to suit any taste preferences. They're great for parties or casual get-togethers!

Cheesy Pizza Pockets

Cheesy Pizza Pockets: Your New Favorite Homemade Snack

Cheesy Pizza Pockets are customizable, quick, and kid-friendly snacks perfect for any occasion.
Print Recipe Pin Recipe
Prep Time 15 minutes mins
Cook Time 15 minutes mins
Cooling Time 5 minutes mins
Total Time 35 minutes mins
Servings: 4 pockets
Course: Snacks
Cuisine: American
Calories: 250
Ingredients Equipment Method Nutrition Notes

Ingredients
  

For the Dough
  • 1 pack crescent or pizza dough
For the Filling
  • 1 cup mozzarella cheese feel free to mix in cheddar for extra flavor
  • 1/2 cup marinara sauce substitute with pesto for a fresh twist
  • 1 cup toppings e.g., pepperoni, spinach, or mushrooms
For the Finish
  • 1 egg for egg wash, optional

Equipment

  • Mixing Bowl
  • Baking Sheet
  • Pizza Cutter
  • Pastry brush

Method
 

Step‑by‑Step Instructions for Cheesy Pizza Pockets
  1. Roll out your chosen dough on a lightly floured surface to about ¼ inch thick.
  2. In a mixing bowl, combine the mozzarella cheese with marinara sauce and any additional toppings.
  3. Cut the dough into squares, about 4 inches per side, and place a generous spoonful of the filling in the center of each square. Fold the dough over to form triangles or rectangles, then pinch and seal the edges.
  4. Whisk an egg in a small bowl and use a pastry brush to coat the tops of each pocket.
  5. Preheat your oven to 375°F (190°C). Arrange the pizza pockets on a baking sheet and bake for about 15 minutes until golden brown.
  6. Allow the pizza pockets to cool for a few minutes before serving them warm with extra marinara sauce on the side.

Nutrition

Serving: 1pocketCalories: 250kcalCarbohydrates: 30gProtein: 8gFat: 12gSaturated Fat: 5gPolyunsaturated Fat: 1gMonounsaturated Fat: 4gCholesterol: 70mgSodium: 500mgPotassium: 180mgFiber: 1gSugar: 2gVitamin A: 400IUVitamin C: 2mgCalcium: 200mgIron: 1mg

Notes

Store cooked cheesy pizza pockets in an airtight container for up to 3 days. Uncooked pizza pockets can be frozen for up to 2 months. Bake directly from frozen, increasing cooking time by a few minutes.

Tried this recipe?

Let us know how it was!
  • « Previous Page
  • 1
  • …
  • 114
  • 115
  • 116
  • 117
  • 118
  • …
  • 180
  • Next Page »

Welcome!

Hi, I’m Grace, a Sydney-based home cook with a passion for bold flavors and trending ingredients. Whether you’re a busy beginner or a seasoned foodie, you’ll find dishes here that are fresh, fun, and full of flavor.

More about me

Popular Recipes

  • Butter Pecan Cookies
    Irresistibly Soft Butter Pecan Cookies for Cozy Moments
  • Decadent Turtle Bars
    Decadent Turtle Bars: Indulge in Sweet Gooey Perfection
  • Salted Caramel Butter Bars
    Decadent Salted Caramel Butter Bars You Can't Resist
  • Easy Italian Pasta Salad
    Easy Italian Pasta Salad: A Summer Delight to Share

Footer

↑ back to top

About

  • Privacy Policy
  • Disclaimer
  • Terms & Conditions

Newsletter

  • Sign Up! for emails and updates

Contact

  • About me
  • Contact me

Copyright © 2025 TastyTrendIngredients