tastytrendingredients

  • Home
  • Recipes
    • Appetizers
    • Breakfast
    • Dessert
    • Dinner
    • Drinks
    • Salads
    • Snacks
    • Soups
  • About me
  • Contact
menu icon
go to homepage
  • Home
  • Recipes
    • Appetizers
    • Breakfast
    • Dessert
    • Dinner
    • Drinks
    • Salads
    • Snacks
    • Soups
  • About me
  • Contact
search icon
Homepage link
  • Home
  • Recipes
    • Appetizers
    • Breakfast
    • Dessert
    • Dinner
    • Drinks
    • Salads
    • Snacks
    • Soups
  • About me
  • Contact
×

Savory Apple and Sage Turkey Meatballs for Cozy Dinners

November 13, 2025 by Grace Snow Leave a Comment

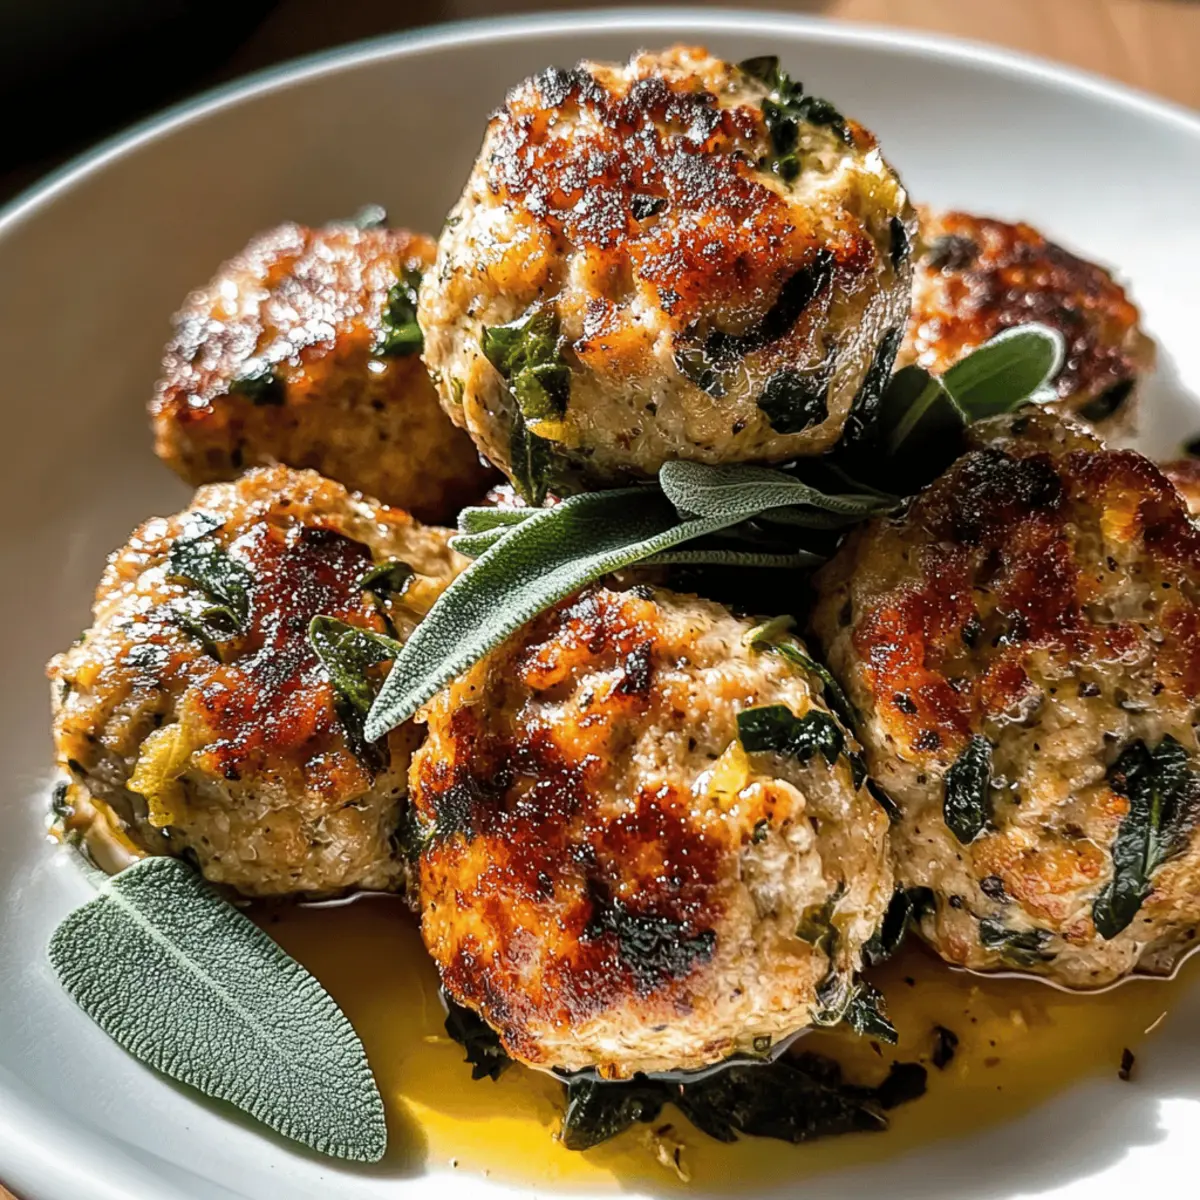
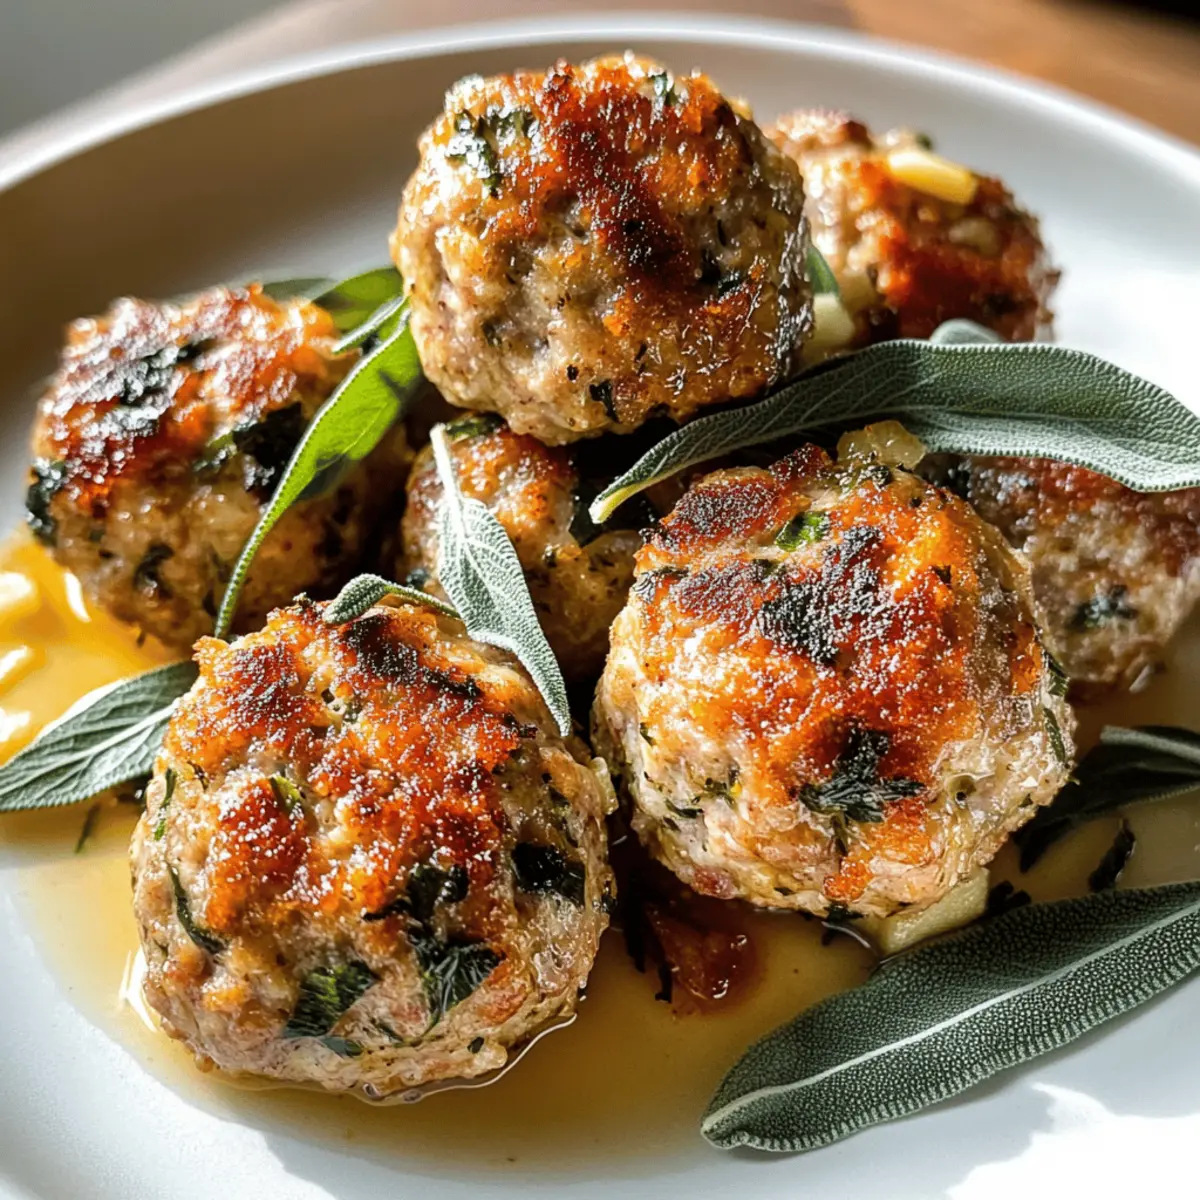
As the aroma of sautéing sage wafted through the kitchen, I couldn't help but smile at my latest culinary experiment. Enter Apple and Sage Turkey Meatballs, a delightful fusion that transforms comfort food into a healthy indulgence. Within just 15 minutes of prep and a quick bake, you can have these juicy, tender bites ready to serve, making them perfect for a busy weeknight or an impressive appetizer. Packed with flavor and coming in at around 350 calories per serving, they remind us that healthy eating doesn’t have to be boring. Whether you're a seasoned home chef or just want to escape the fast-food rut, these savory meatballs are a delicious twist on a classic dish. How will you enjoy yours—over a bed of greens, with a side of roasted veggies, or perhaps dipped in a tangy sauce?

Why Choose Apple and Sage Meatballs?

Healthy Indulgence: These meatballs provide a flavorful experience without the guilt, coming in at just 350 calories per serving.

Quick and Easy: With only 15 minutes of prep time, you can whip these up for a busy weeknight meal or a casual gathering.

Unique Flavor Combination: The fusion of turkey, apple, and sage creates a savory dish that’s unlike any meatball you've had before.

Versatile Serving Options: Pair them with quinoa, a fresh salad, or even a scrumptious cranberry sauce for a delightful twist. They’re perfect for elevating your dinner routine!

Crispy and Tender: Experience the perfect balance of textures with a crispy exterior and juicy, moist interior. You can also try these alongside Chickpea Spinach Curry for a hearty meal.

Apple and Sage Turkey Meatballs Ingredients

• Get ready to create something unforgettable with these savory meatballs!

For the Meatballs

  • Ground Turkey – A lean protein source that ensures moistness in each bite.
  • Grated Apple – Adds a subtle sweetness and moisture; go for tart apples like Granny Smith for a flavor kick.
  • Breadcrumbs – These help bind the mixture together, providing just the right texture to maintain shape.
  • Parmesan Cheese – Brings nutty depth; feel free to substitute it with any hard cheese you prefer.
  • Egg – Essential for binding, keeping your meatballs tender and moist.
  • Fresh Sage – Infuses an earthy aroma that complements the other ingredients; dried sage can also work in a pinch.

For Seasoning

  • Salt and Black Pepper – Basic yet vital seasonings to boost the overall flavor; adjust according to your taste.
  • Olive Oil – Used for searing; creates a crispy exterior while keeping the inside juicy; any cooking oil can be used here as well.

Step‑by‑Step Instructions for Apple and Sage Turkey Meatballs

Step 1: Preheat Your Oven
Begin by preheating your oven to 400°F (200°C). This temperature is key for achieving those perfectly baked Apple and Sage Turkey Meatballs that are crispy on the outside and juicy on the inside. Prepare a parchment-lined baking sheet so you’re ready to transfer the meatballs later.

Step 2: Combine the Ingredients
In a large mixing bowl, combine the ground turkey, grated apple, breadcrumbs, Parmesan cheese, egg, chopped fresh sage, salt, and pepper. Use your hands to mix gently until everything is just combined, taking care not to overmix to maintain tenderness. The mixture should be moist and hold together well for shaping.

Step 3: Shape the Meatballs
With your hands, scoop out portions of the turkey mixture and shape them into meatballs about 1 to 1.5 inches in diameter, resembling golf balls. Aim for uniform sizes to ensure even cooking. Place the formed Apple and Sage Turkey Meatballs on a plate or tray, ready to sear them to perfection.

Step 4: Sear the Meatballs
Heat a skillet over medium-high heat and add a drizzle of olive oil, letting it shimmer. Once hot, carefully add the meatballs, making sure not to crowd the pan. Sear them for about 3-4 minutes until they develop a beautiful golden brown crust on all sides, which enhances the delicious flavor of the meatballs.

Step 5: Transfer to Baking Sheet
After searing, use tongs to transfer the browned meatballs to your prepared parchment-lined baking sheet. Make sure to leave some space between each meatball; this allows hot air to circulate while baking, yielding even cooking and a delightful texture.

Step 6: Bake to Perfection
Place the baking sheet in the preheated oven and bake the Apple and Sage Turkey Meatballs for 15-20 minutes. They are ready when they reach an internal temperature of 165°F (74°C). This step ensures the meatballs are thoroughly cooked while remaining moist and flavorful.

Step 7: Rest and Serve
Once baked, remove the meatballs from the oven and let them rest for a few minutes. This step allows the juices to redistribute, enhancing the overall flavor. Serve your savory Apple and Sage Turkey Meatballs warm, either on their own or paired with a side of fresh salad or roasted vegetables for a wholesome meal.

How to Store and Freeze Apple and Sage Turkey Meatballs

Fridge: Store cooked meatballs in an airtight container in the refrigerator for up to 4 days. Reheat gently in the oven or microwave to maintain their juicy texture.

Freezer: Freeze uncooked meatballs in a single layer on a baking sheet. Once frozen, transfer them to a freezer bag for up to 3 months. Increase cooking time when baking from frozen.

Reheating: To reheat cooked meatballs, place them in a preheated oven at 350°F (175°C) for about 10-15 minutes until warmed through, or use a microwave for a quicker option.

Serving Leftovers: Enjoy leftover apple and sage turkey meatballs as a hearty addition to salads or grain bowls, making meal prep a breeze!

Expert Tips for Apple and Sage Turkey Meatballs

  • Don’t Overmix: Mixing too much can lead to tough meatballs. Gently combine ingredients to retain a tender texture.

  • Use a Thermometer: To avoid dryness, use a meat thermometer to ensure the meatballs reach 165°F (74°C) internally.

  • Prep Ahead: If you're in a hurry, shape the meatballs in advance and refrigerate for up to 24 hours or freeze uncooked for future meals.

  • Choose the Right Apple: Opt for tart apples like Granny Smith for a nice contrast to the savory turkey; avoid overly sweet varieties.

  • Crispy Finish: For an extra crispy exterior, consider broiling the meatballs for a minute or two after baking—just watch them closely!

  • Serve Creatively: These Apple and Sage Turkey Meatballs can elevate any dish. Try them with a tangy dipping sauce or over whole grains for a satisfying meal.

What to Serve with Apple and Sage Turkey Meatballs

These meatballs are a deliciously versatile dish that pairs beautifully with a range of sides, creating a delightful and satisfying meal.

  • Creamy Mashed Potatoes: The buttery texture provides a soothing contrast to the seasoned meatballs, making every bite a creamy delight.
  • Quinoa Salad: A fresh quinoa salad adds a nutty flavor and fluffy goodness, perfectly balancing the savory taste of the meatballs. The grains soak up any sauce beautifully!
  • Roasted Vegetables: Seasonal roasted veggies like carrots and Brussels sprouts add a sweet and earthy note, enhancing the meal's overall depth of flavor.
  • Cranberry Sauce: A tangy cranberry sauce brings an enjoyable burst of acidity, cutting through the richness of the meatballs for a well-rounded experience.
  • Garlic Bread: With crispy edges and a soft interior, this classic side provides a delightful texture contrast, perfect for mopping up meatball juices or sauce.
  • Fresh Green Salad: A crisp salad with vinaigrette adds a refreshing crunch that elevates the whole plate, making it a balanced meal full of nutrients for your body and soul.
  • Grilled Asparagus: Lightly charred asparagus adds an elegant touch, its slight bitterness complementing the sweet apple in the meatballs beautifully.
  • Red Wine: A glass of medium-bodied red wine, like Pinot Noir, enhances the meal's savory richness, creating a wonderful dining experience.
  • Apple Crisp: For dessert, serve a warm apple crisp to echo the flavors of the meatballs while concluding the meal on a comforting note.

Make Ahead Options

These Apple and Sage Turkey Meatballs are perfect for meal prep enthusiasts looking to save time on busy weeknights! You can shape the meatballs up to 24 hours in advance and refrigerate them. Simply mix the ingredients as directed and form the meatballs, then let them rest on a plate covered with plastic wrap in the fridge. For longer storage, freeze uncooked meatballs for up to 3 months; they can go directly from the freezer to the oven, although you may need to add a few extra minutes to the baking time. When ready to cook, simply sear and bake as instructed, and enjoy restaurant-quality results with minimal effort!

Apple and Sage Turkey Meatballs Variations

Feel free to play with these options to suit your taste and dietary needs!

  • Chicken Swap: Substitute ground chicken for turkey for a different flavor profile, while still keeping it lean and delicious.
  • Herb Mix: Try using fresh thyme or oregano instead of sage for a unique twist; these herbs lend a fragrant aroma to your meatballs.
  • Veggie Boost: Add grated zucchini or carrots to the mixture for extra moisture and a hidden nutritional punch; they will blend seamlessly with the other flavors.
  • Cheesy Delight: Swap parmesan for feta or goat cheese for a tangy, creamy variation that enhances the overall taste profile.
  • Gluten-Free: Use gluten-free breadcrumbs or ground oats to keep the meatballs gluten-free without sacrificing texture.
  • Spicy Kick: Incorporate red pepper flakes or a dash of cayenne for those who love a little heat; it will amp up the flavor.
  • Pesto Infusion: Mix in a tablespoon of basil pesto to create a burst of flavor; it complements the apple and sage beautifully.
  • Sautéed Onion: Sauté finely chopped onions before mixing them in for an added layer of sweetness and depth.

You can explore even more delightful options to pair these meatballs with, like a refreshing salad or a sweet cranberry sauce to heighten the enjoyment of your dish!

Apple and Sage Turkey Meatballs Recipe FAQs

What kind of apples should I use for the meatballs?
I recommend using tart apples like Granny Smith for a nice balance of flavor, as their acidity enhances the savory turkey. Sweet varieties like Fuji can also work if you prefer a milder sweetness, but avoid overly sweet apples that can overpower the dish.

How can I store cooked Apple and Sage Turkey Meatballs?
Store your cooked meatballs in an airtight container in the refrigerator for up to 4 days. Reheat gently in the oven or microwave, ensuring you don’t dry them out. They’re perfect for quick meals throughout the week!

Can I freeze the meatballs? If so, how?
Absolutely! To freeze uncooked Apple and Sage Turkey Meatballs, place them on a baking sheet in a single layer and freeze until solid. Then, transfer them to a freezer bag, where they can last up to 3 months. When you’re ready to cook them, just bake straight from the freezer, adding an extra few minutes to the cooking time.

What should I do if my meatballs are falling apart?
If your meatballs are crumbling, it might be due to under-binding. Try adding a bit more egg or breadcrumbs to the mixture. Additionally, ensure you’re not overmixing—it’s best to combine the ingredients gently to keep them tender!

Are these meatballs suitable for my gluten-free diet?
Yes! You can make these Apple and Sage Turkey Meatballs gluten-free by using gluten-free breadcrumbs, which can be found at most grocery stores. Just keep an eye on other ingredients to ensure no gluten is present, and enjoy without worry!

Can my pets enjoy these meatballs?
While turkey meatballs can be a tasty treat for dogs, ensure you omit the ingredients like onions and excessive salt, which can be harmful. Always check with your veterinarian before introducing new foods into your pet’s diet.

Apple and Sage Turkey Meatballs

Savory Apple and Sage Turkey Meatballs for Cozy Dinners

Delightful Apple and Sage Turkey Meatballs make for a healthy indulgence and quick weeknight meal.
Print Recipe Pin Recipe
Prep Time 15 minutes mins
Cook Time 20 minutes mins
Resting Time 5 minutes mins
Total Time 40 minutes mins
Servings: 4 meatballs
Course: Dinner
Cuisine: American
Calories: 350
Ingredients Equipment Method Nutrition Notes

Ingredients
  

For the Meatballs
  • 1 pound Ground Turkey A lean protein source
  • 1 cup Grated Apple Use tart apples like Granny Smith
  • 1/2 cup Breadcrumbs For binding
  • 1/4 cup Parmesan Cheese Can substitute with any hard cheese
  • 1 large Egg For binding
  • 2 tablespoons Fresh Sage Chopped; dried sage can work too
For Seasoning
  • 1 teaspoon Salt Adjust according to taste
  • 1 teaspoon Black Pepper Adjust according to taste
  • 1 tablespoon Olive Oil For searing

Equipment

  • Mixing Bowl
  • Skillet
  • Baking Sheet
  • Meat Thermometer

Method
 

Step-by-Step Instructions
  1. Preheat your oven to 400°F (200°C) and prepare a parchment-lined baking sheet.
  2. In a large mixing bowl, combine the ground turkey, grated apple, breadcrumbs, Parmesan cheese, egg, chopped fresh sage, salt, and pepper. Mix gently until combined.
  3. Scoop out portions of the mixture and shape them into meatballs about 1 to 1.5 inches in diameter. Place on a plate or tray.
  4. Heat a skillet over medium-high heat, add olive oil, and sear the meatballs for 3-4 minutes until golden brown.
  5. Transfer the browned meatballs to the prepared baking sheet, leaving some space between each.
  6. Bake the meatballs in the preheated oven for 15-20 minutes until they reach an internal temperature of 165°F (74°C).
  7. Let the meatballs rest for a few minutes before serving them warm.

Nutrition

Serving: 3meatballsCalories: 350kcalCarbohydrates: 20gProtein: 28gFat: 18gSaturated Fat: 5gPolyunsaturated Fat: 1gMonounsaturated Fat: 10gCholesterol: 95mgSodium: 500mgPotassium: 500mgFiber: 2gSugar: 4gVitamin A: 200IUVitamin C: 4mgCalcium: 100mgIron: 2mg

Notes

Serve with a side of fresh salad or roasted vegetables for a wholesome meal.

Tried this recipe?

Let us know how it was!

Crispy Parmesan Crusted Baby Potatoes for Effortless Elegance

November 13, 2025 by Grace Snow Leave a Comment

The scent of roasting garlic and cheese can transport me to cozy family dinners spent around the table, sharing stories over crispy sides. That’s why I’m excited to introduce you to my Crispy Parmesan Crusted Baby Potatoes—a dish that effortlessly combines crispy exteriors with fluffy interiors, making it an unforgettable addition to any meal. Whipping these up is a breeze, taking just 40 minutes from start to finish, perfect for busy weeknights or casual get-togethers. Plus, they’re gluten-free and completely customizable; you can easily swap in your favorite herbs or cheeses to make them uniquely yours. Ready to elevate your dining experience? Keep scrolling to discover how to make this delicious side dish that will impress everyone at your table!

Why Are These Potatoes So Special?

Crispy Perfection: Get ready to savor the delightful crunch that makes these potatoes irresistible! Quick to Prepare: Perfect for busy nights, this recipe is ready in just 40 minutes. Customization Galore: Switch up the spices and cheese to match your taste—experiment with some Smoky Sweet Potatoes for a twist! Gluten-Free Option: Enjoy a delicious side dish without worries about gluten—it’s a win for everyone! Plus, they pair beautifully with any main course, whether you’re serving up herb-crusted lamb or tender roasted chicken.

Crispy Parmesan Crusted Baby Potatoes Ingredients

• For the Potatoes

  • Baby Potatoes – These tender gems provide a creamy interior and create the perfect base for our crispy coating.
  • Olive Oil – Adds richness and facilitates the golden crust; feel free to swap it out for melted butter if you desire a different flavor.

• For the Crust

  • Grated Parmesan Cheese – This is what gives the potatoes their signature crispy crust; Grana Padano or Pecorino Romano can be used as substitutes for a different taste.
  • Garlic Powder – Enhances the savory flavor; swapping in fresh minced garlic will elevate the dish with a vibrant aroma.
  • Onion Powder – Adds a lovely earthiness; you can omit it for a more delicate flavor.
  • Dried Oregano – Infuses the dish with herbaceous notes; consider using Italian seasoning for a flavorful twist.
  • Paprika – Provides a subtle smokiness; for a kick, substitute with cayenne pepper.
  • Salt & Pepper – Essential for balancing flavors; always adjust to suit your taste preferences.

Feel free to gather these ingredients so you can dive right into making your Crispy Parmesan Crusted Baby Potatoes that are guaranteed to impress!

Step‑by‑Step Instructions for Crispy Parmesan Crusted Baby Potatoes

Step 1: Preheat the Oven
Begin by preheating your oven to 400°F (200°C). This temperature is crucial for achieving the perfect crispy texture on your Crispy Parmesan Crusted Baby Potatoes. While the oven heats up, gather your ingredients and line a baking sheet with parchment paper for easy cleanup.

Step 2: Prepare the Potatoes
Wash and dry about a pound of baby potatoes thoroughly. Slice each potato in half lengthwise and place them in a medium mixing bowl. This ensures each potato half can absorb the flavorful coatings and cook evenly, resulting in a fluffy interior and a crispy exterior.

Step 3: Coat the Potatoes
Drizzle a generous amount of olive oil over the halved potatoes in the bowl. Sprinkle grated Parmesan cheese, garlic powder, onion powder, dried oregano, paprika, salt, and pepper over the top. Toss all the ingredients together until each potato half is well-coated with the mixture, which will create a delicious crust when baked.

Step 4: Arrange for Baking
Transfer the coated potato halves to the lined baking sheet, placing them cut-side down in a single layer. Make sure to leave spaces between them for even cooking. This arrangement helps them to develop that irresistible crispy finish without steaming, ensuring each bite of the Crispy Parmesan Crusted Baby Potatoes is satisfying.

Step 5: Bake the Potatoes
Slide the baking sheet into your preheated oven and bake the potatoes for 25-30 minutes. Halfway through the baking time, carefully flip the potato halves to achieve an even golden-brown crust on both sides. Keep an eye on them, and they should be perfectly golden and crispy when done.

Step 6: Serve and Enjoy
Once baked, allow the Crispy Parmesan Crusted Baby Potatoes to cool for a few minutes. For an elegant touch, garnish with freshly chopped parsley before serving them warm. These potatoes make a wonderful side dish, enhancing any meal with their delightful crunch and flavor!

What to Serve with Crispy Parmesan Crusted Baby Potatoes

These delightful potatoes are just the beginning of a cozy, satisfying meal that brings family and friends together around the table.

  • Roasted Chicken: Juicy, herb-infused chicken pairs beautifully, enhancing the potatoes' crispy texture with savory flavors that create a comforting dining experience.

  • Grilled Vegetables: A medley of seasonal veggies adds vibrant color and freshness, balancing the richness of the parmesan crust with their natural sweetness and crunch.

  • Garlic Butter Shrimp: The succulent, garlicky shrimp provide a luscious contrast to the crispy potatoes, creating a delightful combination that's hard to resist.

  • Mixed Green Salad: A light, tangy salad brings a refreshing zing to the meal, providing a perfect contrast to the hearty potatoes while keeping the dining experience vibrant.

  • Beef Tenderloin: Pairing these crispy potatoes with a perfectly cooked steak results in a luxurious dish that combines textures and flavors, elevating your dinner to special occasion levels.

  • Chardonnay: A chilled glass of this crisp white wine complements the savory notes of the parmesan while enhancing your meal’s overall elegance.

  • Chocolate Mousse: For dessert, a rich, velvety mousse serves as a decadent finish, balancing the crispy savory flavors with sweetness, rounding out your delightful dining experience.

Expert Tips for Crispy Parmesan Crusted Baby Potatoes

  • Choose the Right Potatoes: Opt for small, even-sized baby potatoes for consistent cooking. Larger potatoes can lead to uneven results; slice them evenly if using.

  • Oil Generously: Don’t skimp on the olive oil! Proper coating helps achieve that crispy texture you crave with your Crispy Parmesan Crusted Baby Potatoes.

  • Single Layer Baking: Ensure potatoes are in a single layer on the baking sheet. Overcrowding can cause steaming rather than roasting, making them soft instead of crispy.

  • Flip for Even Crispiness: Remember to flip the potatoes halfway through baking. This guarantees that every side gets that perfect golden-brown crust.

  • Serving Hot is Key: Serve these potatoes right after baking for maximum crispiness. Letting them sit too long can diminish their delightful crunch.

How to Store and Freeze Crispy Parmesan Crusted Baby Potatoes

Fridge: Store any leftover Crispy Parmesan Crusted Baby Potatoes in an airtight container for up to 3 days. This preserves their flavor while keeping them fresh.

Freezer: If you want to keep them longer, freeze the potatoes in a single layer on a baking sheet until solid, then transfer to a freezer-safe bag. They can last up to 2 months.

Reheating: For the best texture, reheat in a preheated oven at 375°F (190°C) for about 10-15 minutes until warmed through and crispy. Avoid the microwave, as it can make them soggy.

Note: Keeping the potatoes well-coated and properly stored will help them retain their delicious flavor and crispy quality for as long as possible!

Make Ahead Options

These Crispy Parmesan Crusted Baby Potatoes are perfect for meal prep enthusiasts! You can wash, dry, and slice the baby potatoes up to 24 hours in advance, storing them in a bowl of water to prevent browning. Additionally, you can mix the olive oil and spices for the coating up to 3 days ahead and keep it in an airtight container in the fridge. When you're ready to finish the recipe, simply combine the prepped potatoes and seasoned oil, arrange them on the baking sheet, and bake as directed for 25-30 minutes. This way, you'll have a delicious, restaurant-quality side dish with minimal effort on busy weeknights!

Crispy Parmesan Crusted Baby Potatoes Variations

Feel free to let your culinary creativity shine with these delightful twists on your Crispy Parmesan Crusted Baby Potatoes!

  • Herb-Infused: Add fresh thyme or rosemary for fragrant earthy notes. These herbs elevate the dish, making it feel gourmet with minimal effort.

  • Spicy Kick: Mix red pepper flakes or diced jalapeños into your coating for a heated surprise. It’s perfect for those who love a fiery flavor!

  • Cheesy Twist: Substitute Parmesan with aged Gouda or sharp cheddar for a different cheesy profile. This swap adds a rich, buttery layer that won't disappoint.

  • Vegan Option: Use nutritional yeast instead of cheese and olive oil for a plant-based twist. This variation still delivers bold flavors while meeting dietary needs.

  • Crispy Tex-Mex: Top with crushed tortilla chips instead of Parmesan. This crunchy layer adds a delightful crunch, pairing wonderfully with tacos or burritos!

For a heartwarming side, these potatoes perfectly complement dishes like German Potato Salad or Fish Taco Bowls. Enjoy customizing each batch, and make every meal shine with your personal touch!

Crispy Parmesan Crusted Baby Potatoes Recipe FAQs

How do I choose ripe baby potatoes?
Absolutely! When selecting baby potatoes, look for ones that are firm with smooth, unblemished skin. Avoid potatoes with dark spots or wrinkles, as they may be signs of aging. Aim for a size that's uniform to ensure even cooking—about 1-2 inches in diameter is ideal!

What’s the best way to store leftover Crispy Parmesan Crusted Baby Potatoes?
Very! To store any leftovers, place them in an airtight container in the refrigerator. They will keep well for up to 3 days. When you're ready to enjoy them again, reheat the potatoes in a preheated oven at 375°F (190°C) for about 10-15 minutes to restore their crispiness. This method helps maintain that delightful crunch!

Can I freeze these potatoes for later?
Of course! To freeze your Crispy Parmesan Crusted Baby Potatoes, first, arrange them in a single layer on a baking sheet and freeze until solid. Then transfer them to a freezer-safe bag or container. They can last for up to 2 months. When you're ready to eat, simply bake them straight from the freezer at 375°F (190°C) for about 20-25 minutes, flipping halfway through to ensure they crisp up nicely.

What should I do if my potatoes aren’t getting crispy?
Don't fret! If your potatoes aren’t achieving that perfect crispiness, here are a few tips: ensure that they are sufficiently coated in olive oil; this is crucial for the crunchy texture. Also, make sure they are arranged in a single layer on the baking sheet. Overcrowding can cause steaming instead of roasting, which will lead to soft potatoes. Lastly, flipping them halfway through baking is essential to ensure all sides get nicely browned!

Are these potatoes safe for my gluten-free diet?
Absolutely! These Crispy Parmesan Crusted Baby Potatoes are naturally gluten-free, making them suitable for those with gluten sensitivities or Celiac disease. Just ensure that any substitution ingredients, like any flavored cheese or seasonings, are also labeled gluten-free before use. Enjoy safely!

Crispy Parmesan Crusted Baby Potatoes

Crispy Parmesan Crusted Baby Potatoes for Effortless Elegance

Crispy Parmesan Crusted Baby Potatoes bring together crunchy exteriors and fluffy interiors for a delightful side dish.
Print Recipe Pin Recipe
Prep Time 10 minutes mins
Cook Time 30 minutes mins
Total Time 40 minutes mins
Servings: 4 potatoes
Course: Dinner
Cuisine: American
Calories: 200
Ingredients Equipment Method Nutrition Notes

Ingredients
  

For the Potatoes
  • 1 pound Baby Potatoes washed and halved
  • 2 tablespoons Olive Oil or melted butter
For the Crust
  • 1 cup Grated Parmesan Cheese or substitutes like Grana Padano or Pecorino Romano
  • 1 teaspoon Garlic Powder or fresh minced garlic
  • 1 teaspoon Onion Powder optional
  • 1 teaspoon Dried Oregano or Italian seasoning
  • 1 teaspoon Paprika or cayenne pepper for heat
  • to taste Salt
  • to taste Pepper

Equipment

  • Oven
  • Baking Sheet
  • Mixing Bowl

Method
 

Step-by-Step Instructions
  1. Preheat your oven to 400°F (200°C) and line a baking sheet with parchment paper.
  2. Wash and dry the baby potatoes, then slice each potato in half lengthwise.
  3. Drizzle olive oil over the potatoes and add Parmesan cheese, garlic powder, onion powder, oregano, paprika, salt, and pepper. Toss until well coated.
  4. Arrange the potato halves cut-side down on the baking sheet, spacing them evenly.
  5. Bake for 25-30 minutes, flipping halfway through for even cooking until golden brown.
  6. Let cool for a few minutes, garnish with parsley, and serve warm.

Nutrition

Serving: 1cupCalories: 200kcalCarbohydrates: 30gProtein: 4gFat: 8gSaturated Fat: 2gMonounsaturated Fat: 6gCholesterol: 5mgSodium: 350mgPotassium: 600mgFiber: 3gSugar: 1gVitamin A: 500IUVitamin C: 15mgCalcium: 100mgIron: 1mg

Notes

Serve immediately for best texture, as letting them sit too long can diminish crispiness.

Tried this recipe?

Let us know how it was!

Crispy Loaded Hasselback Potato Bites to Wow Your Guests

November 13, 2025 by Grace Snow Leave a Comment

As I sliced into those small potatoes, a sense of nostalgia washed over me, reminding me of cozy gatherings filled with laughter and delicious bites. My Crispy Loaded Hasselback Potato Bites transform humble spuds into a stunning appetizer that’s sure to impress friends and family alike. These little beauties are not only super easy to prepare, but they also deliver that delightful crispiness and gooey cheese we all crave—perfect for game day or a fun weeknight side! Plus, they’re loaded with flavors that will have everyone asking for the recipe. Ready to discover how to make this unexpected twist on a cherished classic? Keep reading!

Why Try These Potato Bites?

Ultimate Comfort Food: These Crispy Loaded Hasselback Potato Bites blend crunchy textures with gooey cheese for a cozy treat.

Effortless Preparation: With just a few ingredients and simple steps, you can whip these up quickly—perfect for busy weeknights or last-minute gatherings.

Crowd-Pleasing Appeal: Ideal for game day or parties, they’re an appetizer that everyone will love, making them a go-to for entertaining.

Customization Galore: Want a Mediterranean vibe? Swap in feta. Craving a kick? Toss on some jalapeños! The possibilities are endless.

Show-Stopping Presentation: The artistic Hasselback cut not only looks stunning but also enhances flavor by allowing toppings to seep into every crevice.

For more delicious ideas, don’t miss my Sweet Potato Casserole or Crispy Parmesan Artichoke Hearts!

Crispy Loaded Hasselback Potato Bites Ingredients

For the Potato Bites
• Small Potatoes – Red or Yukon potatoes are ideal for a tender interior with a crispy skin.
• Olive Oil – Helps achieve a beautiful golden color; can substitute with vegetable oil if needed.
• Kosher Salt – Enhances the flavor; you can also use sea salt for a subtle difference.

For the Toppings
• Sliced Cheese (Colby Jack) – Melts beautifully, adding creamy goodness; cheddar or pepper jack will also work well.
• Light Sour Cream – A creamy topping that balances the richness; Greek yogurt is a great healthier alternative.
• Cooked Bacon – Adds a crispy, savory touch; swap for turkey bacon or leave out for a vegetarian option.
• Sliced Green Onions – Freshness and color are provided by these; they're a perfect finishing touch for garnish.

Remember, these ingredients come together to create mouthwatering Crispy Loaded Hasselback Potato Bites that will enchant your guests!

Step‑by‑Step Instructions for Crispy Loaded Hasselback Potato Bites

Step 1: Preheat the Oven
Start by preheating your oven to 400°F (200°C) to ensure it's hot enough for perfect baking. While the oven warms up, grab a baking sheet and line it with aluminum foil for easy cleanup later. This step is essential for achieving the crispy exterior of your Crispy Loaded Hasselback Potato Bites.

Step 2: Prepare the Potatoes
Wash and dry your small potatoes thoroughly. Using a sharp knife, carefully make several thin cuts across the top of each potato, taking care not to slice all the way through. These cuts will create the Hasselback style, allowing the flavors to penetrate, so aim for evenly spaced cuts about every 1/4 inch apart.

Step 3: Season the Potatoes
Place your prepared potatoes on the lined baking sheet. Drizzle them generously with olive oil, using your hands to coat them evenly. Sprinkle kosher salt over each potato, ensuring they are well-seasoned. This will enhance the flavor and help achieve that delicious crispy layer as the potatoes roast.

Step 4: Bake the Potatoes
Slide the baking sheet into your preheated oven and allow the potatoes to bake for about 30 minutes. Keep an eye out for them to become fork-tender and start to crisp on the edges. This step is crucial to developing that soft, fluffy interior characteristic of Crispy Loaded Hasselback Potato Bites.

Step 5: Add the Cheese
Once the potatoes are tender, remove them from the oven and insert cheese squares into some of the cuts you made earlier. This is where the magic happens! Return them to the oven for an additional 5-10 minutes, watching closely for the cheese to melt and bubble, creating a gooey, irresistible topping.

Step 6: Cool and Top the Potatoes
After the cheese is beautifully melted, take the baking sheet out of the oven and let the potatoes cool for about 10 minutes. This cooling period will make them easier to handle while you add your favorite toppings.

Step 7: Serve and Enjoy
Finally, complete your Crispy Loaded Hasselback Potato Bites by adding generous dollops of light sour cream, crumbled cooked bacon, and freshly sliced green onions on top. These delightful bites are ready to be served warm or at room temperature, offering a stunning and delicious appetizer sure to impress your guests!

What to Serve with Crispy Loaded Hasselback Potato Bites

Elevate your meal experience by pairing these delightful bites with harmonious sides and drinks that will round out your gathering beautifully!

  • Creamy Mashed Potatoes: A comforting classic, these velvety mashed potatoes provide a soft contrast to the crunchy texture of the potato bites. The creaminess is a perfect match!

  • Garlic Butter Green Beans: Fresh and vibrant, these garlic butter green beans add a splash of color and a delightful crunch, complementing the richness of the loaded bites.

  • Fresh Garden Salad: A light, crisp salad with mixed greens and vinaigrette will refresh the palate and balance the savory flavors of the potatoes. Toss in some cherry tomatoes for a burst of sweetness!

  • Classic Coleslaw: Crunchy and tangy, coleslaw brings a refreshing crunch and a hint of acidity that cuts through the cheese's richness. It makes a lively accompaniment!

  • BBQ Chicken Wings: Let’s get the party going! Tender and smoky, BBQ chicken wings enhance the game-day vibe. The interplay of flavors will be a hit among your guests.

  • Spicy Jalapeño Poppers: A flavor-packed side! These spicy, cheesy bites will mirror the loaded potato bites while adding a fiery kick that spice lovers will adore.

  • Chilled Beer or Sparkling Cider: Pair with a cold beer or sparkling cider for the ultimate refreshment. The bubbles cleanse the palate between bites, enhancing every delicious mouthful!

Each of these options perfectly complements your Crispy Loaded Hasselback Potato Bites, creating a meal that truly delivers comfort and satisfaction. Enjoy!

Crispy Loaded Hasselback Potato Bites Variations

Feel free to let your imagination run wild and customize these delicious bites to suit your palate!

  • Cheese Swap: Use feta cheese for a Mediterranean flair or try blue cheese for a sharp kick. Both add unique character to the dish.

  • Spicy Kick: For those who enjoy a little heat, add sliced jalapeños as a topping or opt for spicy pepper jack cheese. It will elevate the flavor profile wonderfully.

  • Herb Infusion: Toss in fresh herbs like chives, dill, or rosemary with your toppings for a fragrant and flavorful twist. A sprinkle of herbs creates a bright contrast.

  • Smoky Flavor: Incorporate smoked paprika into the olive oil before drizzling it over the potatoes. This adds a rich, smoky flavor that pairs beautifully with bacon.

  • Bacon Alternatives: Try crispy turkey bacon for a leaner option or omit entirely for a delightful vegetarian version. You won’t miss the meat at all!

  • Vegetable Mix-In: Add sautéed mushrooms or spinach on top for a healthy boost and added texture. These veggies not only taste great but also enhance the overall look.

  • Gourmet Touch: Drizzle a balsamic reduction over the finished bites for a touch of elegance. This sweet-tangy addition elevates the dish for special occasions.

For more creative food ideas, how about pairing these yummy bites with a refreshing Fish Taco Bowl or savoring some smoky flavors with Smoky Sweet Potatoes?

Storage Tips for Crispy Loaded Hasselback Potato Bites

Room Temperature: Allow leftovers to cool completely before storing them in an airtight container. They can be kept at room temperature for up to 2 hours.

Fridge: Store your Crispy Loaded Hasselback Potato Bites in an airtight container in the fridge for up to 3 days. Reheat in the oven to help restore their crispiness.

Freezer: For longer storage, freeze the potato bites individually on a baking sheet before transferring them to a freezer-safe container. They can be kept for up to 2 months.

Reheating: Reheat from frozen in the oven at 375°F (190°C) for about 20-25 minutes, or until heated through and crispy.

Make Ahead Options

These Crispy Loaded Hasselback Potato Bites are fantastic for meal prep, saving you valuable time during busy weeknights or party preparations. You can prepare the potatoes (sliced but unseasoned) up to 24 hours in advance; simply store them in a bowl of cold water in the refrigerator to prevent browning. Additionally, you can slice and pre-cook the bacon up to 3 days ahead, keeping it refrigerated. When you’re ready to serve, drain the potatoes, season them with olive oil and salt, bake until tender, add cheese for a melty finish, then top with sour cream, bacon, and onions. This ensures your bites are just as delicious, with minimal last-minute effort!

Expert Tips for Crispy Loaded Hasselback Potato Bites

• Even Cuts Matter: Consistent cuts in the potatoes promote even cooking and ensure every bite is perfectly crispy.

• Broil for Extra Crispiness: For that ultimate crunch, consider broiling the potatoes for an additional 2-3 minutes after baking.

• Potato Size Consistency: Use uniform-sized potatoes to ensure they all cook evenly and reach that delectable tender state.

• Experiment with Cheese: Feel free to swap the cheese for personal preference; just remember that different varieties can change the melting texture of your Crispy Loaded Hasselback Potato Bites.

• Add Flavor Layers: Enhance taste by adding spices or herbs into the olive oil before coating, providing extra flavor depth with minimal effort.

Crispy Loaded Hasselback Potato Bites Recipe FAQs

How do I choose the right potatoes for this recipe?
Absolutely! For the Crispy Loaded Hasselback Potato Bites, small red or Yukon potatoes work wonderfully. Look for firm potatoes with smooth skin—avoid any with dark spots or blemishes. These varieties yield a tender interior with a delightful crispy skin, taking your appetizer to the next level.

How should I store leftovers?
Very well! Once cooled, keep any leftovers in an airtight container at room temperature for up to 2 hours. For longer storage, shift them to the refrigerator, where they’ll last up to 3 days. When you're ready to enjoy them again, reheat in the oven to restore their delightful crispiness.

Can I freeze the Crispy Loaded Hasselback Potato Bites?
Of course! To freeze these potato bites, first, arrange them in a single layer on a baking sheet and freeze them for a couple of hours until solid. Then, transfer the frozen bites into a freezer-safe container or bag, where they can last for up to 2 months. When you’re ready to enjoy, reheat directly from frozen at 375°F (190°C) for 20-25 minutes.

What if my potatoes aren’t cooking evenly?
Ah, that can happen! Ensure your cuts in the potatoes are consistent, around 1/4 inch apart, as this allows for even cooking. If you find some potatoes are still firm, you can cover them with foil and bake a little longer. Additionally, broiling for the last 2-3 minutes can help achieve that crispy finish.

Are there any dietary considerations for this recipe?
Indeed! This recipe can easily cater to different dietary needs. If you're cooking for vegetarians, simply omit the bacon or substitute it with turkey bacon. For those watching their calories, using light sour cream and reduced-fat cheese can help without sacrificing flavor. Always check for any specific allergies related to cheese or other ingredients you might use!

How should I reheat my potato bites after freezing?
To reheat, preheat your oven to 375°F (190°C). Place the frozen Crispy Loaded Hasselback Potato Bites on a baking sheet and heat for about 20-25 minutes. This method helps regain their crispy texture, so they taste almost as good as freshly made!

These FAQs should help you make the most out of your delicious Crispy Loaded Hasselback Potato Bites—enjoy!

Crispy Loaded Hasselback Potato Bites

Crispy Loaded Hasselback Potato Bites to Wow Your Guests

Crispy Loaded Hasselback Potato Bites transform humble spuds into a stunning appetizer that impresses guests with delightful crispiness and gooey cheese.
Print Recipe Pin Recipe
Prep Time 15 minutes mins
Cook Time 40 minutes mins
Cooling Time 10 minutes mins
Total Time 1 hour hr 5 minutes mins
Servings: 4 bites
Course: Appetizers
Cuisine: American
Calories: 220
Ingredients Equipment Method Nutrition Notes

Ingredients
  

For the Potato Bites
  • 1 pound small potatoes (Red or Yukon)
  • 2 tablespoons olive oil can substitute with vegetable oil
  • 1 teaspoon kosher salt or sea salt
For the Toppings
  • 1 cup sliced cheese (Colby Jack) or cheddar or pepper jack
  • 1/2 cup light sour cream or Greek yogurt
  • 1/2 cup cooked bacon or turkey bacon for vegetarian option
  • 1/4 cup sliced green onions for garnish

Equipment

  • Oven
  • Baking Sheet
  • Sharp Knife
  • Aluminum Foil

Method
 

Step-by-Step Instructions
  1. Preheat your oven to 400°F (200°C) and line a baking sheet with aluminum foil.
  2. Wash and dry the small potatoes, then make several thin cuts across the top of each potato.
  3. Place the potatoes on the baking sheet, drizzle with olive oil, and sprinkle with kosher salt.
  4. Bake the potatoes for about 30 minutes until fork-tender and starting to crisp.
  5. Remove from the oven, insert cheese squares into the cuts, and bake for another 5-10 minutes until melted.
  6. Let the potatoes cool for about 10 minutes before adding toppings.
  7. Top with light sour cream, crumbled bacon, and sliced green onions before serving.

Nutrition

Serving: 2bitesCalories: 220kcalCarbohydrates: 30gProtein: 6gFat: 10gSaturated Fat: 4gPolyunsaturated Fat: 2gMonounsaturated Fat: 3gCholesterol: 15mgSodium: 300mgPotassium: 450mgFiber: 3gSugar: 1gVitamin A: 500IUVitamin C: 12mgCalcium: 150mgIron: 1mg

Notes

Even cuts promote even cooking; for extra crispiness, broil for 2-3 minutes after baking. Store leftovers in an airtight container for up to 3 days or freeze for up to 2 months.

Tried this recipe?

Let us know how it was!

Taco Ranch Bites That Will Wow Your Guests Every Time

November 13, 2025 by Grace Snow Leave a Comment

As I stood in my kitchen contemplating what to whip up for my friends’ spontaneous gathering, a lightbulb moment struck—Taco Ranch Bites! These delightful little morsels combine the flavors of juicy ground beef, zesty taco seasoning, and melty cheddar cheese, all nestled in perfectly crisp phyllo shells. What makes these Taco Ranch Bites such a game-changer is their quick prep time and impressive crowd-pleasing appeal; anyone can whip them up and become the star of the evening! Whether you’re hosting a get-together, tailgating, or simply craving a delicious snack, these appetizers deliver comfort and excitement in every crunchy bite. Want to learn how to create a dish that will leave your guests raving? Let’s dive into this delicious recipe!

Why Are Taco Ranch Bites a Must-Try?

Crowd-Pleaser: These Taco Ranch Bites are sure to impress, making them perfect for any occasion—game day, parties, or just a cozy night in.

Quick Prep Time: With simple ingredients and easy steps, you can whip these up in no time, leaving you free to enjoy your guests' company.

Flavor Explosion: The combination of savory ground beef, zesty taco seasoning, and rich cheddar cheese creates a mouthwatering flavor that everyone will crave.

Versatile Options: Feel free to customize with different cheeses or even create a vegetarian version using black beans and corn for a delightful twist. You can also explore other delicious appetizers like Fish Taco Bowls or Taco Spaghetti Cheesy.

Light Yet Satisfying: The crispy phyllo shells give these bites a unique texture that contrasts beautifully with the cheesy filling, making them both satisfying and light.

Make-Ahead Friendly: Prep and freeze for future gatherings, ensuring you’re always ready to impress with minimal effort!

Taco Ranch Bites Ingredients

For the Filling
• Ground Beef – Provides the main protein; opt for lean meat to reduce fat content.
• Taco Seasoning – Adds essential flavor; store-bought is convenient, but homemade can elevate taste.
• Diced Tomatoes and Green Chiles – Introduces moisture and a kick of spice; canned works best for ease.
• Cheddar Cheese – Gives a creamy, rich texture; use freshly shredded for optimal melting.
• Ranch Dressing – Adds creaminess and tang; choose premium bottled or make your own for the best taste.

For the Shells
• Phyllo Tart Shells – The perfect base for these bites; pick up frozen ones for convenience or try homemade for an artisanal touch.

Step‑by‑Step Instructions for Taco Ranch Bites

Step 1: Preheat Your Oven
Begin by preheating your oven to 350ºF (175ºC). Take a moment to enjoy the anticipation of delicious Taco Ranch Bites bubbling in the oven! A well-preheated oven ensures that your phyllo shells turn golden and crisp, providing the perfect vessel for the savory filling you’re about to create.

Step 2: Brown the Ground Beef
In a large skillet over medium heat, add the ground beef and cook for about 5-7 minutes until it is nicely browned and no pink remains. Make sure to break up any large clumps with a spatula. Once fully cooked, drain any excess fat to keep your Taco Ranch Bites light and delicious.

Step 3: Season the Beef
Return the skillet to the heat, and add taco seasoning along with diced tomatoes and green chiles. Stir well to combine the ingredients, allowing the flavors to meld. Let this simmer for 5 minutes until the mixture is heated through and slightly thickened, creating a flavor-packed filling for your Taco Ranch Bites.

Step 4: Mix the Cheese and Dressing
In a separate mixing bowl, combine the freshly shredded cheddar cheese with the ranch dressing. This mixture will add a creamy texture and a delightful tang to your filling. Carefully fold in the cooked beef mixture until everything is thoroughly combined, ensuring every bite is bursting with flavor.

Step 5: Assemble the Taco Ranch Bites
Now it’s time to fill the phyllo tart shells! Spoon the cheesy beef mixture generously into each shell, allowing them to be heaping full for maximum flavor. If you're planning to freeze them for later, this is the perfect spot to do so. Just place them on a tray and freeze before transferring to a bag.

Step 6: Bake for Perfection
Place the assembled Taco Ranch Bites on a baking sheet and insert them into the preheated oven. Bake for 8-10 minutes until the shells are crispy and golden, and the filling is hot and bubbly. For frozen bites, extend the baking time by an additional 2-3 minutes for a perfect warm treat.

How to Store and Freeze Taco Ranch Bites

Fridge: Store cooled Taco Ranch Bites in an airtight container for up to 3-4 days to maintain their crispy texture and flavor.

Freezer: Freeze unbaked Taco Ranch Bites for up to 3 months. Place them on a tray to freeze individually before transferring to a zip-top bag to prevent sticking.

Reheating: To enjoy frozen bites, bake from frozen at 350ºF for an additional 2-3 minutes, ensuring they are hot throughout for optimal taste.

What to Serve with Taco Ranch Bites

Elevate your gathering with delightful sides that complement the bold flavors of these crispy, cheesy bites.

  • Fresh Guacamole: Creamy and rich, guacamole balances the savory spice of the Taco Ranch Bites while adding a refreshing touch. It's always a crowd favorite!

  • Salsa Verde: This tangy green sauce adds a splash of zest that enhances every bite. The herby notes bring a new depth and brighten up your plate.

  • Mexican Street Corn: Sweet corn finished with lime, cotija cheese, and chili powder creates a satisfying crunch and complements the savory filling perfectly.

  • Crispy Potato Wedges: Seasoned and golden brown, these hearty wedges provide a satisfying texture contrast, making your appetizer spread feel more complete.

  • Zesty Coleslaw: A crunchy, colorful slaw infused with lime and cilantro adds a refreshing crunch that cuts through the richness of the bites. It’s a delightful balance!

  • Classic Margaritas: Pair your Taco Ranch Bites with a chilled margarita for a refreshing drink that embodies the spirit of Mexican cuisine and adds a festive flair.

  • Mini Churros: For dessert, serve these sweet treats sprinkled with cinnamon sugar. Their warm, doughy sweetness is a delightful way to round out your meal.

Expert Tips for Taco Ranch Bites

• Meat Choice Matters: Use lean ground beef to reduce grease and enhance flavor without the heaviness.

• Rest the Beef: Allow seasoned beef to rest before filling the shells; this helps the flavors deepen and meld.

• Shell Handling: If using frozen phyllo tart shells, handle gently to avoid tearing. Allow them to thaw slightly for more ease in filling.

• Cheese Selection: Freshly shredded cheddar melts better and creates a creamier texture in your Taco Ranch Bites.

• Freezing Tips: If freezing assembled bites, lay them on a tray first to avoid sticking together, then transfer to a zip-top bag for convenient storage.

Make Ahead Options

These Taco Ranch Bites are perfect for meal prep, allowing you to save time and serve deliciousness on busy weeknights! You can assemble the bites and keep them in the refrigerator for up to 24 hours before baking. Alternatively, prepare them and freeze for up to 3 months—just lay them flat on a tray to freeze initially, then transfer to a zip-top bag once solid to prevent sticking. When you're ready to serve, bake directly from the freezer, adding an extra 2-3 minutes to the bake time. This ensures you’ll have fresh and crispy Taco Ranch Bites that are just as delightful as if they were made that day!

Taco Ranch Bites Variations & Substitutions

Feel free to get creative and customize these Taco Ranch Bites to satisfy any craving or dietary need!

  • Meat Alternatives: Substitute ground turkey or chicken for a lighter protein option. This twist still delivers incredible flavor without the extra fat.
  • Vegetarian Version: Swap meat for black beans, corn, and diced bell peppers to create a vibrant, plant-based delight. Each bite bursts with color, making it as appealing to the eyes as it is to the palate.
  • Cheese Choices: Use Monterey Jack or Pepper Jack instead of cheddar for a spicy kick. Experimenting with different cheeses elevates the flavor profile, bringing new dimensions to your bites.
  • Dressing Alternatives: Try spicy ranch or cilantro-lime dressing for a refreshing twist. These variations can transition your Taco Ranch Bites from classic to adventurous in moments!
  • Shell Alternatives: If you can’t find phyllo shells, corn tortillas can be baked into cups for a gluten-free alternative. The added corn flavor pairs nicely with the filling, creating a wholesome experience.
  • Heat Level: Add jalapeños or diced green chiles into the filling for those who enjoy a little more heat. This simple addition can transform the dish, making it a hit for spice lovers at the table.
  • Flavor Boost: Incorporate lime juice and zest into the beef mixture for a zesty brightness. Just a hint brings out those beloved taco flavors and pairs beautifully with the cheese.
  • Make it a Meal: Serve over a salad base with fresh greens, tomatoes, and avocado for a wholesome meal option. The crunchy bites on a bed of veggies create a deliciously satisfying dining experience.

These variations ensure you can keep things exciting while making your Taco Ranch Bites even more delectable. Plus, if you're looking for more tasty taco-inspired dishes, check out Taco Bell Crunchwrap for a fun twist, or indulge in the delicious flavors of Shrimp Tacos Zesty.

Taco Ranch Bites Recipe FAQs

What type of ground beef should I use for Taco Ranch Bites?
Opt for lean ground beef to reduce excess fat while still providing great flavor. It helps keep the Taco Ranch Bites light and prevents them from becoming greasy.

How can I store leftover Taco Ranch Bites?
Store cooled Taco Ranch Bites in an airtight container in the fridge for 3-4 days. This way, they maintain their crispy texture and delicious flavor, making for a perfect snack later.

Can I freeze Taco Ranch Bites?
Absolutely! You can freeze unbaked Taco Ranch Bites for up to 3 months. To do this, assemble the bites, lay them out on a tray, and freeze until solid before transferring them to a zip-top bag to prevent sticking.

What if my Taco Ranch Bites come out soggy?
If your bites turn out soggy, it could be due to excess moisture in the filling. Make sure to drain any liquids from the beef mixture well. Additionally, ensure the phyllo shells are fully baked until crispy. Consider baking them a bit longer if needed.

Are Taco Ranch Bites suitable for kids?
Very much! Taco Ranch Bites are a fun and tasty option for kids. You can adjust the spice level by using mild taco seasoning or omitting the green chiles for a gentler flavor. Plus, they're great for teaching kids how to assemble their food!

Is there a vegetarian version of Taco Ranch Bites?
Yes! To make a vegetarian-friendly option, substitute the ground beef with black beans, corn, and diced bell peppers. This creates a hearty and flavor-packed filling that everyone will enjoy!

Taco Ranch Bites

Taco Ranch Bites That Will Wow Your Guests Every Time

Taco Ranch Bites are a crowd-pleasing appetizer that combines ground beef, taco seasoning, and cheddar cheese in crispy phyllo shells.
Print Recipe Pin Recipe
Prep Time 15 minutes mins
Cook Time 20 minutes mins
Total Time 35 minutes mins
Servings: 8 bites
Course: Appetizers
Cuisine: Mexican
Calories: 250
Ingredients Equipment Method Nutrition Notes

Ingredients
  

For the Filling
  • 1 lb ground beef opt for lean meat
  • 1 packet taco seasoning store-bought or homemade
  • 1 can diced tomatoes and green chiles canned for ease
  • 1 cup cheddar cheese freshly shredded
  • 1/4 cup ranch dressing premium bottled or homemade
For the Shells
  • 12 pieces phyllo tart shells frozen for convenience

Equipment

  • Large skillet
  • Mixing Bowl
  • Baking Sheet

Method
 

Step-by-Step Instructions for Taco Ranch Bites
  1. Preheat your oven to 350ºF (175ºC).
  2. In a large skillet over medium heat, add the ground beef and cook for 5-7 minutes until browned.
  3. Return the skillet to heat, add taco seasoning and diced tomatoes, and stir, simmering for 5 minutes.
  4. In a mixing bowl, combine cheddar cheese and ranch dressing, then fold in the cooked beef mixture.
  5. Fill each phyllo tart shell with the cheesy beef mixture.
  6. Bake for 8-10 minutes until the shells are crispy and the filling is hot.

Nutrition

Serving: 2bitesCalories: 250kcalCarbohydrates: 15gProtein: 12gFat: 16gSaturated Fat: 7gCholesterol: 40mgSodium: 450mgPotassium: 300mgFiber: 2gSugar: 1gVitamin A: 500IUVitamin C: 5mgCalcium: 150mgIron: 2mg

Notes

Perfect for parties, can be prepped and frozen for future gatherings.

Tried this recipe?

Let us know how it was!

Fall Fruit Salad with Cozy Cinnamon Orange Dressing Bliss

November 13, 2025 by Grace Snow Leave a Comment

As the leaves start to turn and the chill of autumn creeps in, there's nothing quite like the comforting embrace of a vibrant Autumn Harvest Fruit Salad. This delightful fall fruit salad bursts with the freshness of crisp apples, juicy blackberries, and sweet grapes, all beautifully accented by the crunch of pecans. Drizzled with a cozy homemade cinnamon orange dressing, it’s a refreshing take on seasonal favorites that’s healthy and gluten-free. Plus, with quick prep time, it makes for an ideal side dish or light dessert at your gatherings. Are you ready to capture the essence of fall with this easy-to-make delight? Let’s dive in!

Why is Fall Fruit Salad a Must-Try?

Freshness at its finest: This salad showcases the best of autumn’s bounty, with crisp apples and juicy blackberries that celebrate seasonal flavors.
Nutritious and gluten-free: Packed with vitamins and wholesome ingredients, it's a guilt-free treat for everyone.
Easy to prepare: With just a few simple steps, you can whip up this vibrant dish in no time—perfect for those busy weeknights.
Versatile variations: Feel free to mix in pomegranate seeds or even some fresh yogurt for a unique twist. Enjoy it as a delightful side to accompany your brunch or a light dessert after a hearty meal or alongside a savory dish like Balsamic Steak Salad.
Crowd-pleasing appeal: Whether served at a holiday gathering or casual get-together, this salad will wow your guests with its color and flavor!

Fall Fruit Salad Ingredients

For the Dressing
• Orange – Provides fresh juice and zest, essential for the flavorful dressing. Substitution: Use pineapple or apple juice for a non-citrus alternative.
• Maple Syrup – Acts as a natural sweetener for the dressing. Substitution: Honey can be used if preferred.
• Ground Cinnamon – Adds warmth and spice to the dressing. Optional: Adjust quantity to personal taste.

For the Salad
• Red Seedless Grapes – Offer a juicy and sweet base for the salad. Note: Can use green grapes for a tart flavor difference.
• Blackberries – Contribute a soft texture and deep flavor. Substitution: Raspberries or blueberries can be used.
• Pecans – Provide crunch and a nutty flavor. Substitution: Walnuts or almonds can be used for variety.
• Sweet Apples (like Honeycrisp, Fuji, or Gala) – Add sweetness and crispness. Note: Slice and add last to prevent browning.

Step‑by‑Step Instructions for Fall Fruit Salad

Step 1: Prepare the Dressing
In a large bowl, zest the orange until you have a fragrant layer of bright orange zest, then cut the orange in half and squeeze out the juice, aiming for about ¼ cup. Add in 2 tablespoons of maple syrup and ½ teaspoon of ground cinnamon. Whisk the mixture together for about 30 seconds until fully combined, creating a warm and cozy cinnamon orange dressing that will elevate your Fall Fruit Salad.

Step 2: Add Grapes and Blackberries
Next, introduce the red seedless grapes and fresh blackberries to the dressing in the bowl. As you gently fold the fruits into the dressing, take a moment to observe the vibrant colors contrasting against the rich, golden dressing. Ensure all the berries are well-coated, which should take about 1 minute.

Step 3: Slice and Toss the Apples
Now, wash and slice your sweet apples into bite-sized pieces, making sure to do this just before adding them to prevent browning. Add the apple pieces to the bowl immediately, gently tossing with the other fruits for another minute to ensure the dressing envelops the apples, grapes, and blackberries. The bright colors and textures of your Fall Fruit Salad should look delightful.

Step 4: Serve or Chill
Your Fall Fruit Salad is nearly ready! You can either serve it immediately for a fresh experience or refrigerate it for 30 minutes to help the flavors meld together. If serving later, remember to give the salad a gentle toss before serving to refresh the dressing and ensure even coverage. This dish is perfect for gatherings, offering a seasonal touch that's both healthy and flavorful.

Expert Tips for Fall Fruit Salad

  • Prevent Browning: Toss sliced apples in the dressing immediately to avoid browning. This keeps your Fall Fruit Salad looking fresh and appetizing.
  • Mix and Match: Feel free to substitute fruits based on availability; just ensure they complement the dressing for harmonious flavors.
  • Keep Nuts Crunchy: Add pecans just before serving to maintain their delightful crunch, enhancing the salad's texture.
  • Chill for Flavor: Letting the salad rest in the fridge for about 30 minutes helps the flavors meld beautifully, making each bite even more delicious.
  • Serve with Love: Elevate your presentation by serving the salad in a colorful bowl or garnishing with a sprinkle of extra cinnamon for a festive touch.

Fall Fruit Salad Variations & Substitutions

Feel free to personalize your fall fruit salad with these delightful twists and swaps, making it truly yours!

  • Pomegranate Seeds: Add a burst of color and flavor by incorporating pomegranate seeds for extra crunch and tang. They're not only delicious but also visually appealing!

  • Seasonal Fruits: Substitute or introduce seasonal fruits like pears or figs according to what's fresh at your market. The unique flavors of these fruits can elevate your salad experience.

  • Zesty Kick: Squeeze in some lemon juice for a refreshing zing that contrasts beautifully with the sweetness of the fruits. Just a teaspoon can brighten it up!

  • Creamy Touch: Include a dollop of Greek yogurt or a sprinkle of homemade granola to add creaminess and a crunchy texture. This twist takes your salad from refreshing to indulgent!

  • Nut Variations: Experiment with different nuts, like walnuts or slivered almonds, to switch up the crunchy factor. Each nut brings its own unique flavor and texture to your salad.

  • Dried Fruits: Toss in a handful of dried cranberries or apricots for an interesting chewy texture and an extra dose of sweetness that complements the fresh fruits.

  • Spicy Option: For those who love heat, add a pinch of cayenne pepper or crushed red pepper flakes to the dressing; it adds a surprising kick that balances the sweetness beautifully.

Keep in mind these variations not only enhance taste but can also make it a perfect pairing with other dishes, like the light and refreshing Avocado Egg Salad! Explore these exciting options, and watch your fall fruit salad become a custom creation your family will adore.

What to Serve with Fall Fruit Salad

As you prepare this vibrant salad, think about delightful pairings to make your meal even more memorable.

  • Warm Cinnamon Rolls: These gooey pastries echo the cozy cinnamon notes in your fruit salad and make for a wonderful breakfast or dessert.

  • Grilled Chicken Breast: The savory flavor of grilled chicken balances the sweetness of the salad, creating a delightful combination of tastes and textures.

  • Quinoa Pilaf: A nutty quinoa pilaf with herbs adds a wholesome, protein-rich side that complements the fresh fruits beautifully.

  • Cheese Plate: A selection of cheeses, like creamy brie or tangy goat cheese, adds richness and pairs wonderfully with the crunchy pecans in your salad.

  • Pumpkin Soup: A warm bowl of spiced pumpkin soup adds a hearty contrast to the lightness of the salad, perfect for cozy fall meals.

  • Sparkling Cider: A glass of bubbly cider infuses the meal with festive flavors, enhancing the autumnal essence of your gathering.

  • Gingerbread Cookies: These spiced treats serve as a sweet ending that harmonizes with the salad's flavors while bringing a charming holiday touch.

With these delicious pairings, your Fall Fruit Salad will shine as the centerpiece of a comforting and satisfying meal.

How to Store and Freeze Fall Fruit Salad

Fridge: Store your Fall Fruit Salad in an airtight container in the refrigerator for up to 3-4 days. Be sure to keep it covered to maintain freshness and prevent browning of the apples.

Room Temperature: It's best not to leave the salad out at room temperature for more than 2 hours to ensure food safety and keep the fruits crisp.

Make-Ahead: You can prepare the salad a day in advance; just remember to add the nuts right before serving to retain their crunch and sprinkle a little extra dressing if needed.

Freezer: Freezing is not recommended due to the texture changes in fruits after thawing, which may affect the overall quality of your Fall Fruit Salad.

Make Ahead Options

These Fall Fruit Salad preparations are perfect for busy home cooks looking to save time without sacrificing flavor! You can prepare the cinnamon orange dressing by mixing the orange juice, maple syrup, and cinnamon up to 24 hours in advance and store it in the refrigerator. Additionally, wash and slice the apples, grapes, and blackberries, but hold off on tossing them in the dressing until just before serving to maintain their vibrant colors and crisp textures. By doing this, your salad will be just as delicious, with flavors that meld beautifully overnight. When ready to serve, simply combine the fruits with the dressing, give it a gentle toss, and enjoy a delightful, seasonal masterpiece that’s sure to impress!

Fall Fruit Salad Recipe FAQs

What fruits should I choose for my Fall Fruit Salad?
Absolutely! For the best flavor and texture, select fresh and seasonal fruits such as crisp apples (like Honeycrisp or Fuji), juicy blackberries, and sweet grapes. Look for apples that are firm and free of bruises, and ensure your berries are plump and bright in color—these indicators mean they are at peak ripeness.

How should I store Fall Fruit Salad to keep it fresh?
To maintain the vibrant freshness of your Fall Fruit Salad, store it in an airtight container in the refrigerator. Ideally, it should be consumed within 3-4 days. Keeping it covered helps to prevent the apples from browning and retains the overall quality of the ingredients. If you made it a day in advance, just give it a light toss before serving to refresh the flavors!

Can I freeze my Fall Fruit Salad?
Freezing the Fall Fruit Salad is not recommended due to the moisture content in the fruits. When frozen and thawed, the texture can become mushy and less appetizing. If you want to prepare components ahead of time, consider freezing fruits like grapes or nuts separately, then combine them fresh before serving.

What can I do if my apples start to brown?
No worries! If your apples start browning after slicing, a quick remedy is to drizzle a bit of lemon juice over them. Alternatively, toss the apples in the dressing immediately after slicing to create a protective layer. This will not only keep them looking fresh but will also enhance the overall flavor of your Fall Fruit Salad.

Are there any dietary considerations for this recipe?
Very! This Fall Fruit Salad is naturally gluten-free and made with wholesome ingredients, making it suitable for many dietary preferences. However, if there are allergies to nuts, consider omitting the pecans or replacing them with crunchy seeds like sunflower seeds. Always double-check fruit labels to ensure no hidden allergens are present, especially if serving to guests.

Can I prepare this salad in advance?
Yes, you can prepare your Fall Fruit Salad a day ahead! Just store it covered in the refrigerator and add the nuts right before serving to keep them crunchy. If it looks a little dry after chilling, feel free to remix with a splash of extra dressing to brighten it up!

Fall Fruit Salad

Fall Fruit Salad with Cozy Cinnamon Orange Dressing Bliss

This Fall Fruit Salad is a vibrant, healthy dish highlighting seasonal fruits like crisp apples and juicy blackberries, drizzled with cozy cinnamon orange dressing.
Print Recipe Pin Recipe
Prep Time 15 minutes mins
Chilling Time 30 minutes mins
Total Time 45 minutes mins
Servings: 4 servings
Course: Salads
Cuisine: American
Calories: 200
Ingredients Equipment Method Nutrition Notes

Ingredients
  

For the Dressing
  • 1 medium orange Provides fresh juice and zest
  • 2 tablespoons maple syrup Acts as a natural sweetener
  • 0.5 teaspoon ground cinnamon Adds warmth and spice
For the Salad
  • 2 cups red seedless grapes Offers a juicy and sweet base
  • 1 cup blackberries Contribute a soft texture and deep flavor
  • 0.5 cup pecans Provide crunch and a nutty flavor
  • 2 medium sweet apples (like Honeycrisp, Fuji, or Gala) Add sweetness and crispness

Equipment

  • large mixing bowl
  • Whisk
  • Knife

Method
 

Step-by-Step Instructions
  1. Zest the orange in a large bowl, then cut in half and squeeze out juice (about ¼ cup). Add maple syrup and ground cinnamon. Whisk until combined.
  2. Add red seedless grapes and blackberries to the bowl, gently folding them into the dressing for about 1 minute.
  3. Slice sweet apples into bite-sized pieces and add them to the bowl. Toss gently with other fruits for another minute.
  4. Serve immediately or refrigerate for 30 minutes to meld flavors. Toss before serving.

Nutrition

Serving: 1servingCalories: 200kcalCarbohydrates: 30gProtein: 2gFat: 10gSaturated Fat: 1gPolyunsaturated Fat: 3gMonounsaturated Fat: 5gSodium: 5mgPotassium: 250mgFiber: 4gSugar: 15gVitamin A: 500IUVitamin C: 30mgCalcium: 30mgIron: 1mg

Notes

To prevent browning, toss sliced apples in dressing immediately. Nuts should be added just before serving for crunch.

Tried this recipe?

Let us know how it was!

Craft the Perfect Thanksgiving Charcuterie Board for Festive Flavors

November 13, 2025 by Grace Snow Leave a Comment

As the golden leaves flutter to the ground, it’s the perfect time to gather friends and family around a table brimming with seasonal delights. Enter the Thanksgiving Charcuterie Board—your ultimate answer to easy entertaining during the most festive time of the year. This assembly of fall flavors showcases sharp cheddar, crunchy apples, and savory meats, turning your get-together into a memorable feast. Not only is it a visual stunner, but the variety of snacks promotes mingling, allowing everyone to savor each bite while the turkey cooks in the oven. Plus, it’s a breeze to put together, so you can focus on more exciting aspects of the holiday. Ready to create a centerpiece that’s as fun to assemble as it is delicious? Let’s dive into the colorful layers and delightful arrangements that will leave your guests talking long after the last cracker is gone!

Why is a Thanksgiving Charcuterie Board Perfect?

Visual Feast: The Thanksgiving Charcuterie Board is a stunning centerpiece that showcases the vibrant colors of fall, inviting your guests to dig in.
Effortless Assembly: With just a few simple steps, this board can be put together quickly, giving you more time to enjoy the festivities.
Flavor Combos: Experience the delightful blend of creamy cheeses, crisp fruits, and savory meats that capture the essence of the season.
Versatile Choices: Easily adapt the board to accommodate dietary preferences by swapping types of cheese, meats, or dips—making it perfect for any crowdExplore more variations.
Creative Touches: From decorative mini pumpkins to fresh herbs, you'll have fun personalizing the board to celebrate the holidayCheck out tips for seasonal decorations and flavor pairings!

Thanksgiving Charcuterie Board Ingredients

For the Cheese and Meats
• Cheddar Cheese – Provides a sharp flavor that serves as a rich base; can substitute with Gouda for a milder taste.
• Salty Turkey or Salami – Offers protein and saltiness to balance the sweetness of fruits; replace with ham or prosciutto if preferred.

For the Fruits
• Sliced Apples – Adds sweetness and a crisp texture; pears can be used as a substitute for variety.

For the Base
• Crackers – Act as the foundational element for guests to combine bites; gluten-free options are available for dietary restrictions.

For the Dips
• Cranberry Dip – Enhances autumn flavor profiles; use fig or apple chutney as an alternative.

For Crunch and Decoration
• Nuts (e.g., walnuts, pecans) – Add crunch and heartiness; omit for nut allergies or substitute with seeds.
• Fresh Herbs (e.g., rosemary) – Provides aroma and a decorative touch; thyme or sage can serve as suitable substitutes.
• Mini Pumpkins or Edible Flowers – Serve purely for decoration, adding a festive visual element.

This Thanksgiving Charcuterie Board is designed to delight your taste buds while sparking conversations among your guests!

Step‑by‑Step Instructions for Thanksgiving Charcuterie Board

Step 1: Set the Foundation
Begin by selecting a large, sturdy wooden or slate board as your base for the Thanksgiving Charcuterie Board. Place it on a cleared surface, ensuring enough room for assembly. Start by arranging an even layer of sliced cheddar cheese in the center, creating a visually appealing focal point that will anchor the rest of your ingredients.

Step 2: Add Crackers and Fruits
Next, place an assortment of crackers around your cheese, allowing for easy nibbling. Aim for a mix of textures, such as crunchy and soft. Fill in the gaps with vibrant slices of apples, ensuring they are visually appealing and varied in color to complement the cheese. This combination of flavors will encourage guests to dive right in.

Step 3: Layer in the Meats
Now, it’s time for the savory elements! Neatly arrange slices of salty turkey or salami between the cheese and fruits. For a festive touch, tuck the meat into a turkey shape or layer them flat. This variety not only introduces delicious flavors but also adds richness to your Thanksgiving Charcuterie Board.

Step 4: Introduce the Dips
To enhance the flavors further, incorporate small jars of cranberry dip or your chosen alternative. Position them strategically in the gaps, ensuring they’re easily accessible for your guests to scoop their favorites onto crackers or fruit. This balancing act of dips adds an inviting aroma, drawing everyone to the board.

Step 5: Garnish with Nuts and Herbs
Elevate your board's appearance by sprinkling nuts such as walnuts or pecans around the edges, adding crunch and heartiness. Complement this with sprigs of fresh herbs like rosemary for a fragrant and visually appealing garnish. The combination of colors and textures will create an inviting and festive scene.

Step 6: Add Decorative Touches
For a last flourish, place mini pumpkins or edible flowers intermittently across the board. These decorative elements will not only enhance the festive spirit but also introduce new visual dimensions, making your Thanksgiving Charcuterie Board a true centerpiece.

Step 7: Final Adjustments and Balance
Take a step back and assess your board, adjusting the placements to ensure a balanced look without overcrowding. Make sure that all elements are easily reachable, and there are no gaps left behind. Your beautifully arranged Thanksgiving Charcuterie Board is now ready to entice guests and elevate your holiday gathering!

Tips for the Best Thanksgiving Charcuterie Board

  • Color Balance: Aim for a harmonious mix of colors. Incorporate vibrant fruits like red apples and green herbs, making your Thanksgiving Charcuterie Board visually appealing.
  • Texture Variety: Combine different textures, from creamy cheeses to crunchy nuts. This delightful contrast will enhance the overall experience for your guests.
  • Avoid Overcrowding: While it’s tempting to fill every space, overcrowding can make it challenging for guests to navigate. Leave space for easy access to snacks.
  • Seasonal Ingredients: Use seasonal fruits and flavors to keep the theme cohesive. Think about swapping in pears or quince when apples aren't in season.
  • Interactive Dips: Ensure dips are easily reachable and scoop-friendly. This makes it fun for guests to mix and match flavors without any mess!

Make Ahead Options

The Thanksgiving Charcuterie Board is perfect for meal prep, allowing you to gather flavors ahead of time for a stress-free holiday gathering. You can slice cheeses and fruits up to 24 hours in advance; simply refrigerate them in airtight containers to maintain their freshness. You can also prep and arrange the crackers and dips in advance—just keep them separate until party time to prevent sogginess. When ready to serve, lay everything out on your board and garnish with nuts and herbs to add that fresh touch. This way, you can enjoy quality time with your loved ones while your beautiful Thanksgiving Charcuterie Board stands ready to impress!

Thanksgiving Charcuterie Board Variations

Feel free to experiment and make this Thanksgiving Charcuterie Board uniquely yours, enhancing flavors and textures along the way!

  • Dairy-Free: Use nut-based cheeses like almond or cashew to keep flavors rich without the dairy.
  • Fruity Twist: Swap out apples for seasonal pears or roasted persimmons, adding a twist to the classic sweetness.
  • Savory Addition: Incorporate smoky gouda or blue cheese for a complex flavor profile that excites the palate.
    This twist introduces depth to the board, giving your guests something special to talk about.
  • Spiced Dips: Add unique dips like roasted garlic or pumpkin hummus to bring festive warmth and complimentary flavors.
    The right dip can make all the difference, transforming basic bites into an exciting culinary adventure.
  • Gluten-Free: Select gluten-free crackers or veggie sticks to ensure everyone can join in on the fun.
  • Nuts & Seeds: Opt for sunflower seeds or pumpkin seeds, especially if you're accommodating nut allergies.
  • Herb Infusion: Try adding fresh herbs like thyme or sage to mimic traditional Thanksgiving stuffing flavors, creating an aromatic experience.
    It’s amazing how fresh herbs can elevate the overall scent and enjoyment of your board.
  • Heat It Up: Introduce spicy elements like pepper jack cheese or jalapeño-infused meats for those who love a kick.
    This adds an unexpected surprise that keeps guests reaching for more!

Enhancing your Thanksgiving Charcuterie Board opens up a world of flavors that will delight your guests and create memorable moments around the table.

What to Serve with Thanksgiving Charcuterie Board

The perfect accompaniment can elevate your Thanksgiving gathering, creating an unforgettable feast that dazzles the senses.

  • Creamy Mashed Potatoes: Their buttery texture and rich flavor create a comforting contrast to the savory bites on your board.
  • Roasted Brussels Sprouts: Crispy on the outside and tender within, these bring a delightful earthiness that plays beautifully with the season’s flavors.
  • Warm Bread Rolls: Soft and pillowy, these rolls are perfect for mopping up dips, adding a cozy warmth to your festive spread.
  • Pumpkin Soup: A velvety autumn classic, its creamy sweetness will harmonize with the sharpness of the cheeses and the saltiness of the meats.
  • Spiced Apple Cider: Offering a touch of warmth with fragrant spices, this drink adds a lovely seasonal twist that pairs well with the charcuterie.
  • Pecan Pie: For dessert, this nutty, sweet favorite rounds off the meal with a rich contrast to the savory elements on the board.

Creating a full meal around your Thanksgiving Charcuterie Board means thinking of flavor, texture, and seasonality; these selections do just that!

How to Store and Freeze Thanksgiving Charcuterie Board

Airtight Container: Store any leftover ingredients in an airtight container in the fridge for up to 3 days to maintain freshness.
Fridge: Keep assembled boards in the fridge, but note that fruits and crackers may get soggy; best to store them separately.
Freezer: While not ideal for freezing, uncut cheeses and meats can be frozen for up to 2 months; thaw in the fridge before using.
Reheating: If warming any meats, heat them gently in a microwave or oven to retain flavor, but serve cold items fresh for best taste.

Thanksgiving Charcuterie Board Recipe FAQs

How do I select the best fruits for my Thanksgiving Charcuterie Board?
Absolutely! When choosing fruits, look for vibrant colors and firm textures. Crisp and sweet options like apples should be free of dark spots and bruises. Pears can be a lovely alternative if you're after variety. Remember that freshness is key, so select fruits that are in season for the best flavor!

What’s the best way to store leftovers from the Thanksgiving Charcuterie Board?
You can easily store any leftover ingredients in an airtight container in the fridge for up to 3 days. To maintain the freshness of fruits and crackers, I recommend keeping them separate from other components. If you're dealing with an assembled board, be aware that it may not hold up well, as fruits can get mushy and crackers may become soggy.

Can I freeze ingredients from my Thanksgiving Charcuterie Board?
While it's not ideal to freeze an assembled charcuterie board, you can freeze uncut cheeses and meats. Wrap them tightly in plastic wrap and then place them in a freezer-safe bag. They can last for up to 2 months in the freezer. When you're ready to use them, simply thaw them in the fridge overnight for best results.

What if my cheeses or meats start to smell or look odd?
Very! If you notice any undesirable odors—whether an off-smell from the cheese or discoloration in the meats—it's best to discard them. Always trust your instincts! For fresh items like fruits, look out for any mushiness or dark spots that indicate spoilage.

Are there any dietary considerations for my Thanksgiving Charcuterie Board?
When serving guests, consider dietary restrictions such as nut allergies and gluten intolerance. You can easily provide gluten-free crackers or omit nuts altogether and substitute with seeds for added crunch. Additionally, I often make a point to label each item on my board so everyone can avoid allergens and enjoy the festivities worry-free.

Thanksgiving Charcuterie Board

Craft the Perfect Thanksgiving Charcuterie Board for Festive Flavors

Create a stunning Thanksgiving Charcuterie Board filled with seasonal delights to impress your guests during the festive season.
Print Recipe Pin Recipe
Prep Time 15 minutes mins
Total Time 15 minutes mins
Servings: 8 people
Course: Snacks
Cuisine: American
Calories: 250
Ingredients Equipment Method Nutrition Notes

Ingredients
  

For the Cheese and Meats
  • 8 oz Cheddar Cheese Can substitute with Gouda for a milder taste.
  • 8 oz Salty Turkey or Salami Replace with ham or prosciutto if preferred.
For the Fruits
  • 2 medium Sliced Apples Pears can be used as a substitute.
For the Base
  • 1 box Crackers Gluten-free options are available.
For the Dips
  • 1 cup Cranberry Dip Use fig or apple chutney as an alternative.
For Crunch and Decoration
  • 1 cup Nuts (e.g., walnuts, pecans) Omit for nut allergies or substitute with seeds.
  • 2 tablespoons Fresh Herbs (e.g., rosemary) Thyme or sage can serve as substitutes.
  • 3 pieces Mini Pumpkins or Edible Flowers Purely for decoration.

Equipment

  • Large wooden or slate board

Method
 

Step‑by‑Step Instructions
  1. Begin by selecting a large, sturdy wooden or slate board as your base. Arrange an even layer of sliced cheddar cheese in the center.
  2. Place an assortment of crackers around your cheese. Fill in gaps with vibrant slices of apples.
  3. Neatly arrange slices of salty turkey or salami between the cheese and fruits.
  4. Incorporate small jars of cranberry dip or your chosen alternative in the gaps.
  5. Sprinkle nuts around the edges, adding crunch and complement with sprigs of fresh herbs for garnish.
  6. Place mini pumpkins or edible flowers intermittently across the board for decoration.
  7. Assess your board for balance and ensure all elements are easily reachable.

Nutrition

Serving: 1servingCalories: 250kcalCarbohydrates: 30gProtein: 10gFat: 12gSaturated Fat: 4gPolyunsaturated Fat: 2gMonounsaturated Fat: 6gCholesterol: 20mgSodium: 500mgPotassium: 200mgFiber: 3gSugar: 5gVitamin A: 500IUVitamin C: 5mgCalcium: 200mgIron: 1mg

Notes

This Thanksgiving Charcuterie Board is designed to delight your taste buds while sparking conversations among your guests.

Tried this recipe?

Let us know how it was!

Crispy Fried Chicken Recipe for Ultimate Comfort Food Joy

November 12, 2025 by Grace Snow Leave a Comment

The aroma of crispy, golden Country Fried Chicken frying away in the kitchen is like an invitation to gather around the dining table and share some heartfelt stories. This Fried Chicken Recipe is a cherished Southern classic that not only fills the belly but warms the soul, perfect for Sunday dinners or casual weeknight meals. With its easy preparation and the option to make it gluten-free, it’s a versatile dish that caters to families and guests alike. The secret to mouthwatering tenderness lies in marinating the chicken in buttermilk, creating a flavor so irresistible you’ll be replaying the kitchen magic long after the last bite. Ready to create some culinary memories? Let’s dive into this comforting recipe that promises crispy perfection!

Why is this Fried Chicken Recipe a must-try?

Irresistible Crispiness: Each bite of this fried chicken boasts a golden-brown, crunchy coating that contrasts beautifully with juicy, tender meat inside.

Versatile Adjustments: Whether you prefer boneless chicken or gluten-free options, this recipe allows for customization to suit your taste and dietary needs.

Quick and Easy: With straightforward steps and minimal ingredients, you can whip this up even on busy weeknights without sacrificing flavor.

Crowd-Pleasing Delight: Serve it with creamy mashed potatoes or buttery biscuits for a comforting meal that your family and friends will adore.

Marinated for Flavor: Soaking in buttermilk not only makes the chicken tender but infuses it with a depth of flavor that keeps everyone coming back for seconds!

Fried Chicken Recipe Ingredients

• Get ready to gather everything you need for this delightful dish!

For the Chicken

  • Chicken Pieces – Choose bone-in chicken parts for a classic taste; boneless chicken can be used for quicker cooking.
  • Buttermilk – Marinate the chicken for at least 1 hour for maximum tenderness and flavor.

For the Coating

  • All-Purpose Flour – Provides that essential crispiness; swap for gluten-free flour if needed.
  • Cornstarch – Enhances the crunch of the chicken coating; perfect for that extra crispy texture.
  • Seasonings (e.g., salt, pepper, paprika) – Customize according to your preference; have fun experimenting with spices for your unique fried chicken recipe!

For Frying

  • Oil (Peanut Oil) – Ideal for frying due to its high smoke point; canola oil works well for a lighter touch.

With these ingredients on hand, you're one step closer to enjoying a plate full of this comfort food classic!

Step‑by‑Step Instructions for Fried Chicken Recipe

Step 1: Marinate Chicken
Start by placing your chicken pieces in a large bowl and pouring in enough buttermilk to cover them completely. Let the chicken soak in the buttermilk for at least 1 hour, or ideally, overnight in the refrigerator. This marination helps tenderize the meat and infuses it with moisture and flavor, making your Fried Chicken Recipe irresistible.

Step 2: Prepare Coating
In a separate mixing bowl, combine the all-purpose flour, cornstarch, and your choice of seasonings like salt, pepper, and paprika. Stir the mixture well until all the ingredients are evenly distributed. This flour blend is essential for the crispy coating, so make sure it’s mixed thoroughly to enhance the flavor and texture of your crispy Fried Chicken.

Step 3: Dredge Chicken
Once the chicken has marinated, remove each piece from the buttermilk, allowing excess liquid to drip off. Take one piece at a time and dredge it in the seasoned flour mixture, ensuring an even coat on all sides. Shake off any excess flour, as this will prevent clumping and ensure that your fried chicken has a beautiful, even crunch when cooked.

Step 4: Heat Oil
In a large, deep skillet or dutch oven, pour in enough peanut oil to cover the bottom about 1-2 inches deep. Heat the oil over medium-high heat until it reaches a temperature of 350°F (175°C). You can test if the oil is ready by dropping a small amount of flour into it; if it bubbles and sizzles, you're good to go. Maintaining this temperature is key for crispy fried chicken.

Step 5: Fry Chicken
Carefully add the coated chicken pieces to the hot oil, working in batches to avoid overcrowding, which can lower the oil temperature. Fry each piece for about 10-15 minutes on one side until golden brown and crispy. Flip the chicken and continue cooking for another 10-15 minutes, or until the internal temperature reaches 165°F (74°C). The enticing aroma will fill your kitchen as the chicken cooks to perfection.

Step 6: Drain
Once cooked, use tongs to remove the chicken from the oil and place it on a plate lined with paper towels. Allow the fried chicken to drain for a few minutes to remove excess oil, resulting in a deliciously crispy Fried Chicken that is golden brown on the outside and juicy on the inside. This step is essential for achieving that perfect texture.

Make Ahead Options

These Crispy Southern Country Fried Chicken pieces are an ideal choice for meal prep enthusiasts! You can marinate the chicken in buttermilk up to 24 hours in advance to enhance tenderness and flavor. Additionally, feel free to pre-coat the chicken with the seasoned flour mixture and then refrigerate it for up to 3 days. When you're ready to enjoy your fried chicken, simply heat the oil to 350°F (175°C) and fry the chicken pieces until they are golden brown and cooked through, about 10-15 minutes per side. This way, you'll have a delightful, homemade meal with minimal last-minute effort, preserving that restaurant-quality crunch and juicy interior!

Expert Tips for Fried Chicken Recipe

  • Buttermilk Magic: Always marinate in buttermilk for at least 1 hour; this step ensures tender, juicy fried chicken everyone will love.

  • Flour Power: Use a mix of all-purpose flour and cornstarch for the coating; this combination achieves unbeatable crispiness without clumping.

  • Thermometer Check: Invest in a meat thermometer to check for doneness; aim for 165°F (74°C) for safe and perfectly cooked chicken.

  • Batch Frying: Avoid overcrowding the pan when frying; working in batches keeps the oil temperature consistent for that dreamy crunch.

  • Rest After Frying: Let your fried chicken rest on paper towels for a few minutes to drain excess oil, ensuring a beautifully crispy finish to your dish.

How to Store and Freeze Fried Chicken

Fridge: Store leftover fried chicken in an airtight container for up to 3 days. This helps maintain its delicious flavor and prevents moisture loss.

Freezer: For longer storage, wrap cooled fried chicken tightly in plastic wrap and then foil, keeping it in the freezer for up to 3 months.

Reheating: Reheat in the oven at 350°F (175°C) for 15–20 minutes to restore its crispy texture, making your fried chicken taste fresh and delightful again.

Room Temperature: It's best to avoid leaving fried chicken out at room temperature for more than 2 hours to prevent food safety issues.

Fried Chicken Recipe Variations

Feel free to get creative and make this fried chicken recipe your own; your kitchen is your playground!

  • Boneless Chicken: Use boneless thighs for extra juiciness and a quicker cook time; they still yield crispy goodness.
    Adjusting the cooking time allows for more flexibility, ensuring everyone can enjoy tender bites without the hassle.

  • Gluten-Free Delight: Swap all-purpose flour for gluten-free flour or cornstarch to cater to dietary needs without sacrificing crunch.
    You can still achieve that crispy outer layer while keeping it friendly for gluten-sensitive family and friends.

  • Herb-Infused Flavor: Experiment with herbs like rosemary or thyme to infuse a delightful aroma into your fried chicken.
    Just mix them into your flour mixture for an aromatic surprise that elevates every bite!

  • Spicy Twist: Add cayenne pepper or chili powder to the seasoning blend for a little heat that will wake up your taste buds.
    This adds a zesty kick that will have your guests clamoring for more, perfect for those who crave a little spice!

  • Oven-Baked Alternative: Bake the coated chicken at 400°F (200°C) for a healthier twist while still achieving crispy perfection.
    This method allows you to enjoy your favorite comfort food without the extra oil while maintaining that crunch factor.

  • Honey Glazed Finish: Drizzle with honey or a brown sugar glaze right after frying for an enticing sweet and savory contrast.
    This touch adds a delightful sweetness, creating a flavor profile that makes this dish unforgettable, especially during family gatherings!

  • Seasoned Cornmeal Coating: For Southern charm, incorporate cornmeal into your coating mix for a unique texture twist.
    This gives you both flavor and crunch, bringing a delightful rustic element that speaks to the heart of Southern cooking.

  • Asian-Inspired Marinade: Soak the chicken in a mixture of soy sauce, ginger, and sesame oil for a different flavor profile.
    Your traditional fried chicken can take a new twist, offering a delicious fusion experience that surprises and delights!

Feel free to explore these variations based on what you have on hand or your taste preferences. And while you're practicing these delicious tweaks, why not enhance your meal with some creamy mashed potatoes or a side of freshly made buttery biscuits? Enjoy the adventure in your kitchen!

What to Serve with Crispy Southern Country Fried Chicken?

Savor the warmth of a comforting meal that complements every bite of your crispy creation.

  • Creamy Mashed Potatoes: The buttery goodness of mashed potatoes offers a smooth contrast that pairs wonderfully with the crunch of fried chicken.

  • Coleslaw: This tangy, crunchy side adds a refreshing element, balancing the richness of the chicken and brightening up your plate.

  • Buttery Biscuits: Soft, flaky biscuits are perfect for soaking up any leftover juices, creating a delightful experience that’s truly Southern.

  • Corn on the Cob: Sweet, tender corn enhances the meal with a pop of color and flavor, making it a delightful addition to your fried chicken feast.

  • Green Beans Almondine: The added crunch and nutty flavor elevate the meal, providing a fresh and nutritious side to pair with crispy chicken.

  • Sweet Tea: A classic Southern beverage, this refreshing drink will quench your thirst and complement the savory notes of the chicken.

  • Peach Cobbler: End your meal on a sweet note with this warm, fruity dessert that captures the essence of Southern comfort foods, leaving everyone satisfied.

  • Grilled Vegetables: Lightly charred vegetables provide a healthful, colorful side, adding an array of flavors that balance the richness of the fried chicken.

With these delicious options, your dinner table will be filled with love, laughter, and unforgettable memories.

Crispy Southern Country Fried Chicken Recipe FAQs

How do I know if my chicken is ripe and ready for cooking?
Absolutely! When selecting chicken, look for pieces that are plump and have a consistent color. Avoid any with dark spots or unpleasant odors. Fresh chicken should have a firm, moist texture without any off-putting smells. For optimal flavor and texture, you can marinate it for an hour or even overnight in buttermilk.

What’s the best way to store leftover chicken?
Very! Store your leftover fried chicken in an airtight container in the refrigerator for up to 3 days. To keep it crispy, place a paper towel at the bottom of the container, which will absorb moisture. If you plan on keeping it longer, let it cool completely before wrapping it tightly in plastic wrap or aluminum foil and freezing it.

Can I freeze fried chicken, and how should I do it?
Absolutely! Freezing fried chicken is a great way to enjoy it later. After letting the chicken cool completely, wrap each piece tightly in plastic wrap, ensuring no part of it is exposed. Then, place the wrapped chicken in a freezer-safe bag or container. Label it with the date, and you can store it in the freezer for up to 3 months. When you're ready to enjoy it, simply reheat in the oven at 350°F (175°C) for about 15-20 minutes for that wonderful crispy texture.

What should I do if my fried chicken isn’t crispy?
Very! If your fried chicken comes out soggy, there are a few common culprits. First, ensure you haven’t overcrowded the pan while frying; this lowers the oil temperature. If you notice it lacking that crunch, try dredging it again in the flour mixture for extra coating. Also, letting it rest on paper towels after frying helps to remove excess oil. Make sure the oil is at the right temperature—350°F (175°C) is key for that ideal crispiness!

Is this fried chicken recipe suitable for people with allergies?
Certainly! You can modify this recipe to cater to dietary restrictions. For those allergic to gluten, simply substitute all-purpose flour with gluten-free flour or cornstarch while preparing the coating. Always check the labels on your ingredients to ensure they are free from allergens. If you're cooking for someone with a specific allergy, I recommend discussing these changes beforehand for food safety.

Fried Chicken Recipe

Crispy Fried Chicken Recipe for Ultimate Comfort Food Joy

This Fried Chicken Recipe is a cherished Southern classic that promises crispy perfection and comfort food joy.
Print Recipe Pin Recipe
Prep Time 1 hour hr
Cook Time 30 minutes mins
Marination Time 1 hour hr
Total Time 2 hours hrs 30 minutes mins
Servings: 4 pieces
Course: Dinner
Cuisine: Southern
Calories: 440
Ingredients Equipment Method Nutrition Notes

Ingredients
  

For the Chicken
  • 4 pieces Chicken Pieces Bone-in preferred, boneless can be used
  • 1 cup Buttermilk Marinate for at least 1 hour
For the Coating
  • 2 cups All-Purpose Flour Substitute with gluten-free flour if needed
  • 1/2 cup Cornstarch Enhances crunch
  • to taste Seasonings (e.g., salt, pepper, paprika) Customize to your preference
For Frying
  • 2 cups Oil (Peanut Oil) Can substitute with canola oil

Equipment

  • large bowl
  • Mixing Bowl
  • skillet or dutch oven
  • Tongs
  • Meat Thermometer

Method
 

Marinating and Coating
  1. Marinate chicken in buttermilk for at least 1 hour, or overnight for best results.
  2. In a bowl, combine flour, cornstarch, and seasonings. Mix well.
Frying
  1. Dredge marinated chicken in the flour mixture, shaking off excess.
  2. Heat oil in a skillet to 350°F (175°C) and fry chicken in batches for 10-15 minutes per side.
  3. Remove chicken and drain on paper towels to remove excess oil.

Nutrition

Serving: 1pieceCalories: 440kcalCarbohydrates: 25gProtein: 30gFat: 25gSaturated Fat: 6gPolyunsaturated Fat: 3gMonounsaturated Fat: 10gCholesterol: 95mgSodium: 600mgPotassium: 300mgFiber: 1gSugar: 1gVitamin A: 500IUCalcium: 20mgIron: 2mg

Notes

Allow fried chicken to rest for a few minutes post-frying to enhance texture.

Tried this recipe?

Let us know how it was!

Chocolate Chip Pumpkin Bread: Moist, Cozy Fall Delight

November 12, 2025 by Grace Snow Leave a Comment

As the leaves turn and the air becomes crisp, my kitchen fills with the inviting scent of autumn—spicy cinnamon, warming nutmeg, and just a hint of chocolate. This is my favorite time of year to bake, and nothing says fall quite like my Best Chocolate Chip Pumpkin Bread. Quick to prepare, this delightful bread pairs the rich, moist goodness of pumpkin with sweet chocolate chips, creating a cozy treat that's perfect for gatherings or those quiet afternoons with a cup of tea. Plus, it adapts beautifully—swap out chocolate for walnuts or even use mashed bananas for a twist! Are you ready to fill your home with the entrancing aroma of pumpkin spice? Let’s get baking!

Why Will You Love This Bread?

Irresistible Aroma: The moment you start baking, your home will be filled with the warm, spicy scents of cinnamon, nutmeg, and chocolate—nothing beats that cozy fall vibe!

Quick & Easy: With just a handful of ingredients and minimal prep, this simple recipe comes together in a flash, perfect for both novice and experienced bakers.

Customizable Delight: Want to shake things up? This chocolate chip pumpkin bread is easily adaptable—swap chocolate chips for nuts or try using mashed bananas for an exciting twist!

Crowd-Pleaser: Its rich chocolate flavor combined with moist pumpkin makes this loaf the ultimate treat that’s sure to impress friends and family at any gathering or cozy afternoon get-together.

Perfect for Any Occasion: Whether you're celebrating Thanksgiving or enjoying a lazy weekend, this bread is not just a snack—it's a homemade hug that brings warmth and happiness to your table.

Plus, if you're a fan of seasonal baking, be sure to check out my Pumpkin Brownies Decadent for another delightful autumn-inspired treat!

Chocolate Chip Pumpkin Bread Ingredients

For the Bread
• All-purpose flour – Provides structure; can substitute with whole wheat flour for added nutrition.
• Baking powder – Acts as a leavening agent, ensuring your bread rises perfectly.
• Baking soda – Another leavening agent that contributes to a light, fluffy texture.
• Salt – Enhances sweetness; don't skip it for a balanced flavor!
• Ground cinnamon – Adds warmth and depth; pumpkin pie spice can be a great substitute.
• Ground cloves – Offers a rich aroma; omit if unavailable and use pumpkin pie spice instead.
• Ground nutmeg – Provides that classic sweet and nutty fall flavor.
• Cooking oil – Adds moisture; melted butter works beautifully here as well.
• Eggs – Bind the mixture together and keep the loaf moist.
• Sugar – Sweetens the bread; brown sugar will add a richer flavor.
• Vanilla extract – Introduces a lovely aromatic sweetness to your loaf.
• Pumpkin puree – The star of the show, bringing moisture and that quintessential pumpkin flavor; feel free to use canned puree for convenience.
• Chocolate chips – Create delightful pockets of sweetness; can swap for nuts or dried fruits if desired.

Optional Toppings
• Chocolate chips (extra) – Sprinkling on top gives a lovely finishing touch and extra sweetness.

Dive into the heartwarming journey of creating this chocolate chip pumpkin bread, where the flavors of fall meet sweet indulgence! Enjoy every moment of your baking adventure.

Step‑by‑Step Instructions for Chocolate Chip Pumpkin Bread

Step 1: Preheat the Oven
Begin by preheating your oven to 350°F (175°C). This step is crucial, as it ensures that your chocolate chip pumpkin bread bakes evenly. While the oven heats, gather your baking equipment, including a mixing bowl, whisk, and an 8"x4"x3" loaf pan.

Step 2: Mix the Dry Ingredients
In a medium bowl, whisk together the all-purpose flour, baking powder, baking soda, salt, ground cinnamon, ground cloves, and ground nutmeg. This mixture will form the base of the bread, providing structure and delicious flavor. Look for a well-combined, dry mixture before moving on to the next step.

Step 3: Blend the Wet Ingredients
In a large bowl, combine the cooking oil, eggs, sugar, vanilla extract, and pumpkin puree. Mix these ingredients together until thoroughly combined, resulting in a smooth and glossy mixture. This blend creates the moistness and rich flavor the chocolate chip pumpkin bread is known for.

Step 4: Combine Wet and Dry Mixtures
Gradually fold the dry ingredient mixture into the wet ingredients, stirring gently until just combined. Be mindful not to overmix, as doing so may lead to a denser bread. The batter should remain slightly lumpy, indicating it’s ready for the chocolate chips.

Step 5: Fold in Chocolate Chips
Gently fold in 1 cup of chocolate chips into your batter, ensuring an even distribution throughout. These delightful morsels will create pockets of sweetness in your chocolate chip pumpkin bread. Set aside a small handful of chocolate chips for sprinkling on top later.

Step 6: Prepare the Loaf Pan
Spray your 8"x4"x3" loaf pan with cooking oil or line it with parchment paper to prevent sticking. Pour the batter into the prepared loaf pan, smoothing the top with a spatula. This ensures an even rise and a beautifully shaped bread as it bakes.

Step 7: Sprinkle Remaining Chocolate Chips
Before sliding the pan into the oven, sprinkle the remaining 1/4 cup of chocolate chips over the surface of the batter. This not only adds an enticing visual appeal but also brings extra sweetness to your chocolate chip pumpkin bread as it bakes.

Step 8: Bake to Perfection
Place the loaf pan in the preheated oven and bake for 50-60 minutes. Check for doneness by inserting a toothpick into the center; it should come out clean or with just a few moist crumbs attached. The top should look golden and slightly cracked when it’s ready.

Step 9: Cool and Transfer
Once the chocolate chip pumpkin bread is finished baking, remove it from the oven and let it cool in the pan for about 10 minutes. Then, carefully transfer it to a wire rack to cool completely. This step helps maintain the bread's texture and flavor, allowing you to enjoy every bite.

How to Store and Freeze Chocolate Chip Pumpkin Bread

Room Temperature: Store your chocolate chip pumpkin bread wrapped in plastic wrap or in an airtight container at room temperature for up to 3 days. This keeps it moist and delicious!

Fridge: For longer freshness, refrigerate the bread in an airtight container. It will last up to a week in the fridge, although it may be slightly less moist than at room temperature.

Freezer: To freeze, wrap slices or the entire loaf tightly in plastic wrap followed by aluminum foil. Properly stored, it can be frozen for up to 3 months. Thaw overnight in the fridge before enjoying.

Reheating: For a warm treat, reheat slices in the microwave for 15-20 seconds or in an oven at 350°F (175°C) for about 10-15 minutes. Enjoy that fresh-baked taste again!

Expert Tips for Chocolate Chip Pumpkin Bread

  • Fresh Ingredients: Always check the expiration date on your baking powder and baking soda. Fresh leavening agents ensure your chocolate chip pumpkin bread rises beautifully.

  • Spice Substitutions: Don't fret if you’re missing some spices! Pumpkin pie spice can easily substitute for cloves and nutmeg, giving your bread that warm fall flavor without extra ingredients.

  • Mix Gently: When combining wet and dry ingredients, mix until just combined. Overmixing can lead to a dense texture, affecting the airy quality of your chocolate chip pumpkin bread.

  • Perfect Pan Size: Use an 8"x4"x3" loaf pan for the best results. If you opt for mini loaf pans, adjust your baking time to around 35 minutes and check for doneness earlier.

  • Cooling Process: Allow the bread to cool in the pan for 10 minutes before transferring to a wire rack. This prevents sogginess and helps maintain the delightful texture of your delicious treat!

Make Ahead Options

Preparing this Chocolate Chip Pumpkin Bread in advance is a fantastic way to save time during your busy week! You can mix the dry ingredients (flour, baking powder, baking soda, salt, and spices) up to 3 days ahead of time and store them in an airtight container to maintain freshness. Additionally, you can blend the wet ingredients (oil, eggs, sugar, vanilla, and pumpkin puree) and refrigerate them for up to 24 hours before baking. When you’re ready to finish the recipe, simply combine the wet and dry ingredients, fold in the chocolate chips, and bake as directed. This approach guarantees that your Chocolate Chip Pumpkin Bread will be just as delicious and perfect for enjoying any day of the week!

What to Serve with Best Chocolate Chip Pumpkin Bread

The warmth of the season comes alive as you prepare to enjoy this comforting loaf—perfect for cozy gatherings or afternoon tea.

  • Creamy Cream Cheese Frosting: A luscious spread that balances the sweet chocolate and spices, adding a delightful richness. The tanginess complements the bread's sweetness beautifully.

  • Cinnamon Honey Butter: This spread combines warm spices with a touch of sweetness, transforming each slice into a luxurious treat. Slather it on warm bread for the ultimate experience.

  • Spiced Apple Cider: The fragrant spices in this drink harmonize perfectly with the flavors of your chocolate chip pumpkin bread, enhancing the overall autumn vibe of your gathering.

  • Roasted Pecans: Their crunchy texture adds a wonderful contrast to the soft loaf, while the nutty flavor creates an enticing combination. Toss in a bit of sea salt for an extra flavor punch!

  • Vanilla Ice Cream: A scoop of this classic dessert melting over warm bread creates a heavenly indulgence. The creamy vanilla pairs beautifully with the chocolate and pumpkin.

  • Fresh Fruit Salad: Bright and refreshing, it cuts through the richness of the bread and adds vibrancy to your plate. Choose seasonal fruits like apples, pears, and pomegranate seeds for a festive touch.

  • Pumpkin Spice Latte: Embrace the cozy spirit of fall by pairing this beloved beverage with your slice of chocolate chip pumpkin bread, completing the ultimate seasonal treat.

  • Dark Chocolate Drizzle: A touch of melted dark chocolate over each slice elevates this dessert to new heights. It deepens the chocolate flavor, making every bite irresistible.

  • Ginger Tea: The warming spices in ginger tea create a soothing balance to the rich flavors of pumpkin and chocolate, perfect for chilly afternoons.

Chocolate Chip Pumpkin Bread Variations

Invite your creativity into the kitchen—there's so much you can do to make this chocolate chip pumpkin bread uniquely yours!

  • Nutty Twist: Swap chocolate chips for walnuts or pecans for a delightful nutty flavor. The crunch will perfectly complement the bread's moistness.
  • Banana Surprise: Replace pumpkin puree with mashed bananas to give a sweet, tropical twist. This can add a fluffy texture that's simply irresistible!
  • Cranberry Burst: Add raisins or dried cranberries for extra sweetness and texture. The tartness of cranberries plays beautifully with the pumpkin flavor.
  • Spice Up: For a spicier note, try incorporating a teaspoon of ginger or cardamom along with your spices. It’ll evoke an even cozier feeling during the chilly months.
  • Gluten-Free Option: Substitute all-purpose flour with a gluten-free blend. Ensure you add a bit of xanthan gum if your mix doesn’t include it to maintain great texture.
  • Chocolate Overload: Use a mix of dark, milk, and white chocolate chips for a decadent chocolate experience in every slice. Each bite will feel like a huge hug!
  • Savory Spin: Add herbs like thyme or rosemary for a savory twist that dances beautifully with the pumpkin flavor. It’s a unique take that will definitely surprise your taste buds.
  • Nut Butter Swirl: Swirl in some creamy peanut or almond butter before baking. This adds depth and a nutty richness that takes this quick bread over the top!

Whatever variation you choose, you're bound to create a delicious loaf that becomes a family favorite. While you're in a baking mood, be sure to check out my delightful Pumpkin Brownies Decadent for another cozy fall recipe!

Chocolate Chip Pumpkin Bread Recipe FAQs

How do I select ripe pumpkin for my bread?
Absolutely! When choosing pumpkin for your chocolate chip pumpkin bread, look for a firm exterior without dark spots or blemishes. A good pumpkin should feel heavy for its size and have a smooth skin. I recommend using sugar pumpkins or pie pumpkins for the best flavor and texture, as they are sweeter and less watery than larger carving pumpkins.

What is the best way to store my chocolate chip pumpkin bread?
You can store your chocolate chip pumpkin bread wrapped in plastic wrap or placed in an airtight container at room temperature for up to 3 days. If you want to keep it longer, refrigerate it—this will help maintain its freshness for about a week.

Can I freeze chocolate chip pumpkin bread?
Absolutely! To freeze your chocolate chip pumpkin bread, wrap the entire loaf or individual slices tightly in plastic wrap, then cover them with aluminum foil for added protection. It can be frozen for up to 3 months. To enjoy again, simply thaw overnight in the fridge and reheat as desired!

What should I do if my batter seems too dry?
If your batter feels dry, don't worry! You can add a bit more pumpkin puree or a tablespoon of oil to moisten the mixture. It’s important that your pumpkin puree isn't overly thick; if you're using canned pumpkin, check that it's 100% pumpkin and not pumpkin pie filling. If the bread turns out dryer than expected, try adding a glaze or serving it with a creamy spread, like cream cheese frosting.

Can I make this recipe nut-free?
Very easily! If you’re making your chocolate chip pumpkin bread nut-free, simply omit any nuts from the recipe and focus on chocolate chips or dried fruits for sweetness. Always double-check your chocolate chips, as some brands may contain traces of nuts if you're highly allergic. Additionally, you can replace chocolate with seeds like sunflower seeds for crunch!

Chocolate Chip Pumpkin Bread

Chocolate Chip Pumpkin Bread: Moist, Cozy Fall Delight

Delight in the autumn flavors of moist chocolate chip pumpkin bread, perfect for gatherings and cozy afternoons.
Print Recipe Pin Recipe
Prep Time 15 minutes mins
Cook Time 1 hour hr
Cooling Time 10 minutes mins
Total Time 1 hour hr 25 minutes mins
Servings: 10 slices
Course: Dessert
Cuisine: American
Calories: 200
Ingredients Equipment Method Nutrition Notes

Ingredients
  

For the Bread
  • 2 cups All-purpose flour Can substitute with whole wheat flour for added nutrition.
  • 2 teaspoons Baking powder Acts as a leavening agent.
  • 1 te teaspoon Baking soda Contributes to a light, fluffy texture.
  • 1 teaspoon Salt Enhances sweetness.
  • 1 teaspoon Ground cinnamon Adds warmth and depth.
  • 1/2 teaspoon Ground cloves Offers a rich aroma.
  • 1/2 teaspoon Ground nutmeg Provides that classic fall flavor.
  • 1/2 cup Cooking oil Adds moisture; melted butter works well.
  • 2 large Eggs Bind the mixture together.
  • 1 cup Sugar Brown sugar adds a richer flavor.
  • 1 teaspoon Vanilla extract Introduces sweetness.
  • 1 cup Pumpkin puree Star ingredient for pumpkin flavor.
  • 1 cup Chocolate chips Can swap for nuts or dried fruits.
Optional Toppings
  • 1/4 cup Chocolate chips (extra) Sprinkling on top gives a lovely finishing touch.

Equipment

  • Mixing Bowl
  • Whisk
  • Loaf pan
  • Spatula

Method
 

Step-by-Step Instructions
  1. Preheat your oven to 350°F (175°C).
  2. In a medium bowl, whisk together the all-purpose flour, baking powder, baking soda, salt, ground cinnamon, ground cloves, and ground nutmeg.
  3. In a large bowl, combine the cooking oil, eggs, sugar, vanilla extract, and pumpkin puree. Mix together until smooth.
  4. Gradually fold the dry mixture into the wet mixture, stirring gently until just combined.
  5. Gently fold in 1 cup of chocolate chips into your batter. Set aside a small handful of chocolate chips for later.
  6. Spray your 8"x4"x3" loaf pan with cooking oil or line with parchment paper. Pour the batter in and smooth the top.
  7. Sprinkle the remaining 1/4 cup of chocolate chips over the top of the batter.
  8. Bake in the preheated oven for 50-60 minutes. Check for doneness with a toothpick.
  9. Let it cool in the pan for about 10 minutes before transferring to a wire rack.

Nutrition

Serving: 1sliceCalories: 200kcalCarbohydrates: 30gProtein: 2gFat: 8gSaturated Fat: 1gPolyunsaturated Fat: 2gMonounsaturated Fat: 3gCholesterol: 30mgSodium: 200mgPotassium: 100mgFiber: 1gSugar: 15gVitamin A: 15IUVitamin C: 2mgCalcium: 2mgIron: 4mg

Notes

For best results, use fresh ingredients and avoid overmixing the batter.

Tried this recipe?

Let us know how it was!

Juicy Thanksgiving Turkey Recipe Everyone Will Love

November 12, 2025 by Grace Snow Leave a Comment

As the aroma of roasting turkey wafts through the kitchen, it feels like a warm embrace, evoking memories of cherished family gatherings. This Thanksgiving, I'm excited to share my Foolproof Juicy Thanksgiving Turkey Recipe that promises a succulent, golden bird without the fuss of brining or basting. With simple yet effective techniques, you’ll create a stunning centerpiece that not only looks incredible but also delights your guests with its tender meat and crispy skin. Plus, this recipe is a time-saver, letting you focus on all your favorite sides while still impressing everyone at the table. Ready to elevate your holiday feast? Let’s dive into the magic of preparing a turkey that’s sure to make your Thanksgiving unforgettable!

Why is this turkey recipe so special?

Simplicity at Its Best: This foolproof recipe requires minimal techniques, making it ideal for cooks of all levels. Flavor-Infused Perfection: The herb butter adds an incredible depth of flavor, while the onion and lemon bring a refreshing brightness. Beautiful Presentation: With its golden skin and juicy interior, this turkey is sure to impress at any holiday gathering. Versatile Serving Options: Pair it with stuffing, cranberry sauce, or transform leftovers into delightful sandwiches or casseroles. Experience a stress-free cooking process this Thanksgiving, and create a delicious bird that will have your guests raving about your culinary skills! If you’re looking for more inspiration, don’t miss my Spatchcock Chicken Flavor or Chicken Adobo recipes!

Thanksgiving Turkey Recipe Ingredients

For the Turkey
• Turkey (12-18 pounds) – Main protein, fully thawed for perfect roasting.
• Kosher Salt – Essential for enhancing the turkey's natural flavors.
• Black Pepper – For a slight kick that balances the dish.

For the Aromatics
• Onion – Adds delicious flavor and aroma; shallots are a great substitute.
• Lemon – Brightens the dish with acidity; lime works well for a different twist.
• Fresh Rosemary – Infuses a fragrant touch; consider using dried if fresh isn’t available.
• Fresh Thyme – Offers a subtle earthiness; dry thyme works in a pinch, reduce the quantity.
• Fresh Sage – Complements the turkey beautifully; can also use dried sage if needed.

For the Herb Butter
• Unsalted Butter (¾ cup) – Ensures rich flavor and helps achieve crispy skin; vegan butter is an excellent alternative.
• Garlic (6 cloves, minced) – Packs in flavor; feel free to omit if you prefer a milder taste.

Optional Vegetables for Roasting
• Celery (3 ribs, chopped) – Adds depth to the drippings and gravy.
• Carrots (2, chopped) – Sweetens the flavors of the drippings, enhancing the overall dish.

This Thanksgiving turkey recipe is sure to delight your holiday guests, with its mouthwatering aroma and flavor that will transport you back to loving family feasts. Enjoy cooking!

Step‑by‑Step Instructions for Foolproof Juicy Thanksgiving Turkey Recipe

Step 1: Prep the Turkey
Remove the turkey from the refrigerator about 1 hour before roasting to bring it to room temperature. Carefully take out the giblets from the cavity and pat the turkey dry with paper towels. This step ensures a crispier skin and is essential for the success of your Thanksgiving turkey recipe.

Step 2: Fill Cavities
Preheat your oven to 325°F (160°C). Once hot, season the turkey's cavity generously with kosher salt and black pepper. Stuff the cavity with the quartered onion, halved lemon, and a mix of fresh rosemary, thyme, and sage. This aromatic filling enhances flavor while roasting, making your turkey memorable.

Step 3: Make Herb Butter
In a medium-sized bowl, combine softened unsalted butter, minced garlic, salt, black pepper, and chopped fresh herbs. Mix until the ingredients are well incorporated, creating a flavorful herb butter. This rich mixture contributes to both the flavor and the beautiful golden color of your Thanksgiving turkey.

Step 4: Apply Butter
Gently loosen the skin over the turkey breast using your fingers. Rub about one-third of the herb butter mixture under the skin for maximum flavor infusion. Then, spread the remaining herb butter generously over the outside of the turkey, ensuring even coverage for delicious, crispy skin while roasting.

Step 5: Roast the Turkey
Place the turkey breast-side up in a large roasting pan. Roast in the preheated oven for approximately 15 minutes per pound, checking the internal temperature with a meat thermometer. Cook until it reaches 158°-160°F; cover with foil if the skin gets too dark. Your Thanksgiving turkey will be succulent and perfectly cooked.

Step 6: Let Rest
Once your turkey reaches the ideal temperature, remove it from the oven and tent it loosely with aluminum foil. Allow it to rest for at least 30 minutes before carving. This crucial step helps the juices redistribute, keeping your turkey juicy and flavorful when serving.

Step 7: Carve and Serve
Carefully carve the rested turkey, starting with the legs and then the breast, using a sharp carving knife. Present the beautifully sliced turkey on a platter, reserving the delicious drippings for gravy. Your perfectly roasted Thanksgiving turkey is now ready to delight your guests and elevate your holiday feast!

Make Ahead Options

These Foolproof Juicy Thanksgiving Turkey Recipe preparations are perfect for busy home cooks! You can prepare the herb butter and season the turkey up to 24 hours in advance, keeping them covered in the refrigerator to maintain freshness and flavor. Simply make the herb butter by mixing soft butter, garlic, and herbs, and refrigerate it. On the day of roasting, take the turkey out of the fridge 1 hour before cooking to bring it to room temperature. This ensures a flavorful and juicy turkey. When ready to serve, just apply the chilled herb butter, roast, and enjoy a stress-free Thanksgiving dinner that looks and tastes just as delicious!

Thanksgiving Turkey Recipe Variations

Feel free to play around with these variations to make this Thanksgiving turkey recipe truly your own!

  • Spice it Up: Add paprika or cumin to the herb butter for a warm, smoky flavor that elevates your turkey to new heights.

  • Citrus Twist: Swap the lemon for orange or grapefruit to introduce a sweet and tangy twist. The result is a beautifully aromatic bird that will surprise your guests!

  • Herb Medley: Experiment with different herbs like tarragon or marjoram for unique flavor profiles, or use a mix of fresh and dried herbs if freshness isn’t an option.

  • Sweet Touch: Incorporate a touch of honey or maple syrup in the herb butter for a sweet glaze that caramelizes during roasting, giving your turkey a delightful sweetness.

  • Mouthwatering Marinade: Try a herb and garlic marinade the night before roasting to really infuse flavor into the turkey. It’s a fantastic way to add depth to each bite.

  • Veggie Boost: Place sliced apples or pears alongside your standard vegetables under the turkey to add natural sweetness and complexity to the drippings.

  • Asian-inspired Flavors: Brush the turkey with soy sauce and ginger for an exotic flavor twist. This gives a beautiful glaze and a unique flavor profile that’s sure to surprise!

  • For a Zesty Kick: Mix in a bit of chili powder or red pepper flakes for some heat. Just a pinch can add an exciting layer of flavor without overpowering the traditional turkey taste.

If you're curious about unique flavor combinations, check out my takes on Spatchcock Chicken Flavor or take a dive into the delicious world of Chicken Adobo.

Expert Tips for the Best Thanksgiving Turkey

  • Temperature Check: Always use a probe thermometer in the thickest part of the turkey to ensure it reaches 158°-160°F for safe eating.
  • Avoid Stuffing: Skip stuffing the turkey to ensure even cooking; instead, use aromatic herbs for flavor enhancement without the risk of a dry bird.
  • Thaw Properly: Plan ahead—buy a frozen turkey at least a week prior to ensure it fully thaws before roasting, preventing last-minute stress.
  • Resting Time is Key: Let the turkey rest for at least 30 minutes post-roasting. This crucial step promotes juiciness and makes carving easier.
  • Monitor Skin Color: Keep an eye on the turkey’s skin as it roasts; if it’s browning too quickly, cover it with foil to prevent burning.
  • Use Fresh Ingredients: Whenever possible, opt for fresh herbs and vegetables, as they provide enhanced flavors that truly elevate your Thanksgiving turkey recipe.

What to Serve with Foolproof Juicy Thanksgiving Turkey

As you prepare this stunning turkey, let’s create a memorable meal that brings warmth and comfort to your holiday table.

  • Creamy Mashed Potatoes: The rich, buttery texture pairs perfectly with the savory turkey, soaking up those delicious drippings.
  • Sage Stuffing: Infused with aromatic herbs, this classic side complements the turkey’s flavors and adds a wonderful texture contrast.
  • Garlic Green Beans: Crisp-tender green beans sautéed with garlic offer a fresh, bright note to balance the heartiness of the turkey.
  • Cranberry Sauce: The sweet-tart burst of this sauce enhances the turkey’s savory flavors and brings a touch of festivity to your plate.
  • Roasted Root Vegetables: Filling and flavorful, a medley of carrots, parsnips, and sweet potatoes enhances holiday vibes with sweet, caramelized notes.
  • Pumpkin Pie: End the meal on a sweet note; this spiced dessert is a classic pairing that brings back the joy of the season.
  • Apple Cider: Pour this warm, spiced drink to elevate the festive atmosphere while balancing the meal’s rich flavors.
  • Wine Pairing: A smooth Pinot Noir complements the turkey's flavor while enhancing those delightful herb notes, making each bite even more special.

Dive into these pairings to create a feast that will leave your guests talking about it long after the last bite!

How to Store and Freeze Thanksgiving Turkey

Fridge: Store leftover turkey in an airtight container or tightly wrapped with plastic wrap for up to 3-4 days, maintaining its moisture and flavor.

Freezer: For longer preservation, freeze turkey in portions, using freezer-safe bags or containers. Enjoy within 4 months for optimal taste.

Reheating: Reheat turkey in the oven at 325°F (160°C) until warmed through, about 20-25 minutes. Add a little broth to retain moisture for the best texture.

Leftover Creative Ideas: Use leftover turkey in soups, sandwiches, or casseroles for delicious meals that extend the joy of your Thanksgiving turkey recipe!

Thanksgiving Turkey Recipe FAQs

How do I choose the right turkey for roasting?
Absolutely! When selecting a turkey, aim for a fully thawed bird that weighs between 12 to 18 pounds for optimal cooking. If you're shopping for frozen options, avoid last-minute purchases; try to buy it a week in advance for proper thawing. Look for a turkey that's firm to the touch, with no dark spots or off odors, ensuring it's fresh and perfect for your Thanksgiving feast.

How should I store leftover turkey, and how long does it last?
Great question! Leftover turkey can be stored in an airtight container or tightly wrapped with plastic wrap in the refrigerator for up to 3-4 days. To maintain its moisture and flavor, make sure to keep it covered. If you plan to keep it longer, transferring portions to freezer-safe bags or containers can preserve it for up to 4 months. Just label them with the date for easy tracking!

Can I freeze Thanksgiving turkey, and how do I do it properly?
Very! Freezing turkey is a wonderful way to enjoy your Thanksgiving meal beyond the holiday. Start by allowing the turkey to cool completely after carving. Then, portion it into slices or chunks, and place in freezer-safe bags, removing as much air as possible before sealing. For the best taste, try to use it within 4 months. When you're ready to eat, thaw it in the refrigerator overnight before reheating.

What should I do if my turkey skin browns too quickly while roasting?
No worries! If you notice that your turkey skin is browning too fast, simply cover it loosely with aluminum foil to prevent burning while allowing the turkey to continue cooking evenly. This technique helps ensure that the beautiful golden color appears while keeping the meat juicy and perfectly cooked.

Can I use this turkey recipe for dietary restrictions, like allergies?
Absolutely! This Thanksgiving turkey recipe can be adjusted to meet various dietary needs. For those who are dairy-free, you can easily substitute the unsalted butter with a vegan alternative. If you or your guests have herbal allergies, consider using only salt and pepper for seasoning while opting for safe herbs or spices that fit your dietary requirements. Always double-check the ingredient labels to ensure they meet your needs.

How should I reheat leftover turkey for the best flavor?
To reheat your delicious turkey while retaining its moisture, preheat your oven to 325°F (160°C). Place the turkey pieces in an oven-safe dish, and add a splash of broth or stock to keep it juicy. Cover the dish with foil to help retain steam, and heat for about 20-25 minutes or until warmed through. This will keep your turkey from drying out, leaving you with tender and flavorful slices!

Thanksgiving Turkey Recipe

Juicy Thanksgiving Turkey Recipe Everyone Will Love

This Thanksgiving Turkey Recipe promises a succulent, golden bird loved by all, perfect for family gatherings.
Print Recipe Pin Recipe
Prep Time 1 hour hr
Cook Time 4 hours hrs
Resting Time 30 minutes mins
Total Time 5 hours hrs 30 minutes mins
Servings: 10 slices
Course: Dinner
Cuisine: American
Calories: 300
Ingredients Equipment Method Nutrition Notes

Ingredients
  

For the Turkey
  • 12-18 pounds Turkey Main protein, fully thawed for perfect roasting.
  • to taste Kosher Salt Essential for enhancing the turkey's natural flavors.
  • to taste Black Pepper For a slight kick that balances the dish.
For the Aromatics
  • 1 Onion Adds delicious flavor and aroma.
  • 1 Lemon Brightens the dish with acidity.
  • to taste Fresh Rosemary Infuses a fragrant touch.
  • to taste Fresh Thyme Offers a subtle earthiness.
  • to taste Fresh Sage Complements the turkey beautifully.
For the Herb Butter
  • ¾ cup Unsalted Butter Ensures rich flavor and helps achieve crispy skin.
  • 6 cloves Garlic Minced for flavor.
Optional Vegetables for Roasting
  • 3 ribs Celery Adds depth to the drippings and gravy.
  • 2 Carrots Chopped to sweeten drippings.

Equipment

  • Roasting pan
  • Meat Thermometer
  • Mixing Bowl
  • Carving Knife

Method
 

Step-by-Step Instructions
  1. Remove the turkey from the refrigerator about 1 hour before roasting to bring it to room temperature. Carefully take out the giblets from the cavity and pat the turkey dry with paper towels.
  2. Preheat your oven to 325°F (160°C). Once hot, season the turkey's cavity generously with kosher salt and black pepper. Stuff with onion, lemon, and herbs.
  3. In a bowl, combine softened butter, minced garlic, salt, black pepper, and chopped herbs to make the herb butter.
  4. Loosen the skin over the turkey breast and rub about one-third of the herb butter mixture under the skin.
  5. Rub the rest of the herb butter generously over the turkey and place it breast-side up in a roasting pan.
  6. Roast in the preheated oven for about 15 minutes per pound until the internal temperature reaches 158°-160°F.
  7. Remove the turkey from the oven, tent with foil, and let it rest for at least 30 minutes before carving.
  8. Carve the turkey, starting with the legs, and serve beautifully on a platter.

Nutrition

Serving: 1sliceCalories: 300kcalProtein: 25gFat: 22gSaturated Fat: 8gPolyunsaturated Fat: 1gMonounsaturated Fat: 15gCholesterol: 85mgSodium: 600mgPotassium: 350mgVitamin A: 250IUVitamin C: 2mgCalcium: 20mgIron: 2mg

Notes

Use fresh ingredients for enhanced flavors and always check internal temperature for safety.

Tried this recipe?

Let us know how it was!

Delicious Christmas Sprinkle Buttermilk Bread You’ll Adore

November 12, 2025 by Grace Snow Leave a Comment

As I whisked together the ingredients on a cool December morning, the aroma of melting butter and sweet vanilla filled the kitchen, instantly lifting my spirits. It's moments like these that remind me of the joy of holiday baking—and trust me, this Christmas Sprinkle Buttermilk Bread is all about spreading that cheer! Not only is it incredibly moist and easy to prepare, making it a perfect choice for experienced bakers and novices alike, but the festive colors from the sprinkles bring a delightful touch to your holiday spread. Whether you're whipping it up for a cozy brunch or wrapping it as a thoughtful gift, this quick bread is sure to charm anyone lucky enough to enjoy it. So, are you ready to fill your home with festive flavors and a sprinkle of holiday magic?

Why is This Bread a Holiday Favorite?

Festive Charm: The vibrant red and green sprinkles make every slice a feast for the eyes, perfect for adding a touch of joy to your holiday table.
Quick and Easy: With simple ingredients and straightforward steps, bakers of any skill level will find this recipe a breeze. No need to spend hours in the kitchen!
Moist and Delicious: Thanks to the buttermilk and buttery goodness, each slice is wonderfully moist, making it a delightful treat for breakfast or dessert.
Versatile Enjoyment: Serve it on its own, or pair it with cream cheese or butter for added indulgence. You could even accompany it with a warm cup of hot cocoa!
Perfect for Gifting: Wrap a loaf in festive paper, and you have a charming homemade gift for friends, family, or neighbors. Everyone appreciates a heartfelt baking gesture, especially during the holidays!

Christmas Sprinkle Buttermilk Bread Ingredients

  • For the Bread

  • 1 ¾ cups all-purpose flour – Provides structure; swap with gluten-free flour for a gluten-free version.

  • 1 teaspoon baking powder – Helps the bread rise for a light texture.

  • ½ teaspoon baking soda – Enhances fluffiness in the loaf.

  • ½ teaspoon salt – Balances sweetness and enhances flavor.

  • ½ cup unsalted butter, melted – Adds rich moisture; coconut oil serves as a dairy-free alternative.

  • 1 cup granulated sugar – Delivers sweetness and moisture to the bread.

  • 2 large eggs – Contributes structure and richness in flavor.

  • 1 cup buttermilk – Provides tangy moisture; can be replaced with milk mixed with vinegar or lemon juice.

  • 2 teaspoons vanilla extract – Enhances the overall flavor profile.

  • ½ cup red and green sprinkles – Adds festive color; use the jimmies style to prevent bleeding during baking.

  • Optional Topping

  • 1 tablespoon coarse sugar – Creates a delightful crunchy topping.

  • Additional sprinkles – Use for an extra festive garnish!

Embrace the joy of baking this Christmas Sprinkle Buttermilk Bread, and you'll fill your home with warmth and festive delight!

Step‑by‑Step Instructions for Christmas Sprinkle Buttermilk Bread

Step 1: Preheat Your Oven
Begin by preheating your oven to 350°F (175°C). While the oven warms, prepare a 9x5-inch loaf pan by greasing it lightly or lining it with parchment paper. This ensures your Christmas Sprinkle Buttermilk Bread releases easily after baking, making your bread-making experience even more enjoyable.

Step 2: Whisk the Dry Ingredients
In a medium bowl, whisk together 1 ¾ cups of all-purpose flour, 1 teaspoon of baking powder, ½ teaspoon of baking soda, and ½ teaspoon of salt. This combines the dry ingredients thoroughly and helps create a light texture in your bread. Set this bowl aside and let the ingredients mingle as you move on to the wet ingredients.

Step 3: Mix the Wet Ingredients
In a large mixing bowl, combine ½ cup of melted unsalted butter with 1 cup of granulated sugar. Whisk them together until smooth and creamy. Next, add in 2 large eggs one at a time, mixing well after each addition. Stir in 2 teaspoons of vanilla extract and 1 cup of buttermilk until fully incorporated, creating a rich batter for your Christmas Sprinkle Buttermilk Bread.

Step 4: Combine Wet and Dry Ingredients
Gradually add the dry ingredient mixture to the wet ingredients, folding them together gently. Mix until just combined, taking care not to overmix. This will keep your bread tender and fluffy, achieving that delicious consistency you’re aiming for.

Step 5: Fold in the Sprinkles
Gently fold in ½ cup of red and green sprinkles into the batter. Be careful to mix only until they are evenly distributed to prevent the colors from bleeding. The sprinkles will lend vibrant spots of color to your Christmas Sprinkle Buttermilk Bread, making it visually festive and delightful for the holiday season.

Step 6: Pour and Smooth the Batter
Pour the batter into the prepared loaf pan, using a spatula to smooth the top for even baking. For an extra festive touch, you can optionally sprinkle 1 tablespoon of coarse sugar or additional sprinkles on top. This will create a delightful crunchy topping that contrasts beautifully with the soft bread.

Step 7: Bake to Perfection
Place the loaf pan in the oven and bake the Christmas Sprinkle Buttermilk Bread for 45-55 minutes. Keep an eye on it, and check for doneness by inserting a toothpick in the center; it should come out clean. The bread should be golden brown, and your kitchen will be filled with an irresistible aroma as it bakes.

Step 8: Cool and Enjoy
Once baked, remove the pan from the oven and allow the bread to cool in the pan for 10-15 minutes. This makes it easier to transfer to a wire rack for complete cooling. Let the bread cool fully before slicing, so that the delightful flavors can settle and meld together beautifully.

What to Serve with Christmas Sprinkle Buttermilk Bread

As you revel in the joy of baking this festive loaf, consider these delightful pairings that elevate your meal to a warm and inviting gathering of flavors.

  • Cream Cheese Spread: A smooth and tangy addition that enhances the sweetness of the bread, creating a perfect balance of flavors.
  • Honey Butter: The rich, sweet creaminess pairs beautifully with the moist texture, offering an extra layer of indulgence for every slice.
  • Yogurt with Fresh Fruits: This light and refreshing side adds a touch of healthiness, brightening your holiday brunch with vibrant colors.
  • Hot Cocoa or Mulled Wine: Both drinks bring warmth and coziness to your gathering, complementing the sweet and festive tones of the bread.
  • Festive Fruit Salad: A medley of seasonal fruits adds freshness; the juicy flavors enhance the sweetness of the bread wonderfully.
  • Gingerbread Cookies: A delightful companion, their spicy sweetness harmonizes with the buttery bread, enriching your holiday experience.
  • Vanilla Glaze: A simple drizzle adds a touch of sweetness and elegance, turning each slice into a dessert-worthy treat.

Expert Tips for Christmas Sprinkle Buttermilk Bread

  • Avoid Overmixing: Mixing too much after adding dry ingredients can lead to a dense loaf. Stir just until combined for light, fluffy bread.

  • Check Doneness Early: Start checking for doneness around the 40-minute mark to avoid overbaking. A toothpick should come out clean from the center.

  • Sprinkle Wisely: To keep colors from bleeding in your Christmas Sprinkle Buttermilk Bread, use jimmies-style sprinkles and fold them in gently.

  • Grease Properly: Ensure your loaf pan is well-greased or lined for easy release after baking. This makes serving your festive bread much easier!

  • Customize Flavors: Feel free to add a hint of nutmeg or cinnamon for additional holiday warmth to the flavor profile of your bread.

Make Ahead Options

This Christmas Sprinkle Buttermilk Bread is perfect for busy home cooks who love to plan ahead! You can prepare the batter up to 24 hours in advance—simply mix all your wet and dry ingredients as described, fold in those festive sprinkles, and store the batter covered in the refrigerator. This method not only saves time but also allows the flavors to meld beautifully. When you’re ready to bake, just pour the chilled batter into the prepared loaf pan and pop it in the oven following the usual baking instructions. Your bread will be just as delightful, bringing that holiday cheer to your table with minimal hassle!

How to Store and Freeze Christmas Sprinkle Buttermilk Bread

  • Room Temperature: Store the bread in an airtight container for up to 3 days. Keep it in a cool, dry place to maintain its freshness.

  • Fridge: If you’d like to extend its lifespan, refrigerate the bread for up to 1 week in an airtight container. Just be aware that refrigeration may slightly alter its texture.

  • Freezer: For longer storage, wrap the bread tightly in foil, then place it in a zip-top bag. It will freeze well for up to 2 months, ready to thaw whenever the craving strikes.

  • Reheating: To enjoy the bread warm, reheat slices in the microwave for about 15-20 seconds or toast them lightly. This will bring back some of the moistness—like fresh out of the oven!

Christmas Sprinkle Buttermilk Bread Variations

Feel free to explore these delightful twists on Christmas Sprinkle Buttermilk Bread that’ll inspire your festive baking!

  • Gluten-Free: Swap all-purpose flour with a gluten-free blend to make this treat accessible for gluten-sensitive friends.

  • Dairy-Free: Substitute melted butter with coconut oil and use plant-based milk with vinegar in place of buttermilk for a dairy-free version.

  • Flavor Boost: Replace vanilla extract with almond extract for a unique nutty flavor that pairs beautifully with the festive sprinkles.

  • Texture Add-Ins: Fold in white chocolate chips, chopped nuts, or dried fruits like cranberries to enhance texture and flavor.

  • Mini Loaves: Pour the batter into smaller loaf pans to create adorable mini versions. Just adjust the baking time to about 30 minutes.

  • Topping Options: Drizzle a simple vanilla glaze over the cooled bread for an elegant touch, or add coarse sugar on top before baking for a sweet crunch.

  • Festive Spices: Incorporate a teaspoon of cinnamon or nutmeg into the dry ingredients for a warm, cozy flavor that encapsulates the holiday spirit.

  • Show-Stopping Garnish: For a beautiful presentation, sprinkle extra festive jimmies on top after glazing, making each loaf a perfect centerpiece.

These variations keep things fun and festive, much like when you take out a slice of warm bread alongside your favorite hot cocoa or pairing with a slice of Cornbread Breakfast Casserole. Embrace your creativity and have a delightful time baking this holiday season!

Christmas Sprinkle Buttermilk Bread Recipe FAQs

What type of flour should I use for this bread?
I recommend using all-purpose flour for the best texture, but you can substitute with a gluten-free flour blend if you're looking for a gluten-free option. Just ensure it's a blend that includes xanthan gum for proper rising!

How should I store leftover Christmas Sprinkle Buttermilk Bread?
Store your bread in an airtight container at room temperature for up to 3 days. For longer storage, refrigerate it for up to 1 week. Just remember, refrigeration can slightly change the texture, so I sweetly suggest keeping it at room temp for the best flavor!

Can I freeze Christmas Sprinkle Buttermilk Bread?
Absolutely! To freeze, wrap the cooled bread tightly in foil and place it in a zip-top bag. It will keep well for up to 2 months. When you’re ready to enjoy a slice, thaw it in the fridge overnight or let it sit at room temperature for a few hours.

Why is my bread dense and not rising as expected?
Oh no! This can happen sometimes. If your baking powder or baking soda is old, the leavening may not work effectively, so be sure to use fresh ingredients. Also, avoid overmixing the batter, as it can lead to density; mix until just combined for fluffy perfection.

Can pets eat Christmas Sprinkle Buttermilk Bread?
Generally, it's best to keep this treat to humans only. The sugar and butter content aren't great for pets like dogs or cats. If you want to share some love, perhaps save them a small crumb of plain, unsweetened bread instead!

What should I do if my sprinkles bleed during baking?
If you notice bleeding, it’s likely because of the type of sprinkles used. Choose jimmies-style sprinkles as they hold their color better during baking. Fold them gently into the batter to keep them intact!

Christmas Sprinkle Buttermilk Bread

Delicious Christmas Sprinkle Buttermilk Bread You’ll Adore

This Christmas Sprinkle Buttermilk Bread is incredibly moist and festive, making it the perfect addition to your holiday baking.
Print Recipe Pin Recipe
Prep Time 15 minutes mins
Cook Time 50 minutes mins
Cooling Time 15 minutes mins
Total Time 1 hour hr 20 minutes mins
Servings: 10 slices
Course: Breakfast
Cuisine: American
Calories: 210
Ingredients Equipment Method Nutrition Notes

Ingredients
  

For the Bread
  • 1 ¾ cups all-purpose flour Provides structure; swap with gluten-free flour for a gluten-free version.
  • 1 teaspoon baking powder Helps the bread rise for a light texture.
  • ½ teaspoon baking soda Enhances fluffiness in the loaf.
  • ½ teaspoon salt Balances sweetness and enhances flavor.
  • ½ cup unsalted butter, melted Adds rich moisture; coconut oil serves as a dairy-free alternative.
  • 1 cup granulated sugar Delivers sweetness and moisture to the bread.
  • 2 large eggs Contributes structure and richness in flavor.
  • 1 cup buttermilk Provides tangy moisture; can be replaced with milk mixed with vinegar or lemon juice.
  • 2 teaspoons vanilla extract Enhances the overall flavor profile.
  • ½ cup red and green sprinkles Adds festive color; use the jimmies style to prevent bleeding during baking.
Optional Topping
  • 1 tablespoon coarse sugar Creates a delightful crunchy topping.
  • Additional sprinkles Use for an extra festive garnish!

Equipment

  • 9x5-inch loaf pan
  • Mixing bowls
  • Whisk
  • Spatula

Method
 

Step‑by‑Step Instructions
  1. Preheat your oven to 350°F (175°C) and prepare a 9x5-inch loaf pan by greasing or lining it with parchment paper.
  2. In a medium bowl, whisk together the flour, baking powder, baking soda, and salt.
  3. In a large mixing bowl, combine melted butter and sugar until smooth. Add eggs one at a time, mixing well after each addition. Stir in vanilla and buttermilk until fully incorporated.
  4. Gradually add the dry mixture to the wet ingredients, folding gently until just combined.
  5. Fold in the sprinkles carefully until evenly distributed.
  6. Pour the batter into the prepared loaf pan and smooth the top. Optionally, sprinkle coarse sugar or additional sprinkles on top.
  7. Bake for 45-55 minutes, checking doneness with a toothpick that should come out clean.
  8. Allow to cool in the pan for 10-15 minutes before transferring to wire rack to cool completely.

Nutrition

Serving: 1sliceCalories: 210kcalCarbohydrates: 30gProtein: 2gFat: 9gSaturated Fat: 5gPolyunsaturated Fat: 1gMonounsaturated Fat: 3gCholesterol: 50mgSodium: 150mgPotassium: 100mgSugar: 12gVitamin A: 400IUCalcium: 50mgIron: 0.5mg

Notes

Sprinkle wisely to prevent colors from bleeding; customize flavors with spices for added warmth.

Tried this recipe?

Let us know how it was!
  • « Previous Page
  • 1
  • …
  • 172
  • 173
  • 174
  • 175
  • 176
  • …
  • 244
  • Next Page »

Welcome!

Hi, I’m Grace, a Sydney-based home cook with a passion for bold flavors and trending ingredients. Whether you’re a busy beginner or a seasoned foodie, you’ll find dishes here that are fresh, fun, and full of flavor.

More about me

Popular Recipes

  • twice baked potato casserole
    Indulge in This Creamy Twice Baked Potato Casserole Delight
  • Red Potato Casserole
    Irresistible Red Potato Casserole with Crunchy Topping
  • Cowboy Potato Casserole
    Comforting Cowboy Potato Casserole for Cozy Nights
  • Creamy Rotel Pasta with Ground Beef
    Creamy Rotel Pasta with Ground Beef for Ultimate Comfort

Footer

↑ back to top

About

  • Privacy Policy
  • Disclaimer
  • Terms & Conditions

Newsletter

  • Sign Up! for emails and updates

Contact

  • About me
  • Contact me

Copyright © 2025 TastyTrendIngredients