tastytrendingredients

  • Home
  • Recipes
    • Appetizers
    • Breakfast
    • Dessert
    • Dinner
    • Drinks
    • Salads
    • Snacks
    • Soups
  • About me
  • Contact me
menu icon
go to homepage
  • Home
  • Recipes
    • Appetizers
    • Breakfast
    • Dessert
    • Dinner
    • Drinks
    • Salads
    • Snacks
    • Soups
  • About me
  • Contact me
search icon
Homepage link
  • Home
  • Recipes
    • Appetizers
    • Breakfast
    • Dessert
    • Dinner
    • Drinks
    • Salads
    • Snacks
    • Soups
  • About me
  • Contact me
×

Bright and Fresh Pasta Pomodoro in 30 Minutes Flat

September 14, 2025 by Grace Snow Leave a Comment

As I stood in my kitchen, the sweet aroma of sizzling garlic mingling with the vibrant colors of cherry tomatoes, I realized that summer had officially arrived on my plate. It was time to whip up a delightful Pasta Pomodoro that highlights the season's fresh produce while bringing a wave of comfort to the table. This quick and easy dish is not only family-friendly but also perfect for busy weeknights, thanks to its five simple ingredients and just 30 minutes of cooking time. Each bite offers the wholesome goodness of fresh vegetables, making it a healthy alternative to takeout without sacrificing flavor. Are you ready to transform your dinner routine with this stunning summer classic?

Why is Pasta Pomodoro a Summer Favorite?

Quick and Easy: In just 30 minutes, you can create a vibrant dish that celebrates the essence of summer.

Fresh Ingredients: Bursting with juicy cherry tomatoes and fragrant basil, this recipe shines with seasonal produce.

Family-Friendly: Perfect for busy weeknights, it’s a meal everyone will love without the fuss of complicated cooking.

Versatile Options: Feel free to get creative; add grilled chicken for a protein boost or sautéed veggies for extra nutrition!

Healthy Comfort Food: With minimal ingredients, you can enjoy a wholesome meal that's satisfying without the guilt. Discover more delightful variations like Cauliflower Pasta Ready for a low-carb twist or explore how to elevate your dish with Seafood Pasta Savory.

Pasta Pomodoro Ingredients

• Get ready to savor the flavors!

For the Pasta

  • Spaghetti or Bucatini – The foundation of this dish; feel free to swap in gluten-free pasta for dietary needs.

For the Sauce

  • Extra Virgin Olive Oil – Infuses richness and depth; don’t skimp on quality for the best flavor experience.
  • Garlic (4 cloves, minced) – The aromatic hero of Italian cuisine; ensure it's fresh for maximum impact.
  • Cherry Tomatoes (2 pints, halved) – The star of the show; juicy and vibrant, they bring summer to your plate—especially when using heirloom varieties.
  • Kosher Salt (½ teaspoon, plus more to taste) – A flavor enhancer; adjust to suit your palate.
  • Freshly Ground Black Pepper – Adds a touch of spice; omit if you prefer milder flavors.
  • Fresh Basil (10 large leaves, roughly chopped) – A fragrant addition to brighten the dish; parsley or spinach works in a pinch if you’re out of basil.
  • Parmigiano Reggiano Cheese – For serving, it delivers that savory punch; skip it for a vegan version.

For Garnish

  • Small Basil Leaves – These little guys give a gorgeous finish that elevates the presentation!

This Pasta Pomodoro is ready to transform your summer dinners into unforgettable culinary experiences!

Step‑by‑Step Instructions for Pasta Pomodoro

Step 1: Boil the Pasta Water
Start by bringing a large pot of salted water to a boil over high heat. Aim for a generous handful of salt in the water, which enhances the pasta's flavor. Once bubbling vigorously, this is your cue to add either spaghetti or bucatini, which will serve as the base for your delicious Pasta Pomodoro.

Step 2: Prepare the Fresh Ingredients
While waiting for the water to boil, take this time to mince the four cloves of garlic and halve the cherry tomatoes. Set the minced garlic aside and measure out the cherry tomatoes. The vibrant colors and freshness of these ingredients are essential for a beautifully bright Pasta Pomodoro, perfect for summer.

Step 3: Cook the Pasta
Once the water is boiling, add the pasta and cook according to the package instructions until al dente—usually around 8-10 minutes. You’ll know it’s ready when it's tender but still firm to the bite. Stir occasionally to prevent sticking, and keep an eye on the countdown to ensure perfect texture.

Step 4: Sauté the Garlic
While the pasta is cooking, heat 2 tablespoons of extra virgin olive oil in a skillet over medium-high heat. After about a minute, add the minced garlic, stirring for 10-15 seconds until fragrant but not browned. The sizzling garlic will create a wonderfully aromatic base for the sauce that will envelop your cooked pasta.

Step 5: Cook the Cherry Tomatoes
Next, add the halved cherry tomatoes to the skillet with the sautéed garlic, seasoning them with ½ teaspoon of kosher salt and freshly ground black pepper. Continue cooking for about 6-8 minutes, gently stirring until the tomatoes burst and create a juicy, chunky sauce. The colors will deepen, releasing a mouthwatering smell that invites everyone to the kitchen.

Step 6: Reserve Pasta Water and Drain
Once the pasta is perfectly cooked, reserve about 1 cup of the pasta water in a measuring cup, then drain the rest in a colander. This reserved water is valuable for adjusting the sauce’s consistency later and helps to create the glossy finish characteristic of a satisfying Pasta Pomodoro.

Step 7: Blend the Sauce
For a slightly chunkier sauce, use an immersion blender directly in the skillet to blend the tomatoes and garlic mixture briefly. Blend just enough to break down the larger pieces of tomato while maintaining some texture. Alternatively, you can use a standard blender—just be cautious not to over-blend and lose that rustic charm.

Step 8: Combine Pasta with Sauce
Add the drained pasta directly into the skillet with the chunky sauce, embracing each strand of pasta. Stir well to coat everything evenly, adding reserved pasta water as needed to achieve your desired sauce consistency. The glossy finish of your Pasta Pomodoro should cling beautifully to the pasta, merging flavors perfectly.

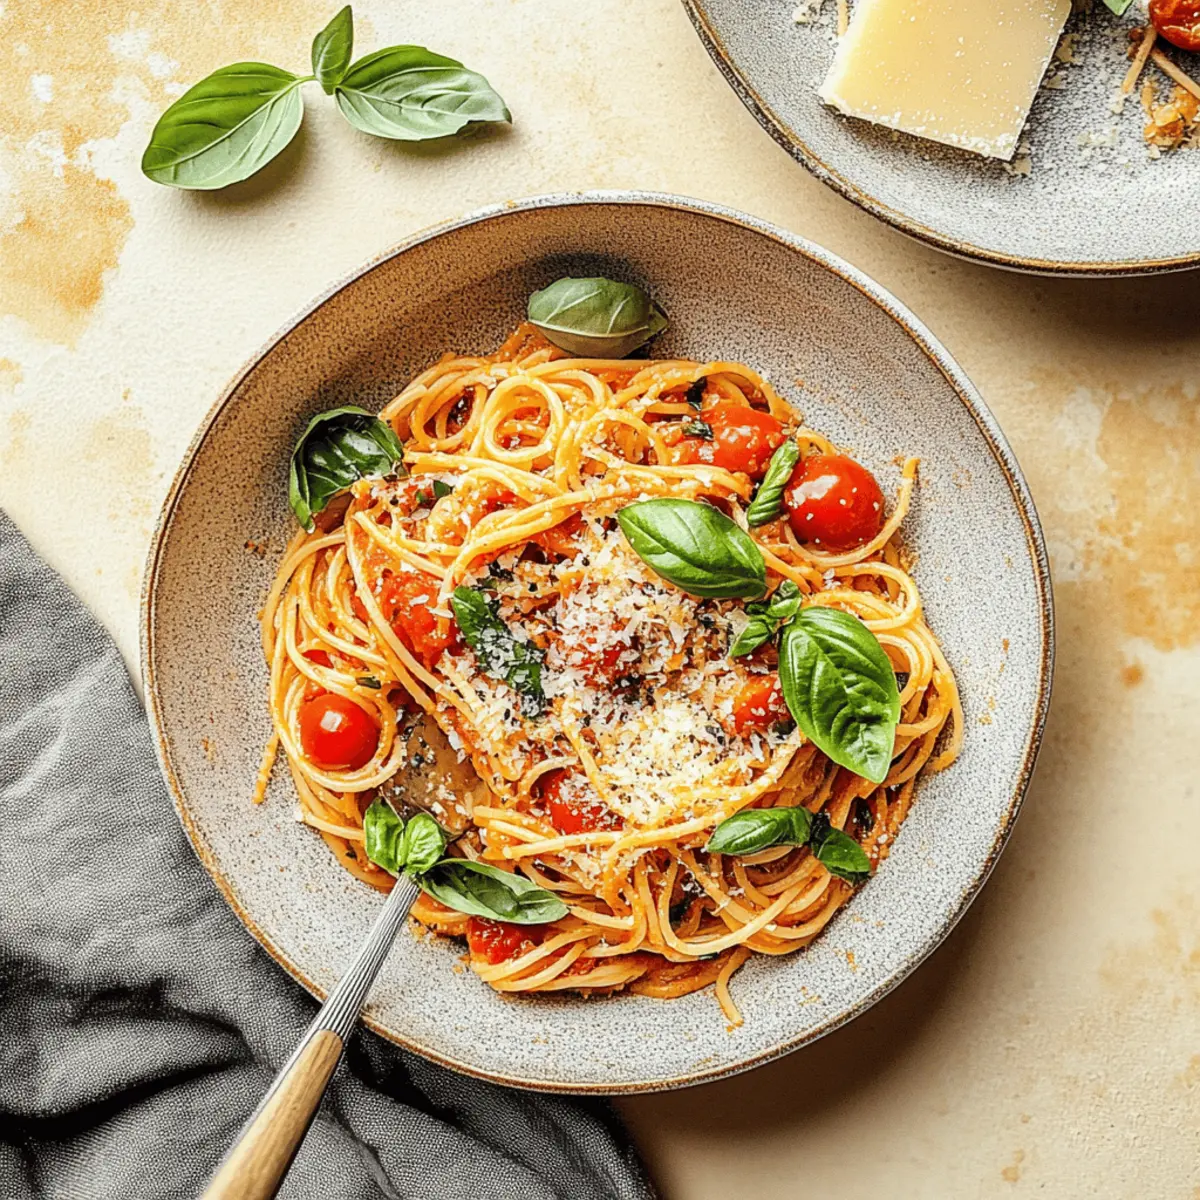
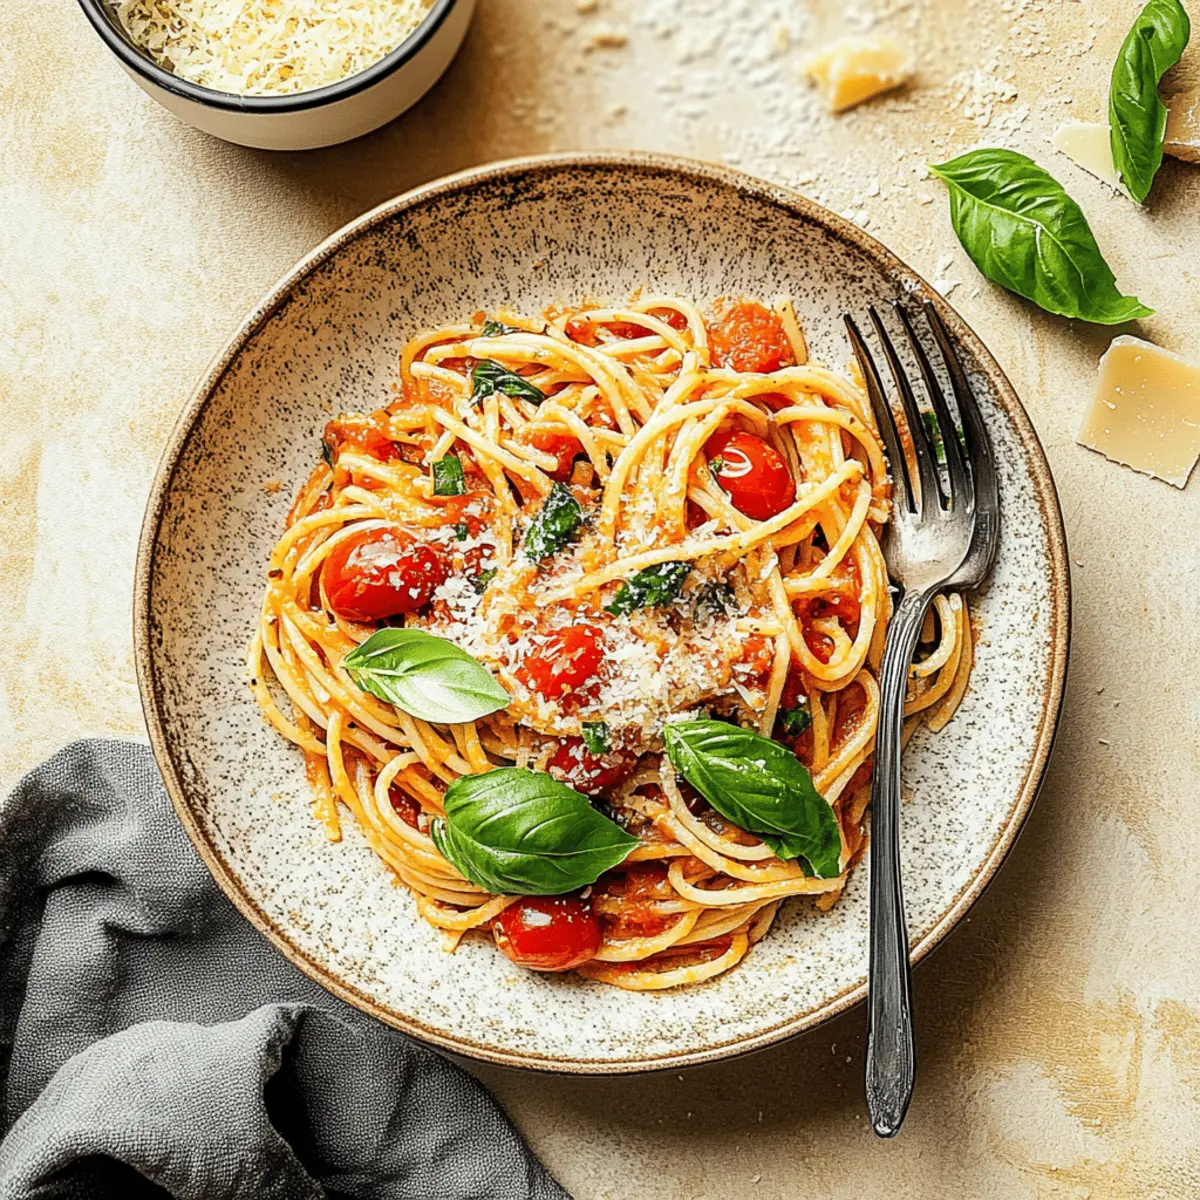
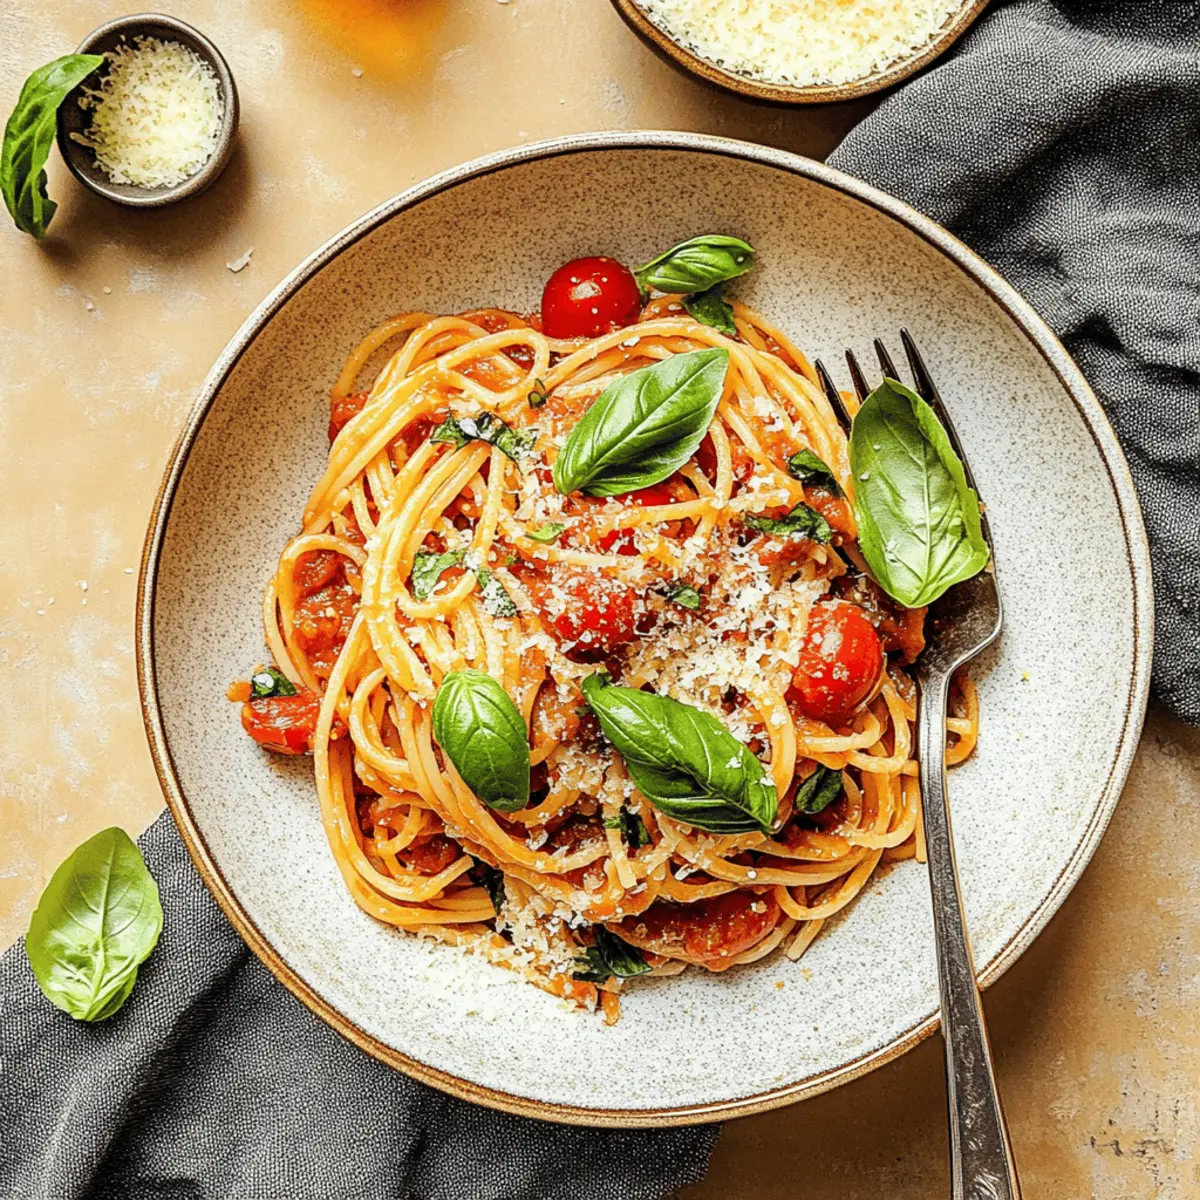
Step 9: Serve with Fresh Garnishes
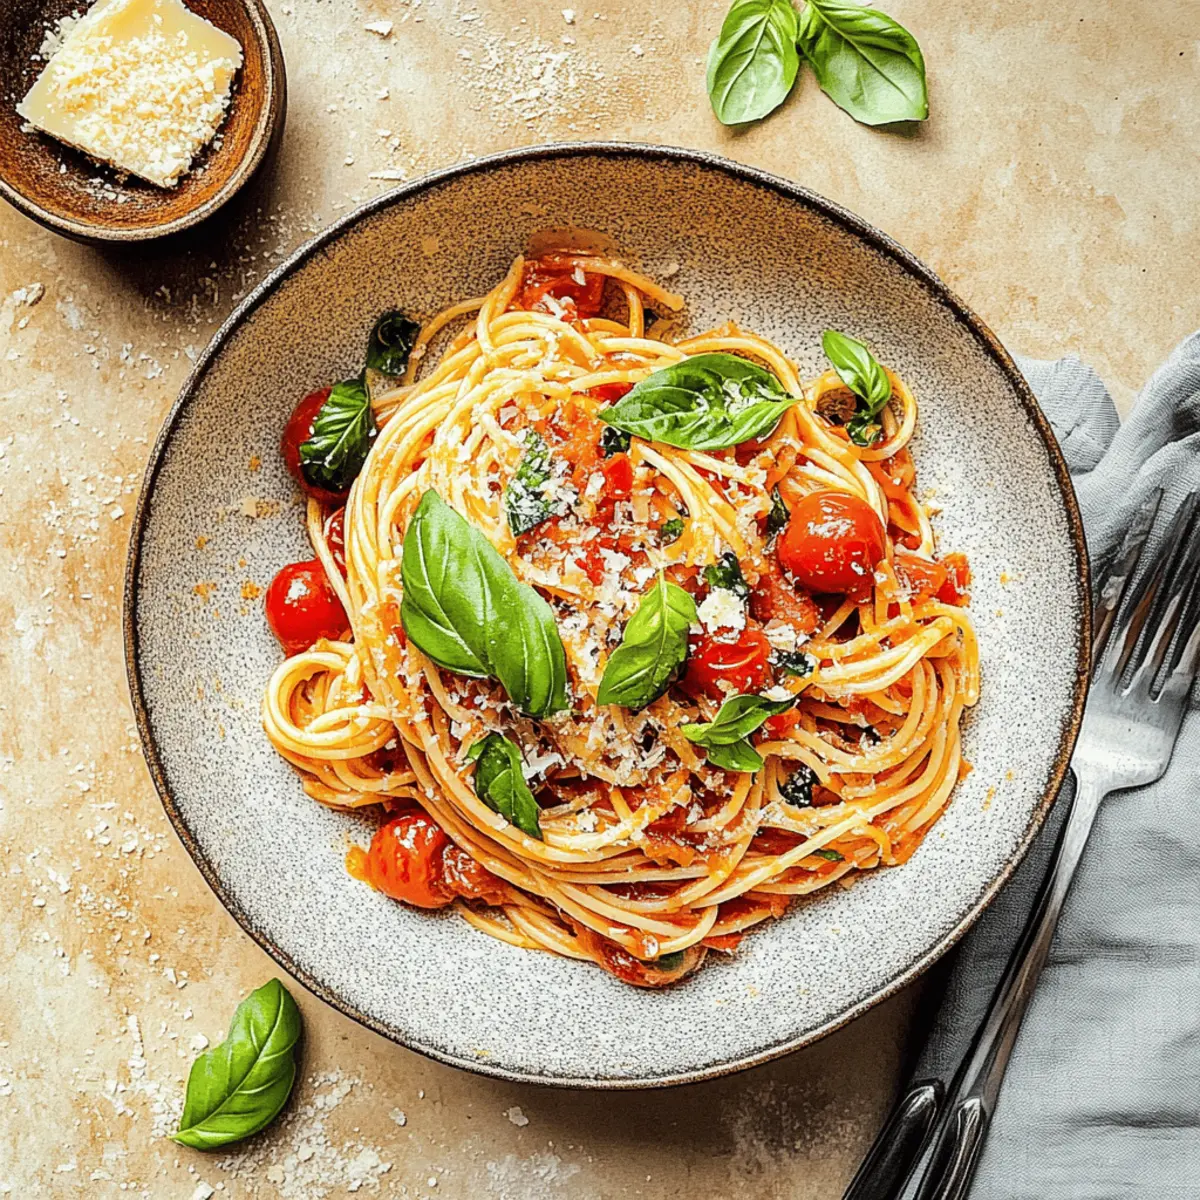
Plate your vibrant Pasta Pomodoro while it’s still hot, and finish with freshly grated Parmigiano Reggiano cheese and a sprinkle of small basil leaves for garnish. The final presentation brings a delightful touch to your dish, inviting your family to dive right in and enjoy this comforting summer meal.

Pasta Pomodoro Variations & Substitutions

Feel free to get creative and customize your Pasta Pomodoro – every twist brings its own delightful charm!

  • Gluten-Free: Use gluten-free spaghetti or bucatini to cater to dietary needs without compromising taste.

  • Spicy Kick: Add a sprinkle of red chili flakes for a lovely kick of heat that balances the sweetness of the tomatoes.

  • Extra Veggies: Incorporate sautéed zucchini or spinach to boost nutrition and add vibrant colors to your dish.

  • Cheesy Twist: Swap Parmigiano Reggiano with a mix of mozzarella and provolone for a melty, gooey experience that everyone loves.

  • Protein-Packed: Toss in cooked grilled chicken or Italian sausage for a hearty addition that makes the meal even more filling.

  • Roasted Alternatives: Substitute cherry tomatoes with roasted bell peppers or even sun-dried tomatoes for a rich, deep flavor.

  • Herb Infusion: Mix in fresh thyme or oregano alongside basil, creating an aromatic herby fusion that elevates each bite.

  • Vegan Delight: Omit cheese and opt for nutritional yeast for a cheesy flavor that’s completely plant-based!

Explore endless possibilities with variations like Cauliflower Pasta Ready for a lighter twist or mix it up with some Seafood Pasta Savory. Your dinner plate is your canvas!

Expert Tips for Perfect Pasta Pomodoro

  • Use Ripe Tomatoes: Selecting vine-ripened cherry tomatoes enhances the overall flavor of your Pasta Pomodoro and ensures a juicy sauce.

  • Don’t Over-Blend: When blending the sauce, avoid the temptation to make it too smooth; a chunky texture adds character and retains the lovely tomato pieces.

  • Adjust with Pasta Water: If your sauce is too thick, gradually mix in the reserved pasta water to achieve that glossy, clingy consistency that makes every bite delightful.

  • Fresh Ingredients Matter: Always opt for fresh garlic and basil; their vibrant flavors are the heart of this dish, elevating your simple Pasta Pomodoro to a whole new level.

  • Serve Immediately: For the best experience, serve your dish right after combining the pasta and sauce; it ensures the flavors are at their peak and the pasta is perfectly sauced.

  • Customize for Variety: Feel free to add other ingredients like grilled chicken or chili flakes to suit your family's preferences and make the recipe your own!

What to Serve with 30-Minute Fresh and Easy Pasta Pomodoro

Nothing elevates a meal quite like the perfect pairings that complement its vibrant flavors and textures.

  • Garlic Bread: This classic side provides a crunchy texture that contrasts beautifully with the saucy pasta, each bite filled with savory goodness.
  • Caprese Salad: Fresh mozzarella, ripe tomatoes, and basil reflect the flavors of your dish while adding a refreshing, juicy element to the meal.
  • Grilled Vegetables: Grilled zucchini and bell peppers introduce a smoky depth that enhances the fresh, light flavors of the Pasta Pomodoro. They also add a nutritious crunch!
  • Lemon-infused Olive Oil: Drizzling lemon-infused olive oil over your pasta brings a zesty brightness, complementing the rich tomato sauce beautifully.
  • Italian White Wine: A chilled Pinot Grigio offers crisp acidity, balancing the dish's sweetness and enhancing its summer vibes.
  • Tiramisu: Finish off your meal with this iconic coffee-flavored dessert, its creamy texture and rich flavors providing a lovely contrast to your light pasta dish.

Make Ahead Options

These Pasta Pomodoro preparations are perfect for busy home cooks looking to save time during the week. You can chop the garlic and halve the cherry tomatoes up to 24 hours in advance—store them in separate airtight containers in the refrigerator to maintain their freshness. You can also cook the pasta and let it cool before refrigerating it for up to 3 days. When you're ready to serve, simply reheat the pasta with the prepared sauce on the stovetop, adding reserved pasta water as needed for texture. This way, you can enjoy a delicious homemade meal, just as fresh and flavorful, without the last-minute rush!

How to Store and Freeze Pasta Pomodoro

Fridge: Store leftover Pasta Pomodoro in an airtight container for up to 4-5 days. This ensures the flavors remain fresh and the tomatoes stay juicy.

Freezer: Freeze the pasta without sauce for up to 3 months. Cool completely before transferring to a freezer-safe container. When ready to enjoy, thaw in the fridge overnight.

Reheating: For best results, gently reheat the stored Pasta Pomodoro on the stovetop with a splash of water or additional olive oil, stirring until heated through.

Tip: Always store ingredients separately whenever possible to maintain freshness, especially if you plan to freeze them.

Pasta Pomodoro Recipe FAQs

What type of tomatoes are best for Pasta Pomodoro?
Absolutely! For the best flavor, opt for ripe, vine-ripened cherry tomatoes. These are usually sweeter and juicier, elevating your sauce to new heights. If you can find heirloom varieties, they're a fantastic choice as well, adding color and sweetness!

How should I store leftover Pasta Pomodoro?
Store your leftover Pasta Pomodoro in an airtight container in the refrigerator for up to 4-5 days. Make sure it's cooled down before sealing it up. When ready to enjoy, simply reheat it on the stovetop with a splash of water or olive oil to keep it saucy!

Can I freeze Pasta Pomodoro?
Yes, you can freeze Pasta Pomodoro, but I recommend freezing the pasta and sauce separately. Cool the sauce completely and transfer it to a freezer-safe container for up to 3 months. When you're ready to enjoy, thaw it overnight in the fridge, then reheat gently on the stovetop.

What if my pasta is too sticky?
Very understandable! If your pasta sticks together, it might be due to overcooking or lack of enough water. To troubleshoot, ensure you're cooking it in a large pot of boiling, salted water while stirring occasionally. If you find it sticky after cooking, adding a bit of olive oil while tossing the pasta can help separate the strands!

Is Pasta Pomodoro suitable for gluten-free diets?
Absolutely! You can easily make this dish gluten-free by using gluten-free spaghetti or bucatini. Many brands offer delicious options that maintain the integrity of the dish while catering to various dietary needs. Enjoy every last bite without worry!

Pasta Pomodoro

Bright and Fresh Pasta Pomodoro in 30 Minutes Flat

A delicious Pasta Pomodoro recipe highlighting fresh ingredients, ready in 30 minutes, perfect for summer dinners.
Print Recipe Pin Recipe
Prep Time 10 minutes mins
Cook Time 20 minutes mins
Total Time 30 minutes mins
Servings: 4 servings
Course: Dinner
Cuisine: Italian
Calories: 350
Ingredients Equipment Method Nutrition Notes

Ingredients
  

For the Pasta
  • 12 ounces Spaghetti or Bucatini use gluten-free pasta if needed
For the Sauce
  • 2 tablespoons Extra Virgin Olive Oil use high quality
  • 4 cloves Garlic, minced fresh for best flavor
  • 2 pints Cherry Tomatoes, halved preferably heirloom varieties
  • ½ teaspoon Kosher Salt plus more to taste
  • Freshly Ground Black Pepper omit for milder flavor
  • 10 leaves Fresh Basil, roughly chopped can substitute parsley or spinach
  • Parmigiano Reggiano Cheese for serving, skip for vegan
For Garnish
  • Small Basil Leaves for a gorgeous presentation

Equipment

  • Large pot
  • Skillet
  • Measuring cup
  • Colander
  • Immersion blender

Method
 

Step‑by‑Step Instructions for Pasta Pomodoro
  1. Start by bringing a large pot of salted water to a boil over high heat.
  2. While waiting, mince four cloves of garlic and halve the cherry tomatoes.
  3. Once boiling, add the pasta and cook until al dente, usually around 8-10 minutes.
  4. Heat 2 tablespoons of olive oil in a skillet over medium-high heat. Add minced garlic and sauté for 10-15 seconds.
  5. Add the halved cherry tomatoes, ½ teaspoon of kosher salt, and black pepper; cook for 6-8 minutes until the tomatoes burst.
  6. Reserve about 1 cup of cooking water and drain the pasta.
  7. Blend the tomato and garlic mixture briefly for a chunkier sauce.
  8. Combine the drained pasta with the sauce, adding reserved pasta water for desired consistency.
  9. Plate while hot, topping with grated cheese and small basil leaves.

Nutrition

Serving: 1servingCalories: 350kcalCarbohydrates: 55gProtein: 12gFat: 10gSaturated Fat: 1.5gPolyunsaturated Fat: 1gMonounsaturated Fat: 8gCholesterol: 5mgSodium: 250mgPotassium: 400mgFiber: 3gSugar: 4gVitamin A: 5IUVitamin C: 25mgCalcium: 8mgIron: 10mg

Notes

For best results, use fresh ingredients and serve immediately after combining pasta and sauce.

Tried this recipe?

Let us know how it was!

Tomato Cucumber Avocado Salad: A Refreshing Summer Delight

September 14, 2025 by Grace Snow Leave a Comment

As I stood in my kitchen, the summer sun streaming through the window, I realized I needed a quick and refreshing dish to embrace the season. Enter the Tomato Cucumber Avocado Salad—a vibrant medley that not only dazzles the eyes but also delights the taste buds. This salad is your go-to for those hot days when you crave something light and satisfying without the fuss. With prep time clocking in at just 15 minutes and no cooking required, it’s perfect for lunch or as a colorful side at your next gathering. Imagine crisp cucumbers, juicy tomatoes, and creamy avocados all tossed in a zesty dressing—what's not to love? Are you ready to create a dish that captures the essence of summer? Let’s dive in!

Why is this salad so refreshing?

Fresh ingredients are the heartbeat of this dish, combining crunchy cucumbers, juicy tomatoes, and creamy avocados for a delightful flavor explosion. Quick and easy, this Tomato Cucumber Avocado Salad comes together in just 15 minutes—perfect for busy summer days. Versatile as it is vibrant, serve it as a standalone meal, a side to grilled chicken, or alongside dishes like Tofu Caesar Salad for a satisfying spread. Crowd-pleasing and gluten-free, this salad will appeal to everyone at your table and will have them coming back for seconds. With its bright colors and fresh taste, it's a dish you'll adore making all summer long!

Tomato Cucumber Avocado Salad Ingredients

For the Dressing
• Extra Virgin Olive Oil – Provides richness and flavor; essential for the dressing. Substitution: Any neutral oil can be used, but olive oil adds distinct taste.
• Fresh Lemon Juice – Adds acidity and brightness; enhances the freshness of the vegetables. Substitution: Red wine vinegar can be used.
• Garlic (1 clove, grated) – Adds depth of flavor; be careful not to overpower the dish.

For the Salad
• Avocados (1 to 2, diced) – Brings creaminess and healthy fats; choose ripe but firm avocados for best results.
• Persian Cucumbers (3 to 4, halved and sliced) – Provide crunch; preferred for their lower water content. Substitution: Regular cucumbers (peeled and seeded) or English cucumbers can be used.
• Cherry Tomatoes (2 pints, halved) – Sweetness and juiciness give color and balance. Choose vibrant red or yellow tomatoes.
• Red Onion (½ medium, thinly sliced) – Adds sharpness; use sparingly. Alternate: Green onions can offer a milder taste.
• Kosher Salt (¼ teaspoon, plus more to taste) – Enhances all flavors of the salad.
• Black Pepper (freshly ground) – Provides slight heat; adjust to your preference.
• Feta Cheese (4 to 6 ounces, cubed) – Adds salty flavor and creaminess to the salad. Substitution: Use dairy-free cheese or omit for a vegan version.
• Fresh Herbs (¼ cup, chopped parsley and/or basil) – Freshness and aromatic notes enhance the overall flavor profile.
• Arugula (3 cups, optional) – A peppery green that can serve as a base; also works well with orzo or grilled chicken.

Step‑by‑Step Instructions for Tomato Cucumber Avocado Salad

Step 1: Whisk the Dressing
In a large mixing bowl, combine 3 tablespoons of extra virgin olive oil, the juice of one lemon, and 1 clove of grated garlic. Whisk these ingredients together for about 30 seconds, until emulsified and fragrant. The dressing should appear smooth and glossy, providing a flavorful base for your Tomato Cucumber Avocado Salad.

Step 2: Add the Main Ingredients
Next, gently fold in 1 to 2 diced avocados, halved cherry tomatoes from 2 pints, and 3 to 4 halved and sliced Persian cucumbers into the bowl. Carefully combine these vibrant ingredients for about 1 minute, ensuring that the avocados maintain their shape while the tomatoes and cucumbers lend color and texture to the salad.

Step 3: Season and Stir
Sprinkle in ¼ teaspoon of kosher salt and freshly ground black pepper to taste. Using a large spoon, gently stir to coat all the vegetables evenly with the dressing, allowing the flavors to meld together beautifully. This step should take about 1 minute, creating a colorful and well-seasoned Tomato Cucumber Avocado Salad.

Step 4: Final Touches with Cheese and Herbs
Before serving, fold in 4 to 6 ounces of cubed feta cheese and ¼ cup of chopped fresh herbs like parsley or basil. Toss lightly for an additional minute, allowing the feta to mingle with the veggies, adding a creamy, salty bite without crumbling too much.

Step 5: Plate Up and Serve
Serve your Tomato Cucumber Avocado Salad immediately over a bed of 3 cups of arugula, or enjoy it alone as a refreshing dish. This salad is best enjoyed right away, as the ingredients remain fresh and vibrant. If desired, personalize your serving with grilled chicken or a sprinkle of nuts for extra texture!

Expert Tips for Tomato Cucumber Avocado Salad

  • Use Ripe Avocados: Choose avocados that are ripe but firm to ensure creaminess without becoming mushy in your Tomato Cucumber Avocado Salad.

  • Fresh Ingredients Only: Opt for fresh vegetables and herbs to truly capture the vibrant flavors. Wilted or overripe produce can dull the taste.

  • Add Dressing Just Before Serving: To maintain crunch and freshness, dress the salad right before you serve it, preventing the cucumbers and tomatoes from getting soggy.

  • Taste and Adjust: Always taste the salad before serving. Adjust the seasoning with more salt or pepper based on your preference for a perfectly balanced dish.

  • Experiment with Variations: Feel free to mix things up! Add nuts or swap feta for goat cheese to create unique flavor profiles while keeping the salad light and refreshing.

Storage Tips for Tomato Cucumber Avocado Salad

  • Fridge: Store leftovers in an airtight container for up to 2-3 days. However, for the best taste, it's recommended to enjoy the Tomato Cucumber Avocado Salad fresh.

  • Prevent Browning: To keep avocados from browning, you can add a little extra lemon juice and store the salad right after preparation.

  • Reheating: This salad is best served cold and does not require reheating. Enjoy it straight from the fridge for a refreshing bite!

  • Freezer: Freezing is not recommended, as it can compromise the texture of the fresh ingredients, particularly the avocado and cucumber.

Make Ahead Options

These Tomato Cucumber Avocado Salad ingredients are perfect for meal prep, making your busy weeknights a breeze! You can chop the cucumbers, tomatoes, and onions up to 24 hours ahead; simply store them in an airtight container in the refrigerator to maintain their crunch. Avocados can be diced in advance, but to prevent browning, consider storing them whole until you're ready to serve. When it's time to enjoy your salad, mix the prepped veggies with the dressing, add in the diced avocados, feta cheese, and fresh herbs, and you'll have a refreshing, vibrant dish ready to impress in just minutes!

What to Serve with Tomato Cucumber Avocado Salad

This colorful salad is a delightful starter or side that pairs beautifully with a variety of dishes.

  • Grilled Chicken: The savory flavors of grilled chicken complement the freshness of the salad, making for a hearty meal.

  • Quinoa Pilaf: A light and fluffy quinoa pilaf enhances the texture contrast while adding nutty flavor to the spread.

  • Pita Bread: Soft and warm pita bread serves as a perfect vehicle for scooping up the vibrant salad, making it fun to eat.

  • Roasted Vegetables: The rich, caramelized taste of roasted vegetables adds depth to the meal, balancing the crispness of the salad.

  • Lemon Sorbet: A refreshing lemon sorbet serves as a palate cleanser, rounding off the meal with a touch of sweetness.

  • Chilled White Wine: A glass of chilled Sauvignon Blanc or Pinot Grigio pairs well, enhancing the dish’s bright, zesty flavors.

  • Shrimp Skewers: Grilled shrimp skewers provide a touch of gourmet elegance, enhancing the meal’s fresh and vibrant theme.

  • Corn on the Cob: Sweet grilled corn brings a delightful crunch and natural sweetness that pairs perfectly with the salad's flavors.

Tomato Cucumber Avocado Salad: Customization Options

Feel free to give your Tomato Cucumber Avocado Salad a personal twist, as there are endless ways to enjoy this vibrant dish!

  • Goat Cheese: Swap feta for goat cheese for a creamier and tangier flavor that pairs beautifully with fresh herbs.
  • Nuts & Seeds: Add walnuts or sunflower seeds for a satisfying crunch that complements the creamy avocado.
  • Grilled Veggies: Include grilled corn or zucchini for a smoky sweetness that elevates the salad's flavor.
  • Spice It Up: Toss in sliced jalapeños or a pinch of red pepper flakes to bring an exciting heat to your salad.
  • Herb Variations: Experiment with fresh dill or cilantro instead of parsley or basil for a different aromatic profile.
  • Chickpeas: Stir in canned chickpeas for added protein, turning this salad into a heartier meal option.
  • Citrus Zest: Add a sprinkle of lime or orange zest for an extra zing that brightens the salad beautifully.
  • Balsamic Drizzle: Finish with a balsamic reduction for a sweet and tangy kick that balances the dish perfectly.

Whether you're serving it alongside grilled chicken or pairing it with a light pasta like German Potato Salad, these variations invite creativity. Enjoy crafting your perfect summer salad!

Tomato Cucumber Avocado Salad Recipe FAQs

What type of tomatoes should I use for this salad?
I recommend using cherry tomatoes for their sweetness and juiciness, which balance beautifully with the creaminess of the avocado and crunch of the cucumber. Opt for vibrant red or yellow tomatoes to ensure maximum flavor and visual appeal.

How should I store leftover Tomato Cucumber Avocado Salad?
Store any leftovers in an airtight container in the refrigerator for up to 2-3 days. To maintain freshness, try to add a little extra lemon juice before sealing it, which also helps slow down browning in the avocados. Always give it a quick stir before serving!

Can I freeze this salad?
Freezing is not recommended for Tomato Cucumber Avocado Salad as it can severely affect the texture of the fresh ingredients, especially the avocado and cucumber. It's best enjoyed fresh, so aim to make just what you need for one meal or gathering!

What if my avocados aren’t ripe enough?
If your avocados are not yet ripe, place them in a paper bag at room temperature for a day or two to speed up the ripening process. Check daily by gently squeezing them; they should give a little when ready to eat. Just make sure to use them when they're ripe but still firm to avoid them getting too mushy.

Is this salad suitable for people with dietary restrictions?
Absolutely! This Tomato Cucumber Avocado Salad is naturally gluten-free and vegetarian. If dairy is a concern, you can easily omit the feta cheese or swap it for a dairy-free alternative. Make sure to always check for any allergies with the ingredients, such as nuts if you're adding them for crunch!

Tomato Cucumber Avocado Salad

Tomato Cucumber Avocado Salad: A Refreshing Summer Delight

A quick and refreshing Tomato Cucumber Avocado Salad that combines vibrant flavors and is perfect for summer gatherings.
Print Recipe Pin Recipe
Prep Time 15 minutes mins
Total Time 15 minutes mins
Servings: 4 servings
Course: Salads
Calories: 220
Ingredients Equipment Method Nutrition Notes

Ingredients
  

For the Dressing
  • 3 tablespoons Extra Virgin Olive Oil Provides richness and flavor
  • 1 medium Fresh Lemon Juice Adds acidity and brightness
  • 1 clove Garlic, grated Adds depth of flavor
For the Salad
  • 1 to 2 pieces Avocados, diced Choose ripe but firm avocados
  • 3 to 4 pieces Persian Cucumbers, halved and sliced Preferred for their lower water content
  • 2 pints Cherry Tomatoes, halved Choose vibrant red or yellow tomatoes
  • ½ medium Red Onion, thinly sliced Use sparingly
  • ¼ teaspoon Kosher Salt Enhances all flavors of the salad
  • Black Pepper, freshly ground Adjust to your preference
  • 4 to 6 ounces Feta Cheese, cubed Adds salty flavor and creaminess
  • ¼ cup Fresh Herbs, chopped parsley and/or basil Enhances the overall flavor profile
  • 3 cups Arugula, optional A peppery green that can serve as a base

Equipment

  • Mixing Bowl

Method
 

Step-by-Step Instructions for Tomato Cucumber Avocado Salad
  1. In a large mixing bowl, combine 3 tablespoons of extra virgin olive oil, the juice of one lemon, and 1 clove of grated garlic. Whisk these ingredients together for about 30 seconds, until emulsified and fragrant.
  2. Next, gently fold in 1 to 2 diced avocados, halved cherry tomatoes from 2 pints, and 3 to 4 halved and sliced Persian cucumbers into the bowl.
  3. Sprinkle in ¼ teaspoon of kosher salt and freshly ground black pepper to taste. Gently stir to coat all the vegetables evenly.
  4. Before serving, fold in 4 to 6 ounces of cubed feta cheese and ¼ cup of chopped fresh herbs like parsley or basil.
  5. Serve your Tomato Cucumber Avocado Salad immediately over a bed of 3 cups of arugula, or enjoy it alone as a refreshing dish.

Nutrition

Serving: 1servingCalories: 220kcalCarbohydrates: 14gProtein: 4gFat: 18gSaturated Fat: 3gPolyunsaturated Fat: 1gMonounsaturated Fat: 12gCholesterol: 10mgSodium: 250mgPotassium: 500mgFiber: 5gSugar: 3gVitamin A: 300IUVitamin C: 25mgCalcium: 80mgIron: 1mg

Notes

Best enjoyed fresh, can add grilled chicken or nuts for extra texture. Dress just before serving to maintain crunch.

Tried this recipe?

Let us know how it was!

Refreshing Jalapeño Watermelon Margaritas for Summer Vibes

September 14, 2025 by Grace Snow Leave a Comment

As the sun sets and the air warms up, nothing screams summer quite like a vibrant cocktail in hand. When I first paired sweet watermelon with a zingy jalapeño, I knew I had stumbled upon a game-changer: Jalapeño Watermelon Margaritas. This refreshing drink beautifully balances the natural sweetness of fresh watermelon juice with a kick of heat from jalapeños, making it the perfect companion for long, lazy afternoons or lively gatherings with friends. Plus, it’s easy to whip up—whether you’re making a small batch or a pitcher to share. Not only does this cocktail bring a fun twist to traditional margaritas, but it’s also a gluten-free option that keeps the summer vibes flowing. Are you ready to dive into this delightful fusion of flavors? Let’s get mixing!

Why Will You Love These Margaritas?

Refreshing: This drink combines the best of summer with its juicy watermelon base and spicy jalapeño kick, making each sip a delight.

Versatile: Tailor the heat level to your taste by adjusting the jalapeño slices, or switch it up with different fruits like strawberries for a unique spin.

Quick and Easy: With simple ingredients and straightforward steps, you can shake these up in minutes—ready for impromptu gatherings or a cozy night at home.

Perfect for Sharing: Scale this recipe effortlessly from a small batch to a pitcher, allowing you to easily serve friends and family at BBQs or summer parties.

Guilt-Free: This cocktail is not just delicious but also gluten-free, offering a lighter, healthier drink option compared to many sugary alternatives.

Jalapeño Watermelon Margaritas Ingredients

Ready to mix up something delightful? Let's gather our ingredients!

For the Margarita

  • Silver Tequila – Base spirit providing the alcoholic content; substitute with Blanco tequila or mezcal for a smoky flavor.
  • Freshly Squeezed Lime Juice – Adds tartness, balancing the watermelon’s sweetness; fresh is preferred, but bottled can work in a pinch.
  • Fresh Watermelon Juice – The primary flavoring component that brings sweetness and vibrant color; store-bought juice can be used if fresh isn’t available.
  • Jalapeño Slices – Infuses a spicy flavor; adjust the amount based on your desired heat level, or substitute with milder peppers if preferred.
  • Agave Nectar – Provides a touch of sweetness that enhances the overall flavor without overpowering; honey or simple syrup are good alternatives.
  • Ice – Essential for shaking and serving, always use fresh ice for the best experience.
  • Coarsely Ground Sea Salt – Used for rimming the glass, it enhances the cocktail's flavor; Tajín can be used for a spicy kick.

Get ready to savor the summertime bliss with these delicious Jalapeño Watermelon Margaritas!

Step‑by‑Step Instructions for Jalapeño Watermelon Margaritas

Step 1: Prepare the Glass
Start by rimming your glass with coarsely ground sea salt for added flavor. Wet the rim by gently rubbing a lime wedge around the edge, ensuring it's thoroughly moistened. Next, dip the rim into the salt until fully coated. Set the glass aside for now, allowing the salt to adhere as you prepare your Jalapeño Watermelon Margarita.

Step 2: Fill the Shaker with Ice
Grab your cocktail shaker and fill it to the top with fresh ice cubes. This step is vital for chilling your margarita and achieving that refreshing taste. The ice should be firm and not melting, ensuring it doesn’t dilute the drink. Once your shaker is filled, it’s time to add the flavorful ingredients that will make this cocktail shine.

Step 3: Add the Ingredients
Into the shaker filled with ice, pour in 2 ounces of silver tequila, followed by 1 ounce of freshly squeezed lime juice to bring in that zesty kick. Next, add 4 ounces of freshly made watermelon juice, which is the star of the Jalapeño Watermelon Margaritas. For a spicy edge, add 2 or 3 jalapeño slices, adjusting to your heat preference, and finish with a touch of agave nectar to sweeten things up.

Step 4: Shake Vigorously
Secure the lid on your cocktail shaker tightly, ensuring it’s sealed properly to prevent any spills. Shake vigorously for about 15-30 seconds. You want to feel the coldness radiating from the shaker and hear the ice clinking as the ingredients mix. The result should be a beautifully blended, chilled mixture with a vibrant pink hue—the essence of summer in a cocktail.

Step 5: Strain and Serve
Now it’s time to pour your refreshing Jalapeño Watermelon Margarita! Remove the lid from the shaker and, using a strainer, carefully pour the mixture into your prepared glass over fresh ice. This step keeps the jalapeño slices behind, ensuring a smooth drink. To garnish, add a cute wedge of watermelon and, if you dare, a couple of additional jalapeño slices for an extra pop of color and spice.

Step 6: Enjoy Responsibly
Your Jalapeño Watermelon Margaritas are ready to be enjoyed! Serve immediately to relish their fresh flavors. Take a moment to appreciate the lovely rosy color and inviting aroma before diving in. This cocktail is perfect for summer gatherings, lazy afternoons, or simply a delightful treat for yourself—sip, savor, and enjoy!

What to Serve with Spicy Jalapeño Watermelon Margaritas

Elevate your cocktail experience with delightful pairings that complement the vibrant flavors of your margaritas.

  • Grilled Shrimp Tacos: The fresh and spicy shrimp elevate the flavor, echoing the jalapeño while balancing the sweetness of watermelon. Perfect for a summer feast!

  • Avocado Salsa: Creamy and zesty, this salsa adds a refreshing element that enhances both the margaritas and any tortilla chips served alongside.

  • Tortilla Chips with Queso: The crunchy chips and warm, gooey cheese create a mouthwatering contrast to the light, refreshing drink, making it an irresistible pairing.

  • Spicy Cilantro Lime Rice: With its zesty flavor profile and fragrant herbs, this rice dish complements the margarita's burst of sweetness while harmonizing the overall meal.

  • Stuffed Mini Peppers: Sweet mini peppers stuffed with cream cheese or spicy sausage echo the drink's sweet-spicy combo, making for an exciting appetizer.

  • Mango Sorbet: For a refreshing dessert, this fruity sorbet becomes a delightful and cooling counterpart to your spicy cocktail.

  • Lightly Grilled Corn on the Cob: The buttery sweetness of grilled corn bursts with summer flavor, pairing beautifully with the tangy and spicy notes of the margarita.

  • Sparkling Water or Lemonade: Stay refreshed with a non-alcoholic option; both drinks will cleanse the palate and balance the cocktail's vibrant flavor profile.

Expert Tips for Jalapeño Watermelon Margaritas

  • Adjust the Heat: Start with fewer jalapeño slices to gauge the spiciness and increase gradually based on your preference for Jalapeño Watermelon Margaritas.

  • Use Fresh Ingredients: Opt for freshly squeezed lime juice and homemade watermelon juice for maximum flavor. Bottled versions may lack the vibrant taste you desire.

  • Sealing the Shaker: Ensure the cocktail shaker is tightly sealed before shaking to prevent leaks. A good seal will give you a well-mixed margarita without mess.

  • Creating a Frozen Version: Blend all your ingredients with ice instead of shaking for a refreshing frozen margarita perfect for hot summer days.

  • Experiment with Garnishes: Enhance your presentation with fun garnishes such as mint leaves or additional jalapeño slices for that extra touch of flair and flavor.

Make Ahead Options

These Jalapeño Watermelon Margaritas are ideal for busy cooks looking to save time without sacrificing flavor! You can prep the watermelon juice up to 3 days in advance; simply juice fresh watermelon, strain it, and refrigerate in an airtight container to maintain its vibrant taste and prevent oxidation. Likewise, slice the jalapeños and store them in a separate container for up to 24 hours. When it’s time to serve, just shake the prepped ingredients together with tequila, lime juice, and agave nectar, then strain into your salted rim glass over ice. With these make-ahead tips, you’ll enjoy delicious cocktails with minimal effort when it’s time to unwind!

How to Store and Freeze Jalapeño Watermelon Margaritas

Fridge: Store any leftover Jalapeño Watermelon Margaritas in an airtight container for up to 2 days. Just give it a quick shake before serving again.

Freezer: For a long-term option, pour the margaritas into ice cube trays and freeze. Once solid, transfer to a freezer bag for easy blending later—perfect for frozen drinks!

Make Ahead: Prepare the watermelon juice ahead of time and keep it in the fridge for up to 2 days for a quick cocktail whenever the mood strikes.

Reheating: Since this cocktail is best served cold, simply blend or shake any frozen cubes with fresh ice when you're ready to enjoy.

Jalapeño Watermelon Margaritas: Customization Options

Don't be afraid to get creative with your margaritas! Explore these delightful variations to craft a drink that's uniquely yours.

  • Frozen Delight: Blend ingredients with ice until smooth for a cool, slushy version that’s perfect for hot summer days.

  • Herbal Infusion: Add fresh mint or basil to the shaker for an aromatic twist that elevates your margarita’s flavor profile.

  • Fruit Swap: Replace watermelon with juicy strawberries or peaches for a refreshing twist. Each option brings its own sweetness that pairs wonderfully with jalapeño.

  • Sweet and Spicy: Spice things up with a splash of jalapeño-infused vodka for an extra kick of heat that enhances the cocktail's complexity.

  • Citrus Burst: Add a splash of orange or grapefruit juice along with lime for a vibrant citrus explosion that brightens each sip.

  • Low-Sugar Option: Use a sugar-free sweetener in place of agave nectar to cut down on the sweetness while keeping the refreshing flavor intact.

  • Pitcher Perfect: Scale up your recipe to serve a crowd! Prepare a pitcher by multiplying the ingredients to keep the good times flowing effortlessly.

Feel free to visit Watermelon Popsicles Blissful for a refreshing treat that pairs wonderfully with your margaritas! The fun of customizing doesn’t have to stop here—there's always room for a delicious twist!

Jalapeño Watermelon Margaritas Recipe FAQs

How do I choose ripe watermelon for my margaritas?
When selecting a watermelon, look for one that feels heavy for its size, which indicates juiciness. The skin should be firm, with a uniform green color. Avoid watermelons with dark spots or dents, as these can signal overripeness or damage. A well-placed yellow spot where it rested on the ground indicates ripeness.

How should I store leftover Jalapeño Watermelon Margaritas?
Any leftover margaritas can be stored in an airtight container in the refrigerator for up to 2 days. Make sure to give it a gentle shake or stir before serving to mix the ingredients again. For best results, it's ideal to consume them fresh, as the flavors are most vibrant right after mixing.

Can I freeze Jalapeño Watermelon Margaritas?
Absolutely! To freeze your margaritas, pour the mixture into ice cube trays and freeze until solid. Once frozen, transfer the cubes to a freezer bag. When you're ready for a refreshing drink, blend a handful of these frozen cubes with a splash of fresh juice to recreate that tantalizing flavor.

What if my margaritas are too spicy?
If you've accidentally used too many jalapeño slices, don't worry! You can balance the heat by adding more watermelon juice or a splash of soda water to dilute the spice. Another option is to add a little extra agave nectar to enhance sweetness without overwhelming the drink.

Are Jalapeño Watermelon Margaritas safe for pets?
While the watermelon itself is safe for most pets, it's best to avoid sharing the margaritas with them due to the alcohol and jalapeños, which can be harmful. Always keep cocktail ingredients away from your furry friends to ensure their safety.

Can I make these margaritas in advance?
Certainly! You can prepare the watermelon juice ahead of time and store it in the refrigerator for up to 2 days. This way, you can whip up a batch of Jalapeño Watermelon Margaritas on demand with utmost ease. Just remember, the fresh flavors shine brightest when served shortly after mixing!

Jalapeño Watermelon Margaritas

Refreshing Jalapeño Watermelon Margaritas for Summer Vibes

This Jalapeño Watermelon Margaritas recipe perfectly balances sweet watermelon with a spicy kick, ideal for summer fun.
Print Recipe Pin Recipe
Prep Time 10 minutes mins
Total Time 10 minutes mins
Servings: 2 cocktails
Course: Drinks
Cuisine: Mexican
Calories: 180
Ingredients Equipment Method Nutrition Notes

Ingredients
  

For the Margarita
  • 2 ounces Silver Tequila Blanco tequila or mezcal can be substituted for a smoky flavor.
  • 1 ounce Freshly Squeezed Lime Juice Fresh is preferred, but bottled can work in a pinch.
  • 4 ounces Fresh Watermelon Juice Store-bought juice can be used if fresh isn’t available.
  • 2-3 slices Jalapeño Slices Adjust amount based on your desired heat level.
  • 1 tablespoon Agave Nectar Honey or simple syrup can be used as alternatives.
  • ice Ice Always use fresh ice for the best experience.
  • Coarsely Ground Sea Salt Used for rimming the glass.

Equipment

  • cocktail shaker
  • strainer
  • measuring jigger

Method
 

Step-by-Step Instructions
  1. Start by rimming your glass with coarsely ground sea salt. Wet the rim with a lime wedge and dip it in salt. Set aside.
  2. Fill your cocktail shaker with fresh ice cubes to the top.
  3. Pour 2 ounces of silver tequila, 1 ounce of freshly squeezed lime juice, 4 ounces of watermelon juice, 2-3 jalapeño slices, and 1 tablespoon of agave nectar into the shaker.
  4. Secure the lid on the shaker and shake vigorously for 15-30 seconds until well mixed.
  5. Strain the mixture into your prepared glass over fresh ice, leaving jalapeño slices behind. Garnish with a watermelon wedge and additional jalapeño slices if desired.
  6. Enjoy your refreshing Jalapeño Watermelon Margaritas immediately.

Nutrition

Serving: 1cocktailCalories: 180kcalCarbohydrates: 12gSodium: 5mgPotassium: 150mgSugar: 10gVitamin C: 20mgIron: 2mg

Notes

This cocktail is perfect for summer gatherings or a cozy treat for yourself.

Tried this recipe?

Let us know how it was!

Lemon Blueberry Zucchini Cake with Lemon Frosting Bliss

September 14, 2025 by Grace Snow Leave a Comment

As I stood in my kitchen, a burst of citrusy aroma filled the air, whisking me away to sunny summer days. That’s when I knew it was time to bake a Lemon Blueberry Zucchini Cake with Lemon Frosting. This delightful dessert not only brings vibrant flavors to your table, but it also cleverly incorporates healthy zucchini, making it a guilt-free indulgence. The best part? It requires just one bowl and one pan, so cleanup is a breeze! Whether you’re looking for a sweet ending to a meal or a wholesome afternoon treat, this gluten-free cake will surely impress family and friends alike. Ready to uncover the secrets of this irresistible summer classic? Let’s dive in!

Why is this cake a must-try?

Unforgettable flavor: Each bite of this Lemon Blueberry Zucchini Cake delivers a zesty punch of freshness, perfectly complemented by juicy blueberries.

Effortless preparation: With its one-bowl method, this recipe is ideal for busy bakers, allowing you to whip up a delightful dessert without the fuss.

Healthy indulgence: Incorporating zucchini not only adds moisture but also boosts the nutrient content, making this cake a guilt-free sweet treat.

Bake it your way: Feel free to experiment! Swap in different fruits or leave off the frosting for a lighter dessert option that caters to everyone's taste.

Perfect for sharing: This cake is perfect for gatherings, sure to impress your guests while being a hit with both kids and adults. So, if you’re looking for a refreshing twist, you might also want to try my Lemon Chicken Soup or even a simpler dessert like Chocolate Pudding Cake.

Lemon Blueberry Zucchini Cake Ingredients

For the Cake

  • Shredded Zucchini – Adds moisture and a nutritious boost; remember to squeeze out excess moisture before using.
  • Eggs – These bind the ingredients together and provide structure to the cake.
  • Honey – A natural sweetener that enhances moisture; maple syrup can be used as a substitute if desired.
  • Lemon Zest & Juice – Infuses the cake with a vibrant citrus flavor that elevates every bite.
  • Almond Extract – Contributes a subtle almond flavor; vanilla extract can replace it if needed.
  • Almond Flour – This is essential for a gluten-free texture and moisture; no direct substitutes are recommended due to its unique properties.
  • Gluten-Free Oat Flour – Helps create a tender crumb; it may be substituted with gluten-free all-purpose flour, though this hasn't been tested.
  • Baking Soda – Acts as a leavening agent to help the cake rise beautifully.
  • Salt – Enhances the overall flavor of the cake.
  • Fresh Blueberries – Bursting with sweetness and tartness; toss them in flour to help prevent sinking in the batter.

For the Frosting

  • Vegan Butter – Provides creaminess and richness; can be swapped for regular butter if you prefer.
  • Powdered Sugar – Sweetens the frosting; for extra citrus punch, add a splash more of lemon juice.

This Lemon Blueberry Zucchini Cake with Lemon Frosting combines delicious flavors with healthy ingredients, setting the stage for a delightful baking adventure!

Step‑by‑Step Instructions for Lemon Blueberry Zucchini Cake with Lemon Frosting

Step 1: Preheat the Oven
Start by preheating your oven to 350°F (175°C). While it heats, prepare an 8x8 inch baking pan by lining it with parchment paper and spraying it with non-stick spray, ensuring a seamless release when it’s time to enjoy your Lemon Blueberry Zucchini Cake.

Step 2: Prepare the Zucchini
Grate the zucchini, then place it in a clean kitchen towel or cheesecloth. Squeeze out excess moisture over the sink, so your batter is not too watery. This step is crucial to achieving a moist cake without compromising its texture.

Step 3: Mix the Wet Ingredients
In a large mixing bowl, whisk together the prepared zucchini, eggs, honey, lemon zest, lemon juice, and almond extract until everything is evenly combined. The mixture should have a smooth, cohesive look and a lovely citrus aroma that hints at the freshness in your Lemon Blueberry Zucchini Cake.

Step 4: Combine the Dry Ingredients
Add the almond flour, gluten-free oat flour, baking soda, and salt to the wet mixture. Gently fold in the dry ingredients until just combined, being careful not to overmix. You want a batter that is thick yet well-mixed, ready to hold all those delightful blueberries.

Step 5: Add Blueberries
Toss the fresh blueberries in a tablespoon of gluten-free oat flour to prevent them from sinking in the batter. Carefully fold the blueberries into the mixture, ensuring they are evenly distributed throughout without smashing them; each bite should burst with blueberry flavor in your Lemon Blueberry Zucchini Cake.

Step 6: Bake the Cake
Pour the batter into your prepared baking pan, spreading it evenly with a spatula. Bake for 30-35 minutes, or until a toothpick inserted into the center comes out clean. The top should be golden brown and have a slight spring when you gently press it, signaling that your cake is perfectly baked.

Step 7: Cool & Frost
Once baked, remove the cake from the oven and let it cool in the pan for about 10 minutes. Carefully transfer it to a wire rack to cool completely. Once cooled, spread the luscious lemon frosting over the top, allowing the flavors to meld beautifully in your delicious Lemon Blueberry Zucchini Cake with Lemon Frosting.

What to Serve with Lemon Blueberry Zucchini Cake with Lemon Frosting

Looking to complement the vibrant flavors of this delightful cake? Let's build a full, mouthwatering spread together.

  • Creamy Mashed Potatoes: These buttery potatoes bring a comforting, velvety texture, offering a delightful contrast to the cake’s lightness.

  • Light Summer Salad: A refreshing mix of greens, cucumber, and a citrus vinaigrette enhances the cake's lemony notes, creating a harmonious balance.

  • Roasted Vegetables: Seasonal veggies roasted to caramelized perfection add earthy flavors, complementing the sweetness of the cake beautifully.

  • Chilled Lemonade: This classic drink with a zesty kick pairs perfectly, echoing the cake’s citrus essence while keeping things refreshingly cool.

  • Vanilla Ice Cream: A scoop of creamy ice cream melts deliciously when paired with warm slices of cake, amplifying the dessert experience to new heights.

  • Berry Compote: A tangy berry sauce drizzled over the cake heightens the fruity flavors, allowing every forkful to burst with summer freshness.

  • Sparkling Wine: A bubbly sip enhances gatherings and celebrations, and its crispness cuts through the sweetness, making each bite of cake even more enjoyable.

  • Chocolate Drizzle: Drizzling melted chocolate over slices introduces a rich element that pairs surprisingly well with the zest of lemon.

  • Almond Biscotti: This crunchy treat adds texture, while its nutty flavor harmonizes with the cake’s almond extract, creating a delightful tasting journey.

How to Store and Freeze Lemon Blueberry Zucchini Cake

  • Room Temperature: Store the cake at room temperature for 1 day, covered with a cake dome or plastic wrap to keep it moist, especially if serving soon.

  • Fridge: For longer storage, keep the Lemon Blueberry Zucchini Cake covered in the fridge for up to 3 days. This prevents drying and maintains its delightful taste.

  • Freezer: If you want to enjoy the cake later, wrap slices tightly in plastic wrap and then in aluminum foil. Freeze for up to 3 months. Thaw in the fridge overnight before enjoying!

  • Reheating: For a warm slice, reheat individual pieces in the microwave for 10-15 seconds. Enjoy it warm or at room temperature for the best experience!

Lemon Blueberry Zucchini Cake Variations

Feel free to get creative and personalize your Lemon Blueberry Zucchini Cake, making it uniquely yours!

  • Berry Swap: Replace blueberries with fresh raspberries or chopped strawberries for a delightful twist. The tartness of raspberries adds a unique zing that perfectly complements the lemon.

  • Nutty Flavor: Add chopped walnuts or pecans for a delightful crunch. The added texture will keep things interesting, almost like a surprise in every bite!

  • Omit Frosting: For a lighter option, skip the frosting and drizzle a simple glaze of lemon juice and powdered sugar instead. This keeps the flavors bright but cuts down on sweetness.

  • Vegan Version: Substitute eggs with a flax egg (1 tablespoon ground flax seeds mixed with 2.5 tablespoons water) for a plant-based twist. Enjoy the same gorgeous texture while catering to vegan friends.

  • Flour Variation: Swap gluten-free oat flour with almond flour for a denser cake. Just remember that the flavor profile will change slightly, adding more nuttiness.

  • Frozen Blueberries: Use frozen blueberries if fresh aren’t available. Make sure not to thaw them beforehand; they’ll hold their shape better, adding bursts of flavor as you bite through the cake.

  • Citrus Zing: Infuse the frosting with orange zest for an extra citrus kick. This combination of lemon and orange creates an unforgettable symphony of flavors that dances on your palate!

  • Spiced Delight: Add a pinch of cinnamon or nutmeg into the batter for a warm spice note. It’s like a cozy hug from the cake itself, perfect for enjoying with a cup of tea.

No matter which variation you choose, each option offers a unique spin on this scrumptious recipe. Don't forget to check out my favorite Cheesy Zucchini Bake for another delicious way to sneak in those zucchinis!

Expert Tips for Lemon Blueberry Zucchini Cake

  • Drain Well: Ensure you squeeze out as much moisture from the zucchini as possible; a watery batter can lead to a dense cake.

  • Use Fresh Blueberries: Fresh berries work best, but if using frozen blueberries, do not thaw them beforehand to prevent excess liquid in your Lemon Blueberry Zucchini Cake.

  • Check for Doneness: Ovens can vary; start checking for doneness a few minutes before the suggested baking time to prevent overbaking.

  • Cool Completely: Allow the cake to cool completely before frosting. If it’s warm, the lemon buttercream will melt and create a puddle rather than a beautiful frosted top.

  • Experiment with Flours: While almond flour is recommended, you can try combining different gluten-free flours to find your favorite texture, but be cautious with substitutions.

  • Store Properly: Keep the cake covered in the fridge for up to 2-3 days. This helps maintain its moisture and deliciousness for a longer time.

Make Ahead Options

These Lemon Blueberry Zucchini Cakes are perfect for meal prep enthusiasts! You can prepare the shredded zucchini and store it in the fridge for up to 3 days, ensuring it's well-drained to maintain the cake's moisture. Additionally, you can mix the dry ingredients (almond flour, oat flour, baking soda, and salt) and keep them in an airtight container for up to 24 hours. When you're ready to bake, simply combine the wet ingredients with the prepped dry mix, fold in the blueberries, and pour into the pan. Once baked and cooled, frost with the lemon buttercream, and enjoy a delightful, stress-free dessert that tastes just as delicious as if made fresh that day!

Lemon Blueberry Zucchini Cake with Lemon Frosting Recipe FAQs

How do I select the right zucchini for this cake?
Absolutely! When choosing zucchini, opt for ones that are firm and have smooth skin. Look for medium-sized zucchinis, as larger ones may contain more seeds and less flavor. I often check for those with a vibrant green hue and no dark spots. Freshly picked zucchinis are usually the sweetest and juiciest!

What’s the best way to store Lemon Blueberry Zucchini Cake?
Very! You can store the cake at room temperature for 1 day, covered with a cake dome or plastic wrap to keep it moist. For longer storage, keep it in the fridge for up to 3 days; this helps maintain its delightful taste and texture.

Can I freeze Lemon Blueberry Zucchini Cake?
Absolutely! To freeze your Lemon Blueberry Zucchini Cake, slice it first for convenience. Wrap each slice tightly in plastic wrap, then cover it with aluminum foil to prevent freezer burn. You can freeze it for up to 3 months. When you're ready to enjoy, simply thaw the slices in the fridge overnight.

What if my cake turns out too dense?
If your cake is dense, it might be due to excess moisture from the zucchini or overmixing the batter. Make sure to drain the zucchini well before adding it to your mix. When combining the dry and wet ingredients, gently fold them together until just mixed—overmixing can lead to a heavy texture.

Is this cake suitable for people with allergies?
The Lemon Blueberry Zucchini Cake is gluten-free, making it a great option for those with gluten sensitivities. However, it's worth noting that it contains eggs and may not be suitable for those with egg allergies. For a vegan version, you can replace the eggs with flax eggs (1 tablespoon ground flaxseed + 2.5 tablespoons water per egg) to maintain moisture and structure.

How long can I keep the frosting?
The lemon buttercream frosting can be stored in an airtight container in the fridge for about 1 week. If you have leftover frosting, make sure to bring it to room temperature before spreading it on your cake again for the best texture and flavor!

Lemon Blueberry Zucchini Cake with Lemon Frosting

Lemon Blueberry Zucchini Cake with Lemon Frosting Bliss

This Lemon Blueberry Zucchini Cake with Lemon Frosting is a guilt-free dessert bursting with citrus flavors and fresh blueberries.
Print Recipe Pin Recipe
Prep Time 15 minutes mins
Cook Time 35 minutes mins
Cooling Time 10 minutes mins
Total Time 1 hour hr
Servings: 12 slices
Course: Dessert
Cuisine: American
Calories: 180
Ingredients Equipment Method Nutrition Notes

Ingredients
  

For the Cake
  • 1 cup Shredded Zucchini Squeeze out excess moisture before using.
  • 3 large Eggs
  • 1/2 cup Honey Maple syrup can be used as a substitute.
  • 2 tablespoons Lemon Zest
  • 1/4 cup Lemon Juice
  • 1 teaspoon Almond Extract Can be replaced with vanilla extract.
  • 2 cups Almond Flour No direct substitutes recommended.
  • 1 cup Gluten-Free Oat Flour May substitute with gluten-free all-purpose flour.
  • 1 teaspoon Baking Soda
  • 1/2 teaspoon Salt
  • 1 cup Fresh Blueberries Toss in flour to prevent sinking.
For the Frosting
  • 1/2 cup Vegan Butter Can swap for regular butter.
  • 2 cups Powdered Sugar Add more lemon juice for extra citrus flavor.

Equipment

  • Mixing Bowl
  • 8x8-inch baking pan
  • Whisk
  • Parchment Paper
  • Spatula

Method
 

Step-by-Step Instructions
  1. Preheat your oven to 350°F (175°C). Line an 8x8 inch baking pan with parchment paper and spray with non-stick spray.
  2. Grate the zucchini and squeeze out excess moisture. This is crucial for a moist cake.
  3. In a large bowl, whisk together the zucchini, eggs, honey, lemon zest, lemon juice, and almond extract until smooth.
  4. Add almond flour, gluten-free oat flour, baking soda, and salt. Fold gently until just combined.
  5. Toss fresh blueberries in a tablespoon of gluten-free oat flour and fold into the batter carefully.
  6. Pour the batter into the prepared pan and bake for 30-35 minutes. A toothpick should come out clean.
  7. Let the cake cool in the pan for about 10 minutes, then transfer to a wire rack to cool completely before frosting.

Nutrition

Serving: 1sliceCalories: 180kcalCarbohydrates: 20gProtein: 4gFat: 8gSaturated Fat: 1gPolyunsaturated Fat: 1gMonounsaturated Fat: 5gCholesterol: 30mgSodium: 150mgPotassium: 200mgFiber: 2gSugar: 10gVitamin A: 500IUVitamin C: 5mgCalcium: 60mgIron: 1mg

Notes

Ensure to check the doneness a few minutes before the baking time is up. Allow it to cool completely before frosting for the best results.

Tried this recipe?

Let us know how it was!

Healthy Apple Pie Bars with Salted Peanut Butter Bliss

September 14, 2025 by Grace Snow Leave a Comment

As the leaves turn golden and the air becomes crisp, there’s nothing quite like the smell of fresh apples baking in the oven. That’s why I’m excited to share my Healthy Apple Pie Bars with Salted Peanut Butter Caramel—a delightful twist on a seasonal favorite. These bars combine sweet, spiced apples nestled within a buttery oat crumble, making them the perfect comfort food or snack. Not only are they gluten-free and vegan, but they also offer an easy, wholesome alternative to traditional desserts. With a rich caramel drizzle to crown each bite, these apple pie bars are sure to satisfy your cravings while keeping you on the healthy side. Have you ever tried a dessert that feels indulgent yet is actually good for you? Let’s dive in and change the way you think about fall treats!

Why Choose Healthy Apple Pie Bars?

Deliciously Unique: These apple pie bars feature a delectable combination of flavors, merging traditional apple pie with a modern health twist.
Healthy Indulgence: Enjoy the sweet satisfaction of dessert without the guilt—perfect for those mindful of their diet.
Versatile Options: Easily customized for gluten-free and vegan lifestyles, making them suitable for everyone!
Crowd-Pleasing Treat: Serve them warm or chilled; these bars are sure to impress family and friends alike. Pair with a scoop of vanilla ice cream or try these Smoky Sweet Potatoes for a complete meal!
Time-Saving Delight: With straightforward steps, you’ll have these ready in just over half an hour, letting you enjoy fall’s cozy flavors without a lengthy prep!

Apple Pie Bars Ingredients

• Dive into the wholesome goodness of Apple Pie Bars with Salted Peanut Butter Caramel!

For the Crust & Topping

  • Gluten-Free Oat Flour – Provides structure and a gluten-free base; replace with all-purpose flour if you prefer, but this will lose the gluten-free aspect.
  • Old-Fashioned Rolled Oats – Adds a chewy texture; be sure they are gluten-free for a completely gluten-free recipe.
  • Brown Sugar – Offers sweetness and moisture; coconut sugar can be a healthier swap, though texture may vary.
  • Ground Cinnamon – Infuses warmth and flavor; essential for traditional apple pie essence.
  • Baking Soda & Salt – Essential for rising and balancing sweetness; key for achieving a well-seasoned crust.
  • Butter (or Vegan Buttery Stick) – Creates richness and binds the crust together; swap with coconut oil for a dairy-free option.
  • Vanilla Extract – Enhances the overall flavor; this ingredient is non-negotiable for the best results.

For the Apple Filling

  • Honeycrisp Apples – The star ingredient! These apples lend sweetness and firmness; you can substitute with other firm varieties if needed.
  • Maple Syrup – Serves as a natural sweetener for the filling; agave syrup is a great alternative.
  • Cornstarch (or Arrowroot Starch) – Thickens the apple mixture; critical for achieving the right texture in your filling.

For the Salted Peanut Butter Caramel

  • Peanut Butter – Forms the base of your luscious caramel drizzle, adding creaminess; almond butter is a suitable alternative for different flavors or allergies.
  • Coconut Oil – Provides richness to the caramel; if you don't have it, more peanut butter or a neutral oil can work in a pinch.

Step‑by‑Step Instructions for Healthy Apple Pie Bars with Salted Peanut Butter Caramel

Step 1: Preheat the Oven
Begin by preheating your oven to 350°F (175°C). This key step sets the perfect baking environment for your Healthy Apple Pie Bars with Salted Peanut Butter Caramel. While the oven warms, you'll have time to prepare your baking pan and the crust mixture.

Step 2: Prepare the Baking Pan
Line an 8x8 inch baking pan with parchment paper, ensuring it hangs over the edges for easy removal. Lightly spray the parchment with nonstick cooking spray to prevent sticking. This preparation is crucial for achieving that clean, beautiful finish on your apple pie bars once baked.

Step 3: Make the Crust & Topping
In a large mixing bowl, combine gluten-free oat flour, rolled oats, brown sugar, ground cinnamon, baking soda, and salt. Pour in melted butter and vanilla extract, mixing everything until crumbly. Press about two-thirds of this mixture firmly into the bottom of your prepared pan and set the remaining crumble aside in the fridge to chill.

Step 4: Cook the Apple Filling
Heat a skillet over medium heat and melt butter (or a vegan buttery stick). Add sliced Honeycrisp apples, maple syrup, cinnamon, allspice, and nutmeg. Cook for 5-7 minutes until the apples soften slightly. Stir in vanilla and cornstarch, cooking until the mixture thickens and becomes syrupy—the irresistible aroma will fill your kitchen!

Step 5: Assemble the Bars
Pour the luscious apple filling evenly over the crust, spreading it out gently. Next, sprinkle the reserved crumble mixture on top, ensuring even coverage for a delightful texture. Bake in the preheated oven for 30-35 minutes, or until the edges are golden brown and the top is set.

Step 6: Prepare the Salted Peanut Butter Caramel
In a bowl, combine peanut butter, maple syrup, coconut oil, vanilla extract, and a pinch of salt. Microwave the mixture for about 30 seconds, then stir until smooth and well-blended. Allow it to cool slightly while the apple pie bars finish baking, then drizzle generously over the cooled bars for that delectable salted caramel touch.

Step 7: Slice and Serve
Once your Healthy Apple Pie Bars with Salted Peanut Butter Caramel have cooled, cut them into 16 squares. These delightful treats can be served warm or cold, making them a versatile option for snacks or dessert. Enjoy the comforting flavors and textures in every bite!

What to Serve with Healthy Apple Pie Bars with Salted Peanut Butter Caramel

As the aroma of spiced apples wafts through your kitchen, it’s easy to dream up the perfect spread to complement these delightful pie bars.

  • Vanilla Ice Cream: Creamy and cool, it perfectly melds with the warm spiced apple filling, creating a comforting contrast.
  • Whipped Coconut Cream: A light, airy topping that adds a hint of sweetness and captures the seasonal essence beautifully.
  • Homemade Granola: Sprinkle for a crunchy, nutty texture that enhances the bars’ soft, tender filling with a wholesome twist.
  • Chai Tea: The warm spices of chai enhance the flavors of the bars, making for a cozy pairing on a crisp autumn day.
  • Caramelized Pecans: Their rich, nutty flavor mirrors the peanut butter drizzle, adding a delightful crunch with each bite.
  • Maple Syrup Drizzle: A bit more sweetness elevates the flavors, giving extra depth to your already delicious dessert.
  • Cinnamon Sugar Dusting: A light sprinkle transforms the bars into an even more inviting treat, intensifying the cozy fall vibe.
  • Cider: Warm apple cider or a spiced variation brings a seasonal refreshment alongside your comforting dessert.

Apple Pie Bars with Salted Peanut Butter Caramel Variations

Feel free to let your creativity shine and customize these delightful bars to suit your taste and dietary needs!

  • Gluten-Free: Replace all-purpose flour with gluten-free oat flour to keep the bars deliciously gluten-free without sacrificing flavor.

  • Vegan: Use a vegan buttery stick and substitute maple syrup for agave syrup to ensure this treat is entirely plant-based. This way, everyone can indulge!

  • Nut-Free: Switch peanut butter for sunflower seed butter, making these deliciously safe for school lunches or nut-sensitive gatherings.

  • Fruit Swaps: Experiment with apples! Try tart Granny Smith apples for a zesty kick or sweet Fuji apples for a softer flavor profile. Mixing different varieties can bring a delightful complexity.

  • Crunchy Texture: Add chopped walnuts or pecans into the crust for extra crunch and flavor. Just remember to toast them first for a richer taste!

  • Extra Spices: Boost the flavor by adding a pinch of nutmeg or ginger to the apple filling. This warm spice twist creates a cozy, inviting aroma reminiscent of fall nights.

  • Lower Sugar: For a healthier version, reduce the maple syrup or use a stevia-based sweetener. You can still enjoy our Crockpot Butter Chicken without the added sweetness!

  • Chocolate Twist: Drizzle melted dark chocolate over the cooled bars for an indulgent touch that pairs perfectly with the salted caramel. Why not make it a little more decadent?

Explore these variations to make the recipe truly your own, and don’t hesitate to share your unique creations!

Expert Tips for Apple Pie Bars

  • Crust Consistency: Ensure to press the crust mixture firmly into the pan for a sturdy base and prevent it from crumbling.
  • Avoid Overcooking Apples: Cook the apples just until softened; overcooking can lead to mushy filling, compromising texture in your apple pie bars.
  • Dairy-Free Option: Substitute butter with coconut oil and use a vegan buttery stick to maintain the flavor while keeping the recipe vegan.
  • Check Sweetness Levels: Taste your apple filling as you cook; adjust the maple syrup to suit your sweetness preference.
  • Cool Before Slicing: Let bars cool completely before slicing to ensure clean cuts and maintain structure when serving.

How to Store and Freeze Apple Pie Bars with Salted Peanut Butter Caramel

  • Room Temperature: Store the apple pie bars in a cool, dry place for up to 2 days, wrapped in parchment paper, to keep them fresh and soft.

  • Fridge: For optimal freshness, refrigerate the bars in an airtight container for up to 5 days. This helps preserve their delightful texture and flavors.

  • Freezer: Freeze the apple pie bars for up to 3 months. Wrap them tightly in plastic wrap followed by aluminum foil, ensuring no air can affect their taste.

  • Reheating: For a warm treat, simply microwave the bars for 10-15 seconds, allowing the salted peanut butter caramel to soften and become gooey once again.

Make Ahead Options

These Healthy Apple Pie Bars with Salted Peanut Butter Caramel are perfect for meal prep enthusiasts! You can prepare the crust and topping up to 24 hours in advance by mixing the dry ingredients and refrigerating the crumbly mixture until you're ready to bake. The apple filling can also be made and stored in the refrigerator for up to 3 days—just ensure it's tightly covered to prevent browning. When you're ready to serve, simply assemble the bars by pouring the filling over the crust, topping with the reserved crumble, and baking as directed. The bars will come out just as delicious, making your busy weeknights a breeze with this delightful, make-ahead dessert!

Healthy Apple Pie Bars with Salted Peanut Butter Caramel Recipe FAQs

How do I choose the best apples for my bars?
Absolutely! For the best flavor and texture, I recommend using Honeycrisp apples, as they provide the right balance of sweetness and firmness. However, you can also try Granny Smith apples for a tart contrast or any other firm variety of apples you enjoy. Just remember to avoid soft or mealy apples!

How should I store the apple pie bars after baking?
Very! To keep your Healthy Apple Pie Bars with Salted Peanut Butter Caramel fresh, store them in an airtight container in the refrigerator for up to 5 days. If you prefer to keep them at room temperature, wrap them in parchment paper; they’ll stay soft for about 2 days.

Can I freeze the apple pie bars?
Yes, indeed! To freeze your apple pie bars, wrap them tightly in plastic wrap, then in aluminum foil to prevent freezer burn. They can be stored for up to 3 months. When you’re ready to enjoy, simply thaw them overnight in the refrigerator or reheat them directly from the freezer in the microwave for a warm treat.

What should I do if my crust is crumbly or too dry?
If your crust turns out crumbly, don’t fret! Simply add a bit more melted butter or coconut oil to the mixture, incorporating one tablespoon at a time until you achieve a moister consistency. Remember to press it firmly into the pan, as this will help give it a better structure when baked.

Can I make these bars vegan and gluten-free?
Absolutely! I’ve designed the recipe to be adaptable. You can easily keep the bars vegan by using coconut oil instead of butter and a vegan buttery stick. Also, just make sure to select gluten-free oats and oat flour to maintain the gluten-free attribute. These modifications will ensure everyone can enjoy this delicious treat!

Apple Pie Bars with Salted Peanut Butter Caramel

Healthy Apple Pie Bars with Salted Peanut Butter Bliss

Enjoy these Apple Pie Bars with Salted Peanut Butter Caramel for a wholesome yet indulgent seasonal dessert.
Print Recipe Pin Recipe
Prep Time 20 minutes mins
Cook Time 35 minutes mins
Total Time 55 minutes mins
Servings: 16 squares
Course: Dessert
Cuisine: American
Calories: 150
Ingredients Equipment Method Nutrition Notes

Ingredients
  

For the Crust & Topping
  • 1 cup Gluten-Free Oat Flour Can replace with all-purpose flour for non-gluten-free
  • 1 cup Old-Fashioned Rolled Oats Ensure gluten-free
  • 1/2 cup Brown Sugar Coconut sugar can be a substitute
  • 1 teaspoon Ground Cinnamon Essential for flavor
  • 1/2 teaspoon Baking Soda For rising
  • 1/4 teaspoon Salt Balances sweetness
  • 1/2 cup Butter (or Vegan Buttery Stick) Replace with coconut oil for dairy-free
  • 1 teaspoon Vanilla Extract Important for flavor
For the Apple Filling
  • 4 cups Honeycrisp Apples Can substitute with other firm varieties
  • 1/4 cup Maple Syrup Agave syrup is a substitute
  • 2 tablespoons Cornstarch (or Arrowroot Starch) Thickens filling
For the Salted Peanut Butter Caramel
  • 1/2 cup Peanut Butter Almond butter can be used
  • 1/4 cup Coconut Oil Use more peanut butter or a neutral oil if unavailable

Equipment

  • 8x8-inch baking pan
  • Skillet
  • Mixing Bowl
  • Microwave

Method
 

Preparation
  1. Preheat the oven to 350°F (175°C).
  2. Line an 8x8 inch baking pan with parchment paper and spray it with nonstick cooking spray.
  3. Combine oat flour, rolled oats, brown sugar, cinnamon, baking soda, and salt in a bowl. Mix in melted butter and vanilla until crumbly. Press two-thirds into the pan.
  4. In a skillet over medium heat, melt butter, add sliced apples, maple syrup, cinnamon. Cook for 5-7 mins, stir in vanilla and cornstarch, and thicken.
  5. Spread apple filling over the crust and sprinkle with remaining crumble mix. Bake for 30-35 mins until golden brown.
  6. Mix peanut butter, maple syrup, coconut oil, and salt in a bowl. Microwave for 30 seconds, stir until smooth, and cool slightly before drizzling on the bars.
  7. Once cooled, slice into squares and serve warm or cold.

Nutrition

Serving: 1squareCalories: 150kcalCarbohydrates: 20gProtein: 3gFat: 7gSaturated Fat: 2gPolyunsaturated Fat: 1gMonounsaturated Fat: 4gSodium: 50mgPotassium: 150mgFiber: 2gSugar: 8gVitamin A: 100IUVitamin C: 5mgCalcium: 30mgIron: 1mg

Notes

Press the crust firmly to prevent crumbling. Avoid overcooking apples for better texture. Use dairy-free substitutes to keep the recipe vegan. Allow bars to cool completely before slicing for clean cuts.

Tried this recipe?

Let us know how it was!

Brown Butter Strawberry Baked Oatmeal to Brighten Mornings

September 14, 2025 by Grace Snow Leave a Comment

As I stood by the warm oven, the heavenly aroma of browned butter filled my kitchen, instantly drawing my family’s attention. Today, I’m thrilled to share my recipe for Brown Butter Strawberry Baked Oatmeal, the kind of comforting breakfast that can make any morning feel special. Not only does it offer a delightful balance of chewy oats and sweet strawberries, but it's also a convenient meal prep option that you can whip up ahead of time—perfect for busy weekdays or leisurely weekend brunches. With its gluten-free option and delightful flavor, this dish is sure to become a family favorite. Wouldn't you love to start your day with a slice of this deliciousness topped with a drizzle of strawberry glaze?

Why is this oatmeal recipe a must-try?

Nourishing Delight: Every bite of Brown Butter Strawberry Baked Oatmeal is a hug for your taste buds, blending wholesome oats with juicy strawberries.

Meal Prep Hero: Make it ahead! This dish stores beautifully, ensuring a quick, delicious breakfast on busy mornings.

Endless Customization: Swap out strawberries for your favorite fruits like blueberries or peaches for a tasty twist.

Kid-Approved: With its slightly sweet glaze and comforting texture, kids will love it, making breakfast a win for the whole family.

Gluten-Free Option: Easily adapt this recipe to fit dietary needs, so everyone can enjoy a slice of spring delight.

If you’re craving more delicious breakfast ideas, consider trying my Pumpkin Brownies Decadent for a comforting treat or explore my Matcha Baked Doughnuts for a unique twist!

Brown Butter Strawberry Baked Oatmeal Ingredients

For the Oatmeal Base
• Salted Butter – Adds richness and flavor; unnecessary for a dairy-free version. Use vegan butter instead, not to be browned.
• Large Eggs – Provides structure and moisture. Can substitute with flax or chia eggs for vegan.
• Milk of Choice – Hydrates and creates creaminess. Substitute with any dairy or plant-based milk.
• Pure Maple Syrup – Natural sweetness; honey or agave can be used as alternatives.
• Vanilla Extract – Enhances sweetness; optional but recommended for flavor depth.
• Almond Extract – Adds a hint of nutty flavor; optional, can omit.
• Rolled Oats – Provides base texture; for gluten-free, ensure oats are certified gluten-free.
• Baking Powder – Leavens the oats; no substitute necessary.
• Kosher Salt – Balances sweetness; used in small amounts.
• Fresh Strawberries – Main fruit ingredient; can swap for other berries or diced fruit like peaches or pears.

For the Glaze
• Freeze-Dried Strawberries – Used in the glaze for intense flavor; may replace with fresh fruit puree if unavailable.
• Powdered Sugar – Sweetens the glaze; can use alternative sweetener for a lower sugar option.
• Additional Milk – Needed for adjusting glaze consistency.

Get ready to enjoy every delicious bite of this Brown Butter Strawberry Baked Oatmeal!

Step‑by‑Step Instructions for Brown Butter Strawberry Baked Oatmeal

Step 1: Preheat and Prepare
Begin by preheating your oven to 350°F (175°C). While the oven warms up, grease an 8-inch square pan with nonstick cooking spray. This will ensure that your delicious Brown Butter Strawberry Baked Oatmeal comes out easily once baked. Set the prepared pan aside for later use.

Step 2: Brown the Butter
In a medium saucepan over medium heat, add the salted butter. Stir it occasionally for about 5-7 minutes until it turns golden brown and emits a nutty aroma. Once the butter is perfectly browned, remove it from the heat and let it cool slightly while you prepare the other ingredients.

Step 3: Mix Wet Ingredients
In a large mixing bowl, whisk together the large eggs, your choice of milk, pure maple syrup, and both extracts until they are well combined. This mixture adds moisture and sweetness to the batter of your Brown Butter Strawberry Baked Oatmeal. Make sure it’s smooth for a creamy texture.

Step 4: Combine Dry Ingredients
Next, stir in the rolled oats, baking powder, and kosher salt into the wet mixture. Gently mix until everything is uniformly incorporated. Then, add the cooled brown butter, mixing well to combine all flavors. This step packs your oatmeal base with rich taste and delightful texture.

Step 5: Add Strawberries
Carefully fold in half of the sliced strawberries, combining them into the oatmeal mixture. This will ensure that every bite of your Brown Butter Strawberry Baked Oatmeal bursts with fresh fruit flavor. Once well mixed, pour the mixture into the prepared pan, then spread the remaining strawberries on top for added sweetness.

Step 6: Bake to Perfection
Place the pan in the preheated oven and bake for 35-45 minutes. You’ll know it’s done when the edges are golden brown and the center is set (a knife inserted should come out clean). During this time, enjoy the delightful aroma wafting through your kitchen!

Step 7: Cool and Prepare the Glaze
Once baked, let the oatmeal cool for about 10 minutes on a wire rack. Meanwhile, prepare the glaze by blending freeze-dried strawberries with powdered sugar and melted butter in a small bowl. Add additional milk as needed to reach your desired consistency for drizzling over your delicious oatmeal.

Step 8: Serve and Savor
Now it's time to serve your Brown Butter Strawberry Baked Oatmeal! Drizzle the prepared glaze over the warm dish. For an extra touch, serve with milk or yogurt, making it perfect for a cozy morning or a lovely brunch with family and friends. Enjoy every comforting bite!

Expert Tips for Brown Butter Strawberry Baked Oatmeal

• Cool the Butter: Let the browned butter cool slightly before mixing it with eggs to prevent them from scrambling.

• Make Ahead: This oatmeal can be prepared a day in advance and stored in the fridge—perfect for busy mornings!

• Uniform Fruit Distribution: For even fruit flavor, dice strawberries uniformly and fold them gently into the batter.

• Avoid Steel-Cut Oats: Using rolled oats ensures the best texture; steel-cut oats will result in a chewier, less creamy oatmeal.

• Use Certified Gluten-Free Oats: If you need a gluten-free option, ensure your oats are certified gluten-free to avoid cross-contamination.

Brown Butter Strawberry Baked Oatmeal Variations

Feel free to sprinkle your creativity into this recipe for a personalized touch that excites your taste buds!

  • Berry Mix: Swap out strawberries for a medley of raspberries, blueberries, or diced peaches for a delightful fruit twist. The combination of flavors will make each bite unique and exhilarating!

  • Chocolate Delight: Mix in chocolate chips before baking for a rich, indulgent flavor. Chocolate and strawberries are a classic favorite, elevating your breakfast from ordinary to extraordinary!

  • Nutty Creaminess: Add a dollop of almond butter or peanut butter on top before serving for a deliciously creamy texture and nutty flavor. It’s a great protein boost, too!

  • Vegan Version: Replace eggs with flax or chia eggs, use vegan butter, and choose any plant-based milk to create a delectable vegan version. You won't miss the traditional ingredients one bit!

  • Cinnamon Spice: Add ground cinnamon or nutmeg to the batter for a warm spice flavor. This dash of warmth will surely evoke cozy memories of family breakfasts.

  • Tropical Escape: Replace strawberries with diced pineapple and add shredded coconut for a tropical breakfast vibe. How about an island getaway on your breakfast table?

  • Maple Pecan Crunch: Top the oatmeal with chopped pecans before baking for added crunch and a wonderful nutty flavor. It will provide a delightful contrast to the soft oatmeal texture.

If you crave more tasty breakfast ideas, check out my Crockpot Butter Chicken for a hearty meal that can be enjoyed for dinner or take a bite out of my Pumpkin Brownies Decadent for a sweet treat that the whole family will adore!

How to Store and Freeze Brown Butter Strawberry Baked Oatmeal

Fridge: Store leftover baked oatmeal in a covered dish in the refrigerator for up to 4 days. This keeps it fresh and ready for quick breakfasts!

Freezer: Cut portions and wrap them tightly in plastic wrap or foil, then place in an airtight container. It can be frozen for up to 3 months.

Reheating: To reheat, thaw in the fridge overnight and warm individual servings in the microwave for 30-60 seconds until heated through. Enjoy as a cozy morning treat!

Make-Ahead Tip: You can prep a batch of Brown Butter Strawberry Baked Oatmeal on the weekends and store it, making weekday breakfasts effortless and delicious.

Make Ahead Options

These Brown Butter Strawberry Baked Oatmeal are perfect for busy home cooks seeking a wholesome breakfast solution! You can prepare the oatmeal mixture up to 24 hours in advance by combining the wet and dry ingredients, then store it in the refrigerator. This keeps the oats fresh and ready without sacrificing flavor. When you’re ready to serve, simply pour the mixture into your greased baking pan, top with strawberries, and bake as directed. To maintain quality, ensure it's tightly covered to prevent drying out. Your family will enjoy a delightful breakfast that's just as delicious as when made fresh, saving you precious time during hectic mornings!

What to Serve with Brown Butter Strawberry Baked Oatmeal

Start your morning off right by creating a delightful breakfast spread that complements this baked oatmeal's rich, fruity flavors.

  • Creamy Yogurt: A dollop of Greek yogurt provides a tangy, creamy contrast, enhancing the sweetness of the oatmeal. This simple pairing adds a protein boost that keeps you full longer.

  • Fresh Fruit Salad: Brighten your plate with a colorful assortment of seasonal fruits. The refreshing bites of melon, berries, and citrus balance the hearty oatmeal beautifully.

  • Nutty Granola: Sprinkling some crunchy granola on top offers an exciting texture and nutty flavor, elevating your experience while adding extra fiber and crunch.

  • Honey Drizzle: A touch of honey or agave syrup brings an additional sweet element that pairs with the oatmeal's glaze, inviting you to savor every spoonful.

  • Chia Pudding: This light and nutritious option provides a fresh twist as a side. The creamy texture and subtle sweetness enhance the overall breakfast vibe.

  • Herbal Tea or Coffee: The warm aromas of herbal tea or a rich cup of coffee help round out the morning meal, creating a cozy atmosphere that encourages lingering at the table.

  • Almond Butter Swirl: For a delightful nutty flavor, add a swirl of almond butter on top of your oatmeal. It takes flavor to new heights while providing healthy fats.

Each of these options is designed to amplify the comforting experience of your Brown Butter Strawberry Baked Oatmeal!

Brown Butter Strawberry Baked Oatmeal Recipe FAQs

How do I choose ripe strawberries for the recipe?
Absolutely! Look for strawberries that are bright red, firm, and plump. Avoid those with dark spots or signs of mold. Ripe strawberries have a sweet aroma and should give slightly when pressed.

How should I store leftover Brown Butter Strawberry Baked Oatmeal?
Very! To keep your baked oatmeal fresh, store it in a covered dish in the fridge for up to 4 days. This way, you can enjoy quick, satisfying breakfasts without any fuss!

Can I freeze Brown Butter Strawberry Baked Oatmeal? How?
Absolutely! Cut the oatmeal into serving portions, then wrap each in plastic wrap or foil. Place the wrapped portions in an airtight container or freezer bag. It will keep well in the freezer for up to 3 months. To reheat, thaw in the fridge overnight, and warm in the microwave for about 30-60 seconds until heated through. Enjoy a cozy breakfast in no time!

What can I do if my baked oatmeal doesn't set in the middle?
If you find your oatmeal is still mushy in the center, it likely needs more baking time. Check every 5 minutes after the initial baking time of 35 minutes until the edges turn golden brown and a knife inserted in the center comes out clean. For next time, ensure your baking powder is fresh for proper rising!

Can I modify this recipe for dietary restrictions?
Absolutely! To make this gluten-free, ensure you're using certified gluten-free oats. If you're looking for a dairy-free option, replace the butter with vegan butter and use your favorite plant-based milk. You can also swap the eggs for a flax egg (1 tablespoon ground flaxseed mixed with 2.5 tablespoons water, let sit for 5 minutes to thicken).

Is this oatmeal safe for pets?
Very! Generally, baked oatmeal is safe for pets in small amounts, but be sure to skip any added sugar or glaze. Always consult your veterinarian before introducing new foods to your pet's diet.

Brown Butter Strawberry Baked Oatmeal

Brown Butter Strawberry Baked Oatmeal to Brighten Mornings

Enjoy a comforting dish of Brown Butter Strawberry Baked Oatmeal, perfect for busy mornings or leisurely brunches.
Print Recipe Pin Recipe
Prep Time 15 minutes mins
Cook Time 40 minutes mins
Cooling Time 10 minutes mins
Total Time 1 hour hr 5 minutes mins
Servings: 8 slices
Course: Breakfast
Cuisine: American
Calories: 220
Ingredients Equipment Method Nutrition Notes

Ingredients
  

For the Oatmeal Base
  • 1/2 cup Salted Butter Use vegan butter for dairy-free
  • 2 Large Eggs Can substitute with flax or chia eggs for vegan
  • 1 cup Milk of Choice Any dairy or plant-based milk
  • 1/2 cup Pure Maple Syrup Honey or agave as alternatives
  • 1 teaspoon Vanilla Extract Optional but recommended
  • 1 teaspoon Almond Extract Optional
  • 2 cups Rolled Oats Ensure oats are certified gluten-free if needed
  • 2 teaspoons Baking Powder
  • 1/4 teaspoon Kosher Salt
  • 2 cups Fresh Strawberries Can swap for other berries or diced fruit
For the Glaze
  • 1/2 cup Freeze-Dried Strawberries May replace with fresh fruit puree
  • 1 cup Powdered Sugar Alternative sweetener can be used
  • 1-2 tablespoons Additional Milk Adjust for glaze consistency

Equipment

  • 8-inch square pan
  • Medium saucepan
  • large mixing bowl
  • Whisk

Method
 

Step-by-Step Instructions for Brown Butter Strawberry Baked Oatmeal
  1. Preheat your oven to 350°F (175°C). Grease an 8-inch square pan with nonstick cooking spray.
  2. In a medium saucepan over medium heat, add the salted butter and stir it for about 5-7 minutes until golden brown.
  3. Whisk together the eggs, milk, maple syrup, and extracts in a large mixing bowl until smooth.
  4. Stir in the rolled oats, baking powder, and kosher salt until well combined, then mix in the cooled brown butter.
  5. Fold in half of the sliced strawberries and pour the mixture into the prepared pan, spreading remaining strawberries on top.
  6. Bake in the preheated oven for 35-45 minutes until the edges are golden brown and the center is set.
  7. Let the oatmeal cool for about 10 minutes. Prepare the glaze by blending freeze-dried strawberries, powdered sugar, and melted butter.
  8. Drizzle the glaze over the baked oatmeal and serve warm with milk or yogurt.

Nutrition

Serving: 1sliceCalories: 220kcalCarbohydrates: 30gProtein: 5gFat: 10gSaturated Fat: 6gPolyunsaturated Fat: 0.5gMonounsaturated Fat: 3.5gCholesterol: 60mgSodium: 150mgPotassium: 200mgFiber: 3gSugar: 8gVitamin A: 300IUVitamin C: 5mgCalcium: 100mgIron: 1mg

Notes

This oatmeal can be prepared a day in advance and stored in the fridge for quick breakfasts.

Tried this recipe?

Let us know how it was!

Creamy Slow Cooker Chicken Alfredo for Effortless Family Dinners

September 11, 2025 by Grace Snow Leave a Comment

As the aroma of garlic and cream fills the air, I can’t help but smile at the simplicity of it all. This Easy Slow Cooker Chicken Alfredo is my secret weapon on those hectic weeknights when I crave comfort without sacrificing family time. With just a handful of ingredients, the slow cooker transforms boneless chicken and rigatoni into a creamy, luxurious dish that rivals any restaurant meal. Not only does it offer up rich, velvety goodness, but it's also a true crowd-pleaser that’s ready to be served with minimal effort. Plus, this recipe allows you to switch things up by using chicken thighs for an even richer flavor! Are you ready to dive into the creamy magic? Let’s get cooking!

Why Is This Recipe a Must-Try?

Simplicity reigns supreme here! With minimal preparation and only a few ingredients, you can create a comforting meal that impresses everyone. Crowd-Pleasing and family-friendly, everyone at the table will be asking for seconds. Versatile enough to swap chicken breasts for richer thighs, this dish adapts to your taste. Texture-rich with velvety sauce enveloping tender rigatoni, it feels like a warm hug in a bowl. Perfect for busy nights, this time-saving recipe lets you enjoy quality time while dinner cooks itself—who can say no to that? Plus, pair it with a refreshing salad or some crispy garlic bread, and watch your family smile!

Slow Cooker Chicken Alfredo Ingredients

• Here’s everything you’ll need for this comforting recipe!

For the Sauce

  • Heavy Cream – Adds richness and creaminess to the sauce; substitute with half-and-half for a lighter version.
  • Low-Sodium Chicken Broth – Provides flavor without overwhelming saltiness; use vegetable broth for a vegetarian option.
  • Salted Butter – Enhances the creaminess of the sauce; unsalted butter can be used; adjust salt to taste.
  • Kosher Salt – Balances flavors in the dish; adjust based on broth saltiness.
  • Black Pepper – Adds a mild heat; freshly ground pepper is recommended for the best flavor.
  • Garlic Cloves – Infuses the dish with aromatic flavor; use garlic powder as a substitute if necessary.

For the Pasta

  • Rigatoni – A pasta of choice; shorter shapes resist clumping; fettuccine, fusilli, or penne may be used instead.

For the Protein

  • Boneless Skinless Chicken Breasts – Provides protein for the dish; chicken thighs can be substituted for a richer flavor.

For the Finishing Touch

  • Freshly Grated Parmesan Cheese – Gives the signature pizza flavor; pre-grated cheese may not melt as well.
  • Flat-Leaf Parsley – Used for garnish; optional, but adds color and fresh flavor.

With these simple ingredients, your Slow Cooker Chicken Alfredo will be smooth, creamy, and absolutely delicious!

Step‑by‑Step Instructions for Slow Cooker Chicken Alfredo

Step 1: Prepare the Slow Cooker Base
Begin by placing the boneless skinless chicken breasts into your slow cooker. Pour in 2 cups of low-sodium chicken broth, followed by 1 cup of heavy cream. Add 2 tablespoons of salted butter, 4 minced garlic cloves, and season with 1 teaspoon of kosher salt and ½ teaspoon of black pepper. Set the slow cooker to low and let it cook for 4 to 5 hours until the chicken is tender and easily shredded.

Step 2: Shred the Chicken
Once the cooking time is up, carefully remove the chicken breasts from the slow cooker using tongs and place them on a cutting board. Using two forks, shred the chicken into bite-sized pieces. The chicken should be fork-tender and full of flavor. Return the shredded chicken back into the slow cooker, stirring it into the creamy mixture to combine the flavors.

Step 3: Add the Pasta
Now it’s time to bring in the rigatoni! Add 12 ounces of rigatoni pasta to the slow cooker, ensuring it’s submerged in the creamy sauce. Stir gently to combine the pasta with the liquid, then cover the slow cooker and switch it to high. Cook for an additional 30 minutes, or until the pasta is tender, stirring occasionally to avoid clumping.

Step 4: Stir in the Cheese
Once the pasta is cooked to perfection, it’s time to elevate your Slow Cooker Chicken Alfredo. Stir in 1 cup of freshly grated Parmesan cheese until melted and creamy. The sauce should become luxuriously thick, enveloping every piece of pasta and chicken. Give everything a good mix to ensure it's well-combined and the cheese has melted evenly throughout.

Step 5: Garnish and Serve
Your Slow Cooker Chicken Alfredo is now ready to serve! Scoop generous portions into bowls and garnish with freshly chopped flat-leaf parsley and additional Parmesan cheese, if desired. Serve hot with a side of crispy garlic bread or a fresh salad to round out your meal. Enjoy the delightful aroma and the smiles around the table as your family digs into this creamy comfort food!

Expert Tips for Slow Cooker Chicken Alfredo

  • Cook Time Check: Ensure to cook the chicken on low; high heat can lead to dryness and tougher meat.

  • Fresh Cheese Choice: Use freshly grated Parmesan for the best melting and flavor. Pre-grated cheese often doesn't melt smoothly.

  • Watch the Pasta: Keep an eye on the rigatoni towards the end of cooking to prevent overcooking, which can make it mushy.

  • Seasoning Adjustments: Taste and adjust salt as needed; chicken broth can vary in saltiness. A little extra pepper adds a nice touch!

  • Extra Nutrients: Consider adding steamed broccoli or spinach in the last 10 minutes for a burst of color and added nutrition.

Make Ahead Options

These Slow Cooker Chicken Alfredo ingredients are perfect for meal prep enthusiasts! You can prepare the chicken and sauce (minus the pasta) up to 24 hours in advance by combining the chicken, chicken broth, heavy cream, butter, garlic, salt, and pepper in your slow cooker; just refrigerate the mixture until you're ready to cook. The pasta can be cooked freshly when you're ready to enjoy the meal, ensuring it retains that perfect al dente texture. When you're ready to serve, simply add the refrigerated mixture to the slow cooker, cook on low for 4-5 hours, add the rigatoni for the final 30 minutes, and stir in the Parmesan cheese. This makes busy weeknights a breeze while still delivering that delicious creamy goodness!

Variations & Substitutions for Slow Cooker Chicken Alfredo

Feel free to personalize your Slow Cooker Chicken Alfredo with these delightful twists that will elevate your dish even further!

  • Pasta Shape: Swap rigatoni for fusilli or cavatappi for a fun twist. Different shapes add texture and make the dish even more inviting.

  • Vegetable Boost: Add steamed broccoli or spinach in the last 10 minutes of cooking for added nutrition and color. This not only enhances the flavor but also makes your meal more visually appealing.

  • Protein Variation: Substitute chicken with sautéed shrimp or Italian sausage for a tasty twist. Each option brings its unique flavor, transforming your Alfredo into something special.

  • Herb Infusion: Incorporate fresh basil or thyme for a herby aroma and taste that elevates the creamy sauce to new heights. Fresh herbs add brightness that complements the richness perfectly.

  • Cheese Options: Try mixing in cream cheese for an extra creamy texture. This can give your sauce a rich, velvety consistency that melts in your mouth.

  • Spice it Up: For those who enjoy heat, add a pinch of red pepper flakes or a dash of hot sauce for a spicy kick that contrasts beautifully with the creamy sauce.

  • Nuts for Crunch: Toss in some toasted pine nuts or walnuts for surprising crunch. The added texture contrasts with the smoothness of the pasta and sauce.

  • Citrus Zest: Brighten up the flavors by adding a teaspoon of lemon zest before serving. The freshness cuts through the richness, making each bite feel refreshing.

For more creative varieties, check out my Chipotle Lime Chicken or consider the comforting flavors of Honey Garlic Chicken for further inspiration!

How to Store and Freeze Slow Cooker Chicken Alfredo

Fridge: Store leftovers in an airtight container for up to 3 days. Reheating can be done gently on the stove with a splash of chicken broth to restore creaminess.

Freezer: Freeze Slow Cooker Chicken Alfredo in a freezer-safe container for up to 2 months. Thaw in the fridge overnight before reheating.

Reheating: To reheat, use the stove over low heat, stirring frequently, and add a little broth or cream if the sauce is too thick.

Portioning: Consider portioning into smaller containers before freezing for easy meals later on.

What to Serve with Easy Slow Cooker Chicken Alfredo

Create a delightful meal that tantalizes the taste buds while perfectly complementing the creamy richness of this dish.

  • Garlic Bread: The crispy, buttery goodness of garlic bread is the perfect contrast to the rich, creamy pasta, making each bite more enjoyable.
  • Simple Green Salad: A refreshing salad with mixed greens and a light vinaigrette adds a crunchy texture and brightens up the meal.
  • Steamed Broccoli: Fresh broccoli florets not only enhance the dish’s nutritional value but also add a fresh, vibrant color against the creamy Alfredo.
  • Roasted Asparagus: Oven-roasted asparagus with a sprinkle of lemon brightens the plate and offers a satisfying crunch, balancing the meal beautifully.
  • Caesar Salad: Crisp romaine tossed with Caesar dressing, croutons, and shaved parmesan complements the rich flavors of the Alfredo, adding a savory twist.
  • White Wine: A chilled glass of unoaked Chardonnay marries beautifully with the creamy sauce, bringing out the richness in every bite.
  • Chocolate Mousse: End the meal on a sweet note with a light, airy chocolate mousse that provides a rich contrast to the savory main dish.
  • Baked Zucchini Fries: For a fun and healthy alternative, crispy baked zucchini fries add a delightful crunch without the heaviness.
  • Fruit Sorbet: A refreshing cup of fruit sorbet can cleanse the palate and provide a light dessert option after the creamy richness of your dinner.

Slow Cooker Chicken Alfredo Recipe FAQs

How do I choose the best chicken for this recipe?
Absolutely! For the best results, select boneless, skinless chicken breasts or thighs. If you opt for thighs, they offer a richer flavor. Look for chicken that is firm and pink, avoiding any packages with discoloration or dark spots.

How long can I store leftovers in the fridge?
You can keep your Slow Cooker Chicken Alfredo in an airtight container in the fridge for up to 3 days. Reheat gently on the stove with a splash of chicken broth to help restore creaminess and flavor when you enjoy it again.

Can I freeze Slow Cooker Chicken Alfredo?
Absolutely! Freeze your Slow Cooker Chicken Alfredo in freezer-safe containers for up to 2 months. To reheat, thaw in the fridge overnight and warm gently on the stove, adding a bit of cream or broth if necessary to maintain the creamy texture.

What if my pasta turns mushy during cooking?
Very! To avoid overcooking, keep an eye on your rigatoni during the last 10 minutes on high. Stir occasionally to distribute the heat evenly and check for tenderness. If you notice it starting to get too soft, take it off the heat immediately.

Is this recipe suitable for my vegetarian friend?
You bet! To make it vegetarian-friendly, simply replace chicken with sturdy vegetables like mushrooms or zucchini, and use vegetable broth instead of chicken broth. Add cream and cheese, and you’ll still achieve that creamy goodness!

How can I enhance the flavor of my dish?
For extra flavor, consider adding steamed broccoli or spinach in the last 10 minutes of cooking! You can also experiment with spices like crushed red pepper or Italian seasoning for a delicious twist. Enjoy experimenting!

Slow Cooker Chicken Alfredo

Creamy Slow Cooker Chicken Alfredo for Effortless Family Dinners

This Slow Cooker Chicken Alfredo offers a creamy, comforting meal that's easy to prepare and perfect for family dinners.
Print Recipe Pin Recipe
Prep Time 15 minutes mins
Cook Time 5 hours hrs
Total Time 5 hours hrs 15 minutes mins
Servings: 6 servings
Course: Dinner
Cuisine: Italian
Calories: 600
Ingredients Equipment Method Nutrition Notes

Ingredients
  

For the Sauce
  • 1 cup Heavy Cream substitute with half-and-half for a lighter version
  • 2 cups Low-Sodium Chicken Broth use vegetable broth for a vegetarian option
  • 2 tablespoons Salted Butter unsalted butter can be used; adjust salt to taste
  • 1 teaspoon Kosher Salt adjust based on broth saltiness
  • 1/2 teaspoon Black Pepper freshly ground pepper is recommended for the best flavor
  • 4 cloves Garlic Cloves use garlic powder as a substitute if necessary
For the Pasta
  • 12 ounces Rigatoni shorter shapes resist clumping; fettuccine, fusilli, or penne may be used instead
For the Protein
  • 2 pounds Boneless Skinless Chicken Breasts chicken thighs can be substituted for a richer flavor
For the Finishing Touch
  • 1 cup Freshly Grated Parmesan Cheese pre-grated cheese may not melt as well
  • Flat-Leaf Parsley used for garnish; optional, but adds color and fresh flavor

Equipment

  • Slow Cooker

Method
 

Step-by-Step Instructions
  1. Place the boneless skinless chicken breasts into your slow cooker. Pour in 2 cups of low-sodium chicken broth, followed by 1 cup of heavy cream. Add 2 tablespoons of salted butter, 4 minced garlic cloves, 1 teaspoon of kosher salt, and 1/2 teaspoon of black pepper. Set the slow cooker to low and let it cook for 4 to 5 hours until the chicken is tender and easily shredded.
  2. Carefully remove the chicken breasts from the slow cooker using tongs and place them on a cutting board. Using two forks, shred the chicken into bite-sized pieces. Return the shredded chicken back into the slow cooker, stirring it into the creamy mixture to combine the flavors.
  3. Add 12 ounces of rigatoni pasta to the slow cooker, ensuring it’s submerged in the creamy sauce. Stir gently to combine the pasta with the liquid, cover the slow cooker, and switch it to high. Cook for an additional 30 minutes, or until the pasta is tender.
  4. Stir in 1 cup of freshly grated Parmesan cheese until melted and creamy. Give everything a good mix to ensure it's well-combined and the cheese has melted evenly throughout.
  5. Scoop generous portions into bowls and garnish with freshly chopped flat-leaf parsley and additional Parmesan cheese, if desired. Serve hot with a side of garlic bread or a fresh salad.

Nutrition

Serving: 1servingCalories: 600kcalCarbohydrates: 40gProtein: 40gFat: 35gSaturated Fat: 20gPolyunsaturated Fat: 0.5gMonounsaturated Fat: 15gCholesterol: 150mgSodium: 800mgPotassium: 700mgFiber: 2gSugar: 2gVitamin A: 500IUVitamin C: 2mgCalcium: 300mgIron: 1mg

Notes

Store leftovers in an airtight container for up to 3 days. Reheat gently on the stove with a splash of chicken broth to restore creaminess. Freezing is possible for up to 2 months for easy meals later on.

Tried this recipe?

Let us know how it was!

Crispy Ranch Chicken with Creamy Herb Sauce to Savor Tonight

September 11, 2025 by Grace Snow Leave a Comment

As the golden sun dipped below the horizon, the tantalizing aroma of crispy chicken wafted through my kitchen, transforming a simple weeknight into a mini celebration. Today, I’m excited to share my Crispy Ranch Chicken with Creamy Herb Sauce—a delightful dish that's as easy to whip up as it is to savor. This family-friendly recipe is perfect for those evenings when time is tight, yet you still crave something comforting and delicious. With its crunchy coating and velvety herb sauce, this ranch chicken is sure to impress while giving you the satisfaction of home-cooked comfort food. Ready to elevate your dinner game? Let’s dive in!

Why Is This Ranch Chicken So Amazing?

Quick and Easy: This recipe is designed for busy weeknights, bringing you a comforting meal in less than 30 minutes. Crispy Texture: The double coating of seasoned breadcrumbs ensures each piece is perfectly golden and crunchy, making every bite irresistible. Savory Sauce: The creamy herb sauce adds a rich depth of flavor, elevating the entire dish to new heights. Versatile Pairings: It pairs beautifully with anything from a fresh green salad to classic mashed potatoes, catering to all taste preferences. Family-Friendly: Even the pickiest eaters will enjoy this dish, turning dinner time into a delight. Don't forget to check out the Honey Garlic Chicken Thighs for another delicious option!

Ranch Chicken Ingredients

For the Chicken

  • All-purpose flour – A great coating base; substitute with gluten-free flour to accommodate dietary needs.
  • Ranch seasoning mix – Infuses flavor into the chicken; use store-bought for convenience or try homemade for a personal touch.
  • Large eggs – Essential for binding the coating; no substitutions are recommended for best results.
  • Kosher salt – Enhances overall flavor; you can use regular salt if needed, just adjust the quantity accordingly.
  • Black pepper – Adds a little heat; feel free to omit it for a milder flavor.
  • Breadcrumbs – Creates a crispy exterior; Panko breadcrumbs can significantly enhance crunchiness.
  • Thinly sliced chicken cutlets (about 2 lb.) – The star of the dish; consider chicken thighs for increased moisture.
  • Vegetable oil (for frying) – Necessary for shallow frying the chicken; olive oil can be a healthier alternative.

For the Creamy Herb Sauce

  • Salted butter – Provides richness to the sauce; unsalted butter can be used with a pinch of added salt.
  • Garlic cloves (grated) – Imparts a robust flavor; if fresh garlic is unavailable, garlic powder works in a pinch.
  • Dry white wine – Adds depth to the sauce; opt for a drinkable wine or substitute with chicken broth for a non-alcoholic version.
  • Chicken broth – Enhances the sauce’s flavor; vegetable broth is a lighter option if desired.
  • Heavy cream – Key for a luscious, creamy texture; you can use milk or half-and-half as a lighter substitute.
  • Finely chopped chives, dill, and flat-leaf parsley – Fresh herbs for garnishing and flavor; dried herbs can be used, but in lesser amounts.

Indulge in the delightful world of Ranch Chicken with these carefully selected ingredients that promise a meal bursting with flavor while being easy to prepare!

Step‑by‑Step Instructions for Crispy Ranch Chicken with Creamy Herb Sauce

Step 1: Prepare the Chicken Coating
Start by setting up three shallow dishes: one with all-purpose flour seasoned with salt, pepper, and ranch seasoning, a second with beaten large eggs, and a third with breadcrumbs mixed with more ranch seasoning. Dip each chicken cutlet first in the flour, then the egg, and finally coat it thoroughly with the breadcrumb mixture. This double-coating technique creates an irresistible crunchy exterior for your ranch chicken.

Step 2: Heat the Oil for Frying
In a large skillet, pour enough vegetable oil to cover the bottom, about 1/4 inch deep. Heat the oil over medium heat until it shimmers—a good indication that it's ready for frying. To check if the oil is hot enough, drop in a small piece of breadcrumb; if it sizzles, it's time to cook. This ensures your chicken turns out crispy and delicious.

Step 3: Fry the Chicken Cutlets
Carefully place the coated chicken cutlets in the hot oil, making sure not to overcrowd the pan. Fry for about 3-4 minutes on each side until the chicken is golden brown and cooked through, reaching an internal temperature of 165°F. Once done, transfer the chicken onto paper towels to drain excess oil. By frying until golden, you ensure a beautiful crust and tender meat inside.

Step 4: Make the Creamy Herb Sauce
In the same skillet, lower the heat and add salted butter, allowing it to melt completely. Once melted, add grated garlic and sauté until fragrant, about 30 seconds—be careful not to burn it. This step builds the savory foundation of your creamy herb sauce, melding perfectly with the flavors from the residues left from frying the ranch chicken.

Step 5: Deglaze the Skillet
Add dry white wine to the skillet, scraping up any browned bits from the bottom with a wooden spoon. This process infuses the sauce with a deeper flavor. Allow the wine to simmer for 1-2 minutes until it's reduced slightly, then add chicken broth and the remaining ranch seasoning, stirring well to incorporate the flavors and enhance the sauce.

Step 6: Incorporate the Cream and Herbs
Next, pour in the heavy cream and add the finely chopped chives, dill, and parsley. Let the sauce simmer for 3-5 minutes, stirring occasionally until it thickens slightly. The creamy herb sauce should resemble a luxurious dressing, which when drizzled over the crispy ranch chicken, creates an irresistible combination that's both comforting and flavorful.

Step 7: Serve and Enjoy
Plate your crispy ranch chicken and generously drizzle the creamy herb sauce over the top. Consider garnishing with additional fresh herbs for a pop of color and flavor. This dish pairs wonderfully with a fresh green salad or buttery mashed potatoes. With each bite of the ranch chicken, you'll experience that delightful mix of crispy texture and creamy sauce you’ve been looking for!

Variations & Substitutions for Ranch Chicken

Feel free to get creative with this recipe and make it your own as you explore delightful twists!

  • Gluten-Free: Use gluten-free flour for the coating and swap traditional breadcrumbs for gluten-free panko. It’ll keep everyone at the table happy!

  • Spicy Cajun: Substitute ranch seasoning with Cajun seasoning for a fiery kick. This change adds a whole new dimension, making each bite an adventure.

  • Herb-Infused: Mix fresh basil or thyme into the creamy herb sauce for a fragrant boost. The addition of these herbs elevates the flavor and aroma to divine levels.

  • Veggie Delight: Replace chicken cutlets with eggplant slices for a satisfying vegetarian option. When roasted, eggplant offers a meaty texture that pairs beautifully with the sauce.

  • Lighter Cream: For a lighter sauce, swap heavy cream with milk or a dairy-free alternative, such as almond milk. You'll still enjoy a creamy consistency without the extra calories.

  • Flavorful Broth: For depth, use homemade chicken broth instead of store-bought. It adds richer taste and makes the dish feel even more homey.

  • Extra Crunch: Add crushed cornflakes to your breadcrumb mixture for an extra crunchy texture. This twist creates an irresistible crispiness that everyone will love.

Don’t forget to check out my other recipes, like Honey BBQ Chicken and Chicken Adobo Again, to explore even more flavors!

How to Store and Freeze Ranch Chicken

Fridge: Store any leftover ranch chicken in an airtight container in the refrigerator for up to 3 days to keep it fresh and safe to eat.

Freezer: For longer storage, freeze the cooked ranch chicken in an airtight container or heavy-duty freezer bag for up to 3 months.

Reheating: To reheat, place the chicken in a preheated oven at 375°F (190°C) for about 15-20 minutes, or until heated through, ensuring that it retains its crispy texture.

Sauce Storage: The creamy herb sauce can also be stored in a separate container in the fridge for up to 5 days. Just reheat gently over low heat before serving.

Make Ahead Options

These Crispy Ranch Chicken cutlets are perfect for meal prep enthusiasts! You can coat the chicken and refrigerate them, up to 24 hours in advance, ensuring flavorful, tender meat when you’re ready to fry. Just bread the cutlets in flour, eggs, and breadcrumbs as instructed, then place them in a single layer on a baking sheet and cover tightly with plastic wrap. For the creamy herb sauce, prepare and refrigerate it for up to 3 days to allow the flavors to meld beautifully. When you're ready to serve, simply fry the chicken until golden brown, reheat the sauce gently on the stovetop, and enjoy a comforting homemade meal without the stress of last-minute preparation!

Expert Tips for the Best Ranch Chicken

  • Oil Temperature Check: Always ensure your oil is hot enough before frying. A cold oil bath leads to greasy, soggy chicken instead of crispy ranch chicken.
  • Coating Technique: Don’t rush the coating process; allow each cutlet to get a nice layer of breadcrumbs. This ensures a crunchier finish and a more flavorful bite.
  • Avoid Overcrowding: Fry chicken in smaller batches to evenly cook and achieve that golden brown color. Overcrowding lowers the oil temperature, leading to uneven cooking.
  • Wine Quality Matters: Use a dry white wine that you’d enjoy drinking, as this significantly enhances the flavor of your creamy herb sauce.
  • Herb Freshness: Always opt for fresh herbs if possible as they add vibrant flavors compared to dried. If using dried herbs, remember to use them sparingly!

What to Serve with Crispy Ranch Chicken with Creamy Herb Sauce

Imagine a meal that not only delights the taste buds but also creates memories around the dinner table as everyone savors each bite.

  • Creamy Mashed Potatoes: Comforting and buttery, they soak up the delicious herb sauce perfectly, creating a satisfying harmony of flavors.

  • Fresh Green Salad: A crisp, refreshing salad adds a vibrant contrast to the richness of the chicken, enhancing your dining experience with bright flavors and textures.

  • Roasted Vegetables: Seasonal veggies like carrots and asparagus, roasted until caramelized, provide a sweet earthy note that complements the savory ranch flavors beautifully.

  • Garlic Bread: Crunchy on the outside yet soft on the inside, garlic bread rounds out the meal, perfect for soaking up any leftover creamy sauce.

  • Coleslaw: With its tangy crunch, coleslaw offers a delightful contrast to the crispy chicken, balancing the richness while adding brightness to your plate.

  • Red Wine: A glass of bold red wine can elevate the meal, enhancing the savory notes of the crispy ranch chicken and making the dinner feel like a special occasion.

  • Apple Crisp: End the meal on a sweet note with warm apple crisp, its cinnamon-spiced apples perfectly balancing the savory elements of the main dish.

Crispy Ranch Chicken with Creamy Herb Sauce Recipe FAQs

How do I choose the right ranch seasoning mix?
Absolutely! For the best flavor, opt for a brand that uses quality ingredients. You can also make your own by combining dried herbs like dill, parsley, garlic powder, and onion powder, along with buttermilk powder and salt. This homemade version allows you to control the flavor and intensity, perfect for tailoring to your family's taste!

What’s the best way to store leftover ranch chicken?
Store any leftover ranch chicken in an airtight container in the refrigerator for up to 3 days. This will keep it fresh and delicious. For reheating, I recommend using an oven at 375°F (190°C) for about 15-20 minutes to retain its crispy texture. It’s one of my favorite ways to enjoy leftovers!

Can I freeze the crispy ranch chicken?
Certainly! To freeze, allow the cooked ranch chicken to cool completely. Then, wrap each piece tightly in plastic wrap or place them in an airtight freezer bag to prevent freezer burn. It can be stored for up to 3 months. When you're ready to enjoy it again, reheat in a preheated oven to keep that lovely crunch intact.

How should I adjust this recipe for dietary restrictions?
If you're looking to accommodate dietary needs, here are some easy swaps: use gluten-free flour and breadcrumbs, opt for dairy-free cream (like coconut cream or cashew cream), or substitute the chicken with eggplant slices for a vegetarian option. Always check the ranch seasoning for any allergens, as some brands may include dairy or gluten.

Why is my ranch chicken not crispy? What should I do?
Very common! Ensure the oil is hot enough before adding the chicken. A temperature test with a small piece of breadcrumb should sizzle immediately when it hits the oil. Avoid overcrowding the pan; if the chicken is too close together, it will steam instead of fry. Fry in batches if necessary, achieving that perfect golden crunch!

Can I prepare the creamy herb sauce ahead of time?
Yes, you can! The creamy herb sauce can be made in advance and stored in the refrigerator for up to 5 days. Just be sure to reheat it gently over low heat before serving to prevent curdling. This tip helps you save time on a busy night while still enjoying that luscious taste with your ranch chicken!

Ranch Chicken

Crispy Ranch Chicken with Creamy Herb Sauce to Savor Tonight

This Crispy Ranch Chicken is a quick and comforting dish, topped with a luscious creamy herb sauce, perfect for weeknight dinners.
Print Recipe Pin Recipe
Prep Time 15 minutes mins
Cook Time 15 minutes mins
Total Time 30 minutes mins
Servings: 4 servings
Course: Dinner
Cuisine: American
Calories: 500
Ingredients Equipment Method Nutrition Notes

Ingredients
  

For the Chicken
  • 1 cup All-purpose flour Substitute with gluten-free flour if needed
  • 2 tablespoons Ranch seasoning mix Use store-bought or homemade
  • 2 large Eggs Essential for binding
  • 1 teaspoon Kosher salt Adjust quantity if using regular salt
  • 1/2 teaspoon Black pepper Omit for milder flavor
  • 1 cup Breadcrumbs Panko breadcrumbs recommended for crunch
  • 2 pounds Thinly sliced chicken cutlets Consider chicken thighs for more moisture
  • Vegetable oil for frying Olive oil can be a healthier alternative
For the Creamy Herb Sauce
  • 1/4 cup Salted butter Unsalted butter can be used with added salt
  • 2 cloves Garlic Grated; can substitute with garlic powder if unavailable
  • 1/2 cup Dry white wine Substitute with chicken broth for non-alcoholic version
  • 1 cup Chicken broth Vegetable broth can be used for a lighter option
  • 1 cup Heavy cream Milk or half-and-half can be a lighter substitute
  • 1/4 cup Finely chopped chives Fresh herbs recommended
  • 1/4 cup Finely chopped dill Fresh herbs recommended
  • 1/4 cup Finely chopped flat-leaf parsley Fresh herbs recommended

Equipment

  • Skillet
  • Shallow Dishes
  • Wooden spoon

Method
 

Step-by-Step Instructions
  1. Prepare the Chicken Coating: Set up three shallow dishes: one with flour mixed with salt, pepper, and ranch seasoning, a second with beaten eggs, and a third with breadcrumbs mixed with ranch seasoning. Coat the chicken cutlets first in flour, then egg, and finally breadcrumbs.
  2. Heat the Oil for Frying: Pour enough vegetable oil in a large skillet to cover the bottom about 1/4 inch deep. Heat over medium heat until shimmering.
  3. Fry the Chicken Cutlets: Carefully place the coated chicken in the hot oil and fry for about 3-4 minutes on each side until golden brown and cooked through.
  4. Make the Creamy Herb Sauce: In the same skillet, melt the salted butter, add grated garlic and sauté until fragrant.
  5. Deglaze the Skillet: Add dry white wine to the skillet, scraping up browned bits, and allow it to simmer for 1-2 minutes.
  6. Incorporate the Cream and Herbs: Pour in the heavy cream and add the chopped herbs. Let simmer for 3-5 minutes until thickened.
  7. Serve and Enjoy: Plate the crispy ranch chicken, drizzle the creamy herb sauce on top, and garnish with fresh herbs.

Nutrition

Serving: 1servingCalories: 500kcalCarbohydrates: 25gProtein: 30gFat: 30gSaturated Fat: 15gPolyunsaturated Fat: 4gMonounsaturated Fat: 12gCholesterol: 150mgSodium: 600mgPotassium: 500mgFiber: 1gSugar: 2gVitamin A: 800IUVitamin C: 2mgCalcium: 40mgIron: 2mg

Notes

Store leftover ranch chicken in the refrigerator for up to 3 days and reheat in the oven to retain crispiness.

Tried this recipe?

Let us know how it was!

Irresistibly Tender Slow Cooker Chicken Thighs for Family Bliss

September 11, 2025 by Grace Snow Leave a Comment

The moment the sun begins to dip below the horizon, I find myself instinctively reaching for my slow cooker, excited for a cozy dinner to unfold. Today, it’s all about Tender Slow Cooker Chicken Thighs with Baby Potatoes and Carrots—a delightful one-pot meal that embodies comfort with every bite. What I love most is how effortlessly this recipe transforms bone-in, skin-on chicken thighs into juicy, fork-tender pieces while infusing the veggies with rich flavor. With minimal prep, it’s the perfect solution for busy evenings, making it a family-friendly favorite. You can savor every mouthful knowing you’ve created something wholesome and delicious, all while letting your slow cooker work its magic. So, are you ready to dig into a dinner that practically makes itself?

Why are Slow Cooker Chicken Thighs a Must-Try?

Effortless Cooking: Just set it and forget it! This recipe requires minimal hands-on time, making dinner a breeze.

Flavor-packed Meal: The chicken thighs soak up all the delicious flavors from the broth and vegetables, creating a savory dish that everyone will love.

Family-friendly: Perfect for picky eaters, this comforting meal pleases all ages—serve it with crusty bread or over rice to soak up every last bite!

Versatile Ingredients: Switch it up by adding other root veggies or adjusting the seasoning to your taste—perhaps with a twist of Garlic Chicken Thighs or some warmth from Chicken Adobo Again.

With these tender delights, gathering around the table becomes a cherished experience without the fuss!

Slow Cooker Chicken Thighs Ingredients

• Here’s everything you need for a delicious meal!

For the Chicken

  • Bone-in, skin-on chicken thighs – This essential protein remains juicy and flavorful during cooking. Can use boneless thighs for less fat but may result in slightly drier meat.

For the Vegetables

  • Carrots (cut into 1-inch pieces) – Adds natural sweetness and texture to the dish. Use baby carrots for easier prep.
  • Baby white potatoes (halved if large) – Hearty side that absorbs flavors beautifully from the chicken. Substitute with new potatoes or Yukon Golds.
  • Shallots (sliced) – Contributes a mild onion flavor that enhances overall complexity. Yellow or red onions make great alternatives.

For Flavor

  • Garlic cloves (chopped) – Provides aromatic depth and an essential flavor punch. Fresh garlic is preferred for best results.
  • Thyme sprigs – Adds herbal notes, enhancing the dish’s overall flavor profile. Dried thyme can be used; reduce quantity to 1 teaspoon.

For the Sauce

  • Low-sodium chicken broth – Used to ensure moisture and create a mouthwatering sauce. Homemade broth offers the best flavor or use vegetable broth for a vegetarian option.
  • Salted butter (cubed) – Enriches the sauce, providing a creamy finish. Omit for a lower-fat version.
  • Cornstarch (optional) – Thickens the sauce for a heartier texture if desired. Mix with cold water before adding to hot liquid to prevent clumping.

For Garnish

  • Fresh parsley (chopped, for serving - optional) – Adds a burst of freshness and color when serving.

Get ready for a delightful evening with these Slow Cooker Chicken Thighs that are sure to satisfy your family’s cravings!

Step‑by‑Step Instructions for Tender Slow Cooker Chicken Thighs with Baby Potatoes and Carrots

Step 1: Sear the Chicken
In a large skillet, heat 2 tablespoons of olive oil over medium-high heat. Season the bone-in, skin-on chicken thighs generously with salt and pepper, then place them in the skillet. Sear each thigh for about 5 minutes on both sides until they develop a beautiful golden-brown crust. This step enhances the flavor that will meld beautifully in your slow cooker.

Step 2: Layer the Vegetables
While the chicken is searing, prepare your slow cooker. Add 1-inch pieces of carrots and halved baby white potatoes to the bottom. Sprinkle the chopped garlic, sliced shallots, and fresh thyme sprigs over the vegetables. This creates a flavorful bed for the chicken thighs, ensuring that they rest atop a delightful mix of flavors that will permeate throughout the cooking process.

Step 3: Add the Chicken Thighs
Once the chicken is seared, carefully place the thighs on top of the layered vegetables in the slow cooker. Make sure the skin side is facing up to allow the fat to baste the meat as it cooks. This layering technique ensures that the vegetables cook perfectly while the chicken thighs become tender and juicy, creating an irresistible harmony of flavors in your tender slow cooker chicken thighs.

Step 4: Pour the Broth and Add Butter
Pour in 1 cup of low-sodium chicken broth around the chicken thighs, ensuring they are surrounded by the flavorful liquid. Drape the cubed salted butter over the top, allowing it to melt and enrich the sauce as everything cooks together. The broth will keep the chicken moist while creating a savory sauce that will be the star of your dish.

Step 5: Cook Low and Slow
Cover the slow cooker with its lid and set it on low for 6-7 hours or high for 4 hours. The key here is to resist lifting the lid during cooking; this helps maintain the heat and steam, ensuring the chicken thighs are cooked thoroughly and achieve that tender texture. After the timer goes off, check that the chicken is fully cooked and the internal temperature has reached 165°F.

Step 6: Thicken the Sauce (Optional)
If you prefer a thicker sauce, mix 2 tablespoons of cornstarch with 2 tablespoons of cold water in a small bowl to create a slurry. About 30 minutes before serving, stir in the cornstarch mixture into the slow cooker, allowing the sauce to thicken and become luscious as it cooks. This step is entirely up to you, depending on your desired consistency.

Step 7: Serve with Fresh Garnish
Once the chicken thighs are tender and fully cooked, serve them hot, garnished with a sprinkle of chopped fresh parsley for a pop of color and freshness. Pair this delightful meal with crusty bread or over a bed of rice to soak up all the flavorful sauce. Enjoy your hours of slow-cooked labor in a comforting family meal made with love!

What to Serve with Tender Slow Cooker Chicken Thighs?

Creating a complete, heartwarming dinner doesn't have to be a challenge—just imagine pairing these tender chicken thighs with some delicious sides!

  • Creamy Mashed Potatoes: These velvety potatoes soak up the savory sauce, providing a satisfying, comforting texture with each bite.
  • Steamed Green Beans: Crisp and vibrant, these green beans add a refreshing crunch and a pop of color to your plate, balancing the richness of the chicken.
  • Garlic Bread: Golden and buttery, this crispy delight is perfect for sopping up the delicious juices from the chicken and vegetables.
  • Caesar Salad: A classic side salad with crisp romaine, crunchy croutons, and rich dressing, it adds a refreshing contrast to the heartiness of the main dish.
  • Grilled Corn on the Cob: Sweet and smoky, grilled corn complements the flavors of the chicken while introducing a burst of summer goodness to your meal.
  • Red Wine: A glass of smooth red wine enhances the overall dining experience, harmonizing with the flavors of your tender slow cooker chicken thighs.
  • Apple Crisp: For dessert, enjoy a warm apple crisp topped with vanilla ice cream; its sweetness and warmth will make the perfect ending to a comforting dinner.
  • Quinoa Salad: Light yet filling, this protein-packed salad adds a nutritious element and fabulous texture contrast to your meal, making it feel complete.
  • Roasted Brussels Sprouts: Crispy caramelized Brussels sprouts provide a slightly nutty flavor that pairs beautifully with the savory chicken and veggies.
  • Herb-Infused Rice: Fluffy, fragrant rice scented with herbs acts as a neutral canvas that elevates the dish without overshadowing the flavorful chicken thighs.

Expert Tips for Slow Cooker Chicken Thighs

  • Don’t Peek: Resist the urge to lift the lid during cooking; it releases steam and extends cooking time, leading to less tender chicken.

  • Sear for Flavor: Always sear the chicken thighs first for that golden-brown crust—the extra step adds depth of flavor to your slow cooker chicken thighs.

  • Layer Wisely: Place vegetables at the bottom of the slow cooker to prevent them from overcooking while the chicken cooks to perfection on top.

  • Check Temp: Use a meat thermometer to make sure your chicken reaches an internal temperature of 165°F for safe and juicy results.

  • Adjust Seasoning: Feel free to customize the herbs and spices to your family's taste; a sprinkle of red pepper flakes can elevate the dish for spice lovers!

Slow Cooker Chicken Thighs Variations

Feel free to get creative with these variations that will elevate your slow cooker chicken thighs to a whole new level!

  • Drumsticks: Swap chicken thighs for drumsticks for a fun twist and crispy skin.
    Drumsticks offer a different texture while maintaining that juicy flavor. Perfect for casual family dinners!

  • Root Veggie Medley: Mix in other root vegetables like parsnips or turnips.
    These additions bring delightful sweetness and earthiness to balance the dish beautifully.

  • Spicy Kick: Add red pepper flakes or your favorite hot sauce for a spicy flavor burst.
    This is a great option to awaken your palate and satisfy any heat lovers at the table!

  • Creamy Ranch: Instead of just broth, stir in a packet of ranch seasoning mix for creamy flavor.
    This will give your chicken a delicious twist, bringing a family-favorite ranch taste to this comforting meal!

  • Citrus Zest: Squeeze in some fresh lemon or orange juice before serving for a bright finish.
    The acidity brightens up the rich flavors, making each bite even more refreshing.

  • Garlic Butter Extra: Double the garlic cloves and add a bit of garlic powder for a garlicky delight.
    If you're a garlic lover, you won’t be able to get enough of this flavor enhancement!

  • Sweet & Savory: Toss in a few tablespoons of honey or maple syrup for a hint of sweetness.
    This adds complexity and balances the savory tones, creating a beautifully dynamic dish.

For more intricate flavors, consider blending in the warmth from recipes like Chipotle Lime Chicken or the comforting familiarity of Crock Pot Chicken to make this meal your own!

How to Store and Freeze Slow Cooker Chicken Thighs

Fridge: Store leftover slow cooker chicken thighs in an airtight container for up to 3 days. Ensure they are completely cooled before sealing to maintain freshness.

Freezer: For longer storage, freeze the chicken and vegetables in an airtight freezer bag or container for up to 3 months. Label with the date for easy identification!

Reheating: To reheat, thaw in the fridge overnight if frozen, then warm in the microwave or on the stovetop until heated through, ensuring the chicken reaches an internal temperature of 165°F.

Airtight Guidance: Always seal your containers tightly to prevent freezer burn and preserve the flavors of your delicious slow cooker chicken thighs!

Make Ahead Options

These Tender Slow Cooker Chicken Thighs are perfect for meal prep enthusiasts! You can season your bone-in, skin-on chicken thighs up to 24 hours in advance, which allows the flavors to deepen for an even more delicious result. Additionally, chop your carrots and prepare your baby potatoes the night before; store them in the refrigerator in an airtight container to keep them fresh. When you’re ready to cook, simply layer the prepped vegetables in the slow cooker, add your seared chicken thighs, pour in the broth, and let it work its magic. This way, you’ll enjoy a comforting family dinner with minimal effort, making it an ideal solution for busy weeknights!

Tender Slow Cooker Chicken Thighs Recipe FAQs

What type of chicken thighs should I use for the best results?
I recommend using bone-in, skin-on chicken thighs for this recipe. They remain juicy and flavorful during cooking, making them the star of your slow cooker chicken thighs. If you're looking for a leaner option, boneless thighs can be used, but they may result in slightly drier meat.

How should I store leftovers from this recipe?
Leftover slow cooker chicken thighs can be stored in an airtight container in the fridge for up to 3 days. Make sure they're completely cooled before sealing the container to maintain freshness. I often place them in smaller portions for quick reheating!

Can I freeze the slow cooker chicken thighs?
Absolutely! For longer storage, freeze the cooked chicken and vegetables in an airtight freezer bag or container for up to 3 months. Just be sure to label with the date for easy identification! To thaw, leave them in the fridge overnight before reheating.

What if my chicken thighs are overcooked? How can I prevent this?
To avoid overcooked chicken, it’s crucial not to lift the slow cooker lid during cooking, as this releases steam and can extend cooking time. Always check the internal temperature; it should reach 165°F. If your chicken is overcooked, try shredding it and mixing it into a sauce or broth to moisten it up!

Are there any dietary considerations for this recipe?
If you or someone you're cooking for has dietary restrictions, feel free to substitute ingredients according to needs. For example, use vegetable broth instead of chicken broth for a vegetarian choice or leave out the salted butter for a lower-fat option. Remember to check for allergies, especially with garlic and onion if you're serving this to someone who may have sensitivities.

How do I know when my chicken thighs are perfectly cooked?
The best way to ensure your chicken is perfectly cooked and safe to eat is to use a meat thermometer. Insert it into the thickest part of the thigh and check that it reads 165°F. Additionally, the meat should be tender and juices should run clear when pierced. Enjoy your meal knowing it's not only delicious but safe too!

Slow Cooker Chicken Thighs

Irresistibly Tender Slow Cooker Chicken Thighs for Family Bliss

Discover the magic of Slow Cooker Chicken Thighs with Baby Potatoes and Carrots, a family-friendly dish that guarantees comfort and flavor.
Print Recipe Pin Recipe
Prep Time 15 minutes mins
Cook Time 7 hours hrs
Total Time 7 hours hrs 15 minutes mins
Servings: 6 servings
Course: Dinner
Cuisine: American
Calories: 450
Ingredients Equipment Method Nutrition Notes

Ingredients
  

Chicken
  • 6 pieces bone-in, skin-on chicken thighs Can use boneless thighs for less fat but may result in slightly drier meat.
Vegetables
  • 3 pieces carrots cut into 1-inch pieces; use baby carrots for easier prep.
  • 1.5 pounds baby white potatoes halved if large; substitute with new potatoes or Yukon Golds.
  • 2 pieces shallots sliced; yellow or red onions make great alternatives.
Flavor
  • 4 cloves garlic chopped; fresh garlic is preferred for best results.
  • 4 sprigs thyme fresh; dried thyme can be used; reduce quantity to 1 teaspoon.
Sauce
  • 1 cup low-sodium chicken broth homemade broth offers the best flavor or use vegetable broth for a vegetarian option.
  • 4 tablespoons salted butter cubed; omit for a lower-fat version.
  • 2 tablespoons cornstarch optional; mix with cold water before adding to prevent clumping.
Garnish
  • 1 tablespoon fresh parsley chopped, for serving - optional.

Equipment

  • Slow Cooker
  • Skillet
  • Meat Thermometer

Method
 

Cooking Steps
  1. In a large skillet, heat 2 tablespoons of olive oil over medium-high heat. Season the chicken thighs generously with salt and pepper, then sear each thigh for about 5 minutes on both sides.
  2. Prepare your slow cooker by adding the carrots and baby potatoes to the bottom. Sprinkle the garlic, shallots, and thyme over the vegetables.
  3. Carefully place the seared chicken thighs on top of the vegetables, skin side up.
  4. Pour in the chicken broth around the thighs and add cubed butter over the top.
  5. Cover the slow cooker and cook on low for 6-7 hours or high for 4 hours. Do not lift the lid during cooking.
  6. For a thicker sauce, mix cornstarch with cold water and stir it into the slow cooker 30 minutes before serving.
  7. Serve the tender chicken hot, garnished with chopped parsley, and enjoy with crusty bread or rice.

Nutrition

Serving: 1servingCalories: 450kcalCarbohydrates: 25gProtein: 35gFat: 20gSaturated Fat: 6gPolyunsaturated Fat: 4gMonounsaturated Fat: 8gCholesterol: 110mgSodium: 500mgPotassium: 800mgFiber: 3gSugar: 2gVitamin A: 600IUVitamin C: 10mgCalcium: 40mgIron: 2mg

Notes

Storage: Store leftovers in an airtight container for up to 3 days in the fridge, or freeze for up to 3 months.

Tried this recipe?

Let us know how it was!

Creamy Butternut Hummus with Feta & Pomegranates Delight

September 11, 2025 by Grace Snow Leave a Comment

As I scooped up a vibrant spoonful of this Butternut Squash Hummus with Feta and Pomegranates, the autumn colors danced delightfully on my plate, promising a burst of flavor in every bite. This creamy dip perfectly marries the sweet, earthy notes of roasted butternut squash with the tangy richness of feta cheese and pops of juicy pomegranates. It’s the ideal crowd-pleaser for holiday gatherings, offering a quick and easy way to impress your guests without spending all day in the kitchen. Not only is this hummus a stunning centerpiece, but it’s also vegetarian, gluten-free, and can be easily tailored for vegan diets by omitting the feta. Are you ready to elevate your snack game with this festive twist on a classic favorite?

Why is This Hummus a Must-Try?

Uniquely Delicious: This Butternut Squash Hummus blends sweet roasted squash with tangy feta for a harmony of flavors that’s both delightful and unexpected.

Customizable: Adjust the recipe to fit your preferences, whether you want it vegan by omitting the feta or spicing it up with extra cayenne.

Quick & Easy: Whip it up in just 30 minutes, making it an effortless party starter or healthy snack option.

Festive Appeal: The vibrant colors and textures create an eye-catching presentation that will wow your guests, perfect for holiday gatherings.

Healthy Indulgence: Packed with nutrients, this dip is not only tasty but fits into gluten-free and vegetarian diets, making it a guilt-free treat!

Whether you're looking for a crowd-pleasing appetizer for Thanksgiving or just a delicious snack, this hummus won’t disappoint. For more exciting flavors, check out my recipes for Sweet Potatoes Black or Fried Shrimp Cabbage.

Butternut Hummus with Feta Ingredients

For the Hummus Base

  • 1 cup cubed butternut squash – Adds sweetness and creaminess; substitute with acorn squash if needed.
  • 1 large or 2 medium garlic cloves – Provides aromatic depth; use roasted garlic for a milder flavor.
  • 1½ cups cooked chickpeas – Main protein source; gives texture and can be swapped for canned chickpeas for convenience.
  • ¼ cup tahini – Adds creaminess and nutty flavor; can substitute with sunflower seed butter for a nut-free option.
  • 3 tablespoons fresh lemon juice – Balances flavors with acidity; fresh juice is preferred for the best brightness.
  • ½ teaspoon cumin – Adds warmth and earthiness; substitute with smoked paprika for a different flavor profile.
  • ½ teaspoon coriander – Enhances the dish with a citrusy spice; can be omitted if unavailable.
  • ½ teaspoon cayenne – Provides heat; adjust according to your spice tolerance and omit for a milder version.
  • ½ teaspoon sea salt – Enhances overall flavor; adjust to your taste.
  • ¼ cup extra-virgin olive oil – Adds richness and aids in blending; opt for high-quality oil for the best flavor.
  • ¼ cup water – Helps achieve smooth consistency; add as needed.
  • Freshly ground black pepper – For seasoning to taste.

For Topping & Serving

  • ¼ cup pomegranate arils – Adds sweetness and a burst of color to the hummus.
  • ¼ cup feta cheese – Provides a creamy, salty contrast; use vegan cheese for a non-dairy option.
  • 2 tablespoons chopped parsley – Adds freshness and vibrant color.
  • 2 tablespoons microgreens (optional) – Perfect for an extra garnish and nutrient boost.
  • Drizzle of olive oil – For added richness and flavor enhancement.
  • Pita, crackers, and/or veggies – Delicious options for serving and dipping into the hummus.

This tasty Butternut Hummus with Feta & Pomegranates is sure to be a hit!

Step‑by‑Step Instructions for Creamy Butternut Hummus with Feta & Pomegranates

Step 1: Preheat the Oven
Begin by preheating your oven to 400°F (200°C). While the oven warms up, line a baking sheet with parchment paper, ensuring an easy cleanup later. This step sets the foundation for roasting the butternut squash and garlic, bringing out their natural sweetness and enhancing the flavors for your Creamy Butternut Hummus.

Step 2: Prepare the Cubed Squash
In a large mixing bowl, toss the 1 cup of cubed butternut squash with a drizzle of extra-virgin olive oil, sea salt, and freshly ground black pepper until evenly coated. Spread the seasoned squash onto the prepared baking sheet. Also, wrap the garlic cloves in foil, adding a splash of olive oil and a pinch of salt, before placing them next to the squash on the same sheet.

Step 3: Roast to Tenderness
Place the baking sheet in the preheated oven and roast the butternut squash and garlic for 20-25 minutes, or until the squash is tender and slightly caramelized. Stir halfway through to ensure even cooking. The irresistible aroma will fill your kitchen, signaling it’s almost time to blend everything into a luscious hummus.

Step 4: Cool Before Blending
Once the squash and garlic are done roasting, remove them from the oven and let them cool slightly for about 5 minutes. This cooling period is essential to avoid overheating your food processor. When cool enough to handle, squeeze the garlic cloves out of their skins and set aside, ready to mix into your hummus.

Step 5: Blend Hummus Ingredients
In a food processor, combine the roasted butternut squash, garlic, 1½ cups of cooked chickpeas, ¼ cup of tahini, 3 tablespoons of fresh lemon juice, ½ teaspoon of cumin, ½ teaspoon of coriander, ½ teaspoon of cayenne, and ½ teaspoon of sea salt. Pulse the mixture until it starts to break down, creating a harmonious blend of flavors for your Butternut Hummus with Feta & Pomegranates.

Step 6: Adjust Texture and Flavor
While blending, gradually drizzle in the ¼ cup of extra-virgin olive oil, achieving a creamy consistency. If the mixture is too thick, add up to ¼ cup of water in small increments, blending until you reach your desired smoothness. Taste your hummus, adjusting seasoning as necessary to ensure it’s perfectly balanced.

Step 7: Transfer and Top
Once your hummus reaches a luxurious, creamy texture, transfer it to a serving bowl. To elevate your Creamy Butternut Hummus, artistically top it with ¼ cup of pomegranate arils, crumbled feta cheese, 2 tablespoons of chopped parsley, and microgreens if desired. Drizzle with a touch of olive oil for that finishing touch of richness.

Step 8: Serve and Enjoy
Pair your festive hummus with an array of pita, crackers, or fresh veggies for a delightful appetizer. Gather family and friends around this inviting dish, knowing that each scoop of your Butternut Hummus with Feta & Pomegranates is brimming with flavor and healthy goodness, perfect for sharing during holiday gatherings or casual get-togethers.

How to Store and Freeze Butternut Hummus

Fridge: Store your Butternut Hummus with Feta & Pomegranates in an airtight container for up to 5 days. To maintain freshness, cover the surface with a light drizzle of olive oil before sealing.

Freezer: You can freeze the hummus for up to 3 months. Portion it into freezer-safe containers, leaving space for expansion. Thaw in the fridge overnight when ready to enjoy.

Reheating: For the best texture, gently reheat the hummus in a microwave or on the stovetop, adding a splash of water if needed to loosen it up.

Serving Tip: Always top with fresh pomegranate arils and feta after thawing for the best flavor and presentation!

Butternut Hummus with Feta Variations

Feel free to personalize this Butternut Squash Hummus with Feta and Pomegranates to suit your taste or dietary preferences, transforming it into your signature dish.

  • Vegan Option: Omit feta entirely and substitute with nutritional yeast for a cheesy flavor without the dairy. The result is a creamy, guilt-free delight.

  • Nut-Free: Swap tahini for sunflower seed butter or pumpkin seed puree to keep it nut-free while maintaining a rich and smooth texture. It's a fantastic way to cater to allergies!

  • Spicy Kick: Increase the cayenne to a full teaspoon or add diced jalapeños for a heat that’ll warm up your gatherings! A little goes a long way, making each dip unforgettable.

  • Texture Twist: For added crunch, mix in coarsely chopped walnuts or toasted pine nuts as a topping. This provides a fantastic contrast to the creamy base.

  • Herb Infusion: Mix in fresh herbs such as basil, dill, or mint into the hummus for an herbaceous kick. This will elevate the flavor profile and add vibrancy.

  • Sweet Contrast: Drizzle a swirl of honey or maple syrup over the hummus for a sweet undertone that pairs beautifully with the saltiness of feta.

  • Smooth Alternative: Replace butternut squash with roasted carrots for a different, equally delicious taste that still imparts a lovely sweetness to the hummus.

Looking for more irresistible flavor ideas? Try the rich and savory recipe for Skillet Pasta Feta or the vibrant Tagliatelle Asparagus Peas. Let your creativity soar!

What to Serve with Creamy Butternut Hummus with Feta and Pomegranates

Enhance your culinary experience with delightful pairings for this creamy, autumn-inspired dip.

  • Crunchy Pita Chips: Their crispy texture perfectly contrasts the smooth hummus, making every bite satisfying and delightful.

  • Fresh Veggie Platter: Colorful carrots, cucumbers, and bell peppers add a refreshing crunch that complements the hummus' rich flavors.

  • Savory Olive Tapenade: The briny notes of olive tapenade elevate the dish's taste, adding a Mediterranean flair that beautifully pairs with the sweet hummus.

  • Roasted or Toasted Nuts: A sprinkle of toasted pine nuts or walnuts brings a nutty crunch, enriching the overall flavor profile with added depth.

  • Crispy Crackers: Choose whole grain or seed-based crackers for a wholesome crunch that enhances the creamy texture of the hummus.

  • Herbed Focaccia: The soft, fragrant bread pairs flawlessly, perfect for scooping up the hummus while adding its own unique flavor to the mix.

  • Sweet Spiced Apple Slices: For an unexpected pairing, serve thin apple slices sprinkled with cinnamon—this contrast of sweet and savory brings new dimensions to the dish.

  • Sparkling Water or Herbal Tea: Refreshing beverages like sparkling water with lemon or a soothing herbal tea can cleanse the palate and enhance the overall experience.

  • Chocolate-Dipped Strawberries: To end on a sweet note, these berries will provide a luscious finish, balancing the savory flavors of the hummus beautifully.

Expert Tips for Butternut Hummus

  • Smoother Texture: Blend in a high-powered food processor to achieve a velvety finish. Ensure everything is well-combined for a delightful Butternut Hummus with Feta & Pomegranates.

  • Roasting Tip: Roast your butternut squash and garlic until slightly caramelized. This intensifies sweetness and flavors, creating a richer hummus.

  • Ingredient Substitutions: Don’t hesitate to swap ingredients like tahini for sunflower seed butter if needed. It’s all about customizing the hummus to your taste.

  • Adjusting Spice Levels: Start with a mild amount of cayenne if you're unsure about heat. You can always add more for an extra kick in your hummus!

  • Make-Ahead Option: Prepare your hummus a day in advance to enhance flavors. Just save the toppings until you’re ready to serve for a fresh presentation.

Make Ahead Options

This Creamy Butternut Hummus with Feta and Pomegranates is perfect for busy home cooks looking to streamline their meal prep! You can roast the butternut squash and garlic up to 24 hours in advance, allowing their flavors to deepen. Simply store them in an airtight container in the refrigerator. Additionally, the hummus can be prepared up to 3 days ahead; just blend all the ingredients and keep it refrigerated. To maintain its creamy texture, add a little water while blending if it thickens. When ready to serve, top it with pomegranate arils and feta just before gathering around the table, ensuring that the vibrant colors and flavors shine through for your guests!

Butternut Hummus with Feta and Pomegranates Recipe FAQs

What is the best way to select ripe butternut squash?
Absolutely! Look for butternut squash that feels heavy for its size, with a smooth, tan skin free from dark spots or blemishes. The stem should be a corky texture, indicating it was harvested at the right time. If you see any soft spots, that’s a sign it might be overripe.

How long can I store Butternut Hummus in the fridge?
Very! You can keep your Butternut Hummus with Feta & Pomegranates in an airtight container for up to 5 days. To keep it fresh longer, drizzle a little olive oil over the top before sealing the container. This will help maintain its creamy texture.

Can I freeze Butternut Hummus, and how?
Absolutely! You can freeze this delicious hummus for up to 3 months. Simply portion it into freezer-safe containers, making sure to leave some space for expansion. When you're ready to enjoy it, thaw it in the fridge overnight. To revive its creamy texture after freezing, gently reheat it and stir in a splash of water if needed.

What should I do if the hummus turns out too thick?
Not a problem! If your hummus is thicker than you’d like, simply add a little more water or olive oil, one tablespoon at a time, while blending until it reaches your desired consistency. Remember, it’s all about achieving that velvety, smooth texture.

Are there any dietary considerations for this recipe?
Absolutely! This hummus is a great vegetarian option and can be easily made vegan by omitting the feta cheese. Additionally, the ingredients used are gluten-free. Always ensure that your tahini is free of nuts if you’re serving it to someone with a nut allergy.

Can I use canned chickpeas for this recipe?
Very! Canned chickpeas are a convenient option that will work beautifully in this recipe. Just be sure to rinse and drain them before use to remove excess sodium and enhance the hummus's flavor!

Butternut Hummus with Feta & Pomegranates

Creamy Butternut Hummus with Feta & Pomegranates Delight

This Butternut Hummus with Feta & Pomegranates blends roasted squash and feta for a flavorful dip, perfect for gatherings.
Print Recipe Pin Recipe
Prep Time 10 minutes mins
Cook Time 25 minutes mins
Cooling Time 5 minutes mins
Total Time 40 minutes mins
Servings: 6 servings
Course: Appetizers
Cuisine: Mediterranean
Calories: 220
Ingredients Equipment Method Nutrition Notes

Ingredients
  

For the Hummus Base
  • 1 cup cubed butternut squash Adds sweetness and creaminess; substitute with acorn squash if needed.
  • 1 large or 2 medium garlic cloves Provides aromatic depth; use roasted garlic for a milder flavor.
  • 1.5 cups cooked chickpeas Main protein source; gives texture and can be swapped for canned chickpeas for convenience.
  • 0.25 cup tahini Adds creaminess and nutty flavor; can substitute with sunflower seed butter for a nut-free option.
  • 3 tablespoons fresh lemon juice Balances flavors with acidity; fresh juice is preferred for the best brightness.
  • 0.5 teaspoon cumin Adds warmth and earthiness; substitute with smoked paprika for a different flavor profile.
  • 0.5 teaspoon coriander Enhances the dish with a citrusy spice; can be omitted if unavailable.
  • 0.5 teaspoon cayenne Provides heat; adjust according to your spice tolerance and omit for a milder version.
  • 0.5 teaspoon sea salt Enhances overall flavor; adjust to your taste.
  • 0.25 cup extra-virgin olive oil Adds richness and aids in blending; opt for high-quality oil for the best flavor.
  • 0.25 cup water Helps achieve smooth consistency; add as needed.
  • freshly ground black pepper For seasoning to taste.
For Topping & Serving
  • 0.25 cup pomegranate arils Adds sweetness and a burst of color to the hummus.
  • 0.25 cup feta cheese Provides a creamy, salty contrast; use vegan cheese for a non-dairy option.
  • 2 tablespoons chopped parsley Adds freshness and vibrant color.
  • 2 tablespoons microgreens Optional garnish for an extra nutrient boost.
  • drizzle of olive oil For added richness and flavor enhancement.
  • pita, crackers, and/or veggies Delicious options for serving and dipping into the hummus.

Equipment

  • Oven
  • Food Processor
  • Mixing Bowl
  • Baking Sheet
  • Parchment Paper
  • Foil

Method
 

Step-by-Step Instructions
  1. Preheat your oven to 400°F (200°C) and line a baking sheet with parchment paper.
  2. Toss the cubed butternut squash with olive oil, sea salt, and black pepper. Spread it on the baking sheet and wrap the garlic cloves in foil with olive oil and salt.
  3. Roast the squash and garlic for 20-25 minutes until tender and slightly caramelized.
  4. Let the roasted squash and garlic cool for about 5 minutes, then squeeze the garlic out of its skins.
  5. In a food processor, blend the roasted squash, garlic, chickpeas, tahini, lemon juice, cumin, coriander, cayenne, and sea salt until smooth.
  6. While blending, drizzle in olive oil to achieve a creamy consistency and adjust with water if too thick.
  7. Transfer hummus to a bowl and top with pomegranate arils, feta cheese, parsley, microgreens, and a drizzle of olive oil.
  8. Serve with pita, crackers, or veggies and enjoy!

Nutrition

Serving: 1cupCalories: 220kcalCarbohydrates: 30gProtein: 7gFat: 10gSaturated Fat: 2gPolyunsaturated Fat: 2gMonounsaturated Fat: 6gCholesterol: 5mgSodium: 400mgPotassium: 600mgFiber: 8gSugar: 2gVitamin A: 160IUVitamin C: 30mgCalcium: 8mgIron: 10mg

Notes

This hummus can be made a day in advance to enhance flavors. Save toppings until serving.

Tried this recipe?

Let us know how it was!
  • « Previous Page
  • 1
  • …
  • 148
  • 149
  • 150
  • 151
  • 152
  • …
  • 179
  • Next Page »

Welcome!

Hi, I’m Grace, a Sydney-based home cook with a passion for bold flavors and trending ingredients. Whether you’re a busy beginner or a seasoned foodie, you’ll find dishes here that are fresh, fun, and full of flavor.

More about me

Popular Recipes

  • Cheesy Chicken Garlic Bread Sandwich
    Cheesy Chicken Garlic Bread Sandwich for Cozy Family Moments
  • Easy Chicken Ranch Wraps
    Easy Chicken Ranch Wraps: Quick, Creamy & Totally Satisfying
  • Chicken Caesar Sandwiches
    Delicious Chicken Caesar Sandwiches for Quick Comfort Food
  • best Cuban sandwich
    The Best Cuban Sandwich You’ll Want Every Weeknight!

Footer

↑ back to top

About

  • Privacy Policy
  • Disclaimer
  • Terms & Conditions

Newsletter

  • Sign Up! for emails and updates

Contact

  • About me
  • Contact me

Copyright © 2025 TastyTrendIngredients