tastytrendingredients

  • Home
  • Recipes
    • Appetizers
    • Breakfast
    • Dessert
    • Dinner
    • Drinks
    • Salads
    • Snacks
    • Soups
  • About me
  • Contact me
menu icon
go to homepage
  • Home
  • Recipes
    • Appetizers
    • Breakfast
    • Dessert
    • Dinner
    • Drinks
    • Salads
    • Snacks
    • Soups
  • About me
  • Contact me
search icon
Homepage link
  • Home
  • Recipes
    • Appetizers
    • Breakfast
    • Dessert
    • Dinner
    • Drinks
    • Salads
    • Snacks
    • Soups
  • About me
  • Contact me
×

Irresistible Black Cat Cookies for a Spooktacular Treat

September 19, 2025 by Grace Snow Leave a Comment

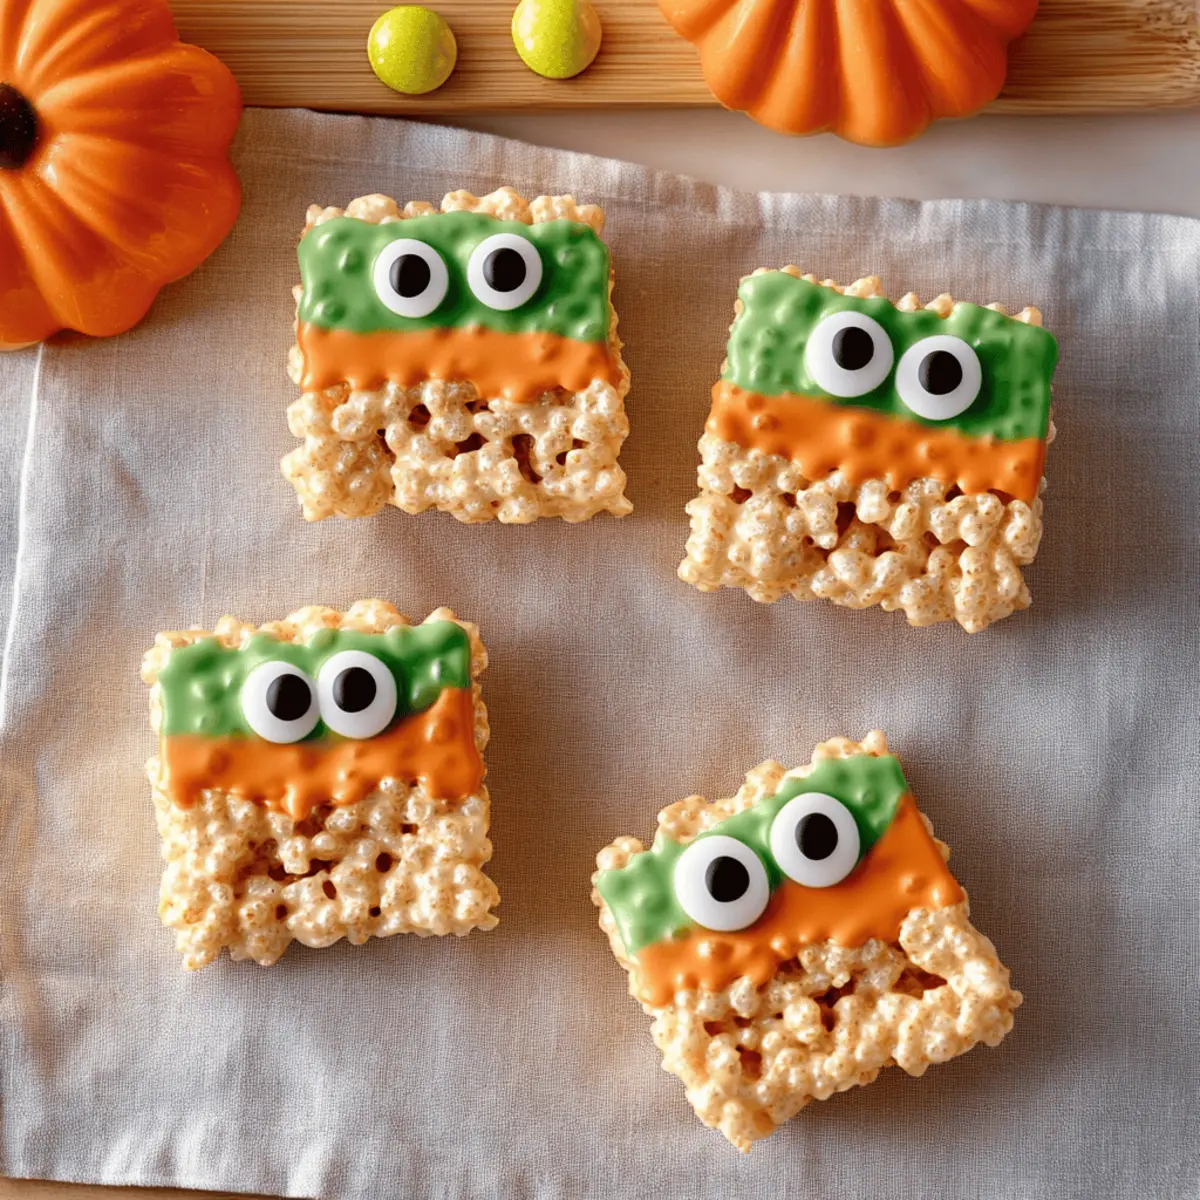
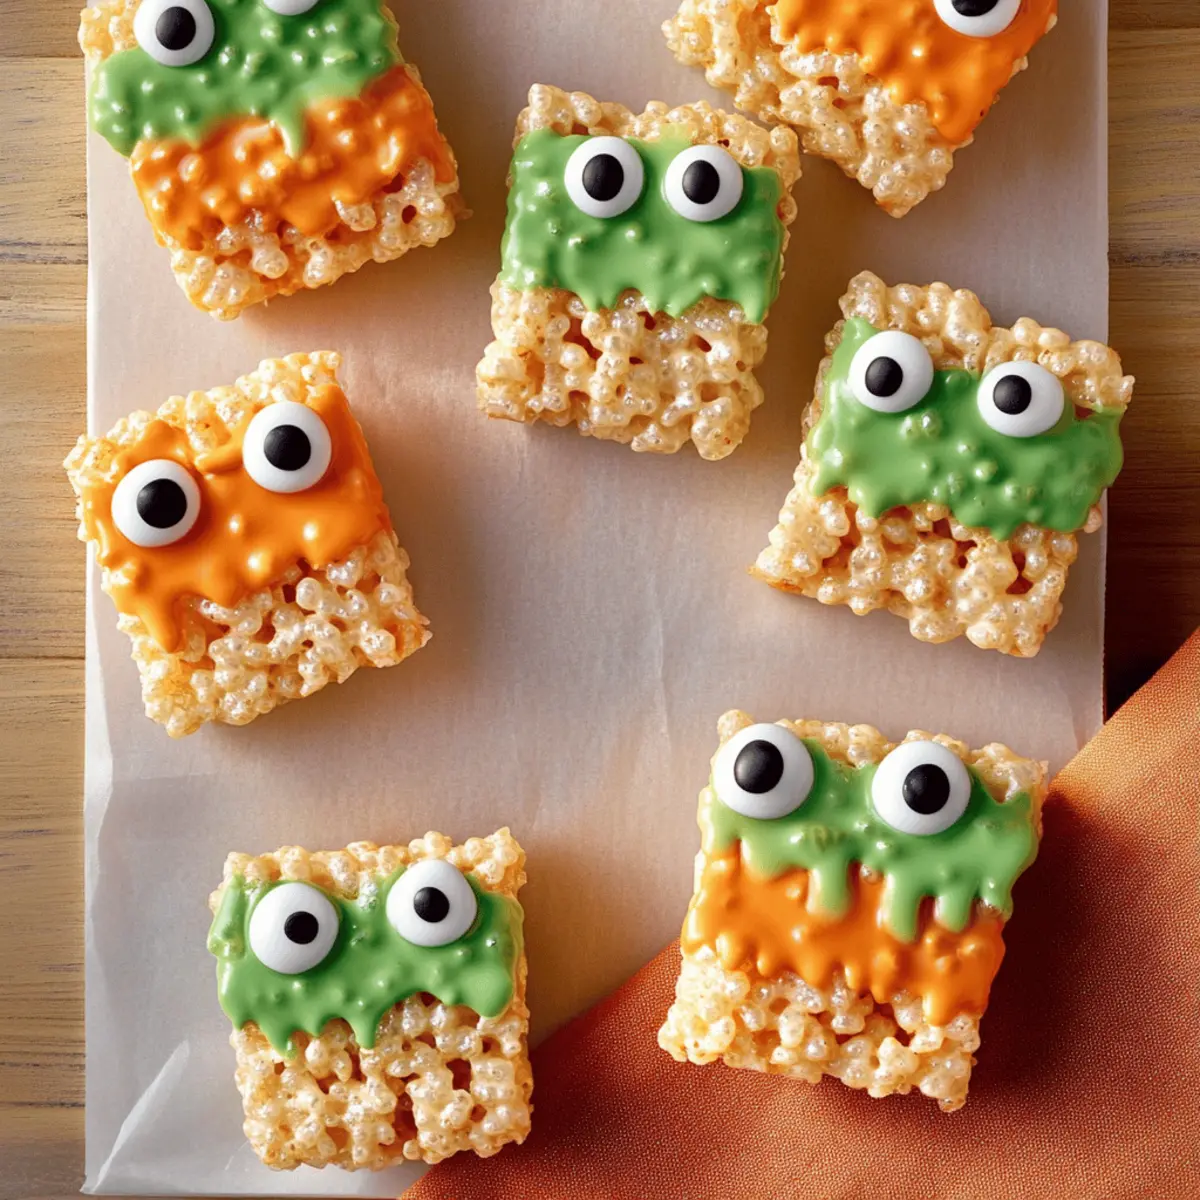
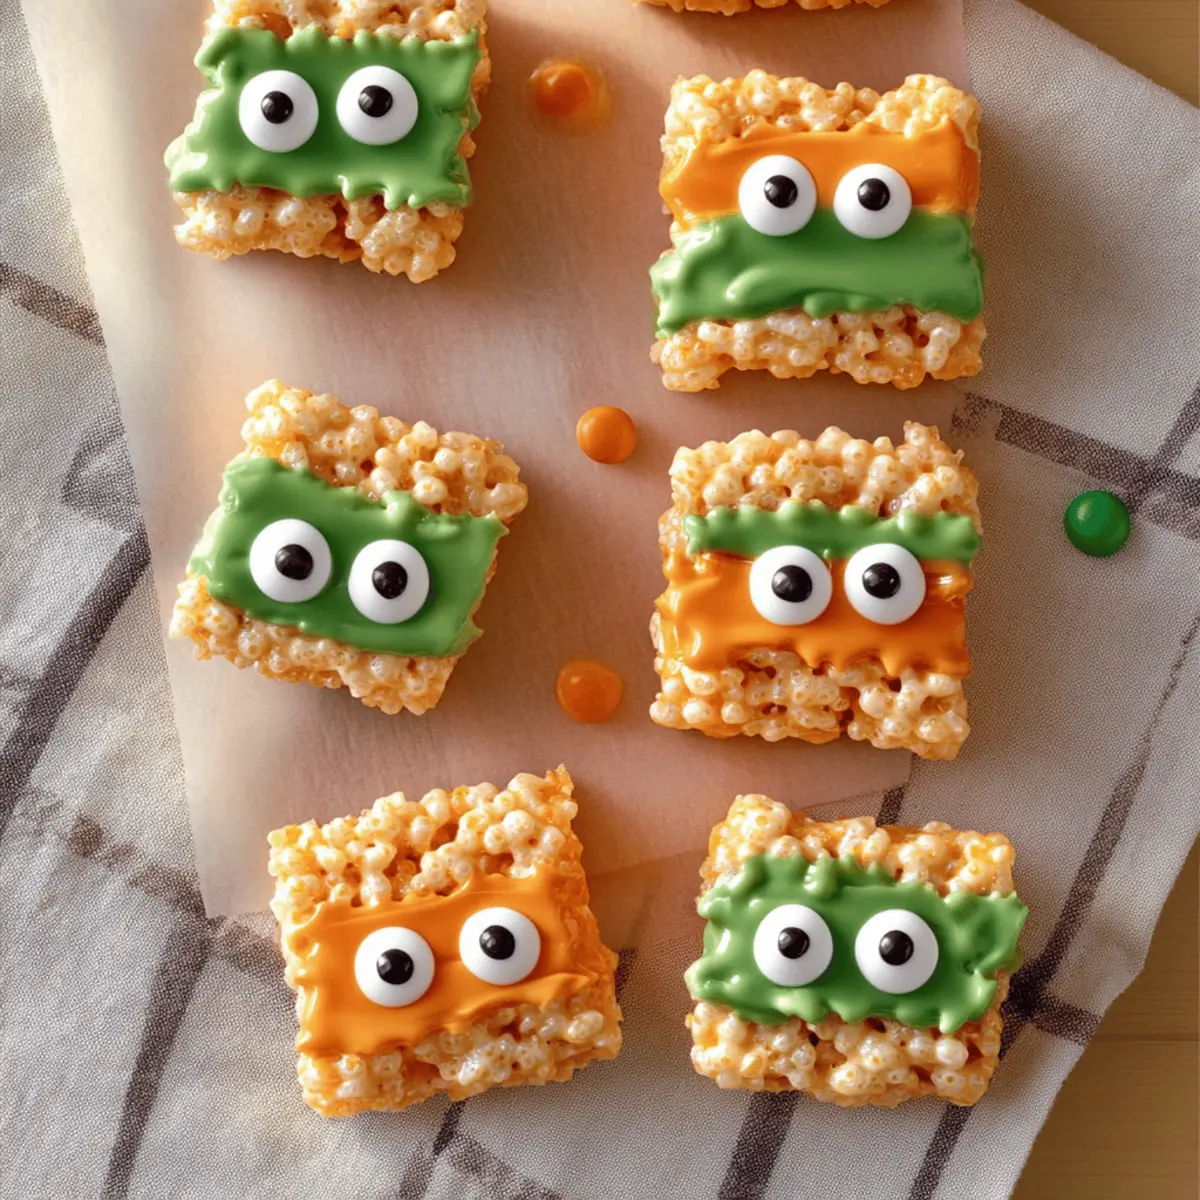
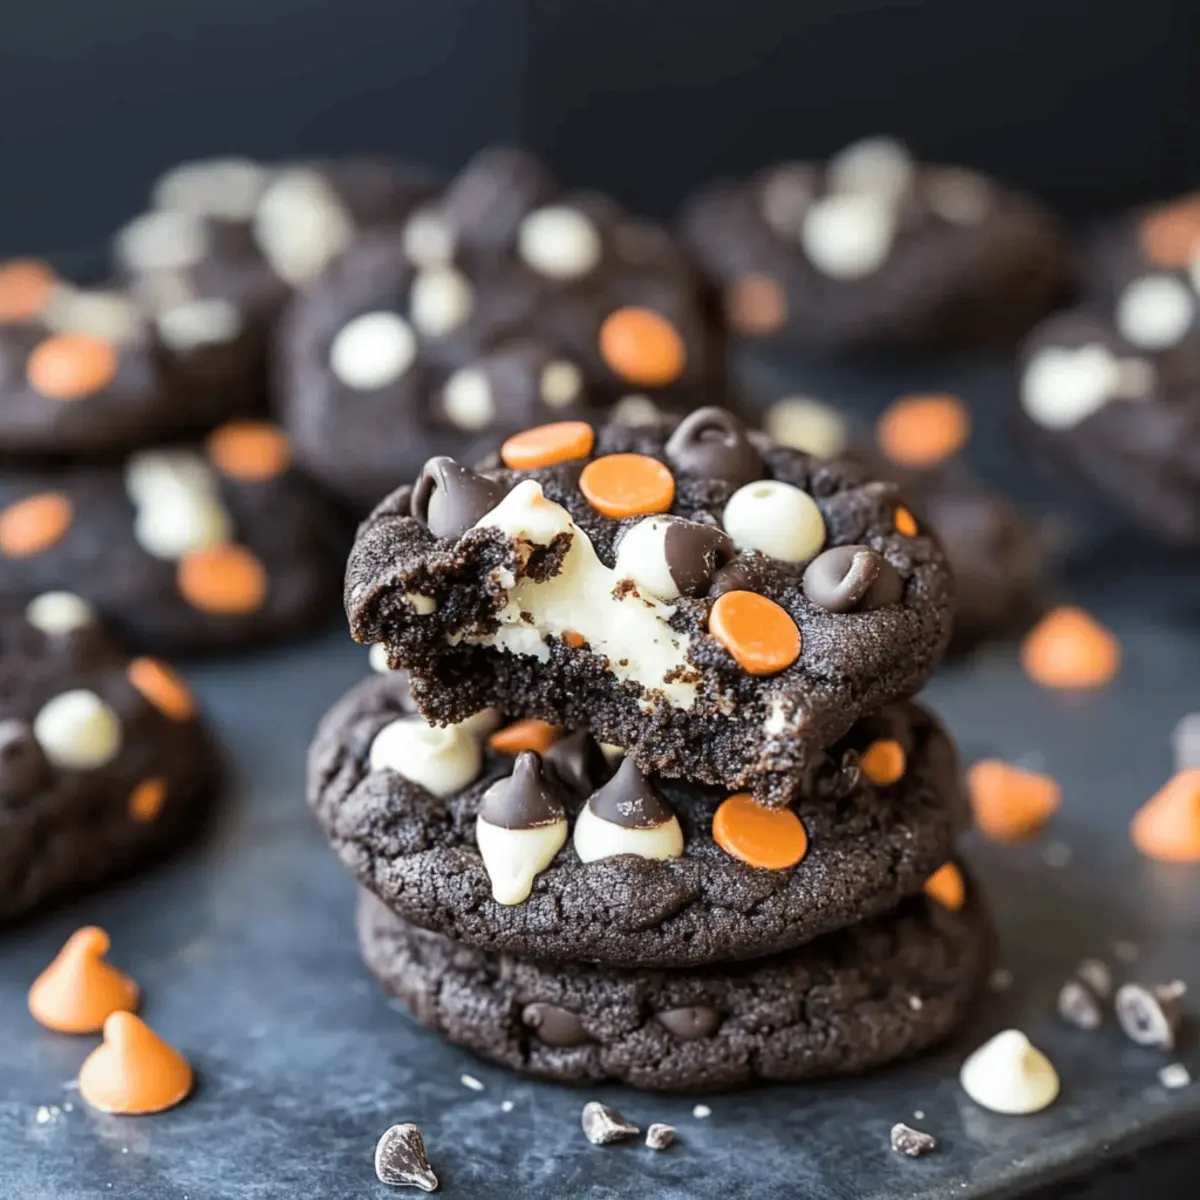
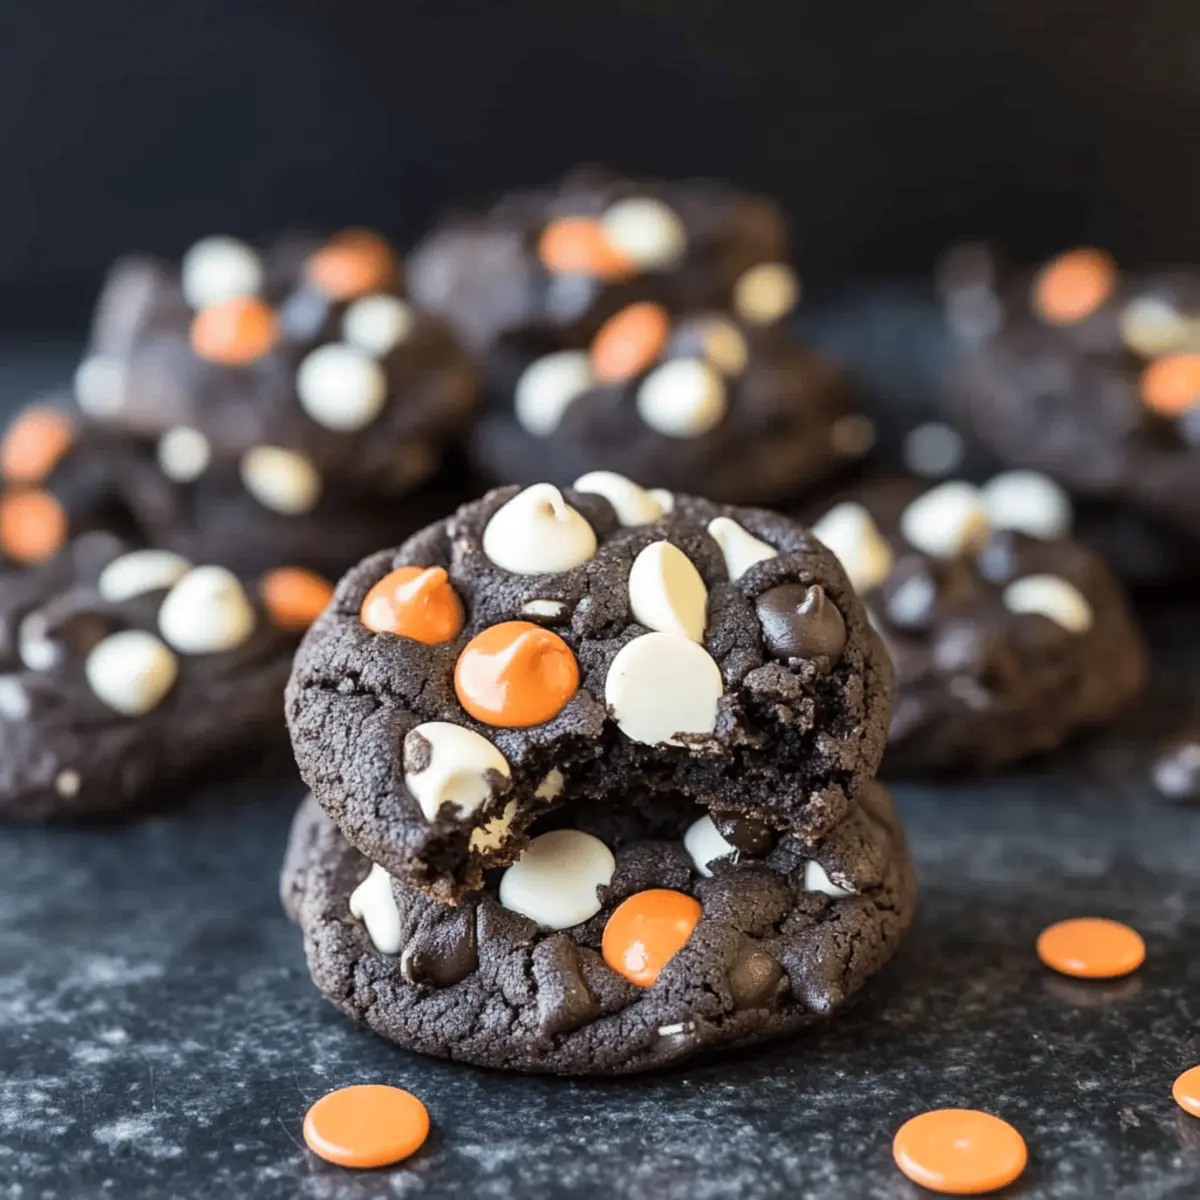
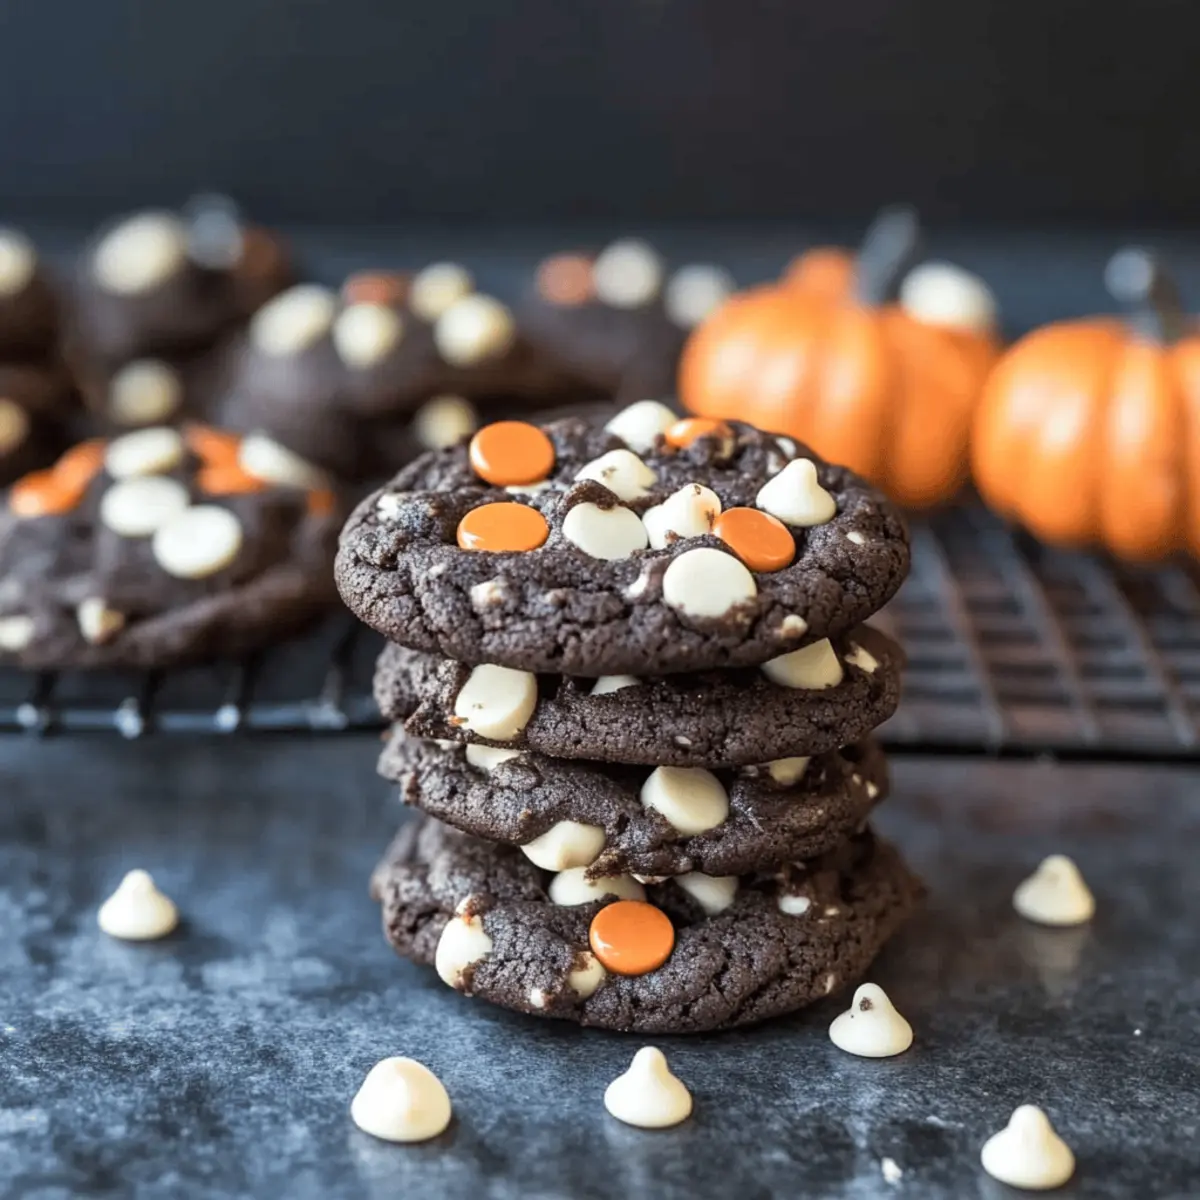
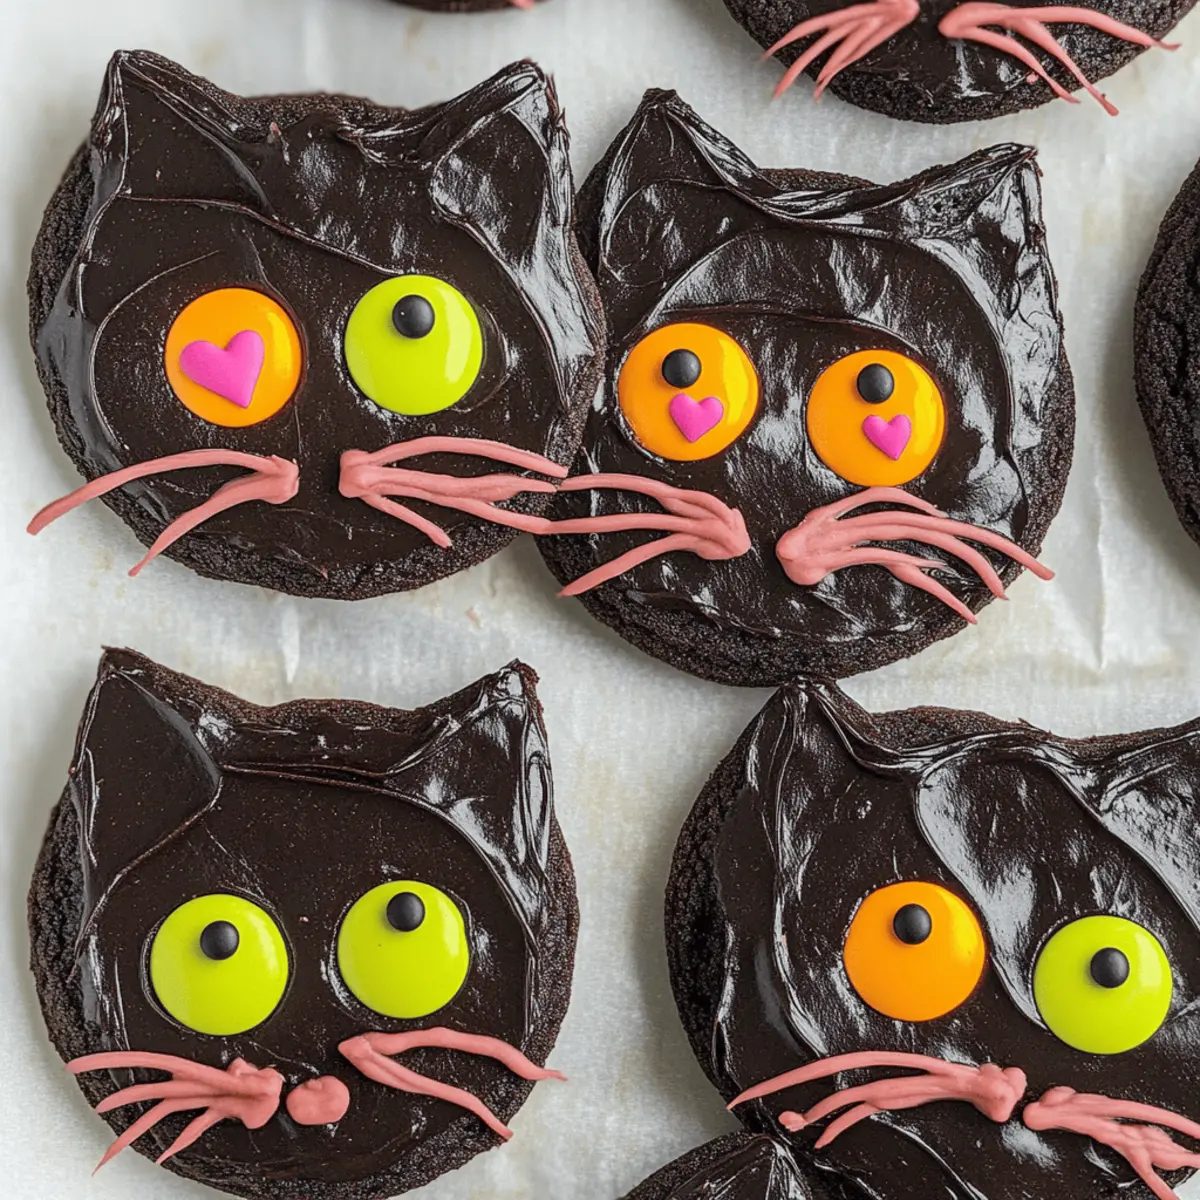
In the heat of the kitchen, surrounded by the sweet aroma of baking, I stumbled upon a delightful surprise that whisked me straight into Halloween spirit: Black Cat Cookies! These festive treats, crafted from rich Devil's Food cake mix, offer a touch of whimsy that’s perfect for family-friendly baking sessions. Not only are they incredibly easy to whip up, but they also allow for fun and creative decorating that kids and adults alike will adore. Picture soft, chocolatey cookies adorned with playful frosting and adorable candy accents—what’s not to love? As the holidays approach, why not gather your loved ones for a fun-filled baking adventure? Let’s dive into the recipe and create some magical memories together!

Why are Black Cat Cookies a must-try?

Whimsical Fun: These Black Cat Cookies are not just treats; they're a delightful way to spark creativity in the kitchen!

Easy and Accessible: With just a few simple ingredients, you can create these festive cookies that are perfect for bakers of all levels, including those who might typically lean towards fast food.

Family-Friendly Activity: This recipe is a wonderful option for quality time with kids, making baking a joyful family experience.

Irresistible Flavor: The combination of soft, chocolatey cookies topped with creamy black cocoa frosting creates a mouthwatering treat that will leave everyone asking for seconds.

Versatile Options: Feel free to get creative with the decoration! Swap out the licorice for fruit leather, or use colorful M&Ms to make your cookie cats truly unique.

For more fun baking ideas, check out these delicious Matcha Cookies Soft or enchanting Thumbprint Cookies Melt!

Black Cat Cookie Ingredients

• Whip up these festive delights with easy-to-find ingredients!

For the Cookies

  • Devil’s Food Cake Mix – This rich mix forms the base for your soft, chocolatey cookies; feel free to use a homemade chocolate cookie recipe if you want a personalized touch.
  • Eggs – Essential for binding the dough and providing that perfect chewy texture.
  • Canola or Vegetable Oil – Adds moisture and tenderness; if using a 13.25 ounce mix, reduce the oil to 1/3 cup.
  • Black Food Coloring – An optional ingredient to enhance the cookie's spooky appearance; omit it for a classic look.

For the Frosting

  • Unsalted Butter – Make sure it's softened for a creamy frosting that's easy to spread.
  • Powdered Sugar – This key ingredient gives the frosting its sweetness and a lovely creamy texture.
  • Black Cocoa Powder – Provides a deep, rich chocolate flavor; regular cocoa can be used but will lighten the frosting's color.
  • Vanilla Extract – A splash of this enhances the overall flavor of the frosting.
  • Salt – Just a pinch balances the sweetness perfectly.
  • Milk – Use 1-3 tablespoons to adjust the frosting consistency; add as needed for spreading.

For Decorating

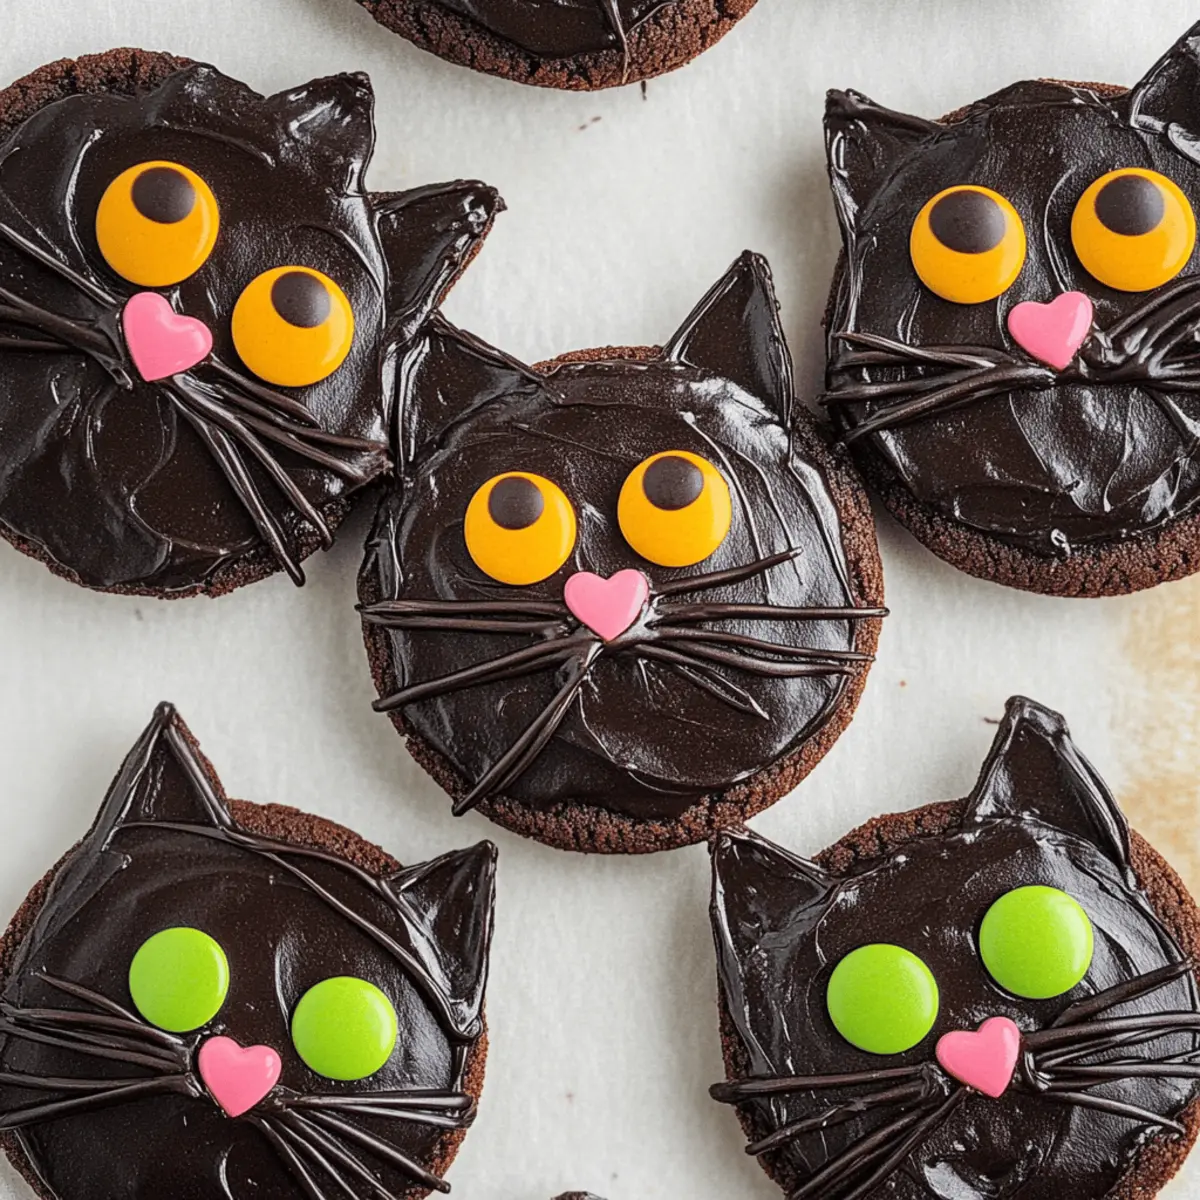
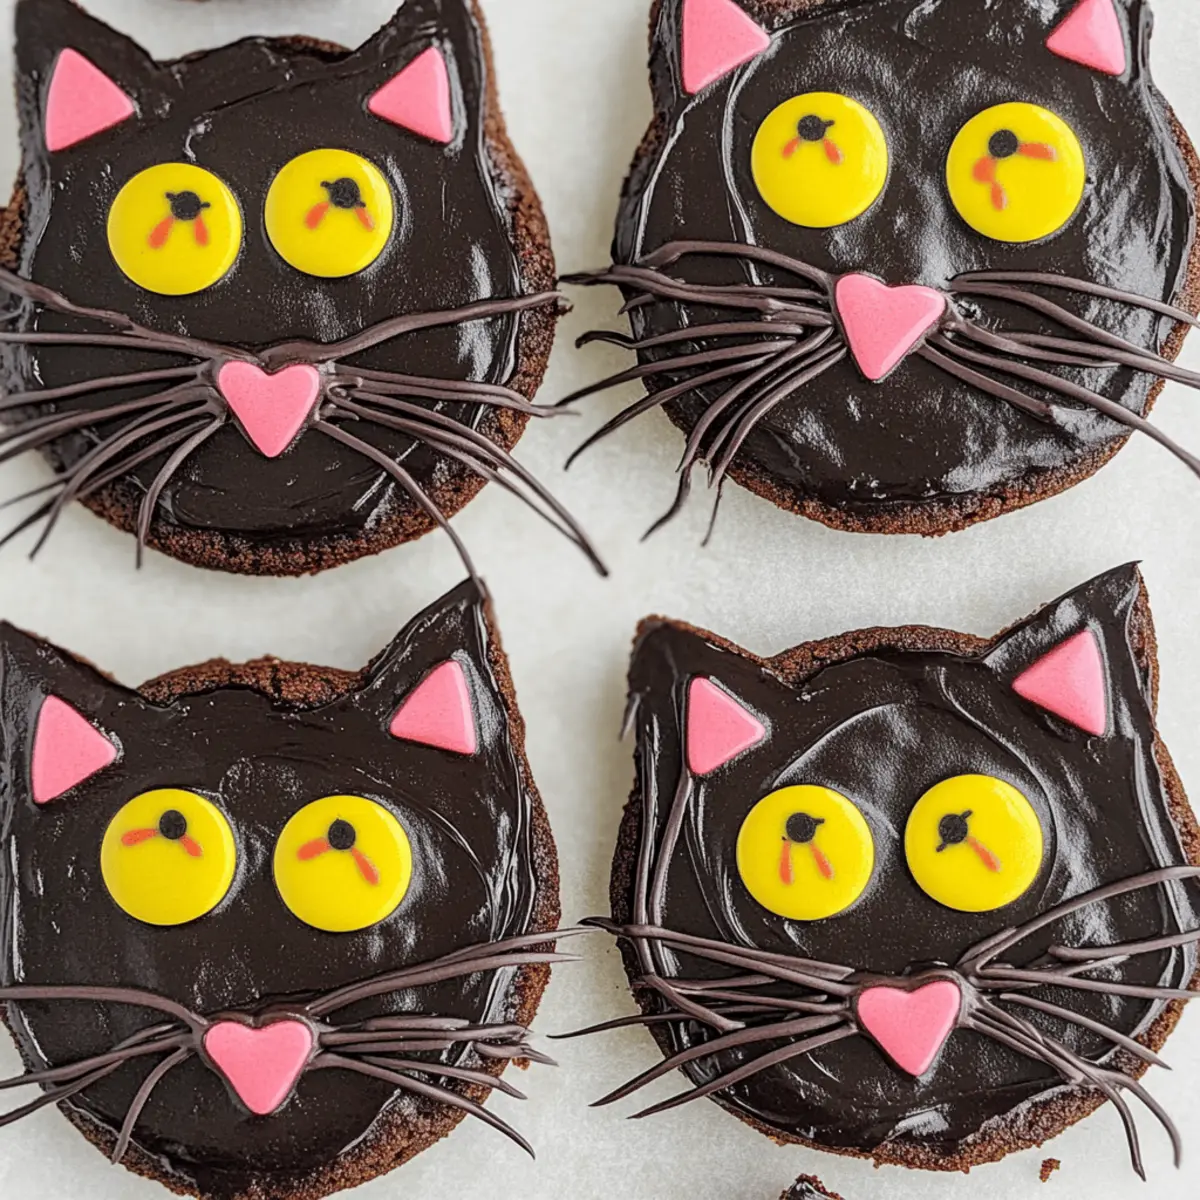
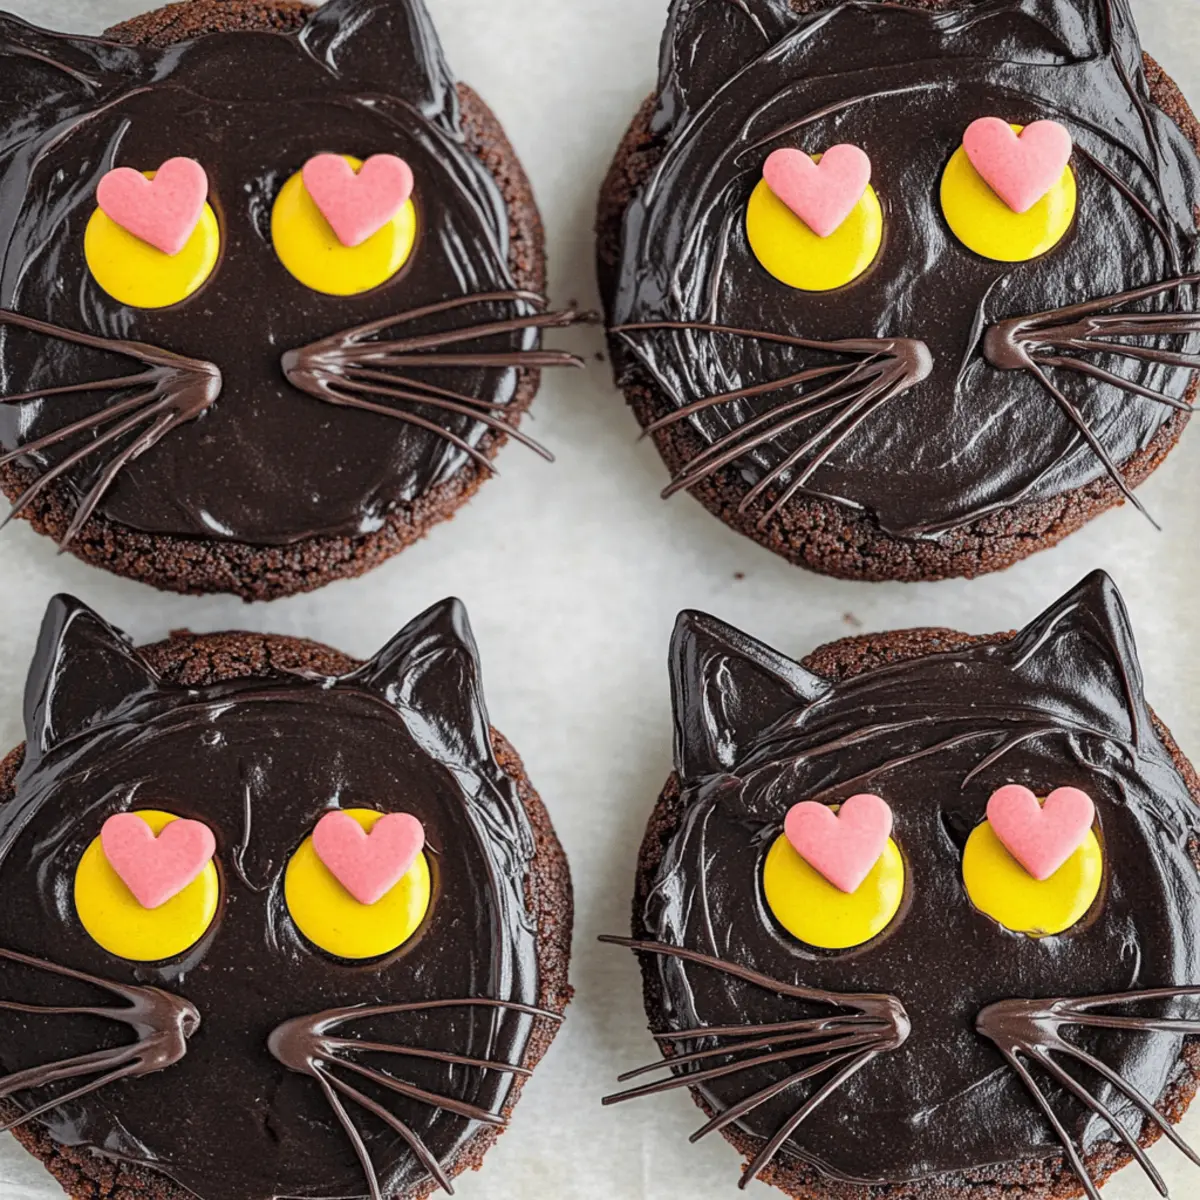
  • Green or Yellow M&Ms – These little gems will be your cat's amusing eyes; other small candies can work too!
  • Black Edible Marker – Great for adding a fun touch to M&Ms, creating pupils for an extra character.
  • Large Heart-Shaped Sprinkles – Perfect for the cat's nose; feel free to swap them for other shapes if you prefer.
  • Black Licorice – A fun choice for whiskers; you can substitute it with fruit leather or pretzel sticks for a different twist.
  • Hershey's Chocolate Bars – Cut into triangles for adorable cat ears; other plain chocolate bars are also an excellent alternative.

Now that you have all the essential Black Cat Cookies ingredients, it's time to gather your loved ones and start baking!

Step‑by‑Step Instructions for Black Cat Cookies

Step 1: Preheat the Oven and Prepare Baking Sheets
Begin by preheating your oven to 350°F (175°C). As the oven warms, take a couple of baking sheets and line them with parchment paper to prevent sticking. This will create an easy release for your delightful Black Cat Cookies once they're baked. A prepped workspace ensures everything is ready for the magic to happen!

Step 2: Mix the Cookie Dough
In a large mixing bowl, combine your Devil's Food cake mix, eggs, and canola oil. Stir until the mixture is smooth and well-combined. If you’re feeling festive, add a few drops of black food coloring to enhance the spooky appearance of your Black Cat Cookies. Make sure the dough has a nice, thick consistency that holds together perfectly!

Step 3: Scoop the Cookie Dough
Using a cookie scoop or tablespoon, portion the dough into balls about 1½ tablespoons each. Place these dough balls onto the prepared baking sheets, spacing them about 2 inches apart to allow for spreading during baking. The fun shapes and colors will help set the playful tone for your spooky cookies!

Step 4: Bake the Cookies
Slide the trays into your preheated oven and bake for 8-10 minutes. Keep a close eye during the last few minutes; the edges should be set, while the centers may appear slightly soft. Once done, remove the cookies from the oven and let them cool on the baking sheets for about 5 minutes before transferring them to a wire rack to cool completely.

Step 5: Prepare the Frosting
While the cookies cool, it's time to make a dreamy black cocoa frosting. In a bowl, beat the softened unsalted butter until creamy, then gradually add powdered sugar, black cocoa powder, vanilla extract, and a pinch of salt. Mix until smooth, adjusting the consistency with milk as needed for easy spreading. This rich frosting will make your Black Cat Cookies irresistibly delicious!

Step 6: Frost the Cookies
Once your cookies have cooled completely, generously spread the black cocoa frosting over each cookie. Use a smooth spatula or the back of a spoon for an even layer. The luscious frosting will not only add flavor but also create the perfect canvas for decorating your whimsical cat features!

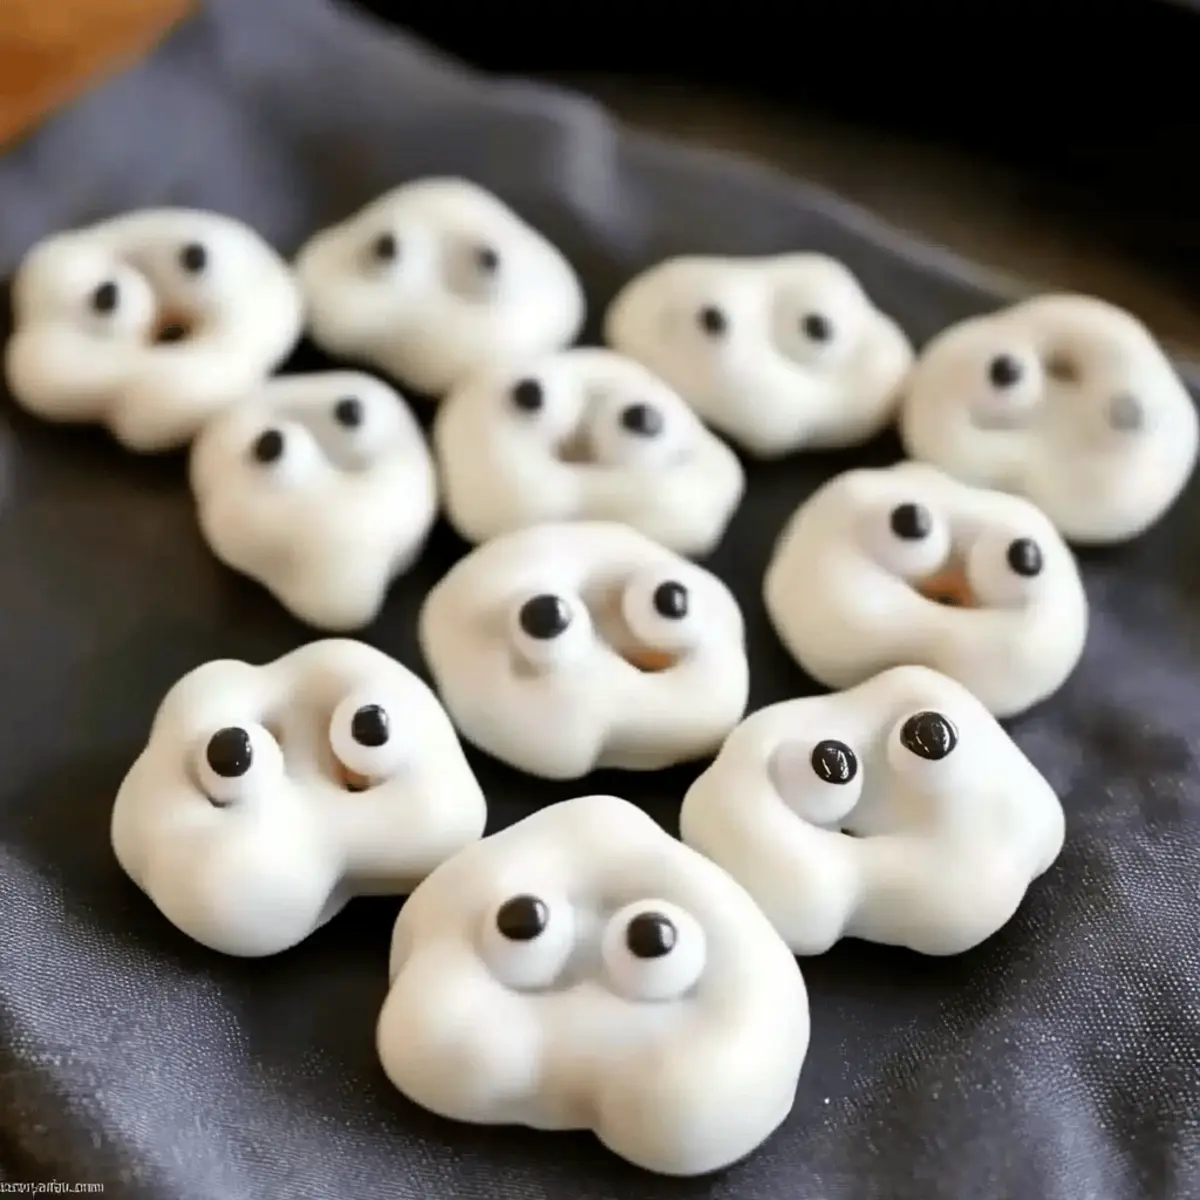
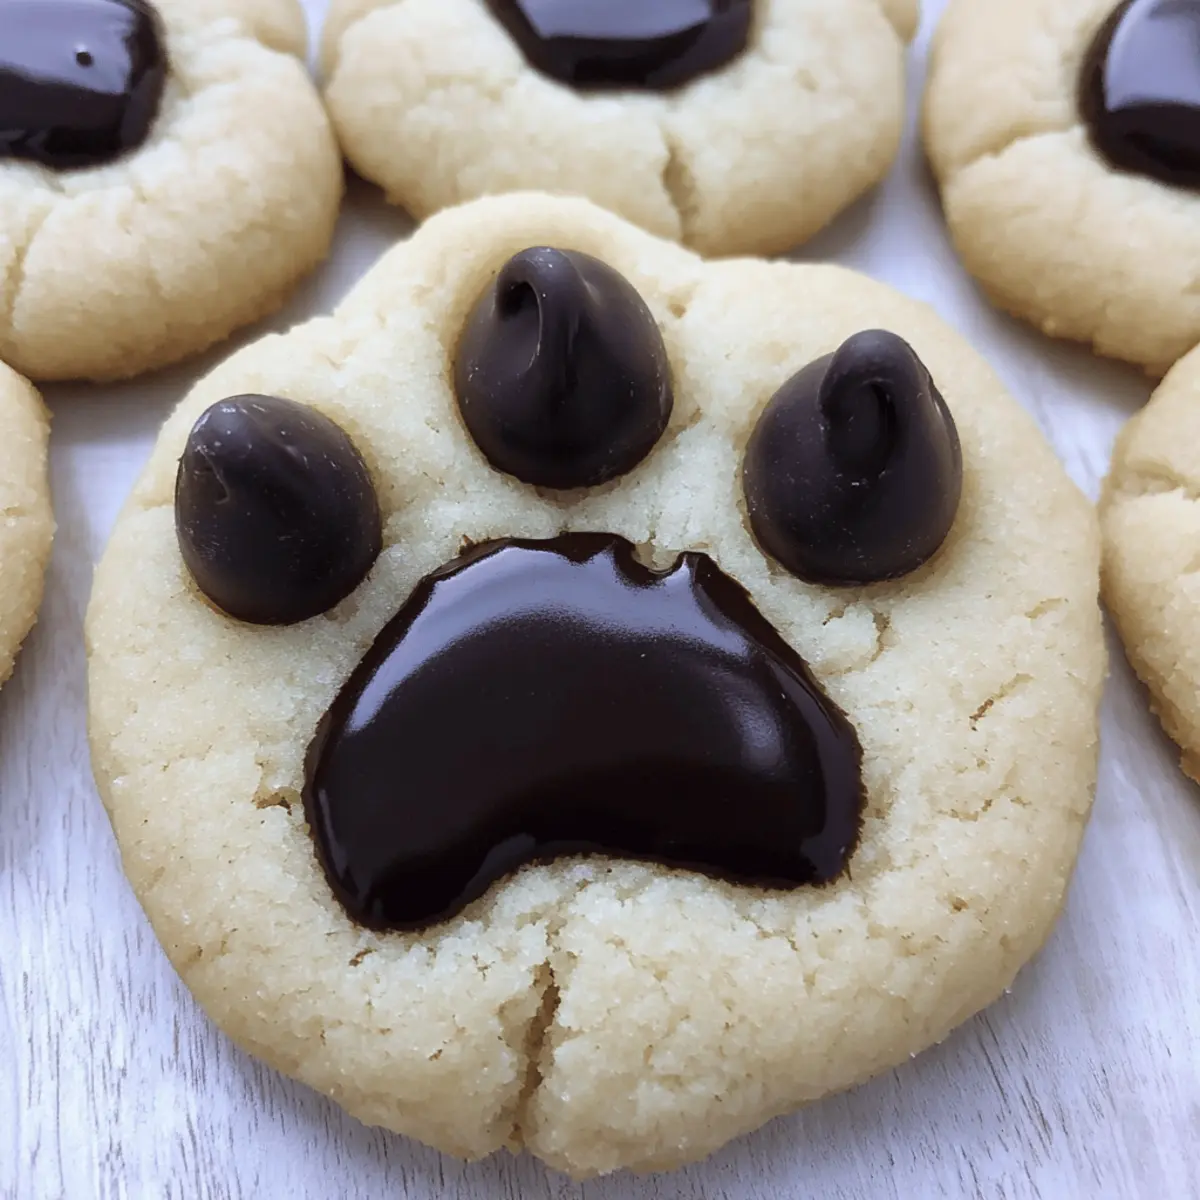
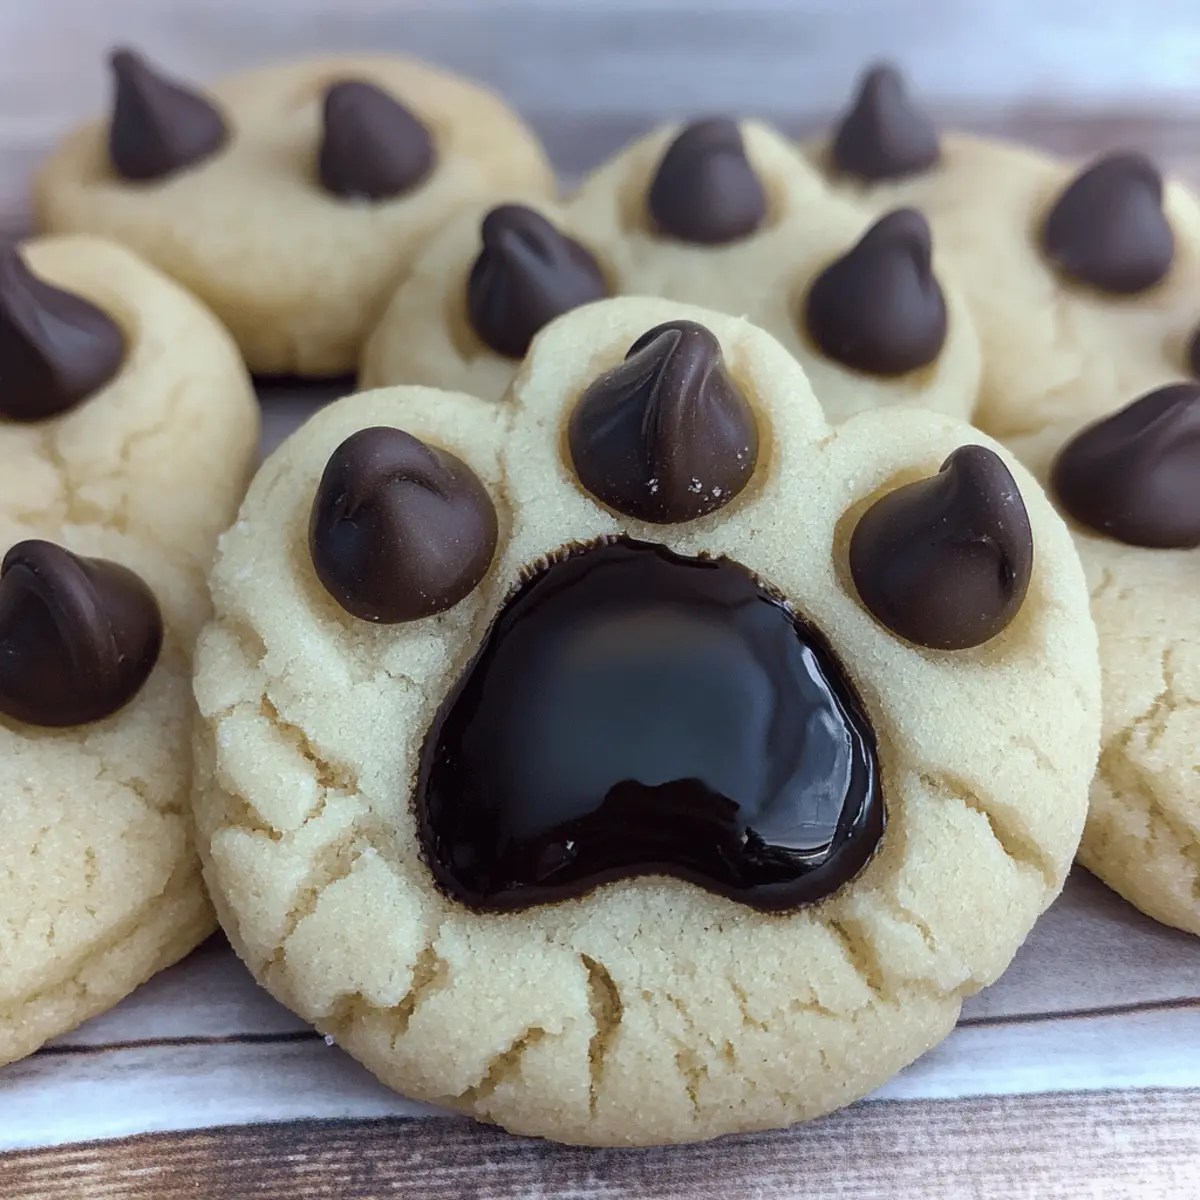
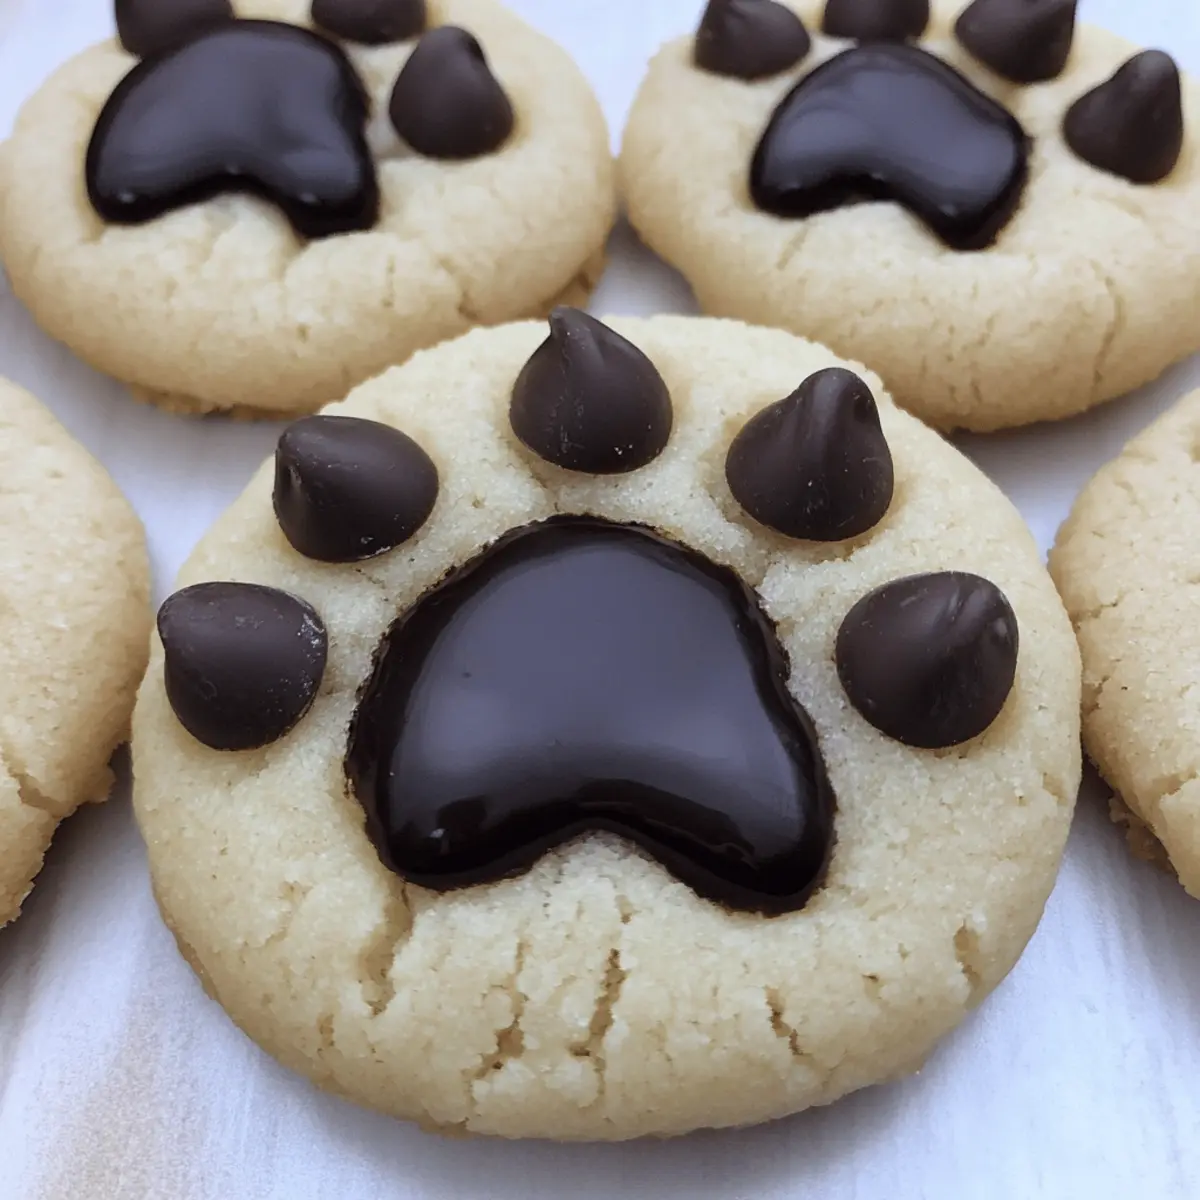
Step 7: Decorate the Cookies
Get creative and decorate your frosted cookies with M&Ms for the eyes, a heart-shaped sprinkle for the nose, and licorice for the whiskers. For ears, cut Hershey's chocolate bars into triangles and place them on top. Use a black edible marker on M&Ms to draw pupils, giving your adorable Black Cat Cookies that playful character!

Step 8: Let the Frosting Set
Allow the frosting to set for a while at room temperature. This will help the decorations stay in place. Once the frosting is firm, your delightful Black Cat Cookies are ready to be served, making perfect treats for Halloween gatherings or simply a fun baking day with family!

Make Ahead Options

These Black Cat Cookies are an ideal choice for meal prep, allowing you to streamline your baking process! You can prepare the cookie dough up to 24 hours in advance. Just mix the dough, wrap it tightly in plastic wrap, and refrigerate until you're ready to bake. Additionally, you can pre-bake the cookies up to 3 days ahead and store them in an airtight container at room temperature. To maintain their soft, chewy texture, ensure they are cooled completely before storing. When it's time to frost your cookies, simply whip up the frosting and decorate as desired. You’ll have your whimsical treats ready for any occasion with minimal effort!

Black Cat Cookies: Creative Variations

Feel free to let your imagination run wild and customize these cookies in delightful ways!

  • Dairy-Free: Substitute unsalted butter with a dairy-free alternative and use almond or coconut milk for the frosting.
  • Gluten-Free: Use a gluten-free Devil’s Food cake mix to make these cookies accessible for everyone.
  • Spicy Twist: Add a pinch of cayenne pepper to the cookie dough for a surprisingly pleasant kick!
  • Nutty Flavor: Stir in finely chopped nuts, like walnuts or pecans, into the cookie dough for added crunch and flavor.
  • Colorful Frosting: Swap in orange or purple food coloring for the frosting, adding vibrant Halloween colors to your cookie display.
  • Fruity Enchantment: Instead of M&Ms, use small gummy candies to bring a different chewy texture and a fruity flavor kite to your cookies.
  • Choco-Lover’s Delight: Mix chocolate chips into the dough alongside the cake mix, enhancing the chocolate decadence with every bite.
  • Meringue Topping: For a fun twist, pipe meringue onto the cookies before baking to create a fluffy, cloud-like topping.

For more creative baking ideas, why not check out these enchanting Peaches Cream Cookies or festive Eggnog Cookies Soft for a burst of flavor?

Expert Tips for Black Cat Cookies

Cool Completely: Ensure your cookies cool completely before frosting to prevent the frosting from melting off and ruining their cute appearance.

Flash-Freezing Trick: Flash-freeze your decorated cookies before storing them to maintain their shape and freshness for longer.

Avoid Cloudy Eyes: Leave the M&M eyes off until after freezing; adding them later keeps them looking vibrant instead of clouded.

Precise Cutting: Use kitchen shears for cutting licorice and chocolate for whiskers and ears; this gives you better control and cleaner edges.

Fun with Food Colors: Experiment with black food coloring for an enhanced spooky look—omit for a classic chocolate treat if preferred.

Use Quality Ingredients: For rich flavor, don't skimp on high-quality cocoa powder or vanilla extract in your frosting; it makes all the difference for your Black Cat Cookies!

How to Store and Freeze Black Cat Cookies

Room Temperature: Store leftover cookies in an airtight container at room temperature for up to 3-4 days. This keeps them fresh and delicious for snacking.

Freezer: To freeze, flash-freeze the cookies on a baking sheet until solid, then transfer to an airtight container or freezer bag. They can be stored for up to 3 months without losing shape or flavor.

Reheating: When ready to enjoy, let them thaw at room temperature. For a warm treat, heat in the microwave for 10-15 seconds, but take care not to overheat.

Frosting Tip: If you plan to freeze the cookies, add M&M eyes and other decorations after thawing to ensure they stay vibrant and cute.

What to Serve with Black Cat Cookies?

Imagine the delight in sharing a cozy Halloween evening filled with enchanting treats and comforting flavors.

  • Cold Glass of Milk: The classic pairing, milk balances the sweetness of the cookies, providing a creamy contrast to the rich chocolate.
  • Hot Cocoa: On a chilly night, a cup of warm cocoa complements the cookies beautifully, turning dessert into a mini celebration.
  • Caramel Popcorn: The light crunch and sweet caramel of popcorn contrast the soft, chewy cookies, perfect for a fun snack spread.
  • Spiced Apple Cider: The warm, spiced notes of cider evoke memories of autumn, enhancing the cozy atmosphere with every sip.
  • Pumpkin Spice Ice Cream: A scoop of this creamy treat offers a festive twist, blending the beloved flavors of fall with your cookies.
  • Chocolate-Dipped Pretzels: The salty crunch of pretzels pair brilliantly with the sweet cocoa, adding an exciting texture to your dessert table.
  • Ghostly Marshmallows: Add a playful element by serving ghost-shaped marshmallows. They provide fun visuals while complementing the spookiness.
  • Fruit Salad: A refreshing fruit salad can lighten the evening and add a burst of freshness, balancing the sweetness of the cookies.
  • Cinnamon Sugar Tortilla Chips: Crispy and sweet, these chips create an interesting textural contrast and are delicious when paired with chocolate dips.

Black Cat Cookies Recipe FAQs

What type of cake mix is best for Black Cat Cookies?
Absolutely! Using Devil’s Food Cake Mix gives these cookies their rich chocolate flavor and soft texture. If you prefer a homemade option, feel free to substitute it with your favorite chocolate cookie recipe. Just be aware that the texture and flavor might vary a bit!

How should I store my Black Cat Cookies?
To keep your cookies fresh, store them in an airtight container at room temperature for up to 3-4 days. This ensures they stay soft and delicious. If you have extras, don't worry—freezing is a great option!

Can I freeze Black Cat Cookies? What’s the best method?
Definitely! To freeze, start by flash-freezing the cookies on a baking sheet until they are solid. This usually takes about 1-2 hours. Once firm, transfer them to an airtight container or freezer bag. They can be stored for up to 3 months. Just make sure to decorate them after they've thawed to keep the candy details vibrant!

What if my cookie dough is too sticky or dry?
Very! If your dough is too sticky, add a little more cake mix—1-2 tablespoons should do the trick. Conversely, if it’s too dry, mix in a teaspoon of milk, a little at a time until you reach the right consistency. The dough should be thick but manageable!

Are there any dietary considerations for Black Cat Cookies?
For those monitoring allergens, these cookies contain eggs and may have traces of nuts depending on the cake mix brand. You can substitute eggs with flaxseed meal or applesauce for an egg-free alternative. Be cautious with decorations, as certain candies may contain allergens. Always check ingredient labels to be safe for everyone!

How do I prevent my frosting from melting on top of the cookies?
To ensure your frosting holds its shape, let the cookies cool completely before spreading on the frosting. If you're preparing them in advance, freeze the decorated cookies as previously mentioned to keep everything intact. Just be patient and allow ample time for the frosting to set before serving!

Black Cat Cookies

Irresistible Black Cat Cookies for a Spooktacular Treat

These Black Cat Cookies are festive treats perfect for Halloween, combining soft chocolatey cookies with whimsical decorations.
Print Recipe Pin Recipe
Prep Time 15 minutes mins
Cook Time 10 minutes mins
Cooling Time 5 minutes mins
Total Time 30 minutes mins
Servings: 24 cookies
Course: Dessert
Cuisine: American
Calories: 150
Ingredients Equipment Method Nutrition Notes

Ingredients
  

For the Cookies
  • 1 box Devil’s Food Cake Mix
  • 2 large Eggs
  • 1/3 cup Canola or Vegetable Oil Reduce if using a 13.25 ounce mix
  • 1 teaspoon Black Food Coloring Optional
For the Frosting
  • 1 cup Unsalted Butter Softened
  • 4 cups Powdered Sugar
  • 1/2 cup Black Cocoa Powder
  • 1 teaspoon Vanilla Extract
  • 1 pinch Salt
  • 1-3 tablespoons Milk As needed for consistency
For Decorating
  • 1 cup Green or Yellow M&Ms For cat's eyes
  • 1 each Black Edible Marker
  • 1 cup Large Heart-Shaped Sprinkles For cat's nose
  • 1 cup Black Licorice For whiskers, optional
  • 2 bars Hershey's Chocolate Bars Cut into triangles for ears

Equipment

  • Mixing Bowl
  • Baking Sheets
  • Parchment Paper
  • Cookie Scoop
  • Spatula

Method
 

Step-by-Step Instructions
  1. Preheat your oven to 350°F (175°C) and prepare baking sheets lined with parchment paper.
  2. In a large bowl, combine Devil's Food cake mix, eggs, and canola oil. Stir until smooth, adding food coloring if desired.
  3. Scoop dough into balls of about 1½ tablespoons each, spacing them on the prepared baking sheets.
  4. Bake for 8-10 minutes, until edges are set. Let cool for about 5 minutes before transferring to a wire rack.
  5. In another bowl, beat softened butter, gradually add powdered sugar, cocoa, vanilla, and salt. Mix until smooth, adjusting with milk.
  6. Once cooled, spread frosting over each cookie evenly.
  7. Decorate the cookies with M&Ms for eyes, heart sprinkles for noses, and licorice for whiskers. Use chocolate pieces for ears.
  8. Allow frosting to set before serving.

Nutrition

Serving: 1cookieCalories: 150kcalCarbohydrates: 20gProtein: 1gFat: 7gSaturated Fat: 4gCholesterol: 20mgSodium: 50mgPotassium: 60mgSugar: 10gVitamin A: 100IUCalcium: 5mgIron: 0.5mg

Notes

Ensure cookies cool completely before frosting. Feel free to experiment with decorations and enjoy fun baking sessions with family!

Tried this recipe?

Let us know how it was!

Delightful Ghost Pretzels: No-Bake Halloween Fun for Everyone

September 19, 2025 by Grace Snow Leave a Comment

As Halloween approaches, the excitement of crafting unique treats fills the air. This year, I wanted to create something both fun and effortless, and that’s when I conjured up these delightful Ghost Pretzels. These whimsical no-bake goodies turn ordinary mini pretzels into spooky little figures coated in creamy white chocolate, all topped with playful candy eyeballs. Not only are they a quick and easy treat to whip up, making them perfect for unexpected guests or festive gatherings, but they also provide a delightful mix of salty and sweet. Kids (and adults!) will love seeing these little ghosts come to life, transforming any Halloween snack table into a festive spectacle. Ready to add some spirit to your seasonal celebrations? Let's dive into this simple recipe!

Why Are Ghost Pretzels So Fun?

Easy and Quick: Preparing these Ghost Pretzels takes just minutes, making them perfect for last-minute Halloween gatherings.

Kid-Friendly Fun: Kids will love the hands-on process, from dipping to decorating—creating spooky snacks has never been this entertaining!

Endless Customization: Feel free to experiment with toppings, sprinkles, or even different chocolate varieties, allowing everyone to personalize their ghostly creations.

Crunchy Meets Creamy: Enjoy the delightful contrast of crunchy pretzels with a rich, sweet chocolate coating, creating a festive flavor combination that’s simply irresistible.

Party Pleaser: These delightful treats are guaranteed to be a hit at any Halloween party or school event, capturing smiles and cheers from partygoers of all ages.

If you enjoy easy, creative recipes, check out more of our no-bake treats perfect for festive celebrations!

Ghost Pretzel Ingredients

For the Pretzels

  • Mini Pretzels – The crunchy base that gives your ghostly treats structure; substitute with gluten-free pretzels if needed.

For the Chocolate Coating

  • Guittard Vanilla Milk Chips (6 oz) – Perfect for dipping, adding a sweet, creamy layer; can be swapped with white candy melts for a different taste.
  • Coconut Oil (½ tsp) – Helps to thin the chocolate for smooth dipping; use shortening as an alternative if needed for allergies.

For the Decoration

  • Wilton Candy Eyeballs (0.88 oz) – These cute little eyes add character to your ghostly pretzels; any edible candy eyes available will work wonderfully as well.

Step‑by‑Step Instructions for Ghost Pretzels

Step 1: Prepare the Baking Sheet
Begin your fun Ghost Pretzels by lining a baking sheet with wax paper, parchment paper, or a silicone mat. This will prevent the pretzels from sticking and provide a clean surface for decoration. Make sure to smooth out any wrinkles to create an even workspace, so your delightful ghosts come out looking perfect.

Step 2: Melt the Chocolate
In a microwave-safe bowl, combine the Guittard vanilla milk chips and coconut oil. Heat in the microwave in short bursts of 10-20 seconds, stirring after each interval until the mixture becomes smooth and melted. The chocolate should be shiny and fluid, making it perfect for dipping. Take care not to overheat!

Step 3: Dip the Pretzels
Once your chocolate is ready, take a mini pretzel and dip it into the melted chocolate, ensuring to coat it evenly. Aim especially to cover the bottom hole of the pretzel, which creates an adorable open-mouthed ghost effect. Shake off any excess chocolate gently as you lift it out, maintaining the structural integrity of your Ghost Pretzels.

Step 4: Decorate with Eyeballs
Now, place the dipped pretzel on your lined baking sheet. Immediately press two candy eyeballs onto each chocolate-coated pretzel, positioning them while the chocolate is still wet to ensure they adhere well. This step adds a playful touch and finishes off your spooky ghost design, making them even more inviting for Halloween treats.

Step 5: Let Them Set
Allow your Ghost Pretzels to harden at room temperature for about 20 minutes, or speed up the process by placing them in the freezer for just 10 minutes. You’ll know they’re ready when the chocolate has set, appearing firm and glossy, ensuring your little ghosts will hold their shape beautifully.

Step 6: Serve and Enjoy
Once your chocolate has fully set, carefully peel each Ghost Pretzel from the baking sheet. The removal should be smooth and easy thanks to your lined surface. Serve them up on a festive platter or in colorful bowls, and watch as they become the star of your Halloween party—each bite a perfect mix of salty and sweet!

Storage Tips for Ghost Pretzels

Room Temperature: Store your Ghost Pretzels in an airtight container at room temperature for up to a week, ensuring they stay fresh and delightful for your Halloween celebrations.

Fridge: If you prefer a cooler treat, you can also refrigerate them for a firmer texture. Just make sure to keep them in a sealed container to prevent them from absorbing moisture and odors.

Freezer: Freezing is not recommended as it may alter the chocolate's creamy texture, causing it to become grainy. For the best experience, enjoy them fresh!

Reheating: If you need to soften any stored pretzels, let them sit at room temperature for a few minutes before serving, allowing the chocolate to regain its lovely consistency.

Tips for the Best Ghost Pretzels

  • Coating Consistency: Ensure the chocolate is smooth and not too thick, which can lead to uneven coating and a clumpy appearance on your Ghost Pretzels.

  • Quick Eyeball Placement: Work swiftly when placing candy eyeballs on the pretzels before the chocolate sets; it secures them perfectly and keeps your ghosts playful.

  • Use Quality Ingredients: Opt for quality chocolate and pretzels for the best flavor and texture, enhancing the taste of your Ghost Pretzels and making them irresistible.

  • Experiment with Toppings: Feel free to add sprinkles or pumpkin-shaped candies for added flair. Customizing your ghosts makes the fun endless and visually appealing!

  • Avoid Overheating Chocolate: Heat the chocolate in short intervals to avoid scorching. A smooth melting process is key to achieving the perfect coating for your Ghost Pretzels.

What to Serve with Ghost Pretzels?

Add some festive flair to your Halloween gatherings with delightful sides that complement these whimsical treats.

  • Pumpkin Spice Dip: This creamy and spiced dip adds a seasonal touch, enhancing the sweet and salty flavors of the pretzels. Serve alongside for a delightful scoop!

  • Caramel Apple Slices: The crispness of fresh apple slices paired with rich caramel is a perfect contrast to the crunchy pretzels, creating a balanced mix of flavors.

  • Chocolate-Covered Strawberries: These juicy, sweet strawberries add a touch of elegance while harmonizing with the sweetness of the white chocolate ghosts. Dispose of any leftover chocolate by dipping strawberries next!

  • Halloween Fruit Salad: A colorful mix of seasonal fruits like oranges, grapes, and kiwi can bring a refreshing brightness to your snack table, refreshing palate between the hearty treats.

  • Spooky Punch: Create a festive beverage with a mixture of fruit juices and sparkling soda, garnished with gummy worms—this playful drink will be a hit with the kids!

  • Boo-tiful Cupcakes: Decorate cupcakes as mini ghosts, using white frosting and candy eyes for a fun dessert that ties in seamlessly with your Ghost Pretzels, making your treat table enchanting!

  • Monster Cheese Platter: A variety of cheeses shaped into monsters or ghosts, paired with crackers, can serve as a savory contrast while still keeping the spooky theme alive.

Make Ahead Options

These delightful Ghost Pretzels are perfect for meal prep and can save you time during the festive season! You can prepare the pretzels up to 24 hours in advance by dipping them in chocolate and setting them on the baking sheet. Just store the pretzels in an airtight container at room temperature to maintain their crunchiness. It’s essential to wait until just before serving to add the candy eyeballs, as this will ensure they stick and keep the ghosts looking lively. When you’re ready to impress your guests, simply place the pretzels on a beautiful platter, and they’ll taste as fresh and fun as the day you made them!

Ghost Pretzels: Fun Variations Await

If you're in the mood for a little creativity, these ghostly delights are ready for your personal touch!

  • Gluten-Free: Substitute mini pretzels with gluten-free varieties to make these treats friendly for everyone!
  • Choco-Mint: For a refreshing change, use mint-flavored chocolate to dip your pretzels. The blend of mint and chocolate provides a delightful twist on traditional flavors.
  • Nutty Ghosts: Add crushed nuts on top of the chocolate before it sets. This nutty crunch perfectly complements the sweet coating and enhances texture.
  • Spooktacular Sprinkles: Customize your ghosts with Halloween-themed sprinkles! Colorful or themed sprinkles can really bring your pretzels to life, adding both vibrancy and fun.
  • Caramel Drizzle: Drizzle melted caramel on top of your ghost pretzels for extra indulgence. This layer of sweetness can take the treat to a whole new level.
  • Dark Chocolate Dip: Swap out the white chocolate for dark chocolate. The deep, rich flavor adds a more sophisticated touch that adult palettes will appreciate.
  • Pumpkin Spice: Incorporate pumpkin spice into the melted chocolate for a fall-inspired twist, making each bite a warm embrace of autumn flavors.
  • Spicy Ghosts: For those who love a kick, sprinkle a tiny bit of cayenne pepper or chili powder into the chocolate before dipping. The heat adds an unexpected but delightful contrast!

Feel free to dive deeper into more exciting creations, like our delicious no-bake treats that bring joy to any festive occasion!

Ghost Pretzels Recipe FAQs

What type of pretzels work best for Ghost Pretzels?
Absolutely! Mini pretzels are ideal for this recipe as they provide the perfect base for your ghostly treats. If you're looking for gluten-free options, feel free to swap the mini pretzels with gluten-free pretzels, which work just as wonderfully!

How do I store my Ghost Pretzels?
You can keep your Ghost Pretzels in an airtight container at room temperature for up to a week. This helps maintain their delightful crunchiness and flavor, making them a tasty treat for last-minute guests or Halloween parties.

Can I freeze Ghost Pretzels?
It’s best to avoid freezing Ghost Pretzels, as doing so might alter the smooth and creamy texture of the chocolate coating. Instead, enjoy them fresh! If you do happen to have leftovers, keep them stored in an airtight container at room temperature.

What should I do if my chocolate coating is too thick?
If your chocolate is becoming too thick during the melting process, you can reheat it in the microwave in short increments of 10-15 seconds, adding a little more coconut oil if necessary to thin it out. The ideal consistency should be smooth and glossy, making for easy dipping and a nice finish.

Are there any allergy considerations with the ingredients?
Yes! Be sure to check labels for any potential allergens in coconut oil and the chocolate chips you choose. If coconut oil isn’t suitable, you can substitute it with shortening to keep the coating nice and smooth. Always consider your guests' dietary needs when creating your treats!

Ghost Pretzels

Delightful Ghost Pretzels: No-Bake Halloween Fun for Everyone

These Ghost Pretzels make for a fun and easy Halloween treat, combining salty pretzels with creamy chocolate and playful candy eyeballs.
Print Recipe Pin Recipe
Prep Time 10 minutes mins
Setting Time 20 minutes mins
Total Time 30 minutes mins
Servings: 12 pretzels
Course: Snacks
Cuisine: American
Calories: 100
Ingredients Equipment Method Nutrition Notes

Ingredients
  

For the Pretzels
  • 6 oz Mini Pretzels Substitute with gluten-free pretzels if needed.
For the Chocolate Coating
  • 6 oz Guittard Vanilla Milk Chips Can be swapped with white candy melts for a different taste.
  • ½ tsp Coconut Oil Use shortening as an alternative if needed for allergies.
For the Decoration
  • 0.88 oz Wilton Candy Eyeballs Any edible candy eyes available will work.

Equipment

  • Microwave-safe bowl
  • Baking Sheet
  • Wax paper or parchment paper

Method
 

Step-by-Step Instructions for Ghost Pretzels
  1. Prepare the baking sheet by lining it with wax paper, parchment paper, or a silicone mat to prevent sticking.
  2. Melt the chocolate by combining the Guittard vanilla milk chips and coconut oil in a microwave-safe bowl. Heat in short intervals of 10-20 seconds, stirring until smooth.
  3. Dip each mini pretzel into the melted chocolate, ensuring even coverage, especially the bottom hole to create a ghost effect. Shake off excess chocolate.
  4. Place the dipped pretzel on the lined baking sheet and immediately press two candy eyeballs onto each one while the chocolate is still wet.
  5. Let the pretzels harden at room temperature for about 20 minutes or in the freezer for 10 minutes until the chocolate is firm.
  6. Peel the Ghost Pretzels from the baking sheet and serve on a festive platter or in colorful bowls.

Nutrition

Serving: 1pretzelCalories: 100kcalCarbohydrates: 15gProtein: 1gFat: 5gSaturated Fat: 3gMonounsaturated Fat: 2gSodium: 200mgPotassium: 50mgSugar: 9gCalcium: 2mgIron: 2mg

Notes

For best results, ensure the chocolate is smooth and not too thick. Quick placement of the eyeballs before the chocolate sets is important for securing them.

Tried this recipe?

Let us know how it was!

Black Magic Margarita: Your Spooky Sip for Halloween Fun

September 19, 2025 by Grace Snow Leave a Comment

As the leaves turn a fiery orange and spooky decorations start making their appearance, it’s time to embrace the Halloween spirit with a drink that truly captivates the imagination. Enter the Black Magic Margarita—a cocktail so enchanting, it’s as if it’s conjured from a witch's brew. This quick-to-prepare elixir features captivating flavors of tropical passion fruit, making it a flexible option for any gathering. Whether you’re hosting a themed party or enjoying a cozy movie night, this customizable Halloween cocktail promises to be the highlight of your soirée. Curious to see how you can mix your own magical concoction?

Why is Black Magic Margarita a Must-Try?

Showstopper at Parties: This cocktail is not just a drink; it's a conversation starter. Its striking dark color and shimmering effect wow your guests, making it the perfect centerpiece for your Halloween party.

Quick and Customizable: Whipping up this magical concoction takes only a few minutes! Plus, with options for ingredient swaps like using raspberry liqueur or different flavored salts, you can easily personalize it to suit anyone's taste.

Irresistible Flavor: The combination of passion fruit liqueur and fresh lime creates a delightful balance that is both lively and refreshing. You'll find it hard to resist pouring another!

Versatile Enjoyment: Perfect for any spooky occasion—be it Halloween festivities, themed parties, or cozy movie nights—this margarita adapts to your needs seamlessly.

Fun for All: Whether you're a cocktail aficionado or a casual sipper, this Black Magic Margarita beckons everyone to join the fun. Pair it with your favorite snacks, like Sweet Potatoes Black or Blackberry Crisp Amp, for an unforgettable flavor experience!

Black Magic Margarita Ingredients

For the Margarita
• Passion Fruit Liqueur – This adds fruity sweetness and tropical notes; feel free to substitute with raspberry, cherry, or lemon liqueur!
• Tequila – The backbone of this cocktail, it provides strength and characteristic flavor; no substitutions recommended for this key ingredient.
• Cointreau – Adds a zesty orange flavor and complexity; can be replaced by Triple Sec or any orange liqueur.
• Fresh Lime Juice – Provides that refreshing acidity; if fresh is unavailable, bottled lime juice or sour mix works just fine.
• Simple Syrup – Sweetens the cocktail perfectly; swap it out for agave nectar if you prefer a different sweetness profile.
• Activated Charcoal – Adds that spooky black color; can be replaced with black gel food coloring if desired.

For the Garnish
• Black Lava Salt – Rims the glass for a striking salty kick and visual appeal; black sugar sprinkles can be used as a substitute.
• Edible Silver Glitter or Shimmer – Optional but enhances the visual allure—perfect for adding that magical touch!
• Cup of Ice – To chill the cocktail and achieve the desired dilution.

Unleash your creativity with this Black Magic Margarita, and watch as your Halloween celebrations soar to new heights!

Step‑by‑Step Instructions for Black Magic Margarita

Step 1: Prepare the Glass
Start your Black Magic Margarita by preparing the glass. Run a lime slice along the rim of your chosen glass, making sure to coat it evenly. Then, gently dip the rim into black lava salt for a striking visual effect and a salty kick. Set the glass aside to let the rim dry while you gather the remaining ingredients.

Step 2: Combine Ingredients
Take a cocktail shaker and fill it with a cup of ice. Pour in the passion fruit liqueur, tequila, Cointreau, fresh lime juice, simple syrup, and a pinch of activated charcoal for that signature spooky color. If you're using edible shimmer for an extra magical touch, add it now. Ensure all ingredients are combined in a harmonious blend before moving on.

Step 3: Shake It Up
Secure the lid on your cocktail shaker and shake vigorously for about 15 seconds. This process is essential to chill the Black Magic Margarita and properly incorporate the flavors. You should feel the shaker cool down in your hands. After shaking, it should have a frosty appearance, indicating that it's perfectly mixed.

Step 4: Strain into the Glass
Now, take your prepared glass filled with fresh ice and position a strainer over the top of the shaker. Carefully pour the chilled margarita into the glass, ensuring the rim stays intact. The vibrant dark color should cascade into the glass, showcasing the cocktail's allure and inviting your guests to take a sip.

Step 5: Add the Finishing Touch
To elevate the presentation of your Black Magic Margarita, garnish with a whimsical skull cocktail stirrer or a sprinkle of edible silver glitter atop the drink. This not only enhances the visual appeal but also adds a touch of festive charm—perfect for any Halloween gathering. Serve immediately to enjoy the freshness!

Black Magic Margarita Variations & Substitutions

Feel free to play around with the Black Magic Margarita; unleash your creativity and craft a drink that fits your taste perfectly!

  • Fruity Twist: Swap the passion fruit liqueur for raspberry or cherry liqueur for a different fruity flavor.

  • Zesty Alternative: Use fresh lemon juice instead of lime for a tart and refreshing change that brightens the drink.

  • Sweetener Switch: Replace simple syrup with agave nectar for a richer sweetness and a touch of natural flavor.

  • Rimmed Delight: Try rimming your glass with flavored salts like jalapeño or chili powder for a spicy kick.

  • Add a Pop: Incorporate a splash of club soda for a fizzy lift that adds extra excitement to each sip.

  • Chilly Option: For a frozen Black Magic Margarita, blend the ingredients with ice instead of shaking them for a slushy delight.

  • Lower Sugar: Use a sugar-free sweetener like stevia or monk fruit for a lighter, calorie-conscious option without sacrificing taste.

  • Colorful Variation: Mix it up with food coloring instead of activated charcoal or black gel food coloring for a festive twist that’s still visually enticing.

As you serve these delightful variations, consider pairing your Black Magic Margarita with tempting snacks like Roasted Bratwurst Peppers for a spooky movie night! Embrace this Halloween season with creativity—your guests will thank you!

What to Serve with Black Magic Margarita

To create a truly memorable Halloween gathering, think about pairing your drink with delightful and themed accompaniments.

  • Spooky Cheese Platter: A selection of cheeses with dark grapes and black licorice adds both visual appeal and tantalizing flavors that enhance the margarita's fruity notes. A mix of creamy and sharp cheeses will cater to different taste preferences.

  • Charcoal-Infused Tortilla Chips: These trendy chips lend a perfect crunch and a touch of the theme, making them great for dipping into spooky salsas or guacamole. The added crunch will contrast nicely with the smooth texture of your margarita.

  • Pumpkin Spice Popcorn: Light and flavorful, this sweet treat complements the tropical elements of your drink, while the crunchiness adds a delightful pairing experience. It's an easy snack to whip up and sure to please all your guests!

  • Black Bean Tacos: Stuffed with flavorful fillings like roasted corn and creamy avocado, these tacos bring a savory delight that balances the cocktail's sweetness. Tacos are always a crowd-pleaser, making them perfect for an informal festive gathering.

  • Witch's Brew Fruit Punch: Mix up a refreshing non-alcoholic option with dark berries and a splash of lime to mimic the magical tones of the Black Magic Margarita. This berry twist will cater to non-drinkers and adds to the overall theme.

  • Chocolate Mousse Cups: Rich and luscious, these dark desserts are the perfect sweet treat to finish off your Halloween feast. The decadent chocolate flavor enhances the cocktail while providing a satisfyingly sumptuous end to your meal!

Expert Tips for Black Magic Margarita

  • Perfect Chilling: Shake vigorously: Ensuring your cocktail is well-chilled enhances the overall flavor. A good shake incorporates air, resulting in a lighter texture.

  • Portion Control: Be mindful of activated charcoal: A little goes a long way! Start with less and adjust according to your desired spooky effect to avoid overwhelming your margarita.

  • Taste Adjustments: Customize your sweetness: If you're using alternative liqueurs, taste the mix before serving. You might need to tweak the simple syrup or agave nectar for balance.

  • Visual Appeal: Enhance your garnish: Opt for unique rim styles like flavored sugars or fun embellishments. This touches your Black Magic Margarita with a personal flair that guests will love!

  • Make-Ahead: Prep ingredients in advance: Prepare your lime juice, simple syrup, and liqueurs ahead of time. It'll save you precious time when guests arrive, ensuring a stress-free serving experience.

Make Ahead Options

These Black Magic Margaritas are perfect for busy home cooks looking to simplify their Halloween festivities! You can prep the cocktail base—combining the passion fruit liqueur, tequila, Cointreau, fresh lime juice, simple syrup, and activated charcoal—up to 24 hours in advance and refrigerate it in an airtight container. This way, all the flavors meld beautifully, making your cocktail just as delicious when served. When it’s time to entertain, simply shake the mixture with ice, strain into your prepared glass with the black lava salt rim, and add your optional garnishes. Enjoy stress-free serving, knowing your spooktacular drinks are ready to impress!

How to Store and Freeze Black Magic Margarita

Fridge: Store any leftover Black Magic Margarita in an airtight container in the fridge for up to 3 days. Be sure to keep the ingredients separate for the best taste.

Freezer: If you'd like to prepare a batch in advance, freeze the margarita in an airtight container for up to 1 month. Allow it to thaw in the fridge before serving, giving it a good shake to restore texture.

Garnish Best Practices: Prepare garnishes separately and store in the fridge. Rimming salt, especially black lava salt, should be kept dry and airtight for freshness when serving.

Serving Freshness: For optimum flavor and presentation, always serve your Black Magic Margarita fresh. Mix ingredients on the day of your gathering for a delightful experience.

Black Magic Margarita Recipe FAQs

What type of passion fruit liqueur should I use?
I recommend using a quality passion fruit liqueur to capture that tropical sweetness. If you can't find passion fruit, alternatives like raspberry, cherry, or sour apple schnapps work beautifully. Just be mindful that different flavors may alter the overall taste!

How should I store leftover Black Magic Margarita?
Store any leftover Black Magic Margarita in an airtight container in the fridge, where it will stay fresh for up to 3 days. If you’ve prepared your ingredients separately, keep them stored that way to maintain flavor integrity and freshness until you’re ready to enjoy!

Can I freeze Black Magic Margarita?
Absolutely! If you want to make a batch ahead of time, pour the margarita into an airtight container and freeze it for up to 1 month. To serve, thaw it in the fridge and shake well before enjoying to restore its original texture!

What if I don’t have black lava salt for rimming?
No worries at all! If black lava salt isn't available, you can substitute it with black sugar sprinkles, which will provide a similar visual impact and sweetness. Alternatively, any flavored salt or a mix of regular salt and activated charcoal will also work nicely.

Is activated charcoal safe for everyone?
While activated charcoal gives that enchanting black color, it's important to note that it can interfere with the absorption of certain medications. If you're concerned, I suggest consulting with a healthcare professional, especially if you're planning to serve this cocktail to guests with health considerations.

Can I make this cocktail non-alcoholic?
Absolutely! To craft a non-alcoholic version of the Black Magic Margarita, substitute the spirits with sparkling water or lemon-lime soda, while using passion fruit juice for sweetness and tang. Adjust the flavors to suit your taste, and it’ll still be a spooky delight for everyone!

Black Magic Margarita

Black Magic Margarita: Your Spooky Sip for Halloween Fun

Enjoy the enchanting Black Magic Margarita, a must-try Halloween cocktail with tropical passion fruit and a striking appearance.
Print Recipe Pin Recipe
Prep Time 5 minutes mins
Total Time 5 minutes mins
Servings: 1 cocktail
Course: Drinks
Cuisine: Mexican
Calories: 200
Ingredients Equipment Method Nutrition Notes

Ingredients
  

For the Margarita
  • 1 ounce Passion Fruit Liqueur Or substitute with raspberry, cherry, or lemon liqueur.
  • 2 ounces Tequila No substitutions recommended.
  • 1 ounce Cointreau Can be replaced with Triple Sec or any orange liqueur.
  • 1 ounce Fresh Lime Juice Bottled lime juice or sour mix can also be used.
  • 0.5 ounce Simple Syrup Agave nectar can be used as a substitute.
  • 1 pinch Activated Charcoal Can be replaced with black gel food coloring.
For the Garnish
  • 1 tablespoon Black Lava Salt Black sugar sprinkles can be used as a substitute.
  • 1 teaspoon Edible Silver Glitter or Shimmer Optional.
  • 1 cup Ice For chilling the cocktail.

Equipment

  • cocktail shaker
  • strainer
  • glass

Method
 

Step-by-Step Instructions
  1. Run a lime slice along the rim of your chosen glass and dip it into black lava salt. Set aside to let the rim dry.
  2. Fill a cocktail shaker with ice. Add passion fruit liqueur, tequila, Cointreau, lime juice, simple syrup, and activated charcoal. Mix well.
  3. Shake vigorously for about 15 seconds until well chilled.
  4. Strain the margarita into the prepared glass filled with fresh ice.
  5. Garnish with edible silver glitter and serve immediately.

Nutrition

Serving: 1cocktailCalories: 200kcalCarbohydrates: 25gSodium: 5mgPotassium: 60mgSugar: 20gVitamin C: 15mgCalcium: 3mg

Notes

Mix ingredients fresh for best flavor and visual appeal. Customize sweetness to taste.

Tried this recipe?

Let us know how it was!

Monster Rice Krispies Treats: Spooky Fun for Halloween

September 19, 2025 by Grace Snow Leave a Comment

“Look out! There’s a monster in the kitchen!” As laughter fills the air, I glance at my counter, where the vibrant colors of these Monstrous Halloween Rice Krispies Treats come to life. This delightful and easy no-bake recipe transforms the classic treat into a spooky sensation that's perfect for any Halloween gathering. With a crispy texture and a fun twist from colorful candy melts and googly eyes, it takes just about 50 minutes to whip up these family-friendly treats. Not only do they make for a wickedly fun project with the kids, but they’re also a hit at bake sales or Halloween parties! So, are you ready to conjure up some deliciously frightful fun in your kitchen? Let's get started!

Why Will You Love Monster Rice Krispies Treats?

Unleash your creativity! These Monster Rice Krispies Treats allow you to transform a classic dessert into a quirky Halloween masterpiece. No-bake convenience means anyone can whip these up in just 50 minutes, perfect for busy parents and last-minute party planners. Versatile options let you switch up the colors or add sprinkles to match your festive theme. Family-friendly fun is guaranteed, as kids love getting involved in the decorating process with googly eyes that bring the treats to life. Looking for more spooky treat ideas? Check out our delicious Lime Chicken Rice or Honey BBQ Chicken Rice recipes!

Monster Rice Krispies Treats Ingredients

For the Base

  • Cooking Spray – Prevents sticking; can substitute with butter for greasing.
  • Unsalted Butter – Adds richness; use salted butter for added flavor, but adjust the included salt.
  • Mini-Marshmallows – Provide sweetness and gooey texture; can substitute with regular marshmallows.
  • Rice Krispies or Other Puffed Rice Cereal – The base for the treats, offering a light crunch; use gluten-free options for gluten-free treats.

For the Decoration

  • Orange Candy Melts (12 oz) – Perfect for coating and decoration; substitute with white chocolate or colored melts as needed.
  • Green Candy Melts (12 oz) – Ideal for eyeball decorations; any other color can be used based on preference.
  • Small Candy Googly Eyes – Fun decorative element; optional, can replace with chocolate chips or mini-M&Ms if unavailable.

Dive into the spirit of Halloween with these delightful Monster Rice Krispies Treats!

Step‑by‑Step Instructions for Monster Rice Krispies Treats

Step 1: Prepare the Baking Dish
Start by preparing a large baking dish (about 9x13 inches) by generously spraying it with cooking spray to prevent sticking. Make sure to cover the corners and edges for easy release later. Set the dish aside while you gather your ingredients and get your cooking supplies ready.

Step 2: Melt the Butter and Marshmallows
In a large saucepan over medium heat, melt 4 tablespoons of unsalted butter until it begins to foam, which takes about 2–3 minutes. Once melted, add in 10 ounces of mini-marshmallows, stirring constantly until they are completely melted and smooth. This mixture should be glossy and well combined, taking about another 3–5 minutes.

Step 3: Combine with Rice Krispies
Remove the saucepan from heat and quickly mix in 6 cups of Rice Krispies cereal. Stir gently but thoroughly until all the cereal is evenly coated with the gooey marshmallow mixture. You should see a sticky yet cohesive texture forming; this process should take about 1–2 minutes.

Step 4: Spread the Mixture in the Dish
Transfer the Rice Krispies mixture to your prepared baking dish. Using a spatula or your greased hands, press it down firmly, spreading it into an even layer about 1 to 2 inches thick. This step is crucial for achieving a solid treat that holds its shape, and it should take around 5 minutes to ensure a firm base.

Step 5: Melt the Candy Melts
While the base cools, melt 12 ounces each of orange and green candy melts in separate microwave-safe bowls. Heat them in the microwave on medium power, stopping every 30 seconds to stir until melted and smooth, which should take about 1 to 2 minutes per color. Set aside to cool slightly before using.

Step 6: Decorate with Candy Melts
Carefully drizzle or pour the melted orange candy over the cooled Rice Krispies base, using a spoon to create a fun, playful design. Let the candy melt set slightly for about 5 minutes before adding the green candy melts as the "eyeballs," allowing for a fun contrast in colors.

Step 7: Apply the Googly Eyes
Before the candy hardens completely, add candy googly eyes onto the green melted candy. Place them strategically to give your Monster Rice Krispies Treats personality and charm. Work quickly, as the candy melt should still be slightly tacky, helping the eyes to stick properly.

Step 8: Cut and Serve
After everything has fully set, which might take about 30 minutes, use a sharp knife to cut the treats into squares or fun shapes. Serve them at your Halloween gathering and enjoy the delightful, spooky look of your Monster Rice Krispies Treats!

What to Serve with Monster Rice Krispies Treats

Looking to create a memorable Halloween feast? Pair these delightful treats with festive dishes that’ll thrill your guests and complement the fun!

  • Crispy Apple Slices:
    Bright, crunchy, and slightly tart, these apple slices can be dipped in caramel for a delicious sweet counterpoint.

  • Pumpkin Spice Cupcakes:
    Soft, spiced, and topped with cream cheese frosting, these cupcakes add warmth to your spooky spread and are a seasonal favorite.

  • Gooey Cheese Quesadillas:
    These warm, melty quesadillas provide a savory balance alongside the sweetness of the treats, making for a fun, finger-food meal.

  • Monster Punch:
    A refreshing blend of fruit juices and soda topped with spooky gummy worms creates a vibrant drink that’s both scary and tasty!

  • Chocolate Ghost Cookies:
    Soft, chocolate-flavored cookies decorated like little ghosts offer a playful addition to the dessert table and continue the Halloween theme.

  • Witch's Brew Soup:
    Creamy and green, this soup adds a savory touch and delightful color contrast while being enviously amusing next to your treats. It’s sure to keep everyone smiling!

  • Spooky Cheese Plate:
    Featuring a variety of cheeses, crackers, and aged meats, this platter provides a rich flavor element that pairs perfectly with the sweet treats.

  • Festive Fruit Skewers:
    Bright and colorful, fruit skewers are a lighter option that brings freshness to your Halloween spread, while kids will love their playful presentation!

Expert Tips for Monster Rice Krispies Treats

  • Marshmallow Care: Avoid overheating marshmallows, as this can make your Rice Krispies Treats too sticky or tough instead of gooey.

  • Firm Pressing: Be sure to press the Rice Krispies mixture firmly in the dish to ensure they hold their shape once cut; this step is crucial!

  • Cool Candy Melts: Allow the melted candy to cool slightly before drizzling; this helps create a beautiful, even coating without running off the edges.

  • Creative Colors: Feel free to mix up candy melt colors for a fun twist. Consider using purple and black for a spooky vibe instead of traditional orange and green.

  • Eye Placement: Work quickly when adding googly eyes, as they adhere better to the still slightly tacky candy melts on your Monster Rice Krispies Treats.

Monster Rice Krispies Treats Variations

Unleash your creativity in the kitchen! These delightful treats are easily adaptable to suit your taste buds and celebration theme.

  • Color Swap: Change orange and green candy melts to purple and black for a ghoulish look.
  • Sprinkle Surprise: Add colorful sprinkles or edible glitter for extra festive flair and a whimsical touch.
  • Chocolate Twist: Mix in mini chocolate chips with the Rice Krispies for a delicious chocolatey flavor that everyone will love.
  • Nutty Delight: Stir in chopped nuts like pecans or almonds for a crunchy texture contrast and a wholesome boost.
  • **CTreats: Use festive cookie cutters to make fun shapes like ghosts or pumpkins, adding an extra layer of fun to your treats!
  • Flavor Addition: Drizzle melted peanut butter or caramel over the top for a creamy, sweet, and savory touch.
  • Spicy Kick: Add a sprinkle of cinnamon or cayenne pepper to add a surprising heat that contrasts beautifully with the sweetness.
  • Dairy-Free Delight: Replace butter and marshmallows with dairy-free alternatives to accommodate lactose intolerance while keeping the fun intact!

For more creative ideas, consider trying these enticing recipes: One Pot Rice for a savory twist, or Furikake Fried Rice as a unique addition to your collection!

Make Ahead Options

These Monster Rice Krispies Treats are perfect for busy parents looking to save time during the Halloween rush! You can prepare the Rice Krispies base up to 24 hours in advance by following steps 1-4; simply cover the baking dish with plastic wrap and refrigerate to maintain that perfect chewy texture. When you're ready to finish, melt the candy melts, drizzle them over the treats, and decorate with googly eyes. This way, your Halloween masterpiece will remain just as delicious and visually spectacular while cutting down on last-minute prep. Trust me, having these treats ready ahead of time will make your Halloween celebrations even more enjoyable!

How to Store and Freeze Monster Rice Krispies Treats

  • Room Temperature: Store your Monster Rice Krispies Treats in an airtight container at room temperature for up to 3 days to keep them crispy and fresh.

  • Fridge: For extended freshness, you can refrigerate the treats. Just remember to keep them in an airtight container, which will maintain their texture and flavor for up to a week.

  • Freezer: If you need to make these treats in advance, freeze them in a single layer on a baking sheet, then transfer to an airtight container or freezer bag for up to 2 months. Thaw at room temperature before serving.

  • Reheating: If they lose some firmness after being stored, pop them in the microwave for about 10 seconds to bring back the gooeyness of your Monster Rice Krispies Treats. Enjoy the spookiness!

Monster Rice Krispies Treats Recipe FAQs

How do I choose the right marshmallows?
Absolutely! Mini-marshmallows provide a sweeter and gooey texture ideal for these treats. If you can't find mini-marshmallows, regular-sized ones can work too—just cut them into smaller pieces to ensure even melting.

How should I store my Monster Rice Krispies Treats?
The best way to store your treats is in an airtight container at room temperature for up to 3 days to keep them crispy and fresh. If you want to extend their freshness, refrigerating them can last up to a week. Always remember to keep the lid on tight!

Can I freeze Monster Rice Krispies Treats?
Definitely! To freeze, first, place your cut treats in a single layer on a baking sheet for a quick freeze. Once frozen, transfer them to an airtight container or freezer bag, where they can last for up to 2 months. When you're ready to enjoy them, simply thaw them at room temperature.

What if my Rice Krispies Treats are too sticky or tough?
Don't worry! If your treats become overly sticky, it could be due to overheating the marshmallows. If this happens, a problem-solving tip is to pop them in the microwave for about 10 seconds to soften them slightly and bring back that gooey texture when serving.

Are these treats safe for pets or people with allergies?
It’s very important to consider allergies! Since the treats contain butter, marshmallows, and candy melts, those with dairy, gluten, or specific food dye allergies should enjoy them cautiously. Always consult with guests about their dietary restrictions. For pets, chocolate and sugar can be harmful, so keep these treats away from them.

Monster Rice Krispies Treats

Monster Rice Krispies Treats: Spooky Fun for Halloween

Transform classic Rice Krispies Treats into spooky Monster Rice Krispies Treats for Halloween fun!
Print Recipe Pin Recipe
Prep Time 50 minutes mins
Cooling Time 30 minutes mins
Total Time 1 hour hr 20 minutes mins
Servings: 12 pieces
Course: Dessert
Cuisine: American
Calories: 180
Ingredients Equipment Method Nutrition Notes

Ingredients
  

For the Base
  • Cooking Spray Cooking Spray Prevents sticking; can substitute with butter for greasing.
  • 4 tablespoons Unsalted Butter Adds richness; use salted butter for added flavor, but adjust salt.
  • 10 ounces Mini-Marshmallows Provide sweetness and gooey texture; can substitute with regular marshmallows.
  • 6 cups Rice Krispies or Other Puffed Rice Cereal The base for the treats; use gluten-free options for gluten-free treats.
For the Decoration
  • 12 ounces Orange Candy Melts Perfect for coating and decoration; substitute with white chocolate or colored melts as needed.
  • 12 ounces Green Candy Melts Ideal for eyeball decorations; any other color can be used based on preference.
  • Small Candy Googly Eyes Fun decorative element; optional, can replace with chocolate chips or mini-M&Ms if unavailable.

Equipment

  • Large saucepan
  • Spatula
  • Microwave-safe bowls
  • Baking dish (9x13 inches)

Method
 

Step‑by‑Step Instructions for Monster Rice Krispies Treats
  1. Prepare a large baking dish (about 9x13 inches) by generously spraying it with cooking spray.
  2. In a large saucepan over medium heat, melt 4 tablespoons of unsalted butter until it begins to foam.
  3. Add 10 ounces of mini-marshmallows, stirring constantly until melted and smooth, about another 3–5 minutes.
  4. Remove from heat and quickly mix in 6 cups of Rice Krispies cereal, stirring gently until evenly coated.
  5. Transfer the mixture to the baking dish, pressing it down firmly into an even layer about 1 to 2 inches thick.
  6. Melt 12 ounces each of orange and green candy melts in separate microwave-safe bowls, stopping to stir until melted.
  7. Drizzle melted orange candy over the cooled Rice Krispies base, letting it set slightly for 5 minutes before adding green candy melts.
  8. Add googly eyes to the green melted candy before it hardens to give your treats personality.
  9. After everything has set (about 30 minutes), cut into squares or fun shapes and serve.

Nutrition

Serving: 1pieceCalories: 180kcalCarbohydrates: 28gProtein: 2gFat: 7gSaturated Fat: 4gCholesterol: 15mgSodium: 120mgPotassium: 30mgSugar: 14gVitamin A: 100IUCalcium: 10mgIron: 0.5mg

Notes

Store in an airtight container at room temperature for up to 3 days or refrigerate for up to a week.

Tried this recipe?

Let us know how it was!

Werewolf Kibble: Spooky Crunchy Treat for Halloween Fun

September 18, 2025 by Grace Snow Leave a Comment

As the air turns crisp and leaves begin to shimmer with the colors of fall, I can't help but feel that familiar thrill of Halloween excitement. This year, I’m sharing a crowd-pleaser that’s as fun to make as it is to eat: Werewolf Kibble! Combining the rich goodness of chocolate and peanut butter with a crunchy medley of cereals, this easy no-bake treat is perfect for both kids and adults. Not only does it whip up in minutes, but it’s also a great way to engage kids in the kitchen—creating spooky memories together. So grab your mixing bowls and let’s conjure up a sweet sensation that will leave everyone howling for more! Are you ready to unleash some Halloween magic?

Why is Werewolf Kibble a Must-Try?

Simplicity: You’ll be amazed at how quickly this no-bake treat comes together! Just a few simple steps and ingredients make delicious Werewolf Kibble a breeze to create.

Crowd-Pleaser: With irresistible chocolate and peanut butter flavors, it's a hit with kids and adults alike, perfect for Halloween parties or cozy movie nights.

Versatile: Feel free to customize with your choice of cereals or mix-ins for a personal touch. It’s all about fun and creativity!

Unique Presentation: Serve them in festive bowls or gift them in decorative bags for a charming touch that adds to your celebration.

Memorable Moments: Engage your kids in the kitchen and create spooky memories together while making this festive treat. Who knew cooking could be this fun?

Werewolf Kibble Ingredients

• Get ready to create a Halloween masterpiece!

For the Kibble

  • Cocoa Puffs® cereal – Acts as the chocolatey base for the kibble; no direct substitute needed, but feel free to swap with similar chocolate cereals.
  • Rice Chex cereal – Adds a crispy, light crunch to the mix; Corn Chex can be used for a different flavor profile.
  • Peanut butter – The creamy binding agent that enhances flavor; can be substituted with almond butter for nut allergies or sunflower seed butter for a nut-free treat.

For the Coating

  • Powdered sugar – Sweetens the mixture and helps achieve that signature coating; reducing the amount can balance out sweetness but will change the texture.
  • Chocolate chips (optional) – Adds a drizzle of chocolatey goodness when melted; choose dark chocolate for richness or white chocolate for a fun contrast.

Let the Halloween fun begin with these amazing ingredients for your Werewolf Kibble!

Step‑by‑Step Instructions for Werewolf Kibble

Step 1: Prepare the Cereals
In a large mixing bowl, combine 4 cups of Cocoa Puffs and 4 cups of Rice Chex cereal. Gently stir the cereals together with a spatula until well mixed. The Cocoa Puffs will bring a rich chocolate flavor while the Rice Chex adds a delightful crunch. Set the bowl aside as you prepare the melting mixture.

Step 2: Melt the Chocolate and Peanut Butter
In a small saucepan, over low heat, add 1 cup of peanut butter and 1 cup of chocolate chips. Stir continuously until both ingredients are melted and fully combined, about 3-5 minutes. Remove the pan from heat before the mixture starts to bubble; you want it smooth and creamy. This will be the delicious binding for your Werewolf Kibble!

Step 3: Coat the Cereals
Pour the warm chocolate and peanut butter mixture over the cereal blend. Use a large spatula to gently fold the mixture into the cereal until every piece is evenly coated—this takes about 1-2 minutes. The combination should look shiny and chocolatey, showcasing the irresistible flavors of the Werewolf Kibble coming together.

Step 4: Shake with Powdered Sugar
Transfer the coated cereal mixture into a large resealable plastic bag. Add 2 cups of powdered sugar, seal the bag tightly, and shake energetically for about 1 minute. This step will coat the kibble with a sweet, snowy finish. Open the bag to reveal the fluffy, sugary surprise—this will make your Werewolf Kibble look extra spooky!

Step 5: Cool and Serve
Spread the coated mixture onto a baking sheet lined with parchment paper. Allow the Werewolf Kibble to cool completely for about 30 minutes at room temperature. As it cools, the pieces will firm up and become extra crunchy. Once cool, serve it in festive bowls or pack it into decorative bags for some Halloween treats!

Werewolf Kibble: Fun Halloween Variations

Feel free to let your creativity shine and personalize this tasty treat in delightful ways!

  • Dairy-Free: Swap peanut butter for almond or sunflower seed butter, ensuring everyone can enjoy this spooky snack without dairy concerns.

  • Different Cereals: Try using Fruity Pebbles or Cinnamon Toast Crunch for a vibrant twist; mix colors and flavors for a playful bite!

  • Extra Crunch: Add in pretzel bites or nuts for a delightful crunch that balances the sweetness and makes each handful exciting.

  • Candy Crunch: Toss in a handful of Halloween-themed candies, like M&M's or candy corn, for pops of color and extra fun in every bite!

  • Spooky Sprinkles: Top your Werewolf Kibble with edible glitter or seasonal sprinkles for a festive look that will charm kids and adults alike.

  • Flavor Boost: Drizzle with caramel sauce after mixing for a deliciously sweet layer that will elevate your Werewolf Kibble to new heights.

  • Heat It Up: Add a pinch of cayenne pepper or chili powder to the melted chocolate mixture for a surprising kick that balances the sweetness.

  • Nut-Free Twist: Instead of peanut butter, use tahini or another seed butter to keep the treat allergen-free while still achieving that creamy consistency.

Embrace your inner chef and enjoy making these Werewolf Kibble variations that suit your taste and those you’re sharing with! Looking for another Halloween-inspired treat? Check out our approach on festive Halloween cupcakes for more delicious fun!

What to Serve with Werewolf Kibble?

Elevate your Halloween celebrations with delicious pairings that perfectly complement this spooky snack!

  • Crispy Apple Slices: The crisp sweetness of fresh apples balances the richness of the Werewolf Kibble, making it a refreshing contrast. Serve with a drizzle of caramel dip for an added treat.

  • Pumpkin Spice Muffins: These warm, spiced muffins add a soft and moist texture to your spread. Their seasonal flavor pairs brilliantly with the sweet crunch of the kibble.

  • Hot Chocolate: A steaming mug of creamy hot chocolate offers a cozy accompaniment on chilly Halloween nights. The chocolate flavors enhance the Werewolf Kibble, creating a delightful indulgence.

  • Popcorn Mix: A sweet and salty popcorn mix sprinkled with Halloween-themed candies adds texture and sweetness. It’s a fun and festive way to nibble alongside your Werewolf Kibble at movie night!

  • Trick-or-Treat Trail Mix: Combine nuts, dried fruits, and chocolate for a nutty crunch that beautifully contrasts the sweetness of the cereal snack. This makes a delightful addition to party bags or bowls.

  • Spooky Sugar Cookies: Soft and chewy sugar cookies decorated with colorful icing can bring an extra festive touch to your Halloween event. They are a fun, sweet treat that kids will adore!

  • Chilled Cider: A glass of chilled apple cider adds a refreshing touch and echoes the fall flavors of Halloween. Its sweetness pairs nicely, bringing a fruity note to your snack table.

  • Gummy Worms: For a playful touch, add some gummy worms alongside your Werewolf Kibble. The chewy texture contrasts the crunchiness and adds to the Halloween fun!

Storage Tips for Werewolf Kibble

  • Room Temperature: Store Werewolf Kibble in an airtight container at room temperature for up to one week. This keeps the treats fresh while preventing them from becoming stale.

  • Fridge: If you prefer a cooler snack, you can refrigerate the Kibble in an airtight container, which will keep it good for up to 10 days. Just be aware it may lose some crunchiness.

  • Freezer: For longer storage, freeze the Werewolf Kibble in a freezer-safe bag or container. It can last up to three months. Thaw at room temperature before serving for best results.

  • Reheating: There's no need to reheat Werewolf Kibble, as it's best enjoyed cold or at room temperature. Just give it a gentle shake to redistribute any powdered sugar before serving!

Make Ahead Options

These Werewolf Kibble are perfect for busy home cooks looking to save precious time during the Halloween festivities! You can prepare the kibble mix up to 3 days in advance, allowing the flavors to meld beautifully while keeping that irresistible crunch intact. Simply follow the recipe instructions up to the point of cooling the coated mixture; after that, store it in an airtight container at room temperature. When you're ready to serve, just spread it onto a baking sheet to air out for about 30 minutes if needed. With this make ahead option, you'll savor all the fun of Halloween without the last-minute rush, and your Werewolf Kibble will be just as delicious!

Expert Tips for Werewolf Kibble

  • Melt Carefully: Always melt the peanut butter and chocolate mixture on low heat, stirring continuously to prevent burning or clumping, ensuring your Werewolf Kibble is perfectly smooth.

  • Coating Technique: When shaking the kibble with powdered sugar in the bag, make sure to seal it tightly to avoid spills. This step is crucial for a uniform coating!

  • Flavor Variations: Experiment with different cereals or add-ins like mini marshmallows or candies for a customized Werewolf Kibble that offers unique textures and fun surprises.

  • Even Spreading: Spread the kibble evenly on the baking sheet to enhance cooling. This prevents clumping and ensures all pieces become equally crunchy for your Halloween treat.

  • Storing Secrets: Keep your Werewolf Kibble in an airtight container to maintain its freshness and crunch. Storing it in a cool, dry place will prolong its delightful flavor!

Werewolf Kibble Recipe FAQs

How should I choose my cereals for Werewolf Kibble?
When selecting your cereals, aim for a good balance of flavor and crunch. Cocoa Puffs are essential for that chocolatey taste, while Rice Chex adds a delightful crunch. If you’re feeling adventurous, swap them for similar cereals like Corn Chex for a different twist. Just avoid using any that might become too soggy.

What is the best way to store Werewolf Kibble, and how long will it last?
Store your Werewolf Kibble in an airtight container at room temperature to keep it fresh for up to one week. If you wish for it to last a bit longer, you can refrigerate it for up to 10 days. Be cautious, though, as chilling can lead to some loss of crunchiness.

Can I freeze Werewolf Kibble? If so, how should I do it?
Absolutely! To freeze Werewolf Kibble, place it in a freezer-safe bag or container. Make sure to remove as much air as possible from the bag before sealing it. It will remain fresh for up to three months. When you're ready to enjoy it, simply thaw the kibble at room temperature; there’s no need to reheat.

What should I do if my peanut butter and chocolate mixture gets too thick?
If your mixture becomes too thick while melting, don’t fret! Simply add a teaspoon of vegetable oil or a splash of milk to the pot, stirring it in with low heat until it smoothens out. This should help create a more pourable consistency for coating the cereals effectively.

Are there any dietary concerns with Werewolf Kibble?
Yes, if you or your guests have nut allergies, consider substituting peanut butter with sunflower seed butter or a nut-free chocolate option for the chocolate chips. If you’re looking to control sugar intake, reduce the powdered sugar in the mix, but note that this will affect texture and sweetness. Always check labels for allergens in your chosen products!

Can I add extra layers of flavor or texture to my Werewolf Kibble?
Definitely! You can mix in mini marshmallows, fun Halloween-themed candies, or sprinkle edible glitter for that festive flair. I often enjoy adding dried fruit or crushed pretzels for an extra crunch and a hint of saltiness that complements the sweetness beautifully. Just remember—be creative!

Werewolf Kibble

Werewolf Kibble: Spooky Crunchy Treat for Halloween Fun

Werewolf Kibble is a crowd-pleasing, no-bake treat combining chocolate, peanut butter, and crunchy cereals, perfect for Halloween fun.
Print Recipe Pin Recipe
Prep Time 15 minutes mins
Cook Time 5 minutes mins
Cooling Time 30 minutes mins
Total Time 50 minutes mins
Servings: 12 treats
Course: Snacks
Calories: 150
Ingredients Equipment Method Nutrition Notes

Ingredients
  

For the Kibble
  • 4 cups Cocoa Puffs® cereal Acts as the chocolatey base
  • 4 cups Rice Chex cereal Adds a crispy, light crunch
  • 1 cup Peanut butter Creamy binding agent
For the Coating
  • 2 cups Powdered sugar Sweetens the mixture
  • 1 cup Chocolate chips Optional drizzle of chocolatey goodness

Equipment

  • large mixing bowl
  • small saucepan
  • Spatula
  • Resealable plastic bag
  • Baking Sheet
  • Parchment Paper

Method
 

Step-by-Step Instructions
  1. In a large mixing bowl, combine 4 cups of Cocoa Puffs and 4 cups of Rice Chex cereal. Gently stir until well mixed.
  2. In a small saucepan over low heat, add 1 cup of peanut butter and 1 cup of chocolate chips. Stir until melted and combined, about 3-5 minutes.
  3. Pour the warm mixture over the cereal blend and gently fold until every piece is coated.
  4. Transfer to a resealable bag, add 2 cups of powdered sugar, seal the bag tightly, and shake for about 1 minute.
  5. Spread the mixture onto a baking sheet lined with parchment paper and allow to cool completely for about 30 minutes.

Nutrition

Serving: 1treatCalories: 150kcalCarbohydrates: 25gProtein: 3gFat: 6gSaturated Fat: 1.5gPolyunsaturated Fat: 0.5gMonounsaturated Fat: 3gSodium: 50mgPotassium: 50mgFiber: 1gSugar: 12gCalcium: 1mgIron: 3mg

Notes

Store Werewolf Kibble in an airtight container at room temperature for up to one week or refrigerated for up to 10 days.

Tried this recipe?

Let us know how it was!

Indulge in Boozy Dirt Cake with Whiskey Caramel Sauce Delight

September 18, 2025 by Grace Snow Leave a Comment

As I sat down with friends for our monthly dinner gathering, the aroma of sweet, rich chocolate filled the room, immediately sparking curiosity. Everyone knows the highlight of our get-togethers is the dessert, and this time, I was excited to unveil my Boozy Dirt Cake with Whiskey Caramel Sauce. This playful adult twist on the classic dirt cake combines silky chocolate pot de crème, whiskey-soaked gummy worms, and a lusciously thick caramel sauce. Not only is it a conversation starter, but it’s also a crowd-pleaser, easily prepared ahead of time. Plus, it’s the perfect remedy for anyone tired of fast food—transforming simple ingredients into an indulgent experience. Are you ready to elevate your dessert game? Let’s dive into this boozy delight!

Why is Boozy Dirt Cake a Must-Try?

Indulgent, playful twist: This recipe transforms a classic dirt cake into a sophisticated dessert, perfect for adult gatherings, ensuring it stands out on any table.

Fuss-free preparation: With a quick soak for the gummy worms and simple layering, you can have this decadent dessert ready in no time.

Richness in every bite: The velvety chocolate pot de crème paired with luxurious whiskey caramel creates an unforgettable flavor experience.

Versatile for any occasion: From Halloween parties to dinner gatherings, this boozy treat is sure to impress your guests.

Nostalgic yet sophisticated: Gummy worms add a playful touch, reminding us of childhood while making this dessert solely for grown-ups.

Easier than you think: If you're looking for another make-ahead dessert, consider this Ice Cream Cake or opt for chocolate lovers with my delightful Chocolate Pudding Cake.

Boozy Dirt Cake Ingredients

Get ready to elevate your dessert experience with these delightful components!

For the Chocolate Pot de Crème
• Large Egg Yolks – These create the creamy texture that's essential for your pot de crème.
• Brown Sugar – Adds a touch of sweetness and rich molasses flavor.
• Salt – A pinch helps balance the sweetness.
• Heavy Whipping Cream – This contributes to that dreamy, luscious texture.
• Whole Milk – Helps moderate the richness for a perfect blend.
• Semi-Sweet/Dark Chocolate Chips – Choose high-quality chocolate for the best flavor in your pot de crème.

For the Whiskey Caramel Sauce
• Whiskey – Infuses the sauce with a sophisticated, adult flavor that enhances the overall dessert.
• Caramel Sauce – Opt for a premium brand to make the whiskey caramel truly shine.
• Cinnamon – Adds warmth to the caramel's sweetness.
• Additional Salt – Enhances and balances the flavors in your sauce.

For the Topping
• Oreos – The crushed Oreos create the classic dirt topping, prefer original for perfect crunch.
• Butter – This binds the crushed Oreos and adds richness to your topping.

For the Fun Touch
• Gummy Worms – Soaked in whiskey for a playful, nostalgic twist in your boozy dessert.
• Decorative Elements (optional) – Consider gravestone toppers or white chocolate skulls for festive flair!

Now, gather these delicious ingredients for your Boozy Dirt Cake with Whiskey Caramel Sauce and get ready to impress your guests!

Step‑by‑Step Instructions for Boozy Dirt Cake with Whiskey Caramel Sauce

Step 1: Soak the Gummy Worms
In a covered container, soak the gummy worms in whiskey for 12 to 24 hours. Choose a container that allows the worms to be fully submerged, ensuring even absorption. By the end of this step, the worms should be plump and infused with whiskey, ready to add a playful touch to your Boozy Dirt Cake.

Step 2: Prepare the Chocolate Pot de Crème
In a heat-safe mixing bowl, whisk together egg yolks, brown sugar, and salt until well combined. Meanwhile, heat heavy whipping cream and whole milk in a saucepan over medium heat until simmering but not boiling, stirring occasionally. Slowly pour the hot cream mixture into the egg mixture, whisking constantly to prevent curdling.

Step 3: Thicken the Mixture
Return the tempered mixture to the saucepan over medium heat. Cook while stirring frequently until the custard thickens enough to coat the back of a spoon, which should take about 5-7 minutes. Remove from heat and stir in semi-sweet or dark chocolate chips until completely melted and smooth, creating a luscious chocolate pot de crème.

Step 4: Chill the Pot de Crème
Pour the velvety chocolate mixture into dessert glasses or ramekins, leaving some space for the whiskey caramel sauce. Cover them with plastic wrap and refrigerate for at least 12 hours, allowing the flavors to meld and the texture to set perfectly in your Boozy Dirt Cake.

Step 5: Prepare the Whiskey Caramel Sauce
In a saucepan over medium heat, combine caramel sauce, whiskey, cinnamon, and additional salt. Stir gently until the mixture is heated through and well combined, about 3-5 minutes. The sauce should be glossy and smooth, ready to enhance the rich flavor profile of your Boozy Dirt Cake once it’s poured over the chilled chocolate pot de crème.

Step 6: Make the Oreo Topping
While your dessert ingredients chill, crush the Oreos into fine crumbs. In a mixing bowl, combine the crushed Oreos with melted butter until it's evenly coated. This mixture will form the crunchy topping, providing a delightful contrast to the creamy chocolate and whiskey layers of your Boozy Dirt Cake.

Step 7: Assemble the Boozy Dirt Cake
Once the pot de crème has set, remove it from the refrigerator. Pour a generous layer of the warm whiskey caramel sauce over each pot de crème, allowing it to cascade down the sides. Sprinkle the Oreo mixture on top evenly, creating a delicious, layered effect that is both visually appealing and enticing.

Step 8: Garnish and Serve
Finish off your Boozy Dirt Cake by placing the soaked gummy worms on top, adding a whimsical touch. For an optional festive flair, consider adding gravestone cupcake toppers or decorative elements. Serve chilled, and get ready to impress everyone with your indulgent creation at your next gathering!

Expert Tips for Boozy Dirt Cake

• Quality Matters: Use high-quality chocolate for the pot de crème; brands like Ghirardelli make a noticeable difference in flavor.

• Don’t Over-Soak: Limit soaking the gummy worms to 24 hours to prevent them from becoming overly mushy, keeping the fun texture intact.

• Chill Time: Allow the dessert to chill for at least 12 hours; this helps the flavors meld beautifully and allows the pot de crème to set properly.

• Sieve the Mixture: Use a fine mesh strainer to pour the chocolate mixture into your glasses—this creates an ultra-smooth pot de crème.

• Layering Technique: Ensure you pour the caramel sauce gently and allow it to cascade over the edges for a visually stunning presentation in your Boozy Dirt Cake.

How to Store and Freeze Boozy Dirt Cake

Fridge: Store leftovers in an airtight container for up to 3 days. This helps retain the rich flavors and creamy texture of the Boozy Dirt Cake.

Freezer: It’s not recommended to freeze this dessert, as the chocolate pot de crème and whiskey caramel sauce may separate, compromising texture and taste.

Reheating: If serving chilled, take the cake out of the fridge just before you’re ready to enjoy it. Allowing it to sit at room temperature for a few minutes enhances flavor.

Assembling Tip: Keep the layers separate until ready to serve for the best presentation. This ensures that the Oreo topping remains crunchy and the pudding stays creamy.

Make Ahead Options

These Boozy Dirt Cake with Whiskey Caramel Sauce delights are perfect for meal prep enthusiasts looking to save time during busy weeks! You can soak the gummy worms in whiskey up to 24 hours in advance, ensuring they’re perfectly infused when it’s time to assemble. Additionally, the chocolate pot de crème can be prepared and refrigerated for up to 3 days before serving; just be sure to cover them tightly with plastic wrap to maintain that silky texture. When you're ready to impress your guests, simply heat the whiskey caramel sauce, assemble the layers, and top off with the Oreo mixture and soaked gummy worms. This way, your dessert will not only be prepared ahead of time but will also be just as delicious!

Boozy Dirt Cake Variations

Invite your inner chef to explore delightful twists on this boozy treat!

  • Non-Alcoholic: Omit the whiskey and soak gummy worms in fruit juice for a fun, family-friendly dessert.
  • Gummy Switch: Swap the gummy worms for rainbow candy or chocolate-covered pretzels for a crunchy surprise.
  • Flavored Chocolate: Experiment with flavored chocolate chips, like mint or raspberry, to add a unique flair.
  • Nutty Crunch: Incorporate crushed nuts, such as pecans or walnuts, for an additional layer of texture and flavor.
  • Spicy Kick: Add a pinch of cayenne pepper or chili powder to the caramel sauce for a surprising heat twist—just a little will elevate the caramel beautifully.
  • Caramel Drizzle: For a richer caramel experience, layer in a homemade salted caramel sauce alongside the whiskey caramel.
  • Cool Layers: Top with whipped cream or chocolate mousse instead of the Oreo crumbles for an ultra-creamy dessert.
  • Creative Toppings: Use festive decorations like white chocolate skulls or edible glitter for a delightful presentation—perfect for Halloween parties!

Feel free to combine these variations for a completely unique take on your Chocolate Pudding Cake or try adding a boozy twist to my German Chocolate Poke Cake next time!

What to Serve with Boozy Dirt Cake with Whiskey Caramel Sauce

Looking to create the perfect spread alongside your indulgent dessert? Here are some delightful pairing ideas that will elevate your meal.

  • Creamy Mashed Potatoes: Their velvety texture enhances any savory main course, creating a comforting contrast to the sweet dessert.

  • Grilled Asparagus: The earthy crunch complements the rich chocolate, adding a fresh element to your dining experience.

  • Spicy Chicken Wings: The savory heat provides a fun, exciting balance to the rich sweetness of the boozy cake, keeping tastebuds dancing.

  • Mixed Green Salad: A bright, tangy salad will cleanse the palate, offering a refreshing diversion from the decadent dessert.

  • Red Wine: Choose a smooth Merlot that enhances the chocolate flavors while bringing a touch of elegance to your gathering.

  • Coffee: A rich, robust brew pairs beautifully with the dessert’s chocolate and whiskey, making every bite and sip more enjoyable.

  • Vanilla Ice Cream: Creamy with a hint of sweetness, it enriches each bite of the cake while providing a satisfying temperature contrast.

  • Chocolate-Covered Strawberries: Adding a fruity burst, these work exceptionally well with the decadent flavors, bringing a touch of romance to the table.

Boozy Dirt Cake with Whiskey Caramel Sauce Recipe FAQs

How do I choose the best gummy worms for this recipe?
Absolutely! Look for gummy worms that are fresh and have a good chewiness. You want them to absorb the whiskey without becoming too mushy. Check the texture and color; avoid any with dark spots or signs of aging, as they may not soak well.

How should I store leftovers of Boozy Dirt Cake?
You can store any leftovers in an airtight container in the refrigerator for up to 3 days. Be sure to keep the layers intact until you're ready to enjoy them, which will help maintain that delightful contrast between the creamy pot de crème and crunchy Oreo topping.

Can I freeze Boozy Dirt Cake?
It's best not to freeze this dessert as the texture may suffer. While the chocolate pot de crème and whiskey caramel sauce are delightful fresh, freezing can cause them to separate or become grainy when thawed. If you have leftover components, consider freezing the whiskey caramel sauce separately for up to 3 months.

What should I do if my pot de crème doesn’t thicken properly?
Very! If your pot de crème hasn’t thickened after 5-7 minutes of cooking, try cooking it for an additional minute or two while stirring continuously. If it still doesn’t thicken, you can mix a little cornstarch with water to create a slurry and stir it in to help thicken it. Just make sure whatever you do, you’re gently heating it and stirring to avoid curdling the eggs.

Are there any dietary considerations with Boozy Dirt Cake?
Definitely keep in mind that this recipe contains alcohol, so it's not suitable for children or those avoiding alcohol for dietary reasons. Additionally, if you’re serving guests with food allergies, check the ingredients—particularly the chocolate, cream, and Oreo cookies—since they may contain allergens like gluten or dairy.

Can I make it non-alcoholic?
Yes! Simply omit the whiskey from the gummy worms and the caramel sauce, and you can still follow the same steps to make a wonderfully delicious dessert. You could also substitute gummy worms with other gummy candy that suits the taste profile— the fun remains, guilt-free!

Boozy Dirt Cake with Whiskey Caramel Sauce

Indulge in Boozy Dirt Cake with Whiskey Caramel Sauce Delight

Boozy Dirt Cake with Whiskey Caramel Sauce is a playful twist on a classic dessert, perfect for adult gatherings.
Print Recipe Pin Recipe
Prep Time 30 minutes mins
Cook Time 15 minutes mins
Chilling Time 12 hours hrs
Total Time 12 hours hrs 45 minutes mins
Servings: 8 slices
Course: Dessert
Cuisine: American
Calories: 450
Ingredients Equipment Method Nutrition Notes

Ingredients
  

Chocolate Pot de Crème
  • 6 large Egg Yolks
  • 1/2 cup Brown Sugar
  • 1/4 teaspoon Salt
  • 2 cups Heavy Whipping Cream
  • 1 cup Whole Milk
  • 8 ounces Semi-Sweet/Dark Chocolate Chips
Whiskey Caramel Sauce
  • 1/2 cup Whiskey
  • 1 cup Caramel Sauce
  • 1/2 teaspoon Cinnamon
  • 1/4 teaspoon Additional Salt
Topping
  • 20 cookies Oreos Crushed
  • 1/4 cup Butter Melted
Fun Touch
  • 1 cup Gummy Worms Soaked in whiskey
  • Decorative Elements (optional) Gravestone toppers or white chocolate skulls

Equipment

  • Mixing Bowl
  • Saucepan
  • ramekins
  • fine mesh strainer
  • Covered container

Method
 

Boozy Dirt Cake Preparation
  1. In a covered container, soak the gummy worms in whiskey for 12 to 24 hours.
  2. In a heat-safe mixing bowl, whisk together egg yolks, brown sugar, and salt until well combined.
  3. Heat heavy whipping cream and whole milk in a saucepan over medium heat until simmering.
  4. Slowly pour the hot cream mixture into the egg mixture, whisking constantly to prevent curdling.
  5. Return the mixture to the saucepan and cook until thickened, about 5-7 minutes.
  6. Stir in chocolate chips until melted and smooth.
  7. Pour the mixture into glasses and refrigerate for at least 12 hours.
  8. In a saucepan, combine caramel sauce, whiskey, cinnamon, and additional salt over medium heat.
  9. Stir until heated through, about 3-5 minutes.
  10. Crush the Oreos and mix with melted butter for the topping.
  11. After chilling, pour the whiskey caramel over each pot de crème and top with the Oreo mixture.
  12. Garnish with soaked gummy worms and any additional decorative elements.

Nutrition

Serving: 1sliceCalories: 450kcalCarbohydrates: 50gProtein: 5gFat: 25gSaturated Fat: 15gPolyunsaturated Fat: 2gMonounsaturated Fat: 3gCholesterol: 100mgSodium: 150mgPotassium: 200mgFiber: 2gSugar: 35gVitamin A: 500IUVitamin C: 1mgCalcium: 100mgIron: 2mg

Notes

For best results, use high-quality chocolate and do not over-soak gummy worms. Chill for at least 12 hours for optimal flavor.

Tried this recipe?

Let us know how it was!

Delightful Bear Paw Cookies Your Kids Will Love to Make

September 18, 2025 by Grace Snow Leave a Comment

In a moment that felt like a scene straight out of a family comedy, my kitchen exploded with laughter as my kids eagerly flung cookie dough in every direction. That's when we decided to whip up some Bear Paw Cookies—a delightful recipe that not only satisfies sweet cravings but also brings the family together for some playful baking fun. These easy cookies are ready in just 30 minutes, making them a perfect match for busy schedules. Each soft and chewy treat, decorated with chocolate, is not only a sweet masterpiece but also a great way to ignite your little ones' creativity. Curious how to transform simple ingredients into these adorable paw-shaped goodies? Let’s dive in!

Why Are Bear Paw Cookies So Adorable?

Playful Design: Each cookie resembles a whimsical bear paw, making baking fun for the kids.
Quick Prep Time: Ready in just 30 minutes, perfect for busy families or spontaneous baking sessions!
Soft & Chewy Texture: Every bite offers a delightful mix of chewy cookie and melty chocolate, sure to satisfy sweet tooth cravings.
Creative Decorating: Involve your little ones in the decorating process, allowing them to express their creativity with chocolate “claws.”
Versatility in Variations: Experiment with different chocolate types or add nuts to customize these treats—just like our yummy Thumbprint Cookies Melt!

Bear Paw Cookies Ingredients

For the Cookie Dough
• Unsalted Butter – Provides richness and moisture; for a twist, use salted butter and reduce added salt slightly.
• Sugar – Adds sweetness and structure; consider substituting with brown sugar for a deeper flavor profile.
• Egg – Acts as a binder, adding moisture; no substitutions are necessary.
• Vanilla Extract – Enhances flavor; you can swap it with almond extract for a unique twist.
• All-Purpose Flour – The backbone of the cookie; use a gluten-free flour blend for a gluten-free version.
• Baking Powder – Acts as a leavening agent, ensuring a soft texture; no substitutions needed.
• Baking Soda – Collaborates with the acid in the recipe for that perfect rise; no alternatives are necessary.
• Salt – Balances sweetness; it can be omitted if you’re using salted butter.

For the Decoration
• Ghirardelli Dark Chocolate Melting Wafers – Used for the center of the paw decoration; feel free to use any melting chocolate you love.
• Semi-Sweet Chocolate Chips – Add visual appeal as "claws"; swap with milk chocolate chips for a sweeter touch.

With these simple yet delightful Bear Paw Cookies ingredients, you’re one step closer to making this charming treat with your family!

Step‑by‑Step Instructions for Bear Paw Cookies

Step 1: Preheat the Oven
Begin by preheating your oven to 350°F (175°C). This ensures that your Bear Paw Cookies will have the perfect baking environment, leading to a beautifully soft and chewy texture. While the oven warms up, gather your ingredients and equipment, including a mixing bowl, stand mixer, and a lined baking sheet.

Step 2: Prepare the Baking Sheet
While the oven preheats, line a cookie sheet with parchment paper. This step prevents sticking and makes cleanup a breeze. With your baking sheet prepared, you’re ready to move on to mixing the ingredients, ensuring your Bear Paw Cookies will bake evenly and come out perfectly.

Step 3: Cream Butter and Sugar
In your stand mixer, combine the softened unsalted butter and sugar. Beat them together on medium speed for about 2-3 minutes until the mixture becomes light and fluffy, creating a creamy texture that will serve as the base for your cookie dough. This step is crucial for ensuring that your cookies rise beautifully in the oven.

Step 4: Incorporate Egg and Vanilla
Next, add one egg and vanilla extract to the butter-sugar mixture. Mix until fully combined, which should take about 1-2 minutes. The egg acts as a binder, and the vanilla enhances the flavor of your Bear Paw Cookies, ensuring each cookie is as delicious as it looks.

Step 5: Combine Dry Ingredients
Gradually add the baking soda, baking powder, salt, and all-purpose flour to the wet mixture. Mix on low speed just until a soft dough forms, taking care not to overmix. You’ll know the dough is ready when it pulls away from the sides of the bowl and forms a cohesive ball, leaving you with a delightful base for your tasty cookies.

Step 6: Portion the Dough
Using a small ice cream scoop, form balls of cookie dough and, if desired, roll them in extra sugar for a sweet touch. Each ball should be about 1-1.5 inches in diameter. This step not only shapes your Bear Paw Cookies but also adds a lovely sweetness when baked, setting them apart from regular sugar cookies.

Step 7: Arrange on the Baking Sheet
Place the cookie balls on the prepared baking sheet, ensuring they are spaced about 2 inches apart. This spacing allows for even spreading while baking. Bake in the preheated oven for 9-12 minutes or until the edges turn golden and the centers look slightly soft, promising a deliciously chewy texture.

Step 8: Decorate the Cookies
Once removed from the oven, immediately press a Ghirardelli dark chocolate wafer into the center of each warm cookie to create the paw pad. Then, place three semi-sweet chocolate chips above as "claws." This decorating step allows your Bear Paw Cookies to take on their whimsical appearance right before your eyes!

Step 9: Cool and Enjoy
Let the cookies cool on the baking sheet for about 30 minutes. This cooling time is essential as it allows the chocolate to set and the cookies to firm up slightly. Once cooled, your delightful Bear Paw Cookies are ready to be enjoyed—perfect for sharing with family or indulging in during a sweet moment!

Bear Paw Cookies Variations & Substitutions

Feel free to explore these fun twists and alternatives, adding your personal touch to the delightful Bear Paw Cookies.

  • Colorful Melts: Swap dark chocolate wafers for brightly colored chocolate melts to make festive cookies for holidays or parties.
  • Nutty Boost: Incorporate chopped nuts like pecans or almonds into the dough for added crunch and a nutty flavor. This twist enhances the texture, making every bite more exciting.
  • Stuffed Surprises: Create a stuffed version by adding a dollop of peanut butter or Nutella in the center of the paw. This surprise adds richness and a creamy delight in every mouthful.
  • Spiced Delight: Add a dash of cinnamon or nutmeg to the dough for a warm spice twist that complements the sweetness beautifully. It’s a surprising flavor that features a homey scent while baking.
  • Fruit Flavors: Mix in dried fruits like cranberries or cherries for a delightful contrast in flavor and chewy texture. The fruit pairs wonderfully with chocolate, elevating the cookie experience!
  • Oatmeal Variation: Incorporate quick oats in the dough for a heartier cookie, adding both texture and flavor. The oats create a delightful chew that balances perfectly with the sweetness.
  • Lower Sugar: Reduce the sugar content slightly or use a sugar alternative to cater to dietary needs while still enjoying the sweet treat. You might be pleasantly surprised by how tasty they are!
  • Zesty Twist: Add a teaspoon of orange or lemon zest to the dough for a refreshing citrus burst that brightens up the cookie's flavor profile. This zest elevates the cookies, adding a lovely aromatic quality.

With these variations, your Bear Paw Cookies will become even more delightful and tailored to your family’s taste preferences. If you're up for more delicious baking, you might also enjoy making Eggnog Cookies Soft or Mexican Wedding Cookies for a festive flair!

Make Ahead Options

These Bear Paw Cookies are a fantastic choice for meal prep, allowing you to save time in your busy schedule! You can prepare the cookie dough up to 24 hours in advance; simply wrap it in plastic wrap and refrigerate until you're ready to bake. If you'd like, you can also portion the cookie balls and freeze them for up to 3 months—just make sure to place them on a baking sheet first to freeze individually before transferring them to a freezer bag. When you're ready to enjoy these adorable treats, bake directly from frozen, adding a couple of extra minutes to the bake time. This way, you’ll have fresh, warm Bear Paw Cookies at your fingertips with minimal effort!

What to Serve with Bear Paw Cookies

Indulging in cookies is even sweeter when complemented with the perfect pairings that elevate your baking experience.

  • Glass of Milk: A classic pairing, the creamy texture of milk enhances the cookies' flavors, making every bite delightful.
  • Fresh Fruit Salad: The natural sweetness of fresh fruit balances the rich chocolate, providing a refreshing contrast to the cookies.
  • Chocolate Milkshake: For chocolate lovers, a thick milkshake offers a decadent treat that mirrors the cocoa in the cookies.
  • Warm Cup of Cocoa: Cozy up with hot chocolate on chilly days, as it amplifies the sweetness of Bear Paw Cookies—perfect for family movie nights.
  • Vanilla Ice Cream: A scoop of vanilla ice cream pairs beautifully, lending a rich, creamy texture that complements the chewy cookies.
  • Nutty Trail Mix: The crunch of nuts and dried fruit adds a contrasting texture, giving a wholesome twist to your sweet cookie experience.
  • Chai Tea: Spiced chai tea introduces warm aromas and flavors that harmonize beautifully with the sweetness of the cookies.
  • Peanut Butter Dip: A creamy peanut butter dip adds a savory note that contrasts wonderfully with the cookie's sweetness, making it fun for dipping.

Storage Tips for Bear Paw Cookies

  • Room Temperature: Store cookies in an airtight container at room temperature for up to 1 week to maintain their soft and chewy texture.

  • Refrigeration: For extended freshness, refrigerate them for up to 2 weeks. Just be sure to bring them back to room temperature before enjoying.

  • Freezer: Freeze Bear Paw Cookies in an airtight container or freezer bag for up to 3 months. Lay parchment paper between layers to prevent sticking.

  • Reheating: When ready to indulge, heat them in the microwave for 10-15 seconds or briefly in the oven at 350°F (175°C) to revive their delightful texture.

Tips for the Best Bear Paw Cookies

  • Room Temperature Butter: Ensure your butter is softened to room temperature for easy creaming; cold butter can lead to dense cookies.

  • Chill Dough: If your dough is spreading too much during baking, chill it in the fridge for 10-15 minutes before scooping to achieve the perfect shape.

  • Mixing Time: Use a stand mixer for better texture; avoid over-mixing the dough after adding flour to keep the cookies tender and soft.

  • Decorating Fun: Get the kids involved in decorating! Allow them to place chocolate “claws” to enhance creativity with these Bear Paw Cookies.

  • Storage Tips: Store your cookies in an airtight container at room temperature for up to one week, keeping them soft and chewy for longer.

Bear Paw Cookies Recipe FAQs

What type of sugar should I use for Bear Paw Cookies?
You can use granulated sugar for this recipe, which will give you classic sweetness and structure. If you prefer a richer flavor, substitute with brown sugar. It’s essential to follow the measurements as both types of sugar serve a purpose in texture and taste!

How should I store Bear Paw Cookies to keep them fresh?
Absolutely! Keep your cookies in an airtight container at room temperature for up to one week. If you want to extend their shelf life, you can refrigerate them for up to two weeks. Remember to bring them back to room temperature before you enjoy them for the best experience!

Can I freeze Bear Paw Cookies?
Very! You can freeze these delightful treats for up to 3 months. To do this, arrange the cookies in a single layer in an airtight container or freezer bag and place parchment paper between layers to prevent sticking. When you’re ready to enjoy them, simply thaw at room temperature or warm them up slightly in the microwave.

What should I do if my cookie dough is too sticky to work with?
If your dough feels overly sticky, don't fret! You can sprinkle a little extra flour on your hands or the work surface while shaping the cookie balls. Additionally, chilling the dough in the fridge for about 10-15 minutes helps firm it up, making it much easier to handle.

Are Bear Paw Cookies safe for kids with allergies?
It's essential to check the ingredient list for any allergies that might be present. This recipe contains eggs and all-purpose flour, which can be allergens for some children. For a gluten-free version, use a suitable gluten-free flour blend and ensure that all other ingredients are free from allergens. Always consult the packaging for any nut-related allergen concerns, especially if you're using chocolate chips.

What’s the best way to decorate Bear Paw Cookies with chocolate?
To achieve the best results when decorating, work with the cookies while they're still warm. After removing them from the oven, press a Ghirardelli dark chocolate wafer into the center of each cookie to form the paw pad and arrange three semi-sweet chocolate chips above it for the claws. Doing this while the cookies are warm will allow the chocolate to melt slightly and adhere better, enhancing the visual appeal of your Bear Paw Cookies!

Bear Paw Cookies

Delightful Bear Paw Cookies Your Kids Will Love to Make

Bear Paw Cookies are adorable, fun to make, and perfect for kids and families, offering a delightful mixture of sweetness and creativity.
Print Recipe Pin Recipe
Prep Time 15 minutes mins
Cook Time 12 minutes mins
Cooling Time 30 minutes mins
Total Time 57 minutes mins
Servings: 24 cookies
Course: Dessert
Calories: 150
Ingredients Equipment Method Nutrition Notes

Ingredients
  

For the Cookie Dough
  • 0.5 cup Unsalted Butter Softened
  • 0.75 cup Sugar Can substitute with brown sugar
  • 1 large Egg No substitutions necessary
  • 1 teaspoon Vanilla Extract Can swap with almond extract
  • 2 cups All-Purpose Flour Use gluten-free blend for gluten-free version
  • 1 teaspoon Baking Powder No substitutions needed
  • 0.5 teaspoon Baking Soda No alternatives necessary
  • 0.25 teaspoon Salt Can omit if using salted butter
For the Decoration
  • 1 cup Ghirardelli Dark Chocolate Melting Wafers Or any melting chocolate you love
  • 0.5 cup Semi-Sweet Chocolate Chips Can substitute with milk chocolate chips

Equipment

  • Mixing Bowl
  • Stand Mixer
  • Baking Sheet
  • Parchment Paper
  • small ice cream scoop

Method
 

Step‑by‑Step Instructions for Bear Paw Cookies
  1. Preheat your oven to 350°F (175°C).
  2. Line a cookie sheet with parchment paper.
  3. In your stand mixer, cream together the unsalted butter and sugar for 2-3 minutes until light and fluffy.
  4. Add the egg and vanilla extract to the mixture and mix until fully combined for about 1-2 minutes.
  5. Gradually mix in baking soda, baking powder, salt, and all-purpose flour until a soft dough forms.
  6. Scoop balls of dough using a small ice cream scoop; each should be about 1-1.5 inches in diameter.
  7. Arrange cookie balls on the prepared baking sheet, spaced about 2 inches apart, and bake for 9-12 minutes.
  8. Immediately press a Ghirardelli dark chocolate wafer into the center of each cookie and place three chocolate chips above as 'claws.'
  9. Let the cookies cool on the baking sheet for about 30 minutes.

Nutrition

Serving: 1cookieCalories: 150kcalCarbohydrates: 20gProtein: 2gFat: 7gSaturated Fat: 4gPolyunsaturated Fat: 0.5gMonounsaturated Fat: 2gCholesterol: 30mgSodium: 50mgPotassium: 50mgFiber: 1gSugar: 9gVitamin A: 300IUCalcium: 15mgIron: 0.5mg

Notes

For best results, ensure butter is softened to room temperature. Chill dough if cookies spread too much while baking. Store cookies in an airtight container for up to one week.

Tried this recipe?

Let us know how it was!

Decadent Dark Chocolate Halloween Chip Cookies for Festive Joy

September 18, 2025 by Grace Snow Leave a Comment

As I reached for the mixing bowl, the scent of cocoa began to weave its way through my kitchen, instantly transporting me to those cozy, autumn afternoons when the air turns crisp and leaves rustle underfoot. Today, I'm excited to share my Dark Chocolate Halloween Chip Cookies, a festive twist on a classic that’s not only quick and easy to whip up but also brimming with an irresistible soft texture that melts in your mouth. With the delightful combination of dark chocolate, creamy peanut butter chips, and vibrant Halloween-themed candies, these cookies are perfect for spooky gatherings or a sweet treat just for you! Ready to join me in creating a seasonal staple that your friends and family will rave about?

Why Are These Cookies So Irresistible?

Irresistible Texture: These Dark Chocolate Halloween Chip Cookies boast a gorgeous softness that gives way to chewy goodness with every bite.
Festive Appeal: The vibrant colors from the Halloween baking chips not only brighten your dessert table but also evoke the spirit of the season.
Easy Preparation: With simple ingredients and quick steps, these cookies can be whipped up in no time, making them perfect for last-minute parties or cozy nights in.
Versatile Variations: Don't hesitate to mix things up—swap peanut butter chips for butterscotch or give them a minty twist for the winter holidays.
Crowd Pleaser: They're a guaranteed hit for gatherings, whether paired with pumpkin spice lattes or enjoyed on their own—everyone will be reaching for seconds!
Enjoy these warm, velvety delights and check out my Matcha Cookies Soft for another delectable treat that’s just as easy!

Dark Chocolate Halloween Chip Cookies Ingredients

For the Cookie Base

  • All-Purpose Flour – Provides structure; can use gluten-free flour for a gluten-free version.
  • Hershey's Special Dark Cocoa Powder – Gives a rich chocolate flavor; regular cocoa powder works but will lighten the cookie color.
  • Baking Soda – Acts as a leavening agent; ensure it's fresh for the best rise.
  • Salt – Balances sweetness and enhances flavor.
  • Salted Butter – Adds richness; substitute with unsalted and adjust salt to taste.
  • Granulated Sugar – Contributes sweetness and chewy texture.
  • Light Brown Sugar – Adds moisture and caramel notes; use dark brown sugar for a deeper flavor.
  • Large Eggs – Binds the ingredients; substitute with flaxseed meal or applesauce for a vegan option.
  • Vanilla Extract – Enhances flavor depth and warmth.

For the Festive Mix-Ins

  • Halloween Baking Chips – Add seasonal flair; substitute with Yummallo brand if Nestle’s aren't available.
  • Peanut Butter Chips – Adds nutty richness; omit for allergies or swap for extra chocolate chips.
  • White Chocolate Chips – Provides sweetness and contrast; regular chocolate chips can be used instead.
  • Mini Reese's Pieces – Introduces fun crunch and peanut butter flavor; substitute with regular-sized Reese's if unavailable.

Elevate your baking with these Dark Chocolate Halloween Chip Cookies that are sure to delight!

Step‑by‑Step Instructions for Dark Chocolate Halloween Chip Cookies

Step 1: Preheat the Oven
Begin by preheating your oven to 350°F (175°C). While the oven warms up, line your baking sheets with parchment paper to prevent the cookies from sticking and ensure even baking. This step sets the stage for perfectly baked Dark Chocolate Halloween Chip Cookies that are soft and chewy.

Step 2: Cream the Butter and Sugars
In a stand mixer, combine the softened salted butter, granulated sugar, and light brown sugar. Beat the mixture on medium speed for about 3-4 minutes, or until it becomes light and fluffy, creating a smooth texture. This step is crucial as it incorporates air, leading to a delightful cookie rise.

Step 3: Add Eggs and Vanilla
Crack in the large eggs, followed by the warm vanilla extract. Continue mixing on low speed until the ingredients are well combined. You’ll notice the mixture becoming even creamier—this is your cue that the wet ingredients for your Dark Chocolate Halloween Chip Cookies are ready to proceed to the next step.

Step 4: Whisk the Dry Ingredients
In a separate bowl, whisk together the all-purpose flour, Hershey's Special Dark cocoa powder, baking soda, and salt. Gradually incorporate this dry mixture into the wet ingredients, mixing on low speed until just combined. Avoid over-mixing; a few flour streaks are okay, as they’ll blend in perfectly.

Step 5: Fold in the Festive Mix-Ins
In another bowl, combine your Halloween baking chips, peanut butter chips, white chocolate chips, and mini Reese's Pieces. Gently fold 1¾ cups of this mix into the cookie dough, reserving some for topping later. This step adds exciting flavors and a festive touch to your Dark Chocolate Halloween Chip Cookies.

Step 6: Shape the Cookie Dough
With a medium cookie scoop, portion about 2 tablespoons of dough for each cookie and shape it into balls. If the dough feels too soft, chill it in the refrigerator for 30-60 minutes. Chilling helps maintain the cookie shape while baking, ensuring you achieve that perfect soft yet chewy texture.

Step 7: Bake the Cookies
Place the dough balls on your prepared baking sheets, spaced about 2 inches apart to allow for spreading. Bake in the preheated oven for 8-10 minutes, until the edges are set but the centers still look slightly soft. This will ensure your Dark Chocolate Halloween Chip Cookies have that coveted melt-in-your-mouth softness.

Step 8: Decorate Your Cookies
Once the cookies are baked, remove them from the oven and immediately press the reserved chips into the tops of each cookie for decoration. This step not only enhances the visual appeal but also adds extra pockets of chocolaty goodness in every bite.

Step 9: Cool and Store
Allow the cookies to cool on the baking sheets for a few minutes before transferring them to a wire rack to cool completely. Once cooled, store your Dark Chocolate Halloween Chip Cookies in an airtight container at room temperature for 3-5 days, or freeze them for up to 2 months for a later treat.

How to Store and Freeze Dark Chocolate Halloween Chip Cookies

Room Temperature: Store in an airtight container for up to 3-5 days to retain softness and flavor.

Fridge: If you prefer, refrigerate for slightly longer freshness, but remember they may become firmer.

Freezer: Freeze the cookies in a single layer in a freezer-safe bag for up to 2 months. Thaw at room temperature before enjoying.

Reheating: To bring back that just-baked softness, reheat cookies in a preheated oven at 350°F for 5-7 minutes.

What to Serve with Dark Chocolate Halloween Chip Cookies

These delightful cookies are not just a treat on their own; they invite a world of delightful pairing possibilities that enhance their rich flavors.

  • Chilled Milk: There's nothing quite like the classic pairing of icy cold milk with cookies, cutting through the richness while adding a comforting touch.
  • Pumpkin Spice Latte: Embrace the season with a warm, spiced latte that complements the chocolatey sweetness, ideal for chilly October evenings.
  • Vanilla Ice Cream: A scoop of creamy vanilla ice cream offers a delightful contrast in temperature and texture, making each bite heavenly.
  • Fresh Apple Slices: Crisp apple slices bring a refreshing crunch and a touch of tartness, balancing the sweetness of the cookies beautifully.
  • Chocolate-Covered Pretzels: The salty, crunchy pretzels wrapped in chocolate create a delightful sweet-and-salty experience that’s simply irresistible.
  • Hot Chocolate: Pair your cookies with a steaming mug of hot chocolate for a cozy afternoon treat that’s sure to warm your heart.
  • Caramel Dipping Sauce: A luscious drizzle of caramel elevates the experience, providing a sweet, gooey element that harmonizes with the cookies.
  • Pumpkin Cheesecake: For an indulgent dessert table, serve alongside creamy pumpkin cheesecake, which echoes the flavors of fall.

Expert Tips for Dark Chocolate Halloween Chip Cookies

  • Don’t Skip Chilling: Chilling the dough for 30-60 minutes helps the cookies maintain their shape and prevents excessive spreading.
  • Baking Time Matters: Be careful not to overbake; take them out when the edges are set but the centers are still soft for that perfect chewy texture.
  • Use Fresh Ingredients: Ensure your baking soda is fresh to achieve a nice rise in your Dark Chocolate Halloween Chip Cookies, as stale ingredients can lead to flat cookies.
  • Mix Wisely: Fold the baking chips gently into the dough to avoid breaking them and maintain a delightful bite of chocolate or peanut butter in every mouthful.
  • Uniform Size: Use a cookie scoop for even sizing, which helps the cookies bake uniformly, ensuring all are perfectly soft and chewy.
  • Storage Tips: Keep the cookies in an airtight container at room temperature for optimal freshness, and for longer storage, freeze them to enjoy later!

Dark Chocolate Halloween Chip Cookies Variations

Feel free to unleash your creativity—these cookies can be customized to cater to your cravings!

  • Dairy-Free: Use coconut oil instead of butter and dairy-free chocolate chips for a delicious vegan option.
    A swap like this not only fits dietary needs but can also enhance the cookie's richness with a subtle coconut taste.

  • Nut-Free: Omit peanut butter chips and replace them with extra chocolate chips for a nut-free alternative that doesn’t compromise on flavor.
    This variation ensures everyone can join in on the fun, making them perfect for school events or gatherings.

  • Minty Twist: Substitute half the chocolate chips with mint chocolate chips for a refreshing seasonal twist.
    Adding this touch can turn your cookies into a delightful holiday treat, reminiscent of candy canes.

  • Seasonal Flavors: Incorporate pumpkin spice or cinnamon to celebrate the autumn season fully.
    A dash of spice can elevate your cookies to new heights, filling your kitchen with the warm aromas of fall.

  • Texture Boost: Mix in chopped pecans or walnuts for a satisfying crunch that contrasts beautifully with the soft cookies.
    The added texture can bring a delightful surprise with every bite, ensuring no two cookies are the same!

  • Caramel Surprise: Add chunks of caramel candy or drizzle warm caramel over the cookies after baking for that extra indulgent touch.
    This change creates a gooey center that simply melts in your mouth, elevating your cookie experience to another level.

  • Chocolate Lover: Go all out by using dark chocolate chips instead of regular chocolate chips for an intense chocolate flavor.
    If you're a chocolate aficionado, this twist will definitely make your taste buds sing!

  • Halloween Themes: Swap festive mix-ins with seasonal candies like M&Ms or Skittles to add color and a playful touch.
    These changes will not only make your cookies eye-catching but also cater to the whims of kids and adults alike!

With these variations in mind, your Dark Chocolate Halloween Chip Cookies will be a hit, no matter the occasion. Enjoy them with a glass of cold milk or hot cocoa, and if you’re looking for more delicious ideas, be sure to check out my Eggnog Cookies Soft for another delightful treat!

Make Ahead Options

These Dark Chocolate Halloween Chip Cookies are fantastic for meal prep, making your baking experience even more enjoyable! You can prepare the cookie dough up to 24 hours in advance; simply mix all the ingredients, shape the dough into balls, and refrigerate them. This will keep the cookies from spreading too much while baking. When you're ready to bake, just pop the dough balls straight into the oven—no thawing necessary! You can also bake and store the cookies in an airtight container at room temperature for 3-5 days or freeze them for up to 2 months. That way, you’ll always have a sweet, festive treat ready to go!

Dark Chocolate Halloween Chip Cookies Recipe FAQs

What type of flour can I use for Dark Chocolate Halloween Chip Cookies?
You can use all-purpose flour for these cookies, which provides great structure and texture. If you're looking for a gluten-free option, simply replace it with gluten-free all-purpose flour. This swap will keep the cookies delicious but ensure they cater to gluten-sensitive friends and family!

How should I store Dark Chocolate Halloween Chip Cookies?
Store the cookies in an airtight container at room temperature for 3 to 5 days. For longer freshness, you could refrigerate them, but they may become a bit firmer. Always aim for an airtight environment to maintain their soft, chewy goodness!

Can I freeze Dark Chocolate Halloween Chip Cookies?
Absolutely! To freeze, place the cookies in a single layer in a freezer-safe bag or container for up to 2 months. When you're ready to enjoy, simply thaw them at room temperature, or for a fresh-out-of-the-oven experience, reheat them at 350°F for 5-7 minutes!

What if my cookie dough is too soft?
If you find your dough is too soft for shaping, don’t worry! Chill the dough in the refrigerator for 30 to 60 minutes. This will help the cookies hold their shape during baking and give you that desirable soft and chewy texture after they come out of the oven.

Are there any dietary considerations for Dark Chocolate Halloween Chip Cookies?
Yes, if you're cooking for those with allergies, you might want to omit the peanut butter chips and replace them with extra white or dark chocolate chips to keep the cookies nut-free. For those on a vegan diet, you can substitute eggs with flaxseed meal (1 tablespoon mixed with 2.5 tablespoons of water) or applesauce (1/4 cup per egg). These swaps ensure everyone can indulge in these delightful treats!

How can I ensure my cookies turn out soft and chewy?
To achieve that perfect soft and chewy texture, be cautious not to overbake the cookies. Take them out of the oven when the edges are set, but the centers look slightly soft. Also, ensure your baking soda is fresh for a good rise, and consider chilling the dough if you find it spreading too much during baking. Enjoy your delightful baking experience with these tips!

Dark Chocolate Halloween Chip Cookies

Decadent Dark Chocolate Halloween Chip Cookies for Festive Joy

These Dark Chocolate Halloween Chip Cookies are a perfect festive treat that combines dark chocolate, peanut butter, and colorful candies. Ideal for gatherings or a cozy night in.
Print Recipe Pin Recipe
Prep Time 15 minutes mins
Cook Time 10 minutes mins
Chilling Time 30 minutes mins
Total Time 55 minutes mins
Servings: 24 cookies
Course: Dessert
Cuisine: American
Calories: 150
Ingredients Equipment Method Nutrition Notes

Ingredients
  

For the Cookie Base
  • 2 cups All-Purpose Flour Can use gluten-free flour for a gluten-free version.
  • ¾ cup Hershey's Special Dark Cocoa Powder Regular cocoa powder works but will lighten the cookie color.
  • 1 teaspoon Baking Soda Ensure it's fresh for the best rise.
  • ½ teaspoon Salt Balances sweetness and enhances flavor.
  • 1 cup Salted Butter Adds richness; substitute with unsalted and adjust salt to taste.
  • ¾ cup Granulated Sugar Contributes sweetness and chewy texture.
  • ¾ cup Light Brown Sugar Adds moisture and caramel notes; use dark brown sugar for a deeper flavor.
  • 2 large Large Eggs Substitute with flaxseed meal or applesauce for a vegan option.
  • 1 teaspoon Vanilla Extract Enhances flavor depth and warmth.
For the Festive Mix-Ins
  • 1 cup Halloween Baking Chips Add seasonal flair; substitute with Yummallo brand if Nestle’s aren't available.
  • ½ cup Peanut Butter Chips Adds nutty richness; omit for allergies or swap for extra chocolate chips.
  • ½ cup White Chocolate Chips Provides sweetness and contrast; regular chocolate chips can be used instead.
  • 1 cup Mini Reese's Pieces Introduces fun crunch and peanut butter flavor; substitute with regular-sized Reese's if unavailable.

Equipment

  • Stand Mixer
  • Baking Sheets
  • Parchment Paper
  • Cookie Scoop
  • Mixing bowls

Method
 

Step-by-Step Instructions
  1. Preheat your oven to 350°F (175°C) and line your baking sheets with parchment paper.
  2. In a stand mixer, beat the softened salted butter, granulated sugar, and light brown sugar on medium speed until light and fluffy (3-4 minutes).
  3. Add the large eggs and vanilla extract, and mix on low speed until well combined.
  4. In a separate bowl, whisk together flour, cocoa powder, baking soda, and salt. Gradually add this dry mixture to the wet ingredients and mix on low until just combined.
  5. In another bowl, combine Halloween baking chips, peanut butter chips, white chocolate chips, and mini Reese's Pieces. Fold 1¾ cups into the cookie dough, reserving some for topping.
  6. Shape dough into balls, about 2 tablespoons each. Chill in the refrigerator for 30-60 minutes if too soft.
  7. Place dough balls on prepared sheets, spaced 2 inches apart, and bake for 8-10 minutes until edges are set but centers look slightly soft.
  8. Press reserved chips into the tops of each cookie once baked to enhance visual appeal.
  9. Allow cookies to cool on baking sheets for a few minutes before transferring to a wire rack to cool completely.

Nutrition

Serving: 1cookieCalories: 150kcalCarbohydrates: 22gProtein: 2gFat: 7gSaturated Fat: 4gPolyunsaturated Fat: 1gMonounsaturated Fat: 2gCholesterol: 20mgSodium: 100mgPotassium: 60mgFiber: 1gSugar: 10gVitamin A: 200IUCalcium: 10mgIron: 1mg

Notes

Chill dough for best results and avoid overbaking. Store cookies in an airtight container for freshness.

Tried this recipe?

Let us know how it was!

Spooky Sweet and Sour 'Bat' Wings Perfect for Halloween Fun

September 18, 2025 by Grace Snow Leave a Comment

The eerie glow of Halloween is right around the corner, and what better way to celebrate than with a dish that has both a twist and a fright? Meet my irresistibly spooky Sweet and Sour 'Bat' Wings, a fun combination of tangy and sweet that will leave your guests delightfully surprised. These wings, baked to crispy perfection, not only stand out with their unique black hue but also serve as a delicious centerstage for any Halloween gathering. Plus, they’re incredibly easy to whip up, making them a fantastic option for last-minute party planning. Whether you choose to keep them mild or turn up the heat with a spicy variation, these sticky wings are bound to be a hit! Are you ready to add a little magic to your Halloween menu?

Why are these wings a Halloween must-try?

Spooky Fun: Transform your Halloween gathering with these eye-catching wings that bring a playful twist to your appetizer spread.

Sweet and Tangy Delight: The balanced flavor profile offers a delightful contrast that keeps everyone coming back for more.

Easy Preparation: Thanks to simple steps, these wings can seamlessly fit into your busy schedule, perfect for those last-minute plans.

Crowd-Pleaser: They’re not just tasty; their unique presentation garners compliments and sparks conversations at any party.

Versatile Variations: Want to kick up the heat? Add hot sauce to cater to all taste preferences while enjoying pizza on the side with a warm dip like those in our Coconutty Beans and Greens Stew and Smoky Sweet Potatoes.

Bring the spooky spirit to life with these Sweet and Sour 'Bat' Wings that everyone will be raving about!

Sweet and Sour 'Bat' Wings Ingredients

For the Marinade

  • Pineapple Juice – Adds a sweet and tangy flavor; substitute apple juice if allergic.
  • Brown Sugar – Enhances sweetness and caramelization during baking.
  • Tomato Sauce – Provides a savory base; essential for the rich taste.
  • Worcestershire Sauce – Boosts umami depth in the marinade mix.
  • Hot Sauce (optional) – Introduces a spicy kick; adjust to match your spice preference.
  • Black Food Coloring – Creates that eerie black hue for your 'bat' wings; it's crucial for the spooky effect.

For the Wings

  • Whole Chicken Wings – The stars of the dish; ensure you use whole wings for a great presentation.
  • Honey – Adds a sticky and sweet finish when glazed over the wings.
  • Apple Cider Vinegar – Balances the sweetness of honey with a touch of acidity for flavor depth.

These Sweet and Sour 'Bat' Wings will be the show-stopper at your Halloween celebration!

Step‑by‑Step Instructions for Sweet and Sour 'Bat' Wings

Step 1: Prepare the Marinade
In a large mixing bowl, combine 1 cup of pineapple juice, 1/2 cup of brown sugar, 1/2 cup of tomato sauce, 2 tablespoons of Worcestershire sauce, and a few drops of black food coloring. Whisk the mixture until the sugar dissolves completely, creating a glossy marinade. The blended ingredients should have a rich aroma with a hint of sweetness. Set it aside while you marinate the chicken wings.

Step 2: Marinate Chicken
Add the whole chicken wings to the marinade, ensuring each wing is thoroughly coated. Toss them gently to ensure an even covering, then cover the bowl with plastic wrap. Refrigerate for at least 6 hours or ideally overnight to enhance the flavor and achieve the unique black hue for your Sweet and Sour 'Bat' Wings.

Step 3: Preheat Oven
Preheat your oven to 400°F (200°C). While the oven heats, line two baking sheets with parchment paper to prevent sticking and make cleanup easier. This temperature is perfect for achieving crispy wings. You’ll know the oven is ready when you can feel the heat radiating against your hand.

Step 4: Bake Wings
Arrange the marinated wings in a single layer on the prepared baking sheets, spacing them a little apart for even baking. Slide them into the oven and bake for 30 minutes until the skin appears crispy and slightly caramelized. You can check on them after 20 minutes for even cooking and to encourage that beautiful glossy finish.

Step 5: Glaze Wings
In a small bowl, mix 1/4 cup of honey with 2 tablespoons of apple cider vinegar until well blended. After baking, carefully remove the wings from the oven and brush this glaze generously over each wing. Return them to the oven for an additional 10 minutes. This will create a sticky sweet layer that enhances their delicious flavor.

Step 6: Serve
Once the wings are perfectly glazed, take them out of the oven and let them cool for a few minutes. Arrange the Sweet and Sour 'Bat' Wings on a spooky serving platter for Halloween, ensuring they are prominently displayed. You can garnish with some fresh herbs if desired for an appealing touch. Get ready for some impressed guests at your gathering!

What to Serve with Sweet and Sour 'Bat' Wings?

Elevate your Halloween feast by pairing these spooky wings with delightful sides that complement their sweet and sour charm.

  • Creamy Coleslaw: This crunchy and refreshing slaw balances the wings' richness, adding a vibrant crunch to every bite.
  • Garlic Breadsticks: Soft and buttery breadsticks provide a comforting touch, perfect for soaking up extra sauce.
  • Roasted Pumpkin Wedges: Slightly sweet, these caramelized pumpkin pieces enhance the autumnal vibe of your dinner.
  • Spicy Corn on the Cob: A touch of heat from chili butter elevates the inviting sweetness of the wings, creating a fun flavor duo.
  • Stuffed Bell Peppers: Colorful and hearty, these peppers bring a savory satisfaction, making them an excellent companion on the plate.
  • Apple Cider Sangria: A fruity and festive drink infused with fall flavors, perfect for toasting with friends at your Halloween gathering.
  • Chocolate Spider Cupcakes: End your meal on a spooky note with these decadent treats that will delight both kids and adults.
  • Crispy Sweet Potato Fries: These offer a delightful crunch and natural sweetness, pairing wonderfully with the sticky wings for an exciting contrast.

How to Store and Freeze Sweet and Sour 'Bat' Wings

Fridge: Store leftover Sweet and Sour 'Bat' Wings in an airtight container for up to 3 days. Ensure they are fully cooled before sealing to maintain their crispy texture.

Freezer: For longer storage, freeze the wings in a single layer on a baking sheet before transferring them to a freezer-safe bag. They can be kept for up to 3 months.

Reheating (Oven): Preheat your oven to 375°F (190°C). Place the wings on a baking sheet and reheat for about 15-20 minutes or until heated through to regain their crispy finish.

Make-Ahead Tip: If you're preparing for a party, consider making the wings a day in advance. Once cooked, refrigerate them and simply reheat in the oven for a quick and easy appetizer!

Expert Tips for Sweet and Sour 'Bat' Wings

  • Marinate Properly: For the best flavor and a deep black color, marinate the wings for at least 12 hours; overnight is even better.

  • Avoid Stains: Use a plastic or glass bowl when mixing in the black food coloring to prevent any lingering stains on surfaces.

  • Baste Generously: During the last 10 minutes of baking, make sure to apply the honey glaze thoroughly for that sticky finish that makes these wings irresistible.

  • Watch the Color: Be cautious with the black food coloring—start with a few drops; it's easier to add more if needed than to fix an overly dark hue.

  • Make Ahead: Prepare the wings a day in advance by marinating them, then just bake them right before your Halloween party for fresh and hot Sweet and Sour 'Bat' Wings.

Sweet and Sour 'Bat' Wings Variations

Feel free to get creative with these Sweet and Sour 'Bat' Wings to suit your taste and dietary needs!

  • Spicy Twist: Increase the hot sauce to your marinade for a fiery kick that will tantalize those who enjoy bold flavors.
    A touch of heat adds an exciting depth that transforms the classic flavor profile into something uniquely thrilling!

  • Natural Color: Replace the black food coloring with activated charcoal for a wholesome alternative.
    It not only achieves the same spooky aesthetic but also adds a healthful boost to your dish!

  • Crispy Option: Use pre-cooked wings for a quick fix, but note that they may not absorb as much flavor.
    While this shortcut saves time, marinated raw wings truly deliver the special essence of your Sweet and Sour 'Bat' Wings.

  • Vegetarian Version: Swap chicken wings for cauliflower florets for a plant-based twist.
    Just be sure to adjust the baking time to achieve that desired crispiness while keeping all the flavor intact!

  • Tropical Fusion: Substitute pineapple juice with mango juice for a tropical sweetness that brightens the dish.
    This twist makes your wings a delightful, fruity surprise that adds a new layer of yumminess!

  • Herbal Infusion: Mix in some fresh herbs such as cilantro or basil into the glaze for a hint of freshness.
    These vibrant notes perfectly complement the sticky, sweet-and-sour profile, elevating your wings to a new culinary adventure.

  • Serve with Dips: Pair these wings with a tangy yogurt dip or a spicy ranch dressing for extra flavor.
    The creamy texture and zesty taste serve as the ideal complement, creating a delightful combination with each bite.

Looking for more inspiration? Try serving these wings alongside delicious sides like our Maple Roasted Sweet Potatoes with Pecans or a creamy dip for the perfect Halloween feast. Enjoy customizing your Sweet and Sour 'Bat' Wings!

Make Ahead Options

These Sweet and Sour 'Bat' Wings are perfect for meal prep, allowing you to save time and enjoy less stress during your Halloween festivities! You can marinate the chicken wings up to 24 hours in advance; just store them covered in the fridge to infuse flavors and achieve that iconic black hue. If you're looking to save even more time, consider preparing the entire marinade a few days ahead and refrigerate it. When it’s time to bake, simply follow the cooking instructions, and you'll have these spooky wings ready to impress your guests. By preparing ahead, you can enjoy delicious, restaurant-quality results that are just as tasty as if made fresh!

Sweet and Sour 'Bat' Wings Recipe FAQs

What type of pineapple juice should I use?
You can use either fresh, canned, or bottled pineapple juice for your Sweet and Sour 'Bat' Wings. Just ensure there are no added sugars if you're keeping it healthy. If you're allergic to pineapple, feel free to substitute with apple juice or mango juice for a similar sweet and tangy effect.

How should I store leftover 'Bat' Wings?
Store leftover Sweet and Sour 'Bat' Wings in an airtight container in the fridge for up to 3 days. Make sure they have fully cooled before sealing to ensure they maintain their crispy texture. If you plan to keep them longer, consider freezing.

Can I freeze these wings?
Absolutely! To freeze your Sweet and Sour 'Bat' Wings, after they have cooled, arrange them in a single layer on a baking sheet and place this in the freezer. Once they’re firm (after about 1-2 hours), transfer them to a freezer-safe bag or container. They can be stored for up to 3 months. When you're ready to enjoy, simply reheat them according to the instructions.

What should I do if my wings didn’t turn out crispy?
If your wings aren't crispy, try adjusting the baking time and temperature. Make sure to bake them in a single layer, and avoid overcrowding the baking sheet. Additionally, ensure they are fully marinated; the longer the marinade, the more flavor and better texture. Next time, consider broiling them for a few minutes at the end to help crisp them up even more!

Are the ingredients safe for my pets?
While the Sweet and Sour 'Bat' Wings are delicious for humans, be cautious! Ingredients like garlic in Worcestershire sauce can be harmful to pets. It's best to keep these wings reserved for human enjoyment. For a pet-friendly treat, consider setting aside some plain, cooked chicken wings without any seasoning!

Can I adjust the spice level?
Very! If you prefer a spicier version, simply increase the amount of hot sauce in the marinade. Start with a tablespoon and taste the marinade before adding more. After all, customizing flavor is half the fun in cooking, so feel free to adapt it to suit your taste preferences!

These Sweet and Sour 'Bat' Wings are sure to wow your Halloween guests, and hopefully, these FAQs will assist you in making the perfect spooky dish!

Sweet and Sour 'Bat' Wings

Spooky Sweet and Sour 'Bat' Wings Perfect for Halloween Fun

Delight your guests with these Sweet and Sour 'Bat' Wings, a fun Halloween twist on a traditional dish.
Print Recipe Pin Recipe
Prep Time 15 minutes mins
Cook Time 40 minutes mins
Marinating Time 6 hours hrs
Total Time 6 hours hrs 55 minutes mins
Servings: 6 wings
Course: Appetizers
Cuisine: American
Calories: 250
Ingredients Equipment Method Nutrition Notes

Ingredients
  

For the Marinade
  • 1 cup Pineapple Juice Substitute apple juice if allergic.
  • 1/2 cup Brown Sugar Enhances sweetness and caramelization.
  • 1/2 cup Tomato Sauce Provides a savory base.
  • 2 tablespoons Worcestershire Sauce Boosts umami depth.
  • few drops Black Food Coloring Crucial for the spooky effect.
  • to taste Hot Sauce Add to match your spice preference.
For the Wings
  • 2 pounds Whole Chicken Wings Ensure you use whole wings for great presentation.
  • 1/4 cup Honey Adds a sticky and sweet finish.
  • 2 tablespoons Apple Cider Vinegar Balances the sweetness of honey.

Equipment

  • Mixing Bowl
  • Baking Sheets
  • Parchment Paper
  • Whisk
  • Brush

Method
 

Step-by-Step Instructions
  1. In a large mixing bowl, combine pineapple juice, brown sugar, tomato sauce, Worcestershire sauce, and black food coloring. Whisk until the sugar dissolves completely.
  2. Add the whole chicken wings to the marinade, ensuring each wing is thoroughly coated. Cover the bowl with plastic wrap and refrigerate for at least 6 hours or overnight.
  3. Preheat your oven to 400°F (200°C) and line two baking sheets with parchment paper.
  4. Arrange the marinated wings in a single layer on the baking sheets and bake for 30 minutes.
  5. Mix honey with apple cider vinegar. Brush the glaze over each wing and return to the oven for an additional 10 minutes.
  6. Once glazed, let the wings cool slightly before serving on a spooky platter.

Nutrition

Serving: 3wingsCalories: 250kcalCarbohydrates: 20gProtein: 15gFat: 12gSaturated Fat: 3gPolyunsaturated Fat: 1gMonounsaturated Fat: 7gCholesterol: 80mgSodium: 550mgPotassium: 160mgSugar: 10gVitamin A: 5IUVitamin C: 2mgCalcium: 1mgIron: 4mg

Notes

For the best flavor, marinate wings overnight. Store in an airtight container for up to 3 days. For longer storage, freeze for up to 3 months.

Tried this recipe?

Let us know how it was!

Spooky Skull Potatoes: A Fun and Creamy Halloween Treat

September 18, 2025 by Grace Snow Leave a Comment

As the air turns crisp and Halloween approaches, it’s time to conjure up some enchanting eats! Nothing sets a festive mood quite like a spooky twist on a classic comfort dish, and these Spooky Skull Potatoes are just the ticket. Transforming ordinary mashed potatoes into playful skull-shaped delights, this recipe not only adds a creative touch to your Halloween feast but also delivers on the creamy goodness we all crave. Perfect for impressing guests or simply adding some fun to family dinners, these potatoes are sure to evoke smiles and laughter around the table. So, are you ready to put a spooky spin on your next meal? Let’s dive into this deliciously eerie experience!

Why Are Spooky Skull Potatoes Unforgettable?

Creativity Unleashed: Transform your holiday gathering with these whimsical skull-shaped potatoes that are as fun to make as they are to eat.

Creamy Texture: The combination of heavy cream and butter creates a rich, velvety mash that's simply irresistible.

Perfectly Spooky: These mashed potatoes are not just a side dish; they’re a conversation starter!

Easy to Prepare: With straightforward steps, you’ll have creepy (yet delicious) skulls ready in no time—ideal for busy hosts.

Crowd-Pleasing Appeal: Children and adults alike will love these playful potatoes, making them a hit at any Halloween party. Why not pair them with additional festive favorites like Roasted Sweet Potatoes for a colorful spread?

Spooky Skull Potatoes Ingredients

For the Base

  • Large Russet Potatoes – The starchy goodness ensures a creamy texture perfect for shaping into skulls.
  • Heavy Cream – This rich addition elevates the dish to comfort food status; feel free to swap with milk for a lighter option.
  • Unsalted Butter – Adds a deep richness and smooth consistency; consider margarine or oil for a dairy-free option.
  • Salt and Pepper – These simple seasonings unlock the flavors; adjust to your taste for the perfect balance!

For the Decoration

  • Black Olives – Create spooky eyes for your skulls; substitute with cherry tomatoes if you prefer a sweeter touch.
  • Fresh Chives or Green Onions (optional) – A dash of color and a mild onion flavor to garnish and elevate the plate.

These Spooky Skull Potatoes promise not just to partake in your Halloween feast but to become the star attraction!

Step‑by‑Step Instructions for Spooky Skull Potatoes

Step 1: Prepare Potatoes
Begin by peeling and chopping the large russet potatoes into 2-inch chunks. Place the cubed potatoes into a large pot, covering them with cold salted water. Bring the water to a boil over high heat, then reduce to a simmer. Cook the potatoes for 15-20 minutes until they are fork-tender, ensuring they are soft enough to mash but not falling apart.

Step 2: Mash
Once the potatoes are cooked, carefully drain them and return them to the pot. Add the heavy cream, melted unsalted butter, salt, and pepper to the potatoes. Using a potato masher or a hand mixer, mash the potatoes until they are creamy and smooth without any lumps. Taste the mixture and adjust seasoning if needed, allowing your Spooky Skull Potatoes to shine with flavor.

Step 3: Shape into Skulls
Now comes the fun part! If you have skull molds, pack the potato mixture tightly into each mold to create the spooky shape. If you don't have molds, you can shape the mashed potatoes by hand into skull forms, ensuring they are tightly packed to hold together. Place the shaped skulls on a baking sheet lined with parchment paper, ready for decoration.

Step 4: Decorate
Take the black olives and slice them into halves for eyes. Carefully place the olive halves onto the skulls to create eerie eyes. Get creative! Use additional pieces of olives to make mouths or other facial features, giving each Spooky Skull Potato its unique character. Make sure your designs stick well to enhance their ghoulish appeal during baking.

Step 5: Bake
Preheat your oven to 375°F (190°C). Once heated, place the decorated Spooky Skull Potatoes in the oven and bake them for about 15-20 minutes. Watch closely as they transform; you're looking for a golden, crispy exterior while keeping the inside creamy. The delightful aroma will fill your kitchen and hint at the deliciousness to come.

Step 6: Serve
After baking, remove your Spooky Skull Potatoes from the oven and allow them to cool slightly. For a festive touch, garnish with fresh chives or green onions. These playful skulls can be served warm, making them a perfect centerpiece for your Halloween feast, sure to evoke smiles from both children and adults alike!

Make Ahead Options

These Spooky Skull Potatoes are perfect for meal prep enthusiasts! You can prepare the mashed potato base up to 24 hours in advance by boiling, mashing, and shaping the potatoes, then refrigerating them tightly covered to maintain their creamy texture. Additionally, you can prep the decorations by slicing black olives and storing them in an airtight container for easy access. When you're ready to serve, simply follow the baking step—preheat your oven to 375°F (190°C) and place your chilled skulls in the oven for about 15-20 minutes. This efficient prep not only saves you time but guarantees that your Spooky Skull Potatoes are just as delicious and fun, making your Halloween festivities seamless and enjoyable!

How to Store and Freeze Spooky Skull Potatoes

Fridge: Store any leftover Spooky Skull Potatoes in an airtight container for up to 3 days. Reheat in an oven at 350°F (175°C) for a crispy texture.

Freezer: If you've made extra, freeze the uncooked skulls by placing them on a baking sheet to firm up first, then transfer to a freezer bag. They’ll last up to 2 months.

Reheating: Bake frozen potatoes directly from the freezer at 375°F (190°C) for 25-30 minutes until hot and crispy. Perfect for a quick Halloween treat!

Spooky Skull Potatoes Variations & Substitutions

Get ready to unleash your creativity in the kitchen! With just a few tweaks, you can make this Halloween dish even more thrilling.

  • Garlic Infusion: Add minced garlic or garlic powder to the mashed potatoes for a bold flavor twist that will entice your taste buds.
    It's the perfect way to turn your potatoes from spooky to spectacular with a savory kick!

  • Cheesy Delight: Mix in shredded cheese, like cheddar or mozzarella, before shaping the skulls for a gooey, melty surprise.
    Every bite will be filled with molten goodness, adding a comforting cheese factor that’s sure to please.

  • Colorful Mashed Potatoes: Use food coloring to dye the potato mixture black, green, or even purple for a more vibrant Halloween look.
    Imagine a plate of vividly colored skulls that will thrill both kids and adults—spooky, fun, and visually captivating!

  • Pumpkin Spice Skull Potatoes: Blend in some pumpkin puree and a sprinkle of cinnamon for a unique fall-inspired mash.
    This twist adds a subtle sweetness and warmth, transforming your dish into a seasonal favorite for all!

  • Plant-Based Option: Swap heavy cream with coconut milk and butter with dairy-free margarine for a vegan-friendly version.
    You won't miss the dairy as the creamy coconut milk adds a delightful richness while still being perfectly spooky.

  • Sweet Potato Alternative: Replace russet potatoes with sweet potatoes for a naturally sweeter and colorful variation.
    Their vibrant orange color and slightly sweeter taste will create a delicious contrast that’s both nutritious and fun!

  • Spicy Kick: Add diced jalapeños or a sprinkle of cayenne pepper for those who love a bit of heat with their spooky bites.
    This fiery twist will be a hit and give your skulls a thrilling surprise for adventurous eaters!

  • Savory Topping: Consider topping these skulls with crispy bacon bits or caramelized onions before baking for added flavor.
    These toppings not only boost flavor but add a satisfying crunch that will elevate your spooky creations!

For more delicious inspiration, why not explore these Smoky Sweet Potatoes or enjoy some Roasted Sweet Potatoes? Each twist offers a unique flavor experience that will keep your holiday gatherings lively!

Tips for the Best Spooky Skull Potatoes

Avoid Overcooking: Test potatoes for doneness with a fork; overcooking can lead to gummy potatoes, ruining your creamy texture.

Seasoning is Key: Don't hesitate to taste during the mashing process. Proper seasoning elevates flavor and ensures your Spooky Skull Potatoes delight everyone.

Pack Firmly: Whether using molds or shaping by hand, ensure the potato mixture is tightly packed to prevent them from collapsing during baking.

Decorate Creatively: Get imaginative with your olive decorations! Different shapes and features can bring each skull to life, adding playful charm to your Halloween spread.

Serve Freshly Baked: For the best texture and flavor, serve these spooky delights right out of the oven while they’re warm and crispy on the outside.

What to Serve with Spooky Skull Potatoes

Imagine the delight around your gathering as you build a festive feast with these charming skull-shaped delights!

  • Crispy Brussels Sprouts: Their earthy crunch adds a perfect contrasting texture, complementing the creaminess of the skull potatoes.
  • Garlic Bread: The warm, buttery flavors of garlic bread can enhance the meal, inviting everyone to savor every bite.
  • Pumpkin Soup: This velvety soup brings a seasonal flair, creating a delightful balance with the heartiness of the mashed potatoes.
  • Roasted Carrots: Sweet and tender, roasted carrots bring brightness and natural sweetness alongside the cozy skull potatoes.
  • Autumn Salad: A mix of greens, nuts, and cranberries will add freshness and a touch of seasonal zest to your Halloween table.
  • Pinot Noir: A light-bodied red wine like Pinot Noir pairs beautifully, offering a fruity contrast to the savory potatoes.
  • Chocolate Graveyard Cake: End the meal with a whimsical dessert that echoes the Halloween theme, sure to send everyone home smiling!
  • Spiced Apple Cider: Warm and aromatic, spiced apple cider provides a comforting drink that enhances the festive atmosphere.

Spooky Skull Potatoes Recipe FAQs

What kind of potatoes should I use for Spooky Skull Potatoes?
Absolutely, I recommend using large russet potatoes as they are starchy and create a creamy texture perfect for mashing. Make sure to choose potatoes that are firm and smooth with no dark spots, as these are ideal for achieving that delightful mash.

How should I store leftover Spooky Skull Potatoes?
After enjoying your spooky treat, store any leftovers in an airtight container in the fridge for up to 3 days. To keep them crispy when reheating, place them in the oven at 350°F (175°C) until heated through. This method revives their lovely texture!

Can I freeze uncooked Spooky Skull Potatoes?
Certainly! To freeze your Spooky Skull Potatoes, start by shaping the skulls and placing them on a baking sheet lined with parchment paper. Freeze them for about an hour until firm, then transfer to a freezer-safe bag. They can be frozen for up to 2 months.

What if my mashed potato mixture is too lumpy?
If you find your potato mixture isn’t smooth enough, don’t worry! Simply add a touch more heavy cream or melted butter to loosen it up, then keep mashing! If some lumps persist, you can always use a hand mixer for a fluffier consistency. Remember to taste and adjust seasoning!

Are Spooky Skull Potatoes safe for kids with allergies?
Always consider your guests' dietary restrictions. If you’re serving children, check for any allergies related to the ingredients—like dairy or olives. You can easily substitute heavy cream with non-dairy milk and use allergen-free toppings, ensuring everyone can enjoy these festive treats.

Spooky Skull Potatoes

Spooky Skull Potatoes: A Fun and Creamy Halloween Treat

Transform ordinary mashed potatoes into playful skull-shaped delights with these Spooky Skull Potatoes, perfect for your Halloween feast.
Print Recipe Pin Recipe
Prep Time 20 minutes mins
Cook Time 20 minutes mins
Total Time 40 minutes mins
Servings: 4 skulls
Course: Snacks
Cuisine: American
Calories: 250
Ingredients Equipment Method Nutrition Notes

Ingredients
  

For the Base
  • 4 large Russet Potatoes The starchy goodness ensures a creamy texture perfect for shaping into skulls.
  • 1 cup Heavy Cream Feel free to swap with milk for a lighter option.
  • 4 tablespoons Unsalted Butter Adds richness and smooth consistency.
  • to taste Salt Adjust to your taste for the perfect balance.
  • to taste Pepper Unlock the flavors for the perfect match.
For the Decoration
  • 1 cup Black Olives Create spooky eyes; substitute with cherry tomatoes if desired.
  • optional Fresh Chives or Green Onions A dash of color and mild onion flavor to garnish.

Equipment

  • Large pot
  • potato masher
  • skull molds
  • Baking Sheet
  • Parchment Paper

Method
 

Step‑by‑Step Instructions
  1. Begin by peeling and chopping the large russet potatoes into 2-inch chunks. Place the cubed potatoes into a large pot, covering them with cold salted water. Bring the water to a boil over high heat, then reduce to a simmer. Cook the potatoes for 15-20 minutes until fork-tender.
  2. Once cooked, drain the potatoes and return them to the pot. Add the heavy cream, melted unsalted butter, salt, and pepper. Mash until creamy and smooth.
  3. Pack the potato mixture tightly into skull molds or shape by hand, ensuring they hold together. Place on a baking sheet lined with parchment paper.
  4. Slice black olives in half for eyes and place onto the shaped skulls. Get creative with additional olive pieces for mouths and features.
  5. Preheat oven to 375°F (190°C). Bake the decorated skull potatoes for 15-20 minutes until golden and crispy.
  6. Remove from oven, allow to cool slightly, and garnish with fresh chives or green onions. Serve warm.

Nutrition

Serving: 1skullCalories: 250kcalCarbohydrates: 35gProtein: 4gFat: 12gSaturated Fat: 7gMonounsaturated Fat: 5gCholesterol: 30mgSodium: 400mgPotassium: 600mgFiber: 3gSugar: 1gVitamin A: 200IUVitamin C: 12mgCalcium: 30mgIron: 1mg

Notes

Serve these delights fresh from the oven for the best texture and flavor. Overcooking potatoes can lead to a gummy texture, so test for doneness carefully.

Tried this recipe?

Let us know how it was!
  • « Previous Page
  • 1
  • …
  • 144
  • 145
  • 146
  • 147
  • 148
  • …
  • 179
  • Next Page »

Welcome!

Hi, I’m Grace, a Sydney-based home cook with a passion for bold flavors and trending ingredients. Whether you’re a busy beginner or a seasoned foodie, you’ll find dishes here that are fresh, fun, and full of flavor.

More about me

Popular Recipes

  • Cheesy Chicken Garlic Bread Sandwich
    Cheesy Chicken Garlic Bread Sandwich for Cozy Family Moments
  • Easy Chicken Ranch Wraps
    Easy Chicken Ranch Wraps: Quick, Creamy & Totally Satisfying
  • Chicken Caesar Sandwiches
    Delicious Chicken Caesar Sandwiches for Quick Comfort Food
  • best Cuban sandwich
    The Best Cuban Sandwich You’ll Want Every Weeknight!

Footer

↑ back to top

About

  • Privacy Policy
  • Disclaimer
  • Terms & Conditions

Newsletter

  • Sign Up! for emails and updates

Contact

  • About me
  • Contact me

Copyright © 2025 TastyTrendIngredients