tastytrendingredients

  • Home
  • Recipes
    • Appetizers
    • Breakfast
    • Dessert
    • Dinner
    • Drinks
    • Salads
    • Snacks
    • Soups
  • About me
  • Contact me
menu icon
go to homepage
  • Home
  • Recipes
    • Appetizers
    • Breakfast
    • Dessert
    • Dinner
    • Drinks
    • Salads
    • Snacks
    • Soups
  • About me
  • Contact me
search icon
Homepage link
  • Home
  • Recipes
    • Appetizers
    • Breakfast
    • Dessert
    • Dinner
    • Drinks
    • Salads
    • Snacks
    • Soups
  • About me
  • Contact me
×

Savory Buffalo Meatball Pumpkins That Steal the Show

September 19, 2025 by Grace Snow Leave a Comment

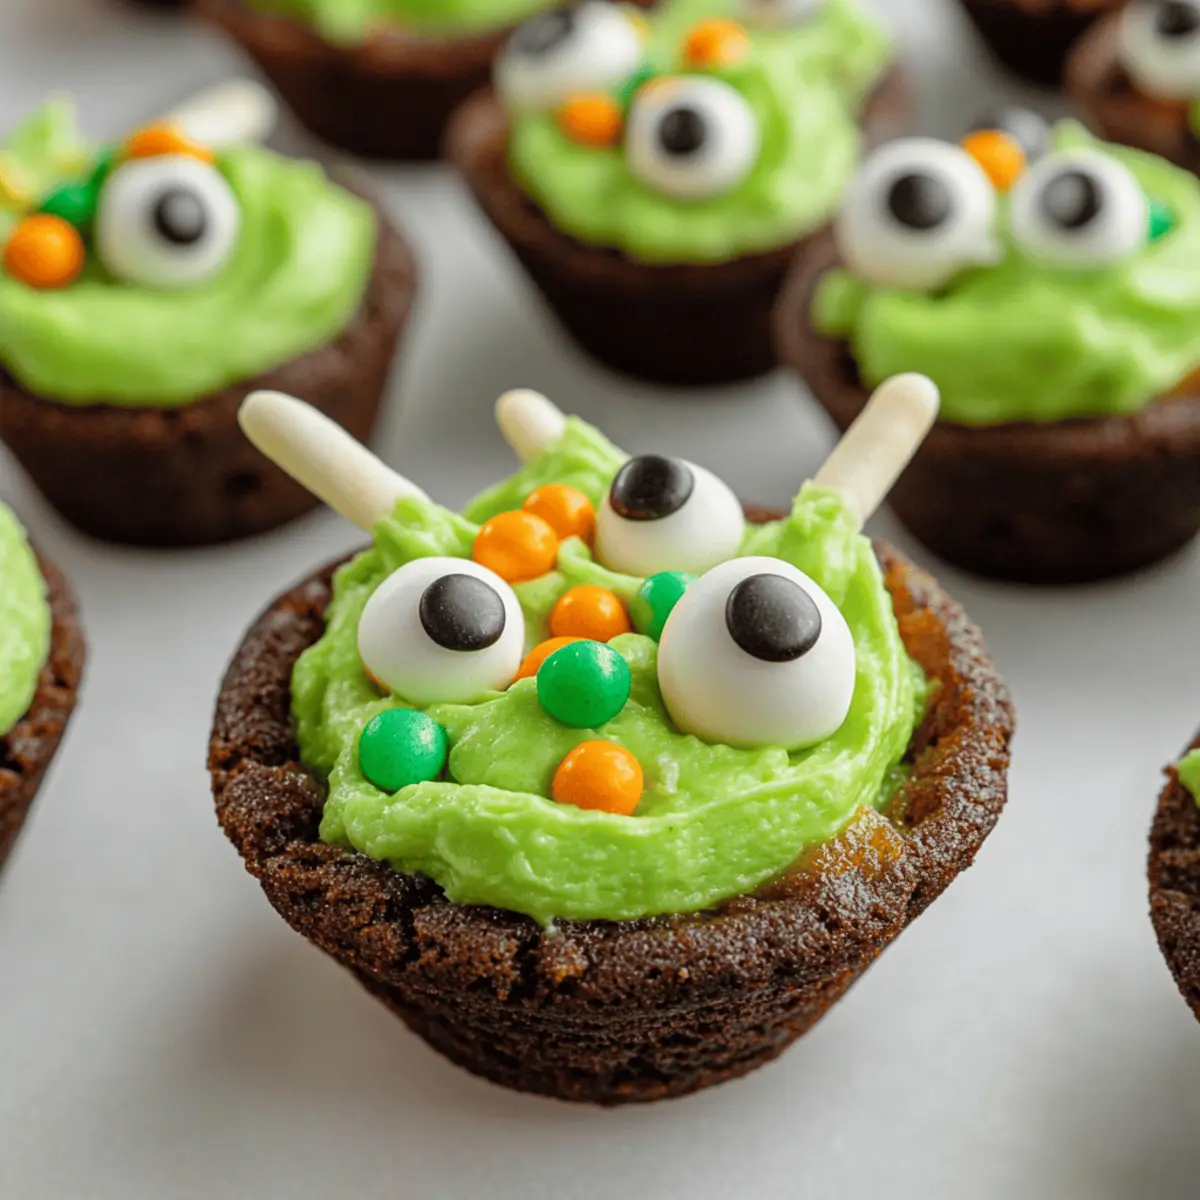
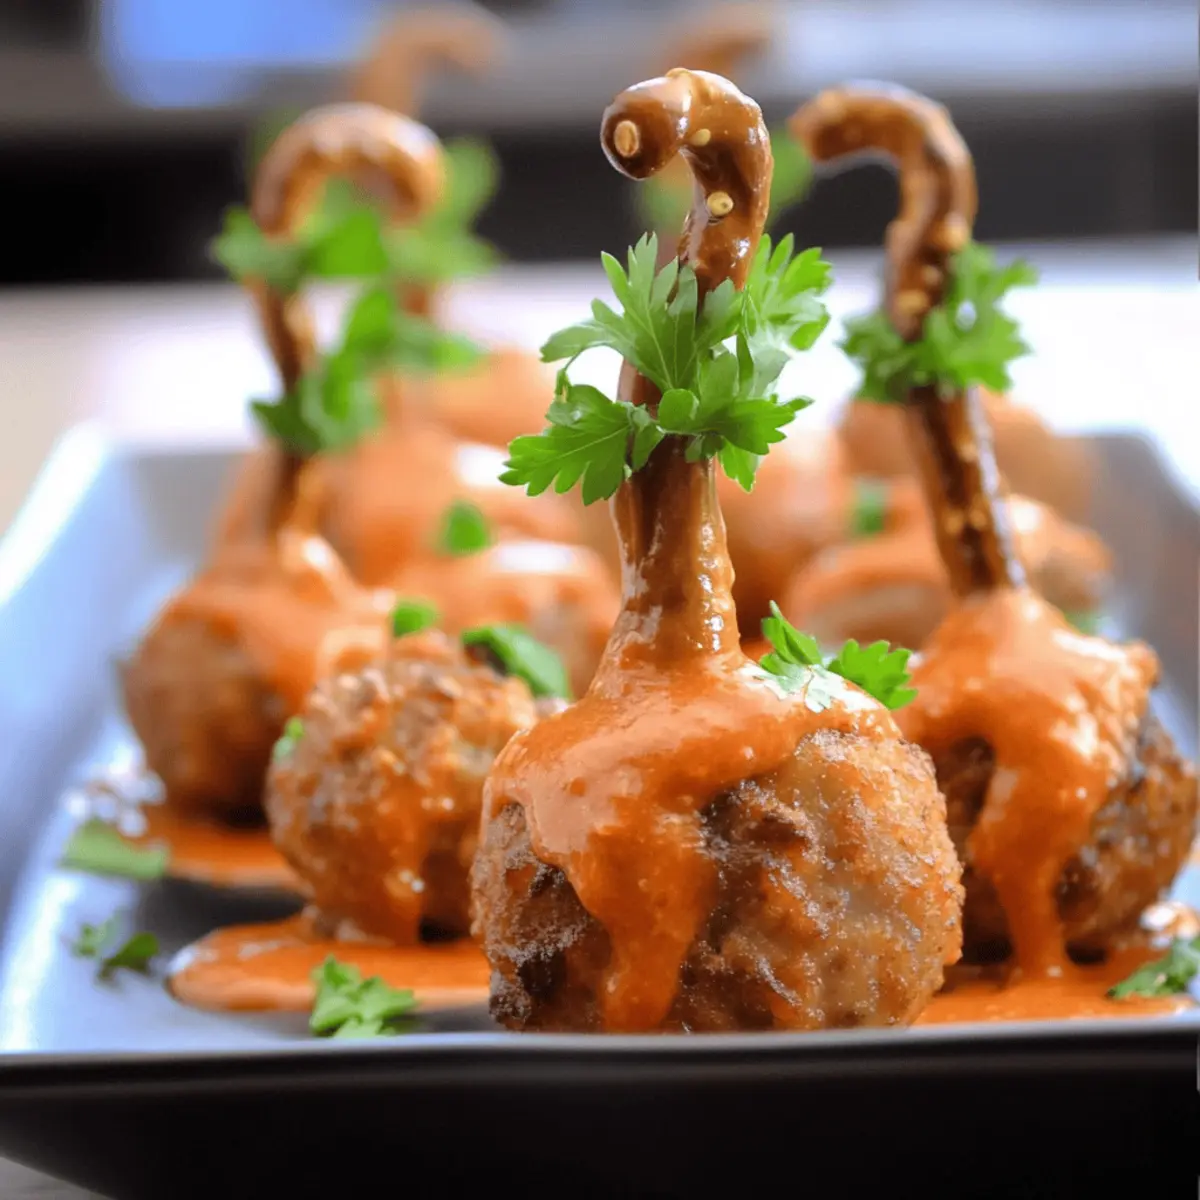
The crisp autumn air is filled with the aroma of seasonal delights, and I can’t help but dive into the spirit of Halloween with these whimsical Buffalo Meatball Pumpkins. Picture tender meatballs dressed in a mild buffalo sauce, artfully perched on pretzel stems and topped with fresh parsley leaves to resemble adorable little pumpkins. This delightful appetizer not only captures the essence of fall gatherings but also brings the perfect blend of fun and flavor to your table. Plus, they’re gluten-free and can be prepped in no time, making them a stress-free hit for parties or cozy nights in. So, are you ready to add a playful twist to your autumn celebrations? Let’s get cooking!

Why Are Buffalo Meatball Pumpkins a Must-Try?

Festive Presentation: These adorable appetizers mimic pumpkins, making them the perfect whimsical addition to your Halloween spread.

Flavor Burst: The balance of mild buffalo sauce and juicy meatballs creates a savory delight that keeps guests coming back for more.

Super Quick Prep: With pre-cooked gluten-free meatballs and easy assembly, you can whip these up in no time—ideal for busy hosts!

Versatile Ingredients: Substitute with your favorite meatball varieties or sauces for a twist—imagine Buffalo Tofu Caesar as an alternative!

Crowd Pleaser: With their bite-sized charm, these meatballs are sure to impress both kids and adults alike—perfect for family gatherings and holiday parties!

Buffalo Meatball Pumpkins Ingredients

For the Meatballs
• Daily Chef - Casa di Bertacchi meatballs – These gluten-free, pre-cooked meatballs save time and add a delicious flavor to your Buffalo Meatball Pumpkins.

For the Sauce
• Butter – Adds richness to the sauce; use olive oil for a lighter alternative.
• Buffalo sauce – The key flavor element; mild buffalo sauce gives just the right amount of heat for everyone to enjoy.
• Pumpkin puree – Introduces a subtle sweetness and festive flair; can be swapped for additional buffalo sauce for more kick.
• Ranch dressing – Adds a creamy texture that complements the heat; feel free to use homemade ranch or swap with blue cheese dressing for a stronger flavor.

For the Assembly
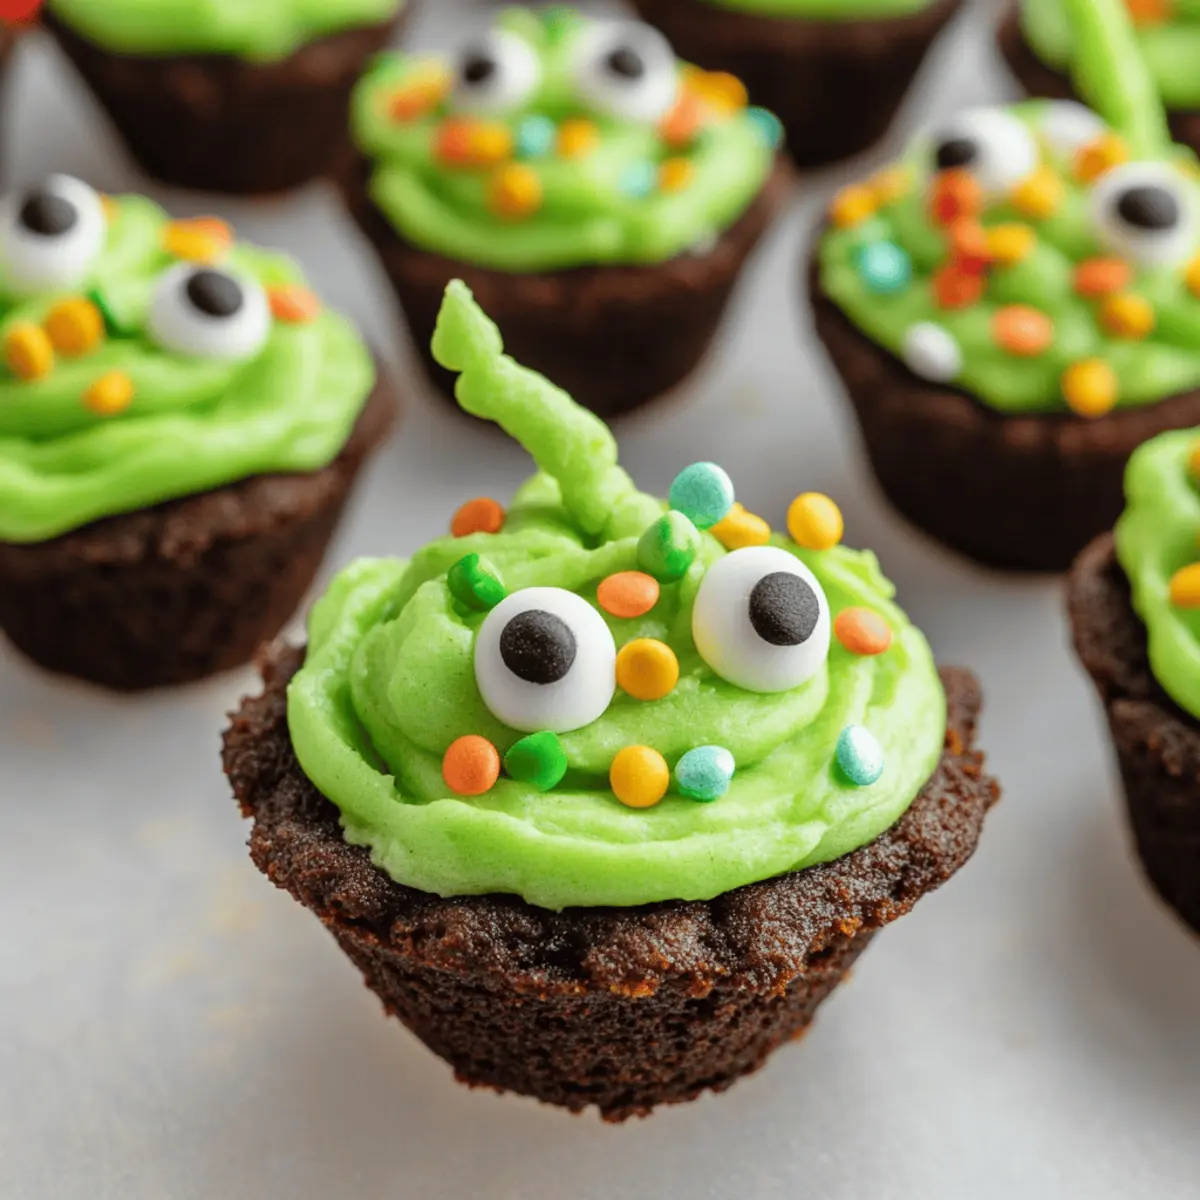
• Pretzel rods – Acting as adorable pumpkin stems; broken to size, they add a whimsical touch. Braided pretzels or pretzel sticks can also be substituted.
• Fresh parsley or cilantro – Adds a pop of color and mimics leaves on your pumpkins; any fresh herb can work beautifully here.

These charming Buffalo Meatball Pumpkins are not just a feast for the eyes but also a delightful bite that will enchant your guests this autumn!

Step‑by‑Step Instructions for Buffalo Meatball Pumpkins

Step 1: Heat the Meatballs
Begin by placing 2.5 pounds of Daily Chef - Casa di Bertacchi gluten-free meatballs into a slow cooker. Cover and set the cooker to high heat, letting the meatballs warm through for about 3 to 3.5 hours. You’ll know they’re ready when they’re steaming and hot, making them perfect for the Buffalo Meatball Pumpkins assembly.

Step 2: Prepare the Buffalo Sauce
While the meatballs are heating, melt ⅓ cup of butter in a medium skillet over low heat. Once melted, stir in ½ cup of mild buffalo sauce, followed by ¼ cup of pumpkin puree and 2 tablespoons of ranch dressing. Mix thoroughly for about 3–5 minutes until you achieve a smooth and well-combined sauce that’s packed with flavor.

Step 3: Coat the Meatballs
Once the meatballs are heated through, carefully pour the prepared buffalo sauce over them in the slow cooker. Gently stir the meatballs to ensure they are evenly coated with the flavorful sauce. Allow them to sit for an additional 10–15 minutes on low heat for the sauce to meld beautifully into the Buffalo Meatball Pumpkins.

Step 4: Assemble the Pumpkins
Using tongs, transfer the sauced meatballs onto a serving tray, placing them apart for easy handling. Break the ends off the pretzel rods to create stems, then insert them into the top of each meatball. If necessary, make a small hole in the meatball to secure the pretzel stems, giving a charming pumpkin appearance.

Step 5: Garnish
To complete your delightful Buffalo Meatball Pumpkins, add a piece of fresh parsley or cilantro on top of each meatball to resemble leaves. This final touch not only adds a pop of color but also enhances the festive presentation. Serve with extra ranch dressing on the side for dipping, and watch them disappear at your gathering!

Expert Tips for Buffalo Meatball Pumpkins

  • Keep It Covered: Always cover the slow cooker while heating to maintain temperature, ensuring that the meatballs stay warm and flavorful.

  • Adjust Spiciness: Customize your buffalo sauce's heat level by varying the amount of buffalo sauce and butter; it's easy to make it more or less spicy based on your guests' preferences.

  • Secure Pretzel Stems: Make sure the pretzel rods are firmly inserted into the meatballs. If they seem loose, consider making a small hole for a snug fit to prevent them from tipping over.

  • Storage Savvy: Store any leftover Buffalo Meatball Pumpkins in an airtight container for up to 3-4 days in the refrigerator or freeze them for a quick snack later—just reheat before serving!

  • Ingredient Flexibility: Don't hesitate to swap out the meatballs or sauces to fit your taste. Vegetarian or turkey meatballs can offer a delicious twist, making this recipe adaptable for everyone.

What to Serve With Buffalo Meatball Pumpkins?

The perfect pairing elevates your festive spread and brings out the best in these whimsical Buffalo Meatball Pumpkins.

  • Crispy Veggie Platter: A colorful medley of fresh veggies complements the saucy meatballs, providing crunch and a refreshing contrast.

  • Creamy Blue Cheese Dip: This tangy dip is the classic pairing for buffalo flavors, adding a rich creaminess that balances the heat nicely.

  • Garlic Breadsticks: Soft, buttery breadsticks have that comforting warmth and are perfect for soaking up any leftover buffalo sauce.

  • Sweet Potato Wedges: Baked sweet potato wedges offer a delightful sweetness and soft texture, balancing the savory punch of the meatballs.

  • Sparkling Apple Cider: A refreshing drink that brings a festive touch! Its fruity sparkle enhances the autumnal vibe without overpowering the meal.

  • Pumpkin Spice Brownies: Cap off the evening with fudgy brownies infused with pumpkin spice, tying the seasonal theme together deliciously.

With these delightful additions, your Buffalo Meatball Pumpkins will shine even brighter at your next gathering!

How to Store and Freeze Buffalo Meatball Pumpkins

Fridge: Store leftover Buffalo Meatball Pumpkins in an airtight container for up to 3-4 days. Make sure they are completely cooled to maintain freshness.

Freezer: For longer storage, these delightful meatballs can be frozen for up to 3-4 weeks. Place them in a single layer on a baking sheet until frozen, then transfer to a freezer-safe bag.

Reheating: To reheat, thaw the meatballs overnight in the fridge and warm in the oven at 350°F (175°C) for about 20-25 minutes, or until heated through.

Assembly Tip: For best results, add pretzel stems and parsley leaves just before serving to keep them looking fresh and festive!

Make Ahead Options

These Buffalo Meatball Pumpkins are an excellent choice for busy hosts looking to save time! You can prepare the meatballs and buffalo sauce up to 24 hours in advance. Simply heat the meatballs and mix them with the buffalo sauce, then refrigerate in an airtight container. To maintain quality, ensure the meatballs are cooled completely before covering. When you're ready to serve, reheat the mixture in a slow cooker on low for about 30 minutes until warmed through. Assemble the pumpkins just before serving by adding the pretzel stems and garnishing with parsley for that delightful presentation. With this make-ahead strategy, you can enjoy stress-free entertaining while ensuring your guests savor every bite of these charming Buffalo Meatball Pumpkins!

Buffalo Meatball Pumpkins Variations & Substitutions

Customize your Buffalo Meatball Pumpkins with these delightful variations, making them uniquely yours to savor!

  • Vegetarian Option: Swap meatballs for plant-based or lentil meatballs to create a hearty alternative that even non-meat eaters will love.
  • Turkey Twist: Use ground turkey meatballs for a lighter protein choice without sacrificing flavor—they pair beautifully with the buffalo sauce!
  • Flavor Variety: Experiment with sauces like teriyaki or barbecue for a non-buffalo twist that brings a completely different taste to the table.
  • Cheesy Surprise: Add a cube of cheese in the center of each meatball before cooking, offering a gooey surprise with every bite.
  • Herb Alternatives: Instead of parsley, try using fresh basil or chives for a unique aromatic touch that adds a different aroma and flavor.
  • Spice It Up: Add a pinch of cayenne pepper or hot sauce to the buffalo sauce for those who crave a little extra heat—just make sure to taste and adjust to your liking!
  • Sauce Swap: For a creamy option, replace buffalo sauce with a yogurt-based sauce for a milder flavor profile that still satisfies.
  • Dress It Up: Serve these adorable pumpkins with a side of homemade ranch or blue cheese dip to elevate their creamy enjoyment, making every bite even more delightful!

Feel free to embrace your creativity amidst the flavors and textures! Your Buffalo Meatball Pumpkins can take on many forms, which makes them all the more memorable at your next gathering, just like a delicious Buffalo Tofu Caesar you might enjoy!

Buffalo Meatball Pumpkins Recipe FAQs

Are there specific meatballs that work best for this recipe?
Absolutely! I recommend using Daily Chef - Casa di Bertacchi meatballs since they are gluten-free and pre-cooked, making preparations super convenient. However, feel free to substitute them with any frozen Italian-style meatballs or turkey meatballs if you prefer a lighter option.

How should I store any leftover Buffalo Meatball Pumpkins?
Store leftover Buffalo Meatball Pumpkins in an airtight container in the refrigerator for up to 3-4 days. Ensure they are completely cooled before storing to maintain freshness. It’s a quick snack option!

Can I freeze Buffalo Meatball Pumpkins?
Yes! You can freeze these charming meatballs for up to 3-4 weeks. To do so, place them in a single layer on a baking sheet until they’re frozen solid, then transfer them to a freezer-safe bag. This method prevents them from sticking together and makes reheating a breeze.

How can I customize the spice level of the buffalo sauce?
Very! You can easily adjust the spice by varying the amount of buffalo sauce and butter used in the recipe. If you like it milder, stick with the mild buffalo sauce. For a kick, you might add more buffalo sauce or even a dash of hot sauce!

What if I have dietary restrictions regarding the ingredients?
Not a problem! This recipe is highly adaptable. You can use vegetarian meatballs for a meat-free version or swap ranch dressing with a dairy-free alternative. Additionally, you can choose gluten-free pretzels to ensure all guests can enjoy this festive treat.

When is the best time to add the pretzel stems and garnishes?
To maintain their freshness and appearance, add the pretzel stems and parsley leaves just before serving. This way, they will stay crispy and vibrant, enhancing the festive look of your Buffalo Meatball Pumpkins!

Buffalo Meatball Pumpkins

Savory Buffalo Meatball Pumpkins That Steal the Show

Delightful Buffalo Meatball Pumpkins are whimsical appetizers perfect for autumn gatherings, combining savory flavors with a festive presentation.
Print Recipe Pin Recipe
Prep Time 15 minutes mins
Cook Time 3 hours hrs 30 minutes mins
Assembly Time 15 minutes mins
Total Time 4 hours hrs
Servings: 12 pumpkins
Course: Appetizers
Cuisine: American
Calories: 150
Ingredients Equipment Method Nutrition Notes

Ingredients
  

For the Meatballs
  • 2.5 pounds Daily Chef - Casa di Bertacchi meatballs gluten-free, pre-cooked
For the Sauce
  • ⅓ cup Butter can substitute with olive oil
  • ½ cup Buffalo sauce mild
  • ¼ cup Pumpkin puree can substitute with more buffalo sauce
  • 2 tablespoons Ranch dressing or blue cheese for stronger flavor
For the Assembly
  • 12 pieces Pretzel rods broken to size for stems
  • 1 bunch Fresh parsley or cilantro for garnish

Equipment

  • Slow Cooker
  • Skillet
  • Tongs

Method
 

Steps
  1. Heat the meatballs by placing 2.5 pounds of gluten-free meatballs into a slow cooker, cover and set to high for 3 to 3.5 hours.
  2. Prepare the buffalo sauce by melting ⅓ cup of butter in a skillet over low heat, then stir in ½ cup of buffalo sauce, ¼ cup pumpkin puree, and 2 tablespoons of ranch dressing. Mix until smooth.
  3. Once meatballs are heated, pour the buffalo sauce over them and stir gently, letting them sit on low heat for 10–15 minutes.
  4. Assemble by transferring the sauced meatballs onto a tray, inserting broken pretzel ends for stems.
  5. Garnish each meatball with fresh parsley or cilantro to mimic leaves.

Nutrition

Serving: 1pumpkinCalories: 150kcalCarbohydrates: 5gProtein: 10gFat: 10gSaturated Fat: 4gPolyunsaturated Fat: 1gMonounsaturated Fat: 4gCholesterol: 35mgSodium: 500mgPotassium: 150mgFiber: 1gSugar: 1gVitamin A: 400IUVitamin C: 2mgCalcium: 50mgIron: 1mg

Notes

Enjoy these playful Buffalo Meatball Pumpkins as a fun appetizer. They are quick to make and sure to please both kids and adults alike.

Tried this recipe?

Let us know how it was!

Spooky Halloween Mimosas with Fun Lychee Eyeballs

September 19, 2025 by Grace Snow Leave a Comment

As I strolled through the vibrant autumn market, a witches' cauldron of ideas began bubbling in my mind. Halloween season calls for creativity, and what better way to celebrate than with a festive Halloween Mimosa? This fun cocktail pairs the crisp effervescence of champagne with the tangy richness of pomegranate juice, making it a perfect choice for lively parties or cozy brunch gatherings. Not only do these mimosas look delightfully spooky with their lychee and blueberry eyeballs, but they also cater to all palates—offering an easy non-alcoholic twist for your guests. Ready to enjoy a sip of Halloween magic and impress your friends? Let’s mix up some spooky delights!

Why Are Halloween Mimosas So Special?

Festive Twist: This Halloween Mimosa brings a playful spin to the classic brunch drink, making it a festive highlight for gatherings.
Visually Stunning: The lychee eyeballs not only add intrigue but also spark conversation, captivating both kids and adults alike.
Simple Preparation: With just a few steps, you can easily whip up these delightful cocktails—perfect for those rushed party prep moments!
Versatile Flavor Options: Feel free to mix and match juices to create your preferred flavor profile, making it enjoyable for every taste bud.
Non-Alcoholic Adaptation: Hosting friends or family who prefer not to drink? Simply swap the champagne for sparkling soda for a delicious non-alcoholic treat!
Serve these fun beverages at your next spooky celebration and watch them fly off the table! Enjoy a delightful twist on a classic with this captivating drink.

Halloween Mimosa Ingredients

• Ready to create your own spooky drink? Here’s what you’ll need!

For the Eyeballs

  • Lychees in Light Syrup – A unique texture and sweetness, perfect for creating "eyeballs." Substitute fresh lychees if unavailable.
  • Blueberries – Bursting with color and flavor, these complete the eyeball look; fresh or frozen work well!

For the Cocktail

  • Pomegranate Juice – The fruity, tangy base for your Halloween Mimosa; cranberry juice is a great substitute if needed.
  • Brut Champagne – Provides the bubbly fizz; can be swapped with sparkling wine or prosecco, or use club soda for a non-alcoholic option.

These ingredients will help you conjure up the perfect festive concoction for your Halloween gatherings!

Step‑by‑Step Instructions for Halloween Mimosas

Step 1: Prepare the Eyeballs
Begin by draining the lychees from the light syrup. Carefully pierce a blueberry into the center of each lychee, creating your spooky eyeballs. Use a cocktail skewer to hold the blueberry in place. As you assemble them, place the finished lychee eyeballs on a serving plate, making sure they are intact and ready for the cocktails.

Step 2: Chill the Glasses
To ensure your Halloween Mimosas are refreshingly cool, chill your champagne glasses in the freezer for about 10 minutes. If you prefer, you can also fill them with ice water while you prepare other ingredients. This step enhances the effervescence of the champagne, making your drinks even more delightful.

Step 3: Pour the Champagne
Once your glasses are chilled, remove them from the freezer or ice water. Gently pour the brut champagne into each glass, filling them about two-thirds full. Look for that pleasant fizz as the bubbles rise, creating a lively atmosphere for your Halloween celebration.

Step 4: Add the Pomegranate Juice
Carefully top each glass of champagne with pomegranate juice, pouring it slowly to maintain the bubbles. Pour until the glass is nearly full, creating a beautiful ombre effect with the dark red juice meeting the golden bubbly champagne. The colors will evoke the spirit of Halloween.

Step 5: Garnish with Eyeballs
Finally, take your cocktail skewers with the lychee eyeballs and place one in each glass. Arrange them so they elegantly float above the liquid, giving your Halloween Mimosas a festive and spooky appearance. The playful presentation will surely delight your guests as they admire their unique, eerie drinks.

Tips for the Best Halloween Mimosa

  • Chill Everything: Ensure your champagne and glasses are well-chilled prior to serving. This helps maintain the effervescence of your Halloween Mimosa.
  • Gentle Assembly: When creating lychee eyeballs, be gentle to avoid breaking the delicate fruit. Patience pays off for an impressive presentation!
  • Flavor Adjustments: Don't hesitate to experiment with different juices! Tasting along the way allows you to customize the sweetness and flavor of your mimosas.
  • Non-Alcoholic Option: If serving guests who prefer not to drink, swap champagne for club soda or a flavored sparkling drink to create a delightful non-alcoholic version.
  • Serve Fresh: Mimosas are best enjoyed fresh to maintain their carbonation, so prepare them just before serving for ultimate enjoyment!

Halloween Mimosa Variations & Substitutions

Feel free to get creative and customize your Halloween Mimosa with these fun twists!

  • Non-Alcoholic: Replace champagne with club soda or a flavored sparkling drink for a bubbly, festive option everyone can enjoy.
    Serving these chilled will keep the fizz lively, ensuring a refreshing experience for all your guests.

  • Juice Swap: If pomegranate juice is not available, cranberry juice makes a delicious alternative, providing similar fruity notes.
    Mixing juices can add an element of surprise in flavor, making your mimosas a talking point around the table!

  • Flavored Champagne: Consider using flavored sparkling wine, like peach or raspberry, to add an exciting twist to the classic taste.
    This is a fun way to enhance the overall flavor profile, transforming your mimosa into a unique seasonal cocktail.

  • Herbal Twist: Infuse your pomegranate juice with fresh mint or basil for a refreshing layer of complexity in each sip.
    A little herb can elevate your drink and add a fresh pop that complements the sweetness wonderfully!

  • Spice it Up: Add a sprinkle of cinnamon or nutmeg to the pomegranate juice for a warm, spiced twist that's perfect for fall.
    These warming spices give your mimosas a cozy touch, inviting warmth to each bubbly sip.

  • Garnish Options: Instead of lychee, use gummy eyeballs or spooky-shaped fruit cutouts for a fun and playful garnish.
    This quick switch can lighten the mood while adding a sweet treat your guests will enjoy after the drink is gone!

  • Colorful Layers: Layer different juices, like orange or pineapple, for a vibrant rainbow effect that adds visual appeal.
    This playful presentation not only looks festive but also gives varied flavors with each sip, delighting both kids and adults alike!

Whether you choose to dive into tropical flavors or spritz up some spookiness, these variations for your Halloween Mimosa ensure everyone's taste buds will be catered to at your celebration!

Make Ahead Options

These Halloween Mimosas are perfect for preparing ahead of time, allowing you to enjoy more time with your guests during the festivities! You can prepare the lychee eyeballs by piercing the blueberries into the lychees and refrigerating them up to 24 hours in advance, ensuring they stay fresh and intact. To serve, simply chill your champagne glasses, pour in the champagne, and top with pomegranate juice just before serving to maintain that lovely fizz. This thoughtful preparation saves you valuable time during busy party moments, allowing your Halloween Mimosas to be just as delicious and festive when served!

What to Serve with Spooky Halloween Mimosas

Elevate your Halloween gathering with delightful pairings that enhance the festive spirit and tantalize the taste buds.

  • Savory Cheese Platter: A variety of cheeses paired with crackers adds a savory contrast to the sweet mimosas, making a perfect handheld bite.
  • Pumpkin Spice Muffins: These warm, spiced treats echo seasonal flavors and offer a cozy feeling, complementing the refreshing cocktails beautifully.
  • Frightful Finger Foods: Mini savory pastries or stuffed mushrooms provide a fun and tasty twist that guests will love while enjoying their mimosas.
  • Halloween Fruit Skewers: Add a splash of color with skewers of seasonal fruits like grapes, oranges, and strawberries for a fresh, vibrant touch.
    Perfect for balancing their sweetness, these fruity bites not only add variety but also refresh the palate.
  • Witch’s Brew Soup: A warm, creamy pumpkin soup serves as a comforting counterpart, embracing the spirit of the season while providing an inviting warmth.
  • Chilling Midnight Brew: For a unique drink option, serve a spooky non-alcoholic punch alongside your Halloween Mimosas, inviting all guests to join in the fun.

Mix and match these options to create an enchanting Halloween feast that guests will remember long after the last toast!

How to Store and Freeze Halloween Mimosas

Fridge: Store any leftover mimosas in the fridge for up to 1 day, covering them tightly with plastic wrap to preserve carbonation.

Lychee Eyeballs: If you prepare lychee eyeballs in advance, keep them refrigerated in an airtight container for up to 3 days before serving.

Make-Ahead Tip: You can mix the juices ahead of time and store them in the fridge, but always add champagne just before serving to enjoy the fizz of your Halloween Mimosa.

Freezer: For no-fuss entertaining, freeze prepared lychee eyeballs in a single layer, then transfer to a bag for up to 1 month.

Halloween Mimosas Recipe FAQs

What are the best lychees to use for the eyeballs?
I recommend using canned lychees in light syrup for their sweet, soft texture, perfect for forming spooky eyeballs. If you can find fresh lychees, they can also work wonderfully—just peel and pit them before inserting the blueberries!

How long can I store leftover mimosas?
Leftover Halloween Mimosas should be stored in the fridge and consumed within 1 day. Make sure to cover them with plastic wrap to help retain some of the bubbles.

Can I make the lychee eyeballs in advance?
Absolutely! You can prepare the lychee eyeballs up to 3 days in advance. Just keep them in an airtight container in the refrigerator to maintain their freshness until it's time to serve.

What’s the proper way to freeze lychee eyeballs?
To freeze lychee eyeballs, first arrange them in a single layer on a baking sheet. Flash freeze them for about 2 hours until solid. Then, transfer the frozen eyeballs to a sealed freezer bag. They can be stored in the freezer for up to 1 month. Simply thaw them in the fridge or at room temperature before using.

Is there a non-alcoholic option for the Halloween Mimosa?
Yes! You can easily create a non-alcoholic Halloween Mimosa by substituting the brut champagne with club soda or a sparkling flavored beverage. This way, everyone can enjoy the festive fun, regardless of their drink preferences.

Can I customize the juice flavors in my mimosas?
Definitely! Feel free to experiment with different juices like cranberry or orange to create a flavor you love. I often mix and match to achieve the perfect blend, ensuring every sip is delightful!

Halloween Mimosa

Spooky Halloween Mimosas with Fun Lychee Eyeballs

These festive Halloween Mimosas feature a delightful combination of champagne and pomegranate juice, topped with lychee eyeballs for a spooky presentation.
Print Recipe Pin Recipe
Prep Time 15 minutes mins
Total Time 15 minutes mins
Servings: 4 mimosas
Course: Drinks
Calories: 150
Ingredients Equipment Method Nutrition Notes

Ingredients
  

For the Eyeballs
  • 1 can Lychees in Light Syrup Substitute fresh lychees if unavailable.
  • ½ cup Blueberries Fresh or frozen both work well.
For the Cocktail
  • 2 cups Pomegranate Juice Cranberry juice is a great substitute if needed.
  • 1 bottle Brut Champagne Can be swapped with sparkling wine or prosecco, or use club soda for a non-alcoholic option.

Equipment

  • champagne glasses
  • cocktail skewers
  • freezer

Method
 

Step‑by‑Step Instructions
  1. Begin by draining the lychees from the light syrup. Carefully pierce a blueberry into the center of each lychee, creating your spooky eyeballs. Use a cocktail skewer to hold the blueberry in place. As you assemble them, place the finished lychee eyeballs on a serving plate.
  2. To ensure your Halloween Mimosas are refreshingly cool, chill your champagne glasses in the freezer for about 10 minutes. If you prefer, you can also fill them with ice water while you prepare other ingredients.
  3. Once your glasses are chilled, remove them from the freezer or ice water. Gently pour the brut champagne into each glass, filling them about two-thirds full.
  4. Carefully top each glass of champagne with pomegranate juice, pouring it slowly to maintain the bubbles. Pour until the glass is nearly full, creating a beautiful ombre effect.
  5. Finally, take your cocktail skewers with the lychee eyeballs and place one in each glass. Arrange them so they elegantly float above the liquid.

Nutrition

Serving: 1mimosaCalories: 150kcalCarbohydrates: 20gSodium: 5mgPotassium: 120mgFiber: 1gSugar: 16gVitamin C: 10mg

Notes

Mimosas are best enjoyed fresh to maintain their carbonation, so prepare them just before serving for ultimate enjoyment.

Tried this recipe?

Let us know how it was!

Creepy Halloween Chicken Parmesan Sliders for Spooktacular Fun

September 19, 2025 by Grace Snow Leave a Comment

As I unwrapped the spooky charm of Halloween, the kitchen filled with tantalizing aromas that promised to thrill. Halloween Chicken Parmesan Sliders bring a playful twist to my usual recipes, combining crispy chicken tenders, melty mozzarella, and zesty marinara sauce into bite-sized delights. This appetizer is a breeze to prepare—perfect for a gathering or a cozy family dinner. Not only do these sliders satisfy cravings, but they also provide a fun and creative outlet for culinary expression. Decked out with monster eyes and cheesy smiles, they’re sure to become a hit at your Halloween festivities. Ready to embark on a cooking adventure that will enchant your guests? Let’s dive in!

Why Are These Sliders So Fun?

Playful Presentation: Get into the Halloween spirit with sliders designed to thrill! Each cheesy bite features delicious monster eyes, enticing kids and adults alike.

Flavorful Layers: The crispy chicken and zesty marinara meld perfectly for a classic taste with a spooky twist.

Quick & Easy: Assembling these sliders is a breeze, making them an ideal appetizer for busy hosts.

Customizable: Experiment with variations like bacon cheddar BBQ sliders or spicy buffalo options, ensuring every guest leaves satisfied.

Crowd-Pleasing Appeal: These sliders are bound to grab attention and create smiles at your Halloween bash, leaving everyone excited for another bite!

Halloween Chicken Parmesan Sliders Ingredients

Get ready to create some spooktacular sliders with these essential ingredients!

For the Sliders

  • Frozen Chicken Tenders – The main protein source for a satisfying bite; swap for grilled chicken or turkey tenders if desired.
  • Slider Buns – A soft base for your sliders; small rolls like whole grain or gluten-free bun options work beautifully.
  • Mozzarella Cheese – The melty favorite that adds flavor; try provolone or cheddar for a fun twist, especially when carving into monster shapes!
  • Marinara Sauce – Provides moisture and zest; for a sweeter touch, consider BBQ sauce instead.

For the Monster Decorations

  • Green Olives (stuffed with pimento) – These make adorable monster eyes; black olives or cherry tomatoes are great substitutes if you prefer.

Step‑by‑Step Instructions for Halloween Chicken Parmesan Sliders

Step 1: Prepare the Chicken Tenders
Begin by preheating your oven to the temperature specified on the chicken tenders package, usually around 400°F (200°C). Arrange the frozen chicken tenders in a single layer on a baking sheet. Bake for 18–22 minutes, flipping halfway through, until they are golden-brown and crispy, ensuring that they reach an internal temperature of 165°F (74°C) for safe consumption.

Step 2: Carve the Cheese
While the chicken is baking, take your mozzarella cheese and carefully slice it into thin pieces. With a pairing knife, shape the slices to resemble playful monster teeth—think jagged edges for a spooky effect! Keep them ready to add an exciting touch to your Halloween Chicken Parmesan Sliders. Set aside these carved cheese pieces on a plate.

Step 3: Prepare the Monster Eyes
Grab your green olives and toothpicks to create monster eyes for your sliders. Skewer one green olive on each toothpick, making two olive eyes for each slider. This step adds a fun and festive element to your Halloween Chicken Parmesan Sliders, making them as delightful to look at as they are to eat. Set these aside for assembly.

Step 4: Heat the Marinara Sauce
In a small saucepan, pour in your marinara sauce and place it over medium heat. Stir gently while allowing it to come to a gentle simmer, approximately 5 minutes. You'll know it’s ready when the sauce begins to bubble lightly. This warming step enhances the flavors and ensures your sliders are served warm and gooey.

Step 5: Assemble the Sliders
Now it’s time to assemble your Halloween Chicken Parmesan Sliders! Take a slider bun and spread about 1 tablespoon of warm marinara sauce on the bottom half. Place a hot, crispy chicken tender on top, and if you desire extra sauce, drizzle some more over the chicken before adding your cleverly carved mozzarella pieces to mimic monster teeth.

Step 6: Cap and Decorate the Sliders
Finish your sliders by placing the top bun over the assembled ingredients. For the final playful touch, take the toothpick with two olive eyes and insert it into the top bun, securing it firmly to create a whimsical monster appearance. Your Halloween Chicken Parmesan Sliders are now ready to impress at your gathering!

Step 7: Serve and Enjoy
Serve these delicious sliders immediately while they’re warm and the cheese is melting. The combination of crispy chicken, tangy marinara, and playful presentation will have everyone clamoring for more. These Halloween Chicken Parmesan Sliders are perfect as an appetizer or a fun dinner option that will delight your guests!

What to Serve with Halloween Chicken Parmesan Sliders

Get ready to enjoy a delicious spread that perfectly complements your spooky sliders and sets the scene for your Halloween gathering!

  • Crispy Sweet Potato Fries: Their natural sweetness contrasts nicely with the savory sliders. Add a sprinkle of cinnamon for a seasonal twist!

  • Garlic Bread Sticks: Cheesy, buttery goodness provides a satisfying side and echoes the mozzarella in your sliders for a cohesive flavor profile.

  • Stuffed Mini Peppers: These colorful bites bring a fresh crunch and a hint of spice, balancing the crispy texture of the sliders in a delightful way.

  • Pumpkin Soup: Creamy and warm, a bowl of pumpkin soup adds a festive touch to your meal, inviting guests to warm up before the main event.

  • Green Salad with Vinaigrette: A light, refreshing salad brightens the plate, offering a balance to the richness of your sliders.

  • Apple Cider: This sweet, tangy beverage adds fall flavor and pairs beautifully with the savory notes of your chicken sliders.

  • Spooky Dessert Platter: Think bat-shaped cookies or monster cupcakes! A playful dessert spread ensures your Halloween theme continues through to sweet treats.

  • Spiked Hot Chocolate: Rich and comforting, this drink is perfect for adult guests looking to indulge and adds a delightful element to the evening's festivities.

Make Ahead Options

These Halloween Chicken Parmesan Sliders are perfect for meal prep, allowing you to streamline your entertaining! You can carve the mozzarella cheese and prepare the olive monster eyes up to 3 days in advance—simply store them in airtight containers in the refrigerator to keep them fresh. Additionally, you can bake the chicken tenders up to 24 hours ahead and reheat them in the oven just before assembling. When you’re ready to serve, warm the marinara sauce for a few minutes until simmering, then assemble the sliders, placing the chicken, cheese, and olives atop the buns for a fun finish. This prep will save you time while ensuring your Halloween Chicken Parmesan Sliders are just as delicious and visually appealing!

How to Store and Freeze Halloween Chicken Parmesan Sliders

Fridge: Store leftover sliders in an airtight container for up to 1 day to maintain freshness. Reheat in the oven to restore their crispy texture.

Freezer: For longer storage, freeze assembled sliders before baking. Wrap each slider tightly in plastic wrap and store in a freezer-safe bag for up to 2 months.

Reheating: When ready to enjoy, bake frozen sliders at 375°F (190°C) for about 20-25 minutes, or until fully heated through. They’re delicious either way, but try to consume within 3 days of baking for the best taste with your Halloween Chicken Parmesan Sliders!

Halloween Chicken Parmesan Sliders Variations

Feel free to get creative and personalize these sliders to suit your taste and dietary preferences!

  • Bacon Cheddar BBQ: Swap chicken for crispy bacon and top with melted cheddar and BBQ sauce for a smoky, savory twist. This combination is rich and mouthwatering, perfect for any gathering.

  • Buffalo Chicken: Replace the marinara with buffalo sauce and use blue cheese crumbles instead of mozzarella for a spicy kick. If you love heat, add sliced jalapeños to intensify the flavor!

  • Vegan Version: Use plant-based chicken slices and dairy-free cheese. Treat them the same way, ensuring a delightful, cruelty-free option for everyone to enjoy.

  • Whole Grain Buns: For a healthier touch, choose whole grain slider buns. They’re just as soft and delicious while adding fiber to your meal. Your waistline will thank you!

  • Garlic Parmesan Twist: Mix minced garlic with the melted butter that you brush over your buns before baking for extra flavor. This will create an aromatic crust that complements the cheesy gooeyness of the sliders beautifully.

  • Stuffed Sliders: Add a layer of spinach and ricotta cheese beneath the chicken for a delightful surprise. It not only enhances the taste but also layers in nutrients for a well-rounded snack.

  • Extra Veggies: Consider adding roasted red peppers or sautéed mushrooms to elevate the flavors while sneaking in some veggies. These enhance the visual appeal and offer a taste explosion in every bite.

  • Chili Heat: Include pickled jalapeños or a drizzle of hot sauce to give a spicy bite. This heat level is sure to excite those who enjoy fiery flavors, making every slider a mini adventure.

These playful variations ensure your Halloween celebration filled with treats caters to all palates. Just like the joy found in Crock Pot Chicken or the zing of Chipotle Lime Chicken, the possibilities are limited only by your imagination. Enjoy your culinary journey!

Expert Tips for Halloween Chicken Parmesan Sliders

  • Cheese Carving: Start carving your mozzarella well in advance, up to 3-4 days before your gathering. This way, you'll save time during assembly and ensure your monster teeth are ready.

  • Chicken Substitution: If you don’t have frozen chicken tenders, grilled chicken or turkey tenders work beautifully too. Just ensure they're cooked thoroughly for the best flavor.

  • Build Flavor: Don’t skimp on the marinara sauce! A good layer not only adds flavor but also keeps the sliders moist. Heat it gently to really bring out the taste.

  • Alternative Toppings: While green olives are perfect for monster eyes, feel free to experiment with black olives or cherry tomatoes to match your party's theme or preferences.

  • Keep Warm: These Halloween Chicken Parmesan Sliders are best when served immediately. If you're preparing for a crowd, keep the assembly neat and reheat the chicken briefly to maintain that crispy texture before serving!

Halloween Chicken Parmesan Sliders Recipe FAQs

What type of chicken tenders should I use for the sliders?
Absolutely! Frozen chicken tenders are perfect for convenience and great taste. However, if you prefer a healthier option, feel free to substitute with grilled chicken or turkey tenders. Just ensure that whichever option you choose is cooked to an internal temperature of 165°F (74°C) for safe consumption.

How should I store leftover Halloween Chicken Parmesan Sliders?
Leftover sliders can be stored in an airtight container in the refrigerator for up to 1 day. To reheat, I recommend placing them in the oven at 350°F (175°C) for about 10-15 minutes to regain that delightful crispy texture. Avoid microwaving them if you want to keep the buns from getting soggy!

Can I freeze these sliders for later use?
Yes! You can absolutely freeze assembled sliders before baking. To do this, wrap each slider tightly in plastic wrap and place them in a freezer-safe bag. They can be stored for up to 2 months. When you’re ready to bake, just preheat your oven to 375°F (190°C) and bake the frozen sliders for about 20-25 minutes until heated through.

What if I have dietary restrictions concerning the ingredients?
Very! You can easily customize these sliders to suit dietary needs. For gluten-free options, look for gluten-free slider buns. If someone is lactose intolerant, consider using lactose-free cheese or non-dairy cheese alternatives. And always double-check ingredients for allergens, especially with marinara sauce and olives.

What should I do if my cheese doesn’t hold its shape when carving?
If you're finding it tough to carve your mozzarella into monster teeth, try chilling the cheese in the refrigerator for about 30 minutes before slicing. This will firm up the cheese and make it easier to carve. Don’t lose heart, if it crumbles, just use it as a cheesy topping—it's still delicious!

Halloween Chicken Parmesan Sliders

Creepy Halloween Chicken Parmesan Sliders for Spooktacular Fun

Delightful Halloween Chicken Parmesan Sliders with crispy chicken, melty cheese, and zesty marinara for a fun appetizer.
Print Recipe Pin Recipe
Prep Time 20 minutes mins
Cook Time 22 minutes mins
Total Time 42 minutes mins
Servings: 6 sliders
Course: Appetizers
Cuisine: Halloween
Calories: 300
Ingredients Equipment Method Nutrition Notes

Ingredients
  

For the Sliders
  • 12 oz Frozen Chicken Tenders or grilled chicken/turkey tenders
  • 6 pieces Slider Buns whole grain or gluten-free options
  • 8 oz Mozzarella Cheese or provolone/cheddar
  • 1 cup Marinara Sauce or BBQ sauce for sweetness
For the Monster Decorations
  • 6 pieces Green Olives (stuffed with pimento) or black olives/cherry tomatoes

Equipment

  • Oven
  • Baking Sheet
  • small saucepan
  • toothpicks

Method
 

Step-by-Step Instructions
  1. Preheat the oven to 400°F (200°C). Arrange frozen chicken tenders in a single layer on a baking sheet and bake for 18-22 minutes until golden-brown.
  2. While the chicken is baking, slice mozzarella cheese into thin pieces and carve them into shapes resembling monster teeth.
  3. Skewer green olives on toothpicks to create monster eyes for the sliders.
  4. In a small saucepan, heat marinara sauce over medium heat, stirring gently until it simmers, about 5 minutes.
  5. Assemble sliders by spreading marinara sauce on the bottom half of the bun, adding chicken tender, and topping with carved cheese pieces.
  6. Cap the sliders with the top bun and insert the toothpick with olive eyes to create a monster appearance.
  7. Serve immediately while warm, ensuring the combination of crispy chicken and melted cheese delights your guests.

Nutrition

Serving: 1sliderCalories: 300kcalCarbohydrates: 30gProtein: 20gFat: 15gSaturated Fat: 7gCholesterol: 60mgSodium: 500mgPotassium: 300mgFiber: 2gSugar: 3gVitamin A: 10IUVitamin C: 15mgCalcium: 20mgIron: 6mg

Notes

For best results, prepare the cheese 3-4 days in advance and store in the refrigerator. Serve sliders immediately for optimal freshness.

Tried this recipe?

Let us know how it was!

Create a Spooky White Skull Snack Board for Halloween Fun

September 19, 2025 by Grace Snow Leave a Comment

As I stood in my kitchen, a swirl of creativity mixed with the anticipation of Halloween fun, I stumbled upon the perfect way to delight my guests: the White Skull Snack Board! This playful and visually striking spread not only delivers a fun Halloween vibe but also whisks you away on a flavor adventure with creamy peanut butter cups and crunchy popcorn. Best of all, it takes just 10 minutes to assemble, so you can focus on enjoying the festivities rather than slaving away in the kitchen. This easy party snack is sure to impress, making it a must-have for your spooky gatherings. Are you ready to join me in creating this delectable Halloween treat?

Why Make a White Skull Snack Board?

Simplicity in Assembly: Even with its stunning presentation, this board takes just 10 minutes to put together, making it a stress-free addition to any party.

Visually Striking: The mix of dark and white elements creates an eye-catching display that will spark conversations and delight your guests.

Flavor Explosion: With creamy peanut butter cups, crunchy popcorn, and soft marshmallows, the flavor combination is truly irresistible.

Versatile Options: You can easily customize the ingredients to suit your preferences, or try adding seasonal treats like Matcha Cookies Soft for extra flair.

Perfect for Sharing: Designed to be enjoyed with friends, this snack board brings people together, making it an ideal centerpiece for your Halloween celebrations.

White Skull Snack Board Ingredients

For the Base

  • Dark Chocolate Chips – For a rich, chocolaty base. Substitution: Use semi-sweet chocolate for a less intense flavor.
  • Popped Popcorn – A crunchy element that complements the sweetness. Substitution: Use caramel corn for added sweetness.

For the Mixed Treats

  • Mini-Marshmallows – Adds lightness and a fluffy texture. Substitution: Use colored marshmallows for a festive twist.
  • Mini-Peanut Butter Cups – Provides a creamy, peanut butter flavor. Substitution: Use chocolate-covered almonds for a nut-free option.
  • White Chocolate Chips – For a sweet, contrasting richness. Substitution: Could use yogurt-covered treats for a tangy flavor.

For the Decorative Elements

  • White Chocolate-Covered Pretzels – Adds a sweet-salty crunch. Substitution: Regular pretzels can be used for less sweetness.
  • Powdered Donuts – For a whimsical touch that resembles skulls. Substitution: Mini muffins can provide a similar shape.

This White Skull Snack Board not only satisfies the taste buds but also serves up a festive aesthetic that will be the highlight of your Halloween gathering!

Step‑by‑Step Instructions for White Skull Snack Board

Step 1: Prepare the Base
Begin by taking a large, flat serving board or platter. Spread the popped popcorn evenly in the center, creating a fluffy base that will anchor your White Skull Snack Board. Aim for a generous layer, roughly 1–2 cups, as this will add structure and volume, setting the stage for the delightful treats to come.

Step 2: Add Sweet Treats
Now, grab your dark chocolate chips, mini-marshmallows, and mini-peanut butter cups. Scatter these goodies around the edge of the popcorn base, creating a colorful and inviting display. Take your time to ensure each treat pops visually against the white of the popcorn; this should take about 5 minutes to achieve a festive look.

Step 3: Incorporate White Elements
Next, add the white chocolate chips and white chocolate-covered pretzels to the board. These elements add a sweet, contrasting richness that complements the darker treats. Tuck powdered donuts into the gaps to form whimsical skull-like shapes, enhancing the spooky aesthetic essential for your White Skull Snack Board.

Step 4: Final Touches
Step back and evaluate the arrangement of your snack board. Distribute the treats evenly, ensuring no spots appear sparse. Adjust the layout by pressing in any ingredients as needed to give an overflowing effect, which not only maximizes visual impact but also invites guests to dig in.

Step 5: Serve Immediately
Once your Halloween masterpiece is complete, present the White Skull Snack Board to your guests. The vibrant colors and diverse textures will entice everyone to gather around. Serve right away to keep the popcorn crispy and the treats fresh, letting the spooky fun begin as everyone enjoys this delightful assembly!

Storage Tips for White Skull Snack Board

  • Room Temperature: If leftovers remain, cover the board with plastic wrap or foil and store at room temperature for up to 4 hours; this keeps the popcorn crunchy and treats fresh.
  • Fridge: If not consumed within a few hours, transfer treats to an airtight container in the fridge for up to 1 day. The popcorn may lose some crunch but the flavors will remain intact.
  • Freezer: For longer storage, seal individual ingredients (like chocolate and pretzels) in freezer bags and freeze for up to 1 month. Thaw in the fridge before reassembling.
  • Reheating: If using refrigerated popcorn, briefly pop it in the microwave for 10–15 seconds to restore some crunch before serving again; however, the overall aesthetic may be affected.

What to Serve with Halloween White Skull Snack Board

Bring your Halloween festivities to life by pairing this playful snack board with delightful accompaniments that enhance the flavors and create a memorable gathering.

  • Festive Apple Cider: The sweet, tangy flavors of apple cider perfectly complement the rich chocolates and bring a seasonal touch to your spread.

  • Spooky Punch: Create a themed cocktail with orange soda, cranberry juice, and floating gummy worms for a fun drink that excites both kids and adults alike.

  • Crispy Celery Sticks: These provide a refreshing crunch that contrasts with the sweetness of the board, offering a lighter palate cleanser between treats.

  • Gourmet Cheese Platter: Adding a selection of cheeses introduces a savory element that balances the sweetness, elevating your snack board to a gourmet experience.

  • Chocolate-Covered Apples: Their silky texture mimics the chocolate from the snack board while adding a fresh fruity twist; everyone will appreciate the maneuver between sweet and tart.

  • Pumpkin Spice Cookies: Embrace the autumn vibe with these soft cookies, their spices harmonizing beautifully with the flavors of your snack board.

  • Creamy Vanilla Dips: Pair with fresh fruit like bananas or strawberries, allowing guests to indulge in a creamy contrast to the board's rich elements.

With these delightful pairings, your Halloween celebration will not only be visually stunning but also a feast of flavors that guests will remember long after the spookiness fades!

White Skull Snack Board Variations

Feel free to get creative and personalize your White Skull Snack Board to match your Halloween vibe!

  • Nut-Free Delight: Swap mini-peanut butter cups with chocolate-covered almonds for a similar crunch but nut-free option. This keeps inclusivity in mind for all your guests!

  • Seasonal Candy Boost: Add candy corn for a pop of vibrant color and that classic fall flavor. It’s a must-have during Halloween and can elevate the festive spirit!

  • Chewy Addition: Toss in some dried fruits like cranberries or apricots. This chewiness balances the board and brings a little tartness to the mix, making it even more enjoyable.

  • Fruity Twist: Use themed cookie cutters to create cheese or fruit shapes. Not only will this add cute designs to your board, but it also introduces fresh elements that complement the sweets.

  • Caramel Craze: Substitute regular popcorn with caramel corn for an extra sweet treat. This will enhance the indulgence of your snack board, making it a winner in the sweet stakes!

  • Yogurt Delight: Replace white chocolate chips with yogurt-covered treats for a slightly tangy flavor. These give a refreshing contrast without sacrificing sweetness, making them a hit with both kids and adults.

  • Playful Pretzels: Use regular pretzels instead of white chocolate-covered ones for a less sweet crunch. This swap introduces a savory element that works beautifully with the sweeter items on the board.

  • Endless Options: For more adventure, consider incorporating some spooky gummy candies or even mini pumpkin-shaped chocolates to boost the Halloween theme. If you’re feeling fancy, try adding colorful elements like Tuscan White Bean for a twist on tradition!

Make Ahead Options

The White Skull Snack Board is perfect for meal prep, allowing you to save time on the day of your Halloween gathering! You can prepare the chocolate, popcorn, and mixed treats up to 24 hours in advance. Simply store individual components in airtight containers in the refrigerator to maintain their freshness. For instance, keep popped popcorn in a sealed bag to prevent it from becoming stale, and store chocolate treats separately to avoid melting. When you're ready to serve, just assemble the board by layering your prepped ingredients for a stunning visual display. This way, you can enjoy a stress-free celebration while still impressing your guests!

Expert Tips for the Best White Skull Snack Board

  • Pre-Pop Popcorn: Ensure your popcorn is fresh and unsalted to prevent overpowering the sweetness of the other treats.
  • Layer Creatively: Use varying heights and textures for an appealing look, keeping the White Skull Snack Board visually enticing.
  • Balance Flavors: Combine sweet and salty elements thoughtfully to ensure everyone finds a treat they love, avoiding an overly sweet board.
  • Keep it Fun: Personalize the snack board with favorite treats or seasonal candies, making it unique and exciting for guests.
  • Serve Fresh: For best results, serve the board soon after assembling to keep popcorn crispy and toppings fresh.

White Skull Snack Board Recipe FAQs

How do I select the best ingredients for my White Skull Snack Board?
Absolutely! For the best flavors, choose ingredients at peak freshness. Look for dark chocolate chips without any bloom (white spots) for a smooth taste. Mini-marshmallows should be soft and fluffy, not stale. When selecting popped popcorn, aim for a fresh batch—air-popped is ideal. You can even make your popcorn at home to control the saltiness!

What are the best ways to store a White Skull Snack Board?
Very good question! If you end up with leftovers, it’s best to cover the board with plastic wrap and store it at room temperature for up to 4 hours, which helps to keep the popcorn crispy. For longer storage, you can transfer leftover treats into an airtight container and keep it in the fridge for 1 day. Just remember, the popcorn may lose some crunch, but the flavors will remain delightful!

Can I freeze the ingredients for my White Skull Snack Board?
Definitely! To freeze, you can seal individual components like chocolate and pretzels in freezer bags and store them for up to 1 month. When you’re ready to use, simply thaw in the fridge overnight. For optimal freshness, I recommend freezing chocolate-covered items separately to prevent any changes in texture.

What if my popcorn gets soggy before serving?
Common issue! If you suspect that your popcorn might lose its crunch, consider reheating it briefly in the microwave for about 10–15 seconds. This can help regain some of the crunchiness. However, keep in mind that if your popcorn is refrigerated, it might not look as visually appealing, so assemble the board as close to serving time as possible.

Are there any dietary considerations I should keep in mind?
Absolutely! If you have guests with allergies, consider using nut-free substitutes like chocolate-covered almonds in place of mini-peanut butter cups. For gluten-free options, make sure any pretzels or candies are labeled gluten-free. Also, check the ingredients of store-bought chocolate and marshmallows to avoid any allergens, helping everyone enjoy this fun treat without concerns!

How can I make my White Skull Snack Board even more festive?
For an extra spooktacular touch, think about using edible decorations like candy corn, themed cookie cutters to create spooky fruit shapes, or even adding dried fruits for color and texture. Personalizing your board with seasonal treats will surely create a unique visual appeal and entice your guests even more!

White Skull Snack Board

Create a Spooky White Skull Snack Board for Halloween Fun

Delight your guests this Halloween with a fun and visually striking White Skull Snack Board that is easy to assemble and delicious.
Print Recipe Pin Recipe
Prep Time 10 minutes mins
Total Time 10 minutes mins
Servings: 8 servings
Course: Snacks
Calories: 200
Ingredients Equipment Method Nutrition Notes

Ingredients
  

For the Base
  • 1 cup Dark Chocolate Chips Substitution: Use semi-sweet chocolate for a less intense flavor.
  • 2 cups Popped Popcorn Substitution: Use caramel corn for added sweetness.
For the Mixed Treats
  • 1 cup Mini-Marshmallows Substitution: Use colored marshmallows for a festive twist.
  • 1 cup Mini-Peanut Butter Cups Substitution: Use chocolate-covered almonds for a nut-free option.
  • 1 cup White Chocolate Chips Substitution: Could use yogurt-covered treats for a tangy flavor.
For the Decorative Elements
  • 1 cup White Chocolate-Covered Pretzels Substitution: Regular pretzels can be used for less sweetness.
  • 3 pieces Powdered Donuts Substitution: Mini muffins can provide a similar shape.

Equipment

  • Large flat serving board or platter

Method
 

Step-by-Step Instructions for White Skull Snack Board
  1. Begin by taking a large, flat serving board or platter. Spread the popped popcorn evenly in the center, creating a fluffy base that will anchor your White Skull Snack Board.
  2. Now, grab your dark chocolate chips, mini-marshmallows, and mini-peanut butter cups. Scatter these goodies around the edge of the popcorn base.
  3. Next, add the white chocolate chips and white chocolate-covered pretzels to the board. Tuck powdered donuts into the gaps to form whimsical skull-like shapes.
  4. Step back and evaluate the arrangement of your snack board. Distribute the treats evenly, ensuring no spots appear sparse.
  5. Once your Halloween masterpiece is complete, present the White Skull Snack Board to your guests. Serve right away.

Nutrition

Serving: 1servingCalories: 200kcalCarbohydrates: 25gProtein: 3gFat: 10gSaturated Fat: 3gPolyunsaturated Fat: 1gMonounsaturated Fat: 3gCholesterol: 5mgSodium: 150mgPotassium: 120mgFiber: 1gSugar: 12gVitamin A: 100IUVitamin C: 1mgCalcium: 40mgIron: 1mg

Notes

For best results, serve soon after assembling to keep popcorn crispy and toppings fresh.

Tried this recipe?

Let us know how it was!

Delicious Halloween Jack Skellington Ricotta Olive Tarts to Wow Guests

September 19, 2025 by Grace Snow Leave a Comment

As the leaves turn and the chilling winds whisper, Halloween becomes a canvas for creativity in the kitchen. This year, I decided to blend whimsy with flavor by crafting these delightful Halloween Jack Skellington Ricotta Olive Tarts. With their flaky, gluten-free crust and savory ricotta filling sprinkled with briny olives and vibrant sun-dried tomatoes, these little delights are not just eye-catching; they’re a wonderful way to elevate your Halloween gathering. Plus, they’re quick to whip up and perfect for impressing your guests, young and old alike. Ready to put a spooky twist on your appetizer table? Let’s dive into this enchanting recipe!

Why Will You Love These Tarts?

Uniqueness: These Halloween Jack Skellington Ricotta Olive Tarts are an exciting spin on traditional appetizers, making them a standout at any gathering.
Quick Prep: With minimal fuss and straightforward steps, you can whip these tarts together in about an hour, leaving you more time to enjoy the festivities.
Crowd-Pleasing Appeal: Beautifully presented with playful Jack Skellington faces, they are sure to earn compliments from guests of all ages.
Versatile Flavor: The combination of creamy ricotta and briny olives creates a savory symphony that pairs perfectly with a crisp salad or as a part of a larger Halloween spread.
Diet-Friendly: Being gluten-free means you can cater to those with dietary restrictions without sacrificing taste. For another delightful treat, check out these Lemon Ricotta Protein pancakes!

Ingredients for Halloween Jack Skellington Ricotta Olive Tarts

For the Crust
• Sweet Rice Flour – Essential for providing the structure in a gluten-free crust.
• Millet Flour – Adds a nutty aroma; substitute with almond flour for a different flavor.
• Gluten-Free Oat Flour – Contributes to a tender texture; you can make this at home by grinding oats.
• Tapioca Flour (or Corn Starch) – Binds the crust together; potato starch works as a substitute.
• Kosher Salt – Enhances overall flavor in both the crust and filling.
• Cold Unsalted Butter – Creates richness; keeping it cold is key to a flaky crust.
• Ice Water – Helps bind the crust mixture without warming the butter; adjust to achieve desired consistency.

For the Filling
• Black Olives – Briny and flavorful, making them a key ingredient in the filling; green olives can be used for a milder taste.
• Julienned Sun-Dried Tomatoes – Impart a tangy sweetness; jarred in oil is recommended for best flavor.
• Fresh Thyme Leaves – Adds aromatic freshness; you may use dried thyme but in lesser quantity.
• Freshly Grated Parmesan Cheese – Offers a creamy aspect; swap for feta cheese if desired.
• Ricotta Cheese – The creamy base of the filling, giving it a rich texture.
• Greek Yogurt – Provides lightness and tang; sour cream can serve as an alternative.
• Egg Whites – Acts as a binder in the filling; for a vegan twist, substitute with flax eggs or a commercial egg replacer.
• Garlic (minced) – Adds depth to the flavor; adjust to your taste preference.

Step‑by‑Step Instructions for Halloween Jack Skellington Ricotta Olive Tarts

Step 1: Prepare the Crust
In a large mixing bowl, whisk together sweet rice flour, millet flour, oat flour, tapioca flour, and kosher salt until well combined. Cut in cold unsalted butter using a pastry cutter or your fingers until the mixture resembles pea-sized crumbs. Gradually add ice water, one tablespoon at a time, until the dough holds together. Shape it into a disk, wrap in plastic wrap, and chill in the refrigerator for 30 minutes.

Step 2: Preheat Oven
While the dough chills, preheat your oven to 400°F (200°C). This temperature will ensure your Halloween Jack Skellington Ricotta Olive Tarts bake evenly and achieve that golden, flaky crust. Make sure your oven is fully heated before baking the tarts to guarantee the best texture.

Step 3: Roll Out Dough
Once the dough has chilled, lightly flour a clean surface and roll it out to about 1/8 inch thick using a rolling pin. Cut out circles to fit your mini tart pans, gently pressing the dough into the bottom and sides. Ensure there are no cracks or holes, as you want to create a secure vessel for your savory filling.

Step 4: Prepare Filling
Slice some black olives for decorating, and chop the rest into small pieces. In each prepared crust, layer the chopped olives, julienned sun-dried tomatoes, fresh thyme leaves, and a sprinkle of freshly grated Parmesan cheese. This colorful combination will not only taste delicious but also make your tarts visually appealing.

Step 5: Mix Ricotta Filling
In a separate bowl, whisk together ricotta cheese, Greek yogurt, egg whites, minced garlic, and a pinch of salt until the mixture is smooth and creamy. This mixture will serve as the base of your filling, creating a rich, satisfying layer inside your Halloween Jack Skellington Ricotta Olive Tarts.

Step 6: Assemble Tarts
Carefully fill each tart with the ricotta mixture, being sure not to overfill. For a spooky touch, arrange whole olives as Jack Skellington's eyes and use sliced olives to craft his mouth. This playful presentation will bring a festive spirit to your appetizer table as you prepare for Halloween.

Step 7: Bake
Place the assembled tarts in the preheated oven and bake for 20-25 minutes, or until the filling is set and the crust turns a light golden brown. Keep an eye on them, checking for doneness early; the tarts should be puffed and slightly firm in the center when done.

Step 8: Serve Warm
Once baked, remove the tarts from the oven and let them cool slightly before serving. These delightful Halloween Jack Skellington Ricotta Olive Tarts are best enjoyed warm, but you can also reheat them at 400°F for 7 minutes if serving later. Gather your friends and family to savor these festive treats!

Expert Tips for Halloween Jack Skellington Ricotta Olive Tarts

  • Chill the Butter: Keep your unsalted butter cold to ensure a flaky crust; warm butter will lead to tough pastry.
  • Use Parchment Paper: Roll out dough between sheets of parchment to prevent sticking and make cleanup easier.
  • Uniform Size: Ensure tart shells are even in size for consistent baking; uneven shells may bake differently, affecting texture.
  • Avoid Overfilling: Fill each tart just below the edge to prevent spilling over during baking; it keeps your tarts neat and presentable.
  • Check Doneness Early: Ovens vary, so start checking tarts a few minutes early to avoid overcooking the filling, keeping it creamy.
  • Serve Fresh: These Halloween Jack Skellington Ricotta Olive Tarts taste best warm; reheat gently to preserve texture if serving later.

What to Serve with Halloween Jack Skellington Ricotta Olive Tarts

As you prepare to enchant your guests with these whimsical tarts, consider adding complementary dishes that will elevate your Halloween gathering.

  • Crisp Green Salad: A refreshing mix of greens with a light vinaigrette balances the rich flavors of the tarts. The crunch provides a delightful contrast to their creamy texture.

  • Garlic Herb Breadsticks: These warm, buttery sticks offer a cozy touch while enhancing the garlic notes in the tarts. Their savory flavor also makes them a favorite for dipping in extra filling.

  • Roasted Vegetable Platter: Vibrant veggies like bell peppers, zucchini, and carrots not only add color but their sweetness perfectly complements the briny olives. This colorful presentation is sure to impress!

  • Pumpkin Soup: Silky and smooth, this seasonal favorite warms the palate and adds a comforting touch to your spooky spread. Its pumpkin flavor harmoniously ties in with the Halloween theme.

  • Sweet Potato Fries: Crispy and slightly sweet, these fries offer a satisfying crunch that contrasts delightfully with the tarts. Serve them with a spicy aioli for an extra kick!

  • Apple Cider: This seasonal drink enhances the autumnal vibe, with its sweet and tart blend offering a refreshing counterpoint to the savory tarts.

  • Chocolate Mousse: Finish off your meal with decadence! This creamy dessert brings a rich sweetness that rounds out the flavors beautifully, making your celebration memorable.

Halloween Jack Skellington Ricotta Olive Tarts Variations

Feel free to get creative and make these delightful tarts your own with some exciting variations!

  • Cheesy Twist: Substitute the ricotta with goat cheese for a tangy flavor that adds a delightful zip. The creamy consistency remains, while the taste offers a new layer of charm.

  • Vegetable Medley: Add colorful veggies like bell peppers or spinach into the filling for a burst of nutrition and flavor. This not only enhances taste but also gives a fresh look to your tarts!

  • Larger Tarts: Instead of mini tarts, mold the dough into a single, larger tart to serve as a stunning centerpiece. Perfect for gatherings, this option allows everyone to slice their own piece.

  • Herb Variation: Swap fresh thyme for fresh basil or parsley to brighten the filling with a herby twist. Each herb brings its own personality, creating a different vibe for your tarts.

  • Vegan Option: Use a dairy-free ricotta or cashew cream in place of ricotta, along with flax eggs to bind. This keeps the savory appeal while accommodating vegan diets.

  • Spiced Up: If you enjoy a kick of heat, add crushed red pepper flakes or diced jalapeños to the filling for a zesty experience. It’ll bring a flavorful punch that spice lovers will adore!

  • Sweet Encounter: Try adding a hint of sweetness by mixing in a teaspoon of honey or agave syrup with the ricotta mixture, creating an intriguing contrast with the savory olives. This unexpected twist will surprise your guests!

  • Complete the Platter: Pair these tarts with delightful additions like my Herby Ricotta Stuffed peppers for a cohesive and impressive appetizer spread that’ll make your Halloween gathering truly unforgettable.

How to Store and Freeze Halloween Jack Skellington Ricotta Olive Tarts

Fridge: Store leftover tarts in an airtight container in the refrigerator for up to 3 days. For best quality, reheat before serving to regain their warm, flaky texture.

Freezer: You can freeze the unbaked tarts for up to 2 months. Assemble them and place them in a freezer-safe container. Bake from frozen, adding a few extra minutes to the baking time.

Reheating: To reheat already baked tarts, preheat your oven to 400°F (200°C) and warm them for about 7 minutes until heated through, keeping the crust crispy.

Prep Ahead: The crust can be made a day ahead and stored in the fridge, while the filling can be prepared a few hours before baking, making it easy to whip up these Halloween Jack Skellington Ricotta Olive Tarts on short notice.

Make Ahead Options

These Halloween Jack Skellington Ricotta Olive Tarts are perfect for meal prep, allowing you to enjoy stress-free entertaining! You can prepare the crust up to 24 hours in advance; simply roll it out, shape it into mini tart pans, and refrigerate. For the filling, mix the ricotta, yogurt, egg whites, garlic, and seasonings up to 3 days ahead and store in an airtight container in the fridge to keep it fresh and creamy. When you're ready to serve, just fill the pre-baked crust with the prepared filling and create those playful Jack Skellington faces before baking. This way, you’ll have delicious tarts ready to impress your guests with minimal last-minute effort!

Halloween Jack Skellington Ricotta Olive Tarts Recipe FAQs

What kind of flour should I use for the crust to ensure it's gluten-free?
For a gluten-free crust in your Halloween Jack Skellington Ricotta Olive Tarts, I recommend using a combination of sweet rice flour, millet flour, and gluten-free oat flour. These flours work together to give your crust the perfect texture. If you need a substitute, almond flour can be a great alternative, offering a unique nutty flavor.

How should I store leftover tarts and how long do they last?
Absolutely! Store any leftover tarts in an airtight container in the refrigerator for up to 3 days. To maintain their delightful flaky texture, it's best to reheat them in the oven at 400°F for about 7 minutes before serving again.

Can I freeze these tarts? If so, how do I do it properly?
Yes, you can freeze the unbaked tarts! Assemble the tarts and place them in a single layer in a freezer-safe container or a baking sheet lined with parchment paper. They can be frozen for up to 2 months. When you're ready to bake, just pop them in the oven from frozen, adding an extra few minutes to the baking time to ensure they're cooked through.

What if I notice my crust is too crumbly? How can I fix that?
If your crust comes out too crumbly, it might not have enough moisture. Next time, try adding a little extra ice water, one teaspoon at a time, while mixing until the dough holds together better. Be sure to keep the butter cold, as it’s crucial for creating that perfect flaky crust!

Are there any dietary considerations I should keep in mind?
These Halloween Jack Skellington Ricotta Olive Tarts are gluten-free, making them suitable for those with gluten sensitivities. If you have dairy allergies, you can substitute ricotta with a dairy-free alternative, and use flax eggs instead of egg whites for a vegan option. If you’re serving to children or pets, be cautious of the olives, as they can be high in sodium.

Halloween Jack Skellington Ricotta Olive Tarts

Delicious Halloween Jack Skellington Ricotta Olive Tarts

A whimsical blend of flavors, these Halloween Jack Skellington Ricotta Olive Tarts are perfect for gatherings.
Print Recipe Pin Recipe
Prep Time 30 minutes mins
Cook Time 25 minutes mins
Chilling Time 30 minutes mins
Total Time 1 hour hr 25 minutes mins
Servings: 12 tarts
Course: Appetizers
Cuisine: American
Calories: 150
Ingredients Equipment Method Nutrition Notes

Ingredients
  

For the Crust
  • 1 cup Sweet Rice Flour Essential for providing structure in a gluten-free crust.
  • 1/2 cup Millet Flour Adds a nutty aroma; substitute with almond flour for a different flavor.
  • 1/2 cup Gluten-Free Oat Flour Contributes to a tender texture; can be made at home by grinding oats.
  • 1/4 cup Tapioca Flour Binds the crust together; potato starch works as a substitute.
  • 1 tsp Kosher Salt Enhances overall flavor in both the crust and filling.
  • 1/2 cup Cold Unsalted Butter Creates richness; keeping it cold is key to a flaky crust.
  • 3-5 tbsp Ice Water Helps bind the crust mixture without warming the butter.
For the Filling
  • 1 cup Black Olives Briny and flavorful, making them a key ingredient.
  • 1/2 cup Julienned Sun-Dried Tomatoes Imparts a tangy sweetness; jarred in oil is recommended.
  • 1 tbsp Fresh Thyme Leaves Adds aromatic freshness; dried thyme can be used in lesser quantity.
  • 1/2 cup Freshly Grated Parmesan Cheese Offers a creamy aspect; swap for feta cheese if desired.
  • 1 cup Ricotta Cheese The creamy base of the filling.
  • 1/2 cup Greek Yogurt Provides lightness and tang; sour cream can be a substitute.
  • 2 each Egg Whites Acts as a binder in the filling.
  • 1 clove Garlic Minced, adds depth to the flavor.

Equipment

  • Mixing Bowl
  • Pastry cutter
  • Rolling Pin
  • mini tart pans
  • Oven

Method
 

Preparation Steps
  1. In a large mixing bowl, whisk together sweet rice flour, millet flour, oat flour, tapioca flour, and kosher salt until well combined. Cut in cold unsalted butter until the mixture resembles pea-sized crumbs.
  2. Gradually add ice water, one tablespoon at a time, until the dough holds together. Shape into a disk, wrap in plastic wrap, and chill in the refrigerator for 30 minutes.
  3. Preheat your oven to 400°F (200°C) while the dough chills.
  4. Roll out the chilled dough to about 1/8 inch thick and cut out circles to fit your mini tart pans.
  5. Layer chopped olives, julienned sun-dried tomatoes, fresh thyme leaves, and sprinkle Parmesan cheese in each prepared crust.
  6. In a separate bowl, whisk together ricotta cheese, Greek yogurt, egg whites, minced garlic, and a pinch of salt until smooth.
  7. Fill each tart with the ricotta mixture and arrange whole olives as Jack Skellington's eyes.
  8. Bake for 20-25 minutes, until the filling is set and the crust turns light golden brown.
  9. Let cool slightly before serving these delightful tarts warm.

Nutrition

Serving: 1tartCalories: 150kcalCarbohydrates: 20gProtein: 6gFat: 6gSaturated Fat: 3gPolyunsaturated Fat: 1gMonounsaturated Fat: 2gCholesterol: 20mgSodium: 200mgPotassium: 200mgFiber: 1gSugar: 1gVitamin A: 500IUVitamin C: 1mgCalcium: 150mgIron: 1mg

Notes

These tarts are best enjoyed warm, and can be reheated if necessary. Store leftovers in an airtight container in the fridge for up to 3 days.

Tried this recipe?

Let us know how it was!

Halloween Temari Sushi: Fun, Easy, and Spooky Finger Food

September 19, 2025 by Grace Snow Leave a Comment

As I was rummaging through my pantry, I stumbled upon a pack of sushi rice that sparked an idea—Halloween Temari Sushi! These delightful, bite-sized sushi balls are the ultimate finger food for your spooky celebrations. Not only are they fun and easy to make, using just cling wrap for shaping, but they also offer a clever way to bring healthier snacks to the table without sacrificing flavor. The combination of smoked salmon and fresh veggies creates a vibrant dish that’s as visually appealing as it is delicious. You can even customize them with playful decorations to match your Halloween vibe! Curious about how to put your own spin on these adorable sushi treats? Let’s dive in!

Why Try Halloween Temari Sushi?

Easy to make: Using just cling wrap, these sushi balls require minimal skills, making them perfect for busy home cooks!
Visually stunning: The vibrant colors and playful designs will steal the show at any Halloween party, impressing both kids and adults alike.
Healthier option: Swap out traditional snacks for these guilt-free delights, each approximately 115 calories.
Customizable: Feel free to substitute ingredients like smoked salmon with crab or avocado for a different twist—your imagination is the limit!
Perfect for gatherings: These finger foods are easy to grab and enjoy, making them a fantastic choice for potlucks and festive celebrations.
Looking for more creative ideas? Check out Vegan Sushi Indulge for additional fun options!

Halloween Temari Sushi Ingredients

For the Sushi Rice

  • Uncooked sushi rice – Use short-grain rice for the perfect sticky texture that holds the sushi balls together.
  • Konbu dashi powder or kelp piece – Adds umami flavor essential for authentic sushi; vegetable broth is a suitable alternative.
  • Rice vinegar – Season your rice with this tangy ingredient to create that classic sushi flavor.
  • Sugar – A little sweetness helps balance the vinegar’s acidity; granulated or castor sugar works wonderfully.
  • Salt – Just a pinch enhances the overall flavor of your sushi.

For the Fillings

  • Smoked salmon – Rich in flavor and perfect for festive decorating; try crab meat or avocado for a delicious alternative.
  • Egg – Fried and cut into fun shapes for added protein and visual appeal; consider a pre-made egg sheet for convenience.
  • Cucumber – Offers a refreshing crunch; remember to slice thinly for easy assembly.
  • Radish – Adds color and crunch to your sushi balls; daikon or carrots can be used as substitutes.

For Toppings and Decorations

  • Fish roe – Enhances flavor and looks great as a decorative topping; feel free to omit if allergies are a concern or you prefer a simpler dish.
  • Nori sheets – Cut into fun shapes to create spooky faces for Halloween-themed sushi.

Let your creativity shine while making these Halloween Temari Sushi! You’ll not only be serving up an appealing dish, but also treating your guests to an exciting taste experience.

Step‑by‑Step Instructions for Halloween Temari Sushi

Step 1: Cook the Sushi Rice
Rinse 1 cup of uncooked sushi rice under cold water until the water runs clear to remove excess starch. In a rice cooker, combine the rice with 1 cup of water and 1 teaspoon of konbu dashi powder, then cook on the sushi setting. Once the rice is done, let it steam for an additional 10 minutes for optimal texture.

Step 2: Prepare Sushi Vinegar
While the rice is steaming, combine 2 tablespoons of rice vinegar, 1 tablespoon of sugar, and 1/2 teaspoon of salt in a small saucepan. Heat gently over medium-low until dissolved, without boiling. Once the sugar and salt dissolve completely, remove from heat and set aside to cool.

Step 3: Mix Sushi Rice with Vinegar
After the sushi rice has steamed, transfer it to a large mixing bowl. Gently fold in the prepared sushi vinegar using a wooden spatula to ensure the grains remain intact. Allow the rice to cool to room temperature, about 15-20 minutes, which is key for shaping your Halloween Temari Sushi.

Step 4: Prepare Decorations
While the rice cools, cut nori sheets into fun shapes like eyes or mouths for Halloween faces. Next, heat a small non-stick pan over medium and lightly oil it before pouring in beaten eggs. Cook until set, about 2-3 minutes, then cut the egg into shapes with cookie cutters for additional decoration.

Step 5: Assemble the Sushi Balls
Lay a piece of cling wrap on a flat surface. Place a slice of smoked salmon, cucumber, or your chosen filling on the plastic. Scoop a small handful of sushi rice (about 2 tablespoons) on top of the filling, then gather the corners of the cling wrap and gently twist to mold it into a round ball shape.

Step 6: Form the Sushi and Release
Release the pressure on the cling wrap while gently pulling it away to reveal the ball, then set it on a serving platter. Repeat this process until you have assembled all your Halloween Temari Sushi, ensuring they remain bite-sized and visually appealing.

Step 7: Decorate with Nori and Roe
Now it's time to add the Halloween flair! Use the prepared nori cutouts to create spooky faces on each sushi ball. For an extra touch, sprinkle fish roe on top of some balls for a burst of flavor and a festive appeal.

Step 8: Serve and Enjoy
Present your beautiful Halloween Temari Sushi on a decorative platter alongside small bowls of soy sauce, mayonnaise, and optional wasabi. These delightful finger foods are perfect for sharing and add an exciting twist to your Halloween festivities.

Expert Tips for Halloween Temari Sushi

  • Cling Wrap Magic: Use cling wrap to shape your rice balls easily—this minimizes mess and ensures uniform sizes for your Halloween Temari Sushi.
  • Nori Precision: Cut nori carefully into small shapes for clear details; consider using scissors for better control over your Halloween-themed designs.
  • Cook Rice Perfectly: Avoid mushy rice by rinsing thoroughly and letting it steam properly after cooking to achieve the perfect texture for shaping.
  • Topping Choices: Experiment with various colorful toppings; using different vegetables can enhance both the visual appeal and nutrition of your sushi.
  • Chill Before Serving: Allow the sushi to cool to room temperature before serving; this enhances flavors and makes them more enjoyable to eat.

What to Serve with Halloween Temari Sushi

Elevate your festive spread with delightful pairings that complement these adorable sushi balls, making your Halloween gathering memorable.

  • Soy Sauce: A classic accompaniment, adding a savory depth that enhances the delightful flavors of the sushi.

  • Pickled Ginger: The zesty bite of pickled ginger cleanses the palate between bites, balancing the rich taste of smoked salmon and other fillings.

  • Edamame: These lightly salted pods provide a nutritious crunch and a textural contrast, bringing a fun, hands-on element to your serving platter.

  • Japanese Salad: A light, crisp salad dressed in sesame vinaigrette offers a refreshing counterpoint to the sushi’s richness, making each bite exciting.

  • Spicy Mayo: For those who crave a kick, drizzle or serve a side of spicy mayo; its creaminess beautifully complements the sushi’s flavor profile.

  • Green Tea: This warm beverage is a soothing addition to your meal, providing a gentle, earthy flavor that enhances the overall dining experience.

  • Pumpkin Soup: A cozy, seasonal starter like spiced pumpkin soup ties in the Halloween theme and adds warmth to your feast.

  • Halloween-themed Dessert: End the night on a sweet note with spooky-themed treats, like ghost-shaped cookies or pumpkin spice cupcakes, to delight your guests.

Halloween Temari Sushi Variations

Feel free to let your creativity shine by customizing these delicious sushi treats! Each twist adds a unique flair to your Halloween party spread.

  • Vegetarian Delight: Replace smoked salmon with diced avocado or a mix of colorful bell peppers for a fresh, veggie-packed flavor.
  • Crab Substitute: Opt for lump crab meat instead of salmon for a different taste while keeping the festive feel intact. The sweetness of the crab can perfectly complement the sushi vinegar!
  • Dairy-Free Twist: Use a vegan cream cheese spread in place of mayonnaise for decoration, adding a creamy texture while keeping it plant-based.
  • Spicy Kick: If you love heat, add a dollop of sriracha in the center before sealing the sushi rice for an exciting surprise in every bite!
  • Eggless Version: Skip the fried egg altogether, or use a store-bought egg sheet for a more straightforward assembly—perfect for a quick fix.
  • Flavorful Mayonnaise: Mix wasabi into store-bought mayo and use it for decorating your sushi; this will add a zesty flavor that packs a punch.
  • Seasonal Themes: Try using pumpkin-shaped nori cutouts for faces or bat silhouettes to delight your guests during Halloween festivities.
  • Crunchy Elements: Incorporate finely chopped nuts or crispy onions as a topping for an added crunch and a delightful texture contrast.

Looking for even more variations? Don’t forget to check out Vegan Sushi Indulge for fresh ideas that elevate your sushi experience!

Make Ahead Options

These Halloween Temari Sushi are a fantastic choice for busy home cooks who want to save time during party preparations! You can prepare the sushi rice and the sushi vinegar up to 24 hours in advance. Simply cook the rice, mix it with the vinegar, and let it cool before storing it in an airtight container in the fridge. Additionally, cut your decorative nori and egg shapes ahead of time—these can be kept in the fridge for up to 3 days in a sealed bag. When you're ready to assemble, just scoop the rice (which stays just as delicious) over your fillings, shape into balls, and apply the nori decorations. This simple prep will help you enjoy a stress-free cooking experience and sweeten the celebration!

Storage Tips for Halloween Temari Sushi

  • Fridge: Store your Halloween Temari Sushi in an airtight container for up to 1 day. This helps maintain their freshness and prevent them from drying out.
  • Freezer: While it's best enjoyed fresh, you can freeze the sushi balls for up to 1 month. Wrap each ball in cling wrap securely, then place them in a freezer-safe bag.
  • Thawing: To enjoy frozen Halloween Temari Sushi, transfer them to the fridge for several hours before serving. Avoid microwaving them, as it may alter the texture.
  • Serving Fresh: For the best experience, serve the sushi as close to preparation time as possible. This ensures you enjoy the delightful combination of flavors and textures in each bite.

Halloween Temari Sushi Recipe FAQs

How do I select the right sushi rice?
Absolutely! For the best results, choose short-grain sushi rice, which provides that lovely sticky texture essential for shaping your Halloween Temari Sushi. Look for rice specifically labeled as sushi rice; it will yield the best texture and flavor when cooked.

How should I store leftover Halloween Temari Sushi?
You’ll want to keep any leftovers fresh! Store your Halloween Temari Sushi in an airtight container in the fridge for up to 1 day. This will help maintain their moisture and vibrancy. If you plan to keep them longer, I recommend following the freezing instructions.

Can I freeze Halloween Temari Sushi?
Yes, you can freeze these delightful sushi balls! To do so, wrap each sushi ball securely in cling wrap, ensuring they are well-protected from freezer burn. Place them in a freezer-safe bag, and they will keep for up to 1 month. When you’re ready to enjoy them, move them to the refrigerator for a few hours to thaw. This gentle thawing process helps preserve the textures and flavors.

What if I have allergies or dietary restrictions?
Very! To make your Halloween Temari Sushi safer for everyone, consider ingredient substitutions. For example, if you’re allergic to fish, you can use avocado or cucumber as a filling instead of smoked salmon. Always double-check packaged ingredients for allergy information, particularly for fish roe.

How do I troubleshoot mushy sushi rice?
If you find your sushi rice a bit too mushy, it likely wasn’t rinsed well before cooking. Make sure to rinse it under cold running water until the water runs clear to remove excess starch. Also, cooking it in a rice cooker can help you achieve the perfect texture; let it steam for an extra 10 minutes after cooking to allow the grains to firm up a bit.

Can children help in making Halloween Temari Sushi?
Absolutely! Making Halloween Temari Sushi can be a fun family activity! Kids can help with placing fillings onto the cling wrap and decorating with nori faces. Just supervise them with the parts that require cooking to ensure safety. This can create an enjoyable and engaging cooking experience for everyone involved!

Halloween Temari Sushi

Halloween Temari Sushi: Fun, Easy, and Spooky Finger Food

Halloween Temari Sushi offers a fun and healthy finger food option for your spooky celebrations.
Print Recipe Pin Recipe
Prep Time 30 minutes mins
Cook Time 15 minutes mins
Cooling Time 20 minutes mins
Total Time 1 hour hr 5 minutes mins
Servings: 12 bites
Course: Appetizers
Cuisine: Japanese
Calories: 115
Ingredients Equipment Method Nutrition Notes

Ingredients
  

For the Sushi Rice
  • 1 cup uncooked sushi rice Use short-grain rice for sticky texture.
  • 1 teaspoon konbu dashi powder Or a kelp piece for umami.
  • 2 tablespoons rice vinegar Seasoning for sushi.
  • 1 tablespoon sugar Granulated or castor.
  • 1/2 teaspoon salt Enhances flavor.
For the Fillings
  • 4 ounces smoked salmon Rich in flavor, also substitute with crab or avocado.
  • 1 large egg Fried and cut into shapes for decoration.
  • 1 medium cucumber Sliced thin for assembly.
  • 1 medium radish Adds crunch and color, substitute with daikon or carrots.
For Toppings and Decorations
  • 2 tablespoons fish roe Optional topping.
  • 2 sheets nori Cut into shapes for decoration.

Equipment

  • Rice cooker
  • small saucepan
  • Non-Stick Pan
  • Wooden spatula

Method
 

Step‑by‑Step Instructions for Halloween Temari Sushi
  1. Rinse uncooked sushi rice under cold water until clear. Cook with water and konbu dashi powder.
  2. Combine rice vinegar, sugar, and salt in a saucepan; heat to dissolve.
  3. Fold the sushi vinegar into the cooked rice and let it cool.
  4. Cut nori into fun shapes for decorations and prepare the egg in a non-stick pan.
  5. Assemble sushi balls by layering filling and rice on cling wrap.
  6. Release the sushi ball from the cling wrap and place on a platter.
  7. Decorate with nori cutouts and sprinkle fish roe if desired.
  8. Serve with soy sauce, mayonnaise, and optional wasabi.

Nutrition

Serving: 1biteCalories: 115kcalCarbohydrates: 20gProtein: 4gFat: 2gSaturated Fat: 0.5gPolyunsaturated Fat: 0.5gCholesterol: 25mgSodium: 200mgPotassium: 100mgFiber: 1gSugar: 1gVitamin C: 2mgCalcium: 10mgIron: 0.5mg

Notes

Use cling wrap to shape sushi balls for consistent sizing. Experiment with toppings for visual and nutritional variety.

Tried this recipe?

Let us know how it was!

Peanut Butter Spider Cookies That Halloween Kids Will Love

September 19, 2025 by Grace Snow Leave a Comment

As Halloween approaches, the excitement in the air becomes almost palpable—especially when it comes to whipping up treats that delight ghouls and goblins alike. My Peanut Butter Spider Cookies are the perfect blend of fun and flavor, topped with creamy Reese's cups and adorable candy eyeballs! Not only are these cookies quick to prepare with no chilling time required, but they also make for a truly crowd-pleasing Halloween dessert. Imagine both kids and adults gathering around, marveling at these festive little delights—who wouldn’t want a bite of these spooky snacks? They are easily adaptable too, allowing you to modify them for gluten-free diets without sacrificing joy. Ready to impress your family this spooky season? Let’s dive into the recipe!

Why Are Peanut Butter Spider Cookies So Fun?

Irresistible Festive Appeal: These cookies are not just treats; they're playful creations that bring Halloween spirit to life!
No-Chill Convenience: Quickly whip up a batch without waiting around—perfect for when those sweet cravings hit!
Kid-Friendly Fun: Let the little ones get creative decorating with candy eyeballs; it's a great way to bond and make memories.
Delicious Flavor Combo: The blend of creamy peanut butter and chocolate is a match made in dessert heaven!
Easily Adaptable: Need a gluten-free option? Feel free to swap in a 1:1 gluten-free flour blend for everyone to enjoy!

You’ll love serving these Peanut Butter Spider Cookies at your Halloween gatherings, transforming them into treats that even your favorite classics like Eggnog Cookies Soft can’t compete with!

Peanut Butter Spider Cookies Ingredients

For the Cookies
• Unsalted Butter – Adds richness and moisture; make sure it's at room temperature for easier mixing.
• Brown Sugar – Provides moisture and chewiness; you can substitute with coconut sugar for deeper flavor.
• Granulated Sugar – Sweetens the cookies and helps achieve those delightful crispy edges.
• Creamy Peanut Butter – The star ingredient that gives flavor and texture; stick with conventional peanut butter for the best results.
• Large Egg – Binds the mixture together and contributes to the cookie's structure.
• Vanilla Extract – Enhances the overall flavor profile beautifully.
• All-Purpose Flour – Provides structure; a 1:1 gluten-free flour blend can be used for a gluten-free version.
• Baking Soda – Acts as a leavening agent for a slightly risen cookie.
• Baking Powder – Works alongside baking soda to ensure fluffiness.
• Salt – Balances out the cookie's sweetness.
• Granulated Sugar (for rolling) – Adds a sweet, crunchy crust.

For the Topping
• Mini Reese’s Peanut Butter Cups – Bring festive joy and flavor to your cookies, making them truly special.
• Semi-Sweet Chocolate Chips – Perfect for creating spider legs and attaching our fun candy eyes.
• Candy Eyeballs – These festive decorations make your cookies irresistibly cute and Halloween-ready!

Your festive Peanut Butter Spider Cookies are just waiting to be made, and I can guarantee they’ll be a hit with the whole family!

Step‑by‑Step Instructions for Peanut Butter Spider Cookies

Step 1: Chill the Reese’s
Begin by placing your unwrapped mini Reese's Peanut Butter Cups in the freezer for about 30 minutes. This helps them maintain their shape when baked into your Peanut Butter Spider Cookies. A quick chill ensures the delicious centers won't melt away completely, leaving you with perfectly festive treats!

Step 2: Prepare the Oven
Preheat your oven to 350°F (175°C). While the oven heats, you'll be ready to mix your cookie dough soon. Make sure to line two baking sheets with parchment paper for easy cleanup and to prevent sticking, ensuring your cookies bake evenly and come out beautifully golden.

Step 3: Mix Butter and Sugars
In a large mixing bowl, beat together ½ cup of unsalted butter, ½ cup of packed brown sugar, and ¼ cup of granulated sugar using an electric mixer. Mix until the mixture is smooth and fluffy—approximately 2-3 minutes. This creaming process helps incorporate air, giving your Peanut Butter Spider Cookies a delightful texture when baked.

Step 4: Combine the Wet Ingredients
Add ¾ cup of creamy peanut butter, one large egg, and 1 teaspoon of vanilla extract to the butter and sugars. Continue mixing until everything is well blended and creamy. This combination adds that essential nutty flavor that makes these cookies irresistible, ensuring each bite encapsulates the heart of Halloween!

Step 5: Incorporate the Dry Ingredients
Gradually mix in 1 cup of all-purpose flour, ½ teaspoon of baking soda, ½ teaspoon of baking powder, and ¼ teaspoon of salt. Stir just until combined, taking care not to overmix; the dough should be thick and slightly sticky. This step ensures your Peanut Butter Spider Cookies maintain the perfect chewiness and structure when baked.

Step 6: Shape the Cookies
Using a tablespoon, scoop out dough and form balls about the size of a golf ball. Roll each ball in granulated sugar for a sweet crust, then place them spaced 2 inches apart on your prepared baking sheets. This allows room for spreading while baking—give them a cozy but not crowded home on the tray!

Step 7: Bake the Cookies
Bake the cookies in the preheated oven for 8-11 minutes, until the edges are golden while the centers remain soft. Keep an eye on them as they bake; you want a nice golden hue without overbaking. When the timer goes off, the aroma of peanut butter will fill your kitchen—yum!

Step 8: Add the Toppings
As soon as they come out of the oven, gently press a chilled Reese’s cup into the center of each cookie while they are still warm. Allow the cookies to cool on the baking sheet for about 15-20 minutes. This helps the Reese’s melt slightly into the cookie, creating a deliciously sweet centerpiece!

Step 9: Decorate the Cookies
Melt ½ cup of semi-sweet chocolate chips in the microwave or over a double boiler until smooth. Use a squeeze bottle or a ziplock bag with a corner snipped off to create spider legs by drizzling the melted chocolate out from the Reese's. Attach candy eyeballs using some of the melted chocolate, letting everything set completely before serving. These Peanut Butter Spider Cookies will be a spooky treat that everyone will adore!

Make Ahead Options

These Peanut Butter Spider Cookies are perfect for busy home cooks looking to save time! You can prepare the cookie dough up to 24 hours in advance by mixing all the ingredients, rolling them into balls, and storing them in an airtight container in the refrigerator. For even longer storage, shape the dough balls, flash freeze them on a baking sheet, and then transfer to a ziplock bag—this allows you to bake fresh cookies later, even up to three months down the line! When you’re ready to bake, just preheat the oven, place them on a baking sheet, and bake as directed. You'll achieve those soft, chewy cookies just as delightful as when made fresh!

What to Serve with Peanut Butter Spider Cookies?

These delightful cookies will surely steal the spotlight, but pairing them with the right sides enhances your Halloween festivities.

  • Milk: A classic pairing that complements the chocolate and peanut butter, providing a creamy balance to each sweet bite.
  • Pumpkin Spice Latte: The warm spices from this seasonal favorite create a cozy experience, perfect for a Halloween gathering.
  • Caramel Apple Slices: Crisp apple slices dipped in caramel add a refreshing crunch that contrasts beautifully with the chewy cookies.
  • Ghostly Cupcakes: Whipped frosting and spooky décor on cupcakes mirror the fun spirit of your cookies, enticing everyone to indulge.
  • Hot Chocolate: Rich, creamy hot chocolate drizzled with chocolate adds a luxurious touch and indulgent experience to the evening.

These pairings will not only elevate your Peanut Butter Spider Cookies but also create a memorable dessert spread for all your Halloween celebrations!

Peanut Butter Spider Cookies Variations

Feel free to get creative with your Peanut Butter Spider Cookies and make them your own!

  • Nut-Free: Swap peanut butter for sun butter to create an allergen-friendly version that still delights.

  • Gluten-Free: Use a 1:1 gluten-free flour blend for a kid-friendly treat that everyone can enjoy.

  • Flavor Boost: Add ½ teaspoon of cinnamon or pumpkin spice to the dough for a warm, autumnal flavor.

  • Chocolate Lovers: Replace mini Reese’s with chocolate-covered pretzels for an extra crunch and sweet-salty twist.

  • Mix and Match Toppings: Experiment with different candies for the spider topping; crushed Oreos or gummy worms can make fun alternatives!

  • Choco-Peanut Butter Twist: Incorporate semi-sweet chocolate chips into the dough for a rich, chocolatey experience.

  • Festive Sprinkles: Add Halloween-themed sprinkles before the cookies cool for a pop of color and celebration.

  • Chopped Candy Bars: Substitute mini Reese’s with chopped fun-sized candy bars, like Snickers or Milky Way, for mixed flavor fun.

No matter which variations you choose, your spooky cookies will be sure to charm all ghosts and goblins at your Halloween gatherings. For holiday treats that are just as delightful, consider making Thumbprint Cookies Melt or Mexican Wedding Cookies to keep the festive spirit alive!

Expert Tips for Peanut Butter Spider Cookies

  • Chill the Reese's: Ensure your Reese's cups are frozen before baking; this keeps their shape intact and prevents melting into the cookie dough.

  • Don’t Overbake: Keep an eye on the cookies; they should be golden on the edges but still soft in the center. They continue to set while cooling.

  • Sugar Coating: Rolling the cookie dough balls in granulated sugar not only adds sweetness but also creates a delightful texture contrast in the finished cookies.

  • Parchment Paper: Use parchment paper on your baking sheets to prevent sticking and to make cleanup a breeze, enhancing your cookie baking experience.

  • Creative Toppings: Don’t hesitate to get festive with decorations—feel free to use different types of candy for variety, while keeping the peanut butter cookie goodness intact!

How to Store and Freeze Peanut Butter Spider Cookies

Airtight Container: Store cookies in an airtight container at room temperature for up to 3 days to keep them fresh and chewy. If stacking, place parchment paper between layers to prevent sticking.

Freezer Friendly: For longer storage, these Peanut Butter Spider Cookies can be frozen. Wrap each cookie individually in plastic wrap, then place them in a ziplock bag for up to 2 months.

Reheating: When ready to enjoy, thaw your cookies at room temperature, or pop them in the microwave for a few seconds to regain that soft, fresh-from-the-oven texture.

Dough Storage: If you'd like, you can also freeze the cookie dough! Shape into balls, flash freeze them on a baking sheet, and then transfer to a ziplock bag. Bake directly from frozen, adding a minute or two to the baking time.

Peanut Butter Spider Cookies Recipe FAQs

How do I choose the right peanut butter for this recipe?
Absolutely! For the best results when making your Peanut Butter Spider Cookies, I recommend using conventional creamy peanut butter. This type creates the ideal texture and flavor. Natural peanut butter may not work as well, as it can be too oily or dry, affecting the consistency of your cookie dough.

What’s the best way to store Peanut Butter Spider Cookies?
To keep your cookies fresh, store them in an airtight container at room temperature for up to 3 days. If you're stacking them, place parchment paper between layers to prevent them from sticking together. They truly taste best when enjoyed fresh!

Can I freeze Peanut Butter Spider Cookies?
Very! To freeze your Peanut Butter Spider Cookies, wrap each cookie individually in plastic wrap and then place them in a ziplock bag. They can be stored in the freezer for up to 2 months. When you're ready to enjoy them, simply thaw at room temperature or warm them in the microwave for a few seconds to regain that soft, fresh-from-the-oven texture!

What if my cookie dough is too dry?
If you find that your dough seems too dry, don’t worry! Simply add a teaspoon of milk or a little more peanut butter to the mix to achieve that perfect, slightly sticky consistency. This will enhance the moisture and ensure your cookies turn out delightfully chewy.

Can I make these cookies gluten-free?
Yes, absolutely! To create a gluten-free version of Peanut Butter Spider Cookies, simply replace all-purpose flour with a 1:1 gluten-free flour blend. This modification allows everyone to enjoy these festive treats without sacrificing flavor or texture!

What can I use instead of Reese's for the topping?
If you prefer, you can substitute mini candy bars instead of Reese's to top your cookies. Feel free to get creative! Using different types of chocolate or candies can add variety and fun to your Halloween treats while still keeping that delicious peanut butter cookie base intact.

Peanut Butter Spider Cookies

Peanut Butter Spider Cookies That Halloween Kids Will Love

Delight kids and adults alike with these fun and flavorful Peanut Butter Spider Cookies, perfect for Halloween gatherings.
Print Recipe Pin Recipe
Prep Time 20 minutes mins
Cook Time 11 minutes mins
Cooling Time 20 minutes mins
Total Time 51 minutes mins
Servings: 24 cookies
Course: Dessert
Cuisine: American
Calories: 150
Ingredients Equipment Method Nutrition Notes

Ingredients
  

For the Cookies
  • 0.5 cups Unsalted Butter At room temperature
  • 0.5 cups Brown Sugar Packed, can substitute with coconut sugar
  • 0.25 cups Granulated Sugar For sweetness
  • 0.75 cups Creamy Peanut Butter Conventional for best results
  • 1 large Egg Binds the mixture
  • 1 teaspoon Vanilla Extract
  • 1 cups All-Purpose Flour Can use a 1:1 gluten-free flour blend
  • 0.5 teaspoon Baking Soda
  • 0.5 teaspoon Baking Powder
  • 0.25 teaspoon Salt To balance sweetness
  • 0.25 cups Granulated Sugar (for rolling) For a crunchy crust
For the Topping
  • 12 pieces Mini Reese’s Peanut Butter Cups
  • 0.5 cups Semi-Sweet Chocolate Chips For spider legs
  • 1 cup Candy Eyeballs For decoration

Equipment

  • Mixing Bowl
  • Electric mixer
  • Baking Sheets
  • Parchment Paper
  • Squeeze bottle or ziplock bag

Method
 

Step-by-Step Instructions
  1. Chill the unwrapped mini Reese's Peanut Butter Cups in the freezer for about 30 minutes.
  2. Preheat your oven to 350°F (175°C) and line two baking sheets with parchment paper.
  3. In a large mixing bowl, beat together the butter, brown sugar, and granulated sugar until smooth and fluffy.
  4. Add peanut butter, egg, and vanilla extract to the mixture and mix until well blended.
  5. Gradually mix in flour, baking soda, baking powder, and salt until just combined.
  6. Scoop out dough and form golf ball-sized balls, roll in granulated sugar, and place them on prepared baking sheets.
  7. Bake for 8-11 minutes until edges are golden and centers are soft.
  8. As soon as they come out of the oven, press a chilled Reese’s cup into the center of each cookie.
  9. Cool on the baking sheet for about 15-20 minutes before decorating.
  10. Melt chocolate chips and create spider legs by drizzling from the Reese's. Attach candy eyeballs with chocolate.

Nutrition

Serving: 1cookieCalories: 150kcalCarbohydrates: 20gProtein: 3gFat: 7gSaturated Fat: 3gPolyunsaturated Fat: 1gMonounsaturated Fat: 2gCholesterol: 15mgSodium: 80mgPotassium: 90mgFiber: 1gSugar: 10gVitamin A: 100IUCalcium: 15mgIron: 1mg

Notes

These cookies can be adapted for gluten-free diets by using a 1:1 gluten-free flour blend.

Tried this recipe?

Let us know how it was!

Delicious Vampire Hearts on Toast for a Spooky Feast

September 19, 2025 by Grace Snow Leave a Comment

As I rummaged through my pantry searching for Halloween inspiration, a spooky idea struck me: why not create a dish that’s both playful and nutritious? Enter Vampire Hearts on Toast, a delightfully eerie appetizer that pairs sweet dried figs with earthy beets, all elegantly served on gluten-free toast. This whimsical treat is not only a feast for the eyes—it's also quick to prepare and fully customizable with various toppings to match your Halloween theme. Whether you're hosting a gathering or craving a fun snack, these vegan delights are sure to impress your guests and make meal prep feel like a Halloween adventure. Curious how to whip up these enchanting bites? Let’s get started!

Why Make Vampire Hearts on Toast?

Uniquely Spooky: These Vampire Hearts on Toast are a fantastic fusion of flavors, offering a striking visual that will captivate your guests.

Quick Prep: With straightforward steps, you can whip up this appetizer in no time—perfect for last-minute gatherings!

Customizable: Use different toppings, like herb-infused cream cheese or various dried fruits, to make each serving your own.

Health-Conscious: Made with wholesome ingredients, they provide a guilt-free indulgence packed with fiber and natural sweetness. Pair them with a refreshing drink or serve alongside Parmesan Artichoke Hearts for a delightful feast.

Impressive Presentation: Your guests will adore these beautifully arranged bites; serve them on a festive platter adorned with edible glitter for added charm!

Vampire Hearts on Toast Ingredients

For the Hearts
• Dried Black Mission Figs – These provide a rich sweetness and chewy texture; substitute with prunes if needed.
• Beet – Adds an earthy flavor and vibrant color; opt for fresh beets for a firmer bite or canned beets for convenience.
• Rice Paper Wrappers – Essential for holding the fig and beet together; if these aren't available, thin cucumber slices make a refreshing alternative.
• Maple Syrup – Enhances sweetness and adds shine; agave syrup can serve as a great alternative for similar results.

For the Base
• Plant-Based Cream Cheese – Perfect for spreading on toast, adding creaminess; feel free to choose your favorite flavor such as herbed or plain.
• Gluten-Free Bread (Toast) – Serves as the hearty base; pick your favorite variety, just ensure it's toasted for that satisfying crunch!

For the Drizzle
• Beet Juice – Used to create a beautiful beet syrup; can be omitted if not available, but adds a lovely elegant touch to your Vampire Hearts.

These Vampire Hearts on Toast are not only a delicious spooky treat but also a captivating centerpiece for any Halloween gathering!

Step‑by‑Step Instructions for Vampire Hearts on Toast

Step 1: Prepare the Figs
Begin by selecting your dried black mission figs, pinching off the hard base to ready them for wrapping. Take thin slices of beet and carefully wrap each fig snugly, ensuring the beet covers the entire fig to maintain moisture while cooking.

Step 2: Wrap with Rice Paper
Moisten the rice paper wrappers until they become pliable, then carefully wrap each beet-and-fig bundle, ensuring that it is tightly secured. For an alternative, thin cucumber slices can be used, but rice paper will provide a crisp texture once baked.

Step 3: Secure the Wraps
Using small skewers, secure each wrapped fig in place. This will help hold the beautiful Vampire Hearts on toast together while they cook, ensuring they maintain their shape and complete the spooky presentation.

Step 4: Drizzle with Maple Syrup
Place the secured Vampire Hearts on a baking sheet lined with parchment paper. Drizzle them lightly with maple syrup to enhance their sweetness and create a beautiful glaze. This step not only adds flavor but also encourages a lovely caramelization during cooking.

Step 5: Air Fry the Hearts
Preheat your air fryer to 350°F (175°C). Carefully place the Vampire Hearts in the fryer basket and air fry for about 4 to 6 minutes, watching closely for the rice paper to become crisp and the beets to soften slightly. A light golden color will signal they are ready.

Step 6: Prepare the Toast
While the Vampire Hearts are air frying, toast your gluten-free bread until it reaches a delightful crispiness. This toasted base will hold the creaminess of the plant-based cream cheese and provide a satisfying crunch in every bite.

Step 7: Assemble the Toasts
Once the Vampire Hearts are done, allow them to cool for a minute. Spread a generous layer of plant-based cream cheese onto each piece of toast, and then artfully place the Vampire Hearts on top, ensuring they shine with that delicious glazed look.

Step 8: Drizzle with Beet Syrup
For a final touch, drizzle the assembled Vampire Hearts on toast with beet syrup, made from the beet juice and maple syrup mixture. This adds a beautiful color contrast and a hint of earthy sweetness that complements the dish perfectly.

Step 9: Serve Creatively
Arrange your Vampire Hearts on a festive platter and consider adding decorative touches, like edible glitter or colorful party picks. Present them at your Halloween gathering, and watch as your guests eagerly dig into this spooktacular appetizer!

How to Store and Freeze Vampire Hearts on Toast

Fridge: Store any leftover Vampire Hearts in an airtight container for up to 3 days. To maintain crispiness, reheat briefly in the air fryer before serving.

Freezer: If you've prepared a batch in advance, freeze the unassembled Vampire Hearts (wrapped but uncooked) in a single layer on a baking tray, then transfer them to a freezer-safe bag for up to 2 months.

Thawing: To use frozen Vampire Hearts, thaw them in the fridge overnight before air frying them according to the instructions. This will ensure they cook evenly.

Make-Ahead Tip: Prepping the ingredients early can save time; assemble and store the Vampire Hearts in the fridge, ready to air fry just before your gathering!

Make Ahead Options

These Vampire Hearts on Toast are perfect for meal prep, allowing you to enjoy spooky treats without the last-minute rush! You can prepare the figs wrapped in beet slices and rice paper up to 24 hours in advance; simply store them in an airtight container in the fridge to maintain freshness. Additionally, you can whip up the beet syrup in advance and store it separately for up to 3 days—this way, the flavors deepen over time. When you're ready to serve, just air fry the Vampire Hearts as directed and toast your gluten-free bread. This method ensures each bite is just as delicious as if you made them freshly on the day!

Vampire Hearts on Toast Variations

Feel free to get creative and customize these delightful Vampire Hearts on Toast for your Halloween festivities!

  • Fruit Swap: Replace black mission figs with other dried fruits like apricots or soft dates for a unique flavor profile. Each bite carries the spirit of Halloween but with a fruity twist!

  • Cream Cheese Infusion: Experiment with flavored plant-based cream cheeses, adding herbs or spices to elevate the taste. Maybe go for a savory garlic spread or a zesty jalapeño cream to surprise your taste buds!

  • Sweet Beet Glaze: Enhance the beet syrup with spices like cinnamon or nutmeg; it brings a warm, seasonal vibe perfect for fall festivities. A touch of warmth adds a cozy element to these spooky treats.

  • Nutty Crunch: Sprinkle chopped nuts like walnuts or pecans on top for added texture and an unexpected crunch. This twist will have your guests wondering what the secret ingredient is!

  • Gluten-Free Options: If gluten-free bread isn’t available, try serving on rice cakes or sweet potato slices for a delicious and unique base. They hold up well and provide a healthy alternative.

  • Spicy Kick: Add a hint of heat to your cream cheese with sriracha or red pepper flakes for those who love a little spice in their life. It's a daring flavor twist that brings excitement to the table.

  • Herbal Garnish: Fresh herbs like basil or chives can beautifully finish off your Vampire Hearts, adding a pop of color and freshness. Herbs will elevate both the taste and the visuals; it’s a win-win!

For even more inspiration, consider pairing these Vampire Hearts with some delightful Parmesan Artichoke Hearts on the side. Their savory goodness complements the festive flair of your Halloween spread!

What to Serve with Vampire Hearts on Toast?

Create a delightful Halloween spread that perfectly complements these spooky treats!

  • Crispy Roasted Brussels Sprouts: The slight bitterness of Brussels sprouts contrasts beautifully with the sweetness of the Vampire Hearts, adding depth to your meal.

  • Pumpkin Soup: A warm, creamy pumpkin soup brings a cozy element to your gathering, enhancing the fall theme and soothing the senses.

  • Herbed Quinoa Salad: This fresh salad adds a light and zesty note, with herbs that brighten the palate and balance the richness of the creamy cheese.

  • Spiced Apple Cider: A warm drink that evokes the essence of fall, pairing perfectly with the sweet and savory flavor profile of the Vampire Hearts.

  • Chocolate Avocado Mousse: For dessert, this indulgently creamy treat provides a rich texture, while its health-conscious ingredients keep the meal light.

  • Hummus with Veggie Sticks: A refreshing option, the crunchy veggies paired with flavorful hummus serve as an energizing nibble between bites of the Vampire Hearts.

  • Ginger Beer: This fizzy drink with a hint of spice adds an exciting contrast and a touch of sass to your spooky Halloween feast.

  • Caramelized Sweet Potatoes: Their natural sweetness and softness blend beautifully with the flavors of the Vampire Hearts, creating a satisfying and delightful taste experience.

  • Vegan Cheese Platter: A selection of artisanal vegan cheese varieties will impress guests while offering a delicious counterpoint to the hearts on toast.

Expert Tips for Vampire Hearts on Toast

• Wrap Tight: Ensure that the rice paper wraps tightly around the figs and beets so they don’t fall apart during cooking.

• Watch the Air Fry: Air fry in small batches for even crisping; overcrowding can lead to uneven cooking and soggy results.

• Prep Ahead: Make the beet syrup in advance and store it in the fridge, enhancing the flavors and saving time on serving day.

• Experiment with Toppings: Feel free to swap out the cream cheese for different flavored varieties or even a spicy option to kick it up a notch!

• Plating Matters: Elevate the presentation by garnishing with fresh herbs or edible flowers, because a beautiful plate makes the Vampire Hearts even more enticing.

Vampire Hearts on Toast Recipe FAQs

How do I choose the best figs for my Vampire Hearts on Toast?
When selecting dried black mission figs, look for ones that are plump, moist, and free from dark spots. Avoid figs with a hard or overly dried exterior as they can affect the texture. If you can’t find black mission figs, prunes work as a great alternative due to their similar sweetness and chewiness.

How should I store leftover Vampire Hearts on Toast?
Store any leftover Vampire Hearts in an airtight container in the refrigerator for up to 3 days. To retain their crunch, reheat them briefly in an air fryer at 350°F until warmed through, which should take about 2-3 minutes.

Can I freeze Vampire Hearts on Toast?
Absolutely! If you want to make a batch in advance, assemble the Vampire Hearts (wrapped but uncooked) and freeze them in a single layer on a baking tray. Once frozen, transfer them to a freezer-safe bag where they will last for up to 2 months. To cook, just thaw in the fridge overnight before air frying as per the instructions.

How do I troubleshoot if my wraps tear during preparation?
If your rice paper tears, it might be due to being too dry or too wet. I recommend lightly moistening the edges for better pliability before wrapping. If it’s too wet, let it sit for a few seconds to let excess moisture evaporate. If you do encounter tears, a small piece of rice paper can patch it up, or use thin cucumber slices as a quick substitute for wrapping.

Are Vampire Hearts on Toast suitable for people with allergies?
Yes! These Vampire Hearts are naturally vegan and gluten-free, which makes them a fantastic choice for various dietary restrictions. However, always double-check the labels on your ingredients, especially for items like plant-based cream cheese, to ensure there are no unexpected allergens. For those with nut allergies, be cautious about certain cream cheese varieties.

How can I add additional flavors to my Vampire Hearts on Toast?
You can easily customize the taste by using flavored plant-based cream cheeses, such as herb-infused or spiced options. Additionally, consider drizzling a blend of maple syrup with spices like cinnamon or ginger to enhance their seasonal flavors. The more the merrier, so feel free to experiment with toppings!

Vampire Hearts on Toast

Delicious Vampire Hearts on Toast for a Spooky Feast

These Vampire Hearts on Toast are a playful and nutritious Halloween appetizer featuring sweet figs and earthy beets.
Print Recipe Pin Recipe
Prep Time 15 minutes mins
Cook Time 6 minutes mins
Total Time 21 minutes mins
Servings: 4 toasts
Course: Appetizers
Cuisine: Vegan
Calories: 200
Ingredients Equipment Method Nutrition Notes

Ingredients
  

For the Hearts
  • 12 pieces Dried Black Mission Figs Substitute with prunes if needed.
  • 1 medium Beet Opt for fresh beets for a firmer bite or canned beets for convenience.
  • 4 sheets Rice Paper Wrappers Thin cucumber slices can be used as an alternative.
  • 2 tablespoons Maple Syrup Agave syrup can serve as a great alternative.
For the Base
  • 8 ounces Plant-Based Cream Cheese Choose your favorite flavor such as herbed or plain.
  • 4 slices Gluten-Free Bread (Toast) Ensure it's toasted for that satisfying crunch!
For the Drizzle
  • 2 tablespoons Beet Juice Can be omitted if not available.

Equipment

  • Air fryer
  • Baking Sheet
  • Skewers

Method
 

Step-by-Step Instructions
  1. Prepare the Figs: Begin by selecting your dried black mission figs, pinching off the hard base to ready them for wrapping. Take thin slices of beet and carefully wrap each fig snugly, ensuring the beet covers the entire fig to maintain moisture while cooking.
  2. Wrap with Rice Paper: Moisten the rice paper wrappers until they become pliable, then carefully wrap each beet-and-fig bundle, ensuring that it is tightly secured.
  3. Secure the Wraps: Using small skewers, secure each wrapped fig in place.
  4. Drizzle with Maple Syrup: Place the secured Vampire Hearts on a baking sheet lined with parchment paper. Drizzle them lightly with maple syrup.
  5. Air Fry the Hearts: Preheat your air fryer to 350°F (175°C). Carefully place the Vampire Hearts in the fryer basket and air fry for about 4 to 6 minutes.
  6. Prepare the Toast: While the Vampire Hearts are air frying, toast your gluten-free bread until it reaches a delightful crispiness.
  7. Assemble the Toasts: Once the Vampire Hearts are done, allow them to cool for a minute. Spread a generous layer of plant-based cream cheese onto each piece of toast.
  8. Drizzle with Beet Syrup: For a final touch, drizzle the assembled Vampire Hearts on toast with beet syrup.
  9. Serve Creatively: Arrange your Vampire Hearts on a festive platter.

Nutrition

Serving: 1toastCalories: 200kcalCarbohydrates: 30gProtein: 3gFat: 7gSaturated Fat: 1gPolyunsaturated Fat: 0.5gMonounsaturated Fat: 4gSodium: 140mgPotassium: 250mgFiber: 4gSugar: 10gVitamin A: 5IUVitamin C: 6mgCalcium: 3mgIron: 5mg

Notes

Ensure tight wraps around the figs and beets to prevent falling apart. Air fry in small batches for even cooking. Consider prepping ingredients in advance for quicker assembly.

Tried this recipe?

Let us know how it was!

Spook-tacular Ghost Pizza for a Fun Halloween Treat!

September 19, 2025 by Grace Snow Leave a Comment

“Did you hear someone’s making ghost pizza for Halloween?” It was the kind of innocent chatter that sparked my curiosity and, of course, my whisk. This Quick and Spooky Ghost-Shaped Pizza turns your kitchen into a hub of Halloween excitement, transforming a standard store-bought pizza into a playful festive treat in just five minutes! With gooey mozzarella cut into playful ghost shapes, this easy recipe is perfect for getting kids involved in the kitchen before heading out for trick-or-treating. Not only does it deliver a deliciously cheesy flavor, but its whimsical presentation guarantees big smiles all around. Whether for a spooky celebration or a fun family dinner, this creative dish is sure to be a hit. Are you ready to make pizza that’s hauntingly delicious?

Why Make a Ghost Pizza?

Quick, this spook-tacular creation takes just five minutes from prep to table! Kids will adore the playful ghost shapes, making it a fun dinner before trick-or-treating. Versatile, you can easily swap in different cheeses or toppings for personalized flavors. Delightful, the melty mozzarella and crispy crust create a dish that’s both cute and cheesy. Perfect for parties, this pizza adds a festive touch to your Halloween spread—great alongside haunting drinks. Don’t miss out on thrilling your family and friends with this easy, family-friendly recipe!

Ghost Pizza Ingredients

• For the Pizza Base

  • Store-bought Pepperoni Pizza – Choose your favorite style for a quick and delicious foundation.

• For the Ghost Decoration

  • Low-moisture Mozzarella Slices – Thin slices create those iconic ghost shapes, maintaining texture during baking.
  • Black Sesame Seeds – These resemble ghostly eyes; substitute with olives or peppercorns if needed.

This ghost pizza recipe is not only quick and easy but sure to bring smiles during your Halloween festivities!

Step‑by‑Step Instructions for Quick and Spooky Ghost-Shaped Pizza

Step 1: Preheat the Oven
Begin by preheating your oven according to the instructions on the pizza package, typically around 400°F (200°C). This crucial step ensures your ghost pizza bakes evenly and comes out with that perfect crispy crust. As the oven heats, gather your ingredients and prepare your workspace for an efficient and fun cooking experience.

Step 2: Prepare the Mozzarella
Grab your low-moisture mozzarella slices and use a ghost-shaped cookie cutter to cut them into fun ghost shapes. Press down firmly to ensure clean edges. You’ll want enough ghosty pieces to cover the pizza adequately, enhancing your spooky theme. Aim for about 6-8 ghosts for optimal decoration on your pizza.

Step 3: Assemble the Ghost Pizza
Take your store-bought pepperoni pizza and lay it on a baking sheet or pizza stone. Carefully place the ghost mozzarella shapes on top, ensuring they are spaced evenly across the pizza. Visualize your ghost pizza taking form, as each ghost adds a whimsical touch that’s sure to delight your little trick-or-treaters.

Step 4: Add the Eyes
To give your ghosts some personality, sprinkle black sesame seeds on each mozzarella ghost to represent their eyes. If you don’t have sesame seeds handy, small pieces of olives or peppercorns can work just as well. These little touches make your ghost pizza not only adorable but also engaging for children to help with.

Step 5: Bake to Perfection
Slide your ghost pizza into the preheated oven. Bake for about 10-12 minutes, or until the cheese is bubbly and lightly golden. Keep an eye on it towards the end of baking to ensure the mozzarella ghosts maintain their shape. The aroma will fill your kitchen as you eagerly await your delicious Halloween creation.

Step 6: Cool and Serve
Once baked, carefully remove the ghost pizza from the oven and allow it to cool slightly for about 5 minutes. This resting time ensures the cheese isn’t too hot to handle when slicing. Cut the pizza into perfect slices, revealing the playful ghosts, and get ready to serve this delightful treat to your family and friends!

Make Ahead Options

These ghost-shaped pizzas are a fantastic meal prep choice for busy Halloween nights! You can prepare the spooky mozzarella ghosts up to 24 hours in advance by cutting them out and storing them in an airtight container in the fridge. Additionally, the pepperoni pizza can be kept in the fridge for up to 3 days before you’re ready to bake. Just make sure to place parchment paper between the mozzarella pieces to prevent sticking. When it’s time to enjoy your ghost pizza, simply place the prepped mozzarella on the pizza, add the sesame seed eyes, and bake as directed. This way, you’ll have a hauntingly delightful treat that’s ready in no time!

How to Store and Freeze Ghost Pizza

Fridge: Store leftover ghost pizza in an airtight container for up to 2 days. This keeps the cheesy goodness intact while preserving flavors.

Freezer: For longer storage, wrap individual slices in plastic wrap and store in a freezer-safe bag for up to 1 month. This method maintains the ghost's whimsical appeal and taste.

Reheating: Reheat in the oven at 350°F (175°C) for about 10 minutes to restore crispiness and melty cheese. Avoid microwaving, as it can make the crust soggy and affect the fun appearance of your ghost pizza.

Expert Tips for Ghost Pizza

  • Mozzarella Consistency: Ensure your mozzarella slices are semi-firm to retain their ghostly shapes during baking, preventing any sogginess.
  • Clean Cuts: When cutting out the ghost shapes, use a sharp cookie cutter and apply firm, even pressure to achieve clean edges.
  • Watch the Time: Ovens can vary, so keep a close eye on your ghost pizza; it's ready when the cheese is golden and bubbly but not burnt.
  • Decorating Ideas: Get creative! Add colorful bell pepper slices or use olives to create unique facial expressions on your ghost pizza for added fun.
  • Perfect Leftovers: If you have any slices left, store them in an airtight container in the fridge; reheat in the oven for better texture than the microwave.

Ghost Pizza Variations & Substitutions

Feel free to play around with this recipe and make it uniquely yours! Each variation brings a delightful twist to your spooky creation.

  • Cheese Swap: Use provolone or cheddar for a richer flavor profile that your family will love.
    Adding different cheeses can create a fun flavor experience, making each bite a surprise.

  • Veggie Toppings: Consider bell pepper slices or black olives to add flair and color.
    These veggies not only enhance the visual appeal but also provide a nutritious twist to your ghost pizza.

  • Gluten-Free Crust: Try a cauliflower crust to make a gluten-free version without sacrificing fun.
    This swap offers a wholesome approach that still keeps all the Halloween joy intact!

  • Flavor Boost: Incorporate spicy pepperoni or chorizo for an added kick that’s sure to impress.
    This fiery twist can turn your ghost pizza into a crowd-pleaser for those who like a bit of heat.

  • Sweeten the Deal: Add pineapple chunks for a sweet and savory combination that knocks it out of the park.
    This delicious surprise will have everyone eager for another slice, making even the pickiest eaters smile.

  • Themed Dippers: Serve with marinara sauce or even a green pesto for dipping.
    It’s a great way to add an interactive element to your meal, fun for kids and adults alike!

  • Herb Infusion: Sprinkle oregano or basil over the ghost cheese before baking for aromatic flavor.
    This simple touch transforms the pizza into a gourmet treat, enhancing its taste while keeping the Halloween spirit.

  • Kid-Friendly Activity: Allow kids to create their own ghosts using sliced bell peppers or tortillas.
    This gets them involved in the kitchen, ensuring they are excited about helping prepare their Halloween feast.

Why stop at one version when you can have so many delightful twists? Dive into the Halloween spirit with these suggestions, and don’t forget to enjoy your ghost creations alongside your spooky-themed drinks like this fabulous Blue Cheese Pizza, making your celebration unforgettable!

What to Serve with Quick and Spooky Ghost-Shaped Pizza

Elevate your Halloween feast with delightful accompaniments that embody the spirit of the season!

  • Crispy Garlic Bread: The buttery, garlicky flavor pairs beautifully with the cheesy pizza, making every bite delightful.
  • Halloween Fruit Platter: Vibrant fruits like orange mandarin segments and blackberries add a fresh, colorful touch—perfect for a festive table.
  • Pumpkin Soup: A warm, creamy pumpkin soup offers a cozy contrast to the savory pizza, enveloping your guests in warmth and deliciousness.
  • Witch’s Brew Punch: This spooky drink serves up a sweet, tangy flavor and a festive color, making it the perfect companion for your haunted meal.
  • Chocolate-Covered Pretzels: The sweet and salty treat creates a fun, whimsical dessert experience, adding a playful twist to end your meal on a high note.
  • Spooky Salad: A mixed green salad with crunchy ghost-shaped croutons and a tangy vinaigrette adds a fresh, light element to balance the cheesy pizza.
  • Caramel Apple Slices: This seasonal favorite combines crisp apples with sweet caramel, making for a delicious, easy-to-eat dessert.
  • Hot Chocolate Bar: Set up a cozy station with toppings like marshmallows and whipped cream for a delightful end to your Halloween evening.
  • Chili con Carne: A hearty chili complements the pizza's flavors with its spicy warmth, filling your guests with comfort and satisfaction.
  • Ghostly Brownies: Moist and fudgy brownies topped with ghostly icing create a sweet end that stays true to your festive theme.

Ghost-Shaped Pizza Recipe FAQs

What type of pizza should I use for the base?
Absolutely! A store-bought pepperoni pizza is perfect for this recipe as it provides a quick and delicious foundation. You can choose your favorite brand or style, whether thick crust or thin, to make it your very own.

How do I store leftover ghost pizza?
After enjoying your ghost pizza, make sure to store any leftovers in an airtight container in the fridge. It'll stay fresh for up to 2 days. This keeps the cheesy goodness intact while preserving the delightful flavors for your next meal.

Can I freeze ghost pizza for later use?
Very! If you want to enjoy your ghost pizza beyond a couple of days, wrap individual slices in plastic wrap and then place them in a freezer-safe bag. They can be stored this way for up to 1 month. This retains both the whimsy and taste!

How should I reheat the ghost pizza?
To restore that delicious texture, preheat your oven to 350°F (175°C) and place the pizza slices on a baking sheet. Reheat them for about 10 minutes. This method keeps the crust crispy and the cheese melty, making your ghost pizza just as delightful as when it was fresh!

Can I customize the toppings on my ghost pizza?
Absolutely! This recipe invites creativity. You can use different cheeses like provolone or cheddar to switch up the flavor. Moreover, feel free to add colorful bell pepper slices or olives to give your ghost pizza a fun and personalized touch!

Is this ghost pizza recipe suitable for children with allergies?
When it comes to dietary considerations, always be cautious. The main ingredients include pizza and mozzarella cheese, which could be allergens for some. If you're making this for kids with allergies, consider dairy-free cheese alternatives, and check that the pizza base is free from common allergens. Always consult with parents or guardians to ensure it's safe!

Ghost Pizza

Spook-tacular Ghost Pizza for a Fun Halloween Treat!

Enjoy a fun Halloween treat with this Ghost Pizza recipe, perfect for kids and delivered in just five minutes!
Print Recipe Pin Recipe
Prep Time 5 minutes mins
Cook Time 12 minutes mins
Cooling Time 5 minutes mins
Total Time 22 minutes mins
Servings: 4 slices
Course: Dinner
Cuisine: American
Calories: 280
Ingredients Equipment Method Nutrition Notes

Ingredients
  

For the Pizza Base
  • 1 pizza Store-bought Pepperoni Pizza Choose your favorite style
For the Ghost Decoration
  • 6-8 slices Low-moisture Mozzarella Cut into ghost shapes
  • to taste Black Sesame Seeds For ghost eyes, may substitute

Equipment

  • Oven
  • Baking Sheet
  • Pizza stone
  • Cookie cutter

Method
 

Step-by-Step Instructions for Quick and Spooky Ghost-Shaped Pizza
  1. Preheat the oven according to the pizza package instructions, typically around 400°F (200°C).
  2. Use a ghost-shaped cookie cutter to cut the mozzarella into ghost shapes.
  3. Lay the store-bought pepperoni pizza on a baking sheet or pizza stone and place the ghost-shaped mozzarella on top.
  4. Sprinkle black sesame seeds on each mozzarella ghost for eyes.
  5. Bake the pizza in the preheated oven for about 10-12 minutes until bubbly and golden.
  6. Remove the pizza and let it cool for about 5 minutes before slicing.

Nutrition

Serving: 1sliceCalories: 280kcalCarbohydrates: 30gProtein: 12gFat: 12gSaturated Fat: 5gCholesterol: 25mgSodium: 600mgPotassium: 200mgFiber: 2gSugar: 3gVitamin A: 10IUCalcium: 20mgIron: 5mg

Notes

Ensure mozzarella slices are semi-firm for best shape retention while baking. Store leftovers in an airtight container in the fridge for up to 2 days.

Tried this recipe?

Let us know how it was!

Easy Cauldron Cookies That Will Bewitch Your Halloween Parties

September 19, 2025 by Grace Snow Leave a Comment

Every Halloween, the excitement of creating something fun in the kitchen is contagious! This year, I decided to whip up Easy Cauldron Cookies, a delightful concoction that combines rich chocolate flavor with a twist of whimsical charm. Not only are these adorable treats customizable—switching up the bases and fillings to suit your taste—but they also make for a fantastic activity to enjoy with the kids. With just a few ingredients and minimal prep time, you can have an eye-catching dessert that’ll steal the show at any spooky gathering. But do you think you can resist turning these cookie cups into bubbling potions? Let’s dive into the recipe and find out!

Why Are Cauldron Cookies So Magical?

Customizable Delight: With variations for both the base and filling, these Easy Cauldron Cookies let your creativity shine! Opt for cake mix cookies or mini brownies—whichever your heart desires.

Kid-Friendly Fun: Engage little chefs in the kitchen! These cookies are a perfect project for kids, allowing them to help with mixing, filling, and decorating their spooky treats.

Quick & Easy: Thanks to simple ingredients and a speedy process, you can whip these up in under an hour! Perfect for last-minute Halloween parties or school events.

Crowd-Pleasing Appeal: Everyone loves a delicious, playful treat! Serve these eye-catching cookies, and watch as they disappear faster than you can say "trick or treat!"

For more fun ideas, try making Matcha Cookies Soft or Eggnog Cookies Soft for the holiday season!

Easy Cauldron Cookies Ingredients

• Perfect for your Halloween baking!

For the Cookie Cups

  • Devil's Food Cake Mix – Provides structure and chocolate flavor; substitute with another chocolate cake mix for variety.
  • Large Eggs – Acts as a binding agent for the cookie mix; no substitute recommended.
  • Canola or Vegetable Oil – Ensures moistness in the cookie cups; olive oil can be used in a pinch.
  • Black Food Coloring (optional) – Enhances the spooky appearance; omit for a more traditional look.

For the Buttercream Frosting

  • Unsalted Butter – Forms the base of the buttercream frosting; margarine could work but may alter flavor.
  • Powdered Sugar – Sweetens and thickens the frosting; granulated sugar cannot be substituted directly.
  • Vanilla Extract – Adds depth of flavor to the buttercream; almond extract can be a flavorful alternative.
  • Salt – Balances sweetness in the frosting; necessary for flavor enhancement.
  • Milk – Adjusts the texture of frosting for a smoother consistency; plant-based milk can be an alternative.
  • Green Food Coloring – Tints the buttercream for festive appeal; omit if a neutral color is preferred.

Fun Decorations

  • Round Green Sprinkles, Halloween Sprinkles, Candy Eyeballs, Pretzel Sticks – Decorative toppings that elevate the fun visual; substitute with other Halloween-themed decorations as desired.

Get ready to enchant your guests with these Easy Cauldron Cookies!

Step‑by‑Step Instructions for Easy Cauldron Cookies

Step 1: Preheat the Oven
Preheat your oven to 350°F (175°C) and prepare your workspace by greasing three 12-count mini muffin pans. This ensures that your Easy Cauldron Cookies will easily release after baking. While the oven heats, gather your ingredients to streamline the mixing process.

Step 2: Mix the Dough
In a large bowl, combine the Devil's Food Cake Mix, large eggs, canola oil, and optional black food coloring. Use a spatula or wooden spoon to mix until the batter is smooth and glossy, approximately 1-2 minutes. The dough should be thick but cohesive, perfect for forming into cookie cups.

Step 3: Fill the Muffin Pans
Using a tablespoon, scoop about ½ tablespoon of dough into each muffin cup. Flatten the dough lightly with your fingers to create small cups. Ensure they are evenly filled to promote uniform baking for your Easy Cauldron Cookies.

Step 4: Bake the Cookies
Place the muffin pans in the preheated oven and bake for 8-10 minutes. Watch for the edges to set and the tops to look slightly firm. As soon as you remove them from the oven, gently press an indentation in the center of each cookie with a small spoon or your finger.

Step 5: Cool the Cookie Cups
Allow the cookie cups to cool in the pans for about 5 minutes before transferring them to a wire rack. It's important for the Easy Cauldron Cookies to cool completely to ensure they hold their shape while filling them with frosting later on.

Step 6: Make the Buttercream Frosting
In a mixing bowl, beat the softened unsalted butter with a hand mixer until creamy. Gradually add powdered sugar, vanilla extract, salt, and milk until the mixture is smooth and fluffy, about 3-5 minutes. Add in green food coloring, adjusting the shade to your preference for a fun, festive touch.

Step 7: Fill the Cookies
Once the cookie cups have completely cooled, it's time to fill them! Transfer the buttercream frosting into a piping bag and pipe it generously into each indentation. The frosting should resemble bubbling potions, making your Easy Cauldron Cookies look delightfully spooky.

Step 8: Decorate Your Treats
Finish off your cauldron cookies with an array of festive decorations. Sprinkle with round green sprinkles, candy eyeballs, or insert a pretzel stick into the frosting to mimic a stirring stick. This extra touch adds both visual appeal and fun to your cookies.

Step 9: Serve the Cookies
Your Easy Cauldron Cookies are now ready to dazzle your guests! Arrange them on a festive platter and watch as they disappear at your Halloween gathering. Enjoy the delight these treats bring to your spooky celebrations!

Storage Tips for Easy Cauldron Cookies

Room Temperature: Keep decorated cookies in an airtight container at room temperature for up to 3 days. This preserves their soft texture and delightful appearance.

Fridge: For extended freshness, store cookies in the refrigerator for up to a week. Just remember to allow them to come to room temperature before serving for the best flavor.

Freezer: Freeze undecorated cookie cups in an airtight container for up to three months. Thaw them before adding frosting to enjoy maximum freshness.

Reheating: If you prefer warm cookies, reheat in the microwave for 10-15 seconds before serving. This brings back that lovely softness in your Easy Cauldron Cookies!

What to Serve with Easy Cauldron Cookies

Get ready to create a magical Halloween feast full of delightful flavors and festive fun!

  • Warm Pumpkin Spice Latte: A cozy drink that complements the rich chocolate of the cookies, adding warmth and spice to your Halloween spread.

  • Chilled Apple Cider: Refreshing and sweet, apple cider provides a light, fruity balance, making it the perfect pairing for these indulgent treats.

  • Candy Corn Fudge: This colorful fudge mirrors the vibrant Halloween spirit and adds a creamy, sweet contrast to the cookie's texture.

  • Ghostly Fruit Salad: A mix of seasonal fruits like ghostly bananas and spooky berries offers a refreshing palate cleanser amidst the chocolatey indulgence. Fruit decorated with Halloween-themed toppings can be a fun addition!

  • Chocolate-Dipped Pretzels: Salty meets sweet in this snack, adding a crunchy texture that pairs perfectly with the soft cauldron cookies' rich filling.

  • Haunted Hot Chocolate: Rich, creamy, and topped with whipped cream and spooky sprinkles, this drink creates an enchanting experience that delights both kids and adults alike.

  • Mini Caramel Apples: Their crisp and chewy texture combined with sweet caramel is a fun bite alongside your Easy Cauldron Cookies, making for a classic Halloween treat that everyone loves.

  • Spooky Cheesecake Bites: These mini cheesecakes provide a creamy and indulgent dessert that playfully complements the cookies’ festive theme while offering a different texture.

  • Pumpkin Pie Bars: A deliciously spiced dessert that carries the essence of Halloween, with its smooth filling perfectly contrasting the cookie texture.

Embrace these pairings as you celebrate the season with your festive, delicious treats!

Make Ahead Options

These Easy Cauldron Cookies are perfect for busy cooks who want to save time! You can prepare the cookie cups up to 24 hours in advance; simply bake and let them cool completely before storing them in an airtight container at room temperature. The buttercream frosting can also be made ahead of time and refrigerated for up to 3 days—just remember to let it sit at room temperature for about 30 minutes before using, so it’s easy to pipe. When you’re ready to serve, fill the cooled cookie cups with buttercream, decorate with your favorite spooky toppings, and enjoy these delightful treats that still taste fresh and delicious!

Expert Tips for Easy Cauldron Cookies

Soften Butter: Ensure butter is softened (not melted) for the buttercream to whip to the desired consistency. This prevents a greasy texture.

Indent Successfully: Press indentations in cookies while warm for better filling retention. This small step makes a big difference in presentation!

Sift for Smoothness: Sift the cake mix before mixing it with the other ingredients. This helps achieve a smoother batter and a better consistency for your Easy Cauldron Cookies.

Decorate Before Serving: Decorate the cookies just before serving to maintain their festive appeal. This keeps the toppings fresh and visually enticing for your party guests!

Experiment with Fillings: Feel free to try different fillings like cream cheese frosting or chocolate ganache for a unique twist on your Easy Cauldron Cookies. Your creativity is the only limit!

Easy Cauldron Cookies Variations & Substitutions

Feel free to let your imagination run wild as you make these delightful cookies uniquely yours!

  • Brownie Base: Swap cake mix for mini brownies to create a denser, fudgy treat. This twist adds rich chocolate flavor and a satisfying chewiness.

  • Frosting Alternatives: Use cream cheese frosting for a tangy kick or opt for ready-made frosting for a quicker option. Both will elevate your cookies in different ways!

  • Fillings: Consider a luscious white chocolate ganache for added richness. The creamy texture complements the soft cookies beautifully, for a truly indulgent experience.

  • Nut-Free Option: Substitute your oil with nut-free options like sunflower seed oil, keeping the deliciousness intact while catering to allergies.

  • Vegan Twist: Replace eggs with flaxseed meal mixed with water and use plant-based butter for the frosting. These swaps make the recipe vegan-friendly without compromising on taste.

  • Chocolate Chip Additions: Mix in chocolate chips to the cookie dough for an extra burst of chocolatey goodness. Everyone loves a little surprise in their treats!

  • Spicy Surprise: Add a pinch of cayenne pepper or cinnamon to the batter for a hint of heat that can create an intriguing flavor contrast with the sweetness.

  • Decorative Delight: Instead of regular sprinkles, use candy corn or gummy worms as toppings for a festive Halloween flair! This small change adds a playful visual element.

For more adventurous baking, try incorporating ideas from Mexican Wedding Cookies or even Peaches Cream Cookies in your repertoire!

Easy Cauldron Cookies Recipe FAQs

What is the best way to select the right cake mix for Cauldron Cookies?
Absolutely! When choosing a cake mix for your Easy Cauldron Cookies, look for a devil's food cake mix to provide that rich chocolate flavor. If you prefer a twist, any chocolate cake mix will work. Always check the expiration date to ensure freshness!

How should I store my Easy Cauldron Cookies?
To maintain their delightful texture, keep your decorated Easy Cauldron Cookies in an airtight container at room temperature for up to 3 days. If you want them to last longer, you can refrigerate them for about a week. Just let them come to room temperature before serving for the best taste!

Can I freeze my Cauldron Cookies?
Very! To freeze your Easy Cauldron Cookies, it's best to leave them undecorated. Place the cooled cookie cups in an airtight container and freeze for up to three months. When you're ready to enjoy them, simply thaw on the counter for a few hours before adding your frosting and decorations.

What should I do if my cookie cups don’t hold their shape?
If your Easy Cauldron Cookies don’t hold their shape after baking, it might be because they were underbaked or the dough was too soft. Make sure to press down firmly in the center while they’re warm to create enough indentation. Try baking them a minute or two longer to ensure they set properly.

Are there any dietary considerations for these cookies?
For those with specific dietary needs, you can adapt the Easy Cauldron Cookies! Use a gluten-free cake mix for a gluten-free option, and substitute regular milk with plant-based milk if lactose intolerant. Just be cautious with decorating ingredients like sprinkles, as they may contain allergens.

How can I make these cookies more visually appealing?
To elevate the visual appeal of your Easy Cauldron Cookies, consider adding fun decorations like colorful sprinkles, candy eyeballs, or even edible glitter! You can also use a piping bag for the buttercream frosting to create delightful swirls, making each cookie a mini work of art. Enjoy the festive fun!

Easy Cauldron Cookies

Easy Cauldron Cookies That Will Bewitch Your Halloween Parties

Easy Cauldron Cookies are a fun, customizable treat perfect for Halloween parties.
Print Recipe Pin Recipe
Prep Time 15 minutes mins
Cook Time 10 minutes mins
Cooling Time 5 minutes mins
Total Time 30 minutes mins
Servings: 24 cookies
Course: Dessert
Calories: 180
Ingredients Equipment Method Nutrition Notes

Ingredients
  

For the Cookie Cups
  • 1 box Devil's Food Cake Mix Provides structure and chocolate flavor; substitute with another chocolate cake mix for variety.
  • 2 large Large Eggs Acts as a binding agent; no substitute recommended.
  • 1/2 cup Canola or Vegetable Oil Ensures moistness; olive oil can be used in a pinch.
  • 1 tsp Black Food Coloring (optional) Enhances the spooky appearance; omit for a more traditional look.
For the Buttercream Frosting
  • 1 cup Unsalted Butter Forms the base of the buttercream; margarine could work but may alter flavor.
  • 4 cups Powdered Sugar Sweetens and thickens the frosting; granulated sugar cannot be substituted directly.
  • 1 tsp Vanilla Extract Adds depth of flavor; almond extract can be a flavorful alternative.
  • 1/4 tsp Salt Balances sweetness; necessary for flavor enhancement.
  • 2 tbsp Milk Adjusts texture for smoother consistency; plant-based milk can be an alternative.
  • 1 tsp Green Food Coloring Tints the buttercream for festive appeal; omit if a neutral color is preferred.
Fun Decorations
  • 1 cup Round Green Sprinkles Decorative toppings that elevate the fun visual.
  • 1 cup Halloween Sprinkles Substitute with other Halloween-themed decorations as desired.
  • 1 cup Candy Eyeballs
  • 10 sticks Pretzel Sticks Mimic stirring sticks.

Equipment

  • Oven
  • Mixing Bowl
  • Muffin Pans
  • piping bag

Method
 

Step-by-Step Instructions for Easy Cauldron Cookies
  1. Preheat your oven to 350°F (175°C) and prepare your workspace by greasing three 12-count mini muffin pans.
  2. In a large bowl, combine the Devil's Food Cake Mix, large eggs, canola oil, and optional black food coloring. Mix until smooth.
  3. Scoop about ½ tablespoon of dough into each muffin cup and flatten lightly to create small cups.
  4. Bake for 8-10 minutes and watch for edges to set. Press an indentation in the center of each cookie.
  5. Allow the cookie cups to cool in the pans for about 5 minutes before transferring them to a wire rack.
  6. Beat the softened butter until creamy. Gradually add powdered sugar, vanilla extract, salt, and milk.
  7. Once the cookie cups have cooled, pipe the buttercream frosting into each indentation.
  8. Decorate your cookies with sprinkles, candy eyeballs, or pretzel sticks.
  9. Arrange the cookies on a platter and serve.

Nutrition

Serving: 1cookieCalories: 180kcalCarbohydrates: 25gProtein: 2gFat: 7gSaturated Fat: 4gPolyunsaturated Fat: 1gMonounsaturated Fat: 1gCholesterol: 30mgSodium: 150mgPotassium: 50mgFiber: 1gSugar: 12gVitamin A: 200IUCalcium: 10mgIron: 0.5mg

Notes

Ensure butter is softened for the buttercream. Decorate cookies just before serving for best appearance.

Tried this recipe?

Let us know how it was!
  • « Previous Page
  • 1
  • …
  • 143
  • 144
  • 145
  • 146
  • 147
  • …
  • 179
  • Next Page »

Welcome!

Hi, I’m Grace, a Sydney-based home cook with a passion for bold flavors and trending ingredients. Whether you’re a busy beginner or a seasoned foodie, you’ll find dishes here that are fresh, fun, and full of flavor.

More about me

Popular Recipes

  • Cheesy Chicken Garlic Bread Sandwich
    Cheesy Chicken Garlic Bread Sandwich for Cozy Family Moments
  • Easy Chicken Ranch Wraps
    Easy Chicken Ranch Wraps: Quick, Creamy & Totally Satisfying
  • Chicken Caesar Sandwiches
    Delicious Chicken Caesar Sandwiches for Quick Comfort Food
  • best Cuban sandwich
    The Best Cuban Sandwich You’ll Want Every Weeknight!

Footer

↑ back to top

About

  • Privacy Policy
  • Disclaimer
  • Terms & Conditions

Newsletter

  • Sign Up! for emails and updates

Contact

  • About me
  • Contact me

Copyright © 2025 TastyTrendIngredients