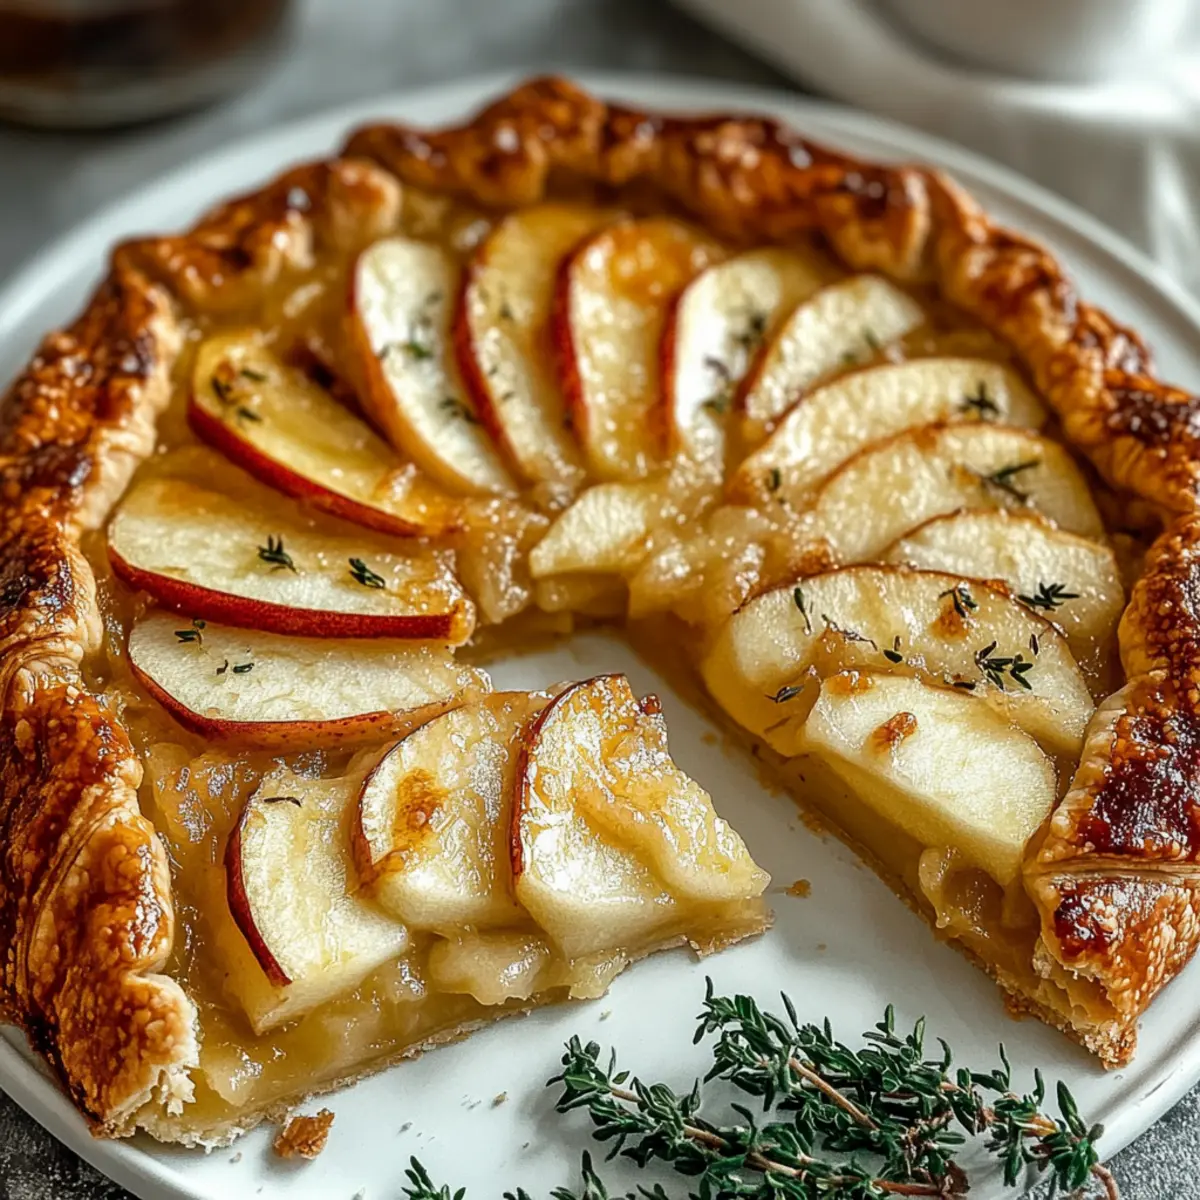
tastytrendingredients

  • Home
  • Recipes
    • Appetizers
    • Breakfast
    • Dessert
    • Dinner
    • Drinks
    • Salads
    • Snacks
    • Soups
  • About me
  • Contact me
menu icon
go to homepage
  • Home
  • Recipes
    • Appetizers
    • Breakfast
    • Dessert
    • Dinner
    • Drinks
    • Salads
    • Snacks
    • Soups
  • About me
  • Contact me
search icon
Homepage link
  • Home
  • Recipes
    • Appetizers
    • Breakfast
    • Dessert
    • Dinner
    • Drinks
    • Salads
    • Snacks
    • Soups
  • About me
  • Contact me
×

Haunted Graveyard Cake: A Spooktacular Halloween Delight

September 30, 2025 by Grace Snow Leave a Comment

As Halloween approaches, the air thickens with whispers of creative culinary adventures. If you're searching for a show-stopping centerpiece that will enchant both kids and adults alike, my Haunted Graveyard Cake is just what you need. This spooktacular treat pairs a rich chocolate flavor with whimsical ghostly decorations and crunchy biscuit gravestones, making it a delightful feast for the eyes and palate. Not only is this Halloween cake a crowd-pleaser, but it's also easy to prepare, giving you more time to enjoy the festivities with friends and family. Plus, it’s perfect for cozy gatherings or festive parties, ensuring you embrace the true spirit of Halloween. Ready to unveil this eerie yet delicious creation? Let’s dive into the fun and spooky world of baking!

Why is This Cake a Must-Make?

Spooktacular Appeal: With its eye-catching design and playful textures, this Haunted Graveyard Cake is guaranteed to be the star of your Halloween festivities.

Unforgettable Flavors: Rich chocolate brings depth to every bite, complemented by the creamy ganache.

Kid-Friendly Fun: Kids will absolutely love the whimsical ghost decorations and crunchy gravestone biscuits, making baking a thrilling adventure.

Easy Steps: Perfect for both novice and seasoned bakers, this cake comes together with straightforward instructions.

Make Ahead Magic: Prepare it up to two days in advance, so you can focus on enjoying the celebration with your loved ones.

Ready to explore more delicious desserts? Check out my Chocolate Pudding Cake for another treat that will please your guests!

Haunted Graveyard Cake Ingredients

For the Ghosts

  • Egg White – Provides structure and volume for the ghost figures; ensure no yolk is present for maximum whipping.
  • Icing Sugar – Adds sweetness and stability to the whipped egg white for perfectly shaped ghost creations.

For the Cake

  • Self-Raising Flour – Provides structure and lift, ensuring a tender and airy cake texture.
  • Cocoa Powder – Adds depth of flavor, enriching the chocolate base of the Haunted Graveyard Cake.
  • Light Brown Muscovado Sugar – Contributes moisture and a subtle molasses flavor, enhancing the cake's sweetness.
  • Eggs – The main binding agent, essential for stability and richness in the cake.
  • Milk – Adds moisture to the cake batter, enhancing texture for a deliciously juicy cake.
  • Vegetable Oil – Keeps the cake moist and tender; can substitute with melted butter for a richer taste.

For the Ganache

  • Single Cream – Used to make a luscious ganache for coating the cake, giving it a rich finish.
  • Dark Chocolate – Base for the ganache, contributing a deep cocoa flavor; semi-sweet chocolate offers a nice balance of sweetness.

For the Decorations

  • Rich Tea Finger Biscuits – Serve as gravestones; their lightness and crunchy texture complement the cake beautifully.
  • Double Chocolate Cookies – Crushed to enhance the cake's flavor profile as a delicious crumb topping.
  • White Chocolate – Used for decorating the ghosts, providing contrast and sweetness to the spooky design.
  • Silver Balls – Decorative element for ghostly eyes, adding a fun and festive touch.

From the delightful ghost figures to the rich chocolate layers, gather these ingredients and let the Halloween magic unfold in your kitchen!

Step‑by‑Step Instructions for Haunted Graveyard Cake

Step 1: Make the Ghost Meringues
Preheat your oven to 110°C (90°C fan/gas ¼). In a clean bowl, whip the egg whites until stiff peaks form. Gradually add icing sugar while continuing to whip until glossy. Pipe ghost shapes onto baking parchment, spacing them out. Bake for about 1½ hours until they are crisp and dry to the touch. Allow cooling completely before storing in an airtight container to keep your haunted graveyard cake decorations fresh.

Step 2: Prepare the Chocolate Cake
Raise the oven temperature to 180°C (160°C fan/gas 4). In a large mixing bowl, combine cocoa powder, self-raising flour, and light brown muscovado sugar. In a separate bowl, whisk together eggs, milk, and vegetable oil until smooth. Gradually mix the wet ingredients into the dry ones until well combined. Pour the batter into a lined baking dish and bake for approximately 30 minutes, or until a toothpick inserted comes out clean. Let it cool on a wire rack.

Step 3: Make the Ganache
Heat the single cream in a small pot over medium heat until it just begins to boil, then pour it over chopped dark chocolate in a bowl. Let it sit for a minute to melt, then stir until smooth. This rich ganache will coat the Haunted Graveyard Cake. Brush the melted chocolate over the rich tea finger biscuits and allow them to set for beautiful, shiny grave markers.

Step 4: Assemble the Cake
Once the cake has completely cooled, place it on your serving plate. Pour the prepared ganache over the top, smoothing it evenly with a spatula to ensure complete coverage. This glossy layer not only enhances the cake’s chocolate flavor but also acts as a glue for the decorations. Let the ganache set slightly before continuing with the fun decorating.

Step 5: Finalize Decorations
Melt the white chocolate in a microwave or using a double boiler. Use a piping bag to create eyes on the ghost meringues and apply some white chocolate onto the gravestones. Once the decorations have set, arrange the finger biscuits into the cake as gravestones, positioning the ghost meringues around them. For added stability, insert a thin wire into the ghosts if you want them to stand tall in your spooky setup.

Expert Tips for Haunted Graveyard Cake

  • Clean Equipment: Ensure all bowls and beaters are thoroughly clean and dry before whipping egg whites; even a trace of fat can prevent them from achieving stiffness.

  • Monitor Ganache Heat: Heat the cream until it just begins to boil, as overheating can scorch it and affect the texture of your ganache, impacting the overall appearance of your Haunted Graveyard Cake.

  • Leveling Cake: Use a serrated knife to level the top of your cake before decorating. This ensures that your ganache and decorations sit evenly, creating a more polished final look.

  • Chill Meringues: After piping the ghost shapes, allow the meringues to cool completely before attempting to remove them from the parchment. This helps maintain their delicate structure.

  • Decorable Ghosts: If you're short on time, consider using store-bought ghost candies for decoration; they can save time while still contributing to the festive look of your Haunted Graveyard Cake.

Haunted Graveyard Cake Variations

Embrace creativity and customize your Haunted Graveyard Cake with these fun twists that will delight your guests!

  • Themed Treats: Swap ghost figures for chocolate spiders or edible eyeballs to keep the spooky theme going strong. Kids will love the unexpected creepy crawlers!

  • Gluten-Free Delight: Use gluten-free flour blends in place of regular flour to accommodate dietary needs without sacrificing flavor or texture. Everyone can enjoy a slice of the fun!

  • Healthier Sweeteners: Try replacing granulated sugar with coconut sugar for a less refined option that still satisfies your sweet tooth. It adds a lovely caramel note too!

  • Boozy Option: For adults, incorporate a splash of coffee liqueur into the ganache for a rich depth and a sophisticated twist. This adds an enchanting flavor dimension to your cake.

  • Fruit Add-ins: Fold in chocolate chips or dried fruit into the cake batter for extra texture and flavor. Cherries or raisins bring sweetness while enhancing the rich chocolate.

  • Spiced Up: Add a dash of cinnamon or nutmeg to the cake mix for a hint of warmth. The spices complement the chocolate beautifully and elevate the fall theme.

  • Alternative Ganache: Substitute dark chocolate with white chocolate for a sweeter, lighter ganache, perfect for a twist on the traditional flavor.

  • Texture Experience: Sprinkle crushed candy corn or Halloween sprinkles over the cake just before serving for a fun crunch and vibrant presentation.

Now that you've got some creative ideas, are you ready to delight your friends and family with something spookily special? And if you're looking for more festive treats, why not try making an Ice Cream Cake next?

What to Serve with Haunted Graveyard Cake?

Bring your Halloween festivities to life with delightful pairings that enhance the spooky vibe!

  • Pumpkin Spice Latte: Warm and fragrant, this seasonal favorite adds cozy spice that beautifully complements the chocolatey richness of your cake.

  • Witch’s Brew Punch: A fizzy, fruity punch in green hues creates a bewitching drink that's a fun, refreshing contrast to the cake's sweetness.

  • Creepy Crawly Cupcakes: Light vanilla cupcakes topped with colorful frosting and gummy worms add a playful element, inviting more festive treats to the table.

  • Chocolate Frogs: Small chocolate candies with whimsical designs echo the chocolate cake's flavor, creating a seamless theme for dessert enthusiasts.

  • Ghostly Marshmallow Treats: Irresistible, gooey treats decorated like friendly ghosts offer a delightful chewiness that complements the cake's textures perfectly.

  • Caramel Popcorn: Crunchy caramel-coated popcorn adds a sweet and salty twist, making it an addictively crunchy sidekick to your dessert spread.

  • Apple Cider: Serve warm or cold, the spiced apple cider ties together the celebratory mood while providing a refreshing palate cleanser between bites.

  • Spooky Cheese Platter: A festive assortment of cheeses, crackers, and grapes brings a savory balance, allowing your guests to enjoy both sweet and savory flavors.

These pairings will not only elevate your Haunted Graveyard Cake experience but also enchant your guests throughout the evening!

How to Store and Freeze Haunted Graveyard Cake

Fridge: Store the decorated Haunted Graveyard Cake in the fridge for up to 3 days. Cover it lightly with plastic wrap to prevent the ganache from hardening and to keep the moisture intact.

Freezer: For longer storage, freeze the unadorned cake wrapped tightly in plastic wrap and then in aluminum foil for up to 2 months. Thaw it overnight in the fridge before decorating.

Ghost Meringues: Keep the ghost meringues in an airtight container at room temperature for up to 1 week. Avoid humid areas, as moisture can affect their crispness.

Reheating: If desired, you can slightly warm individual slices in the microwave for about 10-15 seconds. However, be cautious not to melt the decorations too much—your spooky cake deserves to look impressive!

Make Ahead Options

This Haunted Graveyard Cake is perfect for meal prep, allowing you to dedicate more time to fun Halloween festivities! You can prepare the ghost meringues up to three days in advance; simply store them in an airtight container to keep their delightful crispiness. Additionally, bake the chocolate cake up to two days ahead and refrigerate it tightly wrapped to maintain its moisture. When you're ready to serve, assemble the cake and pour the ganache over it, letting it set for a luscious finish. With this make-ahead approach, you’ll enjoy a deliciously spooky centerpiece without last-minute stress!

Haunted Graveyard Cake Recipe FAQs

What kind of egg whites should I use for the ghosts?
Absolutely! To achieve perfectly fluffy ghost meringues, it's crucial to use fresh egg whites and ensure no yolk is present. This will allow you to whip the egg whites to stiff peaks effectively, providing the structure needed for your whimsical ghostly figures.

How should I store the Haunted Graveyard Cake?
You can store the decorated Haunted Graveyard Cake in the fridge for up to 3 days. Lightly cover it with plastic wrap to prevent the ganache from hardening and to keep the cake moist. If you plan to transport it or want to preserve its texture, consider using a cake carrier.

Can I freeze the Haunted Graveyard Cake?
Yes, indeed! For longer storage, freeze the unadorned cake tightly wrapped in plastic wrap and then in aluminum foil for up to 2 months. When you're ready to enjoy it, simply thaw the cake overnight in the fridge, then proceed with your decorating adventures when you’re ready to serve!

What if my ganache doesn’t set properly?
Very good question! If your ganache seems too runny, it might be due to overheating or not using enough chocolate. To fix this, try placing the ganache in the fridge to cool for about 30 minutes. If it remains too thin, melt a bit more chocolate and whisk it in to thicken. This will help your Haunted Graveyard Cake achieve that luscious, glossy finish you desire!

Are there any dietary considerations for this cake?
Absolutely! If you have guests with dietary restrictions, you can make this cake gluten-free by using a suitable gluten-free flour blend. Additionally, consider using coconut sugar instead of regular sugar for a less refined option. And if you're also concerned about allergies, always check the packaging of your ingredients, especially the chocolate and cookies, as they can sometimes contain allergens like nuts.

How long do the ghost meringues last?
The ghost meringues can be stored in an airtight container at room temperature for up to 1 week. Make sure they are kept in a cool, dry area, as humidity can affect their crunchy texture. If you want to whip them up in advance, these delightful decorations can significantly save you time on the day of your Halloween celebration.

Haunted graveyard cake

Haunted Graveyard Cake: A Spooktacular Halloween Delight

This Haunted Graveyard Cake features rich chocolate flavors and whimsical decorations, making it a delightful centerpiece for Halloween festivities.
Print Recipe Pin Recipe
Prep Time 30 minutes mins
Cook Time 1 hour hr 30 minutes mins
Cooling Time 1 hour hr
Total Time 3 hours hrs
Servings: 12 slices
Course: Dessert
Cuisine: American
Calories: 350
Ingredients Equipment Method Nutrition Notes

Ingredients
  

For the Ghosts
  • 2 large Egg White Ensure no yolk is present
  • 200 g Icing Sugar Adds sweetness and stability
For the Cake
  • 200 g Self-Raising Flour Provides structure and lift
  • 75 g Cocoa Powder Adds depth of flavor
  • 150 g Light Brown Muscovado Sugar Enhances sweetness
  • 3 large Eggs Essential for stability and richness
  • 200 ml Milk Adds moisture to the cake batter
  • 100 ml Vegetable Oil Keeps the cake moist
For the Ganache
  • 200 ml Single Cream Used for making ganache
  • 200 g Dark Chocolate Contributes a deep cocoa flavor
For the Decorations
  • 150 g Rich Tea Finger Biscuits Serve as gravestones
  • 100 g Double Chocolate Cookies Crushed for crumb topping
  • 100 g White Chocolate Used for ghost decorations
  • 50 g Silver Balls For ghostly eyes decoration

Equipment

  • Mixing Bowl
  • Baking Dish
  • piping bag
  • Spatula
  • Whisk
  • Oven

Method
 

Step-by-Step Instructions
  1. Preheat oven to 110°C. Whip egg whites to stiff peaks, adding icing sugar gradually. Pipe ghost shapes and bake for 1½ hours. Cool completely.
  2. Raise oven temperature to 180°C. Combine dry ingredients, whisk wet ingredients, mix together, and bake for 30 minutes. Cool on rack.
  3. Heat cream until boiling; pour over chopped dark chocolate. Stir until smooth to make ganache. Brush melted chocolate on biscuits.
  4. Once cooled, pour ganache over the cake and smooth it with a spatula. Let it set for decoration.
  5. Melt white chocolate and pipe eyes on meringues, apply on gravestones. Arrange biscuits and meringues on the cake.

Nutrition

Serving: 1sliceCalories: 350kcalCarbohydrates: 40gProtein: 5gFat: 20gSaturated Fat: 5gPolyunsaturated Fat: 5gMonounsaturated Fat: 5gCholesterol: 60mgSodium: 150mgPotassium: 200mgFiber: 2gSugar: 20gVitamin A: 200IUVitamin C: 1mgCalcium: 50mgIron: 1.5mg

Notes

Ensure all equipment is clean when whipping egg whites. Monitor the ganache closely to avoid scorching. Use a serrated knife to level cake for even decoration. Consider using store-bought ghost candies for quicker decorating.

Tried this recipe?

Let us know how it was!

Freaky Finger Red Velvet Cake that's Spookily Delicious

September 30, 2025 by Grace Snow Leave a Comment

As I stood in the kitchen, a mischievous idea struck me: what if I could create a cake that both dazzles and scares? Introducing the Spooky Freaky Finger Red Velvet Cake! This Halloween, take your dessert game to the next level with this eye-catching treat that combines the rich allure of chocolate red velvet with a delightfully tangy cream cheese frosting. It’s perfect for impressing your guests—whether they’re young or just young at heart—and best of all, it comes together in a snap. With its vibrant color and whimsical decoration, this cake isn’t just delicious; it’s a fun centerpiece that sparks conversation and laughter at any gathering. Curious how to whip up this spooky delight? Let’s dive in and make your Halloween unforgettable!

Why is this cake a Halloween must-try?

Spooky Appeal: This Freaky Finger Red Velvet Cake brings a playful twist to your Halloween celebrations, charming both kids and adults alike.
Quick & Easy: With simple steps and readily available ingredients, you’ll whip it up without a fuss.
Flavor Explosion: The rich chocolate red velvet perfectly balances the tangy cream cheese frosting, making each bite a delightful experience.
Visual Delight: Its striking color and whimsical design make it a showstopper, guaranteed to spark conversations at your Halloween party!
Versatile Variations: Feeling creative? Switch up the chocolate fingers or add festive touches to suit any theme, just like in our Chocolate Pudding Cake.
Festive Fun: Serve it with a scoop of vanilla ice cream for an extra treat, ensuring your guests leave with sweet memories!

Freaky Finger Red Velvet Cake Ingredients

• Get ready to create a spooky masterpiece with these essential ingredients!

For the Cake

  • Soft Butter (175g) – Adds moisture and richness; ensure it’s room temperature for easy creaming.
  • White Caster Sugar (225g) – Sweetens the cake, ensuring a light and fluffy texture.
  • Vanilla Extract (1 tsp) – Enhances flavor and adds a hint of sweetness.
  • Large Eggs (3, at room temperature) – Provides structure and richness; room temperature eggs mix evenly.
  • Red Food Coloring (1 tbsp) – Gives the cake its bold red hue; paste is preferred for an intense color.
  • Plain Flour (200g) – Forms the cake's structure; can be substituted with gluten-free flour if needed.
  • Cocoa Powder (50g) – Adds a rich chocolate flavor; use a high-quality cocoa for the best results.
  • Bicarbonate of Soda (1 ½ tsp) & Baking Powder (½ tsp) – Leavening agents that help your cake rise beautifully.
  • Salt (¼ tsp) – Balances sweetness and enhances the overall flavors.
  • Low-fat Plain Yogurt (150g, loosened with 2 tbsp milk) – Adds moisture and a slight tang; can substitute sour cream.

For Decoration

  • White Chocolate Fingers (about 3 x 114g boxes) – Perfect for spooky decoration; regular chocolate fingers are a great alternative.
  • Icing Sugar (140g) – Sweetens and thickens the cream cheese frosting; essential for your cake's topping.
  • Milk (2 tsp) – Adjusts the consistency of icing as needed.
  • Additional Red Food Coloring (small blob) – Used for coloring the icing; maintains a thick consistency.

For the Frosting

  • Full-fat Cream Cheese (300g, fridge cold) – Creates a creamy base for the frosting; Philadelphia is recommended for great texture.
  • Zest of Orange (optional) – Brightens the frosting with a fresh flavor twist.

With these ingredients, you're just a step away from crafting the spookiest and most delicious Freaky Finger Red Velvet Cake that’s sure to impress your Halloween guests!

Step‑by‑Step Instructions for Freaky Finger Red Velvet Cake

Step 1: Preheat the Oven
Begin by preheating your oven to 180°C (160°C fan) or gas mark 4. While the oven warms up, prepare your two 20cm sandwich tins by greasing them generously and lining the bottoms with parchment paper. This ensures your Freaky Finger Red Velvet Cake releases easily after baking and gives a clean finish.

Step 2: Cream Butter and Sugar
In a large mixing bowl, cream together 175g of softened butter and 225g of white caster sugar using an electric mixer on medium speed until the mixture turns light and fluffy, about 3–5 minutes. Then, add in 1 teaspoon of vanilla extract and continue mixing. Slowly incorporate the three room temperature eggs, one at a time, ensuring each is fully blended before adding the next.

Step 3: Add Food Coloring
Next, pour 1 tablespoon of red food coloring into your butter and sugar mixture, mixing well until the color is uniformly distributed. This is what gives your Freaky Finger Red Velvet Cake its vibrant hue! Make sure the batter looks bright and inviting, reflecting the spooky delight you’re creating.

Step 4: Combine Dry Ingredients
In a separate bowl, sift together 200g of plain flour, 50g of cocoa powder, 1½ teaspoons of bicarbonate of soda, ½ teaspoon of baking powder, and ¼ teaspoon of salt. This will ensure even distribution of the leavening agents. Gradually mix half of this dry mixture into your wet ingredients, followed by half of 150g of loosened low-fat plain yogurt, folding gently to maintain air in your batter. Repeat this process with the remaining dry ingredients and yogurt.

Step 5: Bake the Cake
Once your batter is fully combined and smooth, evenly divide it between the prepared sandwich tins. Bake in your preheated oven for about 25 minutes, or until the cakes rise and spring back when gently pressed in the center. Once baked, allow them to cool in the tins for about 10 minutes before transferring to a wire rack to cool completely.

Step 6: Prepare the Chocolate Fingers
While the cake is cooling, line a tray with parchment paper for your chocolate fingers. Take around 3 boxes of white chocolate fingers and carefully cut the ends off each piece for a spooky look. This will add a fun touch to your finished cake’s decoration, resembling creepy fingers ready for Halloween!

Step 7: Make the Red Icing
To create the red icing, sift 140g of icing sugar into a bowl and gradually mix in 2 teaspoons of milk until you achieve a thick consistency. Add a small blob of additional red food coloring to the icing to enhance its spooky aesthetic. Make sure the icing holds its shape well, as it will be used to stick the chocolate fingers together.

Step 8: Mix Cream Cheese Frosting
For the cream cheese frosting, start by beating 300g of cold full-fat cream cheese with a mixer until smooth. Add in the chilled butter and optional zest of orange, mixing until combined. Gradually sift in the icing sugar while mixing and fold it in gently to avoid over-beating. Chill the frosting to allow it to firm up slightly before use.

Step 9: Assemble the Cake
Once your cakes have cooled and your frosting is ready, spread a thin layer of the cream cheese frosting on the top of one cake layer and then position the second layer on top. Use a spatula to cover the entire cake with a generous layer of frosting, smoothing it out for a clean appearance.

Step 10: Decorate with Fingers
Press the chocolate fingers into the frosting around the sides of the cake, securing them in place with the thick red icing you prepared. Feel free to get creative and add extra chocolate fingers on top of the cake. This will enhance the spooky effect of your Freaky Finger Red Velvet Cake, making it a striking centerpiece.

Step 11: Chill and Serve
Finally, place your decorated cake in the refrigerator for a bit to allow the frosting to set properly. However, serve the cake at room temperature for the best flavor and texture. Slice it up and watch your guests’ delight as they dive into this spooktacular treat!

Freaky Finger Red Velvet Cake Variations

Feel free to get creative with your spooky dessert and make it uniquely yours!

  • Dairy-Free: Substitute the cream cheese frosting with a vegan cream cheese or coconut whipped cream for a plant-based version.

  • Gluten-Free: Swap out the plain flour with a 1:1 gluten-free flour blend. This way, everyone can enjoy the spooky fun!

  • Spicy Kick: Add a pinch of cayenne pepper to the cake batter for a surprising heat that enhances the chocolate flavor—it's a delightful twist!

  • Citrus Burst: Mix 1-2 teaspoons of orange or lemon zest into the cake batter. The citrus notes will brighten up the rich flavors beautifully.

  • Nutty Crunch: Fold in half a cup of chopped walnuts or pecans to the cake batter for a satisfying texture that adds a nutty flavor.

  • Color Swap: Experiment with different food colorings! Green or purple shades can transform the cake for other spooky occasions or themed parties—imagine a Halloween party with a vibrant twist!

  • Extended Decoration: Instead of just chocolate fingers, use gummy worms or Halloween-themed sprinkles to embellish the cake. This adds a fun, festive touch and extra flavor.

  • Serving Suggestion: Pair a slice with a scoop of vanilla ice cream or a drizzle of warm chocolate sauce. It's the ultimate treat, reminiscent of our delightful Chocolate Poke Cake!

Feel free to mix and match these ideas to create an unforgettable Freaky Finger Red Velvet Cake that will be the talk of your Halloween gathering!

Tips for the Best Freaky Finger Red Velvet Cake

  • Butter Temperature: Ensure your butter is softened to room temperature for easy creaming, which is vital for a fluffy cake texture.
  • Don’t Overmix: After adding the dry ingredients, fold gently to avoid a dense cake. Overmixing can lead to tough results.
  • Quality Cocoa: Use high-quality cocoa powder to enhance the chocolate flavor in your Freaky Finger Red Velvet Cake—it truly makes a difference!
  • Chill the Frosting: Allow your cream cheese frosting to chill slightly before spreading; this helps achieve a smooth and stable finish.
  • Thick Icing for Fingers: The red icing used to decorate the chocolate fingers should be thick to maintain their shape—nobody wants a droopy finger!
  • Serving Temperature: For the best taste and texture, serve your cake at room temperature, allowing the flavors to shine through beautifully.

Make Ahead Options

These Freaky Finger Red Velvet Cakes are perfect for meal prep, significantly easing your Halloween dessert planning! You can bake the cake layers up to 3 days in advance; just ensure they’re completely cooled before wrapping them tightly in plastic wrap and refrigerating to maintain moisture. The cream cheese frosting can also be prepared up to 24 hours ahead; simply keep it chilled in an airtight container until you’re ready to use it. Lastly, assemble and decorate the cake on the day of serving for freshness and visual appeal. When ready to serve, frost the cake and add the chocolate fingers, allowing for a magical dessert presentation that is just as delicious as if made the same day!

What to Serve with Spooky Freaky Finger Red Velvet Cake

Elevate your Halloween gathering with delightful accompaniments that will complement this visually stunning cake and enhance the festive spirit.

  • Vanilla Ice Cream: The creamy, cool texture of vanilla ice cream balances the richness of the cake, creating a delicious contrast.
  • Whipped Cream with Sprinkles: A light dollop of whipped cream adorned with colorful Halloween-themed sprinkles adds a festive touch and extra sweetness.
  • Caramel Sauce: Drizzling warm caramel over each slice provides a decadent flavor that harmonizes beautifully with the chocolate notes of the cake.
  • Pumpkin Spice Latte: The spiced flavors of this fall favorite bring warmth and coziness, perfect for sipping alongside your spooky dessert.
  • Ghoulish Fruit Salad: A mix of fresh fruits like orange slices and blackberries makes a refreshing side, offering a delightful contrast to the cake's richness.
  • Chocolate Chip Cookies: For an extra treat, bake up some soft chocolate chip cookies; their cookie dough comfort pairs wonderfully with the cake's textures.
  • Spiced Apple Cider: This warm beverage not only celebrates the season but also complements the flavors of your cake with a warming note.
  • Creepy Cupcakes: Bake some Halloween-themed cupcakes to create a dessert spread that’s both fun and alluring—great for the little ones!

How to Store and Freeze Freaky Finger Red Velvet Cake

Fridge: Store your cake in an airtight container for up to 3 days to keep it fresh and moist. Ensure it’s covered to prevent it from absorbing any odors.

Freezer: For longer storage, freeze slices wrapped tightly in plastic wrap and aluminum foil for up to 2 months. Thaw in the fridge before serving for the best texture and flavor.

Reheating: If you prefer your cake warm, gently reheat individual slices in the microwave for about 10-15 seconds, ensuring they don't become dry.

Serving: Best served at room temperature, allow the cake to sit out for about 30 minutes before indulging in the marvelous layers of your Freaky Finger Red Velvet Cake!

Freaky Finger Red Velvet Cake Recipe FAQs

How should I select the right red food coloring?
Absolutely! For the richest and most vibrant hue, I recommend using gel or paste food coloring instead of liquid. Gel coloring provides more intense color without adding extra liquid to your batter, which is essential for creating the iconic look of the Freaky Finger Red Velvet Cake. Look for brands that specifically label their products as 'red velvet' coloring for the best results.

What is the best way to store leftovers of this cake?
After enjoying your delicious dessert, you can store the cake in an airtight container in the refrigerator for up to 3 days. Make sure to cover it well to maintain its moisture and flavor. If you find you have more cake than you can eat, you can freeze it for future enjoyment!

Can I freeze slices of the Freaky Finger Red Velvet Cake?
Certainly! To freeze, wrap individual slices tightly in plastic wrap, followed by a layer of aluminum foil for extra protection. You can keep them in the freezer for up to 2 months. When you're ready to enjoy, simply thaw the slices overnight in the fridge before serving.

What do I do if the cake doesn’t rise properly?
If your cake doesn’t rise, it could be due to expired leavening agents or overmixing the batter. Always check the expiration date on your baking powder and bicarbonate of soda, as they need to be fresh to work effectively. When mixing, gently fold in the dry ingredients and avoid overmixing, which can lead to a dense cake.

Are there any dietary considerations with this recipe?
Great question! Since this recipe contains dairy and gluten, those with allergies should be cautious. You can substitute the regular butter with vegan margarine and use a dairy-free cream cheese for a non-dairy option. For gluten-free needs, swap the plain flour with a gluten-free flour blend while ensuring that all other ingredients are also free from gluten to keep it safe for those with dietary restrictions.

Freaky finger red velvet cake

Freaky Finger Red Velvet Cake that's Spookily Delicious

This Freaky Finger Red Velvet Cake is a playful and delicious treat perfect for Halloween celebrations.
Print Recipe Pin Recipe
Prep Time 30 minutes mins
Cook Time 25 minutes mins
Cooling Time 10 minutes mins
Total Time 1 hour hr 5 minutes mins
Servings: 12 slices
Course: Dessert
Cuisine: American
Calories: 350
Ingredients Equipment Method Nutrition Notes

Ingredients
  

For the Cake
  • 175 g Soft Butter room temperature
  • 225 g White Caster Sugar
  • 1 tsp Vanilla Extract
  • 3 large Eggs at room temperature
  • 1 tbsp Red Food Coloring paste preferred
  • 200 g Plain Flour can substitute with gluten-free flour
  • 50 g Cocoa Powder high quality recommended
  • 1.5 tsp Bicarbonate of Soda
  • 0.5 tsp Baking Powder
  • 0.25 tsp Salt
  • 150 g Low-fat Plain Yogurt loosened with 2 tbsp milk
For Decoration
  • 3 boxes White Chocolate Fingers about 3 x 114g boxes
  • 140 g Icing Sugar
  • 2 tsp Milk
  • 1 small blob Additional Red Food Coloring for icing
For the Frosting
  • 300 g Full-fat Cream Cheese fridge cold
  • Zest of Orange optional

Equipment

  • Electric mixer
  • 2 x 20cm sandwich tins
  • Mixing bowls
  • Parchment Paper
  • Spatula

Method
 

Step-by-Step Instructions
  1. Preheat your oven to 180°C (160°C fan) or gas mark 4. Grease and line two 20cm sandwich tins with parchment paper.
  2. Cream together the butter and sugar until light and fluffy, then add vanilla and eggs one at a time.
  3. Add red food coloring to the mixture, ensuring it is well combined.
  4. Sift dry ingredients together and fold into the wet mixture alternately with the yogurt.
  5. Divide the batter between the tins and bake for about 25 minutes, then cool for 10 minutes in the tins before transferring to a wire rack.
  6. Prepare the chocolate fingers by cutting the ends for decoration.
  7. Make the red icing by mixing icing sugar with milk and red food coloring.
  8. Beat cream cheese until smooth, add optional zest and icing sugar, then chill slightly.
  9. Assemble the cake with cream cheese frosting between layers and around the sides.
  10. Decorate with chocolate fingers and use the red icing to secure them in place.
  11. Chill the cake to set the frosting and serve at room temperature.

Nutrition

Serving: 1sliceCalories: 350kcalCarbohydrates: 45gProtein: 3gFat: 18gSaturated Fat: 10gPolyunsaturated Fat: 1gMonounsaturated Fat: 3gCholesterol: 60mgSodium: 200mgPotassium: 120mgFiber: 1gSugar: 25gVitamin A: 500IUCalcium: 60mgIron: 1mg

Notes

Serve with vanilla ice cream for an extra treat. Store in an airtight container in the fridge for up to 3 days.

Tried this recipe?

Let us know how it was!

Frozen Banana Ghosts: A Fun 4-Ingredient Halloween Treat

September 30, 2025 by Grace Snow Leave a Comment

As I scrolled through photos of spooky Halloween treats, I stumbled upon something delightfully whimsical: frozen banana ghosts. These charmingly eerie snacks don’t just look like playful specters; they’re made with just four simple ingredients, transforming ordinary bananas into a creamy, ice cream-like delight. Perfect for all ages, this easy Halloween recipe brings smiles to the table without the fuss—it’s a fantastic way to keep your family away from the candy jar. Imagine serving these chillingly cute treats at your next gathering while everyone wonders how such delightful bites can be both fun and healthy! Ready to surprise your taste buds with this ghoulishly good dessert?

Why Are Frozen Banana Ghosts a Must-Try?

Simplicity shines in this 4-ingredient recipe, making it a perfect option for busy families or home chefs looking to whip up something fun without fuss. Fun presentation transforms healthy bananas into spooky delights that kids will love, while adults appreciate the creamy texture and decadent white chocolate coating. Creative variations allow you to customize your ghosts by experimenting with different toppings or colors, just like you might with our Breakfast Banana Split. Quick to make, they can be prepped ahead and stored in the freezer for spontaneous spooky snacking or festive gatherings! Enjoy these guilt-free treats with just 251 calories each, perfect for a health-conscious Halloween celebration!

Frozen Banana Ghosts Ingredients

For the Coating
• White Chocolate – Provides a creamy, delightful coating that replicates ice cream, enhancing the spooky aesthetic of the frozen banana ghosts.
• Desiccated Coconut – Adds a fun texture and an eerie look; feel free to adjust the amount to suit your spooky style.

For the Bananas
• Ripe Bananas – The star of the show, they become irresistibly sweet and creamy once frozen, forming the perfect base for your ghostly treats.

For Decoration
• Dark Chocolate Drops – Use these for adding eyes and mouths to your banana ghosts, bringing them to life in a playful way!

Embrace creativity with these ingredients to make the most delightful and hauntingly good frozen banana ghosts!

Step‑by‑Step Instructions for Frozen Banana Ghosts

Step 1: Melt the Chocolate
Begin by melting the white chocolate in a microwave or using a double boiler method. If using the microwave, heat in 30-second intervals, stirring until smooth and creamy. Ensure the chocolate is fully melted, with a glossy finish, and then set it aside to cool slightly while preparing the bananas.

Step 2: Prepare the Bananas
Peel the ripe bananas and slice them in half, creating a total of four banana halves. Insert a lollipop stick into the cut end of each half, ensuring they are secure. This will make it easy to dip and hold your bananas while creating your spooky frozen banana ghosts.

Step 3: Set Up Your Workstation
Pour desiccated coconut into a shallow bowl and prepare a baking tray lined with parchment paper. This setup will allow for easy coating and drying of the banana ghosts. Ensure the tray is ready for the coated bananas, providing a non-stick surface as they chill in the freezer.

Step 4: Coat the Bananas
Using a pastry brush or spoon, generously coat each banana half with the melted white chocolate. Allow any excess chocolate to drip off, ensuring an even layer covers the bananas. This chocolate coating will form a delicious shell around the bananas, creating the base of your frozen banana ghosts.

Step 5: Add the Coconut
While the chocolate is still wet, sprinkle the desiccated coconut liberally over the coated bananas. The coconut will adhere and give the ghosts a spooky, textured appearance. Place the coconut-coated bananas onto the lined baking tray, making sure they have space between them to avoid sticking.

Step 6: Decorate Your Ghosts
To create the playful faces on your frozen banana ghosts, gently press dark chocolate drops into the chocolate coating, forming eyes and a mouth. Use additional chocolate, if desired, to create eyebrows or other fun features, giving each ghost its unique personality.

Step 7: Freeze the Treats
Once all banana ghosts are decorated, place the baking tray in the freezer. Allow them to freeze for at least 4 hours, or until solid. This step is crucial for achieving the perfect frozen treat texture, reminiscent of creamy ice cream, making your frozen banana ghosts scary yet delightful.

Make Ahead Options

These frozen banana ghosts are perfect for busy home cooks looking to save time during the spooky season! You can prepare the banana halves and coat them with white chocolate up to 24 hours in advance. Simply follow Steps 1 to 5, then freeze them fully on the baking tray until solid. Once frozen, transfer them to an airtight container to maintain their delightful texture, where they can last for up to a week. When you're ready to serve, just add the dark chocolate drops for eyes and mouths before presenting these fun treats to your family or guests. Enjoy the peace of mind knowing your treats are already prepped and waiting!

Expert Tips for Frozen Banana Ghosts

  • Quality Chocolate: Use high-quality white chocolate for the best flavor and smooth coating; avoid chocolates that contain vegetable oils which won't melt well.

  • Banana Ripeness: Choose ripe bananas with a few brown spots for optimal sweetness; overly ripe bananas may become mushy once frozen.

  • Coconut Coating: Apply desiccated coconut while the chocolate is still wet to ensure it sticks properly; a dry banana will lose its spooky coating.

  • Creative Designs: Feel free to get creative with decorations! Swap dark chocolate drops for colorful candies or sprinkles, transforming your frozen banana ghosts into even more festive characters.

  • Storage Tips: Store your frozen banana ghosts in an airtight container to prevent freezer burn; they can stay fresh for up to a week!

  • Freezing Time: Don’t skimp on freezing time—ensure they freeze for at least 4 hours for a firm texture that matches their charming appearance.

What to Serve with Frozen Banana Ghosts?

Imagine a Halloween gathering filled with laughter and delightful treats that cater to kids and adults alike, all while maintaining a playful spookiness.

  • Cheesy Popcorn Brains: These crunchy snacks bring a whimsical touch to your Halloween spread, perfectly contrasting the creamy texture of the banana ghosts.
  • Slime Bug Cups: Add a fun, textured element to your table with these eerie yet delightful cups that kids will love to dig into.
  • Witch’s Brew Smoothies: A refreshing green smoothie brings a nutritious balance to the festivities, enhancing the spooky theme while remaining family-friendly.
  • Monster Vegetable Platter: Keep things healthy with an array of colorful veggies, served with a creepy dip that draws attention and offers a delicious crunch.
  • Mini Pumpkin Pies: These adorable desserts round out the meal with a touch of traditional fall flavors, delightfully complementing the lightness of the frozen banana ghosts.
  • Grape Eyeballs: Spooky yet healthy, these grapey treats are a fun finger food option that adds to the Halloween theme but keeps the sugar in check.
  • Hot Cider: Serve this warm, spiced drink to bring a cozy warmth to the party, pairing beautifully with the chill of the frozen banana ghosts.
  • Chocolate-Covered Pretzels: With their sweet and salty flavor profile, these delicious bites make for a fun snack that contrasts the sweetness of the banana ghosts.
  • Ghostly Meringues: Light and airy, these meringue treats fit perfectly within the theme, offering a crunchy contrast to the creamy banana ghosts.

How to Store and Freeze Frozen Banana Ghosts

Fridge: Store any leftover frozen banana ghosts in an airtight container in the refrigerator for up to 3 days. Note that they may lose their frozen texture.

Freezer: These frozen treats can be kept in the freezer for up to a week. Make sure they are in an airtight container to avoid freezer burn and preserve their delightful creaminess.

Reheating: There's no need to reheat frozen banana ghosts; simply enjoy them straight from the freezer for a refreshing treat. If they've softened in the fridge, pop them back in the freezer for a bit before serving!

Serving Tips: For best results, serve frozen banana ghosts directly from the freezer and enjoy their icy, creamy consistency, perfect for a spooky snack!

Frozen Banana Ghosts: Customizing Your Treats

Feel free to play around with these frozen banana ghosts and let your culinary creativity shine as you make them your own!

  • Colored Chocolate: Use candy melts or colored chocolate to create vibrant ghost designs. Think purple, green, or even Halloween orange!

  • Nutty Twist: Substitute desiccated coconut with crushed almonds or walnuts for a nutty crunch. It adds an unexpected yet delicious texture to your treats!

  • Sprinkle Fest: Instead of coconut, roll the bananas in fun Halloween-themed sprinkles to make them even more festive. Kids will love the extra color and crunch!

  • Yogurt Dip: For a healthier alternative, dip the banana halves in Greek yogurt instead of chocolate before freezing. It’s a deliciously creamy twist, and you can mix in flavors like vanilla or honey.

  • Spicy Surprise: Add a pinch of cinnamon or cayenne pepper to the melted chocolate for a subtle kick. It’s a fun way to add depth to the flavor, surprising those adventurous taste buds!

  • Fruit Medley: Combine other fruits like strawberries or kiwis for variety, creating a colorful fruit medley. Cut the additional fruits into chunks and freeze them alongside banana ghosts for a fruity snack platter.

  • Decorative Eyes: Swap dark chocolate drops with mini marshmallows or candy eyes. These treats can have funny or spooky faces, giving each ghost a unique personality!

Experimenting with these variations keeps the excitement alive around your festive gatherings. Whether they're side by side with our Breakfast Banana Split or as a standalone sweet treat, these frozen banana ghosts are sure to be a hit!

Frozen Banana Ghosts Recipe FAQs

How do I select the best bananas for this recipe?
Absolutely! For the best results, choose bananas that are ripe but not overripe—look for specimens that have a few brown spots. Ripe bananas are sweeter and create a creamier texture once frozen, but if they’re too mushy, your ghosts may not hold their shape.

How should I store leftover frozen banana ghosts?
Very! To keep your frozen banana ghosts in top shape, store them in an airtight container in the freezer. They will maintain their delightful texture for up to a week. If you have any leftover in the fridge, they're best consumed within 3 days, but know they might lose their icy consistency.

Can I freeze the banana ghosts for a longer period?
Absolutely! If you want to enjoy your frozen banana ghosts beyond a week, you can freeze them for up to 3 months. However, for best taste and texture, it’s recommended to consume them within a week. Just ensure they’re well-packaged to prevent freezer burn!

What should I do if the chocolate coating is uneven?
No worries! If your chocolate coating is uneven, it might be too thick or not properly melted. To fix it, simply return the chocolate to the microwave in 10-second intervals until smooth, then dip again. Alternatively, you can use a pastry brush to lightly even out the coating—just ensure the bananas are well-chilled before dipping again.

Are these treats safe for small children and those with allergies?
Definitely! The frozen banana ghosts are generally safe for small children, as they contain no choking hazards when appropriately prepared. However, always consider allergies—if you’re serving kids or guests with allergies, check for any issues with chocolate or coconut, and feel free to substitute accordingly. For a nut-free version, you can replace coconut with crushed graham crackers or leave toppings off altogether!

Can I use other toppings instead of desiccated coconut?
Absolutely! There are so many fun alternatives! You can swap desiccated coconut for crushed nuts or various colored sprinkles to create different themed ghosts. Just coat the chocolate-dipped bananas, and let your creativity shine—after all, the more the merrier!

Frozen banana ghosts

Frozen Banana Ghosts: A Fun 4-Ingredient Halloween Treat

Frozen banana ghosts are a fun and healthy Halloween treat that combines just 4 ingredients for a creamy delight.
Print Recipe Pin Recipe
Prep Time 15 minutes mins
Cook Time 5 minutes mins
Freezing Time 4 hours hrs
Total Time 4 hours hrs 15 minutes mins
Servings: 4 ghosts
Course: Dessert
Cuisine: American
Calories: 251
Ingredients Equipment Method Nutrition Notes

Ingredients
  

For the Coating
  • 1 cup White Chocolate Melted for coating
  • 1 cup Desiccated Coconut For texture and appearance
For the Bananas
  • 2 large Ripe Bananas Cut in half
For Decoration
  • 1 cup Dark Chocolate Drops For eyes and mouths

Equipment

  • Microwave
  • Double Boiler
  • Baking tray
  • Parchment Paper

Method
 

Step‑by‑Step Instructions
  1. Melt the white chocolate in a microwave or double boiler method until smooth and creamy.
  2. Peel and slice ripe bananas in half, inserting lollipop sticks in each half.
  3. Set up your workspace with desiccated coconut in a shallow bowl and prepared baking tray lined with parchment paper.
  4. Coat each banana half generously with melted white chocolate and allow excess to drip off.
  5. While the chocolate is wet, sprinkle desiccated coconut over the coated bananas.
  6. Press dark chocolate drops into the chocolate coating to create eyes and a mouth.
  7. Freeze the decorated banana ghosts on the baking tray for at least 4 hours or until solid.

Nutrition

Serving: 1ghostCalories: 251kcalCarbohydrates: 33gProtein: 3gFat: 12gSaturated Fat: 7gPolyunsaturated Fat: 1gMonounsaturated Fat: 4gSodium: 5mgPotassium: 200mgFiber: 3gSugar: 20gVitamin C: 10mgCalcium: 2mgIron: 3mg

Notes

Store frozen banana ghosts in an airtight container in the freezer for up to a week. Enjoy straight from the freezer for a deliciously creamy treat.

Tried this recipe?

Let us know how it was!

Funny Face Cookies: Fun Designs for Sweet Celebrations

September 30, 2025 by Grace Snow Leave a Comment

As I sifted through my pantry, a wave of nostalgia washed over me, reminding me of childhood days spent crafting the most whimsical treats. Enter Funny Face Cookies, adorned with quirky moustaches and retro lips—these delights bring a sense of joy and creativity to any occasion. Perfect for parties, these iced cookies are not only a visual feast but also a crowd-pleaser that draws smiles from guests of all ages. Making them is a fun-filled activity that turns the kitchen into a vibrant arena of imagination, leaving you with scrumptious cookies and cherished memories. So, are you ready to dive into the playful world of cookie decorating? Let's turn baking into an art!

Why Are Funny Face Cookies a Must-Bake?

Playful Creativity: These cookies aren’t just treats—they're a canvas for your artistic flair! Imagine the smiles as guests discover their quirky designs.
Sweet Appeal: The blend of flavors and textures—from the buttery base to the vibrant icing—makes each bite a delightful surprise.
Versatile Fun: Perfect for weddings, children's parties, or just a cozy gathering, these cookies adapt to any occasion effortlessly.
Easy to Customize: Feel free to switch up the designs for seasonal events, like adding pumpkin shapes for Halloween or experimenting with flavors.
Memorable Moments: Making Funny Face Cookies turns baking into a fun family activity, leaving you with delicious treats and heartwarming memories to cherish.

Funny Face Cookies Ingredients

Get ready to whip up these whimsical delights!

For the Cookie Dough

  • Soft Butter – Essential for tenderness; make sure it’s at room temperature for easy mixing.
  • Golden Caster Sugar – Provides sweetness and a lovely texture; can be substituted with regular caster sugar if needed.
  • Egg Yolk – Adds richness and moisture; can be replaced with applesauce for a vegan alternative.
  • Vanilla Extract – Enhances flavor; opt for imitation vanilla if you’re keeping an eye on the budget.
  • Lemon Zest – Infuses a bright aroma; orange zest can work as a delightful substitute.
  • Plain Flour – Forms the backbone of your cookies; all-purpose flour works just as well.
  • Salt – Balances sweetness; feel free to omit for low-sodium diets.

For the Icing

  • Icing Sugar – Sweet base for your icing; swap with powdered monk fruit sweetener for a low-sugar version.
  • Egg White – Helps create a glossy finish for your icing; aquafaba is a great vegan alternative.
  • Pink and Brown Food Colouring Pastes – Bring life to your designs; consider using natural dyes for a healthier option.
  • Edible Glitter – Adds a sparkle! It’s optional, so you can skip it if you prefer a simpler look.

For Support

  • Cake Pops or Lolly Sticks – Provide stability for the cookies; make sure to choose sturdy options to avoid breakage.

Now that you have the ingredients for these Funny Face Cookies, let’s bring a smile to everyone’s face with your wonderful creations!

Step‑by‑Step Instructions for Funny Face Cookies

Step 1: Dough Preparation
Begin by creaming together softened butter and golden caster sugar in a mixing bowl until the mixture appears light and fluffy, about 3-4 minutes. Incorporate the egg yolk, vanilla extract, and lemon zest, mixing until well combined. Gradually sift in the plain flour and salt, stirring gently until a soft dough forms. Once your dough is ready, wrap it in plastic wrap and chill it in the refrigerator for 30 minutes to firm up.

Step 2: Cookie Shaping
Preheat your oven to 180°C (350°F) while rolling out the chilled cookie dough on a lightly floured surface to a thickness of about 5mm. Using an 8cm round cookie cutter, cut out the dough, and then creatively shape each round into whimsical lips and moustaches. After shaping, place the cookies on a lined baking sheet and chill them for an additional 10 minutes to help them maintain their designs during baking.

Step 3: Stick Insertion
Once the cookies are well-chilled, carefully insert a cake pop or lolly stick into the base of each cookie shape, ensuring that they stand upright and are properly supported. This step is vital for creating sturdy Funny Face Cookies, so take your time to ensure they're inserted securely.

Step 4: Baking
Bake the cookies in your preheated oven for approximately 12 minutes, or until they turn a pale golden color. Keep an eye on them towards the end of the baking time to prevent overbaking. Once done, remove the cookies from the oven and transfer them to a wire rack to cool completely, allowing them to firm up and develop that perfect crispy edge.

Step 5: Icing Preparation
While the cookies cool, prepare the icing. In a clean bowl, whisk together the egg white and icing sugar until the mixture reaches a thick but smooth consistency. Divide the icing into separate bowls for coloring, adding pink and brown food coloring pastes to achieve your desired shades. Mix until the colors are vibrant, ready for piping.

Step 6: Decorating the Cookies
Using a piping bag fitted with a fine nozzle, outline the edges of each Funny Face Cookie with your colored icing. After outlining, fill in the centers with additional icing to create bold and vibrant designs. For added flair, consider sprinkling them with edible glitter while the icing is still wet. Allow these delightful cookies to dry briefly before moving on to the next decorating step.

Step 7: Finishing Touches
Once the initial icing is set, use darker icing to add intricate details to each Funny Face Cookie, like eyes and moustache curls. If you desire an extra touch of sparkle, sprinkle on more edible glitter. Finally, let the icing set completely before serving; this ensures a clean and beautiful finish to your scrumptious treats.

How to Store and Freeze Funny Face Cookies

Airtight Container: Store your decorated Funny Face Cookies in an airtight container at room temperature for up to 7 days to keep them fresh and flavorful.

Fridge: If you want to extend their shelf life, feel free to refrigerate them. Just be aware that moisture in the fridge can affect the icing if not stored properly.

Freezer: For longer storage, freeze your cookies without icing in a single layer on a baking sheet. Once frozen, transfer them to a freezer-safe bag or container for up to 3 months.

Reheating: If you'd like to enjoy them warm again, simply pop them in the oven at a low temperature (around 150°C / 300°F) for a few minutes until just warmed through.

Funny Face Cookies Variations & Substitutions

Feel free to let your creativity run wild with these delightful cookie options and swaps!

  • Dairy-Free: Replace butter with a vegan substitute like coconut oil or dairy-free margarine for a delicious non-dairy option.
  • Flavor Twist: Mix in almond extract for a nutty flavor that pairs wonderfully with the sweetness of the icing.
  • Sugar-Free: Use a sugar substitute like erythritol instead of caster sugar to create a healthier version for those watching their sugar intake.
  • Seasonal Shapes: Get festive by shaping cookies into seasonal themes, such as pumpkins for Halloween or hearts for Valentine’s Day.
  • Nutty Crunch: Add finely chopped nuts, such as walnuts or pecans, into the dough for added texture and flavor—just remember to adjust the egg content a bit for binding!
  • Colorful Decor: Experiment with vibrant natural food dyes made from beet juice or spinach powder to give your icing a more health-conscious twist.
  • Fruit Zest Variants: Switch out lemon zest for orange or lime zest to introduce a different citrus element that brightens the flavors beautifully.
  • Chocolate Icing: For a delicious chocolate twist, mix cocoa powder into your icing sugar for a rich, chocolatey finish that will have everyone reaching for seconds!

Don't forget, these whimsical treats can also be enjoyed alongside other sweet goodies. Try serving them with our delightful Peaches Cream Cookies or ring in the holiday spirit with gorgeous Eggnog Cookies Soft while you’re at it! Happy baking!

Make Ahead Options

These Funny Face Cookies are a delight to make ahead, making them perfect for busy schedules! You can prepare the cookie dough and refrigerate it for up to 3 days; just be sure to wrap it tightly in plastic wrap to prevent drying out. Additionally, once the cookies are baked and cooled, they can be decorated and stored in an airtight container for up to a week—keeping their vibrant designs intact. When you’re ready to serve, you can add any final touches or extra icing immediately before enjoyment, ensuring your treats are just as charming and delicious as fresh-baked! By prepping these cookies ahead of time, you'll save yourself the stress of last-minute baking, allowing for a more relaxed celebration.

What to Serve with Funny Face Cookies

These whimsical treats add a dash of joy to any gathering, complemented perfectly by playful side dishes and delightful drinks.

  • Milkshake Magic: A classic vanilla or chocolate milkshake pairs beautifully, bringing a nostalgic touch that enhances the cookie experience. The creamy texture and sweet flavor are irresistibly indulgent.

  • Fruit Skewers: Fresh fruit skewers offer a refreshing contrast to the sweetness of the cookies. Their vibrant colors and juicy bites add a nutritious aspect to the spread, appealing to guests of all ages.

  • Ice Cream Sundae Bar: Set up a DIY sundae station with a variety of toppings. The combination of warm cookies with cold ice cream creates a delightful temperature contrast, making every bite memorable!

  • Chocolate Dipped Pretzels: These provide a crunchy, salty balance to your sweet cookies. The combination of sweet and salty flavors is irresistible, bringing delight to your taste buds.

  • Themed Cupcakes: Whimsically decorated cupcakes that match the cookie designs create a cohesive and festive dessert table. Their soft texture perfectly complements the crispy edge of the Funny Face Cookies.

  • Lemonade Spritzers: Serve bubbly lemonade with fresh mint for a refreshing drink option. This zesty beverage brightens the palate and serves as a delightful counterpoint to the rich sweetness of the cookies.

  • Chocolate Fondue: A fun and interactive dessert where guests can dip their cookies into warm, melted chocolate. The rich chocolate and playful cookies create a perfect harmony of flavors.

  • Frozen Yogurt Parfaits: Layered parfaits with granola, yogurt, and berries create a textural contrast and freshness that complements the cookies. They offer a healthier dessert option that's still enticing.

  • Fruit Sorbet: A light sorbet provides a refreshing finish to the meal. The fruity flavors cleanse the palate after enjoying the sweet cookies, leaving everyone feeling satisfied.

Expert Tips for Funny Face Cookies

  • Butter Temperature: Ensure your butter is at room temperature for smooth mixing. Cold butter can lead to a crumbly dough, affecting the cookie's texture.
  • Dough Chilling: Don’t skip chilling the dough! It helps the cookies maintain their whimsical shapes while baking, preventing them from spreading too much.
  • Icing Consistency: Adjust the icing thickness with a few drops of water if needed. Too runny of icing can create a messy look, while too thick may be hard to pipe.
  • Piping Practice: If you're new to piping, practice on parchment paper first. This can help you get the hang of creating clean designs on your Funny Face Cookies.
  • Storage Method: Once decorated, store your cookies flat in an airtight container. This keeps the icing intact and prevents smudging or sticking.

Funny Face Cookies Recipe FAQs

How do I select the right butter for my Funny Face Cookies?
Absolutely! Use unsalted butter that’s been softened to room temperature. This allows for easy mixing and a tender texture. Look for butter that feels soft but isn’t melted, ensuring it will incorporate smoothly into your dough.

How should I store my decorated Funny Face Cookies?
It's best to keep your iced cookies in an airtight container at room temperature for up to 7 days. This helps retain their texture and flavor. If you've got a batch for later, consider refrigerating them, though watch out for moisture that might affect the icing. For long-term storage, freeze them without icing wrapped in plastic wrap.

Can I freeze Funny Face Cookies? How?
Yes, you can! After shaping the cookies but before baking, place them in a single layer on a baking sheet and freeze until solid. Once frozen, transfer them to a freezer-safe bag or container. They can be stored for up to 3 months. When you're ready to bake, just preheat your oven and bake them straight from the freezer; no need to thaw!

What should I do if my icing isn't the right consistency?
If your icing is too thick, simply add a few drops of water and mix until you reach the desired smoothness. Conversely, if it’s too runny, you can add more icing sugar until thickened. Make sure to mix thoroughly between adjustments. A good consistency will help you pipe clean designs on your Funny Face Cookies!

Are there any dietary considerations I should keep in mind when making these cookies?
Definitely! For those with allergies or dietary restrictions, you can substitute the egg yolk with applesauce for a vegan option and use aquafaba instead of egg whites in the icing. Additionally, choose gluten-free flour blends if you're catering to gluten sensitivities. Always double-check ingredient labels for allergens.

How long do the flavors last in these cookies after baking?
After baking, Funny Face Cookies will maintain their delightful flavors for up to a week, when stored properly! To enjoy them at their freshest, consume them within the first few days. Over time, flavors may mellow, but they will still be delicious.

Funny face cookies

Funny Face Cookies: Fun Designs for Sweet Celebrations

These Funny Face Cookies bring joy and creativity to any occasion with their whimsical designs.
Print Recipe Pin Recipe
Prep Time 30 minutes mins
Cook Time 12 minutes mins
Chilling Time 30 minutes mins
Total Time 1 hour hr 12 minutes mins
Servings: 12 cookies
Course: Dessert
Cuisine: American
Calories: 120
Ingredients Equipment Method Nutrition Notes

Ingredients
  

For the Cookie Dough
  • 1 cup Soft Butter at room temperature
  • 3/4 cup Golden Caster Sugar can be substituted with regular caster sugar
  • 1 egg Egg Yolk or replace with applesauce for vegan
  • 1 teaspoon Vanilla Extract opt for imitation to save costs
  • 1 tablespoon Lemon Zest or use orange zest as a substitute
  • 2 cups Plain Flour all-purpose flour works as well
  • 1/4 teaspoon Salt omit for low-sodium diets
For the Icing
  • 2 cups Icing Sugar can be swapped with powdered monk fruit sweetener
  • 1 egg white Egg White or use aquafaba for vegan
  • 1 tablespoon Pink and Brown Food Colouring Pastes for vibrant designs
  • optional Edible Glitter for added sparkle
For Support
  • as needed Cake Pops or Lolly Sticks sturdy options for cookie support

Equipment

  • Mixing Bowl
  • piping bag
  • Cookie cutter
  • Baking Sheet
  • wire rack

Method
 

Dough Preparation
  1. Cream together softened butter and golden caster sugar in a mixing bowl until light and fluffy, about 3-4 minutes. Incorporate egg yolk, vanilla extract, and lemon zest until well combined. Gradually sift in plain flour and salt, stirring gently until a soft dough forms. Wrap in plastic wrap and chill in the refrigerator for 30 minutes.
Cookie Shaping
  1. Preheat your oven to 180°C (350°F). Roll out chilled cookie dough to 5mm thickness. Cut with an 8cm round cookie cutter, then shape each into whimsical lips and moustaches. Place on a lined baking sheet and chill for an additional 10 minutes.
Stick Insertion
  1. Insert a cake pop or lolly stick into the base of each cookie shape, ensuring they stand upright and are properly supported.
Baking
  1. Bake cookies in preheated oven for approximately 12 minutes until pale golden. Monitor to prevent overbaking. Transfer to a wire rack to cool completely.
Icing Preparation
  1. In a clean bowl, whisk together egg white and icing sugar until thick and smooth. Divide for coloring, adding pink and brown food coloring to achieve desired shades.
Decorating the Cookies
  1. Outline cookie edges with colored icing using a piping bag fitted with a fine nozzle. Fill centers with additional icing and sprinkle with edible glitter while wet.
Finishing Touches
  1. Use darker icing to add intricate details such as eyes and moustache curls. For extra sparkle, sprinkle on additional edible glitter. Allow icing to set completely before serving.

Nutrition

Serving: 1cookieCalories: 120kcalCarbohydrates: 18gProtein: 1gFat: 6gSaturated Fat: 4gCholesterol: 20mgSodium: 50mgPotassium: 30mgSugar: 8gVitamin A: 100IUCalcium: 10mgIron: 0.5mg

Notes

Ensure butter is at room temperature for smooth mixing. Chilling the dough helps maintain whimsical shapes during baking.

Tried this recipe?

Let us know how it was!

Delicious Chocolate Bat Biscuits for Spooky Halloween Fun

September 30, 2025 by Grace Snow Leave a Comment

As the crisp autumn air ushers in October, thoughts of Halloween festivities bring out the inner child in all of us. That’s why I’m thrilled to share my delightful Chocolate Bat Biscuits, a spooktacular treat perfect for family gatherings or school parties! Not only are these biscuits a fun and creative way to enjoy baking with kids, but they’re also incredibly quick to whip up, making them a top choice for busy parents. With a rich chocolate flavor that will please both young and old, these biscuits are more than just a treat; they’re a chance to make lasting memories while surrounded by loved ones. Will you dare to create whimsical creatures like bats, owls, and even mischievous cats in your kitchen? Let’s get started on this delightful Halloween adventure!

Why are Chocolate Bat Biscuits a must-try?

Halloween Fun: These whimsical Chocolate Bat Biscuits will bring a smile to everyone’s face, making any gathering a hit!

Quick to Make: With simple steps and easy-to-find ingredients, you can create these spooky treats in no time.

Family-Friendly Fun: Engage your kids in the kitchen and let them unleash their creativity by decorating bats, owls, and cats!

Rich Flavor: Each biscuit offers a decadent chocolatey taste that’s guaranteed to satisfy any sweet tooth and to go perfectly with a warm glass of Homemade Hot Chocolate.

Crowd-Pleaser: Serve them at Halloween parties, and watch as everyone gathers around for these delightful, crunchy cookies!

Storage Friendly: Keep them fresh for even longer in an airtight container, so everyone can enjoy the fun all week long!

Chocolate Bat Biscuits Ingredients

• Get ready to create some eerie yet delightful bites!

For the Cookies

  • 125g Butter – Provides richness and a tender texture; make sure it's at room temperature for easier mixing.
  • 85g Icing Sugar – Adds sweetness and helps create a smooth dough; can substitute with powdered sugar if preferred.
  • 1 Large Egg Yolk – Acts as a binder and adds moisture; avoid using whole eggs for a firmer texture.
  • 1 tsp Vanilla Extract – Enhances the flavor profile; try almond extract for a different twist.
  • 1 tsp Milk – Adds moisture for dough consistency; replace with non-dairy milk for a vegan option.
  • 175g Plain Flour – Provides structure to biscuits; gluten-free flour can be used for a gluten-free version.
  • 1 tsp Fine Espresso-Style Coffee Powder – Intensifies the chocolate flavor; omit if you prefer a milder taste.
  • 50g Cocoa Powder – The main source of chocolate flavor; ensure it's unsweetened for the best results.
  • ¼ tsp Salt – Enhances all flavors in the biscuits; a key ingredient for balance.

For Decoration

  • 100g Dark or Milk Chocolate – Used for decorating the bats; feel free to choose white chocolate for a different look.
  • Chocolate Hundreds and Thousands – Adds a fun and festive touch; any kind of sprinkles will work beautifully.
  • Coloured Writing Icing – Perfect for adding details; you can make your own with icing sugar and water mixed with food coloring.

Step-by-Step Instructions for Chocolate Bat Biscuits

Step 1: Preheat the Oven
Begin by preheating your oven to 180°C (160°C fan) or gas mark 4. While the oven warms up, line two baking sheets with baking parchment, ensuring that they are evenly covered. This will prevent the chocolate bat biscuits from sticking and help them bake evenly, setting the stage for a spooky treat.

Step 2: Cream the Butter and Sugar
In a large mixing bowl, cream together 125g of room temperature butter and 85g of icing sugar using a hand mixer or wooden spoon. Beat until the mixture is pale and fluffy, which should take about 3–5 minutes. Once whipped, mix in 1 large egg yolk, 1 teaspoon of vanilla extract, and 1 teaspoon of milk until well combined, forming a creamy base for your biscuits.

Step 3: Combine Dry Ingredients
Next, sift together 175g of plain flour, 1 teaspoon of fine espresso-style coffee powder, 50g of cocoa powder, and ¼ teaspoon of salt into the wet mixture. Stir gently until you form a soft dough, making sure all the flour is incorporated. You should have a cohesive, chocolatey dough that holds together well; if it’s too sticky, add a bit more flour.

Step 4: Chill the Dough
Once your dough is ready, shape it into a disc and wrap it in cling film. Refrigerate for about 15 minutes, allowing the dough to firm up slightly. This chilling time not only makes it easier to roll out but also ensures your chocolate bat biscuits keep their shape during baking, leading to delightful bat-like figures.

Step 5: Roll and Cut Out Shapes
After chilling, place the dough between two sheets of parchment paper and roll it out to about £1 coin thickness. Use an 8cm bat-shaped cookie cutter to cut out the shapes and transfer them carefully onto the lined baking sheets using a palette knife. Remember to re-roll the trimmings to cut out additional bats, maximizing your spooky creations.

Step 6: Add Stability Notches
To ensure your chocolate bat biscuits stand solidly, cut small notches at the base of each bat. This step helps them balance beautifully, especially if you plan to display them on glasses or plates.

Step 7: Bake the Biscuits
Place the baking sheets in the preheated oven and bake for about 10 minutes. The biscuits should look sandy and aromatic when done; they should not be overly soft but should maintain a slight crunch. Keep an eye on them as baking times may vary slightly depending on your oven.

Step 8: Cool the Biscuits
After baking, remove the biscuits from the oven and let them cool on the sheets for 5 minutes. This is important to allow them to firm up before transferring them to a wire rack. Once they’re firm enough to handle, move them to the rack to cool completely, ensuring they achieve the perfect crispy texture.

Step 9: Decorate the Biscuits
Now for the fun part! Melt 100g of dark or milk chocolate. Using a small brush, coat the wings and ears of your chocolate bat biscuits in melted chocolate. Then, sprinkle with chocolate hundreds and thousands for an eerie touch. Once the decorations are set, pipe on faces and fangs with colored writing icing to add character to your spooky treats.

Step 10: Allow to Set
Let the decorated biscuits sit on the wire rack until the chocolate hardens. This should take about 15-20 minutes. During this time, you can admire your whimsical creations and prepare them for the Halloween festivities ahead. Once set, your chocolate bat biscuits will be ready to delight family and friends with both their appearance and taste!

What to Serve with Spooky Chocolate Bat Biscuits?

Pair your delightful creations with choices that tantalize the taste buds and make your Halloween gatherings truly special!

  • Warm Milk: Complements the rich chocolate flavors perfectly while evoking cozy childhood memories. It’s a delightful pairing for young and old alike during spooky storytelling sessions.
  • Pumpkin Soup: A smooth, savory balance that cuts through the sweetness of the biscuits. Its warm, earthy flavor reflects the season’s spirit, inviting a festive ambiance.
  • Ghostly Marshmallow Treats: Light, fluffy marshmallows shaped like ghosts add a cheerful contrast to the rich biscuits. They are a fun addition, especially for kids at Halloween parties!
  • Fruity Halloween Punch: A refreshing drink, this fruity punch can feature seasonal berries and crisp apples, providing a fresh burst of flavor that complements the sweet cookies beautifully.
  • Caramel Dipped Apples: The crunch of the apples with creamy caramel creates a delightful textural contrast alongside the chocolatey goodness of the biscuits.
  • Chocolate Milkshake: For a double chocolate indulgence, a rich milkshake makes an irresistible pairing, enhancing the treat’s chocolatey flavor and enjoyment.
  • Spooky Fruit Platters: Include orange wedges, grapes, and blackberries. This colorful assortment adds freshness and balances the sweetness, appealing to all tastes.
  • Chocolate Cheesecake Bites: Bite-sized desserts provide a smooth, rich counterpart, making them a favorite for those craving extra chocolate during your Halloween feast!

How to Store and Freeze Chocolate Bat Biscuits

Airtight Container: Store your chocolate bat biscuits in an airtight container at room temperature for up to 7 days to keep them fresh and crunchy.

Freezer Friendly: For longer storage, freeze the baked biscuits in a single layer on a baking sheet, then transfer to a freezer-safe bag after an hour. They’ll last for up to 3 months!

Thawing: When ready to enjoy, simply remove the desired quantity from the freezer and let them thaw at room temperature for about 30 minutes.

Reheating: If you prefer warm biscuits, reheat in the oven at 160°C for 5-10 minutes, keeping an eye on them to prevent over-baking.

Expert Tips for Chocolate Bat Biscuits

  • Room Temperature Butter: Ensure your butter is softened at room temperature for easier mixing, which yields a fluffier dough.
  • Oven Readiness: Preheat your oven properly. An underheated oven can cause uneven baking, affecting the final texture of your chocolate bat biscuits.
  • Chill Time Matters: Don't skip the chilling step! It helps the biscuits hold their shape and keeps them from spreading too much while baking.
  • Optimal Thickness: Roll the dough to the right thickness—about £1 coin thickness—to ensure the biscuits bake evenly and maintain their delightful crunch.
  • Decorate Creatively: Let your creativity shine when decorating! Use different shapes and colors to make your spooky characters even more fun and appealing.

Make Ahead Options

These delightful Chocolate Bat Biscuits are perfect for meal prep enthusiasts! You can prepare the dough up to 24 hours in advance by following the initial steps up to chilling the dough. Simply wrap it tightly in cling film and refrigerate until you're ready to roll it out. For those looking to save even more time, once baked, the biscuits can be stored in an airtight container for up to 3 days before decorating. Just remember to add the finishing touches—chocolate and decorations—right before serving to keep them looking fresh and exciting. With these make-ahead options, you can enjoy a fun baking session with minimal fuss during your Halloween festivities!

Chocolate Bat Biscuits Variations

Feel free to unleash your creativity and adjust the recipe to make it truly your own!

  • Cat and Owl Shapes: Use cookie cutters to create fun shapes like owls and cats for festive variety.

  • Dairy-Free: Swap out butter for coconut oil and use non-dairy milk for a delicious plant-based twist. You'll still get that rich flavor!

  • Gluten-Free: Substitute plain flour with gluten-free flour blend for a tummy-friendly alternative the whole family can enjoy.

  • Spicy Kick: Add a pinch of cayenne pepper to the dough for a surprising spicy accent in your chocolate treats. It’s a fun way to elevate the flavors!

  • Nut Flavors: Stir in some finely chopped nuts or nut butter for added texture and a nutty flavor explosion that pairs beautifully with chocolate. Almonds or hazelnuts work great!

  • Candied Bat Wings: Instead of chocolate decorations, coat the wings with melted candy melts in different colors for a vibrant look that pops.

  • Espresso Boost: For the coffee lovers, increase the espresso powder to 1 ½ teaspoons to really intensify that chocolate flavor.

  • Citrus Zest: A sprinkle of orange or lemon zest in the dough will add a refreshing twist that brightens up the rich chocolate taste.

As you explore these variations, remember to keep your family involved in the kitchen for extra fun! For more delightful treats, check out our other recipes like the charming German Chocolate Poke that will add even more sweetness to your Halloween festivities!

Chocolate Bat Biscuits Recipe FAQs

How can I tell if my ingredients are ripe or fresh?
Absolutely! For the butter, make sure it's at room temperature and soft but not melted. The icing sugar should be dry and powdery without clumps. The egg yolk should be fresh and free from any odd smell. Use fresh, unsweetened cocoa powder without any lumping, and check the expiration dates on all your ingredients to ensure they're at their best!

How should I store my Chocolate Bat Biscuits?
To maintain their freshness, store your chocolate bat biscuits in an airtight container at room temperature for up to 7 days. This will help them stay crunchy and delicious. If you notice any moisture in the container, consider adding a small piece of bread to absorb it and keep the biscuits crisp.

Can I freeze Chocolate Bat Biscuits? If so, how?
Very! To freeze your chocolate bat biscuits, first, allow them to cool completely. Place them in a single layer on a baking sheet and freeze for about an hour. After that, transfer the frozen biscuits to a freezer-safe bag or container, sealing it tightly. They can be stored for up to 3 months.

What’s the best way to thaw frozen biscuits?
When you're ready to enjoy your frozen chocolate bat biscuits, simply remove the desired quantity and let them thaw at room temperature for about 30 minutes. If you prefer them warm, you can reheat them in the oven at 160°C for 5-10 minutes, checking often to avoid over-baking.

What if my dough is too sticky or dry?
Don’t worry! If your dough seems too sticky, add a little more plain flour, one tablespoon at a time, until it reaches the right consistency. On the other hand, if the dough is too dry and crumbly, you can mix in a dash of milk to help bring it together. The goal is a soft and pliable dough that holds its shape when cut.

Are these Chocolate Bat Biscuits suitable for a gluten-free diet?
Definitely! To make these biscuits gluten-free, use a 1:1 gluten-free flour blend in place of plain flour. Just be sure to check that all other ingredients, like baking powder and cocoa powder, are labeled gluten-free as well. This way, everyone can enjoy the spooky fun!

Chocolate bat biscuits

Delicious Chocolate Bat Biscuits for Spooky Halloween Fun

These Chocolate Bat Biscuits are a fun and easy treat to make for Halloween festivities.
Print Recipe Pin Recipe
Prep Time 30 minutes mins
Cook Time 10 minutes mins
Chilling Time 15 minutes mins
Total Time 55 minutes mins
Servings: 12 biscuits
Course: Dessert
Cuisine: Halloween
Calories: 150
Ingredients Equipment Method Nutrition Notes

Ingredients
  

For the Cookies
  • 125 g Butter at room temperature
  • 85 g Icing Sugar can substitute with powdered sugar
  • 1 large Egg Yolk acts as a binder
  • 1 tsp Vanilla Extract or almond extract
  • 1 tsp Milk replace with non-dairy for vegan
  • 175 g Plain Flour can use gluten-free flour
  • 1 tsp Fine Espresso-Style Coffee Powder omit for milder taste
  • 50 g Cocoa Powder ensure it's unsweetened
  • ¼ tsp Salt enhances flavors
For Decoration
  • 100 g Dark or Milk Chocolate for decorating
  • Chocolate Hundreds and Thousands or any sprinkles
  • Coloured Writing Icing for adding details

Equipment

  • Oven
  • Mixing Bowl
  • hand mixer
  • Baking Sheets
  • Parchment Paper
  • Cookie cutter
  • palette knife
  • wire rack

Method
 

Step-by-Step Instructions
  1. Preheat the oven to 180°C (160°C fan) or gas mark 4 and line two baking sheets with parchment paper.
  2. Cream together 125g of room temperature butter and 85g of icing sugar until pale and fluffy. Mix in 1 egg yolk, 1 tsp vanilla extract, and 1 tsp milk.
  3. Sift together 175g plain flour, 1 tsp coffee powder, 50g cocoa powder, and ¼ tsp salt into the wet mixture. Stir until a soft dough forms.
  4. Shape the dough into a disc, wrap in cling film, and refrigerate for about 15 minutes.
  5. Roll out the dough between two sheets of parchment paper to about £1 coin thickness and cut out shapes with a bat-shaped cookie cutter.
  6. Cut small notches at the base of each bat for stability.
  7. Bake the biscuits in the preheated oven for about 10 minutes until sandy and aromatic.
  8. Cool the biscuits on the sheets for 5 minutes before transferring to a wire rack to cool completely.
  9. Melt 100g of chocolate and coat the wings and ears of the biscuits. Sprinkle with hundreds and thousands and pipe on details with icing.
  10. Let the decorated biscuits sit until the chocolate hardens, about 15-20 minutes.

Nutrition

Serving: 1biscuitsCalories: 150kcalCarbohydrates: 20gProtein: 2gFat: 7gSaturated Fat: 4gPolyunsaturated Fat: 0.5gMonounsaturated Fat: 2.5gCholesterol: 10mgSodium: 50mgPotassium: 50mgFiber: 1gSugar: 10gVitamin A: 200IUCalcium: 20mgIron: 0.5mg

Notes

Store in an airtight container for up to 7 days. Freeze for longer storage.

Tried this recipe?

Let us know how it was!

Spider Web Chocolate Fudge Muffins for a Spooktacular Treat

September 30, 2025 by Grace Snow Leave a Comment

As I set out to create a special Halloween treat this year, the idea of Spider Web Chocolate Fudge Muffins popped into my mind. These delightful muffins not only celebrate the spooky season but also bring a fountain of joy with their rich, chocolatey goodness. With a friendly touch of fluffy texture and a stunning cobweb design, these treats are sure to impress both family and friends. They’re perfect for making ahead of time, allowing you to pull them out from the freezer whenever you’re ready to entertain. Plus, their impressive looks make them a fun centerpiece for your Halloween festivities. Curious about how to whip up this festive delight that’s as delicious as it is decorative? Let’s dive into the recipe!

Why You’ll Love Spider Web Muffins

Fun and Festive: These Spider Web Chocolate Fudge Muffins are more than just a treat; they’re a showstopper for any Halloween gathering! Their intricate cobweb design surely brings the holiday spirit to life.

Make-Ahead Marvel: Whip them up in advance and freeze, so you can effortlessly impress guests when the time comes. Simply thaw, decorate, and enjoy!

Rich Chocolatey Goodness: Each bite delivers decadent chocolate flavor combined with a moist texture that will leave your taste buds dancing.

Endless Versatility: Want to switch it up? Add chocolate chips or nuts for an extra texture bite, or top them with caramel for a twist!

Perfect for All Ages: Delight your family and friends alike with these charming muffins that will excite everyone from kids to adults! Serve them warm and watch them disappear!

Spider Web Chocolate Fudge Muffin Ingredients

For the Muffins

  • Dark Chocolate (50g & 100g) – Adds rich chocolate flavor and moisture; substitute with semi-sweet chocolate if unavailable.
  • Butter (85g) – Provides fat for a tender muffin; can be substituted with margarine for a lactose-free option.
  • Liquid (1 tbsp – milk, water, or coffee) – Adds moisture; coffee enhances chocolate flavor while milk offers a milder taste.
  • Self-Raising Flour (200g) – Gives structure and rise; replace with all-purpose flour and add 1 tsp baking powder if needed.
  • Bicarbonate of Soda (½ tsp) – Helps with leavening; can be omitted if using self-raising flour.
  • Light Muscovado Sugar (85g) – Offers deep caramel notes and moisture; substitute with brown sugar for a similar flavor.
  • Golden Caster Sugar (50g) – Adds sweetness and a delicate texture; white sugar may be an alternative.
  • Egg (1) – Provides structure and binds ingredients; substitute with a chia or flaxseed egg for a vegan version.
  • Soured Cream (142ml) – Adds richness and moisture; Greek yogurt can be used as a substitute.

For the Topping

  • White Chocolate (100g) – Adds sweetness and color for the cobweb decoration; can be replaced with more dark chocolate if desired.

These Spider Web Chocolate Fudge Muffins are not only a delight for the taste buds but also make for a visually stunning Halloween treat!

Step‑by‑Step Instructions for Spider Web Chocolate Fudge Muffins

Step 1: Preheat and Prepare
Begin by preheating your oven to 170°C (fan) or 190°C (conventional, gas mark 5). While the oven heats up, line a muffin tin with 10 paper muffin cases, ensuring they’re nestled securely. This sets the stage for your delightful Spider Web Chocolate Fudge Muffins, ready to hold in all that chocolatey goodness!

Step 2: Melt Chocolate Mixture
In a heatproof bowl, combine 50g of dark chocolate, 85g of butter, and 1 tablespoon of your chosen liquid (milk, water, or coffee). Place the bowl in the microwave and heat for 30-45 seconds, stirring halfway through until the chocolate and butter are completely melted and smooth. Allow this mixture to cool slightly while you prepare the dry ingredients.

Step 3: Mix Dry Ingredients
In a separate large bowl, sift together 200g of self-raising flour, ½ teaspoon of bicarbonate of soda, and both 85g of light muscovado sugar and 50g of golden caster sugar. This combination provides the structure and sweetness needed for your Spider Web Chocolate Fudge Muffins. Mixing the dry ingredients evenly ensures an optimal rise and texture during baking.

Step 4: Combine Wet Ingredients
In another bowl, beat 1 egg and stir in 142ml of soured cream until well blended. This mixture adds moisture and helps bind your muffin batter. Gradually add the melted chocolate mixture to this bowl, stirring continuously to create a cohesive and rich chocolate blend that will make your muffins extra delightful.

Step 5: Fold in All Ingredients
Pour the wet ingredients into the bowl of dry ingredients. Gently fold the mixtures together until just combined—be careful not to overmix, as this can cause tough muffins. The batter should be slightly lumpy, with rich flecks of dark chocolate visible, creating a beautiful base for your Spider Web Chocolate Fudge Muffins.

Step 6: Fill Muffin Cases
Spoon the muffin batter into the lined cases, filling each about three-quarters full. This gives your muffins room to rise beautifully in the oven, creating fluffy, indulgent treats. Once filled, place the muffin tin in the preheated oven and bake for about 20 minutes, or until the muffins have risen and a toothpick inserted in the center comes out clean.

Step 7: Cool on Wire Racks
Once baked, carefully remove the muffin tin from the oven and allow it to cool for a few minutes. Then, transfer the muffins to wire racks to cool completely. This step is essential for ensuring a perfect texture and allowing the muffins to settle properly before you add the charming cobweb decoration.

Step 8: Prepare Decoration
While the muffins are cooling, melt an additional 100g of white chocolate along with the remaining 100g of dark chocolate for decorating. If needed, you can use separate bowls or a microwave-safe container to keep the chocolates separated. Fill piping bags with each melted chocolate to create beautiful decorative patterns for your Spider Web Chocolate Fudge Muffins.

Step 9: Decorate Muffins
Begin by spreading a layer of melted dark chocolate over the top of each muffin, creating a smooth base. Next, pipe concentric circles of melted white chocolate on top. Using a skewer or toothpick, gently drag it through the circles to create a stunning cobweb pattern. Repeat this process for all muffins, allowing the chocolates to set slightly before serving.

Step 10: Serve Fresh or Store
These delightful Spider Web Chocolate Fudge Muffins are best enjoyed fresh, but can also be stored in an airtight container for up to 2 days. Alternatively, freeze them before decoration; just thaw and decorate when needed for a spooktacular treat ready for Halloween gatherings!

Make Ahead Options

These Spider Web Chocolate Fudge Muffins are perfect for meal prep, allowing you to enjoy their deliciousness with minimal last-minute effort! You can prepare the muffin batter up to 24 hours in advance; simply mix the ingredients, then cover and refrigerate. When you’re ready to bake, let the batter sit at room temperature for about 30 minutes before spooning it into the muffin cases. Additionally, you can freeze the baked muffins without decoration for up to 1 month. Just wrap each muffin in plastic wrap and store in an airtight container. When you’re ready to serve, thaw them overnight in the fridge, decorate with the melted chocolate, and you'll have delightful treats ready to impress your guests!

Spider Web Chocolate Fudge Muffins Variations

Feel free to personalize your Spider Web Muffins and make them your own!

  • Dairy-Free: Use coconut or almond milk in place of regular milk, and coconut cream instead of soured cream for a delightful twist.
    For a vegan option, consider replacing the egg with a chia or flaxseed egg. The result is surprisingly delicious and still rich!

  • Nutty Buddy: Fold in 1/2 cup of chopped nuts or chocolate chips for an extra crunch and flavor boost. This variation adds a delightful texture to each bite.

  • Flavor Infusion: Experiment with adding a teaspoon of espresso powder for a richer chocolate flavor. It creates a lovely depth that chocolate lovers will adore!

  • Spiced Up: Add a pinch of cinnamon or a dash of cayenne for a warm, spicy kick. It's a fun way to give these treats a festive flair beyond Halloween!

  • Sugar Swaps: Substitute the muscovado with coconut sugar for a healthier version. You might find a subtle caramel flavor, making your muffins even more intriguing.

  • Topping Twist: Swap white chocolate for caramel sauce drizzled on top. This not only adds sweetness but creates a fun and gooey texture.

  • Lighter Option: Use unsweetened applesauce as a butter substitute for a lighter, moist muffin. This swap helps to keep flavor while trimming some calories.

  • Allergen-Friendly: Create gluten-free muffins by substituting self-raising flour with a gluten-free flour blend. This keeps the treat enjoyable for everyone, including those with dietary restrictions.

For those moments when you're craving a savory bite, consider pairing these muffins with warm apple cider or delicious Breakfast Egg Muffins to create a delightful Halloween-themed menu!

How to Store and Freeze Spider Web Chocolate Fudge Muffins

Airtight Container: Store cooled muffins in an airtight container at room temperature for up to 2 days to maintain their freshness and moisture.

Freezer Friendly: For longer storage, wrap each muffin individually in plastic wrap and place them in a freezer-safe bag or container. They can be frozen for up to 1 month.

Thawing Tips: To enjoy your frozen Spider Web Chocolate Fudge Muffins, simply thaw them at room temperature for 1-2 hours or microwave them for a few seconds until warm.

Decoration Storage: If freezing before decorating, add your decorative cobweb topping after thawing to ensure the design remains beautiful and intact.

Tips for the Best Spider Web Muffins

  • Proper Mixing: Avoid overmixing the batter to ensure your muffins remain tender and moist. Aim for a just-combined texture for the best Spider Web Chocolate Fudge Muffins.

  • Melt Chocolate Wisely: When melting chocolate, do it in short bursts to prevent burning. Stir frequently to achieve a smooth consistency for both the muffin base and decoration.

  • Decoration Patience: Allow the muffins to cool completely before starting your cobweb decoration. This prevents the white chocolate from melting into the dark chocolate, preserving the striking design.

  • Temperature Check: Use an oven thermometer to ensure your oven is at the correct temperature. This helps achieve even baking and prevents underwhelming muffins.

  • Storage Savvy: If making ahead, freeze the muffins before decorating. Wrap them tightly to maintain freshness and whip them out for any occasion when you need a delightful treat!

  • Flavor Variations: Don’t hesitate to experiment by incorporating chocolate chips or nuts into the batter. It adds a fun twist to your Spider Web Chocolate Fudge Muffins!

What to Serve with Spider Web Chocolate Fudge Muffins

Bring a delightful contrast to your Halloween spread with vibrant and complimentary sides that enhance your festive treats!

  • Warm Vanilla Custard: Creamy and velvety, this classic pairs beautifully with the rich chocolate flavor, adding an extra layer of indulgence.

  • Maple Pecan Ice Cream: The sweet nuttiness of this ice cream enhances the chocolate muffins, creating a delightful, contrasting texture.

  • Fresh Berries Medley: A burst of tartness from raspberries, strawberries, and blueberries balances the decadence of the muffins, providing a refreshing palate cleanse.

  • Pumpkin Spice Latte: Embrace the season with a warm drink that enhances the chocolate and adds a cozy aroma, perfect for sipping alongside your muffins.

  • Chocolate Drizzle Caramel Sauce: Pour this rich sauce over your muffins for an added touch of sweetness, intensifying the chocolate experience beautifully.

  • Apple Cider: This warm, spiced beverage highlights the flavors of autumn, making it a seasonal favorite to enjoy with your decedent treats.

  • Ghostly Marshmallow Skewers: Simple yet fun, these can be made with marshmallows and a touch of creativity, adding whimsy to your dessert table.

Serve these alongside your Spider Web Chocolate Fudge Muffins for an enchanting Halloween gathering that will create sweet memories!

Spider Web Chocolate Fudge Muffins Recipe FAQs

What type of chocolate should I use for these muffins?
Absolutely, using high-quality dark chocolate is essential for a rich flavor! You can substitute with semi-sweet chocolate if you prefer a milder taste, but I recommend sticking with dark chocolate for that decadent experience.

How should I store leftover muffins?
To keep your Spider Web Chocolate Fudge Muffins fresh, store them in an airtight container at room temperature for up to 2 days. If you want them to last longer, wrap them tightly in plastic wrap and freeze individually for up to 1 month.

Can I freeze these muffins before decorating?
Yes, absolutely! After cooling, wrap each muffin in plastic wrap and place them in a freezer-safe bag or container. When you're ready to enjoy them, simply thaw at room temperature for 1-2 hours, then decorate as desired!

What if my muffins don’t rise properly?
If your muffins didn’t rise, it might be due to expired baking soda or incorrect ingredient measurements. Ensure your bicarbonate of soda is fresh. Also, avoid overmixing your batter; a slightly lumpy batter is best for achieving those fluffy muffins!

Are there any allergy considerations for this recipe?
Certainly! These muffins contain eggs and dairy, which may not be suitable for those with allergies. For a vegan option, you can substitute the egg with a chia or flaxseed egg, and use a dairy-free yogurt in place of soured cream. Always check your chocolate ingredients for any hidden allergens!

Can I add additional flavors or ingredients?
The more the merrier! Feel free to mix in chocolate chips or chopped nuts to the batter for extra texture, or top with caramel sauce or festive sprinkles instead of chocolate for a unique twist!

Spider web chocolate fudge muffins

Spider Web Chocolate Fudge Muffins for a Spooktacular Treat

These Spider Web Chocolate Fudge Muffins are a delightful Halloween treat with rich chocolate flavor and a fun design.
Print Recipe Pin Recipe
Prep Time 30 minutes mins
Cook Time 20 minutes mins
Cooling Time 10 minutes mins
Total Time 1 hour hr
Servings: 10 muffins
Course: Dessert
Cuisine: Halloween
Calories: 200
Ingredients Equipment Method Nutrition Notes

Ingredients
  

For the Muffins
  • 50 g Dark Chocolate Adds rich chocolate flavor and moisture; substitute with semi-sweet chocolate if unavailable.
  • 85 g Butter Provides fat for a tender muffin; can be substituted with margarine for a lactose-free option.
  • 1 tbsp Liquid (milk, water, or coffee) Adds moisture; coffee enhances chocolate flavor.
  • 200 g Self-Raising Flour Gives structure and rise; replace with all-purpose flour and add 1 tsp baking powder if needed.
  • ½ tsp Bicarbonate of Soda Helps with leavening; can be omitted if using self-raising flour.
  • 85 g Light Muscovado Sugar Offers deep caramel notes and moisture; substitute with brown sugar for a similar flavor.
  • 50 g Golden Caster Sugar Adds sweetness and a delicate texture; white sugar may be an alternative.
  • 1 unit Egg Provides structure and binds ingredients; substitute with a chia or flaxseed egg for a vegan version.
  • 142 ml Soured Cream Adds richness and moisture; Greek yogurt can be used as a substitute.
For the Topping
  • 100 g White Chocolate Adds sweetness and color for the cobweb decoration; can be replaced with more dark chocolate if desired.

Equipment

  • Muffin tin
  • Heatproof bowl
  • piping bags
  • Microwave
  • sifter
  • Whisk

Method
 

Step‑by‑Step Instructions
  1. Preheat your oven to 170°C (fan) or 190°C (conventional, gas mark 5). Line a muffin tin with 10 paper muffin cases.
  2. In a heatproof bowl, combine 50g of dark chocolate, 85g of butter, and 1 tablespoon of your chosen liquid. Heat in the microwave for 30-45 seconds, stirring halfway through.
  3. Sift together 200g of self-raising flour, ½ teaspoon of bicarbonate of soda, 85g of light muscovado sugar, and 50g of golden caster sugar in a separate bowl.
  4. In another bowl, beat 1 egg and stir in 142ml of soured cream. Gradually add the melted chocolate mixture, stirring continuously.
  5. Pour the wet ingredients into the bowl of dry ingredients and gently fold until just combined.
  6. Spoon batter into lined muffin cases, filling each about three-quarters full. Bake for about 20 minutes, or until a toothpick comes out clean.
  7. Once baked, allow muffins to cool for a few minutes before transferring to wire racks.
  8. Melt an additional 100g of white chocolate with the remaining 100g of dark chocolate for decorating. Fill piping bags.
  9. Spread melted dark chocolate over each muffin, then pipe concentric circles of white chocolate on top. Create cobweb patterns with a skewer.
  10. Serve fresh or store in an airtight container for up to 2 days. Freeze before decoration if making ahead.

Nutrition

Serving: 1muffinCalories: 200kcalCarbohydrates: 30gProtein: 3gFat: 9gSaturated Fat: 5gPolyunsaturated Fat: 1gMonounsaturated Fat: 3gCholesterol: 25mgSodium: 150mgPotassium: 150mgFiber: 1gSugar: 15gVitamin A: 300IUCalcium: 30mgIron: 1mg

Notes

For best results, avoid overmixing the batter. Allow muffins to cool completely before decorating to prevent melting.

Tried this recipe?

Let us know how it was!

Winter Wonderland Chocolate Chip Cookies You'll Crave

September 29, 2025 by Grace Snow Leave a Comment

As the first snowflakes blanket the ground, a cozy aroma fills the kitchen, signaling the time for baking magic. Today, I’m excited to share my recipe for Winter Wonderland Chocolate Chip Cookies—soft, chewy delights infused with a hint of peppermint that perfectly capture the essence of the holiday season. These cookies are not only a breeze to whip up in just 30 minutes, but they also offer a warm, comforting treat that’ll impress your friends and family at winter gatherings. Perfectly customized, you can even explore gluten-free or reduced sugar options if you want a healthier twist. Are you ready to make this festive indulgence yours? Let’s dive in!

Why are these cookies a must-try?

Softness and Chewiness: The Winter Wonderland Chocolate Chip Cookies deliver an irresistibly soft and chewy texture, making every bite feel comforting and warm.
Quick Prep Time: Created in just 30 minutes, these cookies are perfect for spontaneous baking sessions, ensuring you can whip up a batch before your guests arrive.
Festive Flavor: A delightful hint of peppermint paired with rich chocolate means these cookies truly embrace the holiday spirit, making them an ideal treat for seasonal celebrations.
Customizable Options: With gluten-free and reduced sugar choices available, you can tailor the recipe to cater to various dietary preferences while keeping indulgence in mind. For more variations, check out my Matcha Cookies Soft or Eggnog Cookies Soft!
Crowd-Pleasing Appeal: Whether they’re enjoyed with hot cocoa or gifted as sweet surprises, these cookies are bound to be a hit at any gathering!

Winter Wonderland Chocolate Chip Cookies

• Experience the magic of cozy baking with these irresistible delights!

For the Batter

  • Butter – Provides richness and tenderness; make sure it’s at room temperature for easier creaming.
  • Brown Sugar – Adds moisture and deep flavor; coconut sugar can be used as a healthier substitute.
  • Granulated Sugar – Sweetens the cookies; reduce the amount or substitute with honey for a natural sweetener.
  • Eggs – Bind the ingredients for structure; room temperature eggs work best for mixing.
  • Vanilla Extract – Enhances the cookies’ flavor; try almond extract for a delicious twist.

For the Dry Ingredients

  • All-Purpose Flour – Gives structure to the cookies; substitute a gluten-free blend for gluten-free options.
  • Baking Soda – Helps the cookies rise; use fresh baking soda for the best results.
  • Salt – Balances sweetness and enhances flavor.

For the Mix-Ins

  • Chocolate Chips (Dark and White) – Provide rich chocolate flavor; feel free to mix and match with semi-sweet varieties.
  • Crushed Candy Canes – Adds a festive peppermint crunch; omit or swap with nuts if preferred for a different texture.

Step‑by‑Step Instructions for Winter Wonderland Chocolate Chip Cookies

Step 1: Preheat and Prepare
Begin by preheating your oven to 350°F (175°C) to create the perfect baking environment. While that warms up, prepare your baking sheets by lining them with parchment paper—a crucial step to prevent the cookies from sticking and ensure an easy cleanup later.

Step 2: Cream the Butters and Sugars
In a large mixing bowl, combine softened butter, brown sugar, and granulated sugar. Use a hand mixer on medium speed to cream these ingredients together until the mixture is light and fluffy, about 2-3 minutes. This step is vital, as it incorporates air into the mix, ensuring your Winter Wonderland Chocolate Chip Cookies are tender and delightful.

Step 3: Add the Wet Ingredients
Next, crack in the eggs one at a time, mixing well after each addition to fully incorporate them. Pour in the vanilla extract, and continue blending until the mixture is smooth and glossy. This perfectly blended wet batter will provide the foundational flavor for your holiday cookies.

Step 4: Combine Dry Ingredients
In a separate bowl, sift together your all-purpose flour, baking soda, and salt. Gradually add this dry mixture to the wet ingredients, mixing gently but thoroughly until just combined. Be careful not to overmix; you want to maintain the tender texture that makes these cookies irresistible.

Step 5: Fold in the Chocolate and Peppermint
Now it's time to add fun flavors! Gently fold in the dark and white chocolate chips along with the crushed candy canes. The candy canes will provide a lovely festive crunch and a hint of peppermint, ensuring each bite of your Winter Wonderland Chocolate Chip Cookies is magical.

Step 6: Scoop the Dough
Using a tablespoon or cookie scoop, portion the dough onto the prepared baking sheets, spacing them about two inches apart. This spacing is crucial as the cookies will spread while baking. Make sure the dough looks rounded and plump, ready to transform into delightful treats.

Step 7: Bake to Perfection
Place the baking sheets in the preheated oven and bake for 10-12 minutes or until the edges are golden, while the centers remain soft and slightly underbaked. Keeping an eye on them is important, as overbaking can lead to cookies that are less chewy and tender.

Step 8: Cool and Decorate
Once baked to perfection, remove the cookies from the oven and allow them to cool on the baking sheets for about 5 minutes. This helps them firm up a bit. Then, transfer them to a wire rack. For a festive touch, drizzle melted white chocolate over the cooled cookies and sprinkle with additional crushed candy canes.

Storage Tips for Winter Wonderland Chocolate Chip Cookies

  • Room Temperature: Store cookies in an airtight container at room temperature for up to 3 days to maintain freshness and softness.
  • Fridge: If you prefer, cookies can be stored in the fridge for up to a week, but they may lose some soft texture; be sure to let them come to room temperature before enjoying.
  • Freezer: Freeze cookie dough for up to 3 months, wrapping it tightly in plastic wrap. Thaw in the fridge before baking fresh batches when the craving hits!
  • Reheating: For warm cookies, microwave single pieces for about 10-15 seconds, allowing the chocolate to melt slightly and enhancing that gooey goodness.

Winter Wonderland Chocolate Chip Cookies Variations

Feel free to get creative with these Winter Wonderland Chocolate Chip Cookies and make them your own with these delightful twists!

  • Gluten-Free: Substitute all-purpose flour with a gluten-free flour blend for a cookie that everyone can enjoy.

  • Reduced Sugar: Use mashed bananas or unsweetened applesauce in place of some of the granulated sugar for a healthier treat. The sweetness remains while adding a hint of fruitiness!

  • Dairy-Free: Swap butter for coconut oil and use dairy-free chocolate chips to create a dairy-free dessert without compromising on flavor. The cookies will still be soft and delicious.

  • Nutty Crunch: Mix in chopped walnuts or pecans for an added depth of flavor and delightful crunch. This variation introduces a satisfying texture that complements the sweetness.

  • Flavor Boost: Sprinkle in a teaspoon of cinnamon or a pinch of nutmeg to elevate the cookie’s warmth. These spices add complexity, making each bite more enticing.

  • Peppermint Twist: Rather than crushed candy canes, substitute with peppermint extract for a less crunchy, more intensely peppermint flavor. Just a few drops will infuse the entire batch with festive spirit!

  • Chocolate Variety: Replace half of the chocolate chips with white chocolate, or use salted caramel chips for a unique sweet-and-salty combination. It's an indulgent way to switch up the classic recipe!

  • Frosted Finish: Once cooled, spread a layer of cream cheese frosting on top for an extra indulgent treat. It transforms each cookie into a mini cake-like delight!

Enjoy experimenting with these ideas, and for more delicious cookie recipes, don’t miss my Thumbprint Cookies Melt and German Chocolate Poke for festive treats!

Make Ahead Options

These Winter Wonderland Chocolate Chip Cookies are perfect for busy bakers looking to save time during the holiday hustle! You can prepare the cookie dough up to 24 hours in advance by mixing it as directed, then shaping the dough into balls and refrigerating it in an airtight container. This helps prevent spreading and keeps the cookies just as soft and chewy once baked. When you're ready to enjoy them, simply place the chilled dough on a baking sheet and bake for an extra minute or two, watching for that golden edge to form. You’ll have warm, delicious cookies ready with minimal effort, embodying that comforting holiday spirit!

What to Serve with Winter Wonderland Chocolate Chip Cookies

Indulge in the cozy holiday spirit while creating a complete meal experience that warms the heart and delights the senses.

  • Hot Cocoa: The rich chocolate flavor and warmth of cocoa perfectly complement the peppermint in the cookies, creating a comforting pairing.
  • Creamy Vanilla Chai Latte: This creamy drink enhances the festive flavors of the cookies, adding a fragrant spice that’s perfect for chilly evenings.
  • Cheese Platter: A selection of sharp cheddar and creamy brie provides a savory contrast to the sweetness of the cookies, balancing flavors beautifully.
  • Vanilla Ice Cream: The smooth creaminess of vanilla ice cream drizzled with melted chocolate enhances the cookie’s texture and adds delightful coldness.
  • Peppermint Bark: Add a festive touch with peppermint bark, its crunch and minty flavor echoing the cookie’s hints of peppermint for a cohesive treat experience.
  • Fruit Salad: A light and refreshing side with seasonal fruits balances the sweetness, providing a fresh finish to your holiday gathering.
  • Coffee: A warm cup of coffee, whether black or with cream, contrasts deliciously with the cookies, enhancing their rich chocolate notes.
  • Christmas Cookies: Serve alongside other holiday cookies for a delightful variety, making your dessert table truly festive and inviting.
  • Spiced Apple Cider: The warmth and spices of apple cider offer comfort while perfectly contrasting the sweet, rich flavors of the Winter Wonderland cookies.

Expert Tips for Winter Wonderland Chocolate Chip Cookies

  • Chill the Dough: Always chill the dough for at least 30 minutes before baking to prevent spreading, resulting in thicker cookies.

  • Room Temperature Ingredients: Make sure your butter and eggs are at room temperature for better mixing. Cold ingredients can lead to a lumpy dough.

  • Don’t Overmix: Mix the dry ingredients just until combined with the wet mixture. Overmixing can cause your Winter Wonderland Chocolate Chip Cookies to turn out tough instead of soft and tender.

  • Watch the Bake Time: Keep an eye on your cookies as they bake. Remove them from the oven when the edges are golden and the centers appear slightly soft for the optimal chewy texture.

  • High-Quality Chocolate: Using high-quality chocolate chips enhances the flavor significantly. Opt for a mix of dark and white chocolate for a delightful contrast.

Winter Wonderland Chocolate Chip Cookies Recipe FAQs

What’s the best way to choose ingredients for my Winter Wonderland Chocolate Chip Cookies?
Absolutely! For the best flavor, choose butter that’s at room temperature—it ensures easier creaming with the sugars. When selecting chocolate chips, opt for high-quality brands, as they have a richer taste. If using eggs, make sure they’re room temperature, too, as they blend more smoothly into the batter.

How should I store my cookies to keep them fresh?
To keep your Winter Wonderland Chocolate Chip Cookies soft and delicious, store them in an airtight container at room temperature for up to 3 days. For longer storage, place a slice of bread inside the container; it helps retain moisture and keeps the cookies from drying out. If you decide to refrigerate them, they can last up to a week, but they may lose some of their delightful chewiness.

Can I freeze the cookie dough, and if so, how do I do it?
Yes, you can freeze the dough for up to 3 months! Simply scoop the cookie dough onto a parchment-lined baking sheet and freeze until solid. Then, transfer the dough balls to a freezer-safe bag or container, ensuring they’re well sealed. When you’re ready to bake, just thaw them in the fridge for a few hours and bake as usual, adding a minute or two to the baking time if they’re still a bit cold.

What do I do if my cookies come out too hard or flat?
Oh no! If your cookies are too hard, it could be due to overbaking, so try to watch them closely next time. For flat cookies, make sure your butter is not too warm and that you’ve measured your flour correctly. If your ingredients are too warm or too wet, it can cause the cookies to spread too much during baking. If the dough seems too sticky, add a little extra flour until it holds together better before scooping.

Are there any dietary considerations I should keep in mind?
Certainly! For those with gluten sensitivities, simply substitute the all-purpose flour with a gluten-free blend. Additionally, if you’re looking to reduce sugar, you can cut back on the granulated sugar or use natural sweeteners like honey or maple syrup for a healthier twist. Always check chocolate labels for allergen information if you’re concerned about dairy or gluten.

How long can my baked cookies be kept in the freezer?
Your baked Winter Wonderland Chocolate Chip Cookies can be kept in the freezer for up to 2 months. Just make sure they are fully cooled, then wrap them tightly in plastic wrap or aluminum foil and place them in a freezer-safe container. When you're ready to enjoy, simply let them thaw at room temperature or warm them slightly in the microwave for that fresh-baked feel!

Winter Wonderland Chocolate Chip Cookies

Winter Wonderland Chocolate Chip Cookies You'll Crave

Enjoy the festive flavors of Winter Wonderland Chocolate Chip Cookies—soft, chewy delights with a hint of peppermint.
Print Recipe Pin Recipe
Prep Time 15 minutes mins
Cook Time 12 minutes mins
Chilling Time 30 minutes mins
Total Time 57 minutes mins
Servings: 24 cookies
Course: Dessert
Cuisine: American
Calories: 150
Ingredients Equipment Method Nutrition Notes

Ingredients
  

Batter
  • 1 cup Butter At room temperature
  • 1 cup Brown Sugar Can substitute with coconut sugar
  • 1/2 cup Granulated Sugar Can reduce or substitute with honey
  • 2 large Eggs At room temperature
  • 1 teaspoon Vanilla Extract Almond extract can be used
Dry Ingredients
  • 2 cups All-Purpose Flour Can substitute with gluten-free blend
  • 1 teaspoon Baking Soda Ensure it's fresh
  • 1/2 teaspoon Salt
Mix-Ins
  • 1 cup Chocolate Chips (Dark and White) Can mix with semi-sweet varieties
  • 1/2 cup Crushed Candy Canes Can swap with nuts if preferred

Equipment

  • Oven
  • Mixing Bowl
  • Baking Sheet
  • Parchment Paper
  • hand mixer
  • sifter
  • Cookie Scoop

Method
 

Step-by-Step Instructions
  1. Preheat your oven to 350°F (175°C) and line baking sheets with parchment paper.
  2. In a large mixing bowl, cream together softened butter, brown sugar, and granulated sugar until light and fluffy, about 2-3 minutes.
  3. Add eggs one at a time, mixing well after each addition. Pour in vanilla extract and blend until smooth.
  4. Sift together all-purpose flour, baking soda, and salt in a separate bowl. Gradually add this to the wet ingredients, mixing gently until just combined.
  5. Fold in the dark and white chocolate chips along with crushed candy canes.
  6. Scoop the dough onto prepared baking sheets, spacing them about two inches apart.
  7. Bake for 10-12 minutes until edges are golden but centers remain soft.
  8. Cool on baking sheets for about 5 minutes, then transfer to a wire rack. Drizzle melted white chocolate and sprinkle with additional crushed candy canes if desired.

Nutrition

Serving: 1cookieCalories: 150kcalCarbohydrates: 20gProtein: 1gFat: 7gSaturated Fat: 4gPolyunsaturated Fat: 1gMonounsaturated Fat: 2gCholesterol: 20mgSodium: 100mgPotassium: 50mgFiber: 1gSugar: 10gVitamin A: 250IUCalcium: 10mgIron: 0.5mg

Notes

Chill the dough for at least 30 minutes before baking to prevent spreading, resulting in thicker cookies.

Tried this recipe?

Let us know how it was!

Moist and Spiced Pumpkin Cake That Steals the Show

September 27, 2025 by Grace Snow Leave a Comment

As Halloween approaches, the scent of warm spices and autumnal flavors fills the kitchen, instantly transporting me back to crisp October evenings. This Ghoulishly Good Halloween Pumpkin Cake brings that nostalgic vibe alive, perfect for those of us who crave homemade delights instead of the usual fast food. Utilizing leftover pumpkin or butternut squash, this recipe not only embraces the spirit of the season but also provides an easy way to reduce food waste. With its moist texture and delightful spiced aroma, it's destined to be the centerpiece of your Halloween festivities. Let’s dive into this delicious journey of baking, and discover why this pumpkin cake might just become your new favorite autumnal treat! Curious about how to whip this up and wow your guests?

Why is this pumpkin cake a must-try?

Moist & Flavorful: This pumpkin cake delivers a moist texture, bursting with warm spices that evoke the essence of autumn.

Easy to Make: With simple ingredients and straightforward steps, this recipe is perfect for bakers of all levels, ensuring no one feels overwhelmed in the kitchen.

Versatile Use: Not only does this cake make a festive dessert, but it’s also an excellent way to use up leftover pumpkin or butternut squash, making it a waste-reducing delight!

Crowd-Pleasing Treat: Its rich flavors and creamy frosting are sure to impress family, friends, or even guests at a spooky gathering, making it a true showstopper.

Pair with Indulgence: Serve warm alongside a scoop of vanilla ice cream or a dollop of whipped cream for an irresistible fall treat that will have everyone coming back for more.

Make this seasonal favorite your go-to choice for festive occasions and check out our other recipes for more delicious autumn-inspired bites, like Pumpkin Brownies Decadent or Pumpkin Cinnamon Roll!

Pumpkin Cake Ingredients

• Get ready to delight your taste buds!

For the Cake

  • Self-Raising Flour – Provides structure and lightness; ensure it's fresh for best results.
  • Light Muscovado Sugar – Adds a delicious caramel flavor and moisture; dark muscovado deepens the taste.
  • Mixed Spice – Enhances warmth and depth, a must for autumn; pumpkin spice can be used if preferred.
  • Bicarbonate of Soda – Acts as a leavening agent for rise; check that it's not expired.
  • Sultanas – Adds sweetness and texture; substitute with raisins or dried cranberries if desired.
  • Salt – Enhances overall flavor; essential even in sweet recipes.
  • Eggs – Provide moisture, richness, and structure; use room temperature for better mixing.
  • Butter (Melted) – Introduces richness; must be melted for even mixing; vegetable oil can be a dairy-free substitute.
  • Orange Zest and Juice – Offers fresh citrus flavor, balancing sweetness; lemon can be used instead.
  • Pumpkin or Butternut Squash (Peeled and Grated) – The star ingredient for moisture and flavor; sweet potato can be a swap if needed.

For the Frosting

  • Soft Cheese – Creates a creamy texture for frosting; cream cheese is a suitable alternative.
  • Butter (Softened) – Adds richness to the frosting; ensure it’s at room temperature for easy mixing.
  • Icing Sugar – Sweetens and thickens the frosting; no substitutes recommended for desired texture.

Dive into each step of the process, and prepare to impress with this moist pumpkin cake that truly captures the spirit of Halloween!

Step‑by‑Step Instructions for Ghoulishly Good Halloween Pumpkin Cake

Step 1: Prepare the Baking Tin
Preheat your oven to 180°C (fan 160°C, gas mark 4). Take a 30 x 20cm baking dish and generously butter it to prevent sticking. Line the bottom and sides with parchment paper, ensuring it overhangs slightly for easy removal later. This will create the perfect base for your moist pumpkin cake.

Step 2: Mix Dry Ingredients
In a large mixing bowl, combine self-raising flour, light muscovado sugar, mixed spice, bicarbonate of soda, sultanas, and a pinch of salt. Whisk the ingredients together until they are evenly distributed, creating a fluffy mixture. This step is essential for ensuring your pumpkin cake rises beautifully and is infused with rich autumn flavors.

Step 3: Combine Wet Ingredients
In a separate bowl, beat your room-temperature eggs into the melted butter until well combined. Next, stir in the fresh orange zest and juice, mixing until the ingredients meld together smoothly. This mixture will add rich moisture and a zesty brightness to your cake, harmonizing perfectly with the pumpkin.

Step 4: Combine Mixtures
Gently fold the wet mixture into the dry ingredients using a spatula until just combined. Be careful not to overmix, as you want your pumpkin cake to retain its light and airy texture. Now, carefully incorporate the grated pumpkin or butternut squash, folding until uniformly mixed throughout.

Step 5: Bake the Cake
Pour the batter into your prepared baking dish, spreading it evenly with a spatula. Place it into the preheated oven and bake for approximately 30 minutes, or until the top is golden and springs back lightly when touched. Your kitchen will soon be filled with the delightful aroma of fall.

Step 6: Make the Frosting
While the cake bakes, prepare the frosting by beating together soft cheese, softened butter, icing sugar, orange zest, and a teaspoon of orange juice in a mixing bowl. Continue mixing until you achieve a smooth, creamy consistency. Once combined, chill the frosting in the refrigerator to help it set nicely.

Step 7: Cool the Cake
After 30 minutes, check the cake by inserting a skewer into the center; it should come out clean. Allow the cake to cool in the tin for about 5 minutes before inverting it onto a cooling rack. Prick the top gently with a skewer and drizzle with any remaining orange juice while still warm, enhancing its flavor as it cools fully.

Step 8: Frost the Cake
Once the cake has completely cooled, you may wish to trim the edges for a neater appearance. Using a palette knife, spread the chilled frosting generously over the top of your pumpkin cake. This lovely frosting will complement the warm spices and moist texture beautifully, making your Halloween treat truly irresistible.

Storage Tips for Pumpkin Cake

Room Temperature: Allow the pumpkin cake to cool completely before serving, as it is best enjoyed at room temperature for optimal flavor and texture.

Fridge: Store the frosted pumpkin cake in an airtight container in the fridge for up to 3 days. This will help maintain its freshness and creamy frosting.

Freezer: If you need to store it longer, the unfrosted pumpkin cake can be wrapped tightly in plastic wrap and then aluminum foil, freezing it for up to 2 months. Thaw in the fridge before frosting and serving.

Reheating: If serving leftover cake, you can gently warm individual slices in the microwave for about 10-15 seconds for a cozy treat reminiscent of fresh-baked goodness.

Expert Tips for Halloween Pumpkin Cake

Watch the Baking Time: Keep an eye on your cake, as baking times can vary based on the moisture in the pumpkin, leading to over or underbaking.

Egg Preparation Matters: Ensure your eggs are room temperature and whisk them until pale and fluffy for a lighter pumpkin cake texture.

Avoid Overmixing: When combining wet and dry ingredients, mix just until combined to maintain the perfect cakey texture—overmixing can lead to a dense cake.

Cooling Technique: After baking, use a skewer to prick the cake and drizzle it with orange juice to enhance flavor while it cools, giving it a delightful, moist finish.

Frosting Consistency: Make sure the butter for your frosting is softened to room temperature to achieve a smooth mix with the icing sugar.

With these tips in hand, you’ll create a delicious pumpkin cake that will steal the show at any Halloween gathering!

Pumpkin Cake Variations & Substitutions

Feel free to get creative and make this recipe your own with these delightful twists!

  • Dairy-Free: Substitute melted butter with vegetable oil for a dairy-free version without compromising flavor.
  • Gluten-Free: Use a gluten-free all-purpose flour blend to keep the texture light while catering to dietary needs; just check for a suitable blend!
  • Spicy Kick: Add a pinch of cayenne pepper to the batter for a warm, surprising twist that complements the spices beautifully.
  • Nutty Addition: Fold in chopped walnuts or pecans to the batter for added crunch and depth, enhancing the overall texture while giving your cake a cozy feel.
  • Chocolatey Delight: Swirl in some cocoa powder to create a mocha-flavored pumpkin cake that'll satisfy any chocolate lover.
  • Fruit Fusion: Toss in some finely diced apple or pear for extra sweetness and a touch of moisture that harmonizes perfectly with the pumpkin.
  • Zesty Surprise: Swap orange zest and juice for lemon for a brighter, tangy flavor; this twist will awaken your taste buds with each bite.

If you're looking for more pumpkin-infused delights, you'll adore our Pumpkin Brownies Decadent and the warming flavors of the Pumpkin Cinnamon Roll. Enjoy experimenting with these variations!

Make Ahead Options

These Ghoulishly Good Halloween Pumpkin Cakes are perfect for meal prep enthusiasts looking to save time during the busy Halloween season! You can prepare the unfrosted pumpkin cake up to 3 days in advance. Simply follow all the baking steps, then allow the cake to cool completely before wrapping it tightly in plastic wrap and refrigerating. For the frosting, it can also be made up to 24 hours in advance—just store it in an airtight container in the fridge until you’re ready to frost the cake. When you're set to serve, spread the chilled frosting over the cake, and it will be just as delicious as if you made it fresh that day! This way, you can easily impress your guests with minimal effort!

What to Serve with Ghoulishly Good Halloween Pumpkin Cake

As the warm, spiced aroma of this cake wafts through your home, complement your dessert with delightful pairings that elevate the experience.

  • Whipped Cream: A dollop of freshly whipped cream contrasts perfectly with the moist pumpkin cake, adding a light, fluffy texture.
  • Vanilla Ice Cream: Scoop some creamy vanilla ice cream alongside; its rich, cool flavor melts beautifully on the warm cake, creating an indulgent treat.
  • Spiced Apple Cider: Serve with hot spiced apple cider for a comforting beverage that enhances the cake’s warm notes. This cozy drink captures autumn’s essence perfectly!
  • Chai Tea: A warm cup of chai tea brings cinnamon and cardamom flavors that harmonize nicely with the spiced cake, inviting a moment of relaxation.
  • Chocolate Drizzle: Drizzling warm chocolate sauce over each slice adds a luxurious touch of sweetness, balancing the pumpkin’s earthy tones.
  • Pecan Pie Bars: For a sweet surprise, pair with pecan pie bars to deliver a delightful contrast in flavor and texture; the nutty crunch is marvelous!

Halloween Pumpkin Cake Recipe FAQs

How do I select the perfect pumpkin for this cake?
Absolutely! When choosing a pumpkin, look for one that feels heavy for its size, with a rich, even color and no dark spots or blemishes. A good indicator of ripeness is a hard, smooth skin and a sturdy stem. Smaller sugar pumpkins or butternut squash are your best bets for a sweet and moist cake.

How should I store leftover pumpkin cake?
Very! Once completely cooled, store the frosted pumpkin cake in an airtight container in the fridge for up to three days. It's best enjoyed at room temperature, so consider letting it sit out for 30 minutes before serving for the perfect texture and flavor.

Can I freeze the pumpkin cake?
Of course! To freeze, wrap the unfrosted cake tightly in plastic wrap and then in aluminum foil to prevent freezer burn. It can be stored for up to 2 months. When you're ready to enjoy it, simply thaw it in the refrigerator overnight, then frost before serving.

What if my pumpkin cake turns out too dense?
No worries! Dense cake can be a result of overmixing the batter or not incorporating enough air during the egg-beating step. To achieve a lighter texture, mix the wet and dry ingredients just until combined and whip the eggs until pale and fluffy for added airiness. If you find your cake is still dense, you can try adding an extra tablespoon of baking soda next time for a bit more lift!

Is this pumpkin cake suitable for people with dietary restrictions?
Absolutely! This cake is vegetarian friendly, but if you're concerned about allergies, it contains common allergens such as eggs and dairy. For a dairy-free option, substitute the butter with vegetable oil and use a dairy-free soft cheese for the frosting. Always take care to check the labels on all ingredients for any specific allergens.

Can I use pumpkin puree instead of freshly grated pumpkin?
Definitely! If you have canned pumpkin puree on hand, it works perfectly as a substitute. Use a 1:1 ratio, but ensure it's pure pumpkin without added spices. This handy alternative will save you time while still delivering that beloved pumpkin flavor!

Pumpkin cake

Moist and Spiced Pumpkin Cake That Steals the Show

This moist pumpkin cake is perfect for autumn, featuring warm spices and a delightful texture that makes it a must-try for Halloween celebrations.
Print Recipe Pin Recipe
Prep Time 15 minutes mins
Cook Time 30 minutes mins
Cooling Time 5 minutes mins
Total Time 50 minutes mins
Servings: 12 slices
Course: Dessert
Cuisine: American
Calories: 320
Ingredients Equipment Method Nutrition Notes

Ingredients
  

For the Cake
  • 250 g Self-Raising Flour Ensure it's fresh for best results.
  • 200 g Light Muscovado Sugar Adds a delicious caramel flavor.
  • 2 tsp Mixed Spice Enhances warmth and depth.
  • 1 tsp Bicarbonate of Soda Check that it's not expired.
  • 150 g Sultanas Substitute with raisins if desired.
  • 1 pinch Salt Essential in sweet recipes.
  • 3 Eggs Use room temperature for better mixing.
  • 100 g Butter (Melted) Must be melted for even mixing.
  • 300 g Pumpkin or Butternut Squash (Peeled and Grated) The star ingredient.
For the Frosting
  • 200 g Soft Cheese Creates a creamy texture.
  • 100 g Butter (Softened) Ensure it’s at room temperature.
  • 250 g Icing Sugar No substitutes recommended.

Equipment

  • 30 x 20cm baking dish
  • Mixing Bowl
  • Whisk
  • Spatula
  • palette knife
  • skewer

Method
 

Step-by-Step Instructions
  1. Preheat your oven to 180°C (fan 160°C, gas mark 4). Generously butter a 30 x 20cm baking dish and line with parchment paper.
  2. In a large mixing bowl, combine self-raising flour, light muscovado sugar, mixed spice, bicarbonate of soda, sultanas, and a pinch of salt.
  3. In a separate bowl, beat room-temperature eggs into melted butter. Stir in the fresh orange zest and juice until smooth.
  4. Gently fold the wet mixture into the dry ingredients until just combined. Incorporate grated pumpkin or butternut squash.
  5. Pour the batter into the prepared baking dish and bake for approximately 30 minutes, or until golden and springs back when touched.
  6. Prepare the frosting by beating together soft cheese, softened butter, icing sugar, orange zest, and orange juice until smooth. Chill frosting.
  7. Check the cake by inserting a skewer; it should come out clean. Cool in the tin for 5 minutes, then invert onto a rack.
  8. Once cooled, trim the edges if desired, and spread the chilled frosting generously over the top of the cake.

Nutrition

Serving: 1sliceCalories: 320kcalCarbohydrates: 50gProtein: 4gFat: 12gSaturated Fat: 7gPolyunsaturated Fat: 1gMonounsaturated Fat: 4gCholesterol: 80mgSodium: 150mgPotassium: 200mgFiber: 2gSugar: 30gVitamin A: 3000IUVitamin C: 4mgCalcium: 50mgIron: 2mg

Notes

Serve warm with vanilla ice cream or whipped cream for a delicious treat. Watch the baking time as it can vary based on the pumpkin's moisture.

Tried this recipe?

Let us know how it was!

Chocolate Orange Spider Jellies That Kids Will Love

September 27, 2025 by Grace Snow Leave a Comment

The aroma of fresh orange juice mingling with melted dark chocolate might just take you back to your childhood, right around that magical time of year when spooky treats fill the kitchen. Enter my delightful Chocolate Orange Spider Jellies — a fun, festive dessert perfect for kids' parties or Halloween gatherings! With a zesty twist from tangy oranges and the rich depth of chocolate, these jellies promise to be a crowd-pleaser. They’re not only easy to whip up with minimal ingredients, but they also offer a playful element of creativity with their charming spider-web decorations. So, whether you’re a seasoned home chef or just looking to spice up the dessert table, these jellies are sure to enchant everyone. Curious about how to craft these adorable treats? Let’s dive in!

Why Are Chocolate Orange Spider Jellies Perfect?

Unique Presentation: These jellies aren't just delicious; the creative spider-web design adds a whimsical touch to any kids' party.

Easy to Make: With just a few simple steps, you can create an impressive treat that even novice cooks will master effortlessly.

Flavor Fusion: The combination of zesty orange and rich chocolate creates a delightful taste sensation that’s hard to resist.

Customizable: Feel free to experiment with flavors by swapping the orange juice for lemon or grapefruit for a fun twist, or use white chocolate for a unique look.

Crowd-Pleasing: Perfect for Halloween or any festive gathering, these jellies will have both kids and adults reaching for more!

Chocolate Orange Spider Jellies Ingredients

For the Jelly Base
• Smooth Orange Juice – This provides a fresh and vibrant flavor; opt for fresh juice for the best taste.
• Strips Gelatine – Key for setting the jellies; soak properly to achieve the perfect texture.

For the Chocolate Webs
• Dark Chocolate – Adds a rich depth to the decoration; choose high-quality chocolate for the best results.

These delightful Chocolate Orange Spider Jellies will become a highlight of any Halloween celebration or kids' party!

Step‑by‑Step Instructions for Chocolate Orange Spider Jellies

Step 1: Prepare the Jelly Base
In a medium saucepan, heat 1 liter of smooth orange juice over medium heat until it’s nearly boiling, stirring occasionally. While the juice warms, soak 6 strips of gelatine in cold water for about 5 minutes until spongy, then squeeze out the excess water. Once the juice is hot, remove the pan from heat, stir in the gelatine until fully dissolved, and let the mixture cool slightly before dividing it between 10 serving dishes. Refrigerate for at least 5 hours or overnight to set.

Step 2: Make Chocolate Spider Webs
Line a baking sheet with parchment paper, ready for piping the spider webs. Melt 25g of dark chocolate in the microwave for 1-2 minutes, or over simmering water until smooth and glossy. Transfer the melted chocolate to a small freezer bag and snip a tiny corner to create a piping bag. Carefully pipe 10 spider-web shapes onto the parchment, starting with concentric circles and adding lines radiating outward to create a web effect, then chill in the fridge until firm.

Step 3: Assemble the Jellies
Once the Chocolate Orange Spider Jellies have set, gently peel the hardened chocolate webs off the parchment paper. Place one chocolate web on each jelly just before serving, ensuring they sit snugly atop the jellies. The delightful contrast of the rich chocolate against the smooth, wobbly oranges creates a fun and festive presentation, perfect for capturing the hearts of kids and adults alike.

What to Serve with Chocolate Orange Spider Jellies?

Enhance the spooky magic of your celebration with these enticing pairings that complement the delightful jellies!

  • Gummy Worms: A playful addition that echoes the spooky theme, these chewy treats will thrill kids and add a fun element to your dessert table.

  • Mini Pumpkin Muffins: Their warm spice flavors contrast beautifully with the jellies' bright citrus notes, creating a delightful harmony on your party platter.

  • Whipped Cream: The light, creamy texture serves as a delightful contrast to the smooth jellies; think of a cloud-like topping that kids will love!

  • Chocolate Dipped Fruit: Freshly dipped strawberries or bananas bring a fruity twist that beautifully pairs with both chocolate and orange flavors.

  • Spooky Punch: A vibrant orange drink with floating gummy eyeballs or spider ice cubes will not only look festive but also complement the jellies wonderfully.

  • Caramel Popcorn: The delightful crunch and sweet-salty flavor of caramel popcorn make for a fantastic snacking option alongside the smooth jellies.

  • Rice Krispie Treats: Shape them into spooky ghosts or pumpkins to add a whimsical touch; their crisp texture balances the jellies perfectly.

  • Spiced Apple Cider: Warm and comforting, this beverage rounds out the dessert experience, bringing warmth and autumn flavors to your Halloween gathering.

  • Halloween-themed Cookies: Cut-out cookies in festive shapes add charm and a touch of sweetness, offering varied textures and tastes to delight guests.

These pairings will enhance the experience of enjoying Chocolate Orange Spider Jellies and create a memorable celebration that captures the whimsy of Halloween.

Make Ahead Options

These Chocolate Orange Spider Jellies are perfect for meal prep, allowing you to create an enchanting dessert that saves you time on busy party days! You can prepare the jelly base up to 3 days in advance; simply make the jelly, pour it into serving dishes, and refrigerate until set. The chocolate spider webs can also be made ahead and stored in an airtight container in the fridge for up to 5 days. When you're ready to serve, just place one web atop each jelly for an eye-catching finish. This method ensures that the jellies remain just as delicious while allowing you to focus on enjoying your gathering!

Tips for the Best Chocolate Orange Spider Jellies

  • Gelatine Mastery: Ensure the gelatine is completely dissolved in the warm orange juice to avoid any lumpy texture in your jellies.

  • Creative Piping: Be gentle when piping the chocolate webs; too thick a layer can break when removing them. A light hand yields better results.

  • Chill Time: Allow your jellies to set overnight in the fridge for the best texture. Rushing this step may impact the final wobbly delight.

  • Juice Choice: Using fresh smooth orange juice enhances the flavor. Avoid store-bought concentrates for a richer taste in your Chocolate Orange Spider Jellies.

  • Decorate Just Before Serving: Apply the chocolate webs right before serving to maintain their crispness and charm, ensuring they look fresh and appealing.

Chocolate Orange Spider Jellies Variations

Feel free to unleash your creativity with these delightful Chocolate Orange Spider Jellies, because customizing them can elevate the flavors and make them uniquely yours!

  • Citrus Swap: Replace orange juice with lemon or grapefruit juice for a tangy twist that adds a refreshing zing.

  • White Chocolate Webs: Use white chocolate instead of dark for a milder flavor and striking contrast against the orange jellies.

  • Add a Spice Kick: Sprinkle a pinch of cinnamon or cayenne pepper in the jelly mixture for an unexpected warm flavor that dances on the palate.

  • Fruit Pieces: Fold in small pieces of fresh fruit like mandarin slices or berries for added texture and a burst of flavor throughout.

  • Gummy Monsters: Top each jelly with gummy insects or spiders for an extra festive touch that kids will love.

  • Vegan Version: Swap gelatine for agar-agar to create a plant-based version that's just as delightful.

  • Chocolate Drizzle: Drizzle extra melted chocolate over the jellies for an added layer of richness — an indulgent treat paired with the bright citrus.

  • Fun Shapes: Use fun-shaped molds instead of cups to make unique jelly shapes that will charm party guests just as much as taste good.

Add these wrinkles of creativity to your jellies, and perhaps try pairing them with a hot drink like Homemade Hot Chocolate for a cozy treat during those cool autumn nights!

How to Store and Freeze Chocolate Orange Spider Jellies

Fridge: Keep your Chocolate Orange Spider Jellies covered in the refrigerator for up to 2 days. This will maintain their wobbly texture and vibrant flavor.

Freezer: For longer storage, you can freeze the jellies for up to 1 month. However, it’s best to freeze them without the chocolate webs to prevent texture changes.

Reheating: If enjoyed straight from the fridge, simply remove the jellies from the fridge and let them sit for a few minutes to soften slightly before serving. Avoid reheating, as that can ruin their delightful wobbly texture.

Assemble Before Serving: Always add the chocolate spider webs just before serving for maximum freshness and crunch; this way, they’ll look and taste their best!

Chocolate Orange Spider Jellies Recipe FAQs

What type of orange juice should I use for the jellies?
I recommend using fresh smooth orange juice to achieve the best flavor and vibrant color in your Chocolate Orange Spider Jellies. Avoid store-bought concentrates, as they can lack the freshness and zest that make your jellies truly delightful.

How long can I store leftover Chocolate Orange Spider Jellies?
You can store your jellies in the refrigerator for up to 2 days. Make sure they're covered to maintain their moisture and wobbly texture. If they start to lose firmness, try serving them chilled as a refreshing dessert!

Can I freeze Chocolate Orange Spider Jellies?
Absolutely! You can freeze the jellies for up to 1 month. Just remember to freeze them without the chocolate webs, as they don't freeze well. To do so, wrap each jelly in cling film and place them in an airtight container before popping them in the freezer.

What should I do if my jellies aren't setting properly?
If your jellies aren't setting as expected, it’s likely due to not fully dissolving the gelatine. Ensure you soak the gelatine strips long enough and stir them into the warm orange juice until completely dissolved. If they still don’t set, you might need to reheat the mixture gently and stir in a bit more gelatine—be sure to re-chill it afterward!

Are these jellies safe for kids with allergies?
While the Chocolate Orange Spider Jellies are generally safe, always check for any potential allergies with the ingredients you use. The main components are orange juice (which can be citrus-sensitive), gelatine (check for animal sources), and dark chocolate (often contains dairy). For a vegan option, try using agar-agar instead of gelatine and check for dairy-free chocolate.

How do I maintain the crunch of the chocolate webs?
To ensure your chocolate spider webs stay crunchy, it's best to add them to the jellies just before serving. This way, they won’t absorb moisture from the jelly and will maintain their delightful texture that contrasts beautifully with the smooth jellies!

Chocolate orange spider jellies

Chocolate Orange Spider Jellies That Kids Will Love

Delightful Chocolate Orange Spider Jellies with a zesty twist, perfect for kids' parties or Halloween gatherings.
Print Recipe Pin Recipe
Prep Time 20 minutes mins
Cook Time 5 minutes mins
Chilling Time 5 hours hrs
Total Time 5 hours hrs 25 minutes mins
Servings: 10 jellies
Course: Dessert
Cuisine: American
Calories: 120
Ingredients Equipment Method Nutrition Notes

Ingredients
  

For the Jelly Base
  • 1 liter Smooth Orange Juice Opt for fresh juice for the best taste.
  • 6 strips Gelatine Soak prior to use for the perfect texture.
For the Chocolate Webs
  • 25 g Dark Chocolate Choose high-quality chocolate for best results.

Equipment

  • Medium saucepan
  • Parchment Paper
  • Microwave or double boiler
  • Freezer bag

Method
 

Step-by-Step Instructions
  1. In a medium saucepan, heat 1 liter of smooth orange juice over medium heat until it’s nearly boiling, stirring occasionally. Soak 6 strips of gelatine in cold water for about 5 minutes until spongy, then squeeze out the excess water. Once the juice is hot, remove from heat, stir in the gelatine until fully dissolved, cool slightly, then divide between 10 serving dishes. Refrigerate for at least 5 hours or overnight to set.
  2. Line a baking sheet with parchment paper. Melt 25g of dark chocolate in the microwave for 1-2 minutes or over simmering water until smooth. Transfer melted chocolate to a small freezer bag and snip a corner to create a piping bag. Pipe 10 spider-web shapes onto the parchment, chill in the fridge until firm.
  3. Once the jellies are set, gently peel the hardened chocolate webs off the parchment. Place one web on each jelly just before serving.

Nutrition

Serving: 1jellyCalories: 120kcalCarbohydrates: 25gProtein: 2gFat: 3gSaturated Fat: 1gSodium: 10mgPotassium: 90mgFiber: 1gSugar: 20gVitamin C: 50mgCalcium: 2mgIron: 3mg

Notes

Ensure the gelatine is completely dissolved to avoid lumpy texture. Use fresh juice for the best flavor. Decorate just before serving for maximum freshness.

Tried this recipe?

Let us know how it was!

Spooky Spider Cakes: Fun Treats to Thrill Kids This Halloween

September 27, 2025 by Grace Snow Leave a Comment

As the aroma of baking chocolate wafts through the kitchen, I can’t help but feel the excitement building for Halloween. These Spooky Spider Cakes are not only a delightful treat but also the perfect way to engage little hands in some creative baking fun! Rich and moist, these cupcakes are a hit at any Halloween party, bringing together the joy of cooking with a touch of frightful charm. Whether you’re looking for a festive dessert or a unique activity to share with the kids, these spooky delights promise to be a memorable addition to your celebrations. Ready to transform your kitchen into a mini haunted bakery? Let’s jump into the fun!

Why are Spooky Spider Cakes so special?

Kid-Friendly Fun: Bringing the whole family together to create these whimsical treats sparks joy and laughter.

Rich Chocolate Delight: Each bite delivers a moist, fluffy texture paired with a decadent chocolate flavor that kids and adults will love.

Creative Decorating: Fun spider toppings allow kids to unleash their imagination, making this not just baking but also a delightful art project.

Perfect Halloween Treat: These cupcakes are the ideal addition to Halloween parties, guaranteed to impress guests of all ages.

Make Ahead: Prepare these cakes in advance to save time on the big day, ensuring they are fresh and ready to serve—just like Ricotta Protein Pancakes for a speedy breakfast!

Engaging Activity: Perfect for teaching kids basic cooking skills and sparking a lifelong love for baking, just like with Crab Cakes Forget.

Spooky Spider Cakes Ingredients

Get ready for a fun baking adventure with these delightful treats!

For the Batter
• Butter – Provides moisture and richness; use margarine for a dairy-free option.
• Golden Caster Sugar – Adds sweetness and promotes a light texture; can substitute with regular sugar for a coarser texture.
• Self-Raising Flour – Forms the cake structure and helps it rise; all-purpose flour with extra baking powder can be a substitute.
• Eggs – Bind ingredients and contribute to the cake structure; for a vegan option, replace with flax eggs (1 tbsp ground flaxseed mixed with 3 tbsp water per egg).
• Baking Powder – Helps the cakes rise; omit if using self-raising flour, but ensure freshness for optimal results.
• Vanilla Extract – Enhances flavor depth; pure vanilla is best, though imitation will do in a pinch.
• Chocolate Chips or Chopped Chocolate – Adds a rich chocolate flavor; feel free to swap in dark or white chocolate.

For the Decoration
• Liquorice Catherine Wheels – Used for spider legs; substitute with black candy string or gummy worms if needed.
• Nutella or Chocolate Spread – Acts as the spider body and gives a glossy finish; try other chocolate spreads based on preference.
• Liquorice Allsorts – For spider eyes and mouth; choose any colorful candy that stands out for decoration.
• Black Writing Icing – For the spider detailing; any edible gel or icing can be a fun replacement.
• Red Bootlace Candy – Creates the spider's mouth; swap with red licorice or similar candy if desired.

Enjoy assembling your Spooky Spider Cakes with your little ones and make joyful memories in the kitchen!

Step‑by‑Step Instructions for Spooky Spider Cakes

Step 1: Preheat and Prepare
Begin by preheating your oven to 180°C (fan 160°C or gas 4). While the oven warms, line a muffin tin with 12 brown cupcake cases, ensuring they are securely placed for easy filling. This preparation sets a delightful stage for your Spooky Spider Cakes.

Step 2: Combine Dry Ingredients
In a large mixing bowl, use a spatula to combine the butter, golden caster sugar, and self-raising flour until the mixture is crumbly. This step creates a moist base. Make sure to break up any lumps of butter for a smooth texture, setting the foundation for your rich chocolate cupcakes.

Step 3: Incorporate Eggs
Crack the eggs into a separate bowl, ensuring no shell fragments make their way in. Gently add the eggs to the butter mixture and mix until well combined. The eggs will bind the ingredients together, contributing to the fluffy texture of your Spooky Spider Cakes.

Step 4: Add Baking Powder and Vanilla
Stir in the baking powder and pour in the vanilla extract, mixing with an electric hand whisk until the batter is smooth and creamy. This step should take about 2 minutes. The aroma of vanilla will start to fill your kitchen, promising delicious cakes ahead.

Step 5: Fold in Chocolate
Carefully fold in the chocolate chips or chopped chocolate to the mixture using a spatula. This gentle folding method helps maintain the airiness of the batter. You’ll want to evenly distribute the chocolate, which will melt beautifully during baking, enhancing your Spooky Spider Cakes.

Step 6: Fill Cupcake Cases
Spoon the batter evenly into each cupcake case, filling them about 2/3 full to allow for rising. Use an ice cream scoop for neatness if available. Place the muffin tin in the preheated oven and bake for 20-25 minutes, or until a cocktail stick inserted in the center comes out clean.

Step 7: Cool the Cakes
Once baked, remove the muffin tin from the oven and let the cakes cool in the tin for about 10 minutes. After that, transfer the Spooky Spider Cakes onto a wire rack to cool completely. Proper cooling is essential for a sturdy base for decoration.

Step 8: Prepare Spider Legs
Once the cupcakes are cool, take the liquorice wheels and cut them into lengths for spider legs. Insert eight pieces into the side of each cupcake, sticking them into the frosting later. This step adds to the playful spooky theme of your cakes and helps engage children in decorating.

Step 9: Add Spider Bodies
Spread a generous layer of Nutella or chocolate spread on top of each cupcake for the spider’s body, ensuring an even coating that will hold decorations well. This glossy finish contributes to the overall appeal and makes the cake irresistibly delicious.

Step 10: Create Eyes and Mouth
Using the Liquorice Allsorts, cut small pieces to create eyes, and take red bootlace candy to form the spider’s mouth. Attach these pieces onto the cupcakes, giving each spider a distinct personality. This part of making the Spooky Spider Cakes is where the fun really begins.

Step 11: Detail with Icing
Finally, use black writing icing to add details to the spiders, such as cute little legs and expressions. With each line you draw, watch your Spooky Spider Cakes come to life with unique characters! Let the icing set a bit before serving for the best presentation.

Step 12: Store and Enjoy
Store your lovely, decorated Spooky Spider Cakes in a cool, dry place, where they will stay fresh for up to 2 days. Share these delightful treats at your Halloween gathering and enjoy the smiles they bring!

Make Ahead Options

These Spooky Spider Cakes are perfect for meal prep enthusiasts looking to save time during the Halloween rush! You can bake the cupcakes up to 24 hours in advance; simply store them in an airtight container at room temperature to maintain their moisture and fluffiness. The spider decorations can be prepared ahead as well; cut your liquorice and candy pieces 1-2 days prior, storing them in a cool, dry place. When you're ready to serve, just spread the Nutella or chocolate spread on top, assemble your spider legs, eyes, and mouth, and you’ll have delightful, spooky treats that are just as delicious as when they were freshly baked!

Expert Tips for Spooky Spider Cakes

Room Temperature Butter: Ensure your butter is at room temperature for easy mixing and a smoother batter, leading to fluffier cupcakes.

Don’t Overmix: Mix the batter just until combined. Overmixing can cause dense, tough Spooky Spider Cakes—no one wants that!

Check Doneness: Use a cocktail stick to test for doneness. If it comes out clean, your cakes are perfectly baked and ready for decorating.

Even Baking: To prevent uneven baking, rotate the muffin tin halfway through the baking time. Every little tip helps create the perfect spooky treat!

Creative Decoration: Let your kids personalize the spider decorations! This teaches creativity and makes the baking experience more engaging and fun.

How to Store and Freeze Spooky Spider Cakes

Room Temperature: Store the decorated Spooky Spider Cakes in a cool, dry place for up to 2 days to maintain freshness. Make sure they are covered to keep them from drying out.

Fridge: If you want to keep them longer, place the cupcakes in an airtight container in the fridge for up to 5 days. Be mindful that refrigeration may slightly change their texture.

Freezer: You can freeze un-decorated Spooky Spider Cakes for up to 2 months. Wrap them tightly in plastic wrap and then in foil. Thaw overnight in the fridge before decorating.

Reheating: If you prefer warm treats, reheat unfrosted cupcakes in the microwave for about 10-15 seconds. Frost them after warming for a cozy, delightful experience!

Spooky Spider Cakes Variations & Substitutions

Feel free to unleash your creativity by customizing these delightful treats and making them your own!

  • Dairy-Free: Substitute butter with margarine or coconut oil for a dairy-free version without sacrificing flavor.

  • Gluten-Free: Use a gluten-free all-purpose flour blend instead of self-raising flour to cater to gluten sensitivities. Pair this with a touch of baking powder for rise.

  • Colorful Sprinkles: For added festivity, top your Spooky Spider Cakes with colorful sprinkles instead of liquorice, creating a fun craft moment for the kids.

  • Peanut Butter Delight: Swap Nutella for peanut butter—this creamy alternative gives an unexpected twist! The nutty flavor complements chocolate beautifully and adds richness.

  • Mini Chocolate Chips: Opt for mini chocolate chips instead of regular-sized ones. They spread across the batter better, offering chocolatey goodness in every bite.

  • Fruit Topping: For a fruity variation, top the cupcakes with fresh raspberries or strawberries to create spider bodies. This adds a refreshing contrast to the chocolate!

  • Vegan Option: Replace eggs with flax eggs for a vegan-friendly treat. This ensures everyone can enjoy the spooky fun, just like with various candy swaps.

  • Alternative Decor: If liquorice isn't for everyone, consider using licorice-flavored candies, gummy worms, or even edible googly eyes for a whimsical touch. These variations keep things exciting!

Encourage your family to explore these options, making baking a wonderful bonding experience. You'll be amazed at the new flavor ideas and styles that come out of your kitchen!

What to Serve with Spooky Spider Cakes

As you prepare these delightful treats, consider adding a few more goodies to create a Halloween feast that all your little ghouls will love.

  • Classic Hot Chocolate: A rich and creamy beverage that's perfect for pairing with the chocolatey cupcakes, warming hearts and tummies.

  • Ghostly Marshmallow Treats: These fun treats can be made by dipping marshmallows in white chocolate and adding chocolate chips for eyes, creating a fun, spooky snack that complements the theme.

  • Crispy Apple Slices: Lightly dusted with cinnamon, these crisp apple slices add a fresh, crunchy contrast to the moist cupcakes.

  • Spider Web Cheese Dip: Combine cream cheese and sour cream for a savory dip, then swirl some black olive tapenade to create an enticing spider web effect that perfectly ties in with your cupcake theme.

  • Pumpkin Spice Cookies: Soft and spiced, these cookies bring the essence of fall into the mix, offering warmth that pairs beautifully with the chocolatey flavors of the cakes.

  • Fizzy Apple Cider: This bubbly drink adds a festive feeling, making it a fun option to serve alongside the Halloween treats, keeping the spirits high!

Spooky Spider Cakes Recipe FAQs

How do I choose ripe ingredients for my Spooky Spider Cakes?
Absolutely! For the best flavor and texture, ensure your butter is at room temperature—this helps it blend smoothly with sugar. Additionally, use fresh eggs; if you’re substituting for vegan options, make sure your flaxseed is freshly ground for optimal binding in your Spooky Spider Cakes.

What’s the best way to store Spooky Spider Cakes?
The cakes should be stored in a cool, dry place for up to 2 days. Use an airtight container to keep them fresh. If you decide to refrigerate them, they can last up to 5 days, but be aware that chilling may slightly alter their texture.

Can I freeze Spooky Spider Cakes?
Yes! You can freeze un-decorated Spooky Spider Cakes for up to 2 months. Wrap them tightly in plastic wrap and then foil to prevent freezer burn. When you’re ready to enjoy, let them thaw overnight in the fridge. After thawing, decorate them as desired for a fun, spooky treat!

What should I do if my cupcakes come out dense?
If your Spooky Spider Cakes turn out dense, it may be due to overmixing the batter. Mix the ingredients just until combined, and make sure to use room-temperature butter for a smoother blend. Additionally, check that your baking powder is fresh, as this ensures proper rising.

Are Spooky Spider Cakes safe for children with allergies?
Always check for allergies in your ingredients. These cakes contain butter, eggs, and may include traces of nuts from chocolate or spreads. If you need to accommodate those with dietary restrictions, consider using dairy-free margarine and flax eggs, and ensure that all candies and chocolate are allergy-friendly.

Spooky spider cakes

Spooky Spider Cakes: Fun Treats to Thrill Kids This Halloween

These Spooky Spider Cakes are delightful treats that bring joy and creativity to Halloween celebrations.
Print Recipe Pin Recipe
Prep Time 15 minutes mins
Cook Time 25 minutes mins
Cooling Time 10 minutes mins
Total Time 50 minutes mins
Servings: 12 cupcakes
Course: Dessert
Cuisine: American
Calories: 250
Ingredients Equipment Method Nutrition Notes

Ingredients
  

For the Batter
  • 100 g Butter Room temperature
  • 200 g Golden Caster Sugar Can substitute with regular sugar
  • 200 g Self-Raising Flour Or all-purpose flour with baking powder
  • 2 large Eggs Can use flax eggs for vegan option
  • 1 tsp Baking Powder Omit if using self-raising flour
  • 1 tsp Vanilla Extract Pure vanilla is best
  • 100 g Chocolate Chips or Chopped Chocolate Dark or white chocolate can be swapped
For the Decoration
  • 4 Liquorice Catherine Wheels Used for spider legs; substitute with black candy string
  • 200 g Nutella or Chocolate Spread For spider bodies
  • 10 Liquorice Allsorts For eyes and mouth
  • 1 Black Writing Icing For spider detailing
  • 1 Red Bootlace Candy For spider's mouth

Equipment

  • Muffin tin
  • Mixing Bowl
  • Spatula
  • electric hand whisk
  • Ice cream scoop
  • wire rack

Method
 

Baking Instructions
  1. Preheat your oven to 180°C (fan 160°C or gas 4) and line a muffin tin with 12 brown cupcake cases.
  2. Combine the butter, golden caster sugar, and self-raising flour in a large mixing bowl to create a crumbly mixture.
  3. Crack the eggs into a separate bowl and add them to the butter mixture, mixing until well combined.
  4. Stir in baking powder and vanilla extract, mixing until the batter is smooth using an electric whisk.
  5. Fold in the chocolate chips or chopped chocolate gently using a spatula.
  6. Fill each cupcake case about 2/3 full with batter and bake for 20-25 minutes, or until a cocktail stick comes out clean.
  7. Let the cakes cool in the tin for 10 minutes, then transfer to a wire rack to cool completely.
  8. Cut the liquorice wheels into lengths for spider legs and insert into the side of each cupcake.
  9. Spread Nutella or chocolate spread on top of each cupcake for the spider's body.
  10. Use Liquorice Allsorts for eyes and red bootlace candy for the spider's mouth.
  11. Detail with black writing icing for spider legs and expressions.
  12. Store in a cool, dry place for up to 2 days.

Nutrition

Serving: 1cupcakeCalories: 250kcalCarbohydrates: 35gProtein: 3gFat: 12gSaturated Fat: 7gPolyunsaturated Fat: 2gMonounsaturated Fat: 3gCholesterol: 40mgSodium: 150mgPotassium: 120mgFiber: 1gSugar: 18gVitamin A: 400IUCalcium: 20mgIron: 1mg

Notes

These cakes are perfect for engaging kids in creative baking and decorating activities while enjoying a festive Halloween treat.

Tried this recipe?

Let us know how it was!
  • « Previous Page
  • 1
  • …
  • 24
  • 25
  • 26
  • 27
  • 28
  • …
  • 36
  • Next Page »

Welcome!

Hi, I’m Grace, a Sydney-based home cook with a passion for bold flavors and trending ingredients. Whether you’re a busy beginner or a seasoned foodie, you’ll find dishes here that are fresh, fun, and full of flavor.

More about me

Popular Recipes

  • Mushroom Crostini
    Deliciously Easy Mushroom Crostini for Your Next Gathering
  • Mini Phyllo Feta Bites
    Mini Phyllo Feta Bites for Effortless Entertaining
  • Onion Boil
    Savory Onion Boil Recipe: A Flavorful Vegan Delight
  • Sweet Potato Fondant with Smoked Almond Cream & Rosemary Oil
    Savory Sweet Potato Fondant with Smoked Almond Cream Delight

Footer

↑ back to top

About

  • Privacy Policy
  • Disclaimer
  • Terms & Conditions

Newsletter

  • Sign Up! for emails and updates

Contact

  • About me
  • Contact me

Copyright © 2025 TastyTrendIngredients