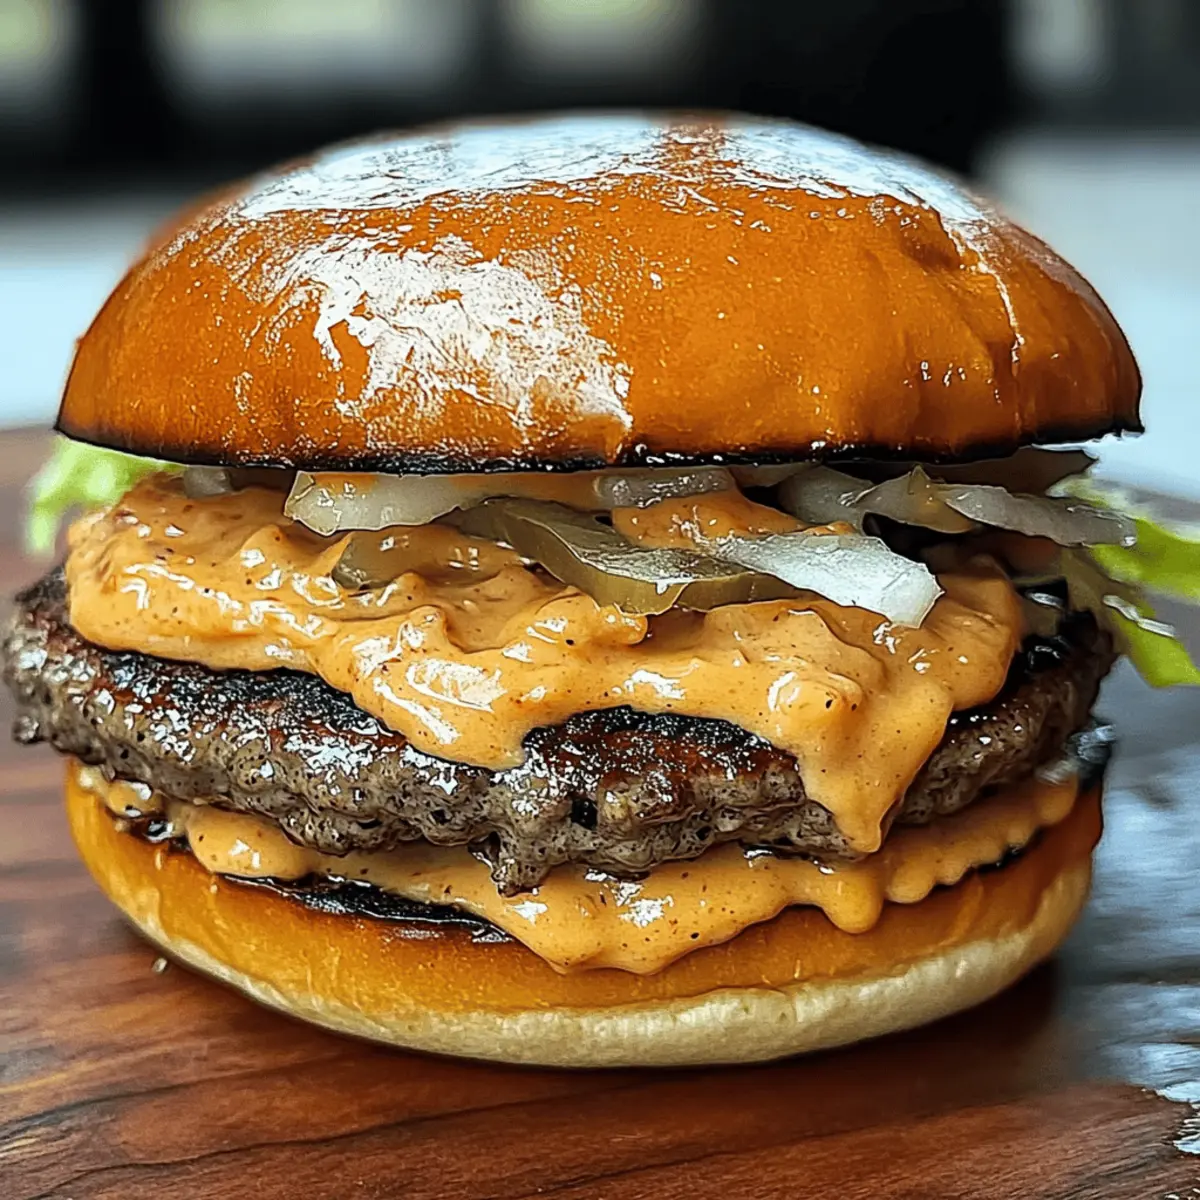
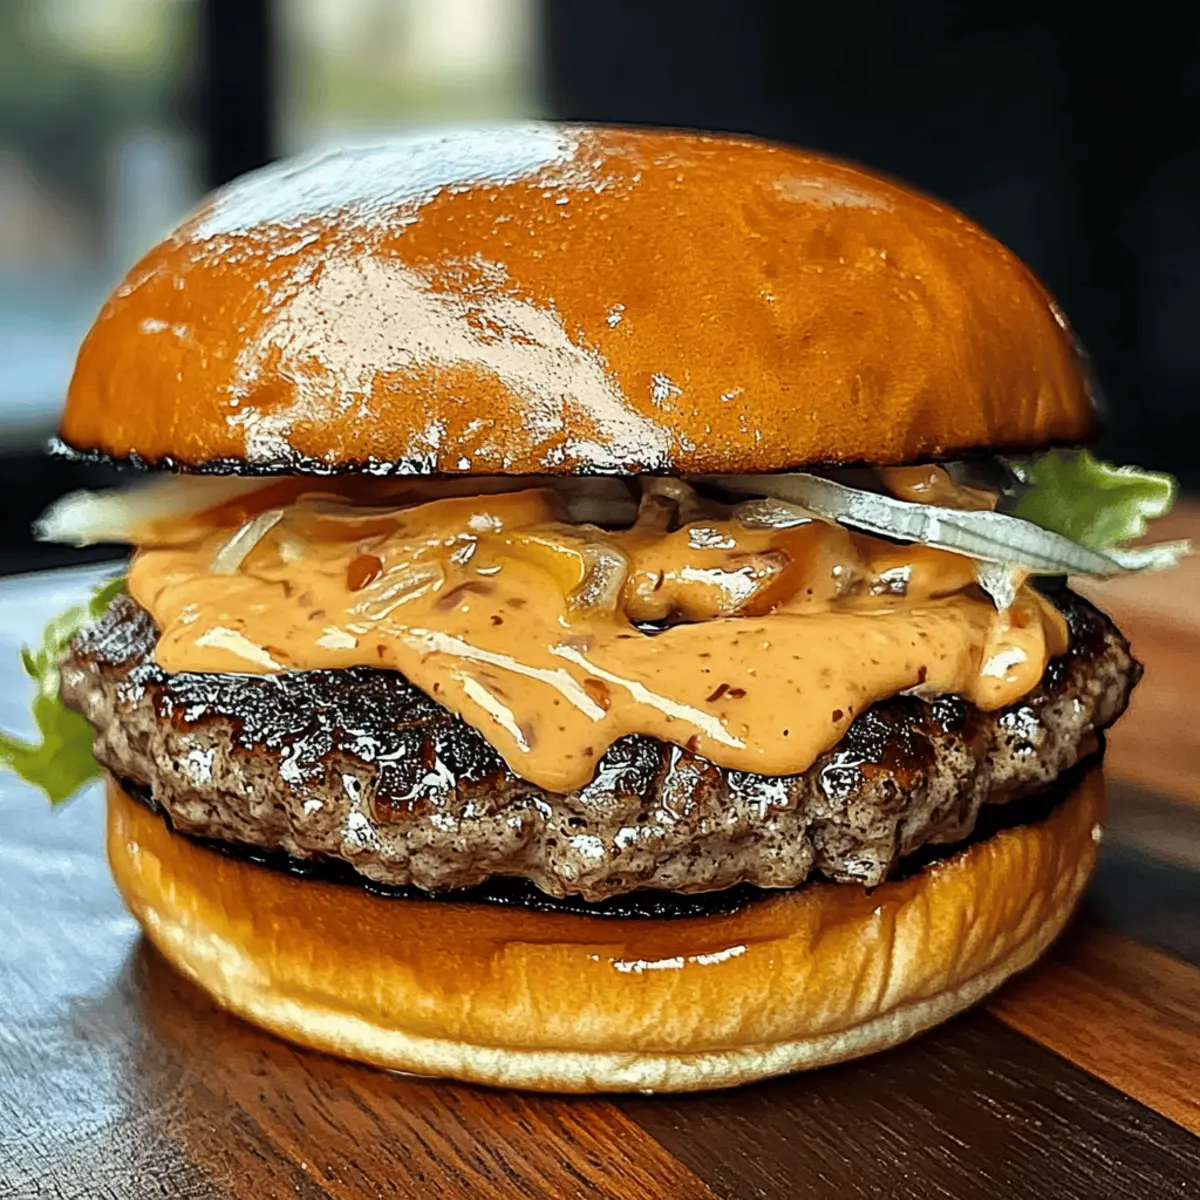
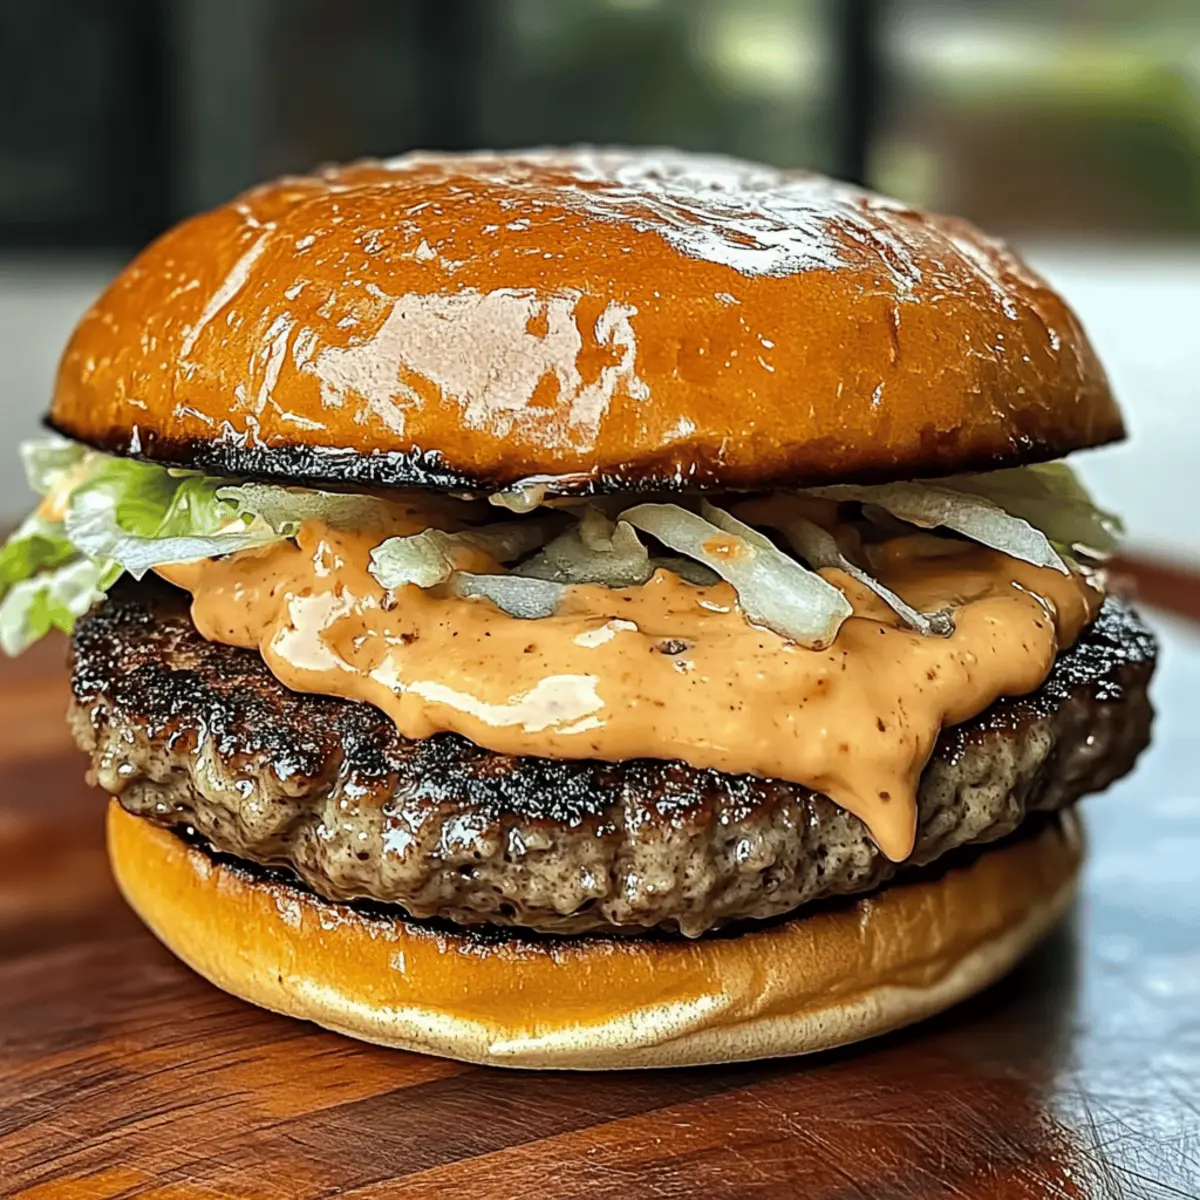
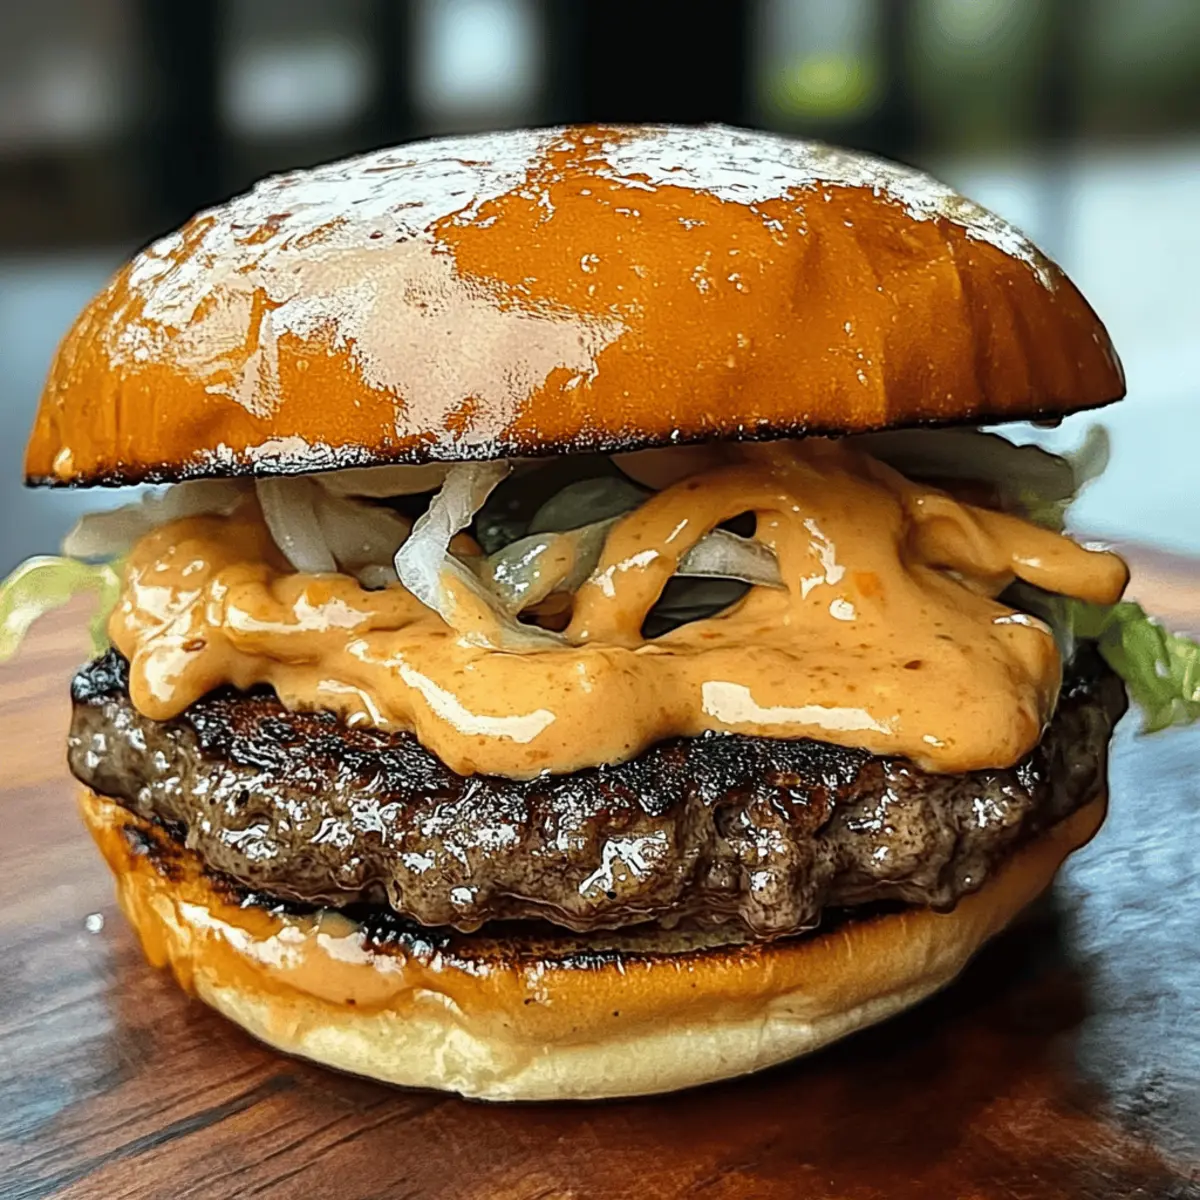
tastytrendingredients

  • Home
  • Recipes
    • Appetizers
    • Breakfast
    • Dessert
    • Dinner
    • Drinks
    • Salads
    • Snacks
    • Soups
  • About me
  • Contact me
menu icon
go to homepage
  • Home
  • Recipes
    • Appetizers
    • Breakfast
    • Dessert
    • Dinner
    • Drinks
    • Salads
    • Snacks
    • Soups
  • About me
  • Contact me
search icon
Homepage link
  • Home
  • Recipes
    • Appetizers
    • Breakfast
    • Dessert
    • Dinner
    • Drinks
    • Salads
    • Snacks
    • Soups
  • About me
  • Contact me
×

Savory Pumpkin Sage Empanadas for Cozy Fall Snacking

August 28, 2025 by Grace Snow Leave a Comment

As the leaves turn golden and the air fills with the scent of spices, these Pumpkin Sage Empanadas become my go-to comfort food. Wrapped in delicate flaky pastry, the warm blend of pumpkin and caramelized onions, kissed by fragrant sage, invites a cozy autumn hug in every bite. What truly sets this dish apart is the accompanying sweet-spicy maple chili dipping sauce—perfect for those moments when you want to impress your friends at gatherings or enjoy a quiet afternoon snack with a steaming cup of cider. Not only are these empanadas a wonderful way to celebrate autumn flavors, but they're also simple enough for even the busiest home-chefs. Interested in how to make these delightful treats your new favorite? Let's dive into the recipe!

Why are Pumpkin Sage Empanadas irresistible?

Warm, Cozy Flavors: Enjoy the inviting essence of autumn with the perfect blend of pumpkin and sage enveloped in flaky pastry.

Versatile Delight: Whether served as a snack or an appetizer, these empanadas fit into any meal.

Easy Preparation: With refrigerated pie dough and simple ingredients, you can whip these up in no time.

Crowd-Pleasing Appeal: The sweet-spicy maple chili dipping sauce will have everyone coming back for more! Whether you're hosting a gathering or craving a cozy afternoon treat, these are sure to be a hit.

Creative Variations: Swap out pumpkin for sweet potato or butternut squash, and play with spice levels to elevate your experience. For more delicious pumpkin inspiration, check out our Pumpkin Cinnamon Roll Muffins.

Pumpkin Sage Empanadas Ingredients

For the Empanada Filling
• Refrigerated Pie Dough – Perfect for a flaky, buttery base, though you can use thawed frozen empanada discs if you prefer.
• Pumpkin Puree (1½ cups) – This rich ingredient brings moisture and flavor; just ensure you’re using pure pumpkin, not pie filling!
• Onion (1 large, thinly sliced) – When caramelized, it elevates the filling with natural sweetness and a savory depth.
• Olive Oil (1 tbsp) – Ideal for caramelizing onions; feel free to swap it with butter for a richer taste.
• Fresh Sage (1 tbsp, minced; or 1 tsp dried) – Adds earthy notes that beautifully complement the pumpkin; use dried in a pinch if fresh isn’t available.
• Salt & Pepper – Essential for enhancing the flavors; season to your personal taste.
• Egg (1, beaten with 1 tbsp water) – Gives a lovely golden color to the empanadas; replace water with milk for a different sheen.

For the Sweet-Spicy Dipping Sauce
• Pure Maple Syrup (¼ cup) – This authentic sweetener lends a rich flavor that elevates the dipping sauce; always choose real maple for the best taste.
• Chili Paste (1 tbsp; Sriracha, Sambal Oelek, etc.) – Infuses the sauce with heat; adjust the heat level to your liking!
• Apple Cider Vinegar (1 tsp) – Introduces a tangy note to balance the sweetness of the maple, enhancing the overall flavor.

Step‑by‑Step Instructions for Cozy Pumpkin Sage Empanadas

Step 1: Caramelize Onions
Heat 1 tablespoon of olive oil in a skillet over medium-low heat. Add 1 large thinly sliced onion and cook for 15–20 minutes, stirring occasionally, until the onions turn golden and develop a sweet aroma. This caramelization enhances the filling of your Pumpkin Sage Empanadas, adding delicious depth.

Step 2: Make Filling
Once the onions are ready, stir in 1½ cups of pumpkin puree, 1 tablespoon of minced fresh sage, and season with salt and pepper. Cook this mixture for an additional 2–3 minutes to blend the flavors, making sure to keep stirring. Allow the filling to cool completely before using it in your empanadas.

Step 3: Prep Dough
Preheat your oven to 375°F (190°C) to ensure it's hot and ready for baking. While the oven warms up, roll out your refrigerated pie dough on a lightly floured surface to about ⅛-inch thick. Use a round cutter to cut out 4–5 inch circles, which will serve as the base for your Pumpkin Sage Empanadas.

Step 4: Fill & Seal
Take each dough circle and place about 1.5–2 tablespoons of the cooled pumpkin filling off-center. Moisten the edges with a little water, fold the dough over the filling, and seal the edges using a fork, pressing firmly. This step is crucial to ensure the delicious filling doesn't leak out during baking.

Step 5: Egg Wash
Prepare the egg wash by beating 1 egg with 1 tablespoon of water. Brush the tops of each filled empanada with this egg wash to achieve a beautiful golden sheen once baked. Arrange the empanadas on a parchment-lined baking sheet, giving them space to expand during baking.

Step 6: Bake
Slide the baking sheet into your preheated oven and bake the empanadas for 18–22 minutes. Keep an eye on them, rotating the tray halfway through for even baking. The empanadas should be golden brown and flaky when they’re ready, inviting you to savor their warm goodness.

Step 7: Mix Sauce
While your empanadas are baking, prepare the sweet-spicy maple chili dipping sauce. In a bowl, whisk together ¼ cup of pure maple syrup, 1 tablespoon of chili paste, and 1 teaspoon of apple cider vinegar. Taste and adjust the heat according to your preference, blending the flavors until harmonious.

Step 8: Serve
Once the Pumpkin Sage Empanadas are out of the oven and have cooled slightly, serve them warm alongside the dipping sauce. This delightful combination of savory empanadas and sweet-spicy sauce is perfect for gatherings or a cozy snack at home, inviting everyone to indulge.

How to Store and Freeze Pumpkin Sage Empanadas

  • Room Temperature: Enjoy freshly baked Pumpkin Sage Empanadas within 1–2 hours of baking for the best taste; if left out longer, cover them to maintain flakiness.
  • Fridge: Store baked empanadas in an airtight container in the refrigerator for up to 3 days; reheat in the oven for a few minutes at 350°F (175°C) to restore crispness.
  • Freezer: Freeze unbaked empanadas in a single layer on a baking sheet; once frozen solid, transfer to a zip-top bag and store for up to 3 months for a quick treat.
  • Reheating: For frozen empanadas, bake from frozen at 375°F (190°C) for 25-30 minutes until heated through and golden; serve warm with the sweet-spicy maple chili dipping sauce.

Make Ahead Options

These Pumpkin Sage Empanadas are a fantastic choice for meal prep, allowing you to enjoy their cozy flavors with minimal last-minute effort! You can assemble the unbaked empanadas and refrigerate them for up to 4 hours before baking, preserving their flaky texture and filling quality. To do this, make sure you allow the filling to cool completely before sealing the empanadas to prevent a soggy pastry. When you're ready to bake, simply preheat your oven and follow the final steps of brushing them with egg wash and baking them for 18–22 minutes. With this make-ahead strategy, you'll have delicious, homemade Pumpkin Sage Empanadas ready in no time!

Expert Tips for Pumpkin Sage Empanadas

  • Cool Filling: Allow the filling to cool completely before sealing the empanadas. This prevents the pastry from becoming soggy and maintains a perfectly flaky texture.

  • Don’t Overfill: Be cautious not to overstuff your empanadas, as this could cause them to leak during baking. A little filling goes a long way!

  • Sealing Techniques: Use a fork to crimp the edges securely. This not only prevents filling from escaping but also adds a touch of charm to your Pumpkin Sage Empanadas.

  • Egg Wash Alternatives: If you don’t have eggs, brush the tops with milk to achieve a lovely golden glaze. This works perfectly while keeping the recipe simple.

  • Make Ahead: Assemble your unbaked empanadas and refrigerate them for up to four hours before baking. This is a great time-saver for busy days or unexpected guests!

  • Customization: Experiment with spices or substitute pumpkin with sweet potato or butternut squash. Adapt the recipe to your liking!

What to Serve with Cozy Pumpkin Sage Empanadas

As you savor the flaky goodness of these delightful empanadas, consider enriching your meal with these perfect pairings.

  • Crisp Green Salad: A refreshing mix of greens, tossed with a light vinaigrette, enhances the flavors and adds crunch.
  • Roasted Brussels Sprouts: Their nutty flavor and caramelized edges complement the sweetness of the filling beautifully. An autumn-inspired side dish that pairs wonderfully with the empanadas!
  • Butternut Squash Soup: The warm, velvety texture of soup contrasts nicely with the flaky pastry, creating a comforting meal during the chillier months.
  • Apple Cider: A glass of spiced apple cider warms you from the inside out and ties together the autumnal theme perfectly.
  • Sweet Potato Wedges: Oven-roasted wedges provide an additional comforting element, and their sweetness brings a delightful harmony to the meal. Toss with a sprinkle of cinnamon for added warmth.
  • Pumpkin Spice Latte: For a cozy drink option, serve alongside this seasonal favorite to elevate the comforting experience of fall flavors.
  • Cheese Platter: A selection of soft cheeses can balance the savory notes of your empanadas with creamy richness, making it an indulgent appetizer or complement.
  • Mini Pumpkin Pies: For dessert, these sweet bites resonate with the same flavors as the empanadas, rounding off your meal with nostalgic fall sweetness.
  • Spicy Hot Chocolate: The sweetness and warmth of this drink can enrich the overall experience, contrasting with the savory elements in a delightful way.

Variations & Substitutions for Pumpkin Sage Empanadas

Feel free to get creative with these Pumpkin Sage Empanadas and make them your own with these delightful twists!

  • Sweet Potato: Swap pumpkin for sweet potato to add a rich, sweet flavor that pairs beautifully with sage. This variation is just as comforting and brings a lovely color twist as well.

  • Butternut Squash: For a slightly nuttier flavor, substitute with roasted butternut squash. Either will leave cozy taste buds tingling with seasonal goodness.

  • Dairy-Free: Use coconut oil instead of olive oil and substitute the egg wash with almond milk for a completely dairy-free option. Your empanadas will remain just as flaky, without sacrificing flavor.

  • Spiced Up: Add a pinch of nutmeg or cinnamon to the filling for added warmth and complexity. This twist can elevate your flavor profile and give your guests a delightful surprise with each bite.

  • Herb Variations: Try swapping sage for thyme or rosemary to create different aromatic experiences. Both herbs will add an intriguing flavor twist that complements the pumpkin beautifully.

  • Chili Level: Adjust the heat level of the dipping sauce by using more chili paste or adding a pinch of cayenne. It’s spicy perfection for those who enjoy that extra kick!

  • Add Veggies: Mix in cooked spinach or sautéed mushrooms in the filling for added texture and nutrients, creating a heartier empanada that works as a satisfying meal.

  • Sauce Change-Up: Experiment with the dipping sauce by incorporating other ingredients, such as cilantro or a dash of lime juice, to add a fresh twist for a zesty flavor combo.

Looking for more ways to indulge in pumpkin? Check out our delightful Pumpkin Cinnamon Roll Muffins for another way to celebrate this beloved seasonal ingredient!

Pumpkin Sage Empanadas Recipe FAQs

What type of pumpkin puree should I use?
Absolutely! Make sure to use pure pumpkin puree, not pumpkin pie filling, as the latter contains added sugars and spices that can alter the taste of your empanadas. Look for cans labeled "pure pumpkin" or opt for homemade puree if you're feeling adventurous!

How should I store leftover Pumpkin Sage Empanadas?
To keep your baked empanadas fresh, store them in an airtight container in the refrigerator for up to 3 days. When you're ready to enjoy them again, reheat in the oven at 350°F (175°C) for a few minutes to restore their delightful flakiness.

Can I freeze Empanadas?
Absolutely! To freeze unbaked Pumpkin Sage Empanadas, arrange them in a single layer on a baking sheet and pop them in the freezer until solid. Once frozen, transfer them to a zip-top bag and store them for up to 3 months. This way, you can have a delicious treat ready in no time!

What if my empanadas leak during baking?
Don't worry if that happens! This can usually be prevented by not overfilling your empanadas and ensuring that the edges are sealed well. If leakage does occur, simply clean off the baking sheet to keep your kitchen tidy—you'll still have that yummy filling intact!

Are Pumpkin Sage Empanadas safe for pets?
No, it's best to keep these delicious empanadas away from your furry friends. The seasonings and ingredients such as onion can be harmful to pets, so stick to pet-friendly treats during your cooking adventures!

Can I customize the filling for dietary needs?
Very! You can easily substitute pumpkin with sweet potato or butternut squash for different flavors. If you want to add more warmth, consider mixing in spices like nutmeg or cinnamon to the filling. Just remember to adjust the seasonings to suit your taste!

Pumpkin Sage Empanadas

Savory Pumpkin Sage Empanadas for Cozy Fall Snacking

Delicious Pumpkin Sage Empanadas filled with pumpkin and caramelized onions, perfect for fall snacking.
Print Recipe Pin Recipe
Prep Time 30 minutes mins
Cook Time 22 minutes mins
Cooling Time 20 minutes mins
Total Time 1 hour hr 12 minutes mins
Servings: 6 empanadas
Course: Snacks
Cuisine: American
Calories: 250
Ingredients Equipment Method Nutrition Notes

Ingredients
  

For the Empanada Filling
  • 1 pack Refrigerated Pie Dough or thawed frozen empanada discs
  • 1.5 cups Pumpkin Puree use pure pumpkin, not pie filling
  • 1 large Onion thinly sliced
  • 1 tbsp Olive Oil or butter for a richer taste
  • 1 tbsp Fresh Sage minced; or 1 tsp dried
  • Salt & Pepper to taste
  • 1 large Egg beaten with 1 tbsp water
For the Sweet-Spicy Dipping Sauce
  • 0.25 cups Pure Maple Syrup use real maple for best taste
  • 1 tbsp Chili Paste adjust heat to liking
  • 1 tsp Apple Cider Vinegar to balance the sweetness

Equipment

  • Skillet
  • Baking Sheet
  • round cutter
  • Mixing Bowl

Method
 

Step-by-Step Instructions
  1. Heat olive oil in a skillet over medium-low heat. Add the sliced onion and cook for 15–20 minutes until golden and sweet.
  2. Stir in pumpkin puree, minced sage, salt, and pepper. Cook for 2-3 minutes, then let cool.
  3. Preheat oven to 375°F (190°C). Roll out pie dough to ⅛-inch thick and cut out 4–5 inch circles.
  4. Place 1.5–2 tbsp of cooled filling on each circle. Moisten edges, fold, and seal with a fork.
  5. Beat egg with water and brush the tops of the empanadas for a golden sheen.
  6. Bake for 18–22 minutes until golden and flaky, rotating halfway through.
  7. Whisk together maple syrup, chili paste, and vinegar for the dipping sauce.
  8. Serve warm with the dipping sauce.

Nutrition

Serving: 1empanadaCalories: 250kcalCarbohydrates: 30gProtein: 4gFat: 12gSaturated Fat: 2gPolyunsaturated Fat: 1gMonounsaturated Fat: 8gCholesterol: 30mgSodium: 200mgPotassium: 150mgFiber: 2gSugar: 4gVitamin A: 100IUVitamin C: 5mgCalcium: 2mgIron: 4mg

Notes

Allow filling to cool before sealing the empanadas. Avoid overfilling to prevent leaks during baking.

Tried this recipe?

Let us know how it was!

Delicious Chicken and Rice with Zante Currants in One Pot

August 27, 2025 by Grace Snow Leave a Comment

Navigating the weeknight dinner dilemma can often feel like an uphill battle—especially when you’re tired of takeout and craving something homemade. That’s where my One-Pot Chicken and Rice with Zante Currants comes to the rescue! Packed with tender, juicy chicken and enriched with the sweet bites of Zante currants, this dish transforms simple ingredients into a comforting masterpiece. Not only is it a tremendous time-saver, allowing you to whip up a flavorful meal with minimal effort, but it’s also highly adaptable to whatever you have lurking in your pantry. Imagine enjoying a nourishing dinner that’s both satisfying and customizable; isn’t that what we all seek? Let me show you how to create this delightful dish that’s sure to impress everyone around your table!

Why is This Recipe a Must-Try?

Simplicity: This dish is a breeze to prepare, making it perfect for busy weeknights.

Flavor Explosion: The combination of tender chicken, sweet Zante currants, and fragrant jasmine rice creates a melody of flavors that will delight your taste buds.

Versatile: With ingredient swaps like sweet potato or different spices, you can easily tailor it to your taste or pantry options.

One-Pot Wonder: No one loves doing dishes, right? Enjoy the ease of cooking everything in one pot, saving time and cleanup hassle.

Crowd Pleaser: Whether it’s a family dinner or a gathering with friends, this dish is sure to impress. Pair it with a simple green salad or even try it alongside Chicken Dumplings Cozy for a delightful meal experience!

Give your weeknight dinners a delicious upgrade with this delightful dish!

Chicken and Rice with Zante Currants Ingredients

For the Chicken

  • Bone-in, skin-on chicken thighs – Provides richness and flavor; substitute with skinless thighs for a lighter option.

For the Rice

  • Jasmine rice – Gives a fragrant, fluffy texture; basmati or long-grain white rice works well as alternatives.
  • Sweet potato – Adds natural sweetness and nutrition; can be swapped with butternut squash or pumpkin.

For the Vegetables

  • Yellow onion – Adds depth and sweetness; shallots can be used for a milder flavor.
  • Rib celery – Offers crunch and flavor; omit or substitute with bell pepper if unavailable.
  • Scallions – Provides a fresh onion flavor; green onions or chives are good replacements.
  • Garlic – Enhances aroma; fresh garlic is preferred, but garlic powder can substitute (use 1/4 teaspoon).

For the Seasoning

  • Sweet paprika – Provides color and mild flavor; swap with smoked paprika for more depth.
  • Smoked paprika – Adds a smoky flavor; optional if unavailable, replace with more sweet paprika.
  • Crushed red pepper – Adds heat to taste; you can omit this for a milder dish.
  • Thyme sprigs (or dry thyme) – Adds herbal notes; use 1 teaspoon of dried thyme in place of fresh sprigs.
  • Salt and pepper – Essential for seasoning.

For the Cooking Liquid

  • Chicken broth or water – Provides moisture for cooking; vegetable broth is a perfect vegetarian option.

For the Sweetness

  • Dry Zante currants – Offers sweetness and chewiness; raisins or dried cranberries can be used as substitutes.

For the Finish

  • Lemon – Brightens flavors; substitute with lime for a twist.
  • Extra virgin olive oil – Used for sautéing; avocado oil is a suitable alternative.

Keep these ingredients on hand and you'll be well on your way to creating a scrumptious Chicken and Rice with Zante Currants!

Step‑by‑Step Instructions for One-Pot Chicken and Rice with Zante Currants

Step 1: Brown Chicken
Preheat your oven to 400°F (200°C). Pat the bone-in, skin-on chicken thighs dry, then season generously with salt and pepper. In a large oven-safe pot, heat 2 tablespoons of extra virgin olive oil over medium-high heat. Place the chicken skin-side down and brown for 5-7 minutes until golden and crispy. Flip the chicken and cook for an additional 2 minutes. Transfer the browned chicken to a plate.

Step 2: Sauté Aromatics
In the same pot, maintain the heat and add the chopped yellow onion, white parts of scallions, and diced celery. Sauté for about 4-5 minutes, stirring occasionally, until the vegetables soften and the onion becomes translucent. Add minced garlic and continue to sauté for another minute until fragrant, allowing the aroma to fill your kitchen.

Step 3: Toast Rice
Stir in 1 cup of jasmine rice, ensuring it gets coated in the savory mixture. Next, mix in the grated sweet potato, sweet paprika, smoked paprika, and dry Zante currants. Cook this mixture for 2-3 minutes, allowing the rice to toast slightly and absorb some of the flavors from the aromatics before moving on to the next step.

Step 4: Bake Chicken
Pour in 3 cups of chicken broth, stirring gently to combine all ingredients. Return the browned chicken to the pot, ensuring it’s nestled in the rice. Bring the mixture to a boil, then cover the pot with a lid and transfer it to the preheated oven. Bake for 16-18 minutes until the rice is tender and the chicken is cooked through, reaching an internal temperature of 165°F (74°C).

Step 5: Broil (optional)
For an irresistible crispy skin finish, carefully remove the pot from the oven and drizzle a little extra olive oil over the chicken. Switch your oven to broil and place the pot back in for 2-3 minutes, keeping a close eye on it to achieve that perfect golden crispiness without burning.

Step 6: Serve
Remove the pot from the oven and discard any thyme sprigs. Squeeze fresh lemon juice over the chicken and rice, then gently stir to combine. Serve warm, plating the fluffy rice topped with juicy chicken. Garnish with the green parts of the scallions for a pop of color and flavor. Enjoy your delightful One-Pot Chicken and Rice with Zante Currants!

Chicken and Rice with Zante Currants Variations

Feel free to get creative with this recipe; after all, the kitchen is your canvas!

  • Dairy-Free: Substitute any butter used with olive oil, making it a wholesome choice for those avoiding dairy. Enjoy the richness without any dairy discomfort!
  • Vegetable Boost: Add seasonal vegetables like bell peppers or spinach for extra color and nutrition. These additions will contribute vibrant flavors and texture to the dish.
  • Spicy Kick: Incorporate a teaspoon of cayenne pepper or diced jalapeños for a delightful heat boost. Tantalize your taste buds and add an exciting twist to your classic dish!
  • Quinoa Swap: Replace jasmine rice with quinoa for a protein-packed option that’s gluten-free. Quinoa provides a nutty flavor that is sure to delight your palate.
  • Citrus Twist: Use lime juice instead of lemon for a zesty reimagining. This small switch can brighten the entire dish and add a new layer of flavor.
  • Mediterranean Flair: Mix in olives and feta cheese before serving to give your dish an exciting Mediterranean twist. The briny olives pair perfectly with the sweetness of the currants!
  • Herb Infusion: Experiment with herbs by adding fresh cilantro or parsley instead of thyme, changing the profile into a fresh herb delight. The vivid green garnish not only looks good but tastes wonderful!
  • One-Pot Salmon: Substitute chicken with salmon to create a seafood version that pairs beautifully with the flavors of currants. It’s a refreshing change that brings together quick cooking times and elegant meals.

Dive into these variations as you experiment with your One-Pot Chicken and Rice with Zante Currants, transforming it into a delightful dish that both excites your palate and nourishes your soul!

How to Store and Freeze Chicken and Rice with Zante Currants

Fridge: Store leftovers in an airtight container for up to 3 days. This keeps your chicken and rice moist and flavorful while preventing any odors from seeping in.

Freezer: For longer storage, freeze the dish in a freezer-safe container for up to 2 months. Allow it to cool completely before sealing to avoid ice crystals forming.

Reheating: When ready to enjoy your Chicken and Rice with Zante Currants, reheat gently on the stovetop with a splash of chicken broth or water. This helps to restore moisture and avoid drying out the dish.

Thawing: If frozen, transfer the dish to the fridge the night before you plan to reheat it. This allows for even thawing and maintains the flavors beautifully.

Tips for the Best Chicken and Rice with Zante Currants

  • Marinate for Depth: Marinate the chicken in lemon juice and spices for at least 30 minutes before cooking to enhance its flavor.

  • Perfect Browning: Always ensure the chicken is well-browned before adding other ingredients; this step builds a flavorful base for your dish.

  • Check the Temperature: Use a meat thermometer to ensure the chicken reaches an internal temperature of 165°F for safe and perfect doneness.

  • Customize Ingredients: Feel free to swap in seasonal vegetables or alternate grains, ensuring a balanced diet with your Chicken and Rice with Zante Currants.

  • Avoid Overcrowding: If your pot is small, consider cooking in batches to prevent steaming, which can affect the texture of the dish.

What to Serve with One-Pot Chicken and Rice with Zante Currants

A cozy, aromatic meal like this one-pot wonder is begging for the perfect companions to create a memorable dining experience.

  • Crispy Green Salad: A fresh, crunchy salad with a zesty vinaigrette adds brightness and balances the hearty flavors of the chicken and rice.
  • Garlic Breadsticks: Soft, buttery breadsticks infused with garlic make for a delightful, comforting side that complements the dish's aromatic profile.
  • Steamed Asparagus: Tender asparagus drizzled with olive oil showcases a pop of color and freshness, enhancing your plate's overall appeal.
  • Roasted Vegetables: A medley of seasonal veggies tossed in olive oil and herbs brings depth and enhances the comforting essence of your meal.
  • Savory Cornbread: Sweet, crumbly cornbread pairs beautifully with the savory flavors, offering a slightly sweet contrast that will warm your heart.
  • Chilled White Wine: A light, crisp white wine, such as a Sauvignon Blanc, complements the chicken perfectly while adding a refreshing touch to the meal.
  • Zesty Lemonade: A homemade, citrusy lemonade can brighten your palate and serves as the perfect thirst-quencher alongside your chicken and rice dish.

These delightful accompaniments will truly round out the meal, making it an experience to savor!

Make Ahead Options

These One-Pot Chicken and Rice with Zante Currants are perfect for meal prep enthusiasts! You can season and brown the chicken up to 24 hours in advance. Simply pat the chicken thighs dry, season with salt and pepper, brown them, and store them in an airtight container in the refrigerator. Additionally, chop the aromatics (onion, celery, and scallions) and refrigerate them for up to 3 days to save time later. When you're ready to cook, sauté the prepped aromatics, add the rice and other ingredients, and follow the recipe from there. This approach ensures you can enjoy a flavorful homemade dinner with minimal effort on busy weeknights!

One-Pot Chicken and Rice with Zante Currants Recipe FAQs

What kind of chicken is best for this recipe?
I recommend using bone-in, skin-on chicken thighs for their rich flavor and tender texture. If you prefer a lighter option, skinless chicken thighs will work just fine!

How do I store leftovers?
Store any leftover Chicken and Rice with Zante Currants in an airtight container in the refrigerator for up to 3 days. This ensures the dish remains delicious while preventing any odors from mixing with other foods in your fridge.

Can I freeze this dish?
Absolutely! To freeze, allow the Chicken and Rice with Zante Currants to cool completely before transferring it to a freezer-safe container. It can be stored for up to 2 months. Just make sure you seal it well to avoid freezer burn.

What should I do if my chicken is undercooked?
If your chicken doesn’t reach the recommended internal temperature of 165°F (74°C), return it to the oven. Cover the pot and bake for an additional 5-10 minutes, checking frequently until properly cooked. Don’t forget a meat thermometer for accurate readings!

Can I make this recipe vegetarian?
Absolutely! You can replace the chicken with vegetables or plant-based protein like tofu or chickpeas. Also, swap the chicken broth for vegetable broth to keep it rich and flavorful without meat.

How can I customize this dish based on dietary restrictions?
This recipe is quite flexible! If you have allergies or dietary preferences, you can adjust the ingredients. For gluten-free options, make sure your broth is gluten-free. Additionally, avoid any ingredients you are allergic to and replace them with suitable alternatives such as using zucchini or bell peppers instead of celery.

Remember, cooking is all about what makes you happy, so feel free to get creative while making this One-Pot Chicken and Rice with Zante Currants!

Chicken and Rice with Zante Currants

Delicious Chicken and Rice with Zante Currants in One Pot

A satisfying Chicken and Rice with Zante Currants dish, perfect for weeknight dinners.
Print Recipe Pin Recipe
Prep Time 15 minutes mins
Cook Time 30 minutes mins
Total Time 45 minutes mins
Servings: 4 servings
Course: Dinner
Cuisine: American
Calories: 450
Ingredients Equipment Method Nutrition Notes

Ingredients
  

Chicken and Rice with Zante Currants Ingredients
  • 4 pieces bone-in, skin-on chicken thighs Substitute with skinless thighs for a lighter option
  • 1 cup jasmine rice Basmati or long-grain white rice are good alternatives
  • 1 cup sweet potato, grated Can be swapped with butternut squash or pumpkin
  • 1 medium yellow onion Shallots can be used for a milder flavor
  • 1 rib celery Omit or substitute with bell pepper if unavailable
  • 2 stalks scallions Green onions or chives are good replacements
  • 3 cloves garlic, minced Fresh garlic is preferred, but 1/4 teaspoon garlic powder can substitute
  • 1 teaspoon sweet paprika Swap with smoked paprika for more depth
  • 1 teaspoon smoked paprika Optional if unavailable
  • 1 teaspoon crushed red pepper Add heat to taste or omit for a milder dish
  • 3 sprigs thyme Use 1 teaspoon of dried thyme in place of fresh sprigs
  • 1 teaspoon salt
  • 1 teaspoon black pepper
  • 3 cups chicken broth Vegetable broth is a perfect vegetarian option
  • 1/2 cup dry Zante currants Substitute with raisins or dried cranberries
  • 1 medium lemon, juiced Substitute with lime for a twist
  • 2 tablespoons extra virgin olive oil Avocado oil is a suitable alternative

Equipment

  • large oven-safe pot

Method
 

Step-by-Step Instructions
  1. Preheat your oven to 400°F (200°C). Pat the bone-in, skin-on chicken thighs dry, then season generously with salt and pepper. In a large oven-safe pot, heat 2 tablespoons of extra virgin olive oil over medium-high heat. Place the chicken skin-side down and brown for 5-7 minutes until golden and crispy. Flip the chicken and cook for an additional 2 minutes. Transfer the browned chicken to a plate.
  2. In the same pot, maintain the heat and add the chopped yellow onion, white parts of scallions, and diced celery. Sauté for about 4-5 minutes, stirring occasionally, until the vegetables soften and the onion becomes translucent. Add minced garlic and continue to sauté for another minute until fragrant.
  3. Stir in 1 cup of jasmine rice, ensuring it gets coated in the mixture. Next, mix in the grated sweet potato, sweet paprika, smoked paprika, and dry Zante currants. Cook this mixture for 2-3 minutes.
  4. Pour in 3 cups of chicken broth, stirring gently to combine all ingredients. Return the browned chicken to the pot, ensuring it’s nestled in the rice. Bring to a boil, cover the pot, and bake for 16-18 minutes until the rice is tender and the chicken is cooked through.
  5. For a crispy skin finish, drizzle extra olive oil over the chicken, switch the oven to broil, and cook for 2-3 minutes, watching closely.
  6. Remove from the oven, discard any thyme sprigs, squeeze lemon juice over the chicken and rice, then gently stir. Serve warm, garnished with the green parts of the scallions.

Nutrition

Serving: 1servingCalories: 450kcalCarbohydrates: 40gProtein: 30gFat: 15gSaturated Fat: 4gPolyunsaturated Fat: 2gMonounsaturated Fat: 8gCholesterol: 100mgSodium: 800mgPotassium: 700mgFiber: 3gSugar: 5gVitamin A: 450IUVitamin C: 15mgCalcium: 50mgIron: 2mg

Notes

Marinate chicken for at least 30 minutes in lemon juice and spices for enhanced flavor. Ensure chicken is well-browned for a flavorful base.

Tried this recipe?

Let us know how it was!

Spicy Crab Pasta: A Flavor-Packed Weeknight Delight

August 27, 2025 by Grace Snow Leave a Comment

A sizzling pan filled with fragrant garlic and sun-dried tomatoes sets the stage for a culinary adventure. As the aroma wafts through my kitchen, I can’t help but feel excited about sharing this Spicy Crab Pasta recipe with you. It’s not just a quick dinner solution; it’s a special occasion waiting to happen—packed with sweetness from the jumbo lump crab meat and a tantalizing kick from crushed red pepper. You'll love the rich tomato sauce, enhanced by savory anchovies and just a splash of white wine, perfect for impressing guests or enjoying a cozy night in. In just a handful of steps, you’ll create a dish that captures the essence of elegant home cooking. So, are you ready to dive into this seafood delight? Let’s begin!

Why is Spicy Crab Pasta unforgettable?

Flavor Explosion: The combination of rich, savory crab meat and spicy crushed red pepper creates a truly memorable dish that tantalizes your taste buds.

Quick and Easy: This recipe is perfect for a weeknight dinner, allowing you to whip up gourmet flavors in just 30 minutes!

Versatile Ingredients: Feel free to swap in shrimp or clams for a different take on this crowd-pleaser, or even try it with a fantastic twist like Seafood Pasta Savory.

Elegant Presentation: Serve it garnished with fresh basil and Parmesan for a restaurant-quality look that will impress any dinner guest.

Nutrient-Packed: With its balance of flavors and textures, it’s a nourishing choice that doesn’t skimp on taste! Enjoy this delicious dish alongside a crisp salad and crusty bread for a complete meal.

Spicy Crab Pasta Ingredients

For the Sauce
• Extra Virgin Olive Oil – Adds healthy fat and richness for sautéing; feel free to substitute with avocado oil for a neutral flavor.
• Shallot – Provides aromatic sweetness; onion can be used if shallots aren't available.
• Sun-Dried Tomatoes – Contributes concentrated flavor and texture; fresh tomatoes can be used, but will alter the sauce's richness.
• Oil from Sun-Dried Tomatoes – Enhances the sauce flavor; olive oil is okay as a last resort.
• Anchovies – Delivers umami depth; can be omitted if avoiding fish, but the flavors will be less rich.
• Garlic – Adds aromatic flavor; always use fresh for the best taste.
• Crushed Red Pepper – Offers heat; adjust according to your preferred spice level.
• Tomato Paste – Intensifies tomato flavor in the sauce; optional for a thicker consistency.
• White Wine or Water – Used for deglazing and building sauce flavor; choose water for a non-alcoholic version.
• Diced Tomatoes (canned) – Forms the base for the sauce; fire-roasted varieties can add extra smokiness.

For the Pasta
• Short Pasta (like rigatoni) – Creates a hearty texture that holds the sauce well; any pasta can be used, but shorter shapes are recommended.
• Jumbo Lump Crab Meat – Provides a sweet seafood flavor and texture; shrimp or mussels can replace crab if desired.

For the Finish
• Parmesan Cheese – Adds saltiness and nuttiness; can substitute with Pecorino Romano for a sharper taste.
• Basil – Freshness and aroma that beautifully complements the dish; flat-leaf parsley is a great alternative.
• Lemon Juice – Balances flavors with acidity; fresh lemon is best for maximum flavor.
• Salt, Pepper, and Sugar – Adjust to taste for perfectly balanced flavors.

Get ready to prepare a delightful Spicy Crab Pasta that will tantalize your taste buds!

Step‑by‑Step Instructions for Spicy Crab Pasta

Step 1: Prepare the Sauce
In a wide pot, heat 2 tablespoons of extra virgin olive oil over medium heat. Add chopped shallots and sauté for 3-4 minutes until they become translucent, then stir in sliced sun-dried tomatoes and anchovies. Cook until the anchovies mash into the mixture, followed by minced garlic and crushed red pepper for about 30 seconds, or until fragrant. Incorporate 1 tablespoon of tomato paste, cooking for an additional 1-2 minutes to deepen the flavors of your Spicy Crab Pasta.

Step 2: Simmer the Sauce
Pour in ½ cup of white wine, scraping up any browned bits from the bottom of the pot. Bring the mixture to a gentle boil, then mix in one can of diced tomatoes (drained). Season generously with salt and pepper, and let the sauce simmer uncovered for 30 minutes, stirring occasionally, until it thickens and the flavors meld beautifully. This step ensures a robust flavor base for the Spicy Crab Pasta.

Step 3: Cook the Pasta
While the sauce simmers, bring a large pot of salted water to a rolling boil. Add 8 ounces of short pasta, like rigatoni, and cook according to the package instructions until al dente, usually about 8-10 minutes. Before draining, reserve ½ cup of the pasta cooking water in case you need to adjust the sauce’s consistency. Drain the pasta in a colander, ensuring it retains some of its starchy goodness.

Step 4: Finish the Sauce
Gently fold in 8 ounces of jumbo lump crab meat into the simmering sauce, taking care not to break it apart too much. Add in ¼ cup of grated Parmesan cheese, freshly chopped basil, and the juice of half a lemon. Stir everything together gently, allowing it to simmer for an additional 5-6 minutes, just until the crab is warmed through and the cheese melts beautifully into the sauce.

Step 5: Combine and Serve
Toss the cooked pasta into the sauce, incorporating it well to coat every piece with the rich flavors of the Spicy Crab Pasta. If the sauce seems too thick, add some of the reserved pasta cooking water a little at a time until you achieve your desired consistency. Serve hot, garnished with fresh basil and additional Parmesan cheese for an elegant touch that makes this dish both inviting and delicious.

Make Ahead Options

These Spicy Crab Pasta dishes are perfect for meal prep enthusiasts! You can prepare the sauce up to 3 days in advance by following the first two steps—sautéing the aromatics and simmering with tomatoes and white wine. Allow the sauce to cool before refrigerating it in an airtight container to ensure it retains its rich flavors. When you're ready to enjoy your meal, simply reheat the sauce on the stovetop while cooking fresh pasta according to package instructions. Gently fold in the crab meat and remaining ingredients right before serving for a dish that's just as delicious as when made fresh, all while saving you precious time on busy weeknights!

How to Store and Freeze Spicy Crab Pasta

Fridge: Store any leftover Spicy Crab Pasta in an airtight container for up to 3 days. Reheat gently on the stove with a splash of water or broth to revive its creamy texture.

Freezer: For longer storage, freeze the sauce (not pasta) in a sealed container for up to 3 months. Thaw overnight in the fridge, then reheat before serving with freshly cooked pasta.

Reheating: When reheating, add a little extra olive oil or water to help bring back the original consistency, and heat slowly over medium-low to prevent sticking.

Make-Ahead Tip: You can prepare the sauce in advance and refrigerate it for up to 3 days, making it a convenient option for busy weeknights or unexpected guests.

Expert Tips for Spicy Crab Pasta

  • Perfect Simmer: Allow the sauce to simmer long enough to develop its flavors; rushing this step can lead to a bland sauce.

  • Gentle Handling: When folding in the crab, be gentle to preserve its delicate texture; over-mixing can break it apart too much.

  • Taste Adjustments: Regularly taste your sauce and adjust the crushed red pepper according to your preferred spice level to ensure the perfect kick for your Spicy Crab Pasta.

  • Starchy Water: Save some pasta cooking water; this starchy liquid can help to thicken your sauce and improve its texture if needed.

  • Fresh Ingredients: Always opt for fresh garlic and lemon juice for the best flavors; they truly elevate the dish to another level.

Spicy Crab Pasta Variations and Substitutions

Love the idea of Spicy Crab Pasta but want to make it your own? Here are some delightful twists and substitutions to inspire your creativity!

  • Seafood Swap: Replace crab with shrimp, mussels, or clams for a different seafood flair. Each option brings its unique character and taste to the dish!

  • Fresh Twist: Use fresh tomatoes instead of sun-dried for a lighter, brighter sauce during summer months when they're at their peak.

  • Veggie Boost: Add in greens like spinach or kale for a nutritious color pop. They wilt beautifully, blending with the sauce and enhancing your meal.

  • Creamy Addition: Stir in a splash of heavy cream or a dollop of mascarpone at the end for a luscious, rich finish that elevates the dish.

  • Herb Swap: If basil is unavailable, fragrant flat-leaf parsley makes a lovely alternative, adding a fresh touch to every bite.

  • Cheese Options: Try Pecorino Romano in place of Parmesan for a sharper, bolder cheese flavor that complements the spicy notes.

  • Heat Level: For those who love extra heat, incorporate some fresh diced jalapeños or a teaspoon of sriracha into the sauce. Just the right kick for spice enthusiasts!

  • Pasta Variety: Not a fan of short pasta? Use long pasta like linguine or fettuccine for a beautiful presentation and different texture.

Feel free to explore these variations, and you’ll discover that the beauty of cooking lies in personalizing each dish. While you're here, check out this Skillet Pasta Sun or give Spicy Miso Tuna a try for more culinary inspiration!

What to Serve with Spicy Crab Pasta

Transform your Spicy Crab Pasta into a complete meal with these delightful pairings that enhance flavor and texture.

  • Garlic Bread: Crispy and buttery, this classic side complements the rich sauce while providing a satisfying crunch to each bite.

  • Simple Green Salad: A fresh salad with mixed greens and a light vinaigrette adds a bright contrast, balancing the savory flavors of the pasta perfectly. Toss in some cherry tomatoes for extra color and sweetness.

  • Roasted Asparagus: This lightly charred veggie adds a delightful crunch and earthy flavor, creating a beautiful plate that’s both colorful and nutrient-rich.

  • Chilled White Wine: A glass of chilled Sauvignon Blanc or Pinot Grigio pairs harmoniously with the spicy and savory notes, enhancing your dining experience.

  • Lemon Sorbet: For a refreshing finish, a scoop of lemon sorbet cleanses the palate after the rich pasta, leaving you invigorated and satisfied.

  • Parmesan Crisps: These savory bites add an exceptional crunch and cheesy flavor that beautifully harmonizes with the pasta's sauce, making each mouthful memorable.

Spicy Crab Pasta Recipe FAQs

How do I select the perfect crab meat?
Absolutely! When selecting crab meat, look for jumbo lump crab that's sweet, with a delicate texture. It should be fresh and smell of the sea, not fishy. If you're buying canned crab, check for any dark spots or a strong odor, which may indicate it’s not fresh. I often opt for crab meat that’s pasteurized, as it's safe and ready to use in my recipes.

Can I store leftover Spicy Crab Pasta?
Very! Leftover Spicy Crab Pasta can be stored in an airtight container for up to 3 days in the refrigerator. When you’re ready to enjoy some comfort food again, just reheat it on the stovetop with a splash of water or broth to bring back its delicious creamy texture.

What’s the best way to freeze Spicy Crab Pasta?
Certainly! To freeze the Spicy Crab Pasta, it's best to separate the sauce from the pasta. Place the sauce in a sealed container and it can be frozen for up to 3 months. When ready to enjoy, thaw it overnight in the fridge and heat gently on the stove. Cook fresh pasta for the best quality, combining them just before serving.

Why is my sauce too thin?
If you find your sauce is too thin, no need to worry! You can thicken it by letting it simmer longer until it reduces to your desired consistency. If you’re in a pinch, you can also mix in a bit of tomato paste or a cornstarch slurry—a mixture of cornstarch and cold water—adding it gradually while stirring to thicken the sauce effectively.

Are there any dietary restrictions for this recipe?
You can definitely adapt it! If you're considering allergies, be aware that this recipe contains shellfish and may not be suitable for those with seafood allergies. For a non-seafood alternative, try substituting the crab with sautéed mushrooms or other vegetables. If cooking for pets, ensure to avoid any ingredients that might be harmful, like garlic and onions.

Spicy Crab Pasta

Spicy Crab Pasta: A Flavor-Packed Weeknight Delight

Spicy Crab Pasta is a delightful seafood dish that combines rich crab meat with a spicy, flavorful sauce, perfect for weeknight dinners.
Print Recipe Pin Recipe
Prep Time 10 minutes mins
Cook Time 30 minutes mins
Total Time 40 minutes mins
Servings: 4 servings
Course: Dinner
Cuisine: Italian
Calories: 500
Ingredients Equipment Method Nutrition Notes

Ingredients
  

For the Sauce
  • 2 tablespoons Extra Virgin Olive Oil Can substitute with avocado oil
  • 1 medium Shallot Can use onion if shallots aren't available
  • 1/2 cup Sun-Dried Tomatoes Fresh tomatoes can be used but will alter the richness
  • 1 tablespoon Oil from Sun-Dried Tomatoes
  • 2 anchovies Anchovies Can be omitted if avoiding fish
  • 4 cloves Garlic Use fresh for best taste
  • 1 teaspoon Crushed Red Pepper Adjust according to preferred spice level
  • 1 tablespoon Tomato Paste Optional for thicker consistency
  • 1/2 cup White Wine or Water Use water for non-alcoholic version
  • 1 can Diced Tomatoes (canned) Fire-roasted can add extra smokiness
For the Pasta
  • 8 ounces Short Pasta (like rigatoni) Shorter shapes are recommended
  • 8 ounces Jumbo Lump Crab Meat Shrimp or mussels can replace crab if desired
For the Finish
  • 1/4 cup Parmesan Cheese Can substitute with Pecorino Romano
  • 1/4 cup Basil Flat-leaf parsley is a great alternative
  • 1/2 tablespoon Lemon Juice Fresh lemon is best
  • to taste Salt
  • to taste Pepper
  • to taste Sugar

Equipment

  • wide pot
  • Colander

Method
 

Step-by-Step Instructions
  1. In a wide pot, heat 2 tablespoons of extra virgin olive oil over medium heat. Add chopped shallots and sauté for 3-4 minutes until they become translucent, then stir in sliced sun-dried tomatoes and anchovies. Cook until the anchovies mash into the mixture, followed by minced garlic and crushed red pepper for about 30 seconds, or until fragrant. Incorporate 1 tablespoon of tomato paste, cooking for an additional 1-2 minutes to deepen the flavors of your Spicy Crab Pasta.
  2. Pour in ½ cup of white wine, scraping up any browned bits from the bottom of the pot. Bring the mixture to a gentle boil, then mix in one can of diced tomatoes (drained). Season generously with salt and pepper, and let the sauce simmer uncovered for 30 minutes, stirring occasionally, until it thickens and the flavors meld beautifully.
  3. While the sauce simmers, bring a large pot of salted water to a rolling boil. Add 8 ounces of short pasta, like rigatoni, and cook according to the package instructions until al dente, usually about 8-10 minutes. Before draining, reserve ½ cup of the pasta cooking water in case you need to adjust the sauce’s consistency.
  4. Gently fold in 8 ounces of jumbo lump crab meat into the simmering sauce, taking care not to break it apart too much. Add in ¼ cup of grated Parmesan cheese, freshly chopped basil, and the juice of half a lemon. Stir everything together gently, allowing it to simmer for an additional 5-6 minutes.
  5. Toss the cooked pasta into the sauce, incorporating it well to coat every piece. If the sauce seems too thick, add some of the reserved pasta cooking water a little at a time until you achieve your desired consistency. Serve hot, garnished with fresh basil and additional Parmesan cheese.

Nutrition

Serving: 1servingCalories: 500kcalCarbohydrates: 60gProtein: 25gFat: 15gSaturated Fat: 4gPolyunsaturated Fat: 1gMonounsaturated Fat: 10gCholesterol: 60mgSodium: 800mgPotassium: 600mgFiber: 4gSugar: 6gVitamin A: 300IUVitamin C: 5mgCalcium: 150mgIron: 2mg

Notes

Store any leftover Spicy Crab Pasta in an airtight container for up to 3 days. Reheat gently on the stove with a splash of water or broth to revive its creamy texture.

Tried this recipe?

Let us know how it was!

Savor Chicken Meatballs in Arrabbiata Sauce for Quick Comfort

August 27, 2025 by Grace Snow Leave a Comment

"Weeknight dinners often feel like a sprint, don’t they? When I find myself racing against the clock, I turn to my secret weapon: Chicken Meatballs in Arrabbiata Sauce. This quick and hearty dish marries juicy herby chicken meatballs with a zesty, spicy sauce that brings smiles to the dinner table—even on the busiest of nights. Not only is it a high-protein meal that can be on the table in under 30 minutes, but it also offers a delightful twist to traditional pasta nights. With a fiber-rich choice of pasta or even zoodles on the side, this recipe is perfect for anyone craving comfort without the fuss. So, are you ready to transform your weeknight meals into something extraordinary?"

Why are Chicken Meatballs Essential?

Simplicity at Its Best: This recipe is designed for busy weeknights, needing just a few fresh ingredients to create a delicious meal.

High-Protein Delight: Featuring lean ground chicken, it's a healthy choice that hits all the right notes for protein lovers.

Zesty Flavor Explosion: The spicy arrabbiata sauce elevates the meatballs, making every bite a savory adventure.

Versatile Pairings: Enjoy these meatballs over pasta or switch it up with zoodles for a low-carb option—perfect for diverse dietary needs!

Quick as a Flash: Whip up this comforting dish in under 30 minutes, saving you time while satisfying your cravings.

Crowd-Pleasing Appeal: This dish is sure to impress family and friends alike, making it your go-to for gatherings or cozy dinners at home.

Chicken Meatballs in Arrabbiata Sauce Ingredients

For the Chicken Meatballs

  • Ground Chicken – A lean protein that keeps the dish healthy and satisfying.
  • Garlic (4 cloves) – Freshly minced for the best aromatic flavor.
  • Shallot (1 small) – Adds a mild onion taste; yellow onion works in a pinch.
  • Basil Leaves (10) – Fresh herbs enhance the meatballs; substitute with parsley if needed.
  • Egg (1) – Helps bind the ingredients; use a flax egg for a vegan version.
  • Heavy Cream (2 tablespoons) – Adds moisture and richness; milk can be a lighter substitute.
  • Italian Seasoning (1 tablespoon) – A tasty blend of herbs; try fresh herbs for a burst of flavor.
  • Breadcrumbs (½ cup) – Provides texture; panko can offer extra crunch.
  • Parmesan Cheese (2 tablespoons, finely grated) – Brings umami and creaminess; replace with nutritional yeast for dairy-free.
  • Salt, Pepper, Crushed Red Pepper – Essential seasonings to taste; adjust crushed red pepper for spice level.
  • Olive Oil (2 tablespoons) – Perfect for frying meatballs; avocado oil is a great alternative.

For the Arrabbiata Sauce

  • Arrabbiata Sauce (32-ounce jar) – The sauce base that spices up the whole dish; homemade versions are also delightful.
  • Red Wine (½ cup) – Enhances flavor through deglazing; sub with vegetable broth for a non-alcoholic touch.
  • Water (¼ cup) – Thins the sauce to achieve desired consistency.
  • Pinch of Sugar – Balances the sauce's acidity; feel free to omit if not needed.

For the Pasta

  • Short Pasta (12 ounces, such as radiatori, rigatoni, or penne) – Serves as a hearty base; gluten-free options are available.
  • Additional Parmesan Cheese (½ cup, for serving) – Optional garnish for an extra cheesy touch.
  • Basil Leaves (optional, for serving) – Fresh garnish brightens up the meal and adds flavor.

With these ingredients in hand, you'll set the stage for a delicious and comforting meal, perfect for busy weeknights. Embrace the flavors of chicken meatballs in arrabbiata sauce that your family will love!

Step‑by‑Step Instructions for Chicken Meatballs in Arrabbiata Sauce

Step 1: Prepare the Meatballs
In a large mixing bowl, combine the ground chicken with salt, pepper, and crushed red pepper. Using a food processor, mince the garlic, shallot, and basil finely, then blend them with the egg, heavy cream, Italian seasoning, breadcrumbs, and Parmesan cheese until smooth. Gently combine this mixture with the chicken until just mixed, then roll the mixture into 1-inch balls and set aside.

Step 2: Cook the Meatballs
Heat 2 tablespoons of olive oil in a large pot over medium heat until shimmering. Carefully add the prepared chicken meatballs, cooking them for about 6-8 minutes, turning occasionally until they are browned on all sides. Once browned, transfer the meatballs to a plate and set them aside while you prepare the sauce.

Step 3: Make the Sauce
In the same pot, pour in ½ cup of red wine, bringing it to a boil, and scrape up any browned bits on the bottom for extra flavor. Once the wine has reduced slightly, add the 32-ounce jar of arrabbiata sauce, ¼ cup of water, a pinch of sugar, and more crushed red pepper if desired. Stir to combine and let the sauce simmer for 5-10 minutes to meld the flavors.

Step 4: Simmer the Meatballs
Gently add the browned chicken meatballs back into the pot with the simmering arrabbiata sauce. Cover the pot and reduce the heat to low, letting the mixture simmer for about 30 minutes. This slow cooking allows the meatballs to absorb the sauce's spicy flavor while remaining juicy and tender.

Step 5: Cook the Pasta
While the meatballs simmer, bring a large pot of salted water to a boil. Add 12 ounces of your choice of short pasta, cooking it according to package instructions until al dente, usually around 8-10 minutes. Reserve ½ cup of the starchy pasta water before draining the rest, ensuring the pasta is well-timed to finish with the sauce.

Step 6: Finish the Sauce
After draining the pasta, return the sauce with meatballs to medium heat. Stir in the reserved pasta water and ½ cup of Parmesan cheese for creaminess. Toss in the cooked pasta and mix gently to coat the pasta completely with the zesty arrabbiata sauce and the succulent chicken meatballs.

Step 7: Serve
To plate, serve a generous portion of the pasta and meatballs on each dish. Garnish with extra Parmesan cheese and fresh basil leaves for a pop of flavor and color. Enjoy your homemade chicken meatballs in arrabbiata sauce for a comforting, high-protein weeknight meal!

What to Serve with Herby Chicken Meatballs in Spicy Arrabbiata Sauce

Transform your weeknight dinner by infusing complimentary flavors around this authentic Italian dish, creating a meal everyone will love.

  • Garlic Bread: Crunchy, buttery slices that echo the aroma of your kitchen, perfect for soaking up that spicy arrabbiata sauce. Every bite is a delightful experience!
  • Mixed Green Salad: A fresh salad with a tangy vinaigrette adds a crisp contrast, enhancing the savoriness of the meatballs while providing a refreshing palate cleanser.
  • Roasted Vegetables: Tender roasted seasonal vegetables add a sweet, caramelized depth that pairs wonderfully with the robust meatballs, bringing color and nutrition to your table.
  • Creamy Polenta: Silky smooth polenta can serve as a luxurious canvas for your meatballs, providing a comforting and filling side that complements the dish beautifully.
  • Basil Pesto Crostini: These crispy bites topped with basil pesto add a vibrant burst of herbaceous flavor, offering a delightful starter or refreshing palate enhancer.
  • Chardonnay or Pinot Noir: A chilled Chardonnay brings out the rich flavors, while a bold Pinot Noir complements the spices of the arrabbiata sauce, creating a harmonious dining experience.
  • Tiramisu: For dessert, this classic Italian treat wraps up your meal with layers of coffee-soaked goodness, leaving a sweet memory of your dining adventure.

Each pairing enhances the heartiness of the chicken meatballs in arrabbiata sauce, wrapping your meal in vibrant flavors!

Make Ahead Options

These Chicken Meatballs in Arrabbiata Sauce are perfect for busy home cooks looking to simplify mealtime! You can prepare the meatballs up to 24 hours in advance by rolling them and placing them in the fridge, covered. Additionally, the arrabbiata sauce can be made ahead and stored in an airtight container for up to 3 days in the refrigerator, maintaining its flavor and quality. To reheat, gently warm the sauce on the stove while simmering the meatballs in it until heated through. Serve with freshly cooked pasta for a dish that feels just as delicious as when made fresh!

Chicken Meatballs in Arrabbiata Sauce Variations

Feel free to explore these fun twists to make this dish uniquely yours!

  • Turkey Swap: Use ground turkey for a leaner alternative that’s still juicy and delicious. This option keeps the flavors intact while adding a lighter profile.

  • Beef Bonanza: Opt for extra lean ground beef to add a rich, hearty flavor to your meatballs. You might find yourself loving the savory depth it brings!

  • Zoodles Delight: Replace traditional pasta with zoodles for a vibrant, low-carb meal. This veggie twist is not only healthy but adds a colorful presentation to your plate!

  • Stuffed Meatballs: Add a small cube of mozzarella cheese into the center of each meatball for a melty surprise. As the meatballs cook, the cheese creates a delightful, gooey filling.

  • Vegetable Boost: Stir in finely chopped spinach or shredded carrots into the meatball mixture for added veggies and nutrition. This tweak allows you to sneak in some greens without affecting flavor.

  • Spice It Up: Enhance the heat by adding chopped jalapeños or more crushed red pepper to the sauce. Perfect for those who revel in a fiery kick!

  • Gluten-Free Pasta: Swap traditional pasta with gluten-free varieties or enjoy your meatballs over creamy polenta for a comforting, gluten-free option. This elevates your meal without compromising on taste.

  • Homemade Sauce: Make your own arrabbiata sauce with crushed tomatoes, garlic, and red pepper for a fresh twist. Homemade always adds a touch of love and flavor!

Feel free to try any of these variations and make this recipe your family's favorite! For even more delightful chicken recipes, check out my Honey Garlic Chicken Thighs or the savory Crock Pot Chicken. Bon appétit!

How to Store and Freeze Chicken Meatballs in Arrabbiata Sauce

Fridge: Store leftover chicken meatballs in arrabbiata sauce in an airtight container for up to 3 days. Be sure to cool them completely before sealing to maintain freshness.

Freezer: For longer storage, place meatballs in arrabbiata sauce in a freezer-safe container. They can keep well for up to 3 months. When you’re ready to enjoy them, simply thaw overnight in the fridge.

Reheating: To reheat, place the chicken meatballs in a saucepan over medium-low heat. Stir gently until warmed through, about 8-10 minutes, adding a splash of water if the sauce thickens.

Serving Suggestions: Serve the meatballs over freshly cooked pasta or zoodles for a delightful meal that’s just as delicious the second time around!

Expert Tips for Chicken Meatballs in Arrabbiata Sauce

  • Don’t Overmix: Mixing the chicken too much can result in tough meatballs. Gently combine ingredients until just mixed for the best texture.
  • Test Seasonings: Before rolling into balls, cook a small piece of the mixture to taste. Adjust salt, pepper, and crushed red pepper accordingly.
  • Deglazing Love: Use red wine to deglaze the pan, enhancing the flavor. If avoiding alcohol, vegetable broth works wonderfully as a substitute.
  • Choose Your Pasta Wisely: Use short pasta shapes for better sauce adherence. Alternatively, zoodles make a delicious, low-carb pairing for the chicken meatballs.
  • Coating Perfection: Toss the pasta in the sauce gently to ensure every strand is deliciously coated, maximizing flavor in every bite.

Chicken Meatballs in Arrabbiata Sauce Recipe FAQs

What kind of ground chicken should I use?
Absolutely! I recommend using lean ground chicken for the meatballs. Look for a blend that has around 10-15% fat content for the best moisture and flavor balance. If you prefer a different meat, ground turkey or lean beef also works beautifully and can give a different flavor profile.

How can I store leftovers properly?
For the fridge, store your chicken meatballs in arrabbiata sauce in an airtight container for up to 3 days. Be sure to allow them to cool completely before sealing. If you're thinking longer term, freeze the meatballs directly in the sauce in a freezer-safe container for up to 3 months. It's a great way to have a quick meal ready for those busy days!

Can I freeze the chicken meatballs?
Yes, you can! To freeze, follow these steps: Allow the cooked chicken meatballs in arrabbiata sauce to cool completely. Then, transfer them to a freezer-safe container or a resealable bag. For best results, try to remove as much air as possible to prevent freezer burn. When you're ready to eat, simply thaw them overnight in the fridge or heat from frozen, adjusting the cooking time as needed.

What if my meatballs break apart during cooking?
Very! If your meatballs break apart, don't worry too much. You can simply serve them as a meat sauce over pasta, and they'll still be delicious! To avoid this issue in the future, make sure to handle the meat mixture gently and avoid overmixing while forming the meatballs. Also, letting them chill for about 15-30 minutes after forming can help them hold together better when cooking.

Can I adapt this recipe for dietary restrictions?
Absolutely! This recipe is quite flexible. For a gluten-free version, you can substitute regular breadcrumbs with gluten-free breadcrumbs or panko. If you're looking for a dairy-free option, use nutritional yeast in place of Parmesan cheese. You can also substitute heavy cream with coconut milk for a dairy-free alternative. Feel free to adjust according to your dietary needs while still enjoying delicious chicken meatballs in arrabbiata sauce!

Chicken Meatballs in Arrabbiata Sauce

Savor Chicken Meatballs in Arrabbiata Sauce for Quick Comfort

Indulge in Chicken Meatballs in Arrabbiata Sauce for a quick and hearty meal that balances zesty flavors with lean protein.
Print Recipe Pin Recipe
Prep Time 15 minutes mins
Cook Time 15 minutes mins
Total Time 30 minutes mins
Servings: 4 meatballs
Course: Dinner
Cuisine: Italian
Calories: 450
Ingredients Equipment Method Nutrition Notes

Ingredients
  

For the Chicken Meatballs
  • 1 pound Ground Chicken A lean protein that keeps the dish healthy and satisfying.
  • 4 cloves Garlic Freshly minced for the best aromatic flavor.
  • 1 small Shallot Adds a mild onion taste; yellow onion works in a pinch.
  • 10 leaves Basil Leaves Fresh herbs enhance the meatballs; substitute with parsley if needed.
  • 1 large Egg Helps bind the ingredients; use a flax egg for a vegan version.
  • 2 tablespoons Heavy Cream Adds moisture and richness; milk can be a lighter substitute.
  • 1 tablespoon Italian Seasoning A tasty blend of herbs; try fresh herbs for a burst of flavor.
  • ½ cup Breadcrumbs Provides texture; panko can offer extra crunch.
  • 2 tablespoons Parmesan Cheese Brings umami and creaminess; replace with nutritional yeast for dairy-free.
  • to taste Salt Essential seasonings to taste.
  • to taste Pepper Essential seasonings to taste.
  • to taste Crushed Red Pepper Essential seasonings to taste; adjust for spice level.
  • 2 tablespoons Olive Oil Perfect for frying meatballs; avocado oil is a great alternative.
For the Arrabbiata Sauce
  • 32 ounces Arrabbiata Sauce The sauce base that spices up the whole dish; homemade versions are also delightful.
  • ½ cup Red Wine Enhances flavor through deglazing; sub with vegetable broth for a non-alcoholic touch.
  • ¼ cup Water Thins the sauce to achieve desired consistency.
  • a pinch Sugar Balances the sauce's acidity; feel free to omit if not needed.
For the Pasta
  • 12 ounces Short Pasta such as radiatori, rigatoni, or penne; gluten-free options are available.
  • ½ cup Additional Parmesan Cheese Optional garnish for an extra cheesy touch.
  • to taste Basil Leaves Fresh garnish brightens up the meal and adds flavor.

Equipment

  • large mixing bowl
  • Food Processor
  • Large pot
  • stirring spoon

Method
 

Step-by-Step Instructions
  1. In a large mixing bowl, combine the ground chicken with salt, pepper, and crushed red pepper. Using a food processor, mince the garlic, shallot, and basil finely, then blend them with the egg, heavy cream, Italian seasoning, breadcrumbs, and Parmesan cheese until smooth. Gently combine this mixture with the chicken until just mixed, then roll the mixture into 1-inch balls and set aside.
  2. Heat 2 tablespoons of olive oil in a large pot over medium heat until shimmering. Carefully add the prepared chicken meatballs, cooking them for about 6-8 minutes, turning occasionally until they are browned on all sides. Once browned, transfer the meatballs to a plate and set them aside while you prepare the sauce.
  3. In the same pot, pour in ½ cup of red wine, bringing it to a boil, and scrape up any browned bits on the bottom for extra flavor. Once the wine has reduced slightly, add the 32-ounce jar of arrabbiata sauce, ¼ cup of water, a pinch of sugar, and more crushed red pepper if desired. Stir to combine and let the sauce simmer for 5-10 minutes to meld the flavors.
  4. Gently add the browned chicken meatballs back into the pot with the simmering arrabbiata sauce. Cover the pot and reduce the heat to low, letting the mixture simmer for about 30 minutes.
  5. While the meatballs simmer, bring a large pot of salted water to a boil. Add 12 ounces of your choice of short pasta, cooking it according to package instructions until al dente, usually around 8-10 minutes.
  6. After draining the pasta, return the sauce with meatballs to medium heat. Stir in the reserved pasta water and ½ cup of Parmesan cheese for creaminess.
  7. To plate, serve a generous portion of the pasta and meatballs on each dish. Garnish with extra Parmesan cheese and fresh basil leaves. Enjoy!

Nutrition

Serving: 1plateCalories: 450kcalCarbohydrates: 40gProtein: 30gFat: 20gSaturated Fat: 10gPolyunsaturated Fat: 5gMonounsaturated Fat: 4gCholesterol: 100mgSodium: 800mgPotassium: 600mgFiber: 5gSugar: 6gVitamin A: 500IUVitamin C: 6mgCalcium: 200mgIron: 3mg

Notes

For best results, don't overmix the meatball mixture and adjust spices according to taste.

Tried this recipe?

Let us know how it was!

Cozy Cabbage Walnut Pasta: A Quick Vegan Comfort Bowl

August 27, 2025 by Grace Snow Leave a Comment

As I tossed my farfalle pasta into the boiling water, a delightful aroma of sautéed garlic wafted through my kitchen, revealing a little secret about this dish: it’s not just any ordinary pasta dinner. This Quick and Easy Vegan Cabbage Walnut Pasta combines the crunch of walnuts and the tender embrace of earthy savoy cabbage, all in under 45 minutes! Perfect for busy weeknights, this comforting meal brings not only hearty flavors but also a nutritious boost to your evening routine. Plus, it’s a one-pan wonder, which means easy cleanup—a win for any home chef. Curious about how to make this delightful dish? Let’s dive in!

Why is Cabbage Walnut Pasta a Must-Try?

Quick Preparation: This dish comes together in just 45 minutes, making it the perfect choice for busy weeknights when you crave something homemade.

Nutritious Ingredients: Packed with vitamins, minerals, and fiber, it’s a healthy option without sacrificing flavor.

Unique Flavor Profile: The combination of savory garlic and the hint of sweetness from brown sugar creates a delightful balance that keeps your taste buds excited.

Versatile Base: Feel free to experiment with different pasta shapes or substitute nuts to suit your preferences—your kitchen, your rules!

Crowd-Pleasing: This vegan meal is sure to satisfy everyone at the table, making it a great choice for family dinners or gatherings. Plus, it’s an excellent accompaniment to a fresh side salad, just like our Seafood Pasta Savory or White Bean Pasta for a well-rounded meal. Enjoy this delicious Cabbage Walnut Pasta that’s as comforting as it is nourishing!

Cabbage Walnut Pasta Ingredients

For the Pasta
• Farfalle Pasta – Acts as the base of the dish, providing structure and texture; feel free to swap with any pasta shape you love.

For the Sauté
• Extra Virgin Olive Oil – Adds richness and a fruity flavor; can be replaced with lighter oils like grapeseed if desired.
• Yellow Onion – Provides a sweet, aromatic base; shallots are a fantastic milder alternative.
• Savoy Cabbage – Offers a tender texture and unique flavor; substitute with green or regular cabbage, remembering to adjust cooking times.
• Garlic – Infuses the dish with a strong, pungent flavor; adjust to your taste or use garlic powder when short on time.

For the Crunch
• Walnuts – Adds delightful crunch and healthy fats; pecans or almonds work wonderfully if you're looking for a change.

For the Sweetness
• Brown Sugar – Enhances the sweetness of the cabbage; feel free to omit it or replace with agave syrup for a vegan-friendly option.

For the Garnish
• Fresh Parsley – Brightens the dish with a fresh herb flavor; basil or cilantro can easily step in if you're out of parsley.
• Paprika – Adds warmth and depth of flavor; adjust according to your spice preference or omit completely.

For Seasoning
• Salt and Pepper – Essential for bringing out the flavors in the dish; always taste and adjust to your liking.

Step‑by‑Step Instructions for Cabbage Walnut Pasta

Step 1: Cook the Pasta
In a large pot, bring salted water to a rolling boil. Add the farfalle pasta and cook until just under al dente, about 2 minutes less than the package instructions. Feel free to use your timer for accuracy! Once done, reserve ½ cup of cooking water, then drain the pasta in a colander, shaking off any excess water.

Step 2: Sauté Onion
While the pasta is cooking, heat 1 tablespoon of extra virgin olive oil in a large skillet over medium heat. Add the sliced yellow onion and sauté for 5–7 minutes until softened and fragrant. Season the onions with a pinch of salt to enhance their sweetness, stirring frequently until they become translucent and slightly golden.

Step 3: Cook the Cabbage
Increase the heat to medium-high and add the rest of the olive oil along with the chopped savoy cabbage to the skillet. Sauté for about 6–8 minutes, stirring often, until the cabbage is softened and has developed a slight char, enhancing its flavor. Add a little more salt to taste during cooking for richer flavor.

Step 4: Add Garlic
Stir in the minced garlic to the skillet, cooking for an additional 1-2 minutes until fragrant. The smell of garlic will fill your kitchen! Be sure to stir continuously to prevent burning, as you want its lovely aroma to infuse the cabbage mixture beautifully without any bitterness.

Step 5: Combine Ingredients
Once the garlic is fragrant, add the drained farfalle pasta, walnuts, and brown sugar (if using) to the skillet. Toss everything together, combining the ingredients well. Gradually mix in the reserved pasta water, a little at a time, until you achieve your desired sauce consistency. Cook for an additional 3–4 minutes, allowing everything to heat through thoroughly.

Step 6: Serve
Divide your delicious Cabbage Walnut Pasta into bowls, garnishing with fresh parsley for a vibrant finish. The contrasting colors and textures will make this dish appealing. Serve immediately to enjoy the freshness, and appreciate your homemade creation that’s both comforting and nourishing!

Expert Tips for Cabbage Walnut Pasta

  • Season Wisely: Always taste and adjust seasoning at each cooking stage. This ensures a balanced flavor throughout the Cabbage Walnut Pasta.

  • Heat Management: When sautéing the onions and cabbage, avoid high heat to prevent them from burning and turning bitter. Medium heat is your friend!

  • Pasta Perfection: Cook the farfalle pasta just under al dente; it will continue to cook when mixed with the other ingredients, ensuring a perfect texture.

  • Sauce Consistency: If the dish feels dry, gradually add more reserved pasta water. This will help create a harmonious sauce that clings to every bite.

  • Nut Variations: Don’t be afraid to explore! Substitute walnuts with pecans or almonds for a delightful twist on flavor and crunch.

  • Fresh Herbs Finish: Garnishing with fresh parsley not only adds color but a bright flavor. If you’re out, basil or cilantro can be excellent stand-ins!

How to Store and Freeze Cabbage Walnut Pasta

Fridge: Store leftovers in an airtight container for up to 3 days. Allow the pasta to cool before sealing to maintain freshness.

Freezer: If you want to save it for later, freeze the Cabbage Walnut Pasta in portions for up to 2 months. Thaw in the fridge overnight before reheating.

Reheating: Gently reheat on the stove over low heat, adding a splash of water or broth to bring back moisture, ensuring the pasta remains delightful and creamy.

Serving Tips: Freshly garnishing with parsley upon reheating can revive the dish’s vibrant flavors and presentation!

What to Serve with Cabbage Walnut Pasta

Elevate your comforting bowl of pasta with delightful sides and complementary flavors that create a complete dining experience.

  • Mixed Green Salad: Light and refreshing, a salad with a tangy vinaigrette balances the richness of the pasta beautifully.

  • Grilled Vegetables: The smoky flavors from grilled zucchini and bell peppers add a delicious, contrasting texture that brings out the savory notes in the dish.

  • Garlic Bread: Warm, crunchy garlic bread provides a perfect vessel for savoring every drop of the pasta’s flavorful sauce, adding a lovely buttery aroma.

  • Roasted Chickpeas: Crispy, spiced chickpeas offer a delightful crunch and additional protein, enhancing the meal's nutritional profile while matching the pasta's flavors.

  • Lemon Tahini Sauce: A drizzle of creamy lemon tahini adds a zesty kick that complements the sweetness of the cabbage and the depth of the walnuts.

  • Red Wine: A glass of full-bodied red wine enhances the richness of the dish and deepens your dining experience, making it feel extra special.

  • Chocolate Avocado Mousse: For dessert, this rich, creamy treat offers a decadent yet healthy finish that pairs wonderfully with the lightness of pasta.

Make Ahead Options

These Cabbage Walnut Pasta are perfect for meal prep enthusiasts! You can chop the savoy cabbage and slice the onions up to 24 hours in advance and store them in airtight containers in the refrigerator to maintain freshness. Additionally, you can cook the farfalle pasta up to 3 days ahead, tossing it lightly with a bit of olive oil after draining to prevent sticking. When you’re ready to serve, simply sauté the onion and cabbage, add the garlic, and toss in the pre-cooked pasta and walnuts. This makes for a quicker cooking time while ensuring your dish remains just as delicious and vibrant! Enjoy a homemade meal with minimal last-minute effort!

Cabbage Walnut Pasta: Flavorful Variations

Feel free to put your own spin on this delightful dish, letting your creativity run wild in the kitchen!

  • Spicy Kick: Add pickled jalapeños for a fiery touch that contrasts beautifully with the sweetness of the cabbage. Your taste buds will dance with excitement!

  • Protein Boost: Incorporate grilled tofu or chickpeas to turn this pasta into an even heartier meal. The added protein will keep you satisfied longer.

  • Nutty Substitutes: Try different nuts like pecans or almonds for a new flavor and texture. Each nut brings its unique essence, inviting a world of possibilities.

  • Herbal Twist: Use fresh basil or cilantro instead of parsley for a refreshing taste that brightens the dish. The aromatic herbs will elevate every bite!

  • Texture Variety: Include sunflower seeds for an extra crunch that adds delightful contrast. This variation enhances the appeal of your Cabbage Walnut Pasta.

  • Sweetness Adjustment: Swap brown sugar for maple syrup for a different sweet note that complements the earthiness of the cabbage. Alternately, skip the sweetener entirely for a savory profile!

  • Creamy Sauce: Drizzle with tahini for a creamy, nutty sauce that envelops the pasta warmly. You’ll love the rich texture it provides without any dairy!

Experiment with these variations, and don’t forget to check out our recipes for Skillet Pasta Sun or Fried Shrimp Cabbage for more inspiration on your culinary journey!

Cabbage Walnut Pasta Recipe FAQs

What type of cabbage is best for Cabbage Walnut Pasta?
Savoy cabbage is perfect for this recipe because of its tender texture and mild flavor. However, you can easily swap it for green or regular cabbage. Just be aware that cooking times may vary slightly, so keep an eye on the cabbage as it cooks!

How should I store leftovers of Cabbage Walnut Pasta?
Absolutely! Store any leftovers in an airtight container in the fridge for up to 3 days. Let the pasta cool completely before sealing it to maintain its freshness and prevent moisture buildup, which could make it mushy.

Can I freeze Cabbage Walnut Pasta?
Yes, you can freeze this pasta dish! To do so, portion it into airtight containers or freezer bags and store it for up to 2 months. When you’re ready to enjoy, thaw it in the fridge overnight. To reheat, gently warm it on the stove over low heat, adding a splash of water or broth to restore moisture.

What if my pasta seems dry after cooking?
Very common! If you find that the pasta appears dry after combining it with the other ingredients, simply add more of the reserved pasta cooking water gradually. Start with a couple of tablespoons until it reaches your desired sauce consistency. This will help the flavors meld beautifully and ensure a lovely, creamy texture!

Are there any dietary considerations I should be aware of?
If you're cooking for someone with nut allergies, feel free to replace the walnuts with seeds like sunflower seeds or omit them altogether. This recipe is naturally vegan, but be sure to double-check any store-bought ingredients, like the broth, to ensure they align with dietary preferences.

How long does it take to make this dish?
You’ll be delighted to know that this Cabbage Walnut Pasta comes together in just 45 minutes! It’s a fantastic option for busy weeknights when you want something homemade and satisfying without spending hours in the kitchen.

Cabbage Walnut Pasta

Cozy Cabbage Walnut Pasta: A Quick Vegan Comfort Bowl

This Cabbage Walnut Pasta is a quick vegan comfort dish with earthy cabbage and crunchy walnuts, ready in under 45 minutes!
Print Recipe Pin Recipe
Prep Time 15 minutes mins
Cook Time 30 minutes mins
Total Time 45 minutes mins
Servings: 4 bowls
Course: Dinner
Cuisine: Vegan
Calories: 400
Ingredients Equipment Method Nutrition Notes

Ingredients
  

For the Pasta
  • 12 ounces Farfalle Pasta Acts as the base of the dish; substitute with any pasta shape you love.
For the Sauté
  • 1 tablespoon Extra Virgin Olive Oil Can be replaced with lighter oils like grapeseed.
  • 1 medium Yellow Onion Can substitute with shallots for a milder flavor.
  • 4 cups Savoy Cabbage Can substitute with green or regular cabbage.
  • 3 cloves Garlic Adjust to your taste or use garlic powder.
For the Crunch
  • 1 cup Walnuts Pecans or almonds can be substituted.
For the Sweetness
  • 1 tablespoon Brown Sugar Can be omitted or replaced with agave syrup.
For the Garnish
  • 1/4 cup Fresh Parsley Basil or cilantro can substitute.
  • 1 teaspoon Paprika Adjust according to your spice preference.
For Seasoning
  • Salt To taste.
  • Pepper To taste.

Equipment

  • Large pot
  • Large skillet
  • Colander

Method
 

Step‑by‑Step Instructions
  1. In a large pot, bring salted water to a rolling boil. Add the farfalle pasta and cook until just under al dente, about 2 minutes less than the package instructions. Reserve ½ cup of cooking water, then drain the pasta in a colander, shaking off any excess water.
  2. While the pasta is cooking, heat 1 tablespoon of extra virgin olive oil in a large skillet over medium heat. Add the sliced yellow onion and sauté for 5–7 minutes until softened and fragrant.
  3. Increase the heat to medium-high and add the rest of the olive oil along with the chopped savoy cabbage to the skillet. Sauté for about 6–8 minutes, stirring often, until softened and slightly charred.
  4. Stir in the minced garlic to the skillet, cooking for an additional 1-2 minutes until fragrant.
  5. Once the garlic is fragrant, add the drained farfalle pasta, walnuts, and brown sugar (if using) to the skillet. Toss everything together, gradually mixing in the reserved pasta water.
  6. Divide the Cabbage Walnut Pasta into bowls, garnishing with fresh parsley.

Nutrition

Serving: 1bowlCalories: 400kcalCarbohydrates: 60gProtein: 10gFat: 15gSaturated Fat: 2gPolyunsaturated Fat: 7gMonounsaturated Fat: 5gSodium: 250mgPotassium: 450mgFiber: 8gSugar: 5gVitamin A: 10IUVitamin C: 50mgCalcium: 6mgIron: 8mg

Notes

This vegan meal is sure to please everyone and pairs well with a fresh side salad. Adjust seasoning and ingredients as you see fit for your taste preferences.

Tried this recipe?

Let us know how it was!

Savor the Warmth of Ginger-Scallion Chicken Soup Tonight

August 27, 2025 by Grace Snow Leave a Comment

“Did you hear that? A pot of bubbling broth, fragrant with ginger and scallions, is the perfect antidote to a hectic day.” That’s exactly how I felt when I first created this Quick Ginger-Scallion Chicken Soup, a recipe that transformed my busy weeknights. Utilizing rotisserie chicken makes this dish not just quick but also wonderfully nourishing—ideal for lunch, dinner, or even brunch. The punchy ginger paired with fresh scallions brings a magical balance of comfort and energy to your bowl. Plus, it’s a gluten-free option that fits perfectly into a healthy lifestyle without sacrificing flavor. Are you ready to cozy up to a steaming bowl of deliciousness? Let’s dive into this heartwarming recipe you’ll want to make over and over again!

Why is this soup your new favorite?

Quick and Easy: This Ginger-Scallion Chicken Soup comes together in minutes, making it perfect for those weeknights when you're short on time.

Healthy and Nourishing: Using rotisserie chicken not only speeds up the process but also packs in protein, making it a satisfying meal.

Flavor Explosion: The zesty ginger combined with scallions offers a fresh taste that invigorates your palate, turning an ordinary soup into something extraordinary.

Versatile Recipe: Feel free to customize with your favorite veggies or swap in rice noodles for a gluten-free option. You can even toss in leftover turkey for a delightful twist!

Crowd-Pleasing Comfort: Whether served at family dinner or a cozy gathering with friends, this soup is sure to impress everyone seated at your table. For another comforting option, check out my delicious Crock Pot Chicken.

Ginger-Scallion Chicken Soup Ingredients

For the Soup
• Rotisserie Chicken – Provides protein and flavor; can substitute with homemade cooked chicken for a fresher taste.
• Neutral Oil (1 tablespoon) – Used for sautéing the vegetables and to prevent sticking; can use olive oil or sunflower oil.
• Yellow Onion (1, diced) – Adds sweetness and depth; substitute with shallots for a milder flavor.
• Carrots (3, sliced) – Offers sweetness and texture; can replace with peas or bell peppers if desired.
• Celery (3 ribs, diced) – Contributes crunch and aroma; can omit if not available.
• Minced Ginger (1 tablespoon) – Key source of spiciness and warmth; fresh ginger is recommended, but ground ginger can be used in a pinch.
• Thai Chili Peppers (1-2, optional) – Adds heat; omit if you prefer a milder soup or substitute with red pepper flakes.
• Scallions (10, minced, white and green parts kept separate) – Provides freshness and a mild onion flavor; green onions can be used as a substitute.
• Chicken Broth (6 cups) – Main liquid used, enriching the soup; use low-sodium for less salt or vegetable broth for a vegetarian version.
• Frozen Ramen Noodles (16 ounces) – Quick to cook and adds heartiness; substitute with soba or udon noodles as desired.
• Sesame Oil (4 teaspoons, divided) – Adds a nutty flavor; can use additional olive oil for a lighter taste.
• Sesame Seeds (2 teaspoons) – Garnish that adds texture; can be omitted or replaced with chopped peanuts for crunch.
• Salt – Enhances flavor; adjust to taste or use soy sauce for added umami.

Feel excited about crafting this Ginger-Scallion Chicken Soup? Each ingredient plays a vital role in delivering that comforting yet energizing flavor you’ll adore!

Step‑by‑Step Instructions for Ginger-Scallion Chicken Soup

Step 1: Prepare Chicken
Start by shredding the meat from the rotisserie chicken into bite-sized pieces, discarding the carcass. This quick step ensures you have tender chicken ready to be added to your Ginger-Scallion Chicken Soup. Set the shredded chicken aside while you prepare the vegetables, making the cooking process smoother and faster.

Step 2: Cook Vegetables
In a large pot, heat the neutral oil over medium heat until shimmering. Add the diced onion, sliced carrots, and diced celery. Sauté the vegetables for about 3-4 minutes until they soften and the onion turns translucent. Season with a pinch of salt to enhance their natural sweetness, creating a flavorful base for your soup.

Step 3: Add Aroma
Stir in the minced ginger, optional Thai chili peppers, and the white parts of the scallions. Cook for an additional minute, allowing the aromatic ingredients to release their enticing fragrance. This step elevates your Ginger-Scallion Chicken Soup with a vibrant burst of flavor that will have your kitchen smelling amazing!

Step 4: Combine Broth and Chicken
Pour in the chicken broth and add the shredded chicken to the pot. Increase the heat to bring the mixture to a boil, then reduce it to a simmer. Allow the soup to gently simmer for 30 minutes, stirring occasionally and tasting to adjust the seasoning. This simmering time helps meld the flavors beautifully.

Step 5: Cook Noodles
While the soup simmers, cook the frozen ramen noodles in a separate pot according to the package instructions. Once cooked, drain and rinse the noodles under cold water to wash away excess starch. Divide the noodles among four serving bowls, ready for the delicious soup to be ladled over them.

Step 6: Finish Soup
Stir half of the minced scallion greens and 2 teaspoons of sesame oil into the simmering soup. Let the soup cook for an additional 5 minutes, allowing the scallions to wilt slightly and impart their fresh, mild flavor. This finishing touch brings the Ginger-Scallion Chicken Soup to life, making it comforting and satisfying.

Step 7: Prepare Garnish
In a small bowl, combine the remaining scallion greens with the last 2 teaspoons of sesame oil and a pinch of salt. This simple garnish adds a delightful crunch and enhances the dish’s presentation, making your Ginger-Scallion Chicken Soup not only delicious but visually appealing as well.

Step 8: Serve
Ladle the flavorful soup over the noodles in each bowl. Garnish with the scallion mixture and additional chili if desired for an extra kick. Your Ginger-Scallion Chicken Soup is now ready to be enjoyed, promising a heartwarming meal that is sure to please everyone at your table!

Ginger-Scallion Chicken Soup Variations

Feel free to elevate your culinary creativity with these delightful twists and swaps for the Ginger-Scallion Chicken Soup!

  • Dairy-Free: Omit any dairy-based garnishes and replace with coconut milk for a creamy texture.
  • Gluten-Free Noodles: Swap ramen for rice noodles or quinoa to keep the dish gluten-free without sacrificing heartiness.
  • Extra Veggie Power: Toss in more vegetables like bok choy or spinach, adding a colorful nutrient boost to your soup.
  • Protein Alternatives: Use leftover turkey or tofu for a hearty protein variation that still brings that comforting essence. Each option offers its unique flavor profile and texture!
  • Heat Level: Adjust the spice by using milder bell peppers instead of chili peppers, or act as a heat hero by adding more Thai chilies or sriracha.
  • Savory Depth: Enhance the umami flavor by adding a splash of soy sauce or a dollop of miso paste during the simmering process.
  • Citrus Zest: Refresh your soup by adding a squeeze of lime or lemon juice just before serving for a bright finish.
  • Spice Blend: Introduce garlic or a dash of curry powder for an exotic spin that will tantalize your taste buds.

Experimenting with these variations is a fun way to discover new favorites! If you also enjoy vibrant chicken recipes, why not try my Honey Garlic Chicken Thighs or dive into the flavors of Chipotle Lime Chicken? Explore, savor, and enjoy your soup adventure!

Tips for the Best Ginger-Scallion Chicken Soup

Finely Mince: Ensure your vegetables, especially ginger and scallions, are minced finely to speed up cooking and enhance flavor.

Watch the Salt: When adding chicken broth, taste first before seasoning. Many broths are already salty, so adjust with caution.

Noodle Timing: Cook ramen noodles separately to avoid mushiness; rinse them to remove excess starch and keep a delightful texture in the soup.

Customize Wisely: Feel free to add extra veggies, but keep their cooking times in mind for a balanced, evenly cooked Ginger-Scallion Chicken Soup.

Leftover Magic: Use leftover chicken, turkey, or even tofu for an effortless switch, ensuring your soup remains a comforting staple in your home!

How to Store and Freeze Ginger-Scallion Chicken Soup

Fridge: Store leftovers in an airtight container in the refrigerator for up to 3 days. This allows you to enjoy the warm, comforting soup again while maintaining its flavorful profile.

Freezer: For longer storage, freeze the soup in individual portions in airtight containers or freezer bags for up to 3 months. Just make sure to leave some space at the top for expansion during freezing.

Reheating: When you're ready to enjoy your Ginger-Scallion Chicken Soup, thaw it overnight in the fridge or use the microwave. Gently reheat on the stovetop over low heat, stirring occasionally until warmed through.

Noodle Storage: If you’ve added noodles to your soup, consider storing the noodles separately. This prevents them from becoming mushy after freezing and allows for better texture upon reheating.

What to Serve with Quick Ginger-Scallion Chicken Soup

A warm bowl of soup is just the beginning; let’s explore side dishes that elevate your meal experience.

  • Crusty Bread: Perfect for dipping, this bread adds a satisfying crunch and complements the soup's richness.
  • Simple Green Salad: A fresh salad with crisp greens and a light vinaigrette balances the hearty flavors of the soup.
  • Garlic Toast: The buttery, garlic-infused toast enhances the comforting elements of the soup while providing a flavorful crunch.
  • Steamed Broccoli: Adding this vibrant veggie infuses your meal with nutrients and color, enhancing the overall presentation.
  • Pickled Vegetables: A tangy side introduces an exciting contrast to the warming broth, adding layers of flavor and texture.
  • Green Tea: A soothing cup of tea cleanses the palate and serves as a peaceful complement to your comforting meal.
  • Chili Oil Drizzle: For those who crave spice, an extra drizzle of chili oil over the soup will kick things up a notch.
  • Fruit Sorbet: A light and refreshing dessert rounds out the meal, balancing the savory flavors with a sweet finish.

Make Ahead Options

These Ginger-Scallion Chicken Soup is perfect for meal prep enthusiasts! You can shred the rotisserie chicken and chop the vegetables up to 24 hours in advance, storing them separately in airtight containers in the refrigerator to maintain their freshness. Additionally, the ginger and scallion mixture can be prepared ahead, preventing any browning and ensuring vibrant flavors. When you're ready to serve, simply sauté your prepped vegetables, add the broth and chicken, and simmer to finish the soup. Cook the ramen noodles fresh right before serving for the best texture, and enjoy a delicious, heartwarming meal with minimal effort on busy nights!

Ginger-Scallion Chicken Soup Recipe FAQs

How do I choose the right rotisserie chicken?
Absolutely! When selecting a rotisserie chicken, look for one that is golden-brown with a crispy skin and avoid those with visible dark spots all over. You want a chicken that looks fresh and succulent for the best flavor in your Ginger-Scallion Chicken Soup.

What is the best way to store leftovers?
Store any leftover Ginger-Scallion Chicken Soup in an airtight container in the refrigerator for up to 3 days. Let it cool completely before sealing the container to avoid condensation inside, which can affect taste and texture. Reheat gently on the stovetop or in the microwave to enjoy it again!

Can I freeze Ginger-Scallion Chicken Soup?
Yes, you can! To freeze the soup, portion it into airtight containers or freezer bags. I recommend pouring the soup into bags, laying them flat to freeze, as they’ll take up less space. It can be stored for up to 3 months. Just remember to leave some room at the top of the container or bag for expansion!

What should I do if my soup is too salty?
If your soup turns out too salty, don't worry! You can add additional low-sodium chicken broth to dilute the saltiness or throw in a peeled potato while simmering for 10-15 minutes, as it will absorb some of the excess salt. After cooking, just remove the potato.

Is this soup suitable for gluten-free diets?
Very! This Ginger-Scallion Chicken Soup can easily be made gluten-free by swapping the ramen noodles for gluten-free rice noodles or quinoa. Additionally, ensure that the chicken broth and any sauces used are gluten-free as well to keep it safe for those with gluten sensitivities.

What vegetables can I add to enhance the soup?
The more the merrier! You can add vegetables like bok choy, spinach, or bell peppers to your Ginger-Scallion Chicken Soup for extra nutrition. Just remember to chop them into small pieces for even cooking and add them in with the other vegetables at the beginning!

Ginger-Scallion Chicken Soup

Savor the Warmth of Ginger-Scallion Chicken Soup Tonight

Ginger-Scallion Chicken Soup is the perfect antidote to a hectic day, nourishing and flavorful.
Print Recipe Pin Recipe
Prep Time 10 minutes mins
Cook Time 30 minutes mins
Total Time 40 minutes mins
Servings: 4 bowls
Course: Soups
Cuisine: Asian
Calories: 300
Ingredients Equipment Method Nutrition Notes

Ingredients
  

For the Soup
  • 1 whole Rotisserie Chicken Provides protein and flavor; can substitute with homemade cooked chicken for a fresher taste.
  • 1 tablespoon Neutral Oil Used for sautéing the vegetables and to prevent sticking; can use olive oil or sunflower oil.
  • 1 Yellow Onion Adds sweetness and depth; substitute with shallots for a milder flavor.
  • 3 Carrots Offers sweetness and texture; can replace with peas or bell peppers if desired.
  • 3 Celery Contributes crunch and aroma; can omit if not available.
  • 1 tablespoon Minced Ginger Key source of spiciness and warmth; fresh ginger is recommended, but ground ginger can be used in a pinch.
  • 1-2 Thai Chili Peppers Adds heat; omit if you prefer a milder soup or substitute with red pepper flakes.
  • 10 Scallions Provides freshness and a mild onion flavor; green onions can be used as a substitute.
  • 6 cups Chicken Broth Main liquid used, enriching the soup; use low-sodium for less salt or vegetable broth for a vegetarian version.
  • 16 ounces Frozen Ramen Noodles Quick to cook and adds heartiness; substitute with soba or udon noodles as desired.
  • 4 teaspoons Sesame Oil Adds a nutty flavor; can use additional olive oil for a lighter taste.
  • 2 teaspoons Sesame Seeds Garnish that adds texture; can be omitted or replaced with chopped peanuts for crunch.
  • Salt Enhances flavor; adjust to taste or use soy sauce for added umami.

Equipment

  • Large pot
  • Cutting Board
  • Knife
  • Ladle

Method
 

Step-by-Step Instructions
  1. Prepare Chicken: Start by shredding the meat from the rotisserie chicken into bite-sized pieces, discarding the carcass.
  2. Cook Vegetables: In a large pot, heat the neutral oil over medium heat until shimmering. Add the diced onion, sliced carrots, and diced celery. Sauté the vegetables for about 3-4 minutes until they soften.
  3. Add Aroma: Stir in the minced ginger, optional Thai chili peppers, and the white parts of the scallions. Cook for an additional minute.
  4. Combine Broth and Chicken: Pour in the chicken broth and add the shredded chicken to the pot. Increase the heat to bring the mixture to a boil, then reduce it to a simmer for 30 minutes.
  5. Cook Noodles: While the soup simmers, cook the frozen ramen noodles in a separate pot according to the package instructions.
  6. Finish Soup: Stir half of the minced scallion greens and 2 teaspoons of sesame oil into the simmering soup. Let cook for an additional 5 minutes.
  7. Prepare Garnish: In a small bowl, combine the remaining scallion greens with the last 2 teaspoons of sesame oil and a pinch of salt.
  8. Serve: Ladle the flavorful soup over the noodles in each bowl and garnish.

Nutrition

Serving: 1bowlCalories: 300kcalCarbohydrates: 30gProtein: 25gFat: 10gSaturated Fat: 2gPolyunsaturated Fat: 3gMonounsaturated Fat: 4gCholesterol: 60mgSodium: 800mgPotassium: 650mgFiber: 4gSugar: 2gVitamin A: 180IUVitamin C: 20mgCalcium: 40mgIron: 2mg

Notes

Ensure vegetables are minced finely for quicker cooking. Adjust salt based on broth's saltiness.

Tried this recipe?

Let us know how it was!

Creamy Mushroom-Taleggio Risotto for Cozy Comfort Moments

August 27, 2025 by Grace Snow Leave a Comment

As I stirred the creamy Mushroom-Taleggio Risotto, the rich aroma of sautéed mushrooms began to fill my kitchen, transforming it into a cozy haven. There's something truly magical about this dish - it strikes the perfect balance between comfort food and gourmet indulgence. With just a handful of ingredients, including the luscious Taleggio cheese that melts beautifully, you can create a satisfying meal that feels like a warm hug on a chilly evening. Not only is this risotto effortlessly simple to prepare, but it’s also a crowd-pleaser that’s both vegetarian and wonderfully creamy. Whether it serves as a delightful lunch or a hearty dinner, it's time to elevate your home cooking game. Are you ready to dive into this delicious journey?

Why Is This Risotto So Special?

Creamy Delight: Made with the luxurious Taleggio cheese, this risotto is irresistibly creamy, offering a decadent texture that melts in your mouth.

Earthy Goodness: The blend of dried porcini and cremini mushrooms brings an incredible depth of flavor, lifting this dish from ordinary to extraordinary.

Quick and Simple: With straightforward steps and minimal prep, this recipe is perfect for both novice cooks and seasoned chefs looking for an easy win in the kitchen.

Crowd-Pleaser: Its elegant taste and comforting qualities make it ideal for gatherings or cozy dinners at home—everyone will savor every bite!

Versatile Creations: Feel free to experiment by adding your favorite veggies or proteins, like asparagus or grilled chicken, to suit your family’s preferences. Explore different flavor profiles by substituting cheeses and discover your perfect version of this classic dish!

Mushroom-Taleggio Risotto Ingredients

For the Risotto Base
• Dried Porcini Mushrooms – Adds depth and umami flavor; can substitute with more cremini mushrooms if needed.
• Cremini Mushrooms – Fresh, earthy flavor enhances the risotto’s texture; ensure they are cleaned and thinly sliced.
• Leek – Provides a mild onion-like flavor; substitute with yellow onion if necessary.
• Arborio Rice – The base for risotto; its starchiness creates creaminess—do not substitute with regular rice.
• Olive Oil – Enhances overall flavor and aids in cooking; can use butter for a richer taste.

For Cooking Liquid
• Boiling Water – Used for soaking dried porcini to rehydrate.
• Warm Water or Vegetable Stock – Liquids to cook the rice; stock adds flavor depth.

For Flavor and Creaminess
• Taleggio Cheese – Offers creaminess and a unique flavor profile; substitute with soft cheeses like Brie or Fontina.
• Parmesan Cheese – Used for finishing and added richness; more can be served on top when plating.
• Lemon Juice – Brightens the dish; alternatives are lime juice or vinegar.
• Salt and Pepper – Essential for seasoning the dish to taste.

For Garnishing
• Parsley – Adds freshness and color; no recommended substitute.
• Sweet Pea Tendrils – Optional garnish for color and delicate flavor; can use fresh herbs like basil or microgreens.

Remember, this delicious Mushroom-Taleggio Risotto is all about layering flavors that comfort the soul!

Step‑by‑Step Instructions for Mushroom-Taleggio Risotto

Step 1: Prepare Porcini Mushrooms
Start by soaking the dried porcini mushrooms in boiling water for about 20 minutes. This rehydrates them and releases their deep umami flavor. After soaking, remove the mushrooms, chop them finely, and reserve the soaking liquid for later use in your luscious Mushroom-Taleggio Risotto.

Step 2: Fry Cremini Mushrooms
In a large pot, heat a drizzle of olive oil over medium heat. Add the cleaned and thinly sliced cremini mushrooms, sautéing them for 16 to 20 minutes until they are browned and crisp. As they cook, season gently with salt and pepper to enhance their earthy flavor, ensuring a rich base for the risotto.

Step 3: Cook Leek and Porcini
Once the cremini mushrooms are golden, stir in the chopped porcini mushrooms along with the sliced leeks. Continue cooking for about 5 minutes, or until the leeks are softened and fragrant. This flavorful mix will add layers of taste to your creamy Mushroom-Taleggio Risotto.

Step 4: Toast Arborio Rice
Next, add the Arborio rice to the pot, stirring it into the mixture for 2-3 minutes. This step is crucial as toasting the rice gently enhances its nutty flavor and helps release the starch that will create creaminess. Lightly season the rice during this step to build a delicious foundation.

Step 5: Begin Adding Liquid
Pour in the reserved porcini soaking liquid, letting it simmer until almost fully absorbed, which should take about 4-5 minutes. Begin adding warm vegetable stock or water gradually, one ladle at a time, stirring often. Continue this process for roughly 20-25 minutes, until the rice is creamy and tender but still has a slight bite.

Step 6: Finish Risotto
Once the rice reaches your desired creaminess, reduce the heat and stir in the decadent Taleggio and Parmesan cheese. Mix until fully melted and integrated, followed by adding fresh parsley and a splash of lemon juice for brightness. Let the risotto sit for 5 minutes, allowing the flavors to meld beautifully.

Step 7: Serve
Spoon your creamy Mushroom-Taleggio Risotto into bowls, garnishing with sweet pea tendrils and additional Parmesan if desired. The rich flavors and velvety texture create a comforting dish that’s sure to impress, perfect for any cozy gathering!

Mushroom-Taleggio Risotto Variations

Feel free to let your creativity shine and personalize your risotto with these delightful twists!

  • Cheese Swap: Substitute Taleggio with Gorgonzola for a bolder, tangy flavor that perfectly complements the mushrooms. This twist adds a distinct taste that many cheese lovers will appreciate.

  • Additional Veggies: Toss in some fresh peas or asparagus during the last few minutes of cooking for a burst of color and a nutritious boost. These additions bring a delightful crunch and freshness that brighten up the dish.

  • Protein Boost: Incorporate cooked chicken or shrimp for a more hearty meal. Simply stir in the protein of your choice for that extra satisfying element, transforming this side dish into a main course.

  • Herb Infusion: Swap out parsley for fresh basil or thyme to change the flavor profile. The subtle herb notes elevate the dish beautifully, creating a new twist that is both fragrant and delicious.

  • Nutty Flavor: Toast some pine nuts or walnuts and sprinkle them on top before serving for an added crunch. The texture contrast and nutty flavor introduce a wonderful depth to the creamy risotto.

  • Spicy Kick: Add a pinch of red pepper flakes or a dash of hot sauce to spice things up. This can turn a comforting dish into something exciting and vibrant, perfect for those who love a bit of heat.

  • Creamy Alternative: Try using mascarpone cheese in place of Taleggio for an even creamier texture. This modification makes the risotto luxuriously smooth and gives it an incredible richness that’s hard to resist.

  • Citrus Zest: Enhance the brightness by adding a tablespoon of lemon zest along with the lemon juice. This simple addition elevates the dish, providing a delightful zing that pairs beautifully with the earthy flavors.

Embrace these variations and make this Mushroom-Taleggio Risotto uniquely yours, loaded with your favorite tastes! If you're looking for a quick side dish, consider pairing it with a light green salad to balance the creaminess or serve it alongside some rustic bread for the ultimate comfort food experience. Enjoy!

Expert Tips for Mushroom-Taleggio Risotto

Toast the Rice: Ensure to toast the arborio rice for a few minutes before adding liquid to enhance its flavor and promote a creamy texture.

Perfect Heat: Adjust your stove to maintain a medium-low heat while cooking to prevent sticking and ensure even cooking throughout the risotto.

Taste as You Go: Always taste the risotto as you stir in the cheese, adjusting the seasoning since Parmesan can add saltiness—a delicious Mushroom-Taleggio Risotto shouldn’t be over-seasoned!

Careful with Liquids: Add your stock or water gradually; this allows the rice to absorb the flavors properly, resulting in a luxuriously creamy dish.

Keep Warm: Keep your liquids warm before adding them to the risotto; this helps maintain cooking temperature and improves overall creaminess.

What to Serve with Mushroom-Taleggio Risotto

Creating the perfect meal is a delightful journey, and pairing dishes can elevate your dining experience to new heights.

  • Crisp Green Salad: A fresh salad tossed with light vinaigrette complements the creamy richness of the risotto perfectly, adding brightness and texture.

  • Garlic Bread: The crusty, buttery goodness of garlic bread contrasts beautifully with the soft, velvety risotto while providing a satisfying crunch.

  • Roasted Asparagus: These tender, slightly-charred spears not only enhance the meal’s nutrition but also bring a delightful crunch that balances the creaminess of the risotto.

  • Herbed Quinoa: This fluffy, nutrient-packed side adds a nutty flavor and a unique texture, making it an excellent match for the risotto.

  • Grilled Lemon Chicken: The zesty, smoky notes of grilled chicken will harmonize beautifully with the earthy mushroom flavors, creating a heartier meal.

  • Chardonnay: A glass of chilled Chardonnay adds sophisticated acidity, enhancing the rich, creamy tones of the Mushroom-Taleggio Risotto.

  • Chocolate Mousse: End on a sweet note with a light, airy chocolate mousse; its indulgent sweetness perfectly contrasts the savory risotto.

  • Steamed Broccoli: Bright green broccoli drizzled in olive oil is a simple yet nutritious pairing that contrasts with the creamy texture of the dish.

Make Ahead Options

These creamy Mushroom-Taleggio Risotto preparations are perfect for busy home cooks looking to save time during the week. You can soak the dried porcini mushrooms up to 24 hours in advance and store them in the refrigerator, ensuring to keep the soaking liquid for later use. Also, the sautéed cremini mushrooms and leeks can be prepared up to 3 days ahead; just refrigerate them in an airtight container. When you’re ready to finish the risotto, simply reheat the mushroom mixture, add the Arborio rice, and follow the cooking instructions, adding the reserved mushroom liquid and warm stock. This way, you’ll enjoy a comforting, gourmet dish with minimal effort, just as delicious as if made fresh!

How to Store and Freeze Mushroom-Taleggio Risotto

Fridge: Store your Mushroom-Taleggio Risotto in an airtight container for up to 3 days. This keeps it fresh while maintaining its creamy texture.

Freezer: For longer storage, freeze risotto in portions using airtight freezer bags or containers. It can be stored for up to 2 months.

Reheating: When ready to enjoy, reheat thawed risotto gently on the stove, adding a splash of water or stock to restore its creaminess. Stir frequently to ensure even heating.

Serving Tip: If the risotto appears dry after reheating, don’t hesitate to add a bit more cheese or a drizzle of olive oil for extra flavor and richness.

Mushroom-Taleggio Risotto Recipe FAQs

What type of mushrooms should I use?
For the best flavor in your Mushroom-Taleggio Risotto, I recommend using both dried porcini mushrooms and fresh cremini mushrooms. The dried porcini adds a deep umami richness, while the cremini lends a fresh, earthy flavor that enhances the dish’s overall texture. If you cannot find porcini, opt for more cremini or even shiitake mushrooms as alternatives.

How should I store leftover risotto?
Absolutely! For storing your Mushroom-Taleggio Risotto, place it in an airtight container and keep it in the refrigerator for up to 3 days. Be sure to let it cool before sealing to maintain freshness. When you're ready to enjoy it again, reheat gently on the stove with a splash of water or broth to bring back its creamy consistency!

Can I freeze Mushroom-Taleggio Risotto?
Yes, you can! To freeze your Mushroom-Taleggio Risotto, portion it into airtight freezer bags or containers. Squeeze out excess air to prevent freezer burn, and label with a date. It’s best consumed within 2 months, but remember to thaw it in the refrigerator overnight before reheating. When heating, add a little liquid to help restore that luscious creaminess.

What can I do if my risotto turns out too thick?
If your Mushroom-Taleggio Risotto is too thick, don’t fret! Simply add a splash of warm water or vegetable stock gradually while stirring over low heat. This will loosen the mixture and restore creaminess. If necessary, you can also stir in a touch more cheese, which can enhance flavor and smoothness. Remember to take it slow when adjusting the consistency!

Is this dish suitable for vegetarians?
Yes, very much! The Mushroom-Taleggio Risotto is a delightful vegetarian dish, featuring wholesome ingredients such as mushrooms, leeks, and creamy cheeses. It's a winning choice for anyone looking for comfort food without meat. Just ensure all cheese products you use are made without animal rennet for a strict vegetarian option.

Can I add proteins to my risotto?
Definitely! If you’d like to elevate your Mushroom-Taleggio Risotto with more substance, feel free to add cooked proteins like chicken, shrimp, or even a scoop of lentils. Just stir them in during the final mixing step to incorporate them seamlessly. The more, the merrier!

Mushroom-Taleggio Risotto

Creamy Mushroom-Taleggio Risotto for Cozy Comfort Moments

Enjoy the rich, creamy Mushroom-Taleggio Risotto, a perfect balance of comfort and gourmet, ideal for cozy dinners.
Print Recipe Pin Recipe
Prep Time 15 minutes mins
Cook Time 45 minutes mins
Total Time 1 hour hr
Servings: 4 servings
Course: Dinner
Cuisine: Italian
Calories: 450
Ingredients Equipment Method Nutrition Notes

Ingredients
  

For the Risotto Base
  • 1 cup Dried Porcini Mushrooms soaked and chopped
  • 8 oz Cremini Mushrooms cleaned and thinly sliced
  • 1 Leek sliced
  • 1 cup Arborio Rice
  • 2 tbsp Olive Oil
For Cooking Liquid
  • 4 cups Boiling Water for soaking porcini
  • 4 cups Warm Water or Vegetable Stock
For Flavor and Creaminess
  • 8 oz Taleggio Cheese melted
  • 1/2 cup Parmesan Cheese for finishing
  • 1 tbsp Lemon Juice
  • to taste Salt
  • to taste Pepper
For Garnishing
  • 1/4 cup Parsley chopped
  • 1/4 cup Sweet Pea Tendrils optional

Equipment

  • Large pot
  • Cutting Board
  • Knife
  • Ladle

Method
 

Step-by-Step Instructions
  1. Soak the dried porcini mushrooms in boiling water for about 20 minutes.
  2. Remove the mushrooms, chop them finely, and reserve the soaking liquid.
  3. In a large pot, heat olive oil over medium heat, add cremini mushrooms and sauté for 16-20 minutes.
  4. Stir in chopped porcini mushrooms and sliced leeks, cooking for about 5 minutes.
  5. Add Arborio rice to the pot, stirring for 2-3 minutes.
  6. Pour in reserved porcini soaking liquid, simmer until almost fully absorbed.
  7. Continue adding warm vegetable stock or water one ladle at a time for about 20-25 minutes.
  8. Once creamy, stir in Taleggio and Parmesan cheese, and add parsley and lemon juice.
  9. Let sit for 5 minutes before serving.
  10. Spoon risotto into bowls and garnish with sweet pea tendrils.

Nutrition

Serving: 1cupCalories: 450kcalCarbohydrates: 60gProtein: 12gFat: 20gSaturated Fat: 10gPolyunsaturated Fat: 2gMonounsaturated Fat: 6gCholesterol: 30mgSodium: 600mgPotassium: 500mgFiber: 3gSugar: 2gVitamin A: 800IUVitamin C: 5mgCalcium: 300mgIron: 2mg

Notes

This Mushroom-Taleggio Risotto is about layering flavors that comfort the soul!

Tried this recipe?

Let us know how it was!

Hearty Beef Barley Stew for Ultimate Comfort and Warmth

August 27, 2025 by Grace Snow Leave a Comment

As the chilly winds start to rustle through the trees, I find myself yearning for the heartwarming embrace of a classic comfort food: Beef Barley Stew. This nourishing dish boasts a thick, velvety texture and delightful, rich flavors that make it a favorite for cozy gatherings or a quiet evening at home. Infused with sweet vermouth and a medley of wholesome vegetables, this stew is not only easy to whip up but also a true crowd-pleaser that warms both body and soul. Plus, with a simple swap of beef for mushrooms or beans, it's accessible for those seeking a vegan option. So, are you ready to dive into a bowl of warmth and comfort? Let's get cooking!

Why is Beef Barley Stew So Irresistible?

Comforting and Hearty: This beef barley stew is the definition of a warming hug in a bowl, perfect for chilly evenings.
Flavor-Packed: The sweet vermouth infuses a depth of flavor that harmonizes beautifully with the tender beef and vegetables.
Versatile: Easily adaptable, simply swap beef for mushrooms or beans to create a delightful vegan version!
Quick Preparation: With straightforward steps, you can have this rich stew simmering away in no time, making it an ideal choice for busy weeknights.
Crowd-Pleasing: Whether it’s a family dinner or a gathering with friends, this stew is sure to impress and satisfy every palate! Your guests will be asking for seconds, just like they do for my popular Lamb Stew Hearty.

Beef Barley Stew Ingredients

Get ready to create a comforting masterpiece with these essential ingredients!

For the Stew

  • Neutral Oil – Provides fat for browning the meat and sautéing vegetables; can substitute with olive oil for added flavor.
  • Top Sirloin/Rump Roast/Chuck Roast (1½ pounds) – Main protein that gives depth; trim excess fat before cutting into 1-inch cubes for even cooking.
  • Yellow Onion (1) – Adds sweetness and savoriness; swapping for white onion gives a sharper flavor profile.
  • Celery (3 ribs) – Contributes a crunchy texture and aromatic flavor; fennel can be substituted for a unique taste.
  • Carrots (4) – Bring natural sweetness and vibrant color; cut into thick rounds for better texture retention during cooking.
  • Garlic (5 cloves) – Enhances overall flavor; mincing allows better blending into the stew for a rich taste.
  • Dry Thyme (2 teaspoons) – Imparts earthy notes; can replace with Italian seasoning for a herb blend twist.
  • Flour (¼ cup) – Acts as a thickening agent for the stew, ensuring a velvety finish.
  • Sweet Vermouth (4 ounces) – Adds depth and a hint of sweetness; can substitute with red wine or omit for a non-alcoholic version.
  • Beef Broth (6 cups) – The rich base for the stew; adjust for desired consistency.
  • Potatoes (1 pound) – Provides heartiness; cut into 1-inch cubes for the perfect bite.
  • Pearl Barley (1 cup) – Offers chewiness and thickens the stew; rinsing before use removes excess starch.
  • Salt & Pepper – Essential for seasoning; adjust to taste for optimal flavor.
  • Crushed Red Pepper (to taste) – Adds a touch of heat; optional for those who prefer a milder dish.
  • Parsley (½ cup, plus more for serving) – Brings freshness and vibrant color; cilantro can be used as a fun substitute.

Feel the warmth and excitement as you gather these ingredients for your comforting beef barley stew—it's a dish that's sure to evoke joy at every hearty spoonful!

Step‑by‑Step Instructions for Beef Barley Stew

Step 1: Brown the Beef
Begin by seasoning 1½ pounds of cut beef with salt and pepper generously. In a wide pot, heat a splash of neutral oil over medium-high heat until shimmering, then add the beef in a single layer. Brown each side for 3-5 minutes until caramelized and a deep color develops, forming that irresistible flavor base for your beef barley stew.

Step 2: Cook the Aromatics
Once the beef is beautifully browned, reduce the heat to medium and add one chopped yellow onion, three sliced celery ribs, and four thick-cut carrot rounds to the pot. Sauté for about 5 minutes until the vegetables soften slightly, then stir in five minced garlic cloves and two teaspoons of dry thyme. Cook for an additional 1-2 minutes until fragrant, seasoning further with salt, pepper, and crushed red pepper if you like a hint of heat.

Step 3: Cook the Flour
Sprinkle ¼ cup of flour evenly over the aromatic mixture in the pot. Toss everything together to coat thoroughly, allowing the flour to toast lightly for about 1-2 minutes. This step is essential for thickening your beef barley stew and developing a rich, hearty texture for each delicious spoonful.

Step 4: Simmer the Stew
Next, pour in 4 ounces of sweet vermouth, whisking until smooth to deglaze the pot. Then add 6 cups of beef broth, ensuring the mixture comes to a vigorous boil. Once boiling, reduce the heat to low, cover, and let it simmer gently for 1 hour and 20 minutes, allowing the flavors of the beef barley stew to meld beautifully.

Step 5: Add Potatoes and Barley
After the initial simmering time, carefully remove the lid and taste for seasoning adjustments. Add 1 pound of diced potatoes and 1 cup of rinsed pearl barley into the stew, stirring them in well. Return the pot to a boil, then cover again and simmer for an additional 30-40 minutes until the potatoes and barley are tender and inviting.

Step 6: Finalize the Stew
Once everything is perfectly cooked, remove the pot from heat and taste again for any last-minute adjustments in seasoning. Stir in half a cup of chopped fresh parsley, adding a burst of color and freshness to your savory beef barley stew. Let the stew sit for 5-10 minutes to allow the flavors to settle before serving, filling your home with delightful aromas.

Make Ahead Options

These Beef Barley Stew are ideal for busy home cooks looking to save time during hectic weeknights! You can chop the vegetables (onion, celery, carrots, and potatoes) and store them in an airtight container in the refrigerator for up to 3 days. Additionally, you can brown the beef in advance and refrigerate it, which enhances flavors and makes the cooking process smoother. When you’re ready to enjoy your hearty stew, simply combine the prepped ingredients in your pot and proceed with the simmering steps as detailed. This method ensures that your beef barley stew tastes just as delicious while saving you precious time during meal prep!

Beef Barley Stew Variations & Substitutions

Feel free to personalize this stew to suit your taste buds and dietary preferences with these delightful variations!

  • Vegetarian Option: Substitute beef with mushrooms or beans to create a hearty, plant-based version. The umami flavors of the mushrooms complement the stew beautifully.
  • Root Vegetable Twist: Experiment with parsnips or turnips in place of carrots for a different flavor dynamic. Their earthy tones add depth while offering a nutritious alternative.
  • Add More Greens: Toss in fresh spinach or kale during the last 10 minutes of cooking for a burst of color and nutrition. It not only enhances the appearance but also elevates the health factor.
  • Spicy Kick: Adding a pinch of cayenne pepper or diced jalapeños will turn up the heat! This twist suits those who love a warm, spicy kick with their comfort food.
  • Citrus Brightness: A squeeze of lemon juice before serving can elevate the flavors, adding a refreshing zing that brightens the rich stew. It's a surprising twist that complements the savory notes wonderfully.
  • Barley Swap: For a gluten-free alternative, replace pearl barley with quinoa or rice; both will add texture and heartiness to the dish, making it just as filling.
  • Herbal Infusion: Swap out dry thyme for herbes de Provence or rosemary for unique herbal notes. This small change can significantly shift the flavor profile, giving your stew a fresh take.
  • Umami Boost: Add a splash of soy sauce or Worcestershire sauce for a deeper umami flavor. This not only enhances the taste but also adds richness to your stew.

With these variations, your cozy Beef Barley Stew will take on new life each time you prepare it! And if you're looking for more comforting recipes, check out this delicious Coconutty Beans and Greens Stew or my family-favorite Crock Pot Chicken Stew. Happy cooking!

Expert Tips for Beef Barley Stew

  • Avoid Crowding: When browning the beef, cook in batches if necessary. Overcrowding leads to steaming instead of browning, which affects flavor.
  • Season Gradually: Taste your stew as it cooks and adjust the salt and pepper gradually. It’s easier to add than to fix an overly salty stew!
  • Perfect Thickness: If your beef barley stew turns out too watery, simply remove the lid during the last 30 minutes to let some liquid evaporate.
  • Choosing Barley: Use pearl barley for a chewier texture, and remember to rinse it to remove excess starch before adding it to the pot.
  • Storage Smart: This stew thickens as it cools, making it excellent for leftovers. Store in an airtight container up to 3 days in the fridge, or freeze for later.
  • Flavor Boost: For added depth, consider a splash of Worcestershire sauce during the simmering process—it enhances the umami profile of your beef barley stew.

How to Store and Freeze Beef Barley Stew

Fridge: Store leftovers in an airtight container for up to 3 days. The stew may thicken as it cools, so a splash of broth can revive its original consistency when reheating.

Freezer: For longer storage, allow the stew to cool completely, then transfer to freezer-safe containers. It can be frozen for up to 3 months.

Reheating: When ready to enjoy, thaw overnight in the refrigerator, then reheat on the stove over low heat, adding a little broth if necessary to reach your desired consistency.

Quick Tip: Always label your containers with the date, so you know when to indulge in your hearty beef barley stew again!

What to Serve with Comforting Beef Barley Stew

Create the perfect dining experience by pairing this rich stew with delicious sides that elevate your meal.

  • Crusty Bread: Perfect for soaking up the savory broth and adding a satisfying crunch with each bite.
  • Mixed Greens Salad: A refreshing salad with bright vinaigrette balances the stew’s hearty richness, adding a crisp texture.
  • Garlic Butter Noodles: Soft and buttery noodles complement the stew's bold flavors and provide a comforting, familiar mouthfeel.
  • Roasted Vegetables: Seasoned and caramelized, they bring in additional layers of flavor and roasted sweetness that beautifully harmonizes with the dish.
  • Herb-Infused Rice: Light and fluffy, this rice offers a delicate base to accompany the robust flavors of the stew without being overwhelming.
  • Fruit Sorbet: A light, icy dessert can cleanse the palate after a hearty meal, providing a refreshing finish to your cozy dinner.

Whether it’s a casual family gathering or a cozy night in, these pairings transform your comforting beef barley stew into a truly memorable feast!

Beef Barley Stew Recipe FAQs

What type of beef is best for this stew?
I recommend using top sirloin, rump roast, or chuck roast for their tenderness and flavor. Trim any excess fat before cutting into 1-inch cubes to help the meat cook evenly and release those flavorful juices.

How should I store leftover Beef Barley Stew?
Leftovers should be cooled completely before transferring to an airtight container. They can be stored in the refrigerator for up to 3 days. If you find the stew thickens upon cooling, adding a splash of beef broth when reheating will help restore its original consistency.

Can I freeze Beef Barley Stew?
Absolutely! Once the stew has cooled, transfer it to freezer-safe containers. It will keep in the freezer for up to 3 months. When you’re ready to enjoy, thaw overnight in the fridge and reheat on the stove over low heat, adding a bit of broth if necessary.

What can I do if my stew is too watery?
If you notice your stew has become too watery, don't worry! Remove the lid for the last 30 minutes of cooking to allow some liquid to evaporate. You can also stir in a little extra flour to thicken it, whisking it well to avoid lumps.

Are there any dietary considerations for this stew?
For those with dietary restrictions, you can easily make a vegan version by substituting the beef with hearty mushrooms or beans like kidney or black beans. Additionally, check the broth to ensure it's vegetable-based to keep it plant-friendly.

How can I tell if my vegetables are ripened and ready for the stew?
Look for vegetables that are firm to the touch with vibrant colors. For instance, onions should be dry and have crisp skin, while carrots should be brightly colored without any dark spots or soft patches. Fresh produce ensures a more flavorful stew!

Beef Barley Stew

Hearty Beef Barley Stew for Ultimate Comfort and Warmth

This Beef Barley Stew is a comforting dish infused with rich flavors, perfect for chilly evenings.
Print Recipe Pin Recipe
Prep Time 20 minutes mins
Cook Time 1 hour hr 40 minutes mins
Resting Time 10 minutes mins
Total Time 2 hours hrs 10 minutes mins
Servings: 6 servings
Course: Soups
Cuisine: American
Calories: 450
Ingredients Equipment Method Nutrition Notes

Ingredients
  

For the Stew
  • 2 tablespoons Neutral Oil Can substitute with olive oil for added flavor.
  • 1.5 pounds Top Sirloin/Rump Roast/Chuck Roast Trim excess fat before cutting into 1-inch cubes.
  • 1 Yellow Onion Swapping for white onion gives a sharper flavor profile.
  • 3 ribs Celery Fennel can be substituted for a unique taste.
  • 4 Carrots Cut into thick rounds for better texture retention.
  • 5 cloves Garlic Mincing allows better blending into the stew.
  • 2 teaspoons Dry Thyme Can replace with Italian seasoning.
  • 0.25 cup Flour Acts as a thickening agent for the stew.
  • 4 ounces Sweet Vermouth Can substitute with red wine or omit for a non-alcoholic version.
  • 6 cups Beef Broth Adjust for desired consistency.
  • 1 pound Potatoes Cut into 1-inch cubes.
  • 1 cup Pearl Barley Rinse before use to remove excess starch.
  • Salt & Pepper Adjust to taste.
  • Crushed Red Pepper Optional for those who prefer a milder dish.
  • 0.5 cup Parsley Plus more for serving.

Equipment

  • wide pot

Method
 

Step-by-Step Instructions for Beef Barley Stew
  1. Brown the beef by seasoning 1½ pounds of cut beef with salt and pepper, then brown each side for 3-5 minutes in a wide pot with oil.
  2. Cook the aromatics by adding chopped yellow onion, celery, and carrots to the pot, sautéing for about 5 minutes, then adding garlic and thyme.
  3. Cook the flour by sprinkling it over the mixture, tossing to coat, and toasting for 1-2 minutes.
  4. Simmer the stew by adding sweet vermouth and beef broth, bringing to a boil, then simmering gently for 1 hour and 20 minutes.
  5. Add potatoes and barley, stirring them in, returning to a boil, and simmering for an additional 30-40 minutes.
  6. Finalize the stew by stirring in chopped parsley and allowing to sit for 5-10 minutes before serving.

Nutrition

Serving: 1cupCalories: 450kcalCarbohydrates: 40gProtein: 35gFat: 15gSaturated Fat: 5gPolyunsaturated Fat: 2gMonounsaturated Fat: 7gCholesterol: 100mgSodium: 800mgPotassium: 700mgFiber: 5gSugar: 3gVitamin A: 500IUVitamin C: 15mgCalcium: 50mgIron: 5mg

Notes

This stew thickens as it cools and can be stored in airtight containers for up to 3 days, or frozen for later use.

Tried this recipe?

Let us know how it was!

Aromatic Choo Chee Fish Curry for a Cozy Weeknight Meal

August 27, 2025 by Grace Snow Leave a Comment

As the sun dips below the horizon, the air fills with the vibrant, spicy aroma of Choo Chee Fish Curry simmering on the stove. This fragrant curry is not just a dish; it’s a warm embrace during those busy weeknights when you want to delight your family without spending hours in the kitchen. In under 40 minutes, you’ll create a creamy, gluten-free masterpiece, thanks to the rich coconut milk and a kick of choo chee paste that dances on your palate. Not only does this dish promise hearty nourishment, but it also allows for easy customization based on your pantry staples or dietary needs. Curious how to make this comforting bowl of goodness? Let’s dive into the recipe together!

Why is Choo Chee Fish Curry amazing?

Flavor Explosion: The choo chee paste brings a unique mix of spices that elevate ordinary meals into extraordinary culinary experiences.

Quick & Easy: Ready in under 40 minutes, this recipe is perfect for busy weeknights when you crave delicious homemade comfort without the fuss.

Versatile: Easily adaptable, feel free to swap the mahi mahi with salmon, tofu, or even chickpeas, ensuring it suits your preferences or dietary needs.

Creamy Delight: The combination of full-fat coconut milk and fresh veggies creates a silky texture that's both indulgent and satisfying, appealing to the whole family.

Crowd-Pleaser: Whether you're hosting a dinner party or serving family, this dish dazzles effortlessly, making it a go-to for gatherings. Pair it with some Cheesy Zucchini Bake for a complete meal experience!

Choo Chee Fish Curry Ingredients

For the Curry

  • Neutral Oil – Used for sautéing aromatics; opt for canola or vegetable oil for a mild flavor.
  • Shallot – Adds sweetness and depth; you can replace it with onion if needed.
  • Scallions – Provide a fresh, oniony flavor; both green and white parts enhance the dish, or substitute with chives.
  • Choo Chee Curry Paste – The heart of this dish; offers a unique spice blend that defines the Choo Chee Fish Curry; consider red curry paste with extra brown sugar as an alternative.
  • Full-Fat Coconut Milk – Brings creaminess; use light coconut milk for a lower calorie option if desired.
  • Water or Chicken Stock – Hydrates the curry; using less results in a thicker consistency.
  • Carrots – Add sweetness and texture; feel free to replace them with sweet potatoes for a delightful twist.
  • Bell Pepper – Contributes crunch and sweetness; any color works, or substitute with zucchini or green beans.
  • Fish Sauce – Heightens umami flavor; can be replaced with soy sauce for a vegetarian option.
  • Mahi Mahi Filets – Primary protein with a firm texture; substitute with salmon, mackerel, or tofu for a vegetarian choice.
  • Salt – For seasoning; adjust according to your taste.

For Serving

  • Cooked White Rice or Rice Noodles – Serve as a hearty base; quinoa is a great gluten-free option.
  • Thai Basil Leaves – Adds fragrance and depth; regular basil can be used in a pinch.
  • Lime Wedges – Provide necessary acidity and brightness that balances flavors beautifully.
  • Minced Cilantro and Crispy Shallots – Optional but recommended for an enhanced presentation and flavor.

Step‑by‑Step Instructions for Choo Chee Fish Curry

Step 1: Prepare Aromatics
Heat a tablespoon of neutral oil in a large pot over medium heat. Add finely chopped shallots and the white parts of scallions, sautéing for about 2-3 minutes until softened and fragrant. Stir in a pinch of salt to enhance their flavor, watching the shallots turn translucent.

Step 2: Cook Curry Paste
Add the choo chee curry paste to the pot, stirring well to combine. Fry the mixture for another 2-3 minutes until the paste is fragrant and slightly darkened. Then, pour in the solidified fat from the can of full-fat coconut milk, allowing it to melt and blend with the aromatics.

Step 3: Add Liquids
Once the paste is ready, gradually pour in the remaining coconut milk and your choice of water or chicken stock. Increase the heat to bring the mixture to a gentle boil, stirring occasionally to ensure everything is well incorporated.

Step 4: Simmer Vegetables
Incorporate sliced carrots and bell pepper into the boiling mixture. Lower the heat to a simmer and cover the pot, cooking for about 20 minutes until the vegetables are tender yet still have a slight crunch, absorbing the rich flavors of the choo chee fish curry.

Step 5: Season
After the vegetables have softened, stir in the fish sauce, tasting as you go to adjust the seasoning to your preference. This will deepen the umami flavor of the dish, making sure your choo chee fish curry is perfectly balanced.

Step 6: Cook Fish
Pat the mahi mahi filets dry and season them lightly with salt. When the curry reaches a steady boil again, gently place the fish into the pot. Cover the pot and let it simmer for 5-8 minutes until the fish is cooked through and reaches an internal temperature of 145ºF, flaking easily when tested with a fork.

Step 7: Serve
Carefully transfer the cooked fish and vegetables into serving bowls, ladling the luscious curry sauce over the top. Serve with cooked white rice or rice noodles, garnishing with fresh Thai basil leaves, lime wedges, minced cilantro, and crispy shallots for an extra touch.

Choo Chee Fish Curry Variations

Feel free to explore and elevate your choo chee fish curry with these delightful twists that cater to your tastes!

  • Dairy-Free: Substitute full-fat coconut milk with light coconut milk for a lighter option that still retains creaminess.
  • Vegetarian Delight: For a meatless version, swap out the fish for chickpeas—a fantastic source of protein that pairs beautifully with the curry.
  • Add Extra Veggies: Toss in snap peas or eggplant for added texture and nutrient diversity, enhancing the visual appeal and taste.
  • Spicy Kick: For those who like it hot, add a pinch of red pepper flakes or fresh chili slices to bring a tantalizing heat to your dish.
  • Citrusy Notes: Squeeze extra lime juice over the finished curry to brighten and elevate the flavors, creating a fresh burst that refreshes every bite.
  • Different Proteins: While mahi mahi works wonderfully, feel free to swap with salmon or even tofu for a vegetarian delight that’s rich in flavor and nutrition.
  • Flavor Boost: Integrate a spoonful of peanut butter into the curry for a luscious depth of flavor and a creamy richness that complements the spices elegantly.
  • Garnish Variety: Instead of just Thai basil, try fresh mint or even coriander leaves for a unique flavor twist that compliments the curry beautifully.

Pair your creations with delightful sides like Fish Taco Bowls or indulge in a side of Cheesy Corn Fritters for a complete meal experience! Customize and savor the comforting magic of your choo chee fish curry!

How to Store and Freeze Choo Chee Fish Curry

Fridge: Store leftovers in an airtight container for up to 3 days; this allows the flavors to meld beautifully.

Freezer: For longer storage, freeze the curry in an airtight container for up to 2 months. Thaw overnight in the fridge before reheating.

Reheating: Gently reheat on the stovetop or in the microwave until warmed through, adding a splash of coconut milk or water if the curry thickens.

Serving Tip: Fresh herbs can elevate the dish, so consider adding Thai basil or cilantro when reheating your choo chee fish curry!

Expert Tips for Choo Chee Fish Curry

  • Ingredient Freshness: Use fresh ingredients for the best flavor and aroma; wilted veggies or old spices can dull the vibrant taste of your choo chee fish curry.

  • Don't Overcook the Fish: Keep a close eye on the fish during cooking; overcooking can lead to a tough texture. It should easily flake apart when perfect.

  • Adjust Consistency: Feel free to tweak the amount of liquid based on your preference. For a thicker curry, use less water or stock while simmering with the vegetables.

  • Balance Flavors: Always taste and adjust seasoning before serving. A squeeze of fresh lime at the end brightens the flavors in your choo chee fish curry.

  • Customize Your Veggies: This curry is very versatile. Don’t hesitate to add other favorite vegetables, like snap peas or eggplant, for added nutrients and flavor.

  • Make Ahead Tip: You can prepare the curry paste in bulk and freeze it for quick weeknight meals; this will save you time for your next choo chee fish curry.

Make Ahead Options

These Choo Chee Fish Curry components are perfect for meal prep enthusiasts! You can prepare the aromatics (shallots and scallions) and the choo chee curry paste up to 24 hours in advance by sautéing them and refrigerating them in an airtight container. Additionally, slice the carrots and bell peppers the day before and store them in the fridge to maintain their crunch. When you're ready to enjoy your delicious curry, simply heat the prepped ingredients with coconut milk and water, simmer for about 10 minutes, and add your fish to finish cooking. This way, you can savor a comforting homemade meal with minimal stress!

What to Serve with Choo Chee Fish Curry

The aromatic, creamy goodness of this dish deserves delightful companions that enhance every bite.

  • Jasmine Rice: The fragrant, fluffy rice soaks up the rich curry sauce, making every mouthful a comforting experience.

  • Rice Noodles: This delicate yet chewy option offers a delightful contrast to the creamy curry, perfect for twirling with your fork.

  • Thai Basil Leaves: Their fresh, herbal flavor adds brightness to each serving, elevating the richness of the curry.

Enjoy the burst of flavors with a side of Lime Wedges for a zesty squeeze that balances the complex spices beautifully.

Don’t forget a chilled glass of Chardonnay; its crispness complements the dish's creaminess, making it a splendid pairing.

For dessert, Coconut Sticky Rice with Mango provides a sweet, tropical finish that echoes the curry’s underlying ingredients.

Savoring these pairings will turn your choo chee fish curry into a truly memorable meal.

Choo Chee Fish Curry Recipe FAQs

What should I look for when selecting fish for my Choo Chee Fish Curry?
When choosing fish, I recommend going for fillets that are fresh and firm, like mahi mahi or salmon. Look for clear, bright eyes and shiny, moist skin. Avoid any that have a strong fishy smell or dark spots, which indicate they may not be fresh anymore.

How should I store leftovers of Choo Chee Fish Curry?
Absolutely! Store any leftovers in an airtight container in the fridge for up to 3 days. This allows the flavors to deepen over time and maintain their deliciousness. Just remember to reheat gently on the stovetop or microwave, adding a bit of coconut milk if it thickens.

Can I freeze Choo Chee Fish Curry, and if so, how?
Yes, you can freeze Choo Chee Fish Curry! To do this, let it cool to room temperature, then transfer it to an airtight container or a heavy-duty freezer bag. Make sure to remove any excess air before sealing. It can be stored in the freezer for up to 2 months. When you're ready to enjoy it again, thaw overnight in the fridge and reheat on the stovetop, adding a splash of coconut milk for creaminess.

What are some common issues when making Choo Chee Fish Curry?
One common issue is overcooking the fish, which can make it rubbery. To avoid this, keep a close eye on the cooking time; once the fish reaches an internal temperature of 145ºF, it’s perfectly done. If your curry seems too thick, you can always add a bit more coconut milk or water to adjust the consistency.

Is Choo Chee Fish Curry suitable for those with allergies?
When prepared with gluten-free fish sauce or tamari, this dish can be safe for individuals with gluten allergies. However, if you’re serving it to someone with a seafood allergy, feel free to replace the fish with chickpeas or tofu for a vegetarian twist. Always check the labels for any hidden allergens in the ingredients you select!

How can I enhance the flavors in my Choo Chee Fish Curry?
For added flavor, consider adjusting the seasoning at the end with a squeeze of fresh lime juice. This little touch brightens up the dish! Additionally, topping your curry with fresh herbs like cilantro or Thai basil right before serving offers a burst of freshness and aroma that truly elevates the dish.

Choo Chee Fish Curry

Aromatic Choo Chee Fish Curry for a Cozy Weeknight Meal

Delight in this creamy Choo Chee Fish Curry, ready in under 40 minutes, perfect for busy weeknights.
Print Recipe Pin Recipe
Prep Time 10 minutes mins
Cook Time 30 minutes mins
Total Time 40 minutes mins
Servings: 4 servings
Course: Dinner
Cuisine: Thai
Calories: 450
Ingredients Equipment Method Nutrition Notes

Ingredients
  

For the Curry
  • 1 tablespoon Neutral Oil Canola or vegetable oil
  • 1 medium Shallot Finely chopped
  • 2 stalks Scallions White and green parts, chopped
  • 3 tablespoons Choo Chee Curry Paste Can substitute with red curry paste and extra brown sugar
  • 1 can Full-Fat Coconut Milk Use light coconut milk for a lower calorie option
  • 1 cup Water or Chicken Stock Adjust for consistency
  • 2 medium Carrots Sliced
  • 1 medium Bell Pepper Any color, sliced
  • 2 tablespoons Fish Sauce Can substitute with soy sauce for vegetarian option
  • 1 pound Mahi Mahi Filets Can substitute with salmon, mackerel, or tofu
  • to taste Salt For seasoning
For Serving
  • 4 servings Cooked White Rice or Rice Noodles Quinoa is a great gluten-free option
  • 1 cup Thai Basil Leaves For garnish
  • 2 wedge Lime Cut into wedges
  • 1/4 cup Minced Cilantro Optional garnish
  • 1/4 cup Crispy Shallots Optional garnish

Equipment

  • Large pot

Method
 

Step-by-Step Instructions
  1. Heat a tablespoon of neutral oil in a large pot over medium heat. Add finely chopped shallots and the white parts of scallions, sautéing for about 2-3 minutes until softened and fragrant. Stir in a pinch of salt to enhance their flavor, watching the shallots turn translucent.
  2. Add the choo chee curry paste to the pot, stirring well to combine. Fry the mixture for another 2-3 minutes until the paste is fragrant and slightly darkened. Then, pour in the solidified fat from the can of full-fat coconut milk, allowing it to melt and blend with the aromatics.
  3. Once the paste is ready, gradually pour in the remaining coconut milk and your choice of water or chicken stock. Increase the heat to bring the mixture to a gentle boil, stirring occasionally to ensure everything is well incorporated.
  4. Incorporate sliced carrots and bell pepper into the boiling mixture. Lower the heat to a simmer and cover the pot, cooking for about 20 minutes until the vegetables are tender yet still have a slight crunch, absorbing the rich flavors of the choo chee fish curry.
  5. After the vegetables have softened, stir in the fish sauce, tasting as you go to adjust the seasoning to your preference.
  6. Pat the mahi mahi filets dry and season them lightly with salt. When the curry reaches a steady boil again, gently place the fish into the pot. Cover the pot and let it simmer for 5-8 minutes until the fish is cooked through and reaches an internal temperature of 145ºF.
  7. Carefully transfer the cooked fish and vegetables into serving bowls, ladling the luscious curry sauce over the top. Serve with cooked white rice or rice noodles, garnishing with fresh Thai basil leaves, lime wedges, minced cilantro, and crispy shallots for an extra touch.

Nutrition

Serving: 1bowlCalories: 450kcalCarbohydrates: 50gProtein: 25gFat: 20gSaturated Fat: 12gPolyunsaturated Fat: 2gMonounsaturated Fat: 5gCholesterol: 70mgSodium: 800mgPotassium: 800mgFiber: 5gSugar: 3gVitamin A: 600IUVitamin C: 30mgCalcium: 50mgIron: 2mg

Notes

Use fresh ingredients for the best flavor and aroma. Adjust seasoning and consistency to your preference. This recipe is very versatile; feel free to customize with your favorite vegetables.

Tried this recipe?

Let us know how it was!

Honey-Sriracha Rotisserie Chicken Bowl: A Sweetly Spicy Delight

August 27, 2025 by Grace Snow Leave a Comment

As I stirred the fragrant sauce over the stovetop, I could feel a wave of excitement building—there’s something magical about quick meals that pack a punch, and this Honey-Sriracha Rotisserie Chicken Bowl does just that! This delightful dish marries the sweet heat of sriracha with the comforting ease of rotisserie chicken, creating a meal perfect for busy weeknights. It's not only a breeze to prepare but also incredibly customizable, allowing you to swap in seasonal veggies or grains you have on hand. You'll love how effortlessly it comes together while still looking vibrant and delicious. Are you ready to spice up your dinner routine? Let’s dive into this colorful bowl that will have everyone asking for seconds!

Why is this chicken bowl so irresistible?

Quick and Easy: This Honey-Sriracha Rotisserie Chicken Bowl takes just minutes to prepare, making it ideal for busy weeknights when you crave something delicious without the fuss.

Explosive Flavor: The sweet and spicy combination of honey and sriracha creates a taste sensation that's both bold and comforting—perfect for flavor lovers!

Versatile Ingredients: It's incredibly customizable; swap seasonal veggies or grains according to what's fresh and available in your kitchen.

Healthy Balance: With a mix of protein, fresh vegetables, and healthy fats, this bowl is a nutritious choice that will keep you satisfied without feeling guilty.

Crowd-Pleaser: Serve it up with lime wedges and crunchy toppings for a dish that everyone will love; it’s guaranteed to become a family favorite!

For more chicken inspiration, check out my recipes for Crock Pot Chicken or try the Honey Garlic Chicken for an easy alternative!

Honey-Sriracha Rotisserie Chicken Bowl Ingredients

Unlock the secrets of this flavorful dish!

For the Chicken
• Neutral oil – Essential for sautéing, opt for canola or vegetable oil.
• Onion – Adds depth and sweetness when sautéed.
• Rotisserie chicken – The star of the bowl; shredded for easy incorporation.
• Scallion whites – Boosts flavor in the sautéed mixture.

For the Sauce
• Sriracha – Contributes heat; adjust to your preference.
• Honey – Balances the spice of sriracha with a touch of sweetness.
• Low-sodium soy sauce – Adds umami without excess sodium.
• Fish sauce – Introduces complexity; can be omitted for vegetarian bowls.
• Lime juice – Freshly squeezed brightens up the flavors.
• Sesame oil – Use toasted for a richer, nutty aroma.

For the Salad
• Napa cabbage – Crunchy base for the salad.
• Scallion greens – Adds freshness and color.
• Salted peanuts – For delightful crunch; swap with other nuts if desired.
• Cilantro and Thai basil – Fresh herbs provide a flavor boost; parsley can substitute.
• English cucumber – Introduces refreshing crispness.

For Garnishes
• Sesame seeds – Optional but adds texture and appeal.
• Avocado – For creaminess; highly recommended for richness.
• Crispy shallots – Optional crunchy topping for extra flavor.

Let your creativity shine as you prepare this Honey-Sriracha Rotisserie Chicken Bowl and feel free to mix and match based on seasonal ingredients!

Step‑by‑Step Instructions for Honey-Sriracha Rotisserie Chicken Bowl

Step 1: Prepare Chicken
Heat 2 tablespoons of neutral oil in a large skillet over medium heat. Once shimmering, add one diced onion and sauté for about 5 minutes, until softened and translucent. Then, toss in the chopped scallion whites and cook for an additional minute before adding 2 cups of shredded rotisserie chicken. Stir well and warm for 8-10 minutes until the chicken is heated through and slightly crisped.

Step 2: Make Sauce
In a mixing bowl, whisk together 3 tablespoons of sriracha, 2 tablespoons of honey, 2 tablespoons of low-sodium soy sauce, 1 teaspoon of fish sauce, the juice of one lime, and 1 teaspoon of sesame oil until well combined and smooth. Taste the sauce and adjust the sweetness or heat to your preference, ensuring the flavors balance perfectly for your Honey-Sriracha Rotisserie Chicken Bowl.

Step 3: Finish Chicken
Pour the prepared sauce over the warm chicken mixture in the skillet, stirring to coat every piece. Increase the heat to medium-high until the mixture comes to a gentle boil. Reduce the heat to low and let it simmer for about 5 minutes, allowing the sauce to thicken slightly and the chicken to absorb the flavors, making it irresistibly tasty.

Step 4: Make Salad
In a large bowl, combine 4 cups of shredded Napa cabbage, the chopped scallion greens, 1/2 cup of salted peanuts, and a handful of chopped cilantro and Thai basil. Chop one English cucumber and add it into the mix. Drizzle freshly squeezed lime juice and a teaspoon of sesame oil over the ingredients. Lightly massage the salad to combine while tasting for seasoning, adjusting with salt if needed.

Step 5: Prepare Garnishes
Arrange sliced avocado, additional peanuts, minced scallions, lime wedges, and optional fresh Thai basil on a serving platter. These garnishes add fresh flavors and delightful textures, ensuring that your Honey-Sriracha Rotisserie Chicken Bowl is as visually appealing as it is delicious.

Step 6: Serve
To serve, scoop a generous portion of the sautéed chicken atop the vibrant salad. Garnish with the prepared toppings for added flavor and crunch. Serve immediately while everything is warm and delicious, inviting everyone to dig into this delightful Honey-Sriracha Rotisserie Chicken Bowl!

Honey-Sriracha Rotisserie Chicken Bowl Variations

Feel free to explore these exciting twists on your Honey-Sriracha Rotisserie Chicken Bowl and create a dish that’s uniquely yours!

  • Vegetarian Option: Substitute rotisserie chicken with crispy tofu or chickpeas for a hearty plant-based delight. Both options soak up the sauce beautifully!

  • Seasonal Veggies: Enhance your salad with seasonal star ingredients like bell peppers, radishes, or even roasted corn for a fresh, colorful crunch.

  • Nuts Swap: Use almonds or cashews instead of peanuts for a different flavor profile. Experimenting can elevate the dish’s texture and taste in surprising ways!

  • Herb Variations: Fresh parsley or mint can replace cilantro and Thai basil for a different herbal twist. Each herb brings unique qualities to your bowl.

  • Heat Levels: Adjust the spiciness by mixing sweet chili sauce with sriracha for a milder heat. It’s an excellent way to tailor the bowl for everyone's taste preferences.

  • Grain Base: Instead of Napa cabbage, try quinoa or brown rice as a base for added fiber and heartiness. These grains add a filling element and make the dish savory.

  • Crispy Toppers: Incorporate fried shallots or crispy bacon bits for a richer crunch. These add a decadent flair to the wholesome flavors of the bowl.

For even more flavor inspiration, don’t miss my recipes for Spatchcock Chicken Flavor and Honey Garlic Chicken. Happy cooking!

Make Ahead Options

These Honey-Sriracha Rotisserie Chicken Bowls are perfect for meal prep! You can make the chicken mixture and salad components up to 3 days in advance, storing them separately in airtight containers in the refrigerator. To keep everything fresh, prepare the chicken with the sauce and allow it to cool before refrigerating. The salad can be prepped by chopping the napa cabbage, cucumbers, and herbs, but mix in the dressing (lime juice and sesame oil) just before serving to prevent wilting. When you're ready to enjoy, simply reheat the chicken in a skillet until warm, layer it over the salad, and garnish as desired for a delicious, satisfying meal that saves you time on busy weeknights!

Expert Tips for Honey-Sriracha Rotisserie Chicken Bowl

  • Simmer for Flavor: Allow the sauce to simmer lightly to meld the ingredients for a more balanced and flavorful Honey-Sriracha Rotisserie Chicken Bowl.

  • Adjust Heat Gradually: Start with a small amount of sriracha and increase to your desired spice level. This helps avoid overwhelming heat that could detract from the dish.

  • Keep Chicken Warm: Maintain the temperature of the chicken while prepping other components; this ensures the toppings stay warm and delightful when served.

  • Customize Veggies: Don’t hesitate to swap seasonal veggies or proteins to maintain variety. Think bell peppers or chickpeas for that customizable touch!

  • Fresh Herbs Matter: Use fresh cilantro and Thai basil—they elevate flavors significantly. If unavailable, parsley works as a fine substitute while still tasting great.

How to Store and Freeze Honey-Sriracha Rotisserie Chicken Bowl

Fridge: Store leftovers in an airtight container for up to 3 days. This will help maintain the flavors and keep your Honey-Sriracha Rotisserie Chicken Bowl fresh.

Freezer: If you want to freeze, separate the chicken from the salad components. Freeze the chicken in a freezer-safe bag for up to 2 months; thaw overnight in the fridge before reheating.

Reheating: When ready to enjoy, reheat the chicken in a skillet over low heat until warmed through. Add a splash of water or extra sauce to keep it moist, then serve over fresh salad ingredients.

Seeds and Toppings: Store crispy shallots and any fresh herbs separately to maintain their texture and freshness; add them just before serving for the best experience.

What to Serve with Honey-Sriracha Rotisserie Chicken Bowl

Elevate your weeknight dinner with delightful sides that perfectly complement the vibrant flavors in this bowl!

  • Coconut Rice: Fluffy and fragrant, coconut rice adds a creamy texture and subtly sweet flavor, making it a perfect bed for the spicy chicken.

  • Roasted Vegetables: A medley of seasonal vegetables like bell peppers and zucchini, roasted to perfection, pairs wonderfully with the warm and tangy chicken.

  • Crunchy Spring Rolls: These fresh rolls filled with veggies provide a crisp contrast. Dip them into a sweet chili sauce to enhance the meal's flavor profile.

  • Garlic Soy Green Beans: Sautéed green beans drizzled with soy sauce add a savory element. Their crunch and garlic flavor elevate the experience of the chicken bowl.

  • Chilled Cucumber Salad: The refreshing crunch of cucumber salad balances the heat of the chicken, providing a cooling effect that's soothing and delightful.

  • Mango Salsa: Sweet, juicy mangoes tossed with red onion and cilantro brighten the dish. This tropical twist adds a burst of flavor that’s irresistible.

  • Lemonade or Iced Tea: Light and refreshing drinks like iced tea or homemade lemonade cut through the dish's richness, making for a well-rounded meal.

Indulging in these delicious sides transforms your honey-sriracha rotisserie chicken bowl into a complete culinary experience!

Honey-Sriracha Rotisserie Chicken Bowl Recipe FAQs

How do I choose the right rotisserie chicken?
Absolutely! When selecting a rotisserie chicken, look for one that has an even golden-brown skin and is hot to the touch. Inspect the meat; it should be moist, and the juices should run clear rather than cloudy. If you notice any dark spots or signs of spoilage, opt for another one.

How do I store leftovers from the Honey-Sriracha Rotisserie Chicken Bowl?
Leftovers can be easily stored in an airtight container and will stay fresh in the refrigerator for up to 3 days. To keep the flavors intact, I recommend keeping the chicken and salad components separate, especially if you're storing them for longer periods. This will help maintain the crispness of the salad!

Can I freeze the Honey-Sriracha Rotisserie Chicken Bowl?
Yes, you can! To freeze, separate the chicken from the salad and store the chicken in a freezer-safe bag for up to 2 months. When you're ready to enjoy it again, thaw the chicken overnight in the fridge and reheat in a skillet, adding a splash of water or extra sauce for moisture. The salad is best if made fresh.

What if the sauce is too spicy for my taste?
Very! If you find the sauce too spicy, don’t worry! You can balance the heat by adding a bit more honey to sweeten it and reduce the sriracha gradually. Another option is to mix in some Greek yogurt or sour cream to cool it down without sacrificing the flavor.

Are there any allergy considerations for this recipe?
Be aware of any allergies when preparing this dish. Fish sauce can be excluded for vegetarians or those with allergies. Additionally, if you're concerned about nut allergies, you can substitute salted peanuts with seeds, like sunflower seeds or pumpkin seeds, while still achieving that satisfying crunch.

What if I’m looking for a vegetarian option?
Absolutely! For a vegetarian Honey-Sriracha Bowl, try swapping the rotisserie chicken for chickpeas or tofu. Cook the tofu until crispy for a delightful texture and toss it with the same sauce for the sweet and spicy kick. Feel free to add any extra seasonal veggies you love—they’ll blend perfectly!

Honey-Sriracha Rotisserie Chicken Bowl

Honey-Sriracha Rotisserie Chicken Bowl: A Sweetly Spicy Delight

This Honey-Sriracha Rotisserie Chicken Bowl delivers sweet and spicy flavors, perfect for a quick dinner.
Print Recipe Pin Recipe
Prep Time 15 minutes mins
Cook Time 20 minutes mins
Total Time 35 minutes mins
Servings: 4 bowls
Course: Dinner
Cuisine: Asian
Calories: 600
Ingredients Equipment Method Nutrition Notes

Ingredients
  

For the Chicken
  • 2 tablespoons neutral oil canola or vegetable oil
  • 1 medium onion diced
  • 2 cups rotisserie chicken shredded
  • 2 scallions scallion whites
For the Sauce
  • 3 tablespoons sriracha adjust to preference
  • 2 tablespoons honey
  • 2 tablespoons low-sodium soy sauce
  • 1 teaspoon fish sauce optional for vegetarian
  • 1 juice lime freshly squeezed
  • 1 teaspoon sesame oil toasted preferred
For the Salad
  • 4 cups Napa cabbage shredded
  • 2 scallions scallion greens chopped
  • 1/2 cup salted peanuts can substitute with other nuts
  • 1 handful cilantro and Thai basil chopped
  • 1 English cucumber cucumber chopped
For Garnishes
  • sesame seeds optional
  • 1 medium avocado sliced
  • crispy shallots optional

Equipment

  • Skillet
  • Mixing Bowl
  • Cutting Board
  • Knife

Method
 

Step-by-Step Instructions
  1. Heat 2 tablespoons of neutral oil in a large skillet over medium heat. Add the diced onion and sauté for about 5 minutes until softened. Toss in scallion whites and cook for 1 additional minute. Add 2 cups of shredded rotisserie chicken, stirring well.
  2. In a mixing bowl, whisk together 3 tablespoons of sriracha, 2 tablespoons of honey, 2 tablespoons of low-sodium soy sauce, 1 teaspoon of fish sauce, the juice of one lime, and 1 teaspoon of sesame oil until well combined.
  3. Pour the prepared sauce over the chicken mixture in the skillet, stirring to coat. Increase heat to medium-high until it comes to a gentle boil, then reduce to low and simmer for about 5 minutes.
  4. In a large bowl, combine 4 cups of Napa cabbage, chopped scallion greens, 1/2 cup of salted peanuts, cilantro and Thai basil, and chopped cucumber. Drizzle with lime juice and sesame oil, lightly massage to combine.
  5. Prepare garnishes by arranging sliced avocado, additional peanuts, minced scallions, and lime wedges on a serving platter.
  6. To serve, scoop the sautéed chicken onto the salad and garnish with toppings. Serve immediately.

Nutrition

Serving: 1bowlCalories: 600kcalCarbohydrates: 40gProtein: 25gFat: 30gSaturated Fat: 5gPolyunsaturated Fat: 10gMonounsaturated Fat: 10gCholesterol: 70mgSodium: 800mgPotassium: 800mgFiber: 5gSugar: 8gVitamin A: 200IUVitamin C: 30mgCalcium: 60mgIron: 2mg

Notes

Aim for fresh ingredients to enhance the dish's flavor; customize according to seasonality.

Tried this recipe?

Let us know how it was!
  • « Previous Page
  • 1
  • …
  • 115
  • 116
  • 117
  • 118
  • 119
  • …
  • 133
  • Next Page »

Welcome!

Hi, I’m Grace, a Sydney-based home cook with a passion for bold flavors and trending ingredients. Whether you’re a busy beginner or a seasoned foodie, you’ll find dishes here that are fresh, fun, and full of flavor.

More about me

Popular Recipes

  • Mushroom Crostini
    Deliciously Easy Mushroom Crostini for Your Next Gathering
  • Mini Phyllo Feta Bites
    Mini Phyllo Feta Bites for Effortless Entertaining
  • Onion Boil
    Savory Onion Boil Recipe: A Flavorful Vegan Delight
  • Sweet Potato Fondant with Smoked Almond Cream & Rosemary Oil
    Savory Sweet Potato Fondant with Smoked Almond Cream Delight

Footer

↑ back to top

About

  • Privacy Policy
  • Disclaimer
  • Terms & Conditions

Newsletter

  • Sign Up! for emails and updates

Contact

  • About me
  • Contact me

Copyright © 2025 TastyTrendIngredients