
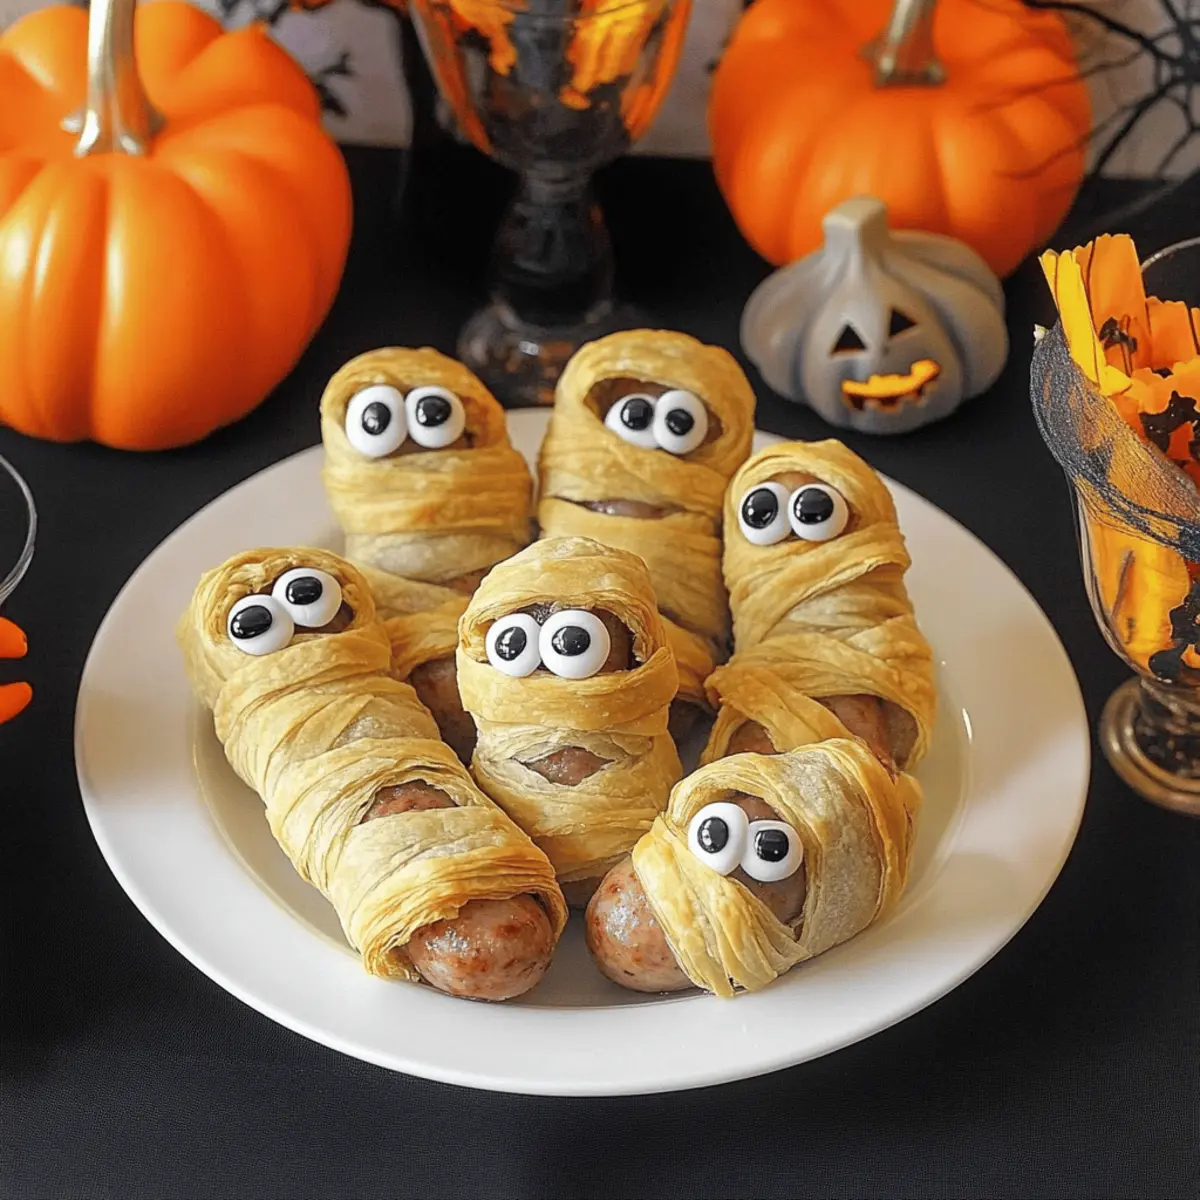
As the sun begins to set on October evenings, there’s a certain magic in the air that whispers of ghosts and goblins. This time of year, I love transforming our kitchen into a mini haunted house with recipes that are both spooky and scrumptious. Enter the delightful Sausage Mummies—a dish that wraps flavorful pork sausages in crispy puff pastry, creating easy, kid-friendly bites that are perfect for Halloween gatherings. With their charming edible eyes peeking out, these little phantoms are sure to bring a smile to faces both young and old. The best part? They come together in no time, making them a spectacular addition to your festive spread without the hassle. So, are you ready to make this Halloween extra fun by whipping up a batch of these deliciously creepy treats? Let's dive into the recipe!
Why Will Kids Adore These Sausage Mummies?
Kid-Friendly Fun: With their spooky look and playful edible eyes, these Sausage Mummies make cooking an exciting adventure for children.
Quick & Easy: The straightforward preparation ensures you'll be in and out of the kitchen in no time, leaving more room for Halloween festivities.
Flaky Texture: The crispy puff pastry wrapping adds a delightful crunch to each bite, making them irresistible.
Savory Goodness: Juicy sausage packed inside brings a burst of flavor that kids—and adults—can’t resist!
Versatile Options: Feel free to switch things up by using vegetarian sausages or different pastry styles, keeping the excitement going at your Halloween party!
Crowd-Pleaser: These treats are suitable for gatherings, ensuring everyone will have a creepy good time!
Sausage Mummies Ingredients
Get ready to transform your Halloween snacks with these fun and easy Sausage Mummies!
For the Mummies
- Pork Sausages – The star of the show; tender and rich in flavor. Substitute with chicken or turkey sausages for a healthier option.
- Ready-Rolled Puff Pastry – Provides the perfect flaky wrap; if unavailable, refrigerated dough can do the trick.
For Decoration
- Edible Eyes – The whimsical touch that brings these mummies to life; can be replaced with black sesame seeds or small olives for a fun twist.
- Honey (optional) – Acts as a glue for those adorable eyes; feel free to swap with maple syrup for a hint of sweetness.
Make sure you have these ingredients ready, and let's create some creepy culinary magic this Halloween!
Step‑by‑Step Instructions for Sausage Mummies
Step 1: Preheat the Oven
Begin by preheating your oven to 180°C (350°F). While the oven warms up, line a baking tray with parchment paper to ensure the Sausage Mummies don’t stick during baking. This is an important step for achieving that crispy, flaky exterior that everyone will love.
Step 2: Prepare the Puff Pastry
Unroll the ready-rolled puff pastry on a clean surface. Using a sharp knife or pizza cutter, slice the pastry into long strips about 1 cm wide. This uniform cutting is essential for wrapping, allowing the pastry to encase the sausages evenly and create that adorable mummy appearance.
Step 3: Wrap the Sausages
Take a pork sausage and place it at one end of a puff pastry strip. Wrap the strip around the sausage, overlapping slightly as you go, and cut off any excess pastry. This not only keeps them looking neat but also ensures that there's enough pastry to cook thoroughly, giving your Sausage Mummies their signature look.
Step 4: Bake the Mummies
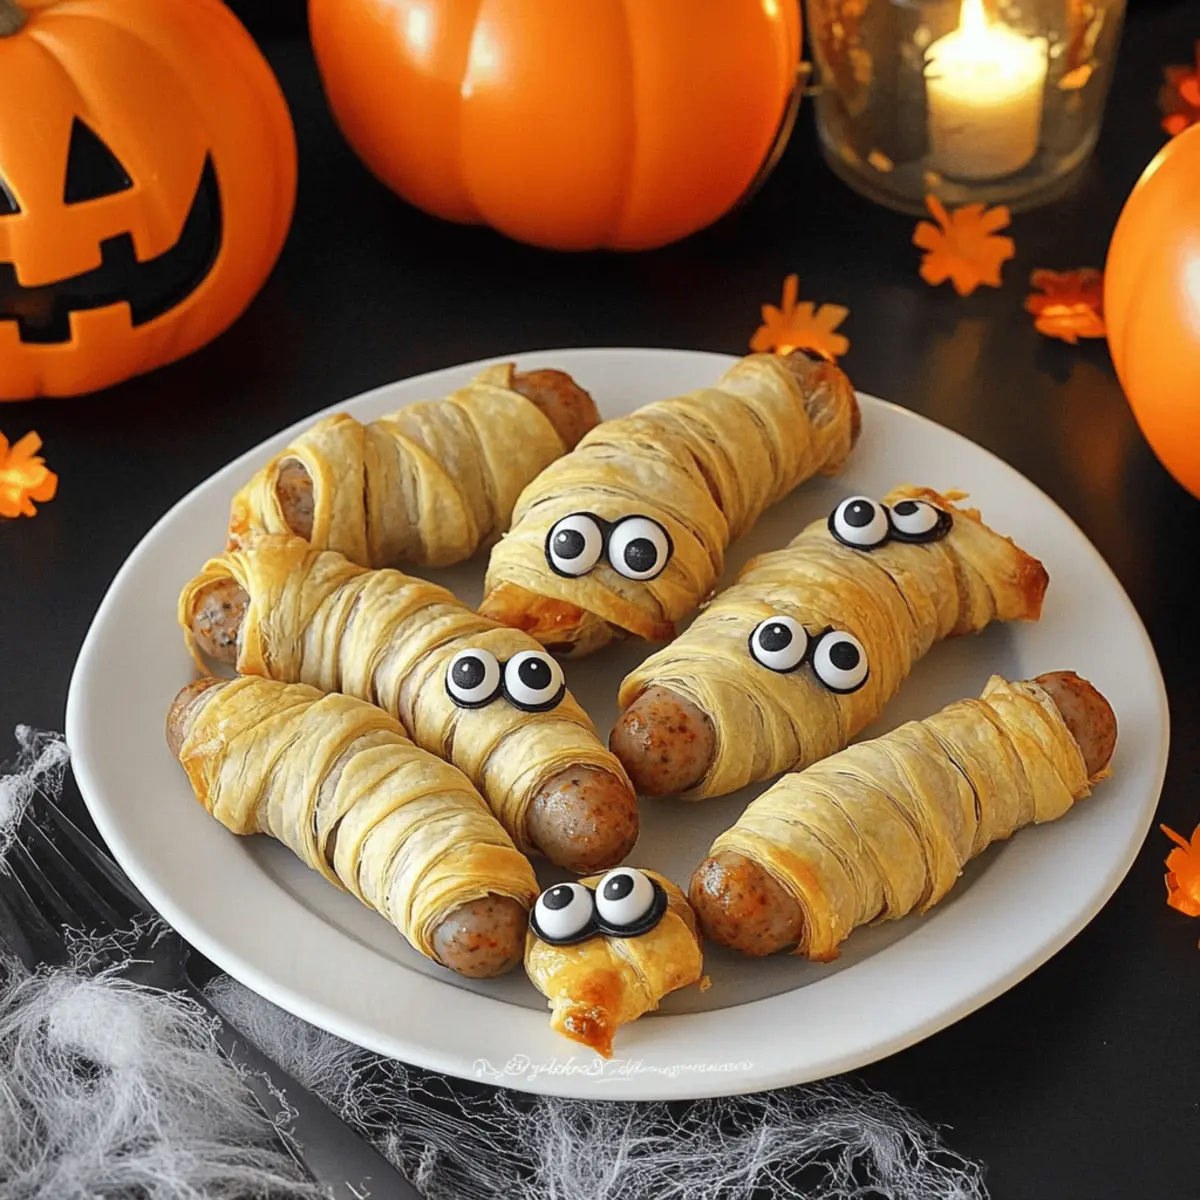
Carefully place the wrapped sausages on the prepared baking tray, spacing them evenly apart. Slide the tray into the preheated oven and bake for 20 minutes, or until the pastry is golden brown and puffed up. Keep an eye on them; you'll know they're ready when they look delightfully crispy and golden.
Step 5: Crisp Up the Pastry
After the initial baking time, increase the oven temperature to 220°C (430°F) and continue baking for an additional 5 minutes. This extra heat will ensure your Sausage Mummies get that irresistible golden finish. The higher temperature will also help make the pastry extra flaky and delicious.
Step 6: Add the Edible Eyes
Once the Sausage Mummies are out of the oven, allow them to cool slightly. While they’re warm, apply a small dab of honey on each sausage where you want to place the edible eyes. This tasty glue will help them stick and complete the spooky look of your festive treats just in time for serving.
Step 7: Serve and Enjoy
It’s time to dig into your delightful creation! Arrange the Sausage Mummies on a serving platter while they’re warm for the best texture and flavor. Pair them with ketchup or mustard for dipping, and watch as they disappear from the plate during your Halloween celebrations!

Sausage Mummies: Customization Ideas
Feel free to let your creativity shine by customizing these delightful Sausage Mummies to suit your taste or dietary needs!
-
Vegetarian Options: Use vegetarian sausages for a meat-free alternative that everyone can enjoy. They still pack a punch of flavor and a fun, spooky appearance!
-
Cheesy Delight: For a flavor explosion, tuck some shredded cheese between the sausage and pastry. As it melts, it adds a creamy texture that complements the flaky pastry beautifully.
-
Spicy Twist: Add a dash of hot sauce or diced jalapeños to your sausage mixture for a spicy kick. This twist will elevate the flavor profile and impress those who love a bit of heat in their snacks.
-
Different Pastry Types: Try using different pastry styles like shortcrust or phyllo for an interesting texture. Each pastry brings its own unique crunch, giving a fun variation in your Halloween spread.
-
Seasoned Sausages: Use flavored sausages like apple and sage or spicy garlic for an extra layer of taste. These unique flavors can turn your mummies into mouthwatering bites that stand out at any gathering.
-
Dipping Sauces: Serve your Sausage Mummies with different dipping sauces like barbecue sauce or zesty ranch dressing. This addition turns your easy snack into a delightful tasting experience!
-
Halloween Decor: For an extra spooky flair, create a “blood” sauce using ketchup and sriracha to drizzle on the platter. It adds an eerie touch to your Halloween presentation that guests will love!
-
Healthy Sides: Pair these with fresh veggies or a fruit platter to balance the meal. Simple carrot sticks or grapes make for a colorful and healthy accompaniment that contrasts well with the savory mummies.
Remember, the goal is to have fun while cooking and enjoy the process! Whether you stick to the traditional recipe or explore these variations, your Sausage Mummies are sure to be a hit!
Make Ahead Options
These Sausage Mummies are perfect for meal prep enthusiasts looking to save time on festive gatherings! You can wrap the sausages in puff pastry and refrigerate them for up to 24 hours before baking. To do this, simply follow the wrapping instructions and place the uncooked mummies on a baking tray lined with parchment paper, then cover them tightly with plastic wrap. This prevents the pastry from drying out and helps maintain its flakiness. When ready to serve, preheat the oven and bake them directly from the fridge for the same times indicated in the recipe. Enjoy delicious, effortless treats that are just as tasty when prepped ahead!
Expert Tips for Sausage Mummies
- Sausage Selection: Choose savory pork sausages for best flavor; you can also try turkey or chicken for a lighter option.
- Perfect Pastry Strips: Use a pizza cutter for even, uniform strips, ensuring they wrap neatly around the sausages for that "mummy" appearance.
- Avoid Excess Pastry: Cut off any extra pastry after wrapping to prevent overly long wrappings, which could hinder baking and presentation.
- Gauge Doneness: Watch for a golden, flaky finish while baking; this indicates the Sausage Mummies are perfectly cooked and ready to enjoy.
- Serve Fresh: For optimal crispness, serve the Sausage Mummies immediately after baking, as they tend to lose their flaky texture if stored.
What to Serve with Sausage Mummies
As these spooky bites emerge from the oven, you'll want to create a vibrant spread that makes your Halloween gathering memorable.
- Crispy Vegetable Sticks: Crunchy carrots, celery, and bell peppers bring a refreshing contrast to the savory Sausage Mummies, lightening up your meal.
- Creamy Dip Trio: A mix of ranch, mustard, and ketchup gives your guests fun and flavorful choices for dipping, enhancing every mummy bite.
- Halloween Fruit Platter: A colorful assortment of fruits like grapes and clementines adds a sweet touch, balancing out the savory treats on your table.
- Fluffy Mashed Potatoes: Creamy, buttery potatoes provide a comforting side that pairs well with the flaky texture of the Sausage Mummies, making for a hearty meal.
- Spooky Salad: Toss together spinach, sliced apples, and walnuts drizzled with a honey vinaigrette for a fresh and seasonal side that’s both delicious and festive.
- Witch’s Brew Punch: A fizzy, fruity drink that adds a fun twist to your meal—think cranberry juice mixed with soda for that perfect Halloween spirit!
Storage Tips for Sausage Mummies
Fridge: Store your Sausage Mummies in an airtight container for up to 2 days. This helps retain their flavor, but serve them soon for the best crispiness.
Freezer: If you're prepping in advance, freeze the unbaked Sausage Mummies on a baking tray, then transfer to a freezer bag for up to 2 months. Bake from frozen, adding extra time.
Reheating: To restore that lovely crunch after storage, reheat the Sausage Mummies in the oven at 180°C (350°F) for about 10 minutes. Avoid microwaving, which can make them soggy.
Avoid Room Temperature: For food safety, keep them out of the danger zone. Never leave the Sausage Mummies at room temperature for more than 2 hours, especially during those spooky gatherings!

Sausage Mummies Recipe FAQs
How can I select the best pork sausages for this recipe?
Absolutely! Look for sausages that are firm to the touch and have a nice color—deep pink or reddish hues. Avoid any with dark spots, which may indicate spoilage. If you're after a leaner option, turkey or chicken sausages work wonderfully, providing great flavor without excess fat.
How should I store leftover Sausage Mummies?
Very! To ensure they stay delicious, place your leftover Sausage Mummies in an airtight container and refrigerate them. They can be kept for up to 2 days. Remember, they taste best fresh out of the oven, so enjoy them soon after you make them!
Can I freeze Sausage Mummies for later?
Absolutely! If you want to prepare them in advance, wrap the unbaked Sausage Mummies on a tray and flash freeze them for about an hour. Once they’re firm, transfer them to a freezer bag and keep them in the freezer for up to 2 months. When you're ready to bake, don’t thaw them; simply bake from frozen, adding 5-10 minutes to the baking time.
What if my pastry isn't crisp after baking?
Very! To achieve a nice crispy texture, it’s important to bake the Sausage Mummies until they are golden brown. If they’re not crisping up, it could be due to too much pastry. When wrapping, ensure that you cut off excess pastry; also, increase the oven temperature towards the end of baking for that delightful crunch.
Are Sausage Mummies safe for kids with allergies?
Absolutely! Since this recipe primarily uses pork sausages, if there are concerns around allergies, consider checking the ingredient labels or opting for vegetarian sausages. Always consult with an expert if there are specific allergy issues to ensure safe enjoyment for all little ghouls and goblins at your Halloween gathering!
Sausage Mummies: Fun Halloween Treats Kids Will Love
Ingredients
Equipment
Method
- Preheat your oven to 180°C (350°F) and line a baking tray with parchment paper.
- Unroll the ready-rolled puff pastry and slice into long strips about 1 cm wide.
- Wrap each sausage with a strip of puff pastry, overlapping slightly, and cut off excess pastry.
- Place the wrapped sausages on the baking tray and bake for 20 minutes or until golden brown.
- Increase the oven temperature to 220°C (430°F) and bake for an additional 5 minutes for a crispy finish.
- Allow the pastries to cool slightly, then use honey to attach the edible eyes.
- Serve warm on a platter, accompanied by ketchup or mustard for dipping.


Leave a Reply