
As the aroma of browning beef fills your kitchen, it sparks a delightful memory: a family gathering where laughter is accompanied by the sound of crunching pastries. This whimsical culinary moment leads me to share my recipe for Cheesy Beef Biscuit Bombs—an easy recipe that embraces the essence of comfort food. Imagine transforming simple ingredients into a savory snack that warms the heart and pleases the palate. These little gems are not only beginner-friendly but also customizable, allowing you to cater to your taste or dietary preferences. Whether you're serving them for breakfast, a casual dinner, or a cozy family snack, I promise they’ll become a cherished staple in your home. Curious about how to create these mouthwatering bites? Let’s dive into the details!

Why Will You Love Cheesy Beef Biscuit Bombs?
Easy Preparation: This recipe is straightforward, making it perfect for beginner chefs or anyone looking to whip up a quick snack without fuss.
Customizable Options: With endless possibilities for fillings, you can easily swap out ingredients to fit your family’s tastes—think sautéed veggies or different cheeses!
Flavor Explosion: Each bite reveals a deliciously rich blend of savory beef and gooey cheese, giving your taste buds a treat that rivals fast food without the guilt.
Crowd-Pleaser: These biscuit bombs are sure to impress guests at any gathering, bringing smiles and satisfaction to everyone at the table. Pair them with a side of marinara sauce for a delightful dipping experience!
Perfect for Any Meal: Serve them for breakfast, as a snack, or a quick dinner option that everyone will love. It’s a versatile dish that fits any occasion!
Cheesy Beef Biscuit Bomb Ingredients
For the Filling
- Ground Beef – Provides a rich, savory filling; substitute with ground turkey or chicken for a lighter option.
- Cream Cheese (softened) – Adds a creamy texture, binding the beef and cheese together.
- Shredded Cheddar Cheese – Creates a gooey, melty center; swap with mozzarella or Monterey Jack for a different flavor profile.
- Grated Parmesan Cheese – Enhances the filling with a salty, umami taste.
- Garlic Powder – Adds aromatic depth without overpowering the dish.
- Onion Powder – Provides mild sweetness and savory notes.
- Black Pepper – Adds a slight kick to balance the richness of the filling.
For the Dough
- Refrigerated Biscuit Dough – Serves as the outer layer, creating a soft, flaky casing.
For Topping
- Melted Butter – Brushed on top for a golden finish and enhanced flavor.
These Cheesy Beef Biscuit Bombs are not just delicious but also a wonderful way to delve into the realm of home cooking!
Step‑by‑Step Instructions for Cheesy Beef Biscuit Bombs
Step 1: Preheat the Oven
Begin by preheating your oven to 375°F (190°C). This step prepares the environment for your Cheesy Beef Biscuit Bombs, ensuring they cook evenly. While the oven is warming up, gather your ingredients and equipment, including a large skillet and a baking sheet lined with parchment paper for easy cleanup.
Step 2: Brown the Ground Beef
In a large skillet, add your ground beef and cook over medium heat. Stir frequently for about 6-8 minutes until the beef is nicely browned, breaking it into smaller pieces. Once cooked, drain off the excess grease, keeping the skillet ready for the next steps in preparing your cheesy filling.
Step 3: Season the Beef Mixture
Return the skillet to low heat and stir in the garlic powder, onion powder, and black pepper. Cook for an additional 1-2 minutes until the spices become fragrant and well incorporated into the beef. This step enhances the flavors of your Cheesy Beef Biscuit Bombs, making them savory and delicious.
Step 4: Cool the Beef Mixture
Transfer the skillet off the heat and allow the beef mixture to cool slightly, about 5 minutes. This cooling step is essential as it prevents the cream cheese from melting too quickly when mixed, ensuring a creamy filling instead of a runny one.
Step 5: Combine the Cheesy Ingredients
In a separate mixing bowl, combine the softened cream cheese, shredded cheddar cheese, and grated Parmesan cheese. Use a fork or spatula to mix until smooth and creamy, creating a luscious filling for your Cheesy Beef Biscuit Bombs that guests will rave about.
Step 6: Mix Together the Filling
Fold the cooled beef mixture into the cheese mixture, stirring gently until all components are evenly combined. The contrast of the creamy cheese with the savory beef creates a delightful filling that will burst with flavor in every bite.
Step 7: Prepare the Biscuit Dough
Open your refrigerated biscuit dough and separate it into individual biscuits according to package instructions. On a lightly floured surface, flatten each biscuit into a disc approximately 4 inches wide, ensuring it can encase the filling without tearing.
Step 8: Fill and Seal the Biscuit Bombs
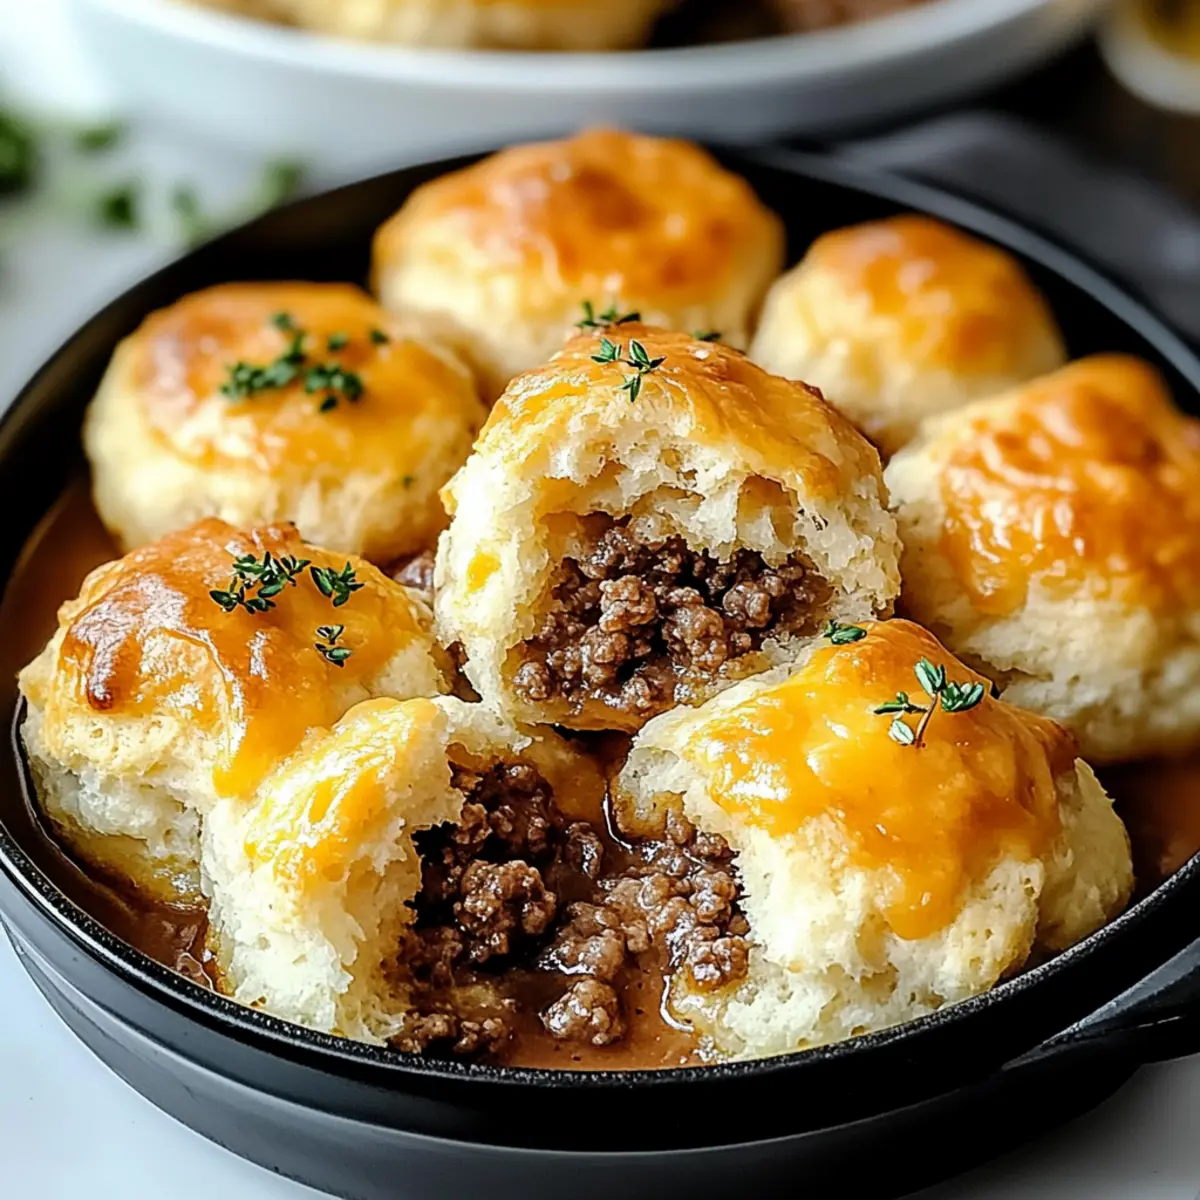
Place a generous spoonful of the meat and cheese mixture in the center of each flattened biscuit. Carefully bring the edges up and pinch them together to seal tightly, ensuring no filling escapes during baking. This little step guarantees your Cheesy Beef Biscuit Bombs turn out beautifully.
Step 9: Arrange and Brush
Arrange the sealed biscuit bombs on your prepared baking sheet. Before baking, brush the tops generously with melted butter to give them a golden-brown finish during baking. This simple addition not only enhances flavor but creates a visually appealing crust.
Step 10: Bake to Perfection
Place the baking sheet in your preheated oven and bake for 12-15 minutes. Keep an eye on them; they should turn golden brown and become crispy on the outside. You’ll know they’re done when the cheese is bubbling slightly through the edges.
Step 11: Cool and Serve
Once baked, remove the Cheesy Beef Biscuit Bombs from the oven and let them cool for a few minutes on the baking sheet. This resting period helps set the filling, making them easier to eat. Serve warm, and watch them disappear quickly!

Make Ahead Options
These Cheesy Beef Biscuit Bombs are perfect for busy weeknights! You can prepare the beef and cheese filling up to 24 hours ahead; simply combine the cooled beef mixture with the cheeses and refrigerate it in an airtight container. Furthermore, you can assemble the biscuit bombs (filling them and sealing them up) and store them in the refrigerator for up to 3 days before baking. When you're ready to enjoy them, simply brush with melted butter and bake as directed—no need to thaw! This time-saving prep allows you to serve a delicious, homemade snack with minimal effort, ensuring that your cheesy comfort food shines just as brightly!
What to Serve with Cheesy Beef Biscuit Bombs
There’s something truly heartwarming about pairing these golden delights with complementary flavors and textures for a memorable meal.
-
Marinara Sauce: A tangy dip that enhances the savory beef, adding a zesty contrast that awakens every bite. Perfect for those who love a flavorful dunk!
-
Fresh Garden Salad: Crisp greens and colorful veggies provide a refreshing balance to the rich biscuit bombs. Drizzle with a light vinaigrette to brighten the meal.
-
Creamy Coleslaw: The crunchy and creamy textures of coleslaw contrast beautifully with the flaky biscuits, making each mouthful a delightful experience.
-
Garlic Breadsticks: Soft, buttery garlic breadsticks create a cozy Italian atmosphere. Pairing similar comfort foods enhances your dining experience!
-
Baked Sweet Potato Fries: These slightly sweet and crispy fries offer a delicious contrast. They’re nutritious too, complementing the richness of the biscuit bombs.
-
Sparkling Lemonade: A refreshing beverage that cleanses the palate, making each cheesy bite feel light and invigorating. This drink brings the meal together beautifully!
-
Chocolate Chip Cookies: For dessert, these classic treats add a sweet touch to round off your meal. Their warmth echoes the comfort of your main dish!
Cheesy Beef Biscuit Bombs Variations
Feel free to get creative and make these cheesy beef biscuit bombs your own by trying out some tasty twists!
-
Dairy-Free: Substitute cream cheese and cheddar with nondairy options like cashew cream and vegan cheese.
-
Veggie-Packed: Mix in sautéed diced bell peppers, onions, or spinach for a nutrient boost and added texture.
-
Spicy Kick: Add crushed jalapeños or diced green chilies to the beef filling for a flavor explosion.
-
Herb Infusion: Incorporate fresh herbs such as cilantro or parsley into the filling to brighten the taste.
-
Cheesy Mix-Up: Swap cheddar cheese for a blend of mozzarella and pepper jack for a melty and spicy combination.
-
Whole Wheat Dough: Choose whole wheat biscuit dough for a healthier alternative while still keeping that flaky texture.
-
Serve with Style: Accompany these bombs with homemade marinara or guacamole for a delicious dipping experience; similar to serving with the flavorful Cheesy Garlic Bread.
-
Breakfast Version: Use breakfast sausage instead of ground beef for a hearty morning treat that pairs wonderfully with eggs.
With these variations, there's no doubt you'll delight your family with your personalized versions of these delicious Cheesy Beef Biscuit Bombs!
Expert Tips for Cheesy Beef Biscuit Bombs
-
Seal Them Well: Ensure each biscuit is tightly sealed to avoid any filling leakage while baking. A strong pinch around the edges is key!
-
Vary the Cheese: Experiment with different cheeses for the filling. Mixing shredded mozzarella or pepper jack can create delightful surprises in flavor.
-
Don’t Overfill: Be cautious not to overload the biscuit dough with filling. A generous tablespoon is perfect; too much can make sealing difficult.
-
Crispy Reheating: For leftover Cheesy Beef Biscuit Bombs, reheating them in the oven at 350°F (175°C) restores their crispiness. Avoid the microwave!
-
Prep Ahead: You can prepare these savory snacks in advance and freeze them unbaked. Simply bake from frozen, adding a few extra minutes to the cooking time.
How to Store and Freeze Cheesy Beef Biscuit Bombs
Fridge: Store leftovers in an airtight container for up to 3-4 days. This keeps your Cheesy Beef Biscuit Bombs fresh so you can enjoy them later.
Freezer: Freeze the unbaked biscuit bombs for up to 3 months. Wrap each tightly in plastic wrap and place in a freezer-safe bag.
Reheating: When ready to eat, bake from frozen at 350°F (175°C) for about 20-25 minutes. Avoid microwaving to retain their crispy texture.
Thawing: If you prefer, you can thaw in the refrigerator overnight before baking for quicker prep; just adjust baking time accordingly.
Cheesy Beef Biscuit Bombs Recipe FAQs
How do I choose the right ground beef for the filling?
Absolutely! When selecting ground beef, look for lean options around 80/20 or 85/15 fat ratio for a rich flavor without too much grease. If you're health-conscious, feel free to swap it with ground turkey or chicken, which makes it lighter yet still delicious!
What is the best way to store leftover Cheesy Beef Biscuit Bombs?
I recommend storing leftovers in an airtight container in the refrigerator for up to 3-4 days. To keep them firm, ensure they are completely cooled before sealing. You can reheat them in the oven at 350°F (175°C) to restore their crispiness—definitely better than the microwave!
Can I freeze Cheesy Beef Biscuit Bombs for later use?
Very! You can freeze unbaked biscuit bombs for up to 3 months. Just wrap each one tightly in plastic wrap and place them in a freezer-safe bag. When you’re ready to enjoy them, bake from frozen at 350°F (175°C) for about 20-25 minutes until golden brown and delicious.
What should I do if the biscuit bombs leak during baking?
To prevent this, ensure that you pinch the edges of the biscuit dough tightly after filling. If you find leaks happening, don’t worry! Just keep the oven clean with a baking sheet underneath to catch any drips. You can also adjust how much filling you use; too much can make it harder to seal.
Are there any dietary considerations I should keep in mind?
Absolutely! If you or your loved ones have allergies, keep an eye on the ingredients. The filling contains dairy from cream cheese and cheeses, so it’s not suitable for those with lactose intolerance. For a gluten-free option, use gluten-free biscuit dough available at many stores—just double-check the label!
How can I customize Cheesy Beef Biscuit Bombs?
The more the merrier when it comes to customization! You can mix in sautéed vegetables like peppers or onions for added nutrition. Want a little spice? Incorporate some diced jalapeños or swap out the cheeses for something bold, like pepper jack or feta. Let your creativity shine!

Cheesy Beef Biscuit Bombs That Will Brighten Your Day
Ingredients
Equipment
Method
- Preheat your oven to 375°F (190°C).
- In a large skillet, add your ground beef and cook over medium heat for about 6-8 minutes until browned.
- Stir in garlic powder, onion powder, and black pepper. Cook for an additional 1-2 minutes.
- Allow the beef mixture to cool slightly, about 5 minutes.
- In a mixing bowl, combine softened cream cheese, shredded cheddar cheese, and grated parmesan cheese until smooth.
- Fold cooled beef mixture into the cheese mixture until combined.
- Open refrigerated biscuit dough and separate into individual biscuits. Flatten each into a disc.
- Place a spoonful of filling in the center of each biscuit and pinch edges to seal.
- Arrange the sealed biscuit bombs on a baking sheet and brush tops with melted butter.
- Bake for 12-15 minutes until golden brown and crispy.
- Remove from oven and let cool before serving.


Leave a Reply