
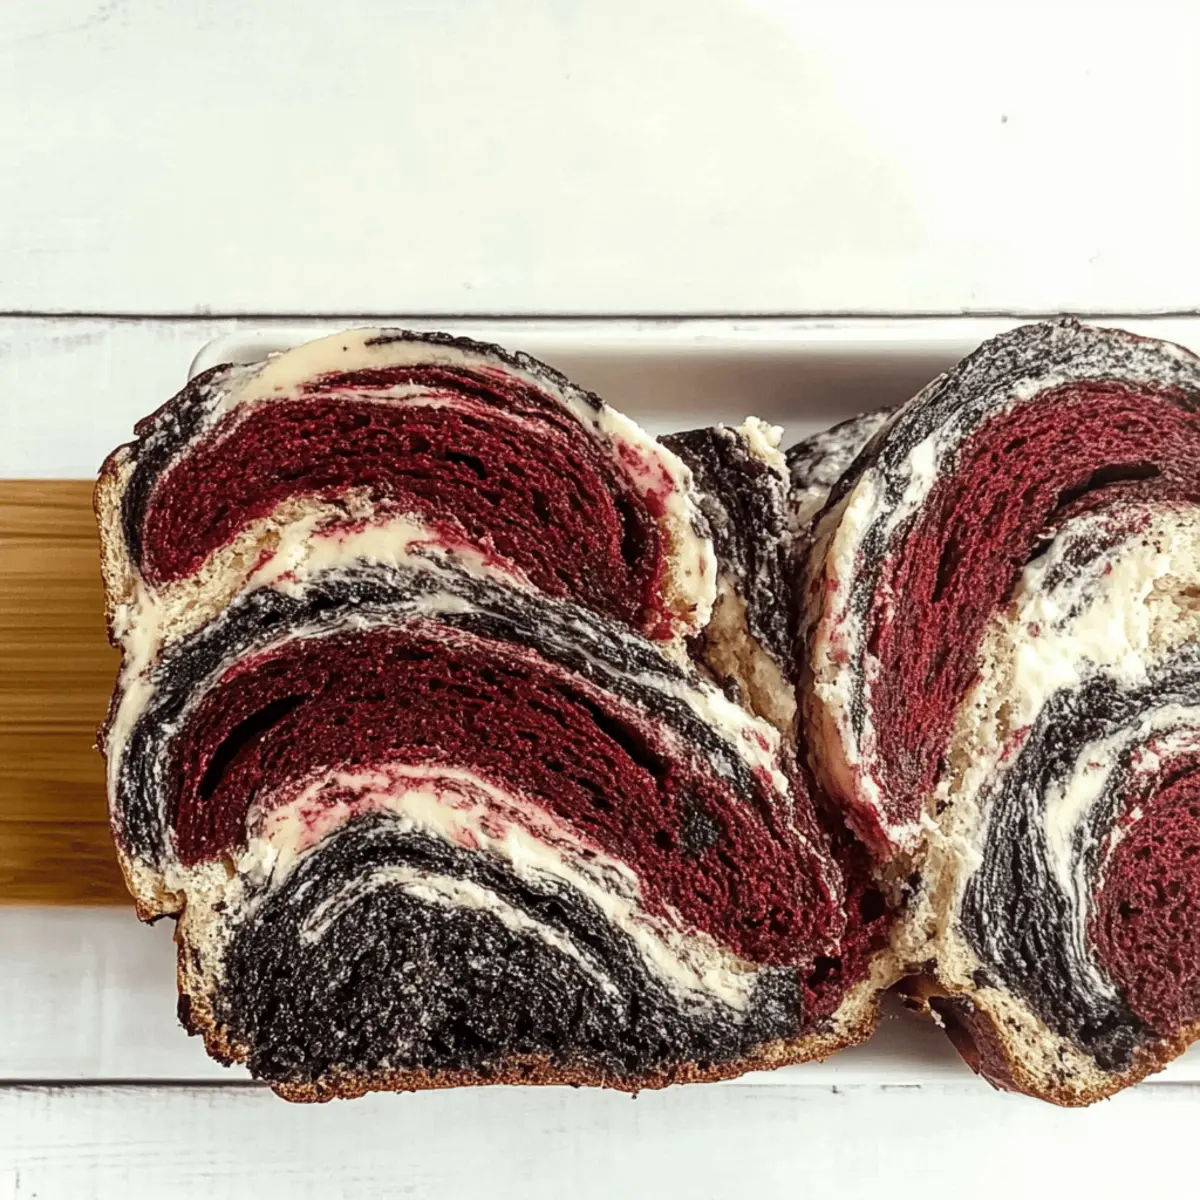
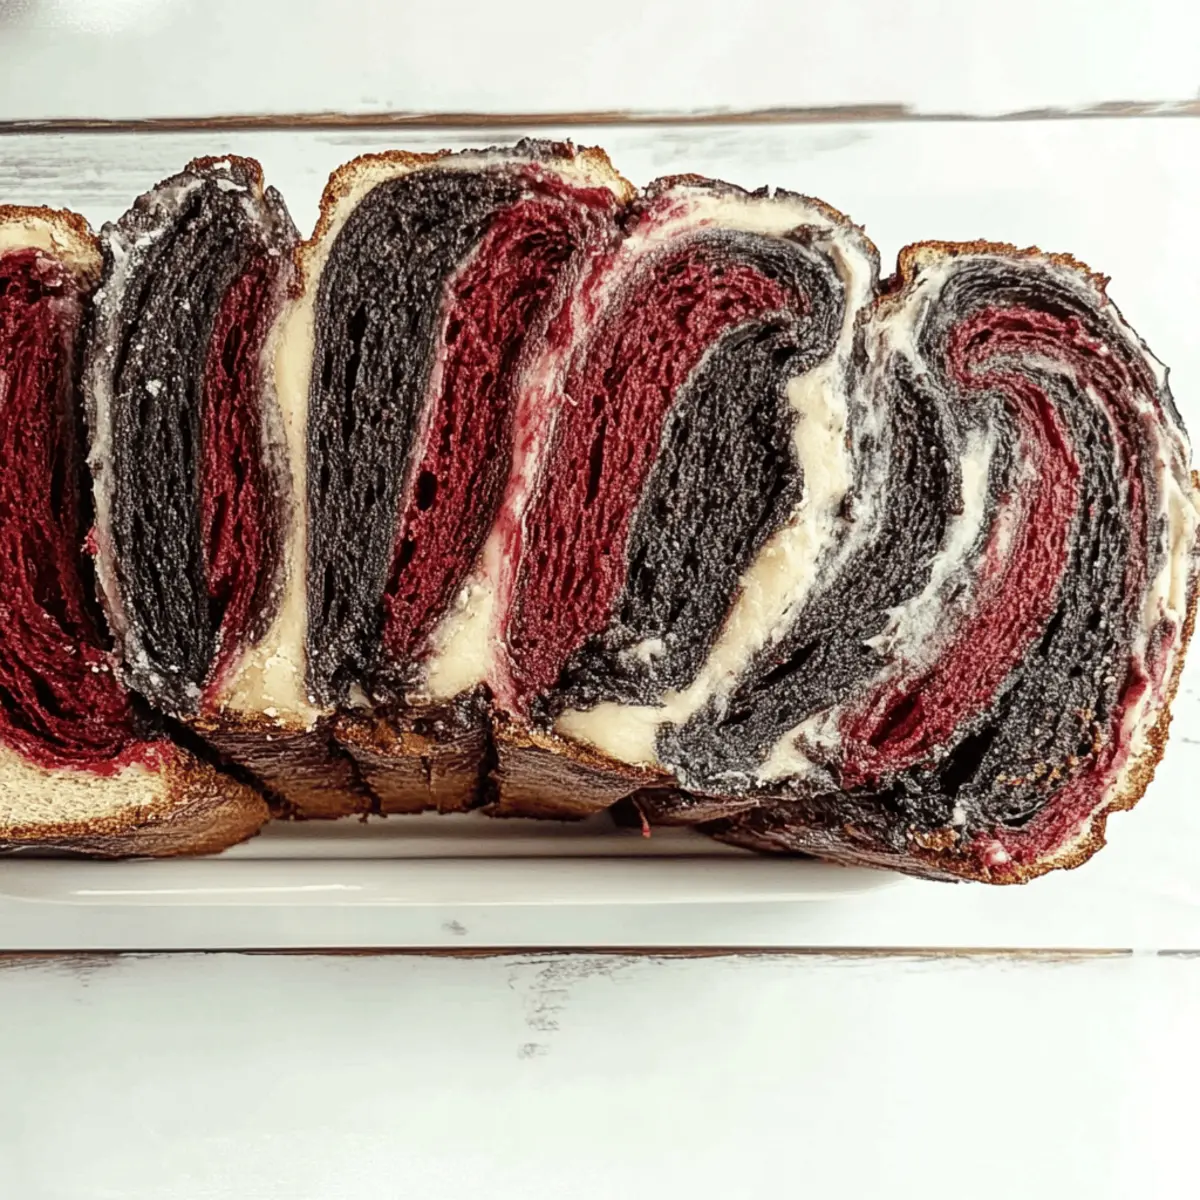
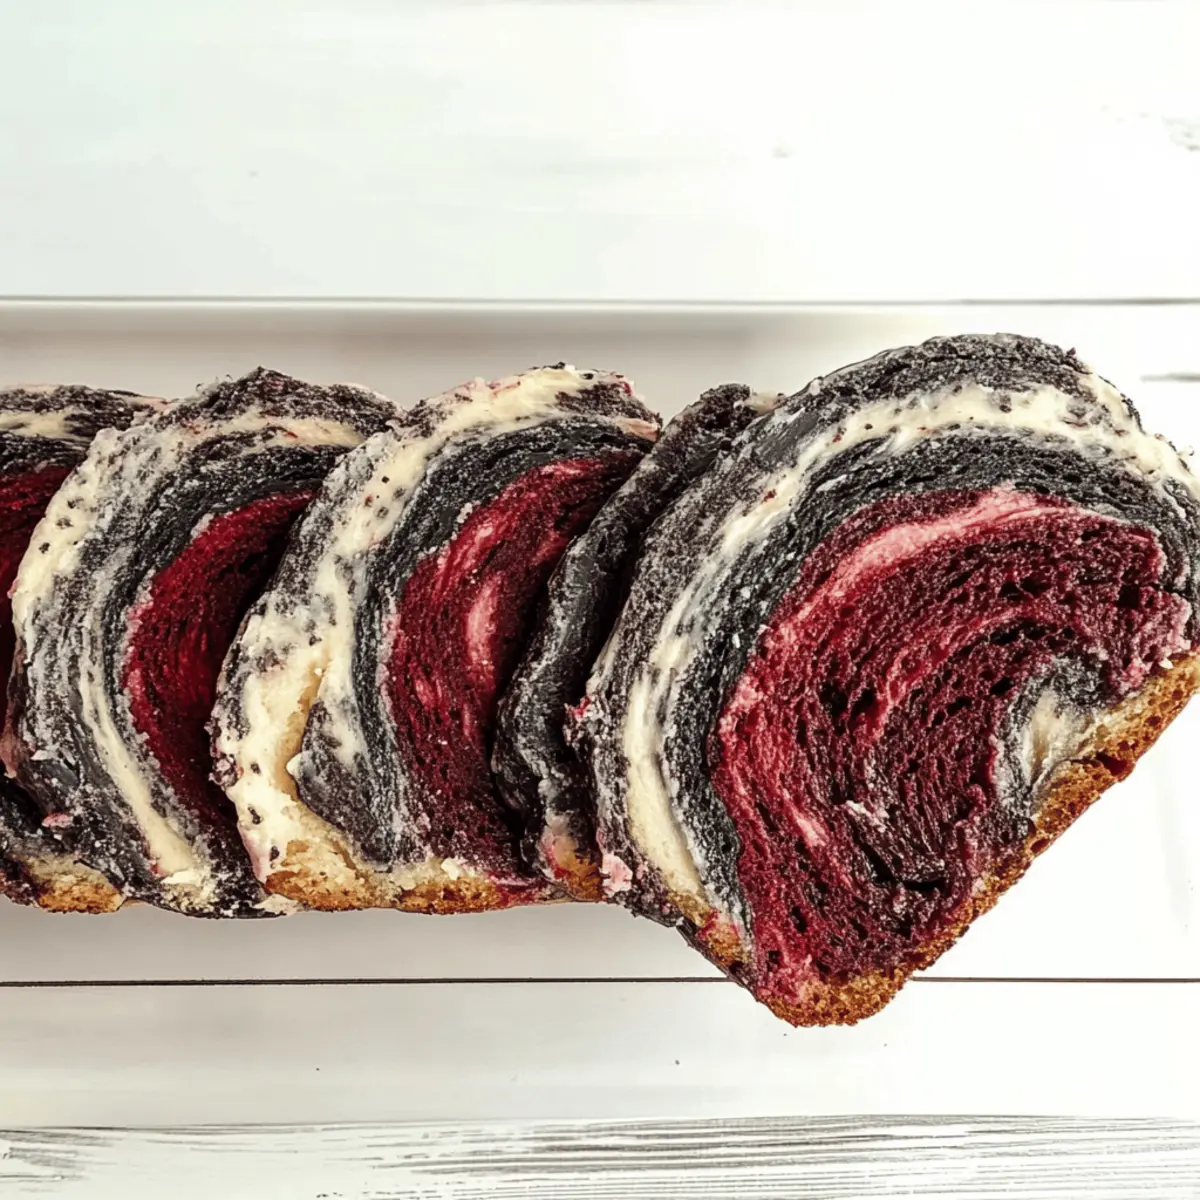
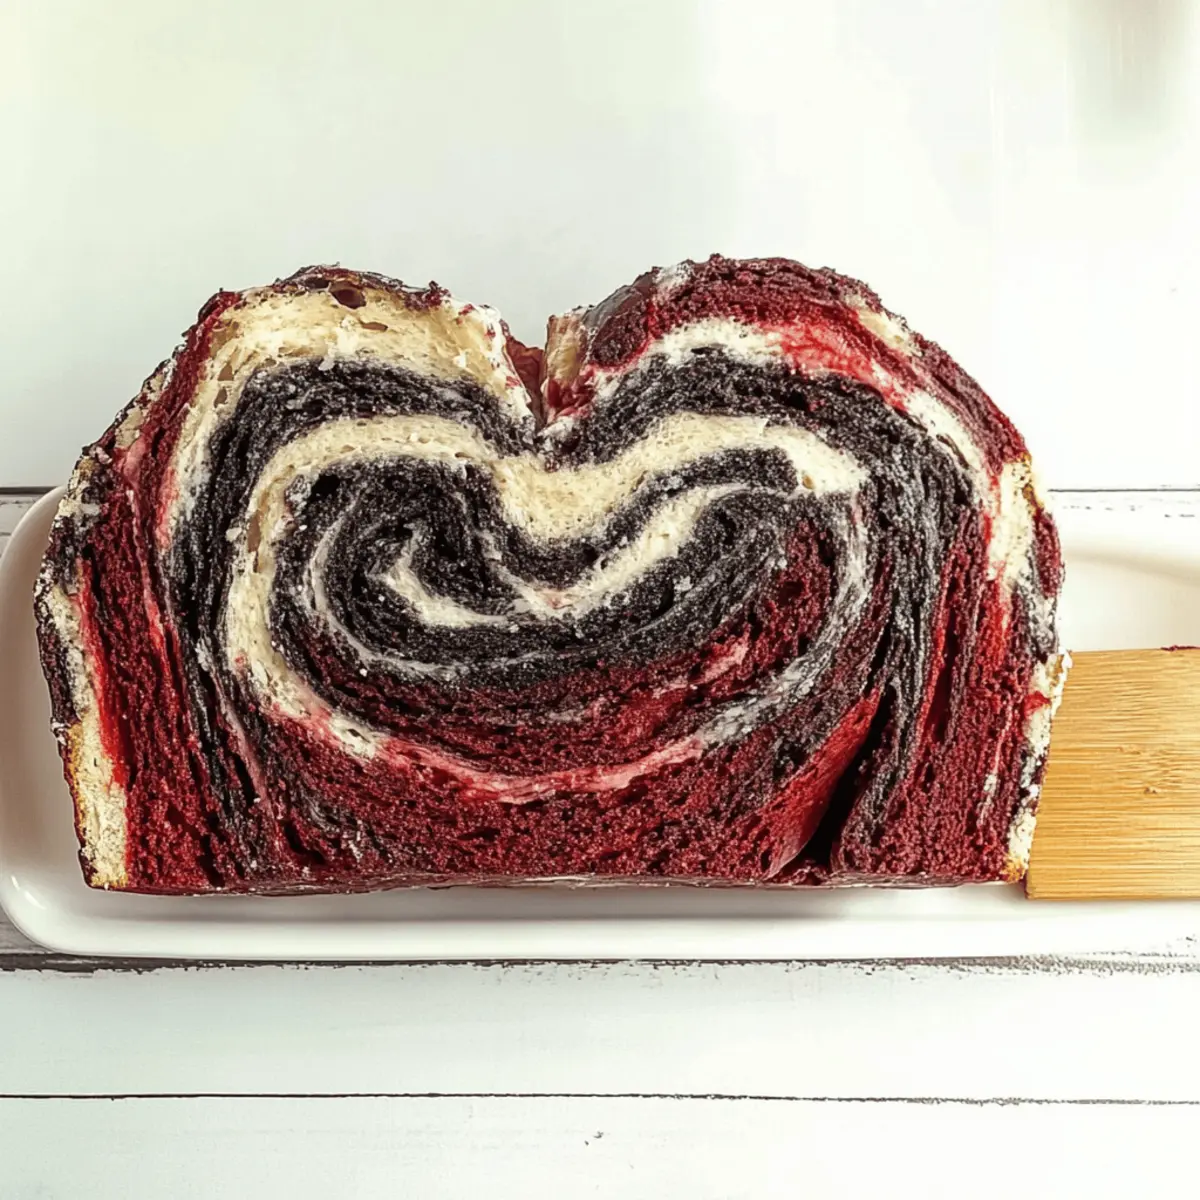
As I stared at my kitchen, it hit me: a perfect canvas for a spooky masterpiece. Enter my Vampire Bread, a whimsical twist on traditional loaves that’s as delightful as it is visually striking. With its enchanting black and red swirls, this recipe serves up just the right amount of eeriness for Halloween parties or cozy family breakfasts. Best of all, it’s a breeze to whip up in under an hour—ideal for anyone craving homemade goodness without the fuss! Plus, it’s low in fat and sodium, making it a guilt-free treat that both kids and adults will adore. Are you ready to sink your teeth into this hauntingly fun bread? Let’s get started!
Why is Vampire Bread the Ultimate Treat?
Eerily Fun: This recipe transforms ordinary baking into a spooky adventure, bringing excitement to family kitchens during Halloween.
Quick Preparation: Whip it up in under an hour, so you can spend less time prepping and more time enjoying.
Kid-Friendly: Perfect for involving children in the baking process—watch them squeal with delight as they knead vibrant dough!
Guilt-Free: With low fat and sodium, you can indulge worry-free, making it an ideal choice for all dietary needs.
Versatile Use: Pair with your favorite spreads or make it the centerpiece of your Halloween spread; the options are endless! Try serving it with Cheesy Garlic Bread for a complete feast.
Vampire Bread Ingredients
Get ready to create some enchanting dough!
For the Dough
- Flour – Structure. Use all-purpose for the best results or substitute with gluten-free flour for a gluten-free version.
- Sugar – Sweetness. Granulated sugar can be substituted with a sugar alternative like agave syrup for reduced calories.
- Yeast – Leavening agent. Instant yeast is recommended for ease; active dry yeast can be used, but allow for extra proofing time.
- Water – Hydration. Use warm water to activate the yeast, or substitute with milk for a richer flavor.
- Salt – Flavor Enhancer. Essential for taste; omit for a low-sodium variant.
- Food Coloring – Visual appeal. Black and red hues for a spooky effect; gel food coloring works best for vibrant colors.
Feel the excitement as you gather these ingredients to whip up your very own Vampire Bread—it’ll be a hit at your next gathering!
Step‑by‑Step Instructions for Vampire Bread
Step 1: Dough Preparation
In a large mixing bowl, combine 3 cups of all-purpose flour, 1 tablespoon of sugar, 2 teaspoons of instant yeast, and a pinch of salt. Mix these dry ingredients well. Gradually pour in 1 cup of warm water, stirring continuously until a dough begins to form. Your dough will be slightly sticky but manageable, perfect for the next stage of delicious Vampire Bread creation.
Step 2: Kneading
Transfer the dough onto a well-floured surface and knead it by hand for about 10 minutes. Focus on creating a smooth and elastic texture; the dough should be soft and pliable without sticking too much to your hands. Once achieved, form the dough into a ball and let it rest for a few moments, allowing the gluten to relax before moving forward.
Step 3: Color Mixing
Divide the dough into two equal portions. In one portion, add a few drops of black gel food coloring, and in the other, add red gel food coloring. Knead each portion separately until the colors are uniformly incorporated. Enjoy watching how vibrant your Vampire Bread takes shape, as each color transforms your dough into a spooky delight!
Step 4: Shaping
On a lightly floured surface, roll out each colored dough into rectangular shapes. Layer the red and black dough on top of each other, then carefully twist and roll them together to form a loaf. The swirled appearance will create a striking effect once baked. Ensure the edges are sealed to maintain the shape of your enchanting Vampire Bread.
Step 5: First Rise
Place the shaped loaf into a greased loaf pan, ensuring it fits snugly. Cover the pan with a clean kitchen towel and set it in a warm, draft-free area. Allow the dough to rise for about 2 hours, or until it has doubled in size. This step is crucial for fluffy Vampire Bread that has a delightful texture.
Step 6: Baking
Preheat your oven to 350°F (175°C). Once the dough has risen, place the loaf in the preheated oven and bake for 30 minutes. You'll know it’s ready when the top turns golden brown and the loaf sounds hollow when tapped gently. Keep an eye on it to avoid over-baking, as you want that perfect, moist crumb.
Step 7: Cooling
After baking, carefully remove the Vampire Bread from the oven and let it cool in the pan for 10 minutes. Then, transfer it to a wire rack to cool completely before slicing. This cooling process enhances the bread’s structure and locks in its soft, airy texture, making it an irresistible treat for your family!
What to Serve with Vampire Bread
Imagine a festive spread that takes your Halloween gathering from ordinary to extraordinary, with flavors that dance on your palate.
-
Creamy Pumpkin Soup: This velvety soup offers a comforting contrast to the bread’s sweetness, making for a cozy autumn meal. Pair it with a sprinkle of nutmeg to enhance the flavors.
-
Garlic Herb Hummus: Smooth and savory, this dip is perfect for slathering on slices of Vampire Bread. Its earthy notes provide a great balance to the slightly sweet bread.
-
Fresh Spinach Salad: A crisp salad with bright greens and a tangy vinaigrette adds a refreshing element, balancing the delicious bread's texture and richness.
-
Cheddar Cheese Straws: These crispy, cheesy snacks complement the soft Vampire Bread with a delightful crunch. They’re a fantastic crowd-pleaser that kids and adults will enjoy!
-
Spicy Salsa: The bold flavors of a fresh salsa made with tomatoes, onions, and jalapeños offer a zesty kick that pairs beautifully with the sweet and spooky bread.
-
Mulled Apple Cider: Warm, spiced cider fills the room with holiday scents and contrasts nicely with the sweetness of the bread. It's the perfect drink to warm your heart!
-
Dark Chocolate Fondue: For a decadent dessert, dip pieces of Vampire Bread into smooth chocolate. This indulgence takes the treat to a whole new level, delighting your guests.
-
Cinnamon Sugar Toast: Dust slices with cinnamon sugar for a sweet treat that echoes the bread's light sweetness; it’s perfect for breakfast bites or a tempting snack.
Make Ahead Options
These enchanting Vampire Bread loaves are perfect for meal prep enthusiasts looking to save time during busy weeknights! You can prepare the dough up to 24 hours in advance by following the first five steps, then refrigerate it (cover tightly with plastic wrap) to retain its quality. To ensure the best results, make sure to remove the dough from the fridge and let it come to room temperature for about 30 minutes before proceeding with the final rise. When you're ready to bake, simply shape the dough, let it rise again for roughly 2 hours, and bake as instructed. This way, you'll have a fresh, spooky treat ready with minimal effort!
Storage Tips for Vampire Bread
- Room Temperature: Store your Vampire Bread in an airtight container at room temperature for up to 3 days to keep it fresh and soft.
- Freezer: For longer storage, wrap slices tightly in plastic wrap or aluminum foil and freeze for up to 3 months. This will preserve the striking flavors and colors!
- Reheating: When ready to enjoy, simply thaw the slices and reheat them in a toaster or oven until warmed through. The bread will be just as delightful as the first day!
- Avoid Moisture: Keep your bread away from direct sunlight and moisture to prevent it from becoming soggy or stale, ensuring your Vampire Bread remains a treat worth sinking your teeth into!
Vampire Bread Variations & Substitutions
Feel free to get creative with your Vampire Bread! Each twist promises to delight your taste buds and make your kitchen adventures even more fun.
- Gluten-Free: Use a gluten-free flour blend to make this bread celiac-friendly without losing its enchanting texture.
- Sweetener Swap: Replace granulated sugar with honey or agave syrup for a naturally sweetened loaf that’s equally delicious.
- Milk Option: For a richer flavor, swap warm water with buttermilk or milk to create an even softer crumb in your bread.
- Herb-Infused: Add a teaspoon of dried herbs like rosemary or thyme to the dough before kneading for an aromatic twist sure to surprise your guests.
- Themed Shapes: Create themed bread shapes by molding the dough into ghosts, bats, or pumpkins for festive gatherings—perfect for little ones to enjoy!
- Nutty Flavor: Mix in some finely chopped nuts or seeds for a delightful crunch that contrasts beautifully with the soft bread texture, adding nutritional value too.
- Spice it Up: Incorporate spices like cinnamon or nutmeg into the dough for a cozy fall flavor that your family will love.
- Pairing Suggestions: Serve alongside homemade Cheesy Garlic Bread or a rich Cornbread Breakfast Casserole to create a well-rounded meal experience that’s fun and savory all at once.
The beauty of this recipe is in its versatility, so let your culinary imagination soar!
Expert Tips for the Best Vampire Bread
- Activate the Yeast: Ensure your warm water is between 100°F and 110°F. Too hot can kill the yeast, resulting in a dense bread.
- Kneading Technique: Knead the dough until it's smooth and elastic. Over-kneading can make the Vampire Bread tough; stop when it’s soft and slightly tacky.
- Rising Space: Choose a warm, draft-free spot for the first rise. Make use of your oven’s light to create a cozy environment that encourages the dough to double in size.
- Color Additions: Use gel food coloring for the brightest results; less liquid means a firmer dough. Knead colors thoroughly but gently to avoid overworking the dough.
- Check for Doneness: Tap the baked loaf gently—if it sounds hollow, it's done! Avoid lingering in the oven longer than necessary to keep your Vampire Bread moist.
- Storing Leftovers: Store your Vampire Bread in an airtight container at room temperature for up to 3 days to maintain its delightful softness.
Vampire Bread Recipe FAQs
What type of flour is best for Vampire Bread?
Absolutely! I recommend using all-purpose flour for the best texture and structure. If you're looking for a gluten-free option, feel free to substitute with a high-quality gluten-free flour blend. Just keep in mind that the texture might be slightly different but still delightful!
How should I store Vampire Bread?
Store your Vampire Bread in an airtight container at room temperature for up to 3 days. For longer storage, wrap slices in plastic wrap or foil and freeze them. They’ll keep nicely for up to 3 months, ready for a quick reheating session when cravings hit!
Can I freeze Vampire Bread?
Yes, you can! Once the bread has completely cooled, slice it and wrap each slice tightly in plastic wrap. Place them in a freezer-safe bag or container. When you’re ready to enjoy, just thaw and pop the slices in the toaster or oven to bring back that fresh-baked goodness!
What if my dough doesn’t rise?
If your dough is not rising, it may be due to the yeast being inactive. Ensure that your warm water is between 100°F and 110°F when you activate the yeast—too hot can kill it! Try resting the dough in a warm, draft-free area, like an oven with the light on. If it's still stubborn, it might be time to check your yeast's expiration date!
Is Vampire Bread suitable for kids?
Very much! This recipe is not only visually fun, thanks to the vibrant colors, but it also contains wholesome ingredients making it a kid-friendly treat. Just be mindful of any allergies to the ingredients, like wheat if using all-purpose flour. Kids love getting hands-on with the colorful dough!
Vampire Bread: A Spooky Treat for Fun Family Baking
Ingredients
Equipment
Method
- In a large mixing bowl, combine 3 cups of all-purpose flour, 1 tablespoon of sugar, 2 teaspoons of instant yeast, and a pinch of salt.
- Gradually pour in 1 cup of warm water, stirring continuously until a dough begins to form.
- Transfer the dough onto a well-floured surface and knead it by hand for about 10 minutes, then let it rest.
- Divide the dough into two equal portions; add black gel food coloring to one, and red to the other, kneading until colors are incorporated.
- Roll out each colored dough into rectangles, layer them, twist and roll to form a loaf.
- Place the shaped loaf in a greased loaf pan, cover, and let it rise in a warm area for about 2 hours.
- Preheat oven to 350°F (175°C) and bake for 30 minutes until golden brown and hollow when tapped.
- Cool for 10 minutes in pan, then transfer to a wire rack until completely cooled before slicing.


Leave a Reply