
As the leaves turn and the air cools, Halloween creeps closer, bringing with it a delightful sense of playful mischief. This year, why not turn your kitchen into a frightfully fun hangout with Halloween spider pizzas? These eye-catching treats are not only easy to make but also a fantastic way to involve your kids (if you dare!). With soft pizza dough, zesty tomato sauce, and a mix of gooey cheese accented by creepy-crawly olive and salami spiders, they’re bound to become a highlight of your festive gatherings. Whether you’re hosting a spooky soirée or just looking for a new family favorite, these kid-friendly pizzas promise to delight both the young and the young-at-heart. Ready to get your creative juices flowing and your oven preheated? Let's dive into this eerie culinary adventure!
Why Are Halloween Spider Pizzas a Must-Make?
Fun for Everyone: These Halloween spider pizzas are not just treats; they're an exciting project for the entire family, encouraging creativity during the spooky season.
Easy to Assemble: With simple ingredients and straightforward steps, this recipe guarantees tasty results without the stress—perfect for busy days filled with Halloween activities.
Creepy-Crawly Appeal: The whimsical spider design using olives and salami transforms an ordinary pizza into a showstopper, ensuring your gathering is festive and memorable.
Customizable Delight: Use your favorite toppings! Whether you stick to traditional cheese or opt for veggies, the flexibility of this recipe means everyone gets a pizza tailored to their taste.
Kid-Friendly Fun: While maintaining flavor, these pizzas encourage kids to get hands-on in the kitchen, making cooking an enjoyable experience. So why not explore other fun ideas with your kids, such as Halloween-themed treats?
Perfect for Parties: Their eye-catching look and delightful flavors make these spider pizzas a hit at any Halloween gathering, ensuring your friends and family will be buzzing about them long after the celebration is over!
Halloween Spider Pizza Ingredients
For the Pizza Base
- Pizza Base Mix – Easy and convenient; using a ready-made mix saves you time!
- Plain Flour – Perfect for dusting; prevents sticking while rolling out your dough.
For the Sauce
- Passata or Tomato Pasta Sauce (120ml) – Provides moisture and flavor; homemade adds a personal touch.
- Garlic Clove (1, crushed) – Boosts overall flavor; garlic powder works in a pinch if needed.
For the Toppings
- Grated Mozzarella (150g) – Melts beautifully and binds the toppings for a cheesy delight.
- Grated Parmesan (25g-50g) – Adds a rich, salty finish; substitute with pecorino for a different kick.
For the Creepy Decor
- Large Pitted Black Olives (4) – Spin your spiders with these; green olives can bring a fresh twist!
- Small Slices of Salami or Chorizo (6) – Gives your spiders a savory touch; feel free to swap for veggies for a meatless option.
- Small Capers (8, drained) – Craft adorable spider eyes; feel free to omit if there’s an allergy.
Get ready to create some hauntingly delicious Halloween spider pizzas!
Step‑by‑Step Instructions for Halloween Spider Pizzas
Step 1: Prepare the Dough
Begin by making the pizza dough using your chosen base mix, following the package instructions. Knead the dough gently until it feels soft and bouncy, then place it in a warm area and cover with a clean kitchen towel. Allow it to rise for about 1 hour, or until it has doubled in size, which will create a lovely fluffy texture for your Halloween spider pizzas.
Step 2: Preheat the Oven
While the dough rises, preheat your oven to 240°C (220°C fan) or gas mark 9. As the oven heats, prepare two baking sheets by dusting them lightly with plain flour to prevent sticking. This step is crucial for achieving crispy Halloween spider pizzas, so make sure they're ready for the dough once it's risen.
Step 3: Shape the Pizza Bases
Once your dough has risen beautifully, divide it into eight equal pieces. Roll four pieces into thin circles, roughly 25 cm wide, and place them onto the prepared baking sheets. Don’t worry about perfection; a slightly rustic look adds to the fun of your Halloween spider pizzas!
Step 4: Add the Sauce and Cheese
Spread a thin layer of passata or tomato pasta sauce over each pizza base, ensuring you leave a small border around the edges. Sprinkle the grated mozzarella and parmesan cheese generously on top, allowing the flavors to meld together beautifully. This cheesy layer is essential for a delightful taste and helps hold the creepy-crawly toppings in place.
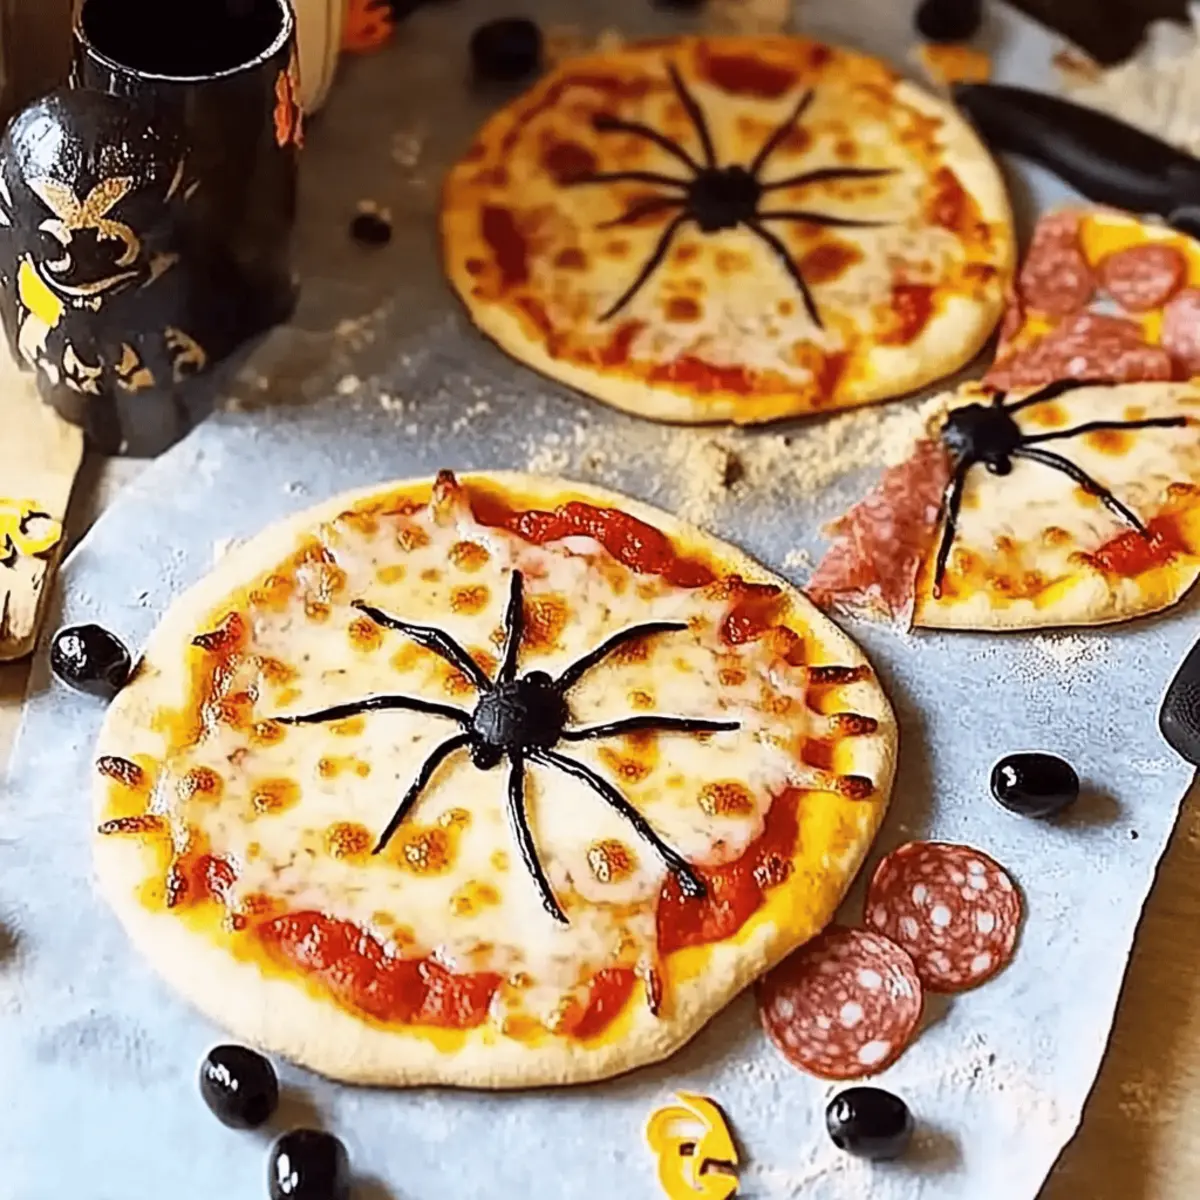
Step 5: Create the Spider Bodies
Halve the large pitted black olives and place the cut sides down on the cheese, positioning them to resemble spider bodies. Use strips of the remaining olive halves to add eight legs for each spider, letting your imagination run wild. The whimsical design of your Halloween spider pizzas will surely delight everyone at your gathering!
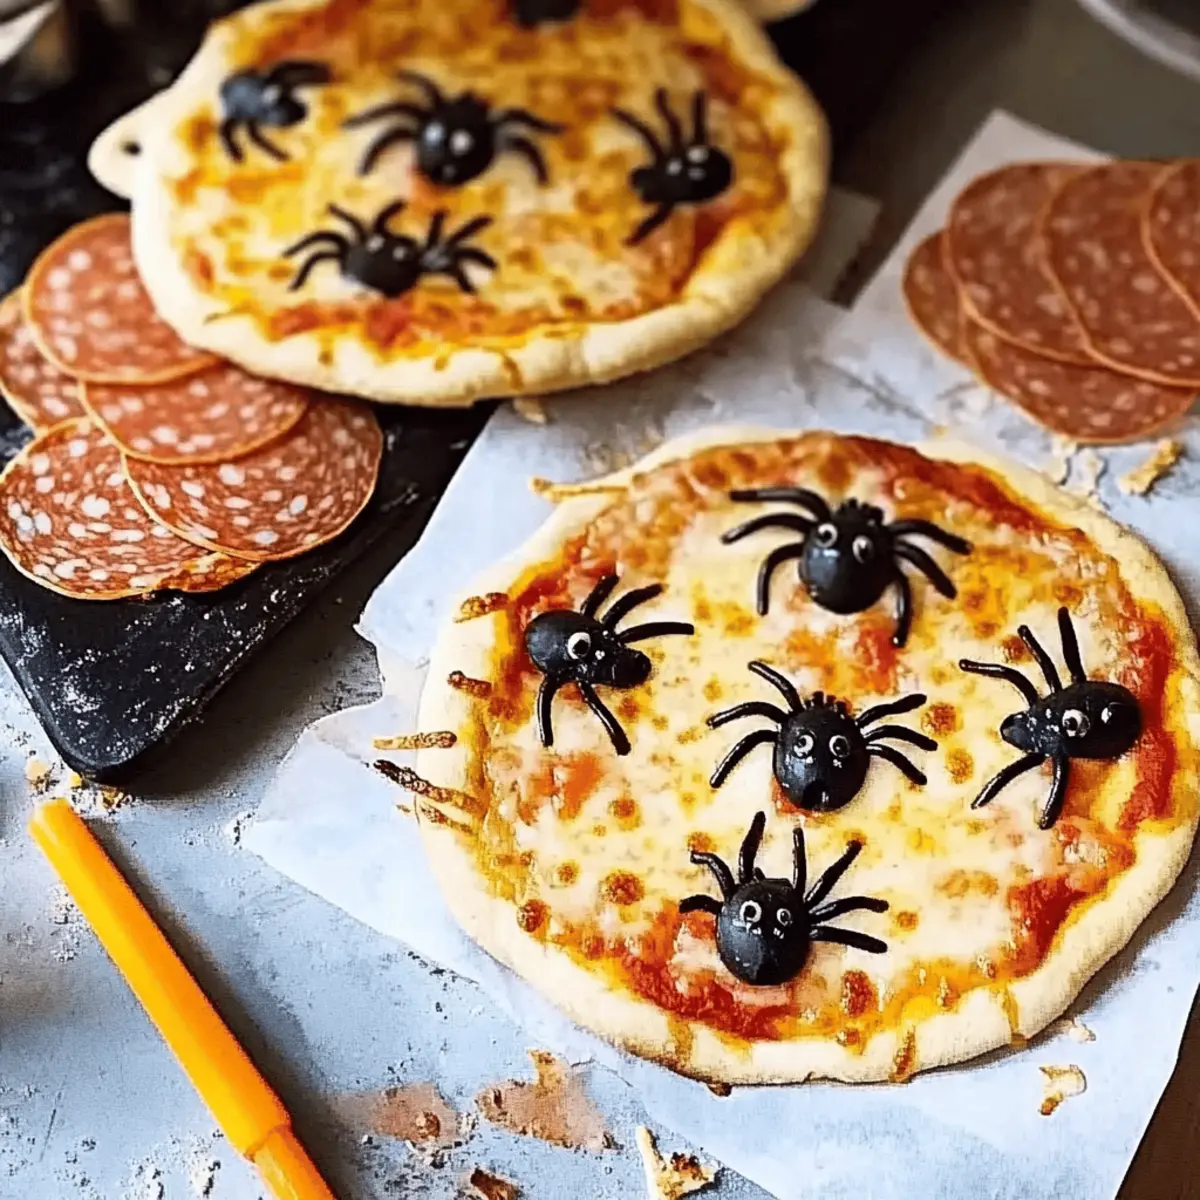
Step 6: Decorate with Salami
For the remaining four pizza bases, scatter small slices of salami or chorizo across the cheese, arranging them in a way that allows for additional spider legs. You can also add small capers for eyes next to the salami, creating a fun and spooky appearance. Get creative with this stage, personalizing each spider pizza to reflect the tastes of your guests.
Step 7: Bake to Perfection
Place both trays in the preheated oven and bake for about 12 minutes, or until the edges are golden and crispy, and the cheese is beautifully melted and bubbly. Keep a close eye on the pizzas in the last few minutes to achieve that perfect golden crust on your Halloween spider pizzas, making them irresistibly festive.
Step 8: Serve and Enjoy
Once baked, carefully remove the Halloween spider pizzas from the oven and let them cool for a couple of minutes on a wire rack. This will allow the cheese to set slightly. Serve the pizzas warm, cutting them into slices to share at your Halloween celebration, and watch as everyone admires your delightful, spooky creations!
Halloween Spider Pizzas: Customization Ideas
Get ready to unleash your creativity in the kitchen! These spooky spider pizzas are perfect for putting your own twist on a classic favorite.
- Gluten-Free Base: Substitute regular pizza dough with a gluten-free mix to accommodate dietary needs while still enjoying all the fun!
- Dairy-Free: Swap mozzarella and parmesan with vegan cheese to create a cheesy blissful experience for those avoiding dairy.
- Spicy Pop: Add crushed red pepper flakes on top before baking for a tasty kick that adults will love. Spice up your gatherings with this delightful twist!
- Veggie-Loaded: Pile on colorful bell peppers, mushrooms, or zucchini to enhance nutrition and add vibrant colors to your spooky creations. These veggies will make your pizzas even more appealing!
- Herbaceous Flavor: Sprinkle fresh basil or oregano over the cheese before baking to infuse these Halloween spider pizzas with a fragrant kick! It beautifully balances the savory elements.
- Sweet Surprise: Drizzle balsamic glaze over the finished pizzas for a sweet counterbalance that tantalizes the taste buds without compromising the Halloween theme.
- Child-Friendly: For a more playful appeal, use pepperoni slice shapes or create other fun figures instead of spiders to make it a whimsical experience for younger chefs.
With these variations, your Halloween spider pizzas can become an even more thrilling treat for all ages. Don't forget to explore other fun ideas like Halloween-themed snacks to keep the spooky spirit alive!
What to Serve with Halloween Spider Pizzas
These spooky treats will steal the show, but pairing them with complementary sides and drinks can elevate your festive feast.
-
Crispy Garlic Bread: Perfect for scooping up extra sauce or cheese, this buttery delight enhances the pizza experience.
-
Vibrant Salad: A refreshing green salad with cucumbers and cherry tomatoes balances the richness of the pizzas, adding a burst of color to your table.
-
Spooky Dips: Serve with themed dips like ghostly white bean hummus or a bubbling cauldron of guacamole to keep the fun alive while enhancing flavors.
-
Halloween Fruit Skewers: Sweet, colorful fruit skewers can appease those with a sweet tooth and bring a touch of sweetness to your spooky spread.
-
Witch’s Brew Punch: A spooky drink made from lime sherbet and lemonade, this fizzy concoction is a hit for all ages, adding a festive spirit to your gathering.
-
Chocolate Mousse Cups: End on a sweet note with these creamy, rich desserts topped with whipped cream. Their silky texture perfectly contrasts the crispy pizzas.
Make Ahead Options
These Halloween spider pizzas are perfect for busy cooks looking to save time during the festive season! You can prepare the pizza dough and shape the bases up to 24 hours in advance; simply roll out the dough, place the uncooked bases on floured baking sheets, and cover tightly with plastic wrap in the fridge to maintain freshness. The spider toppings can also be prepped in advance—slice the olives, salami, and capers, and store them in airtight containers for up to 3 days. When you're ready to serve, spread a thin layer of sauce and top with cheese and the prepared decorations, then bake as instructed for delicious, spooky results just in time for your gathering!
Expert Tips for Halloween Spider Pizzas
Warm Environment: Ensure your dough rises in a warm spot, as this helps it become fluffy and gives your Halloween spider pizzas the best texture.
Avoid Sogginess: Use a thin layer of sauce on each pizza base to prevent them from becoming soggy after baking, ensuring a delightful crunch.
Creative Toppings: Feel free to substitute traditional toppings with your family’s favorites—adding veggies or different cheeses can keep your Halloween spider pizzas exciting and versatile.
Watch the Oven: Keep an eye on the pizzas as they bake to prevent overcooking; a golden-brown crust is the goal for perfect creepy-crawly presentations.
Decorate Together: Involve the kids in arranging the spider toppings; it turns cooking into a fun family bonding activity while bringing creativity to your Halloween festivities!
How to Store and Freeze Halloween Spider Pizzas
Room Temperature: Enjoy your Halloween spider pizzas fresh for the best taste. If any leftovers remain, they can sit out for up to 2 hours at room temperature.
Fridge: Store leftover pizzas in an airtight container in the fridge for up to 2 days. Reheat in the oven for a crisp texture or microwave them if preferred.
Freezer: For longer storage, freeze individual pizzas wrapped in plastic wrap and then aluminum foil for up to 1 month. Reheat directly from frozen at 180°C (350°F) for 15-20 minutes.
Reheating: To retain the crispy crust, reheat your Halloween spider pizzas in the oven for best results. Avoid the microwave, as it may make the crust soggy.
Halloween Spider Pizzas Recipe FAQs
What type of olives should I use for Halloween spider pizzas?
You can use large pitted black olives for the spider bodies, but green olives are a great alternative if you're after a different flavor profile. Whichever you choose, just make sure they are pitted to ensure easier assembly!
How should I store leftover Halloween spider pizzas?
If you have any leftovers, store them in an airtight container in the fridge for up to 1-2 days. To reheat, the oven is your best friend! Simply place them back in a preheated oven at 180°C (350°F) for about 8-10 minutes to restore their crispy texture.
Can I freeze Halloween spider pizzas?
Absolutely! If you’d like to save some for later, wrap each individual pizza in plastic wrap and then in aluminum foil before placing them in the freezer. They can last up to 1 month. When you're ready to enjoy, reheat them straight from frozen in a preheated oven at 180°C (350°F) for approximately 15-20 minutes, keeping an eye on them to ensure a crispy crust.
What if my pizza dough doesn’t rise properly?
If your pizza dough doesn't rise sufficiently, it might be due to a cold environment. To troubleshoot, ensure your dough is kept in a warm, draft-free area. You can even place it in a slightly warmed oven with just the light on. Kneading it a bit more can also help activate the yeast. If it still fails to rise, you may want to consider starting with a new batch if it looks dense or firm.
Are Halloween spider pizzas suitable for kids with allergies?
You can certainly make Halloween spider pizzas safer for kids with allergies! If a child is allergic to olives or salami, consider substituting these toppings with safe alternatives like sliced bell peppers or thinly sliced zucchini to create "spider legs." Always check labels on packaged foods like pizza base mixes and sauces for potential allergens.
Can I prepare the Halloween spider pizzas in advance?
Yes, you can prepare them in advance! Assemble the pizzas without baking them and store them covered in the fridge for up to 24 hours. When you're ready to serve, simply pop them in the oven as per the baking instructions. They'll be as fresh and tasty as if you made them right before the party!

Creepy-Crawly Halloween Spider Pizzas for Spooky Fun
Ingredients
Equipment
Method
- Prepare the dough using your chosen base mix, follow the package instructions, knead gently, rise until doubled in size.
- Preheat your oven to 240°C (220°C fan) or gas mark 9 and prepare baking sheets with flour.
- Divide risen dough into eight, roll four pieces into thin circles (25 cm) on prepared baking sheets.
- Spread tomato sauce over pizza bases, leaving a border; sprinkle mozzarella and parmesan evenly.
- Halve olives, place them on the cheese for spider bodies and use strips for legs.
- For other pizza bases, add salami slices and capers for additional decoration.
- Bake in the oven for about 12 minutes until golden and crispy.
- Let cool slightly, slice, and serve warm.


Leave a Reply