
The moment I discovered the delightful world of Cottage Cheese Wraps, my meal prep took a delicious turn. These wraps are not just another health trend; they’re a revelation! Packed with over 21 grams of protein per serving, they are incredibly satisfying and entirely gluten-free. With only a few wholesome ingredients required, you’ll blend, bake, and roll your way to a quick, nutritious meal perfect for any time of day. Whether you're looking for an easy breakfast option or a creative low-carb lunch, these versatile wraps can be filled with whatever your heart desires—from savory chicken and veggies to a sweet touch of banana and almond butter. Are you ready to elevate your cooking game with this protein-packed wonder?
Why Choose Cottage Cheese Wraps?
Nutritious Delight: Each wrap boasts a whopping 21g of protein, making them a fantastic high-protein choice without the flour.
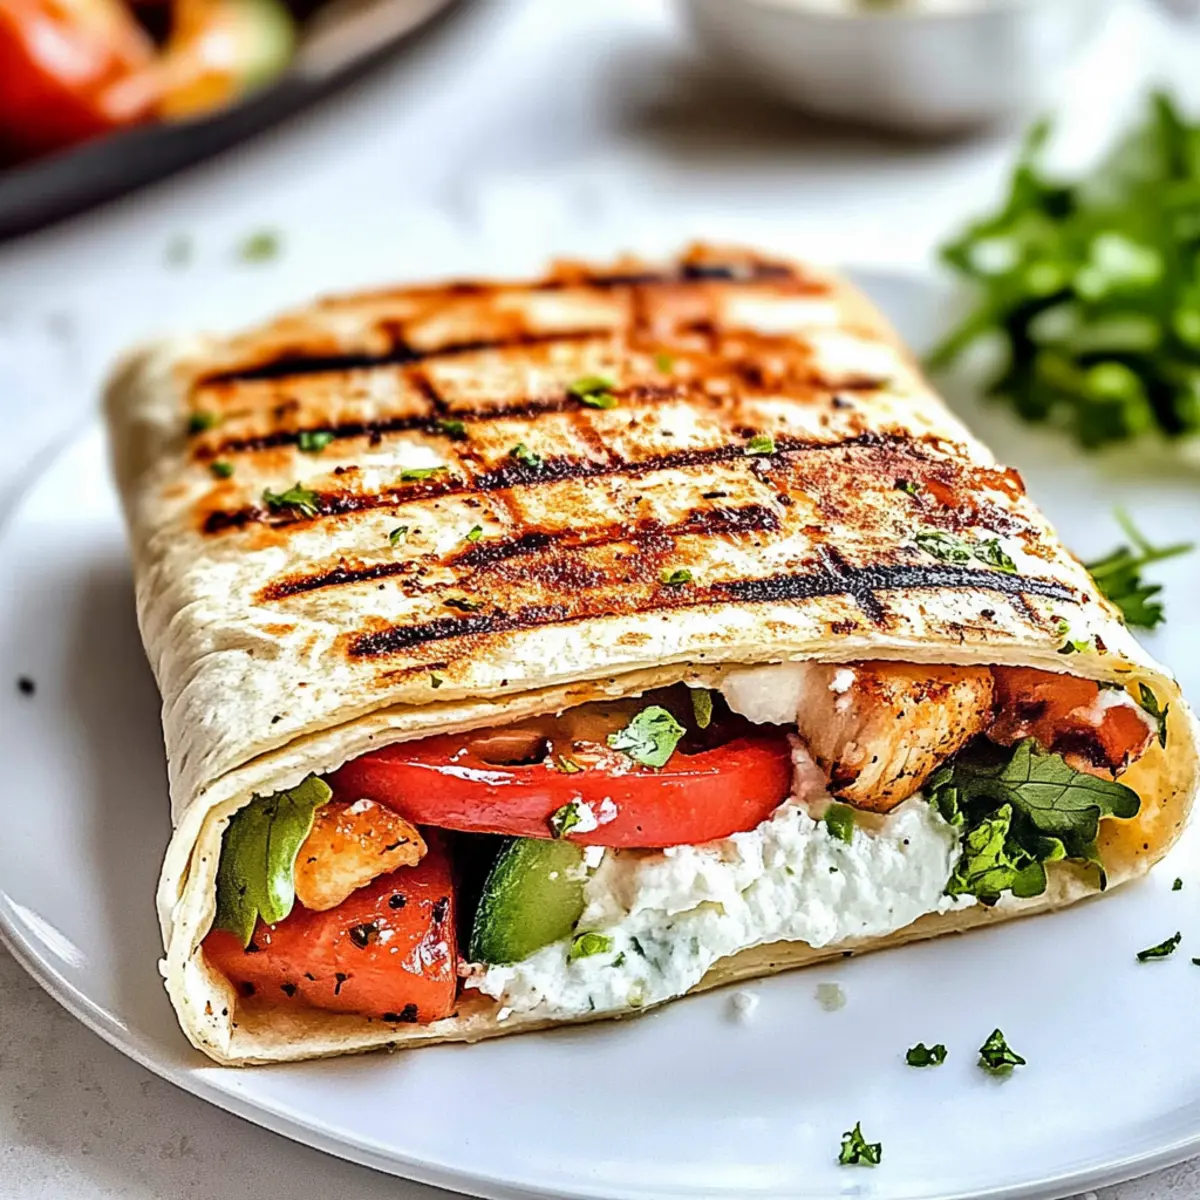
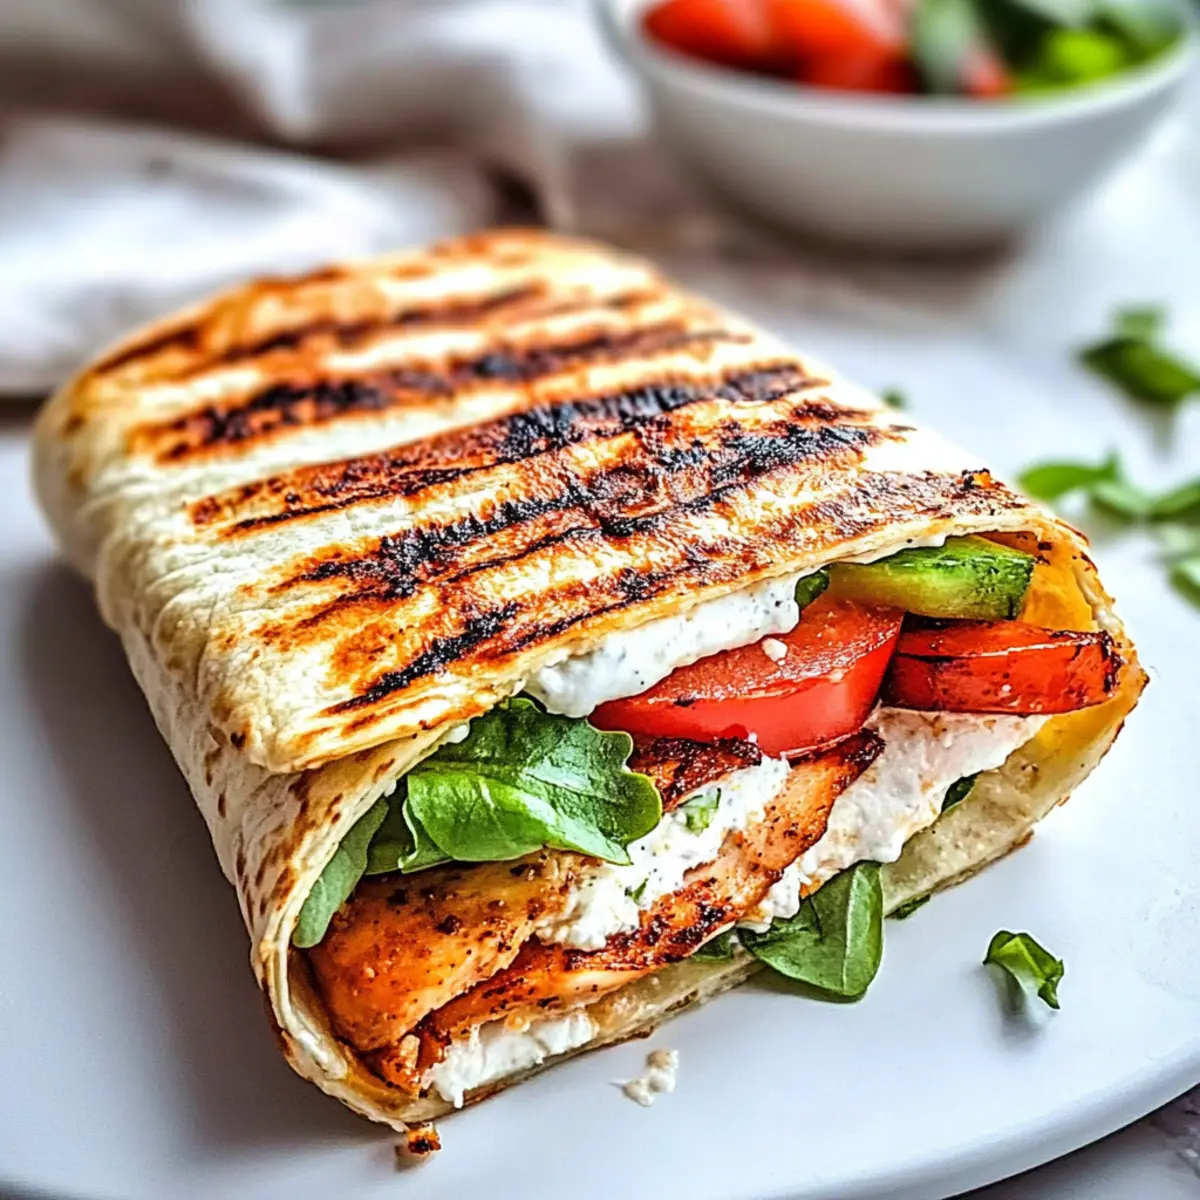
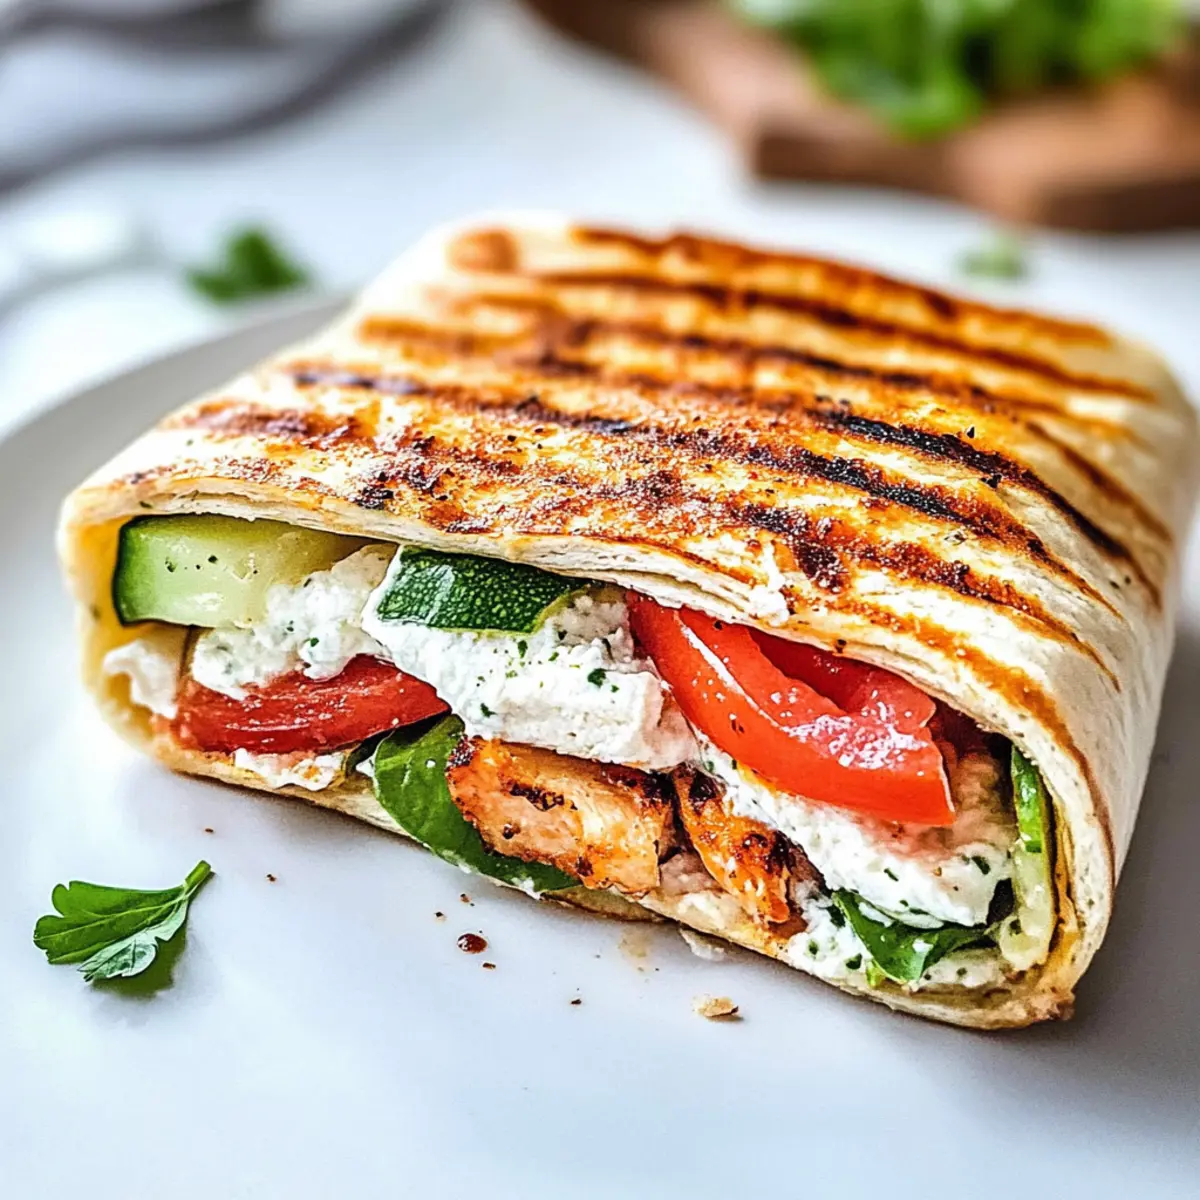
Versatile Fillings: Whether you’re in the mood for savory or sweet, these wraps can accommodate just about any filling—from grilled chicken and veggies to cream cheese and smoked salmon.
Quick & Easy: With just a few simple steps, you can whip up these delicious wraps without the hassle, perfect for meal prepping!
Diet-Friendly: Ideal for those on a gluten-free, keto, or low-carb diet, these wraps truly fit seamlessly into various dietary preferences. If you enjoy creative meals, try pairing them with Jello Salad Cottage for a delightful side.
Crowd-Pleasing: Their soft, pliable texture makes them a hit for both kids and adults, ensuring everyone leaves the table satisfied!
Cottage Cheese Wraps Ingredients
• Get ready to roll with these simple ingredients!
For the Wraps
- Full-fat Cottage Cheese – Offers a creamy base and packs a protein punch; try ricotta for a different flavor profile.
- Large Eggs – Binds the wraps together for a perfect texture; aquafaba is a great vegan substitute.
- Grated Parmesan Cheese – Adds savory flavor; feel free to substitute with mozzarella for a milder touch or nutritional yeast for a dairy-free option.
- Garlic Powder – Intensifies the wraps' savory taste; fresh garlic can also deliver a delightful kick if you prefer.
- Italian Seasoning – Infuses herby goodness; swap with oregano or your favorite dried herbs for a personalized flair.
These Cottage Cheese Wraps not only fit into your meal-prepping routine but also make for a refreshing and protein-rich treat any time of the day!
Step‑by‑Step Instructions for Cottage Cheese Wraps
Step 1: Preheat the Oven
Begin by preheating your oven to 350°F (175°C). While the oven is heating, line a baking sheet with parchment paper and lightly grease it with cooking spray or a drizzle of olive oil. This preparation ensures that your Cottage Cheese Wraps will not stick, allowing for easy removal and perfect crispiness.
Step 2: Blend the Ingredients
In a blender, combine the full-fat cottage cheese, large eggs, grated Parmesan cheese, garlic powder, and Italian seasoning. Blend the mixture on high for about 1 minute until it achieves a smooth and creamy texture. This step is crucial for ensuring that the mixture is well combined, providing the best foundation for your tasty wraps.
Step 3: Spread the Mixture
Carefully pour the blended mixture onto the prepared baking sheet. Using a silicone spatula, spread the batter evenly into a thin rectangle, ensuring it’s consistent in thickness. This even layer is key to achieving uniform cooking and a delightful texture in each Cottage Cheese Wrap.
Step 4: Bake Until Golden
Place the baking sheet in the preheated oven and bake for 30 to 35 minutes. Keep an eye on your wraps; they should emerge golden on top and feel firm to the touch. The surface should no longer be sticky, indicating they’re ready to come out.
Step 5: Cool Completely
Once baked, remove the wraps from the oven and let them cool completely on the baking sheet. This cooling period is vital as it helps the wraps firm up and makes them easier to handle without tearing. Patience will pay off in texture!
Step 6: Remove and Cut
After the wraps have cooled, gently peel them off the parchment paper. Cut them into desired sizes, which can vary depending on your filling preferences. Now your delicious Cottage Cheese Wraps are ready to be filled with your choice of ingredients, from savory options to sweet delights.

Expert Tips for Cottage Cheese Wraps
-
Smooth Batter: Ensure the batter is blended until completely smooth, as lumps can result in an uneven texture and cooking experience.
-
Grease the Parchment: Don’t skip the greasing step. This prevents the wraps from sticking and aids in a clean release after baking.
-
Full Cooling Required: Allow your wraps to cool completely before removing them from the parchment. This helps maintain their structure and flexibility.
-
Test for Firmness: To ensure your Cottage Cheese Wraps are done, gently press on the surface; it should feel firm and dry to the touch, indicating they’re ready.
-
Flavor Variations: Feel free to get creative! Experiment with different cheeses and spices to customize the flavor to your liking.
Make Ahead Options
These Cottage Cheese Wraps are a fantastic choice for busy home cooks looking to save time during the week! You can prepare the wrap mixture and refrigerate it in an airtight container for up to 3 days. Simply blend the ingredients as directed, pour it onto the baking sheet, and bake when ready to enjoy. To maintain their quality, ensure the wraps are cooled completely before storing and wrap them individually in parchment paper if you plan to freeze them. If freezing, they can last for up to 2 months. When ready to serve, just thaw and reheat gently in the oven or microwave, and you’ll have delicious, high-protein Cottage Cheese Wraps ready in minutes!
What to Serve with Cottage Cheese Wraps?
Elevate your meal experience by pairing these delicious wraps with complementary sides and flavors that delight the senses.
- Savory Salad: A fresh arugula salad adds pepperiness and crunch, perfectly balancing the creamy texture of the wraps.
- Roasted Veggies: Colorful roasted bell peppers and zucchini provide heartiness, infusing your meal with sweet, caramelized flavors.
- Herbed Greek Yogurt: A drizzle of tangy Greek yogurt mixed with fresh herbs brightens each bite and adds a refreshing touch.
- Creamy Avocado Dip: Rich avocado dip not only enhances flavors but also offers a velvety contrast to the protein-packed wraps.
- Crisp Pickles: Tart dill pickles make for exciting, crunchy bites that cut through the richness, stimulating your taste buds.
- Fruit Salsa: A vibrant mango or pineapple salsa introduces a sweet, tropical flair that pairs surprisingly well with savory wraps.
- Sparkling Water: Refresh yourself with a bubbly drink; the fizz cleanses your palate and adds a light, celebratory feel to the meal.
- Dark Chocolate Bites: End on a sweet note with a few squares of dark chocolate; it complements the wraps’ savory fillings beautifully.
Cottage Cheese Wraps Variations
Get ready to unleash your creativity with these mouthwatering adaptations that will keep your meals exciting!
-
Dairy-Free: Substitute cottage cheese with silken tofu for a creamy, plant-based version.
Letting silken tofu take the spotlight not only makes it dairy-free but also adds a lovely velvety texture that's perfect for any filling. -
Herb-Infused: Mix in fresh herbs like basil or cilantro before blending to enhance flavor.
Your wraps will burst with aromatic goodness, providing a fresh touch that elevates even the simplest fillings. -
Spicy Kick: Add a teaspoon of chili powder or hot sauce to the batter for extra heat.
Transform your wraps into a zesty delight! Pair these spicy wraps with cooling fillings like sour cream or guacamole for a balanced bite. -
Sweet Twist: Fill with Greek yogurt and fresh fruit, like strawberries or peaches, for a sweet breakfast option.
Start your day on a delightful note with a touch of sweetness! These fruity wraps are a healthy and delicious way to energize your mornings. -
Texture Contrast: Fold in sautéed veggies or crispy bacon bits into the batter for added texture.
Crunchy elements in these wraps will surprise your taste buds and provide satisfying bites that your family will love. -
Seasonal Flavors: Experiment using pumpkin puree with a pinch of cinnamon during fall, or spinach and feta for a Mediterranean flair.
These seasonal spins add a festive touch, making your wraps adaptable to any occasion. -
Savory Cheese Varieties: Swap parmesan for a sharper cheese like feta or gouda for a unique flavor.
This simple substitution will let each bite take you on a delicious journey. Just imagine a rich gouda paired with your favorite fillings!
For more flavorful pairings, consider enjoying your wraps alongside Potato Blue Cheese or perhaps a refreshing serving of Jello Salad Cottage. The possibilities are endless in making these Cottage Cheese Wraps your very own!
Storage Tips for Cottage Cheese Wraps
Fridge: Store your Cottage Cheese Wraps in an airtight container for up to 5 days. Wrapping each individually in parchment paper can prevent sticking and maintain freshness.
Freezer: For longer storage, freeze the wraps for up to 2 months. Place a piece of parchment paper between each wrap to avoid sticking, ensuring easy separation when you're ready to enjoy them.
Thawing: To thaw, simply place the frozen wraps in the refrigerator overnight or leave them at room temperature for a couple of hours.
Reheating: Reheat in the microwave for about 30 seconds or in a warm skillet for a few minutes until heated through. Enjoy with your favorite fillings!
Cottage Cheese Wraps Recipe FAQs
What type of cottage cheese should I use for the wraps?
I recommend using full-fat cottage cheese as it provides the best creamy base and rich flavor, boosting the protein content significantly. If you want to try something different, ricotta cheese is a smooth alternative that can add a unique flavor profile to your wraps.
How should I store the Cottage Cheese Wraps?
These wraps can be stored in an airtight container in the fridge for up to 5 days. I suggest wrapping each individual wrap in parchment paper to prevent them from sticking together. For longer storage, you can freeze them for up to 2 months!
Can I freeze Cottage Cheese Wraps?
Absolutely! When freezing, place a piece of parchment paper between each wrap to avoid sticking. To thaw, simply transfer them to the refrigerator overnight or let them sit at room temperature for a few hours. Reheat in the microwave for about 30 seconds or in a skillet until warmed through.
What if my wraps turn out too fragile or break?
If your wraps become fragile, it's likely that they weren't baked long enough or didn't cool completely before handling. Ensure that the surface feels firm and dry when baking, and allow the wraps to cool completely on the baking sheet for the best texture. If they do tear, don’t worry! You can always piece them together and fill them with your choice of fillings.
Are these wraps safe for people with dietary restrictions?
Yes! Cottage Cheese Wraps are gluten-free and low-carb. They can also be adapted for various diets; for instance, using aquafaba instead of eggs makes them vegan-friendly. However, always double-check the ingredient labels for potential allergens, especially if you're serving guests with food sensitivities.
What are some tasty filling ideas for my Cottage Cheese Wraps?
The filling options are nearly limitless! You can go savory with grilled chicken, veggies, and hummus or indulge in a sweet treat with slices of banana and almond butter. Feel free to get creative and try out different combinations that match your taste buds, because the more, the merrier!
Delicious Cottage Cheese Wraps: High-Protein and Versatile
Ingredients
Equipment
Method
- Preheat your oven to 350°F (175°C) and line a baking sheet with parchment paper, lightly greased.
- Blend the cottage cheese, eggs, Parmesan, garlic powder, and Italian seasoning until smooth.
- Pour the mixture onto the prepared baking sheet and spread it evenly into a thin rectangle.
- Bake for 30 to 35 minutes until golden and firm to the touch.
- Let the wraps cool completely on the baking sheet.
- Gently peel the wraps off the parchment and cut into desired sizes.


Leave a Reply