
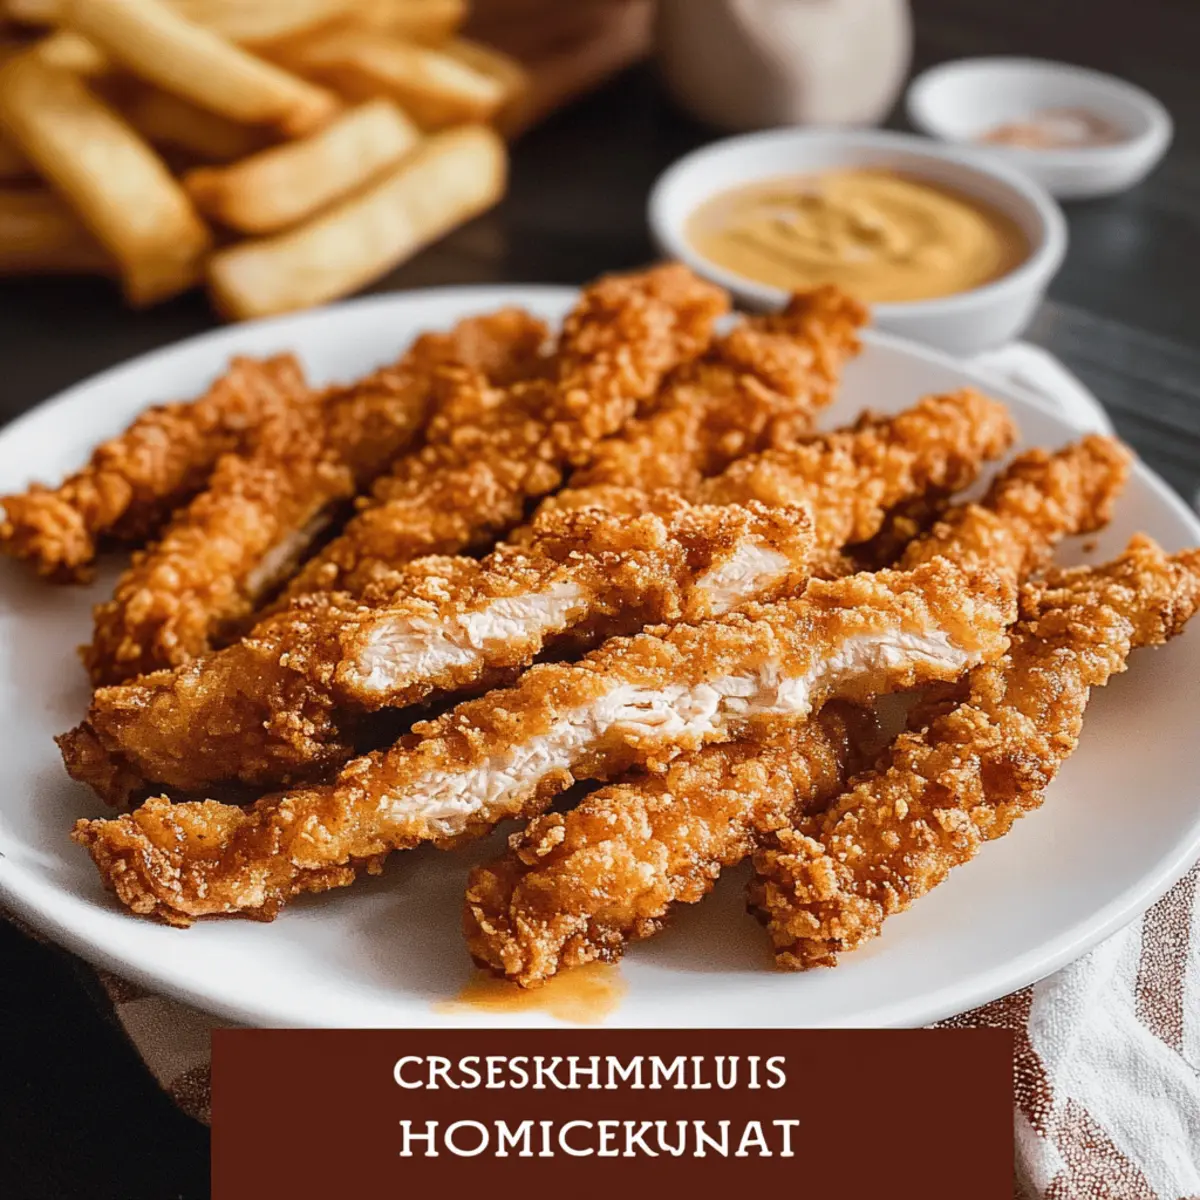
“Mom, can we have chicken strips for dinner?” As a home chef, I get these requests all too often, and who could resist that crispy goodness? These Easy Fried Chicken Strips deliver a deliciously satisfying meal your whole family will adore. With minimal ingredients and straightforward preparation, even those new to the kitchen can join in on the fun. Plus, they’re not only budget-friendly but also a quick solution for busy weeknights. Whether served with a side of your favorite dipping sauce or tucked next to a fresh salad, these homemade comfort food stars will bring smiles around the dinner table. So, are you ready to make dinner a delightful experience? Let’s get started!
Why Are These Chicken Strips So Irresistible?
Crispy Texture: Each tender strip boasts a golden, crunchy coating that rivals any fast-food favorite.
Kid-Friendly: Perfect for picky eaters, these chicken strips are sure to please both kids and adults alike!
Budget-Friendly: With simple ingredients, this recipe doesn’t break the bank, making it ideal for families.
Quick Prep: Ready in just 30 minutes, it's a meal solution for those hectic weeknights when time is precious.
Versatile Serving Options: Pair these strips with homemade ranch or try them alongside a refreshing salad, a delicious Roasted Corn Fried dish, or even some comforting fries for the ultimate feast!
Get ready to share a plate with loved ones because these chicken strips will have everyone coming back for seconds!
Fried Chicken Strips Ingredients
For the Chicken
• Boneless Skinless Chicken Breasts – The main protein source that stays juicy; pound thin for even cooking.
For the Coating
• All-Purpose Flour – Provides structure and crispiness; you can substitute with self-rising flour by omitting baking powder.
• Baking Powder – Lightens the flour mixture to create a fluffy batter texture, crucial for those crispy fried chicken strips!
• Garlic Powder – Adds depth of flavor; fresh garlic can be swapped in for a more robust taste.
• Onion Powder – Enhances the savory goodness of the coating.
• Seasoned Salt – Offers salty flavor; feel free to adjust based on your taste preference.
• Poultry Seasoning – Compounds the flavor profile; can be replaced with thyme and sage if needed.
• Pepper – For a touch of heat; use black or cayenne if you prefer extra spice.
For the Binding
• Eggs – Acts as a binder for the coating, ensuring the breading sticks.
• Milk (2% or Whole) – Adds moisture and richness to the egg wash, enhancing the final texture.
For Frying
• Canola or Vegetable Oil – Essential for frying; ensure there's enough oil to achieve even cooking.
These ingredients combine to create the crispy, delightful chicken strips that your family will crave!
Step‑by‑Step Instructions for Crispy Homemade Chicken Strips
Step 1: Prepare the Egg Mixture
In a medium bowl, beat together 2 large eggs and 1 cup of milk until they are fully combined and smooth. This egg wash will ensure your chicken strips get a nice, thick coating. Set the bowl aside, and make sure you have all your ingredients ready for a smooth cooking process.
Step 2: Mix the Dry Ingredients
In another bowl, whisk together 1 cup of all-purpose flour, 1 teaspoon of baking powder, 1 teaspoon of garlic powder, 1 teaspoon of onion powder, 1 teaspoon of seasoned salt, 1 teaspoon of poultry seasoning, and 1 teaspoon of pepper until evenly mixed. This dry blend is the key to achieving those crispy fried chicken strips, so make sure there are no lumps.
Step 3: Prepare the Chicken
Take 1 pound of boneless skinless chicken breasts and use a meat mallet to pound them evenly until they are about ½ inch thick. Slice the pounded chicken into strips about 1 inch wide. This ensures that each chicken strip cooks uniformly, resulting in tender meat and a crispy exterior.
Step 4: Heat the Oil
In a heavy-bottom skillet, pour enough canola or vegetable oil to cover about 1 inch of the bottom. Heat the oil over medium heat until it reaches 350°F; you can test it by dropping a pinch of flour into the oil. If it sizzles immediately, you're ready to fry, ensuring your chicken strips will be golden and crispy.
Step 5: Coat the Chicken
Dip each chicken strip into the egg mixture, allowing any excess to drip off, then coat it in the flour mixture, pressing gently to adhere. For an even crispier finish, consider double-dipping: dip back into the egg wash and then into the flour mixture again before frying. This will create a wonderfully crunchy texture on your fried chicken strips.
Step 6: Fry the Chicken Strips
Carefully place a few coated chicken strips into the hot oil without overcrowding the skillet. Fry them for about 5 to 7 minutes, flipping halfway through, until they turn a deep golden brown and reach an internal temperature of 165°F. The enticing aroma will fill your kitchen as the chicken strips cook to perfection.
Step 7: Drain and Serve
Once cooked, remove the chicken strips from the hot oil and place them on a plate lined with paper towels to absorb excess oil. Let them drain for a few minutes, ensuring that every bite of your crispy homemade chicken strips is as delicious as can be. Serve hot with your favorite dipping sauces!

Make Ahead Options
These Crispy Fried Chicken Strips are perfect for meal prep enthusiasts looking to save time on busy weeknights! You can marinate the chicken strips in your seasoning mix up to 24 hours in advance to allow the flavors to deeply penetrate. Additionally, you can coat the chicken in the egg wash and dry mixture, then refrigerate it for up to 3 days before frying. To maintain quality, ensure that the coated strips are stored in an airtight container to prevent moisture loss. When you're ready to serve, simply heat the oil and fry the chicken until golden brown, enjoying the same crispy texture and delicious taste as if they were freshly made!
Variations on Fried Chicken Strips
Feel free to get creative with these chicken strips to delight your taste buds even further!
-
Air-Fried: Swap traditional frying for air frying at 360°F for 12-15 minutes for a healthier crispy option. It's speedy and delivers a wonderful crunch, just with less oil!
-
Baked: Place the coated chicken strips on a parchment-lined baking sheet and bake at 400°F for 20-25 minutes for a delicious twist. Drizzle with olive oil for an added touch of crispiness.
-
Non-Dairy: Use almond milk or oat milk instead of cow's milk in your egg wash for a delightful non-dairy version. This way, everyone can join in on the fun, no matter their dietary needs.
-
Smoky Flavor: Incorporate smoked paprika into your flour mixture for an enticing flavor boost. This turns your chicken strips into a smoky delight that will impress all your guests!
-
Crispy Panko Coating: Substitute half of the all-purpose flour with panko breadcrumbs for an extra crunchy texture. You'll experience an explosion of crunch in every bite – perfect for those who crave crispy goodness!
-
Seasoning Variations: Experiment with spices like cayenne pepper or Sriracha powder for a spicy kick. These bold flavors will have everyone reaching for more, making them the ultimate comfort food.
-
Herb-Infused Coating: Blend fresh herbs like parsley or thyme into your flour mix for an aromatic twist. This will not only enhance flavor but also bring a beautiful pop of color to your homemade masterpiece.
These variations will not only keep the chicken strips exciting but will also complement other delicious meals, such as a comforting Chipotle Lime Chicken or an uplifting Pan Fried Shrimp dish! Let your creativity roam, and enjoy the culinary journey!
Expert Tips for Fried Chicken Strips
• Oil Temperature Check: Ensure the oil is at 350°F before frying. This helps avoid soggy strips. Use a food thermometer for accuracy.
• Double Dipping Magic: For ultimate crunchiness, double-dip your chicken strips in the egg wash and flour mixture. This creates a thicker, crunchier coating.
• Avoid Overcrowding: Fry in batches to prevent dropping the oil temperature, which can lead to greasy fried chicken strips.
• Use a Meat Thermometer: Check that the chicken reaches an internal temperature of 165°F to avoid undercooked strips that compromise safety.
• Storage Solutions: If you have leftovers, store them in an airtight container in the fridge for up to 3 days. Reheat in the oven to restore crispness!
Storage Tips for Fried Chicken Strips
Fridge: Store leftover fried chicken strips in an airtight container for up to 3 days to maintain freshness and flavor.
Freezer: For longer storage, freeze the cooked chicken strips in a single layer, then transfer to a freezer-safe bag for up to 3 months.
Reheating: To reheat and restore crispiness, place frozen or refrigerated chicken strips in a preheated oven at 400°F for 10-15 minutes or until heated through.
Thawing: If frozen, allow the fried chicken strips to thaw in the fridge overnight before reheating for the best texture.
What to Serve with Crispy Homemade Chicken Strips
Pair your chicken strips with delightful sides that elevate your family’s meal experience into something truly special.
-
Creamy Coleslaw: Fresh and crunchy, coleslaw adds a vibrant contrast that complements the crispy texture perfectly. The tangy dressing brightens the dish for a refreshing bite.
-
Fries Galore: Enjoy classic French fries that provide a comforting, salty crunch with each bite. Whether thin and crispy or thick-cut, they are a perfect match for dipping!
-
Garden Salad: A light, colorful salad brimming with your favorite veggies adds freshness to the meal. The chilled elements balance the warm chicken strips beautifully.
-
Homemade Dipping Sauces: Serve with ranch, honey mustard, or zesty BBQ sauce for deliciously bold flavors. These sauces make each bite fun and customizable, appealing to all palates.
-
Macaroni and Cheese: Creamy, cheesy goodness offers a rich and comforting side that pairs seamlessly with the chicken strips. It’s a kid-favorite and a nostalgic delight for adults!
-
Steamed Broccoli: Bright green broccoli adds a touch of healthy crunch to offset the rich fried chicken. Its slight bitterness balances the meal, making it feel wholesome.
-
Sweet Potato Wedges: Roasted sweet potatoes bring a touch of sweetness and earthiness that contrasts well with the savory chicken. Plus, they're easy to prepare and a delightful twist on traditional fries.
-
Lemonade or Iced Tea: Refreshing beverages like homemade lemonade or iced tea are perfect to wash down the crispy chicken. Their light sweetness pairs nicely with savory flavors and adds a fun twist.
Each of these choices complements your crispy homemade chicken strips while enhancing the overall meal experience with vibrant flavors and textures!

Fried Chicken Strips Recipe FAQs
How do I select the best chicken breasts for frying?
Absolutely! When choosing boneless skinless chicken breasts, look for those that are plump and have a pale pink color. Avoid any that have dark spots or an off smell. Fresh chicken will be firm to the touch and should not feel slimy.
What’s the best way to store fried chicken strips?
For the freshest taste, store leftover fried chicken strips in an airtight container in the refrigerator. They’ll stay good for up to 3 days if kept properly stored, allowing you to enjoy them as a quick meal.
Can I freeze leftover chicken strips?
Of course! To freeze, place the cooked chicken strips in a single layer on a baking sheet and freeze them for about 2 hours. Once frozen solid, transfer them to a freezer-safe bag. They’ll keep well for up to 3 months! Just remember to label the bag with the date.
What should I do if my chicken strips aren't crispy?
Very! If your fried chicken strips are coming out soggy, ensure that your oil is properly heated to 350°F before frying. Also, avoid overcrowding the pan, as this lowers the oil temperature. For extra crunch, consider double-dipping your chicken strips in the egg and flour mixtures before frying.
Are these chicken strips suitable for my child’s allergies?
Absolutely! You can tailor these fried chicken strips to suit dietary needs. Use gluten-free flour to make them suitable for those with gluten sensitivities. Additionally, swap the eggs with a flax or chia seed mixture for a vegan option! Always check the ingredient labels to ensure they meet your dietary requirements.
How can I reheat chicken strips without losing their crispiness?
For perfect reheating, place your fried chicken strips in a preheated oven at 400°F for about 10-15 minutes. This method revitalizes the coating, allowing them to crisp back up beautifully. If reheating from frozen, allow them to thaw in the refrigerator overnight for best results before warming.

Crispy Fried Chicken Strips Everyone Will Crave
Ingredients
Equipment
Method
- In a medium bowl, beat together the eggs and milk until fully combined and smooth. Set aside.
- In another bowl, whisk together the flour, baking powder, garlic powder, onion powder, seasoned salt, poultry seasoning, and pepper until evenly mixed.
- Pound the chicken breasts evenly until about ½ inch thick and slice into 1 inch wide strips.
- Heat enough oil in a skillet to cover about 1 inch and reach 350°F.
- Dip each chicken strip into the egg mixture, then into the flour mixture, pressing to adhere. Optionally, double-dip.
- Fry the strips in hot oil for 5 to 7 minutes until golden brown and internal temperature reaches 165°F.
- Drain fried chicken strips on a plate lined with paper towels and serve hot.
Leave a Reply