tastytrendingredients

  • Home
  • Recipes
    • Appetizers
    • Breakfast
    • Dessert
    • Dinner
    • Drinks
    • Salads
    • Snacks
    • Soups
  • About me
  • Contact me
menu icon
go to homepage
  • Home
  • Recipes
    • Appetizers
    • Breakfast
    • Dessert
    • Dinner
    • Drinks
    • Salads
    • Snacks
    • Soups
  • About me
  • Contact me
search icon
Homepage link
  • Home
  • Recipes
    • Appetizers
    • Breakfast
    • Dessert
    • Dinner
    • Drinks
    • Salads
    • Snacks
    • Soups
  • About me
  • Contact me
×

Coconutty Beans and Greens Stew: A Cozy Weeknight Wonder

August 14, 2025 by Grace Snow Leave a Comment

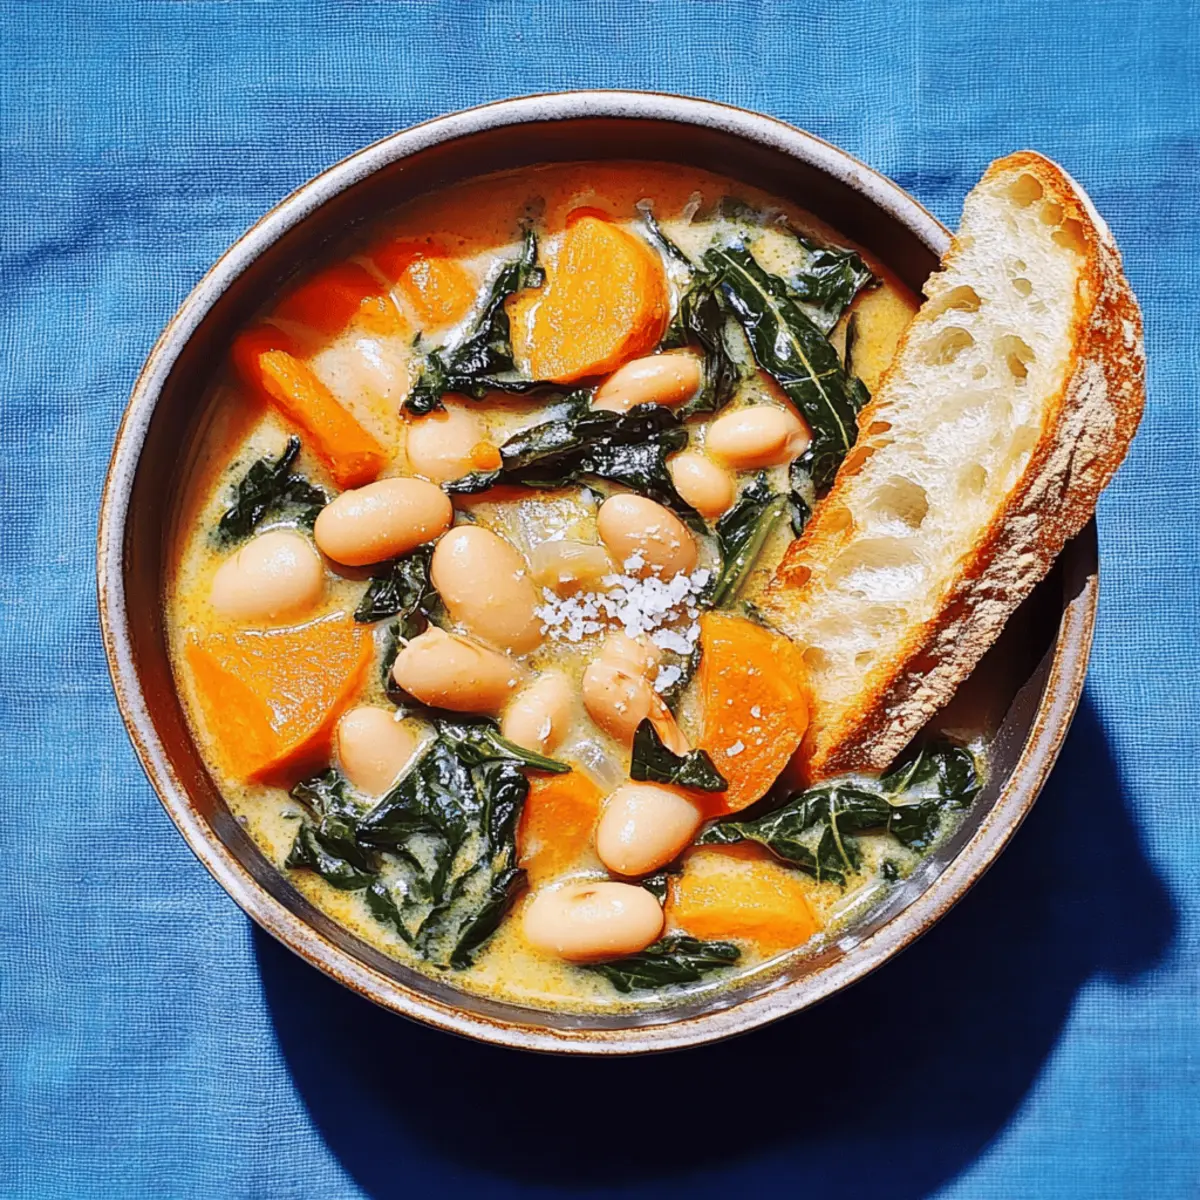
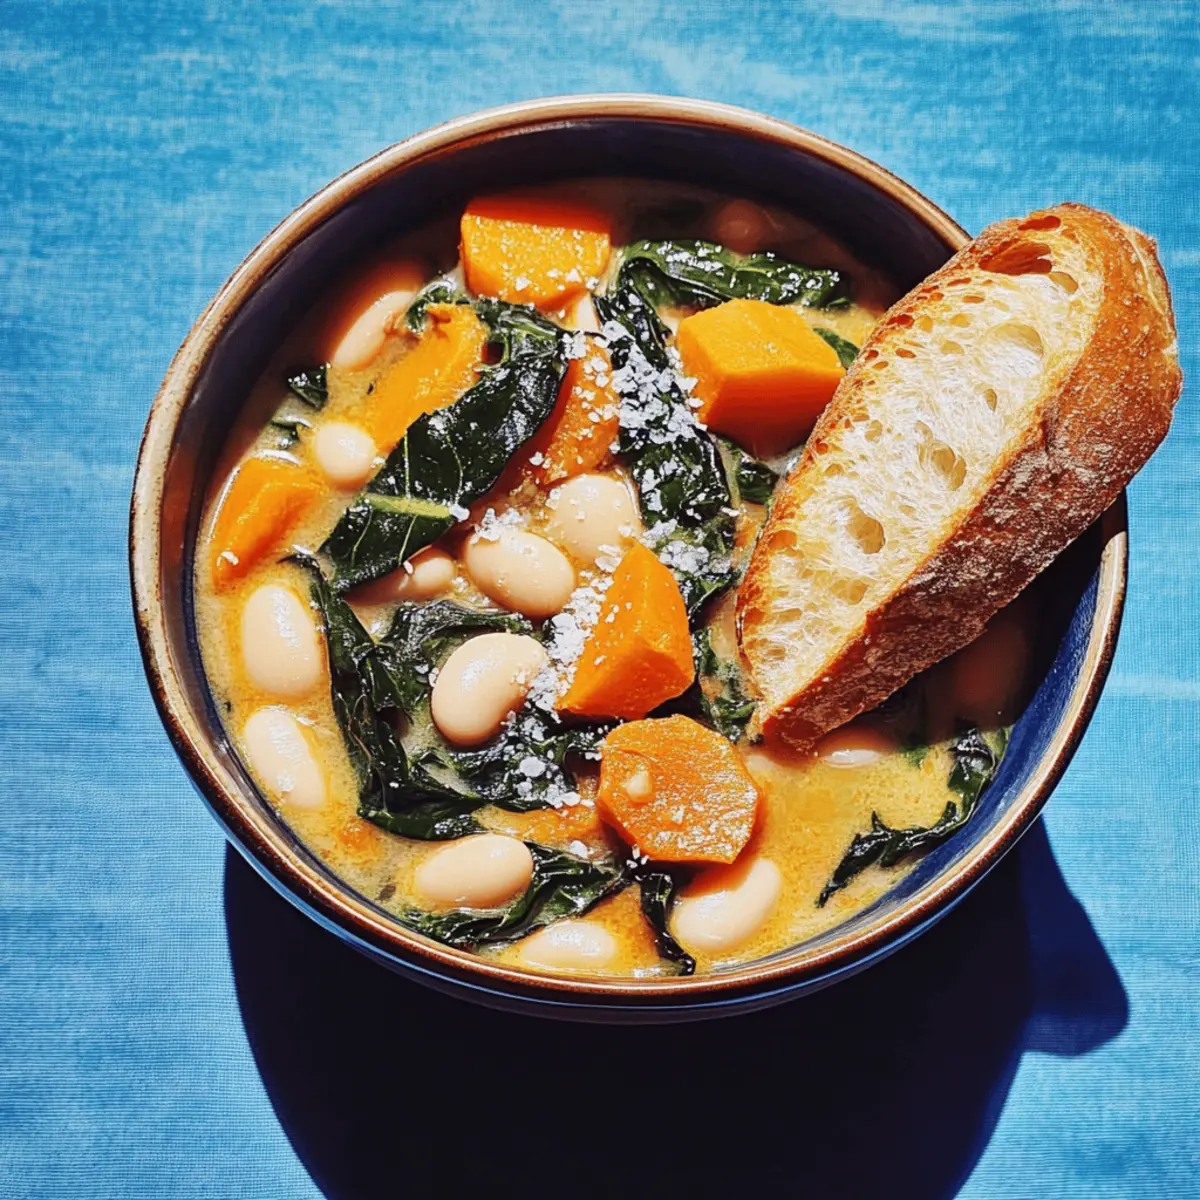
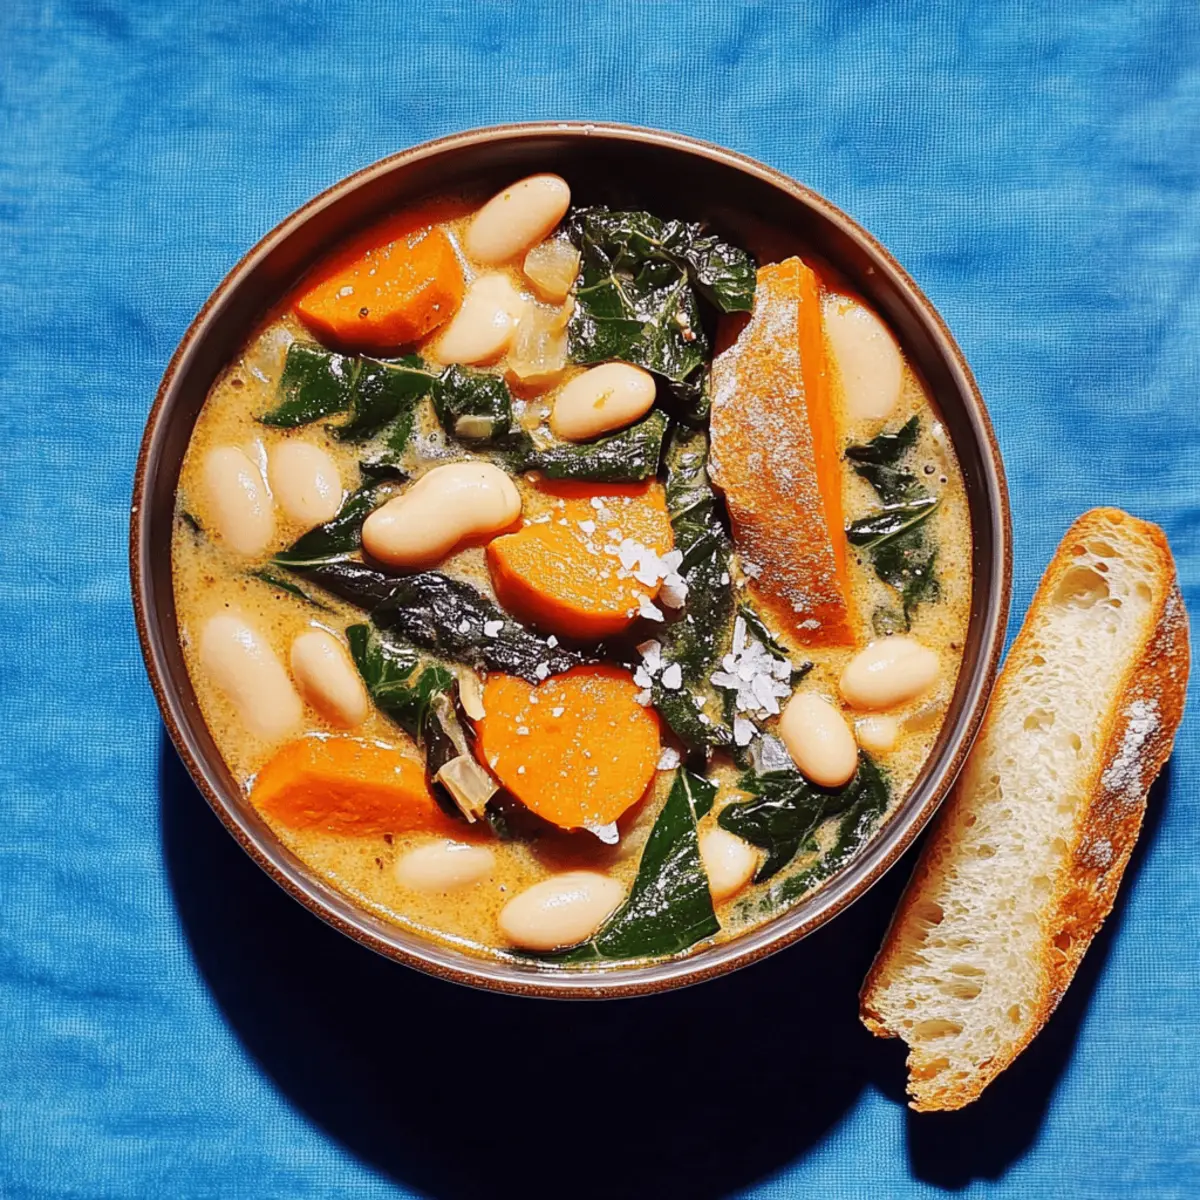
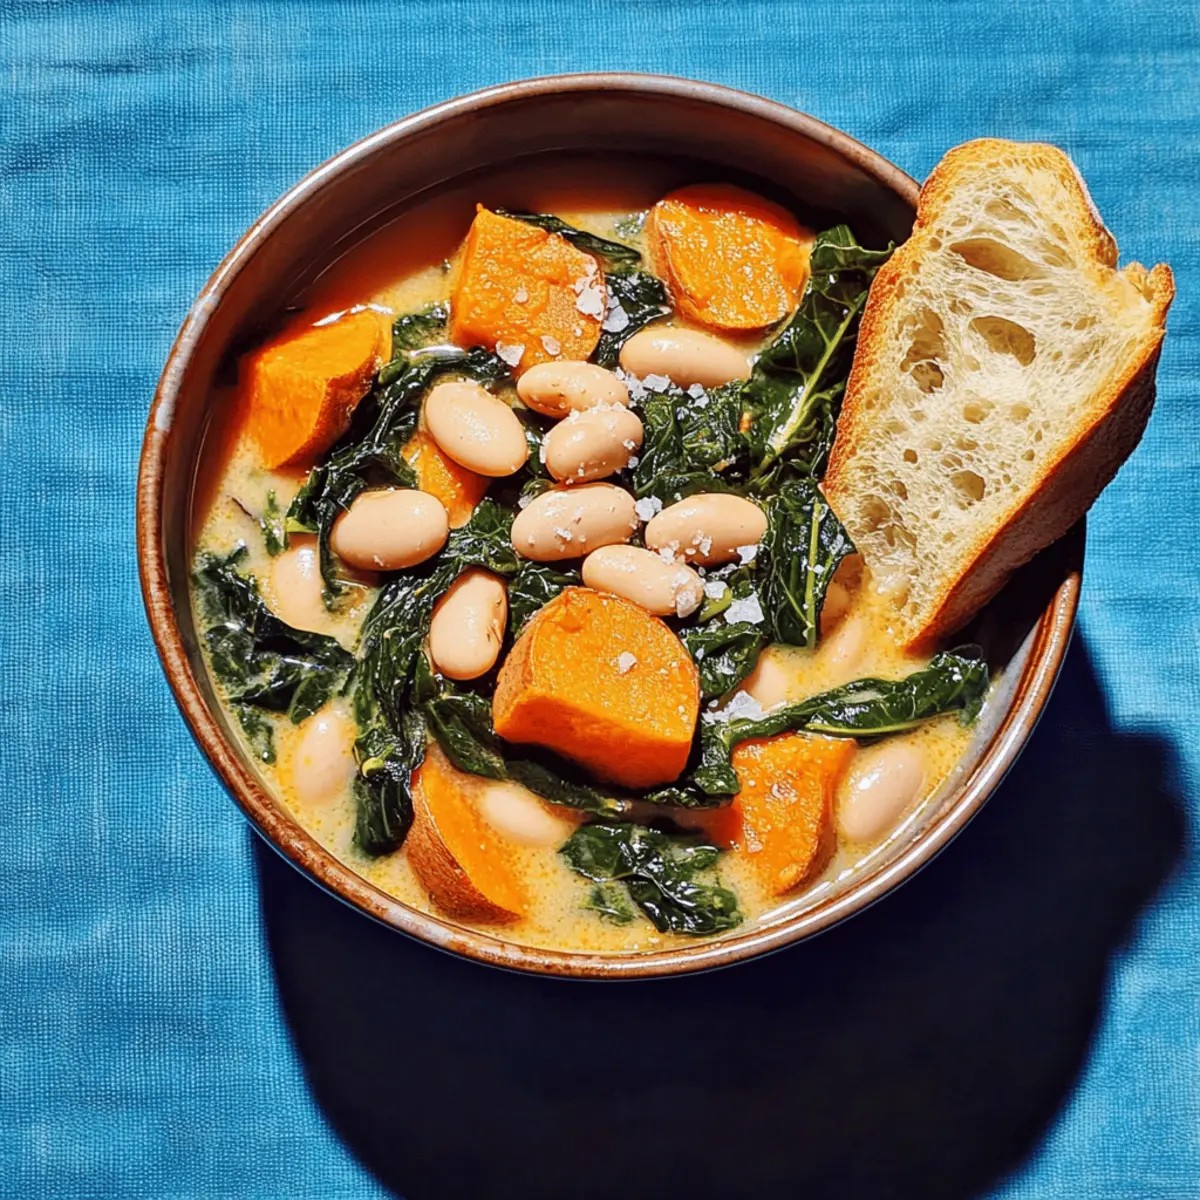
As I poured the creamy coconut milk into the pot, the kitchen instantly filled with a warm, inviting aroma that felt like a cozy hug. This Coconutty Beans and Greens Stew is my go-to solution for busy weeknights when a comforting meal is a must, yet time is short. Not only is it quick to prepare, but it’s also packed with nourishing ingredients like white beans, sweet potatoes, and vibrant Swiss chard. The combination creates a hearty, flavorful dish that can be easily customized to suit your taste, making it a versatile addition to your meal rotation. Plus, it's completely vegetarian and vegan, providing a healthy yet satisfying option for everyone at the table. Ready to dive into a bowl of wholesome goodness that will warm your soul? Let's get cooking!

Why is this Coconutty Stew so special?

Comforting, Cozy Flavors: This Coconutty Beans and Greens Stew brings the warmth of home cooking right to your table. Nutritious Ingredients: Packed with fiber-rich beans and leafy greens, it’s a wholesome choice that keeps you feeling full and energized. Easy Customization: You can effortlessly switch up vegetables or beans based on what you have on hand, making it a fantastic way to reduce food waste. Quick Prep Time: Whip it up in under 30 minutes, perfect for busy evenings! Family-Friendly Appeal: Its rich, creamy texture and robust flavors guarantee that even the pickiest eaters will come back for seconds. Experience this culinary hug that’s all about deliciousness and simplicity!

Coconutty Beans and Greens Stew Ingredients

For the Stew

  • Onion – An aromatic base; shallots can also work well as a substitute.
  • Plum Tomato – Adds a perfect balance of acidity and sweetness; diced canned tomatoes can replace it if needed.
  • Garlic cloves – Essential for depth of flavor; no substitutions necessary.
  • Ginger (1" piece) – Enhances the stew’s aromatic profile; ground ginger can be used in a pinch.
  • Red Thai chiles (2) – Bring that hint of heat; feel free to use jalapeño or omit for a milder dish.
  • Extra-virgin olive oil – Ideal for sautéing; avocado oil makes a great alternative.
  • Coconut milk (13.5 oz) – Creamy base for the Coconutty Beans and Greens Stew; try light coconut milk for fewer calories.
  • Water – Adjusts the stew's consistency; vegetable broth can enrich the flavor beautifully.
  • Sweet potato (1 medium) – Supplies bulk and natural sweetness; swap for regular potatoes or butternut squash if you like.
  • Swiss chard (1 large bunch) – Adds essential greens and nutrition; spinach or Tuscan kale can be substituted.
  • Butter beans, gigante beans, or cannellini beans (2 cans) – Provide protein and creaminess; any canned beans work just fine.
  • Fresh lemon juice (2 tbsp) – Brightens the dish wonderfully; lime juice serves as a good substitute.
  • Flaky sea salt – Elevates flavor; kosher salt is equally effective.
  • Baguette – Perfect for serving; any crusty bread goes well alongside this stew.

Step‑by‑Step Instructions for Coconutty Beans and Greens Stew

Step 1: Purée the Base
In a blender, combine the onion, plum tomato, garlic cloves, ginger, and red Thai chiles, then blend until smooth. This aromatic mixture will be the heart of your Coconutty Beans and Greens Stew. Once blended, set it aside for the next step.

Step 2: Cook the Aromatics
Heat two tablespoons of extra-virgin olive oil in a large skillet over medium heat. Add the puréed mixture along with a pinch of flaky sea salt, cooking for about 12-16 minutes. Stir occasionally until the mixture thickens and releases fragrant aromas, signaling that it's ready for the next ingredients.

Step 3: Add the Spices and Base Liquids
Once the purée has thickened, stir in your choice of ground coriander and cumin, adjusting salt to taste. Pour in 13.5 ounces of coconut milk and one cup of water, mixing well. Bring the stew to a gentle boil while stirring, watching for thick bubbles that indicate it's time to add the sweet potatoes.

Step 4: Incorporate Sweet Potatoes
Add one medium sliced sweet potato to the bubbling stew. Cook for about 10-12 minutes, or until the sweet potatoes are tender yet firm. You’ll know it’s done when they pierce easily with a fork but don’t fall apart, adding body to your Coconutty Beans and Greens Stew.

Step 5: Fold in the Greens and Beans
Stir in one large bunch of chopped Swiss chard along with two cans of rinsed butter beans, gigante beans, or cannellini beans. Cook for an additional 4 minutes, just until the greens are wilted and vibrant. This adds a fresh burst of color and nutrition to your stew.

Step 6: Finish with Lemon Juice
Remove the skillet from heat and gently mix in two tablespoons of fresh lemon juice to brighten the flavors. The tangy addition will enhance the richness of the Coconutty Beans and Greens Stew, giving it a delightful finish ready for serving.

Step 7: Prepare the Baguette
In a separate skillet, drizzle olive oil and heat over medium-low. Slice a baguette and fry each side for about 2 minutes, or until golden and crispy. This crunchy side is perfect for scooping up your delicious stew, adding texture to the meal.

Step 8: Serve the Stew
Ladle the rich Coconutty Beans and Greens Stew into bowls, topping each serving with a sprinkle of flaky sea salt and a drizzle of olive oil. Enjoy alongside the freshly toasted baguette for a warm, satisfying meal that invites everyone to share in this hearty delight.

Make Ahead Options

These Coconutty Beans and Greens Stew ingredients are perfect for meal prep, saving you valuable time during busy weeknights! You can prepare the base purée (onion, tomato, garlic, ginger, and chiles) up to 24 hours in advance—simply blend and refrigerate in an airtight container to preserve freshness. Additionally, the sweet potatoes can be peeled and chopped ahead of time, stored in water to prevent browning. When you're ready to enjoy your stew, just sauté the purée, add the coconut milk and water, and cook the sweet potatoes until tender before folding in the greens and beans. This way, you'll savor a delicious, wholesome meal with minimal effort!

What to Serve with Coconutty Beans and Greens Stew

Transform your delightful stew into a memorable meal with perfect pairings that elevate the experience.

  • Creamy Mashed Potatoes: The rich, buttery flavor and velvety texture create a lovely contrast to the stew's heartiness.

  • Quinoa Salad: A light and nutty side that's packed with protein; its fresh herbs complement the aromatic notes of the stew beautifully.

  • Grilled Corn on the Cob: Sweet, smoky, and slightly charred, grilled corn adds a crunchy dimension that enhances the stew's creamy goodness.

  • Garlic Bread: Crunchy, buttery, and aromatic garlic bread is the ultimate dipping companion for soaking up every bit of the Coconutty Beans and Greens Stew.

  • Roasted Vegetables: Seasonal veggies glazed with olive oil and herbs add a colorful, caramelized component that pairs wonderfully with the dish.

  • Cucumber Mint Yogurt: Cooling and refreshing, this yogurt dip provides a zesty contrast to the spices in the stew and rounds out the meal.

  • Fruit Salad: A light and refreshing medley of seasonal fruits cleanses the palate while adding a burst of natural sweetness to the meal.

  • Iced Herbal Tea: The floral notes and chill of herbal tea serve as a refreshing drink that softly balances the stew's robust flavors.

How to Store and Freeze Coconutty Beans and Greens Stew

Fridge: Store leftover Coconutty Beans and Greens Stew in an airtight container for up to 4 days. Allow it to cool completely before refrigerating to maintain freshness.

Freezer: For longer storage, freeze the stew in individual portions. Use freezer-safe containers or bags to preserve flavor and texture for up to 3 months.

Reheating: To reheat, thaw in the refrigerator overnight and warm gently on the stove over low heat. Add a splash of water or coconut milk if the stew thickens too much.

Serving Note: Enjoy the stew with a fresh drizzle of olive oil and crusty bread to bring back the delightful flavor of your initial meal.

Coconutty Beans and Greens Stew Variations

Feel free to put your personal spin on this delightfully creamy stew and create a dish that sings to your taste buds!

  • Butternut Squash: Swap sweet potatoes for butternut squash for a slightly sweeter, earthier flavor that pairs beautifully with coconut milk.
  • Black Beans: Try black beans instead of white beans for a rich, hearty body and a hint of earthiness that enhances the stew's deep flavors.
  • Extra Greens: Add in chopped kale or collard greens alongside Swiss chard for extra nutritional punch and an enticing variety of textures.
  • Spicy Kick: Toss in some crushed red pepper flakes or a few extra Thai chiles to elevate the heat level to your liking—a perfect way to spice things up!
  • Curry Flavor: Mix in a teaspoon of curry powder for a fragrant twist that adds warmth and depth to your comforting stew.
  • Coconut Rice: Serve your stew over coconut rice for an extra burst of coconut flavor, making it a wonderfully filling meal.
  • Creamy Twist: Stir in a dollop of coconut yogurt before serving for an extra creamy touch, enhancing both flavor and texture in your dish.
  • Herb Infusion: Top with fresh herbs like cilantro or basil just before serving for a fresh, fragrant finish that brightens the overall taste.

If you're looking for more vibrant meal ideas, consider pairing this stew with Smoky Sweet Potatoes or enjoy it alongside some crispy Fried Shrimp Cabbage on the side!

Helpful Tricks for Coconutty Beans and Greens Stew

  • Perfect Purée: Blend the aromatic ingredients until completely smooth to create a richer flavor base for your Coconutty Beans and Greens Stew.
  • Thickening Tip: Allow the puréed mixture to cook long enough until it thickens, which develops more depth and richness before adding liquids.
  • Customize Heat: Adjust the spice level by either decreasing the number of red Thai chiles or opting for a milder alternative; tasting along the way helps you get it just right.
  • Sweet Potato Care: Cook the sweet potatoes until just tender, so they maintain their integrity in the stew and don’t turn mushy.
  • Greens Swaps: Feel free to swap Swiss chard with whatever leafy greens you have on hand—kale or spinach work wonderfully!
  • Toast it Right: Fry the baguette slices until golden and crisp for the perfect crunchy accompaniment to your hearty stew.

Coconutty Beans and Greens Stew Recipe FAQs

How do I choose ripe ingredients for this stew?
Absolutely! When selecting your sweet potatoes, look for ones that are firm with smooth skin and no dark spots. For Swiss chard, bright, crisp leaves indicate freshness, while brown or wilting leaves should be avoided. Tomatoes should be plump and slightly fragrant; avoid those that feel too soft or have blemishes.

How should I store leftover Coconutty Beans and Greens Stew?
Store any leftovers in an airtight container in the refrigerator for up to 4 days. Make sure to let the stew cool completely before transferring it to the fridge to keep all those delicious flavors intact!

Can I freeze Coconutty Beans and Greens Stew for later?
Very much so! To freeze, ladle the cooled stew into freezer-safe containers or bags, leaving a little space for expansion. It can be stored for up to 3 months. When you're ready to enjoy it again, thaw it overnight in the fridge, then reheat gently on the stove with a splash of water or coconut milk to restore its creamy consistency.

My Coconutty Beans and Greens Stew turned out too thick. What can I do?
No worries! If your stew becomes too thick, simply add a little water or vegetable broth while reheating. Start with a quarter cup and stir until you reach your desired consistency. This not only restores the texture but also keeps the flavor where it belongs—deliciously rich!

What dietary considerations should I keep in mind?
This stew is inherently vegan, dairy-free, and nut-free, making it suitable for many dietary needs. However, if serving to pets, ensure that any ingredients used, like onions and garlic, are safe for them, as they can be harmful to some animals. Always check for allergies if you're sharing this comforting dish with friends or family!

Coconutty Beans and Greens Stew

Coconutty Beans and Greens Stew: A Cozy Weeknight Wonder

This Coconutty Beans and Greens Stew is a comforting, nourishing dish perfect for busy weeknights.
Print Recipe Pin Recipe
Prep Time 10 minutes mins
Cook Time 20 minutes mins
Total Time 30 minutes mins
Servings: 4 bowls
Course: Soups
Cuisine: American, Vegan, Vegetarian
Calories: 350
Ingredients Equipment Method Nutrition Notes

Ingredients
  

For the Stew
  • 1 medium Onion An aromatic base; shallots can also work well as a substitute.
  • 1 medium Plum Tomato Adds a perfect balance of acidity and sweetness; diced canned tomatoes can replace it if needed.
  • 3 cloves Garlic Essential for depth of flavor; no substitutions necessary.
  • 1 inch Ginger Enhances the stew’s aromatic profile; ground ginger can be used in a pinch.
  • 2 pieces Red Thai chiles Bring that hint of heat; feel free to use jalapeño or omit for a milder dish.
  • 2 tbsp Extra-virgin olive oil Ideal for sautéing; avocado oil makes a great alternative.
  • 13.5 oz Coconut milk Creamy base for the Coconutty Beans and Greens Stew; try light coconut milk for fewer calories.
  • 1 cup Water Adjusts the stew's consistency; vegetable broth can enrich the flavor beautifully.
  • 1 medium Sweet potato Supplies bulk and natural sweetness; swap for regular potatoes or butternut squash if you like.
  • 1 bunch Swiss chard Adds essential greens and nutrition; spinach or Tuscan kale can be substituted.
  • 2 cans Butter beans, gigante beans, or cannellini beans Provide protein and creaminess; any canned beans work just fine.
  • 2 tbsp Fresh lemon juice Brightens the dish wonderfully; lime juice serves as a good substitute.
  • to taste Flaky sea salt Elevates flavor; kosher salt is equally effective.
  • 1 loaf Baguette Perfect for serving; any crusty bread goes well alongside this stew.

Equipment

  • Blender
  • Skillet

Method
 

Step-by-Step Instructions
  1. In a blender, combine the onion, plum tomato, garlic cloves, ginger, and red Thai chiles, then blend until smooth.
  2. Heat two tablespoons of extra-virgin olive oil in a large skillet over medium heat. Add the puréed mixture along with a pinch of flaky sea salt, cooking for about 12-16 minutes.
  3. Once the purée has thickened, stir in your choice of ground coriander and cumin, adjusting salt to taste. Pour in 13.5 ounces of coconut milk and one cup of water.
  4. Add one medium sliced sweet potato to the bubbling stew. Cook for about 10-12 minutes, or until the sweet potatoes are tender yet firm.
  5. Stir in one large bunch of chopped Swiss chard along with two cans of rinsed butter beans, gigante beans, or cannellini beans. Cook for an additional 4 minutes.
  6. Remove the skillet from heat and gently mix in two tablespoons of fresh lemon juice to brighten the flavors.
  7. In a separate skillet, drizzle olive oil and heat over medium-low. Slice a baguette and fry each side for about 2 minutes, or until golden and crispy.
  8. Ladle the rich Coconutty Beans and Greens Stew into bowls, topping each serving with a sprinkle of flaky sea salt and a drizzle of olive oil.

Nutrition

Serving: 1bowlCalories: 350kcalCarbohydrates: 50gProtein: 12gFat: 14gSaturated Fat: 9gPolyunsaturated Fat: 1gMonounsaturated Fat: 8gSodium: 500mgPotassium: 800mgFiber: 10gSugar: 5gVitamin A: 10000IUVitamin C: 25mgCalcium: 150mgIron: 3mg

Notes

Store leftover stew in an airtight container for up to 4 days. Freeze in individual portions for up to 3 months.

Tried this recipe?

Let us know how it was!

Healthy Egg Drop Soup in 15 Minutes for Cozy Nights

August 12, 2025 by Grace Snow Leave a Comment

In just 15 minutes, you can have a bowl of comfort that warms both heart and belly—let me introduce you to my Quick & Healthy Egg Drop Soup with Ginger and Turmeric. As I whisk the eggs into the simmering broth, I’m reminded of family dinners where laughter filled the room. This soup shines with wholesome ingredients, making it perfect for anyone seeking a quick and nutritious meal without MSG or sugar. Not only is it gluten-free and low-carb, but the combination of ginger and turmeric offers a fragrant, healthful twist that sets it apart from the usual fare. Curious how a few simple ingredients can transform into something so deliciously satisfying? Let’s dive into the details!

Why is Egg Drop Soup So Special?

Uniqueness: This Quick & Healthy Egg Drop Soup elevates a classic dish with the bold flavors of ginger and turmeric, offering a unique twist that delights the senses.
Quick to Prepare: In just 15 minutes, you can whip up this comforting meal, making it a perfect solution for busy weeknights.
Health Benefits: Low-carb and gluten-free, this soup is packed with nutritious ingredients that provide a satisfying meal without any added MSG or sugar.
Versatile Base: Feel free to customize with your favorite add-ins! Whether it’s adding cooked chicken for protein or mixing in fresh greens, it’s easy to make this recipe your own.
Crowd-Pleaser: This recipe is sure to impress family and friends alike—pair it with dumplings or rice for a cozy dinner that everyone will love. For additional meal inspirations, check out my Breakfast Egg Muffins or these delightful Turkish Eggs Discover you can enjoy anytime.

Egg Drop Soup Ingredients

For the Broth

  • Low-Sodium Chicken Broth (or Vegetable Broth) – This forms the flavorful base; use vegetable broth for a vegetarian option.
  • Cornstarch – Acts as a thickening agent; substitute with arrowroot powder or tapioca flour, but adjust accordingly for the right texture.
  • Ground Ginger – Infuses the soup with warmth; fresh ginger can also be used for a brighter flavor.
  • Kosher Salt – Enhances the overall taste of the soup.
  • Toasted Sesame Oil – Provides a nutty depth; feel free to reduce the amount based on preferences.
  • Tamari Soy Sauce – Adds umami richness; use coconut aminos for a soy-free substitute if needed.
  • Ground Turmeric (optional) – Offers vibrant color and health benefits, complementing the overall flavor.
  • Ground White Pepper – Gives a subtle kick; you can use black pepper as a substitute.

For the Egg Mixture

  • Large Eggs – Create the beloved silky egg ribbons that define egg drop soup.

For Garnish

  • Green Onion – Adds a fresh burst of flavor and color to each bowl.

This Egg Drop Soup recipe comes together quickly, nurturing not just your hunger but your soul as well. Enjoy!

Step‑by‑Step Instructions for Quick & Healthy Egg Drop Soup

Step 1: Make the Slurry
In a measuring cup, combine ¼ cup of low-sodium chicken broth with cornstarch, whisking until smooth to create your slurry. This mixture serves as a thickening agent for your egg drop soup, enhancing its velvety texture. Set aside for now while you prepare the soup base.

Step 2: Prepare the Soup Base
In a medium-sized saucepan, heat the remaining chicken broth over medium heat until it reaches a gentle simmer, about 5 minutes. Stir in the ground ginger, tamari soy sauce, toasted sesame oil, kosher salt, and optional ground turmeric. Allow the broth to heat through while these flavors meld together, creating a warm, fragrant foundation for your soup.

Step 3: Thicken the Broth
Gradually whisk the cornstarch slurry into the simmering broth, stirring continuously to prevent lumps from forming. Simmer this mixture for an additional minute, observing the broth thicken slightly. Once you notice a glossy finish on the surface, it’s ready for the next step in crafting your comforting egg drop soup.

Step 4: Create Egg Ribbons
Lower the heat to low and stir the broth in a circular motion to create a vortex. Slowly pour in the beaten large eggs in a thin stream, allowing them to form delicate ribbons as they meet the hot broth. After about 30 seconds, gently stir the soup to fully incorporate the egg ribbons, creating that signature texture of egg drop soup.

Step 5: Garnish and Serve
Once the eggs have set and the soup is steaming, ladle it into bowls. Top each serving with freshly sliced green onions for a pop of color and flavor. This quick & healthy egg drop soup is now ready to enjoy, providing a nurturing, satisfying meal in just 15 minutes!

Egg Drop Soup Variations & Substitutions

Feel free to get creative and make this egg drop soup your own with these delightful twists and substitutions!

  • Dairy-Free: Swap the cornstarch for arrowroot powder or tapioca flour to keep it creamy without any dairy.

  • Vegetarian: Use vegetable broth instead of chicken broth for a wholesome vegetarian option that still packs a flavorful punch.

  • Protein Boost: Add cooked shredded chicken or tofu to increase protein content, making this soup heartier and even more satisfying.

  • Extra Greens: Stir in spinach, kale, or bok choy for an infusion of nutrients and vibrant color. This not only enhances flavor but also adds a lovely texture.

  • Spicy Kick: For a burst of heat, mix in some chili flakes or a dash of sriracha to the broth before adding the eggs. The warmth will awaken your taste buds!

  • Herbal Infusion: Incorporate fresh herbs like cilantro or basil at the end for an aromatic freshness that elevates each spoonful. The difference these fragrant herbs make is absolutely delightful.

  • Asian Flair: Drizzle a bit of chili oil or sprinkle sesame seeds on top for added flair and depth in flavor. This will definitely impress your dinner guests.

Feel free to explore these variations, and remember, cooking is all about making it your own! If you need more ideas for quick meals, consider trying these Breakfast Egg Muffins or these delicious Turkish Eggs Discover. Happy cooking!

What to Serve with Quick & Healthy Egg Drop Soup?

Gather around the table and savor the inviting warmth of homemade comfort food that complements this delightful soup.

  • Steamed Jasmine Rice: This fragrant rice offers a perfect base to soak up the flavorful broth, making each bite even more fulfilling.
  • Garlic Green Beans: Sautéed with sesame oil, they add a delightful crunch and vibrant flavor palette, enhancing the overall dining experience.
  • Soft Spring Rolls: Fresh vegetables wrapped in rice paper create a light and refreshing contrast to the warm, savory soup, ideal for dipping in sauces.
  • Crispy Dumplings: These golden pockets of flavor provide a hearty texture that pairs beautifully with the silkiness of the egg drop soup.
  • Miso Salad: A light, tangy salad dressed with miso vinaigrette adds an umami kick, balancing the warmth of the soup with vibrant freshness.
  • Chrysanthemum Tea: This herbal tea, served warm, complements the gentle flavors of the soup while promoting relaxation and comfort.

Each pairing enriches your meal, creating a harmonious blend that transforms ordinary nights into joyful culinary experiences.

Storage Tips for Egg Drop Soup

Fridge: Refrigerate leftover egg drop soup in an airtight container for up to 3 days. To maintain the delicate texture, avoid letting it sit out at room temperature for more than 2 hours.

Freezer: It's best to avoid freezing egg drop soup, as the texture of the eggs may change and become rubbery upon thawing.

Reheating: When you're ready to enjoy your leftovers, reheat gently on the stovetop over low heat, stirring occasionally until warmed through. This will help preserve the silky consistency of the soup.

Serving Fresh: For optimal flavor and texture, try to prepare and serve your egg drop soup fresh, as it's quickly made and best enjoyed warm!

Make Ahead Options

This Egg Drop Soup is a fantastic choice for meal prep, saving you time on busy weeknights! You can prepare the broth base, including the ginger, tamari soy sauce, sesame oil, and salt, up to 3 days in advance. Simply store it in the refrigerator, ensuring it’s in an airtight container to preserve flavor. When you're ready to enjoy your soup, reheat the broth until it simmers, then mix in the cornstarch slurry and whisk in your beaten eggs. This method ensures that the soup remains just as delicious and warm, with silky egg ribbons, making dinnertime both quick and satisfying!

Expert Tips for Egg Drop Soup

  • Smooth Slurry: Ensure the cornstarch is fully dissolved in the broth before adding to the simmering soup to avoid lumps.

  • Controlled Heat: Keep the broth on low heat when adding eggs to prevent them from cooking too quickly and becoming rubbery.

  • Quality Broth: For the best flavor in your egg drop soup, opt for freshly prepared broth or a high-quality store-bought option.

  • Incremental Thickening: Adjust the cornstarch gradually, as adding too much at once can create an overly thick texture.

  • Fresh Garnishes: Enhance flavor by using fresh green onions; they add a burst of color and freshness that elevates the dish.

Egg Drop Soup Recipe FAQs

How do I choose the right eggs for this Egg Drop Soup?
Absolutely! When selecting eggs, look for large, fresh eggs with clean shells. If you have access to free-range or organic options, they often have richer flavors and better color, enhancing your soup's overall taste. Always check the expiration date and avoid any eggs with cracks or off smells.

How should I store leftover Egg Drop Soup?
Refrigerate any leftover soup in an airtight container for up to 3 days. It’s important to let it cool completely before sealing it in to ensure the lid doesn’t trap excess moisture. Always remember not to leave it out at room temperature for more than 2 hours to keep it safe for eating!

Can I freeze Egg Drop Soup?
It’s best to avoid freezing egg drop soup. Freezing can alter the texture of the eggs, making them rubbery upon thawing. If you must freeze, I recommend separating the soup from the eggs, then adding freshly cooked eggs when reheating for optimal taste and texture.

What if my soup turned out too thick?
If you find your egg drop soup has thickened too much, don’t worry! You can easily thin it out by gradually stirring in more warm chicken broth or water. Add a splash at a time until you reach your desired consistency. Just remember to reheat gently and stir continuously for a smooth finish.

Is this Egg Drop Soup suitable for people with dietary restrictions?
Very! This recipe is naturally gluten-free if you use tamari soy sauce or coconut aminos as a substitute. If you have an allergy to eggs or soy, consider using flax seeds or chia seeds mixed with water as an alternative. Always be sure to read labels on any store-bought ingredients to avoid hidden allergens.

Can I add other ingredients to enhance the flavor?
Absolutely! You can mix in vegetables like spinach, mushrooms, or even cooked chicken for added protein and nutrients. If you’re in the mood for something spicy, try adding a dash of chili flakes or some fresh garlic. The beauty of this recipe lies in its versatility!

Egg Drop Soup

Healthy Egg Drop Soup in 15 Minutes for Cozy Nights

Quick & Healthy Egg Drop Soup is a comforting dish featuring ginger and turmeric, perfect for busy nights.
Print Recipe Pin Recipe
Prep Time 5 minutes mins
Cook Time 10 minutes mins
Total Time 15 minutes mins
Servings: 4 bowls
Course: Soups
Cuisine: Asian
Calories: 150
Ingredients Equipment Method Nutrition Notes

Ingredients
  

For the Broth
  • 4 cups Low-Sodium Chicken Broth or Vegetable Broth for vegetarian option
  • 2 tablespoons Cornstarch acts as a thickening agent
  • 1 teaspoon Ground Ginger or fresh ginger for brighter flavor
  • 1 teaspoon Kosher Salt
  • 1 tablespoon Toasted Sesame Oil adjust based on preferences
  • 2 tablespoons Tamari Soy Sauce use coconut aminos for soy-free option
  • 1/2 teaspoon Ground Turmeric optional
  • 1/2 teaspoon Ground White Pepper black pepper can be substituted
For the Egg Mixture
  • 4 large Eggs beaten
For Garnish
  • 2 tablespoons Green Onion sliced

Equipment

  • medium-sized saucepan
  • Measuring cup
  • Whisk

Method
 

Step-by-Step Instructions for Quick & Healthy Egg Drop Soup
  1. In a measuring cup, combine ¼ cup of low-sodium chicken broth with cornstarch, whisking until smooth to create your slurry. Set aside.
  2. In a medium-sized saucepan, heat the remaining chicken broth over medium heat until it reaches a gentle simmer, about 5 minutes. Stir in the ground ginger, tamari soy sauce, toasted sesame oil, kosher salt, and optional ground turmeric.
  3. Gradually whisk the cornstarch slurry into the simmering broth, stirring continuously to prevent lumps from forming. Simmer for an additional minute until glossy.
  4. Lower the heat and stir the broth in a circular motion. Slowly pour in the beaten eggs in a thin stream, allowing them to form ribbons. Stir gently after about 30 seconds.
  5. Ladle the soup into bowls and top each serving with freshly sliced green onions.

Nutrition

Serving: 1bowlCalories: 150kcalCarbohydrates: 10gProtein: 12gFat: 6gSaturated Fat: 1gPolyunsaturated Fat: 3gMonounsaturated Fat: 2gCholesterol: 200mgSodium: 800mgPotassium: 300mgFiber: 1gVitamin A: 5IUVitamin C: 2mgCalcium: 30mgIron: 1mg

Notes

For best results, serve immediately. This soup is best enjoyed fresh.

Tried this recipe?

Let us know how it was!

Cozy Up with Creamy Zuppa Toscana Soup You’ll Love

August 12, 2025 by Grace Snow Leave a Comment

There's something magical about the first chilly evening when a warm bowl of soup becomes not just food, but a comfort to wrap around your soul. This Creamy Zuppa Toscana Soup captures that essence beautifully, combining spicy Italian sausage, crispy bacon, and tender potatoes with vibrant kale in a sumptuous, creamy broth. Perfect for cozy family dinners or quiet nights in, this recipe is a breeze to whip up and offers a taste that rivals your favorite Olive Garden classic. Plus, it freezes well, making it a fantastic option for meal prepping or unexpected guests. Are you ready to transform your kitchen into a cozy Italian bistro? Let’s dive in!

Why is Zuppa Toscana a Must-Try?

Comforting in every scoop, Zuppa Toscana brings warmth to your table, transforming chilly nights into cozy gatherings. Rich flavors intertwine as spicy sausage and crispy bacon create a savory base that will have your taste buds dancing. Versatile options make it easy to adapt; whether you prefer turkey sausage or a vegetarian twist, you can customize it to fit your palate. Quick to prepare, this soup is perfect for busy weeknights, allowing you more time with family. For more delicious soup options, explore our creamy Potato Leek Soup or hearty Chili Con Carne!

Zuppa Toscana Soup Ingredients

For the Soup Base

  • Bacon – Adds a crispy, smoky flavor and richness. Substitution: Use turkey bacon for a leaner option.
  • Spicy Ground Italian Sausage – Provides heat and depth; essential for authentic flavor. Substitution: Mild sausage for less spice.
  • Garlic (5 cloves, minced) – Adds aromatic flavor to the soup.
  • Medium Yellow Onion (1, diced) – Brings sweetness and depth as it cooks.
  • Yukon Gold Potatoes (1½ pounds, cut into 1-inch pieces) – Forms the hearty base of the soup. Prep Note: Ensure pieces are uniform for even cooking.
  • Italian Seasoning (1 teaspoon) – Enhances the overall flavor profile, contributing herbal notes.
  • Low-Sodium Chicken Broth (6 cups) – The soup’s flavorful liquid base. Use low-sodium to control saltiness.

For the Greens

  • Kale (4 cups, roughly chopped) – Adds color, nutrition, and texture. Substitution: Spinach can be used for a different green.

For the Creaminess

  • Heavy Whipping Cream (1 cup) – Gives the soup its creamy texture. Substitution: Coconut milk for a dairy-free option.

Step‑by‑Step Instructions for Zuppa Toscana Soup

Step 1: Cook the Bacon
In a large pot, cook chopped bacon over medium heat for about 5 minutes until crispy. Use a slotted spoon to remove the bacon and drain excess oil, leaving around 1 tablespoon in the pot to retain that delightful smoky flavor.

Step 2: Cook the Onions
Add diced yellow onion to the pot and sauté over medium-high heat for 3-4 minutes until softened and translucent. Stir in minced garlic and cook for another 30 seconds until fragrant, making sure to scrape up any browned bits left from the bacon.

Step 3: Brown the Sausage
Next, add the spicy ground Italian sausage to the pot, breaking it up with a spoon. Cook for about 5 minutes until the sausage is browned and fully cooked, infusing the soup with savory depth as it browns.

Step 4: Add Potatoes and Broth
Stir in the Yukon Gold potato pieces, Italian seasoning, and low-sodium chicken broth. Bring the mixture to a boil, then reduce the heat to a simmer. Allow it to simmer uncovered for about 10 minutes, or until the potatoes are fork-tender and the flavors have mingled beautifully.

Step 5: Incorporate Greens and Cream
Add the chopped kale and cooked bacon back into the mix, along with the heavy whipping cream. Stir well and let it simmer for an additional 5 minutes, allowing the kale to wilt and the soup to become rich and creamy.

Step 6: Garnish and Serve
Ladle the warm Zuppa Toscana Soup into bowls and finish with a sprinkle of ground black pepper for an extra kick. Serve hot, perhaps with crusty bread on the side, to soak up all that delicious creamy goodness.

Zuppa Toscana Soup Variations

Feel free to tweak this comforting Zuppa Toscana Soup to match your cravings or dietary needs—you’ll love the endless possibilities!

  • Dairy-Free: Substitute heavy cream with coconut milk for a creamy yet dairy-free option. This twist brings a delightful, tropical hint to your cozy soup.

  • Protein Alternatives: Use ground turkey or chicken sausage for a lighter take. This variation maintains the flavor while offering a leaner protein source that everyone can enjoy.

  • Vegetarian Version: Omit meat entirely and incorporate white beans for protein, using smoked paprika instead for a flavor boost. This option is hearty and satisfying, making it a winner for meatless meals.

  • Spicy Kick: Add red pepper flakes or diced jalapeños if you love a little extra heat. Just a pinch can transform the soup into a fiery feast that warms you from the inside out.

  • Creamy Alternatives: Instead of heavy whipping cream, try cashew cream for a rich, nutty flavor that’s also vegan. Simply blend soaked cashews with water until smooth for a creamy addition without dairy.

  • Seasonal Vegetables: Toss in seasonal vegetables like carrots or zucchini for added texture and nutrients. These veggies will complement your potatoes beautifully, adding vibrant color and flavor.

  • Fresh Herbs: Sprinkle in fresh thyme or basil just before serving for an aromatic twist. The fresh herbs will elevate your Zuppa Toscana, offering a delightful fragrance that enchants the senses.

Don’t forget, if you’re in the mood for more comforting flavors, our delicious creamy Potato Leek Soup is always a hit, and you might also enjoy the heartiness of Chili Con Carne for something different!

How to Store and Freeze Zuppa Toscana Soup

Fridge: Store leftover Zuppa Toscana soup in an airtight container in the refrigerator for up to 4-5 days. Allow it to cool before sealing to maintain freshness.

Freezer: If you need to freeze it, pour cooled soup into freezer-safe containers, leaving some space for expansion. Enjoy within 2-3 months for the best flavor—note that potatoes may become grainy.

Reheating: When ready to enjoy, reheat on the stovetop over low heat, adding a splash of broth or cream to restore creaminess. Stir frequently to avoid sticking.

Tip: For the best results, consider consuming your Zuppa Toscana soup within a few days when stored in the fridge to experience its rich, comforting flavors at their peak!

Make Ahead Options

These Creamy Zuppa Toscana Soup ingredients are perfect for meal prep enthusiasts! You can chop the Yukon Gold potatoes, onion, and kale up to 24 hours in advance, storing them in airtight containers in the refrigerator to maintain freshness. Additionally, you can cook the bacon and sausage, then refrigerate them for up to 3 days. When you're ready to enjoy your soup, simply sauté the onions and garlic, add the potatoes and broth, and let it simmer until the potatoes are tender. Finally, incorporate the kale and cream, and you’ll have a comforting meal ready with minimal effort—just as delicious as when freshly made!

Expert Tips for Zuppa Toscana Soup

  • Storage Advice: Cool soup before refrigerating. It keeps well for 4-5 days but freezing can change potato texture.
  • Potato Prep: Cut Yukon Gold potatoes into uniform pieces; this ensures they cook evenly and maintain a delightful texture.
  • Creamy Consistency: For the best creamy blend, add heavy whipping cream in the last few minutes of cooking—this preserves its luscious texture.
  • Flavor Boost: Don’t rush the sautéing process. Browning the onions and garlic adds depth to your Zuppa Toscana soup’s flavor profile.
  • Customization Tips: Feel free to experiment with greens! Substituting kale with spinach offers a different texture and flavor while keeping it vibrant.

What to Serve with Creamy Zuppa Toscana Soup

There's nothing quite like completing your cozy meal with the perfect sides to enhance each comforting spoonful of rich, creamy goodness.

  • Crusty Bread: This is a classic pairing that complements the soup's creamy texture, perfect for dipping and soaking up every last bit.

  • Green Salad: A light, refreshing salad with a tangy vinaigrette adds a bright, crisp contrast to the hearty soup.

  • Garlic Breadsticks: These are a delightful way to bring additional warmth and flavor to your meal, enhancing the Italian theme beautifully.

  • Roasted Vegetables: Sweet, caramelized veggies like carrots and bell peppers create a lovely balance with the richness of Zuppa Toscana.

  • Parmesan Crisps: Crunchy cheese chips amplify the cheesy notes of the soup and add a fun, savory crunch that pleases the palate.

  • Red Wine: A glass of Chianti or another light-bodied red enhances the flavors of the Italian sausage and pairs beautifully with the soup.

  • Tiramisu: End your meal with this classic Italian dessert, offering creamy layers that echo the comforting vibe of your Zuppa Toscana.

  • Olive Tapenade: A zesty spread that adds a burst of flavor to crusty bread, it perfectly complements the soup’s savory essence.

Enjoy exploring these delightful pairings to create a fulfilling meal experience that welcomes everyone to the table!

Zuppa Toscana Soup Recipe FAQs

What kind of potatoes should I use for Zuppa Toscana soup?
For the best results, I recommend using Yukon Gold potatoes as they hold their shape well and add a creamy texture when cooked. If you prefer, you can use russet potatoes, but keep in mind they may become a bit softer.

How should I store leftover Zuppa Toscana soup?
Store leftover soup in an airtight container in the refrigerator for up to 4-5 days. Make sure to let the soup cool completely before sealing the container to help maintain its fresh flavor.

Can I freeze Zuppa Toscana soup, and how?
Absolutely! To freeze, cool the soup completely and pour it into freezer-safe containers, leaving some space for expansion. It’s best consumed within 2-3 months. However, be aware that freezing may cause the potatoes to become slightly grainy upon reheating.

What if I want to make this soup dairy-free?
No problem! Simply substitute the heavy whipping cream with coconut milk. This keeps the soup creamy while making it suitable for a dairy-free diet. You might also want to add a splash of lemon juice to brighten the flavors.

How can I tell if my kale is fresh for the soup?
Look for kale with deep green leaves that are crisp and vibrant. Avoid any leaves that are wilted or have dark spots. Fresh kale will add a lovely texture and nutrition to your Zuppa Toscana soup.

What’s the best way to reheat frozen Zuppa Toscana soup?
To reheat, thaw the soup overnight in the refrigerator if frozen. When ready, heat it gently on the stovetop over low heat. Add a splash of broth or cream to help restore the creamy consistency, stirring frequently to prevent sticking.

Zuppa Toscana Soup

Cozy Up with Creamy Zuppa Toscana Soup You’ll Love

This Zuppa Toscana Soup combines spicy Italian sausage, crispy bacon, and tender potatoes in a creamy broth for a comforting meal.
Print Recipe Pin Recipe
Prep Time 15 minutes mins
Cook Time 30 minutes mins
Total Time 45 minutes mins
Servings: 6 bowls
Course: Soups
Cuisine: Italian
Calories: 350
Ingredients Equipment Method Nutrition Notes

Ingredients
  

For the Soup Base
  • 5 cloves Garlic, minced
  • 1 medium Yellow Onion, diced
  • 1.5 pounds Yukon Gold Potatoes, cut into 1-inch pieces Ensure pieces are uniform for even cooking.
  • 1 teaspoon Italian Seasoning
  • 6 cups Low-Sodium Chicken Broth Use low-sodium to control saltiness.
  • 8 ounces Bacon, chopped Substitution: Use turkey bacon for a leaner option.
  • 1 pound Spicy Ground Italian Sausage Substitution: Mild sausage for less spice.
For the Greens
  • 4 cups Kale, roughly chopped Substitution: Spinach can be used for a different green.
For the Creaminess
  • 1 cup Heavy Whipping Cream Substitution: Coconut milk for a dairy-free option.

Equipment

  • Large pot

Method
 

Step-by-Step Instructions
  1. Cook the chopped bacon over medium heat for about 5 minutes until crispy. Remove the bacon and drain excess oil, leaving about 1 tablespoon in the pot.
  2. Add diced yellow onion to the pot and sauté over medium-high heat for 3-4 minutes until softened. Stir in minced garlic and cook for another 30 seconds until fragrant.
  3. Add the spicy ground Italian sausage to the pot, breaking it up. Cook for about 5 minutes until browned and fully cooked.
  4. Stir in the Yukon Gold potato pieces, Italian seasoning, and low-sodium chicken broth. Bring to a boil, then reduce to a simmer and cook for 10 minutes, until potatoes are fork-tender.
  5. Add the chopped kale and cooked bacon back into the soup, along with the heavy whipping cream. Stir well and simmer for an additional 5 minutes.
  6. Ladle the soup into bowls and finish with a sprinkle of ground black pepper. Serve hot, optionally with crusty bread.

Nutrition

Serving: 1bowlCalories: 350kcalCarbohydrates: 32gProtein: 18gFat: 20gSaturated Fat: 10gPolyunsaturated Fat: 1gMonounsaturated Fat: 7gCholesterol: 75mgSodium: 800mgPotassium: 800mgFiber: 3gSugar: 2gVitamin A: 1500IUVitamin C: 45mgCalcium: 150mgIron: 2mg

Notes

Allow soup to cool before refrigerating. It keeps well for 4-5 days. For freezing, pour cooled soup into containers, leaving space for expansion. Reheat on stovetop over low heat, adding broth or cream if needed.

Tried this recipe?

Let us know how it was!

Creamy Asparagus Soup – A Healthy Spring Delight

August 12, 2025 by Grace Snow Leave a Comment

Springtime whispers of renewal, and what better way to embrace it than with a bowl of creamy asparagus soup? As a passionate home chef, I often find myself drawn to vibrant, seasonal ingredients, and asparagus steals the spotlight with its tender green goodness. This delicious soup is not only healthy and dairy-free, but it also strikes that perfect balance between comfort and freshness. Blending luscious avocados with zesty lemon juice and fragrant herbs creates a silky texture that envelopes your taste buds in warmth. Whether you’re enjoying it as an appetizer or a light main course, this asparagus soup is sure to be a joyous addition to your spring table. Ready to dig into this vibrant dish and savor all its nourishing flavors? Let’s get started!

Why Is This Asparagus Soup a Must-Try?

Springtime Delight: This creamy asparagus soup is a cheerful celebration of the season, bringing fresh flavors into your home.
Healthful Yet Indulgent: Enjoy the luxurious taste without dairy, thanks to the creamy avocado base.
Loaded with Freshness: Zesty lemon and vibrant herbs elevate each spoonful, making it refreshing and nourishing.
Quick & Easy: Perfect for busy weeknights, most of your time is spent on flavor-packed simmering—simple yet rewarding!
Versatile Varieties: Customize with extra greens or spices for a personalized touch; it's truly adaptable!
Impress Your Guests: Warm bowls of this gorgeous soup make for stunning starters or light mains at any gathering. Enjoy with homemade crusty bread or a refreshing salad for a complete meal.

Asparagus Soup Ingredients

• Dive into freshness with these delightful ingredients!

For the Soup Base

  • Extra-Virgin Olive Oil – Adds richness and helps sauté the vegetables; feel free to substitute with avocado oil for a similar flavor.
  • Yellow Onion – Provides sweet and savory base flavors; shallots can be used for a milder taste if desired.
  • Celery – Contributes aromatic notes and a nice crunch; can be omitted if you're looking for a simpler soup.
  • Garlic – Adds depth of flavor; fresh garlic offers the best results; use powdered garlic in a pinch if needed.
  • Kosher Salt – Enhances and balances flavors; adjust with sea salt or table salt based on personal preference.
  • Black Pepper – Adds mild heat to the mix; freshly ground is recommended for the best taste.

For the Star Ingredient

  • Asparagus – The shining star of this asparagus soup, bringing fresh flavor and vibrant color; trim and chop about 2 pounds.

For the Broth

  • Vegetable or Chicken Broth – Forms the heart of the soup; homemade is best, but store-bought is convenient too. If in a bind, water works, though flavors will be less intense.

For the Creamy Texture

  • Avocado – Delivers that lovely creaminess without dairy; ensure it's ripe for optimal results, or use silken tofu if necessary.

For the Freshness

  • Fresh Lemon Juice – Brightens the soup with zesty acidity; lime juice can be a good substitute in a pinch.
  • Fresh Herbs (Parsley, Basil, Dill, Chives) – Adds aromatic flavor; pick your favorite combination to personalize this asparagus soup.

With these ingredients in hand, you’re already on your way to creating a bowl of comforting goodness!

Step‑by‑Step Instructions for Creamy Asparagus Soup

Step 1: Sauté Aromatics
In a large pot, heat 2 tablespoons of extra-virgin olive oil over medium heat. Add 1 diced yellow onion and 1 chopped celery stalk, sautéing for about 3-4 minutes until the onion is translucent and softened. Stir in 2 minced garlic cloves, kosher salt, and black pepper to taste, cooking for another 30 seconds until fragrant.

Step 2: Cook Asparagus
Add 2 pounds of chopped asparagus and 4 cups of vegetable or chicken broth to the pot. Increase the heat and bring the mixture to a rolling boil, then reduce to low, covering the pot. Allow the soup to simmer for 20-25 minutes, or until the asparagus is tender and bright green, signaling it's ready for blending.

Step 3: Blend Soup
Once the asparagus has cooked, remove the pot from heat and stir in 1 ripe avocado, the juice of 1 lemon, and a selection of fresh herbs like parsley, basil, or dill. Using an immersion blender, puree the soup until smooth and creamy, or carefully transfer it to a high-powered blender. Blend for about 30 seconds until you achieve that silky texture characteristic of creamy asparagus soup.

Step 4: Serve
Ladle the delicious creamy asparagus soup into warm bowls, garnishing with a drizzle of olive oil and a few reserved asparagus tips for a fresh presentation. Enjoy this vibrant soup warm, allowing each spoonful to bring the tastes of spring to your table.

How to Store and Freeze Asparagus Soup

Fridge: Store leftover asparagus soup in an airtight container for up to 4-5 days. Make sure it cools to room temperature before sealing to maintain its texture.

Freezer: Freeze the soup in individual portions using freezer-safe containers for up to 3 months. This makes for convenient, quick meals on busy days!

Reheating: To enjoy, simply thaw in the refrigerator overnight and reheat on the stove over medium heat, stirring gently until warmed through. You might want to add a splash of broth or water if it thickens.

Room Temperature: Avoid leaving the asparagus soup out for more than 2 hours to ensure it remains safe to eat; keep it chilled until serving time.

Asparagus Soup Variations & Substitutions

Feel free to get creative and adjust this recipe to suit your taste and dietary needs!

  • Dairy-Free Creaminess: Replace avocado with silken tofu for an equally creamy texture without the fat content.
  • Extra Greens: Toss in a handful of fresh spinach or kale for added nutrition and vibrant color, enriching each bowl even more.
  • Flavor Booster: Mix in a teaspoon of smoked paprika or cumin to add a warm, smoky twist that'll surprise your taste buds.
  • Citrus Swap: If you don’t have lemon juice on hand, try using lime or even a splash of apple cider vinegar to brighten up the soup.
  • Herb Variety: Experiment with different fresh herbs like cilantro or tarragon to bring a new flavor dimension; it’s all about personal preference!
  • Spicy Kick: Add a pinch of cayenne pepper for a delightful heat that lingers with each sip—perfect for those who like a bit of zest in their soup.
  • Nutty Addition: Stir in a spoonful of tahini or almond butter to enrich the soup’s flavor, giving it a creamy, nutty edge that’s simply lovely.
  • Broth Alternatives: If you’re out of broth, using water is a feasible option, but consider enhancing the taste with a splash of soy sauce or miso paste for extra depth.

These variations will help you make this dish truly your own—enjoy the journey of discovering what delights you the most! For even more ideas, check out how adding ingredients like spinach or kale can create a harmonious balance of flavors!

Make Ahead Options

These Creamy Asparagus Soup preparations are perfect for busy cooks looking to save time during the week! You can chop the asparagus and sauté the aromatics (onion, celery, and garlic) up to 24 hours in advance; just refrigerate them in an airtight container to maintain freshness. Additionally, the blended soup can be stored in the refrigerator for up to 3 days. When you're ready to enjoy, simply reheat it gently on the stove while stirring, adding a splash of vegetable broth or water if necessary to reach your desired consistency. This way, you’ll have delicious, homemade asparagus soup that tastes just as good on day three as it does fresh!

Expert Tips for Creamy Asparagus Soup

  • Perfect Asparagus: Choose firm, bright green asparagus. Discard woody ends for the best texture in your asparagus soup.
  • Blending Ease: Use an immersion blender directly in the pot for simplicity, but a high-powered blender yields a creamier result.
  • Herb Fusion: Experiment with fresh herbs based on your preference; they enhance the asparagus soup's flavor profile beautifully.
  • Storage Secrets: Refrigerate leftovers in an airtight container for up to 4-5 days or freeze portions for up to 3 months for future enjoyment.
  • Taste Test: Always adjust seasoning after blending; flavors can mellow, so a little extra salt or lemon juice may brighten your soup.

What to Serve with Creamy Asparagus Soup

Nothing warms the heart and palate quite like a vibrant meal centered around this fresh and creamy asparagus soup.

  • Crusty Bread: Perfect for dipping, a warm, crusty baguette adds a delightful crunch, complementing the soup's silky texture. Together, they're a match made in culinary heaven.
  • Garden Salad: A light and refreshing garden salad with crisp greens, cucumbers, and a tangy vinaigrette brightens the meal, enhancing the fresh asparagus flavors.
  • Quinoa Pilaf: Fluffy quinoa pilaf infused with herbs provides a nutty backdrop and texture contrast that nicely balances the soup's creaminess.
  • Grilled Cheese Sandwich: Creamy, melted cheese between toasted bread makes for a comforting pairing, especially when dipped right into the soup!
  • Roasted Vegetables: Seasoned, caramelized veggies bring out sweet and savory notes that harmonize beautifully with the asparagus soup's lighter profile.
  • White Wine: A chilled glass of Sauvignon Blanc or a light Pinot Grigio can elevate the flavors of the soup, making for a refreshing dining experience. Enjoy!

Creamy Asparagus Soup Recipe FAQs

How do I choose ripe asparagus?
When selecting asparagus, look for firm, straight stalks with tightly closed tips and vibrant green color. Avoid any that shows dark spots or is wilting, as they may be past their prime. The thicker stalks are generally more tender and flavorful, but any size can be used depending on your preference!

How long can I store leftover creamy asparagus soup?
You can store leftover soup in an airtight container in the refrigerator for 4-5 days. Make sure it has cooled to room temperature before sealing to preserve its creamy texture and flavor.

Can I freeze creamy asparagus soup?
Absolutely! To freeze, let the soup cool completely and then pour it into individual freezer-safe containers. Label them with dates and freeze for up to 3 months. When you're ready to enjoy, thaw overnight in the refrigerator, then reheat gently on the stove over medium heat.

What should I do if my soup is too thick?
Should your creamy asparagus soup turn out thicker than desired, simply stir in a splash of vegetable or chicken broth, or even some water, until you reach your desired consistency. Remember to taste and adjust seasoning afterward if needed!

Is this soup suitable for people with food allergies?
This creamy asparagus soup is dairy-free, making it a great option for those with dairy allergies. However, always double-check for potential allergens based on your specific ingredients, especially with store-bought broth, as it may contain traces of allergens.

Can I make this soup ahead of time for a gathering?
Sure! You can prepare the soup a day in advance. Just follow the instructions and chill it overnight. When you’re ready to serve, reheat gently on the stove and enjoy this comforting dish alongside some crusty bread for a delightful experience!

Asparagus Soup

Creamy Asparagus Soup – A Healthy Spring Delight

This creamy asparagus soup is a delightful, healthy spring dish that's both comforting and refreshing.
Print Recipe Pin Recipe
Prep Time 10 minutes mins
Cook Time 30 minutes mins
Total Time 40 minutes mins
Servings: 4 bowls
Course: Soups
Cuisine: American
Calories: 200
Ingredients Equipment Method Nutrition Notes

Ingredients
  

Soup Base
  • 2 tablespoons Extra-Virgin Olive Oil or avocado oil
  • 1 medium Yellow Onion diced
  • 1 stalk Celery chopped, optional
  • 2 cloves Garlic minced
  • 1 teaspoon Kosher Salt to taste
  • 1 teaspoon Black Pepper to taste
Star Ingredient
  • 2 pounds Asparagus trimmed and chopped
Broth
  • 4 cups Vegetable or Chicken Broth homemade preferred
Creamy Texture
  • 1 medium Avocado ripe, or silken tofu
Freshness
  • 1 tablespoon Fresh Lemon Juice or lime juice
  • to taste Fresh Herbs (Parsley, Basil, Dill, Chives)

Equipment

  • Large pot
  • Immersion blender

Method
 

Instructions
  1. In a large pot, heat olive oil over medium heat. Add diced onion and chopped celery, sautéing for 3-4 minutes until translucent. Stir in minced garlic, salt, and pepper, cooking for another 30 seconds until fragrant.
  2. Add chopped asparagus and broth to the pot. Bring to a boil, then reduce heat and cover. Simmer for 20-25 minutes until asparagus is tender.
  3. Remove pot from heat and stir in avocado, lemon juice, and fresh herbs. Blend until smooth using an immersion blender or transfer to a blender.
  4. Ladle soup into warm bowls, garnishing with olive oil and reserved asparagus tips. Serve warm.

Nutrition

Serving: 1bowlCalories: 200kcalCarbohydrates: 25gProtein: 5gFat: 10gSaturated Fat: 1gMonounsaturated Fat: 9gSodium: 400mgPotassium: 700mgFiber: 6gSugar: 2gVitamin A: 800IUVitamin C: 25mgCalcium: 50mgIron: 2mg

Notes

Choose firm, bright green asparagus. Refrigerate leftovers in an airtight container for up to 4-5 days.

Tried this recipe?

Let us know how it was!

Hello world!

August 1, 2025 by admin 1 Comment

Welcome to WordPress. This is your first post. Edit or delete it, then start writing!

frzfzrrzberb

  • « Previous Page
  • 1
  • …
  • 11
  • 12
  • 13

Welcome!

Hi, I’m Grace, a Sydney-based home cook with a passion for bold flavors and trending ingredients. Whether you’re a busy beginner or a seasoned foodie, you’ll find dishes here that are fresh, fun, and full of flavor.

More about me

Popular Recipes

  • Cheesy Chicken Garlic Bread Sandwich
    Cheesy Chicken Garlic Bread Sandwich for Cozy Family Moments
  • Easy Chicken Ranch Wraps
    Easy Chicken Ranch Wraps: Quick, Creamy & Totally Satisfying
  • Chicken Caesar Sandwiches
    Delicious Chicken Caesar Sandwiches for Quick Comfort Food
  • best Cuban sandwich
    The Best Cuban Sandwich You’ll Want Every Weeknight!

Footer

↑ back to top

About

  • Privacy Policy
  • Disclaimer
  • Terms & Conditions

Newsletter

  • Sign Up! for emails and updates

Contact

  • About me
  • Contact me

Copyright © 2025 TastyTrendIngredients