
As I rummaged through the pantry for a treat, I stumbled upon the essence of nostalgia—those iconic Butterfinger bars. But what if I could create a version that satisfies my sweet tooth without the guilt? Enter my Healthy Homemade Butterfingers! Crafted from just five wholesome ingredients, this recipe is a game-changer, being both gluten-free and dairy-free while still packing a satisfying crunch and rich chocolate flavor. The best part? They’re quick to whip up, making them the perfect fix for your candy cravings. Whether you're looking to impress at a gathering or simply treat yourself, these homemade delights easily fit the bill. Intrigued about how to make this guilt-free indulgence? Let’s dive into the deliciousness!
Why Choose Healthy Homemade Butterfingers?
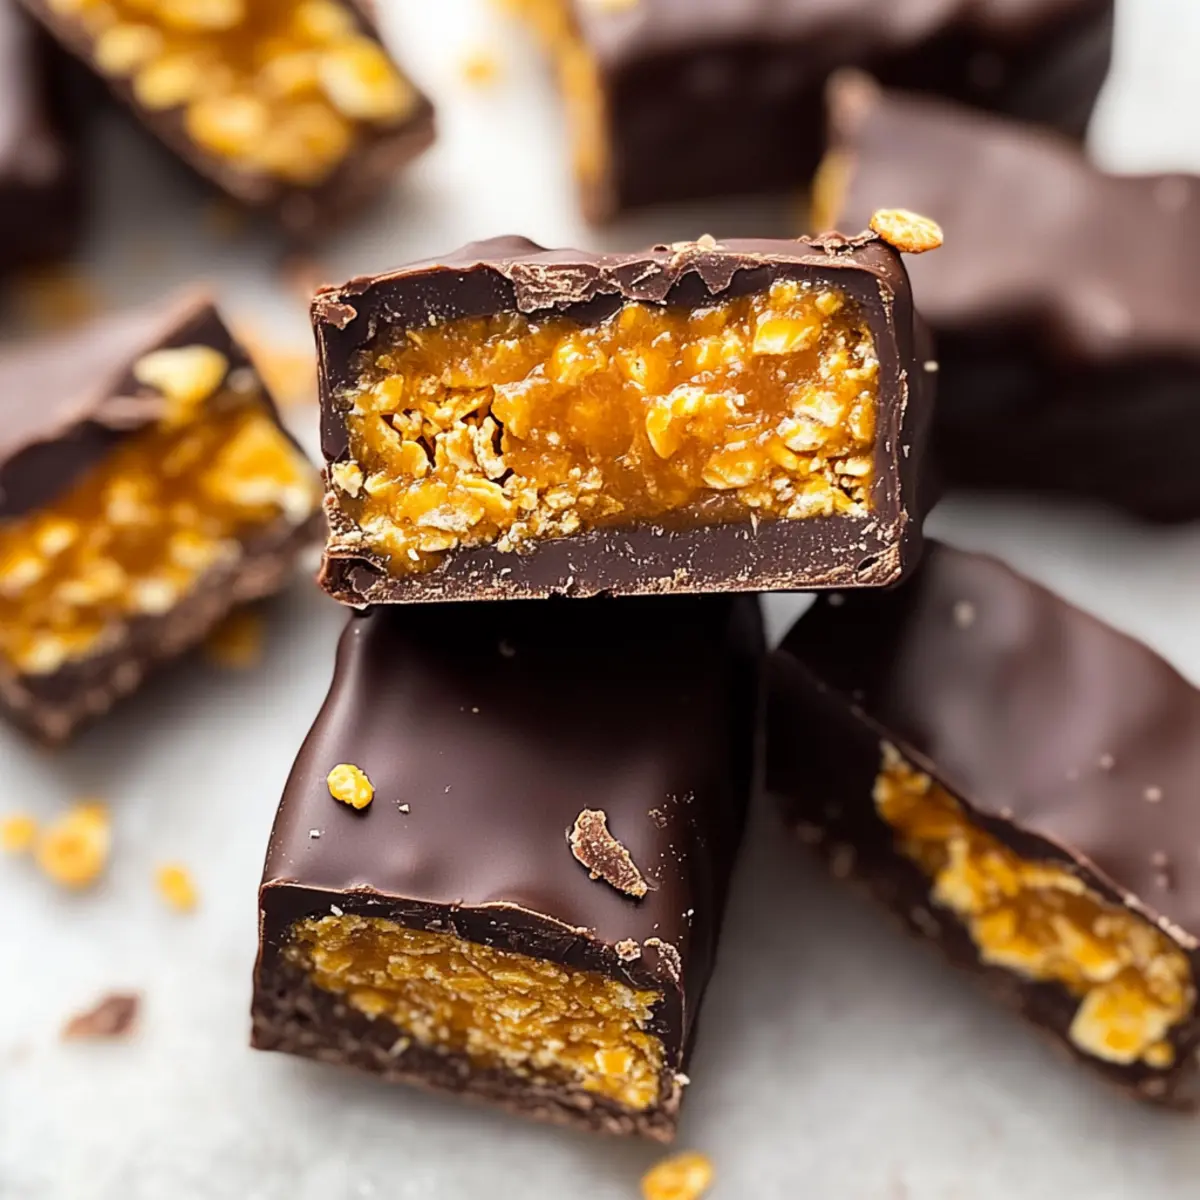
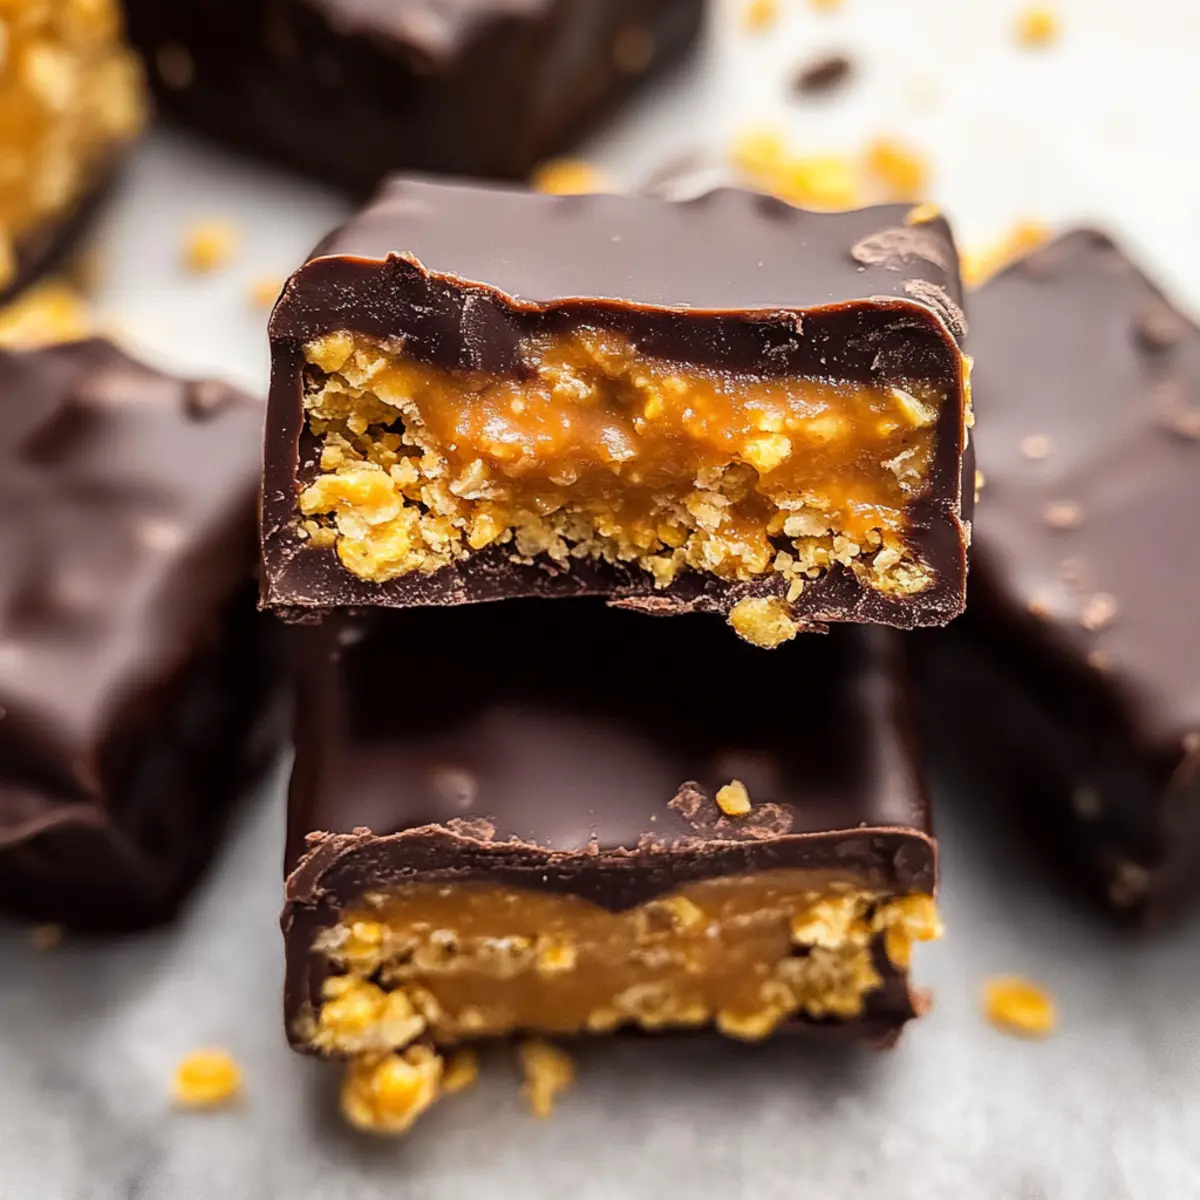
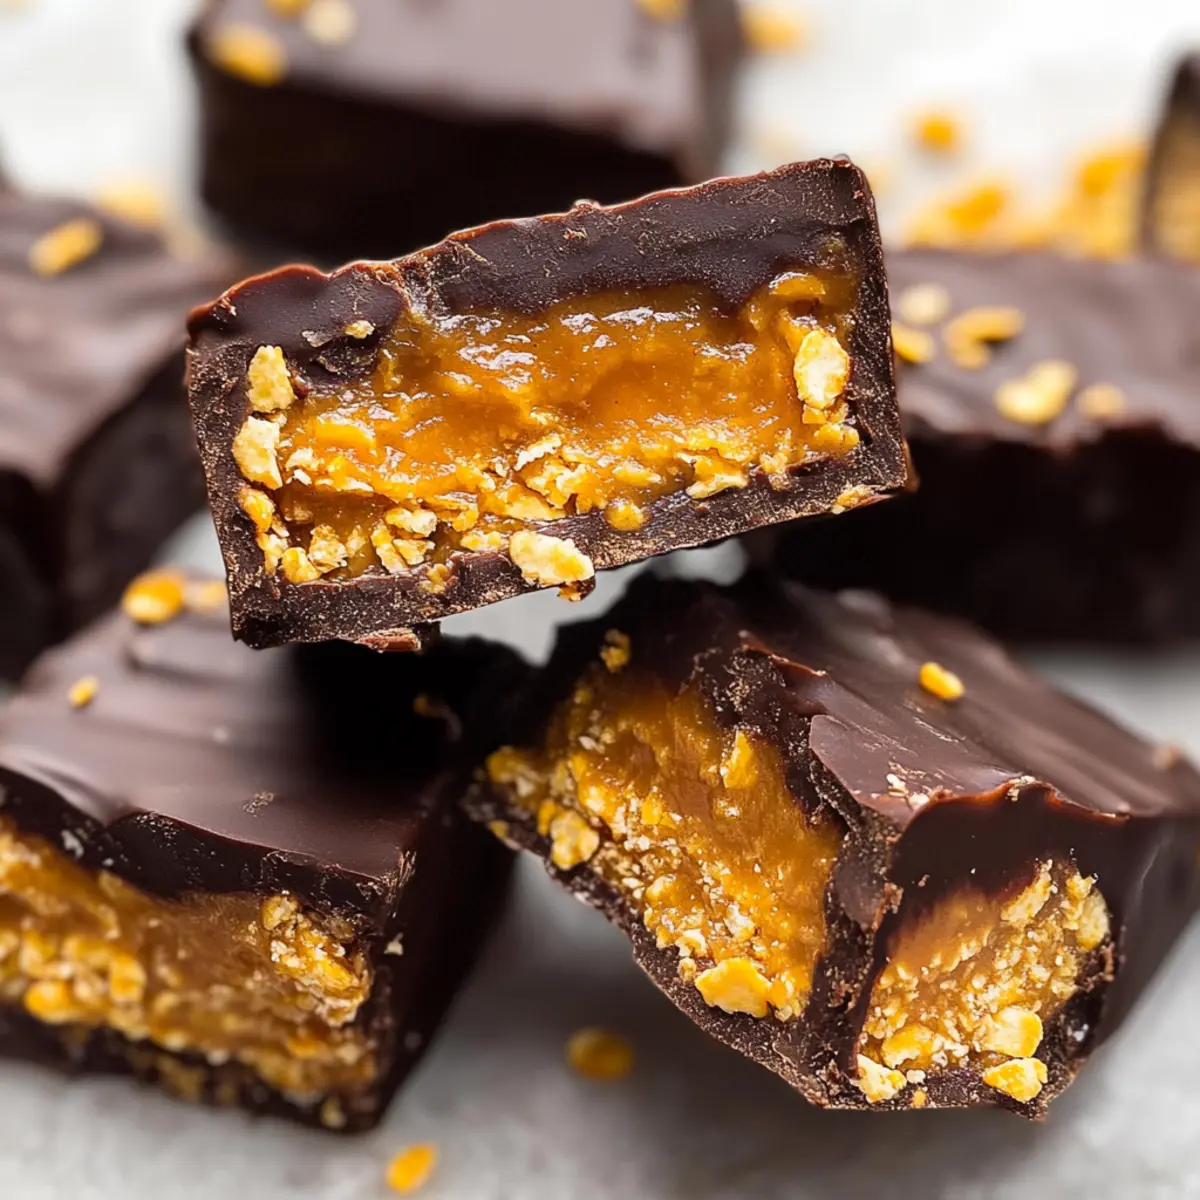
Irresistible Texture: These candy bars deliver a delightful crunch from corn flakes paired with a smooth, creamy peanut butter center, providing a satisfying bite every time.
Wholesome Ingredients: Crafted with just 5 simple ingredients, you know exactly what you're indulging in. Unlike store-bought candies, these Healthy Homemade Butterfingers are gluten-free and dairy-free, making them a guilt-free treat.
Quick and Easy: Preparation takes minimal time! In just a few easy steps, you can whip up these bars and have them ready to enjoy or freeze for later, just like my delicious Homemade Hot Chocolate.
Crowd-Pleasing Appeal: Perfect for sharing, these sweet treats are sure to impress guests at gatherings or satisfy family cravings. Your loved ones won't believe they're enjoying a healthier option!
Adaptable Recipes: Feel free to experiment! Substitute almond butter or rice cereal to customize the flavor and texture to meet your preferences. Try them with various chocolate coatings for an extra twist, or pair with a warm bowl of Asparagus Soup Healthy for a complete meal!
Healthy Homemade Butterfingers Ingredients
For the Bars
• Peanut Butter – Use natural, unsweetened peanut butter for the best flavor and creaminess.
• Maple Syrup or Honey – Provides sweetness and binds the mixture; opt for maple syrup for a vegan-friendly alternative.
• Corn Flakes – Gives the bars that delightful crunch; choose gluten-free corn flakes if necessary.
For the Coating
• Chocolate Chips – Dark chocolate chips work great for a richer, healthier option.
• Coconut Oil – Ensures the chocolate melts smoothly and adds a hint of coconut flavor. You can substitute with butter if preferred.
These Healthy Homemade Butterfingers are a delightful treat you'll love!
Step‑by‑Step Instructions for Healthy Homemade Butterfingers
Step 1: Crush the Corn Flakes
Begin by placing gluten-free corn flakes into a large zip-top bag. Use a rolling pin or your hands to crush them into small pieces, achieving a fine texture that still retains some crunch—this should take about 2 minutes. Set the crushed corn flakes aside, ensuring they're recognizable but broken enough to incorporate into the mixture.
Step 2: Mix Peanut Butter and Sweetener
In a large mixing bowl, combine natural, unsweetened peanut butter with your choice of maple syrup or honey. Use a spatula to stir the mixture vigorously until it’s completely smooth and well blended—about 2-3 minutes. You’ll know it’s ready when the texture is creamy and the ingredients are wholly combined, creating a luscious, sticky base for your Healthy Homemade Butterfingers.
Step 3: Combine with Corn Flakes
Add the crushed corn flakes to the peanut butter mixture, and fold them in using a spatula. Make sure the corn flakes are evenly distributed throughout the mixture, so each bite is equally crunchy. Continue mixing for about 1-2 minutes until you have a cohesive blend that’s thick enough to hold its shape when pressed.
Step 4: Shape and Freeze the Mixture
Line a loaf pan with parchment paper for easy removal, and transfer the mixture into the pan. Press down firmly using your hands or a spatula, creating an even layer, about 1 inch thick. Place the pan into the freezer and let it chill for at least 1 hour, allowing the bars to firm up and hold together for the next steps.
Step 5: Cut into Bars
Once the mixture is set and firm, remove it from the freezer. Lift the bars out of the pan using the parchment paper, and place it on a cutting board. Use a sharp knife to cut it into 12 equal pieces, ensuring you create delicious, bite-sized Healthy Homemade Butterfingers that are ready for coating.
Step 6: Prepare the Chocolate Coating
In a microwave-safe bowl or a double boiler, melt dark chocolate chips with coconut oil. If using the microwave, do it in 30-second intervals, stirring in between, until the mixture is smooth and glossy—this usually takes about 1-2 minutes. The melted chocolate should be warm and fluid for easy dipping.
Step 7: Coat the Bars
Carefully dip each bar into the melted chocolate, ensuring it’s thoroughly coated. Use a fork to lift it out, allowing any excess chocolate to drip back into the bowl. Place the coated bars on a parchment-lined plate to prevent sticking, making sure they're spaced apart for drying.
Step 8: Final Freeze for Hardening
Once all bars are coated, place the plate back in the freezer for about 10 minutes, allowing the chocolate to harden completely. You’ll know they’re ready to enjoy when the chocolate is solid and creates a beautiful, glossy finish on your Healthy Homemade Butterfingers.

Healthy Homemade Butterfingers Variations
Feel free to get creative with these Healthy Homemade Butterfingers and customize them to suit your palate!
-
Nut Butter Swap: Substitute almond butter for peanut butter for a nutty twist that’s equally delicious. You’ll love the change in flavor profile!
-
Rice Cereal Option: Use rice cereal instead of corn flakes to create a gluten-free crunchy sensation. This swap is perfect for those looking for a lighter texture.
-
Chocolate Coating Varieties: Experiment with different chocolate coatings like dark or white chocolate for a playful take on the classic flavor. Your taste buds will thank you!
-
Add Crunchy Toppings: Try tossing in some chopped nuts or seeds for an extra boost of crunch and nutrition. They will add an exciting texture dimension!
-
Flavor Enhancements: Mix in a teaspoon of vanilla extract or a pinch of sea salt for enhanced flavor depth. Small tweaks can make a big difference.
-
Chili Kick: For the adventurous, sprinkle a dash of cayenne pepper into the batter for a surprising spicy kick that contrasts beautifully with the sweetness!
-
Coconut Love: Incorporate shredded coconut into the mixture for a tropical vibe that's simply irresistible. It adds a lovely chewiness that pairs well with chocolate!
All of these variations allow you to personalize your Healthy Homemade Butterfingers. For more delicious ideas, check out my recipe for Shakshuka Savor Bold for a warm, fulfilling meal!
Make Ahead Options
These Healthy Homemade Butterfingers are perfect for meal prep, allowing you to indulge without the last-minute hassle! You can prepare the bars up to 24 hours in advance; simply follow the instructions until the coating step, then wrap the cut bars tightly in plastic wrap and refrigerate. If you want to make them even earlier, the bars can be frozen for up to 3 months. To maintain their quality, make sure they’re well-wrapped to prevent freezer burn. When you're ready to serve, melt the chocolate coating and dip each bar, then freeze again for about 10 minutes until the chocolate hardens. This way, you'll have delightful, guilt-free treats ready whenever cravings strike!
Expert Tips for Healthy Homemade Butterfingers
-
Choose Quality Ingredients: Use natural, unsweetened peanut butter and high-quality dark chocolate chips for the best flavor and health benefits in your Healthy Homemade Butterfingers.
-
Crush Corn Flakes Carefully: Ensure the corn flakes are broken but not pulverized; this balance gives your bars that perfect crunch. Avoid over-crushing, which can result in a soggy texture.
-
Firmly Pack the Mixture: Press the mixture tightly into the loaf pan for a dense structure, ensuring the bars hold together well once frozen. This step is crucial to prevent crumbly bars.
-
Melt Chocolate Gently: Use a double boiler or microwave in short bursts to melt chocolate without burning it. Stir often for a smooth, glossy finish when coating your bars.
-
Monitor Freezing Time: Keep an eye on the bars while freezing to achieve the right firmness. Over-freezing can make the chocolate too hard, making it difficult to enjoy your Healthy Homemade Butterfingers.
How to Store and Freeze Healthy Homemade Butterfingers
Fridge: Store your Healthy Homemade Butterfingers in an airtight container in the fridge for up to 1 week. This keeps them fresh and easy to grab for a quick snack.
Freezer: For longer storage, place the bars in an airtight container or freezer bag, separating layers with parchment paper. They can be frozen for up to 3 months while maintaining their delicious texture.
Reheating: Enjoy directly from the freezer for a refreshingly cool treat. If desired, let the bars sit at room temperature for a few minutes before indulging for softened chocolate!
Wrapping: Ensure the bars are well-wrapped to avoid freezer burn, helping to retain their rich flavor and delightful crunch inside the chocolate coating.
What to Serve with Healthy Homemade Butterfingers?
Make your homemade candy experience complete by pairing these delightful bars with some equally enticing options that will tantalize your taste buds.
-
Creamy Coconut Yogurt: A refreshing and tangy yogurt that balances well with the sweetness of the Butterfingers, adding a creamy texture to your snack.
-
Fresh Fruit Salad: Bright, juicy fruits like strawberries, blueberries, and kiwi provide a refreshing contrast to the rich chocolate flavor, making for a light, vibrant side.
-
Nutty Granola: Adding a crunchy granola is perfect for a wholesome breakfast pairing. Drizzle some maple syrup for an extra touch of sweetness.
-
Homemade Almond Milk: A nutty, silky beverage that perfectly complements the flavors of the bars while being dairy-free and satisfying your thirst.
-
Apple Slices with Almond Butter: The crispness of apple slices dipped in almond butter mirrors the Butterfinger's crunch while introducing a fresh, fruity flavor.
-
Mint Tea: A warm, herbal tea can refresh your palate after enjoying the rich sweetness of the Butterfingers, adding a soothing touch to your day.
Treat yourself to a complete sensory experience by incorporating these delightful pairings alongside your Healthy Homemade Butterfingers!
Healthy Homemade Butterfingers Recipe FAQs
How do I select the right ripeness for peanut butter?
Absolutely! When choosing peanut butter, opt for brands that list only peanuts as the ingredient. Look for natural, creamy varieties without added sugars or oils. The best choices are those that have a smooth texture and a rich, nutty flavor, which perfectly complements the other ingredients in your Healthy Homemade Butterfingers.
What’s the best way to store these bars, and how long do they last?
Very! You can store your Healthy Homemade Butterfingers in an airtight container in the fridge for up to 1 week. If you want to keep them for longer, I recommend freezing them. Store the bars in a freezer-safe container separated by parchment paper, so they don’t stick together. They can last for up to 3 months in the freezer, preserving their delicious crunch and flavor.
Can I freeze Healthy Homemade Butterfingers?
Of course! To freeze them properly, first, allow the bars to set completely in the freezer after coating with chocolate. Then, layer them in an airtight container or a freezer bag, making sure to place parchment paper between layers to prevent sticking. This way, you can enjoy them later without losing their delightful texture!
What if my bars are too crumbly? How can I fix that?
If your Healthy Homemade Butterfingers are too crumbly, it may be due to insufficient mixing or a lack of moisture. My tip is to ensure you've fully combined the peanut butter and sweetener before adding the corn flakes. If they still feel dry, try adding a bit more peanut butter or a splash of maple syrup to bind the mixture better. Remember to pack the mixture tightly into the loaf pan for better cohesion!
Are there any dietary considerations I should keep in mind?
Absolutely! These Healthy Homemade Butterfingers are gluten-free if you use gluten-free corn flakes, and they're naturally dairy-free, making them suitable for various dietary preferences. However, always double-check labels for allergies, especially if serving them to guests. If you're concerned about nut allergies, try using sun butter or seed butter as an alternative for the peanut butter.
Can I substitute any ingredients for different dietary needs?
Yes, you can! If you want to make your Healthy Homemade Butterfingers nut-free, simply substitute the peanut butter with sunflower seed butter. Additionally, if you're looking for a lower sugar option, you can reduce the amount of maple syrup or honey by half or use a natural sweetener like stevia. Just be sure to experiment carefully to maintain the balance of flavors!
Guilt-Free Healthy Homemade Butterfingers You’ll Love
Ingredients
Equipment
Method
- Crush the Corn Flakes by placing them in a zip-top bag and using a rolling pin to achieve a fine texture.
- Mix Peanut Butter and Sweetener until smooth and well blended in a large mixing bowl.
- Combine with Corn Flakes by folding them into the peanut butter mixture until evenly distributed.
- Shape and Freeze the Mixture in a lined loaf pan, pressing firmly to create an even layer.
- Cut into Bars once the mixture is firm, slicing into 12 equal pieces.
- Prepare the Chocolate Coating by melting chocolate chips with coconut oil until smooth.
- Coat the Bars by dipping each piece into the melted chocolate and placing on a lined plate.
- Final Freeze for Hardening by placing coated bars in the freezer for about 10 minutes.


Leave a Reply