
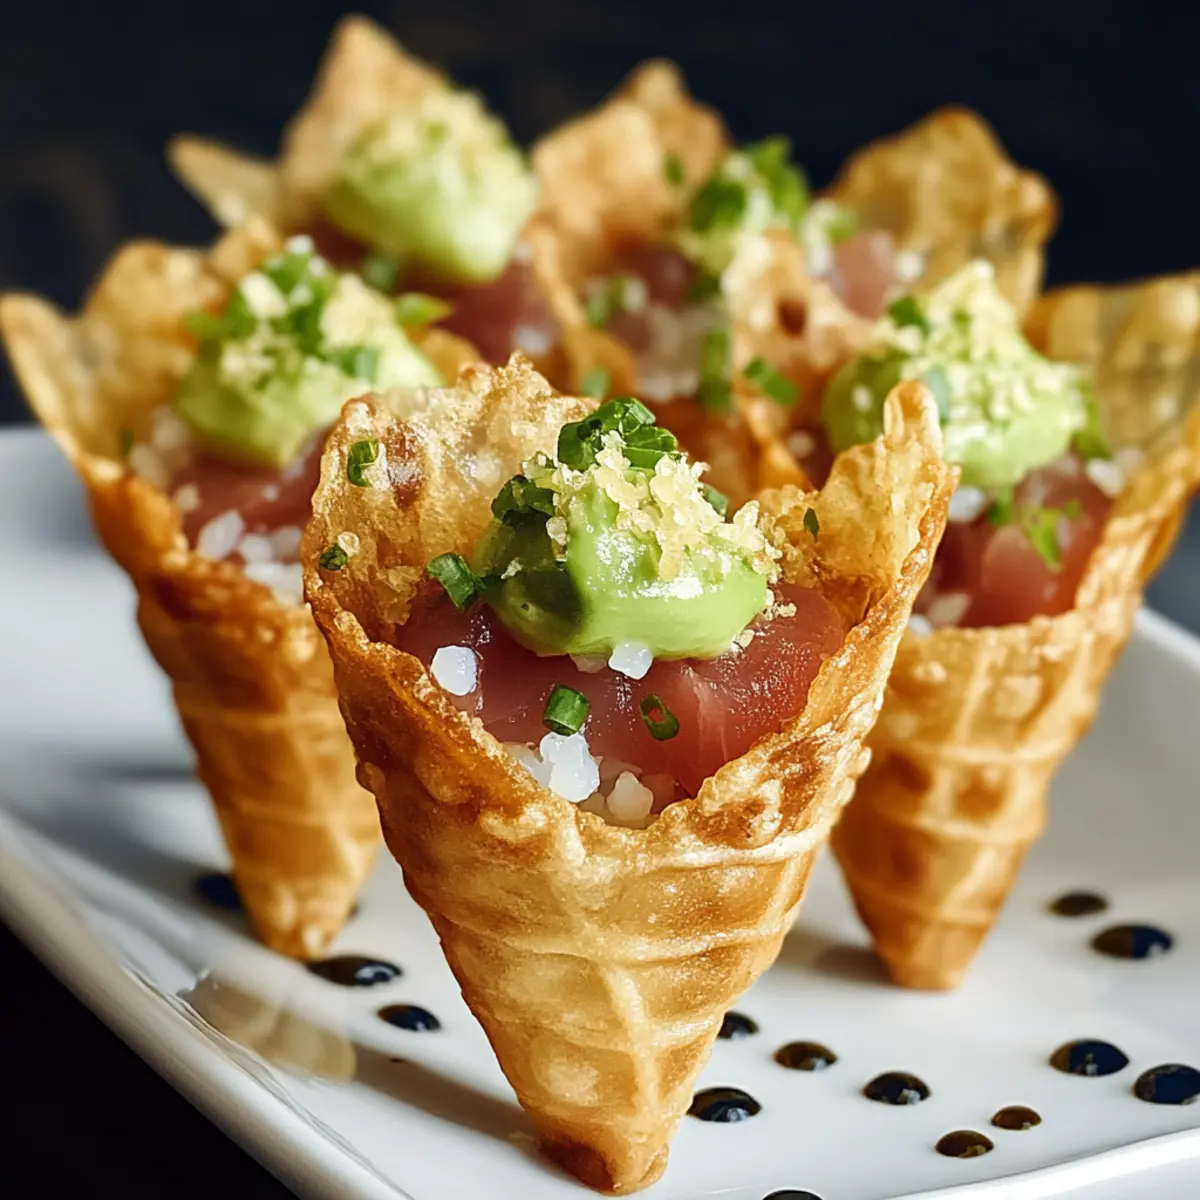
As I settled into my kitchen one sunny afternoon, I found myself longing for something a little different. That’s when the idea of Sushi Wonton Cones struck me—this playful twist on traditional sushi brings all the delicious elements of sushi into a handheld delight. With a crispy wonton wrapper, flavorful seasoned rice, and fresh avocado, these Sushi Wonton Cones are not just visually stunning, but they’re also incredibly customizable, making them ideal for any gathering. Whether you're hosting a party or enjoying a cozy night at home, these crowd-pleasers are an effortless way to impress guests while keeping things fun and interactive. Who wouldn’t enjoy assembling their own perfect cone? Ready to dive into this delightful adventure? Let’s roll!
Why Choose Sushi Wonton Cones?
Customization at its finest: You can tailor each cone to suit every palate, from spicy tuna to vibrant veggies.
Interactive dining experience: Guests will love making their own cones, adding an element of fun to any gathering!
Crispy and creamy texture: The contrast between the crunchy wonton and the soft, creamy fillings offers a delightful bite.
Nutrient-rich ingredients: Packed with healthy fats from avocado and lean protein from tuna, these cones are as nourishing as they are delicious.
Quick to prepare: With simple components and straightforward steps, you'll have these ready in no time—perfect for last-minute parties.
So why not pair these delightful treats with some homemade Vegan Sushi Indulge for a complete sushi feast?
Sushi Wonton Cone Ingredients
Get ready to create delicious Sushi Wonton Cones with these fresh ingredients!
For the Cones
- Wonton wrappers – Perfect structures that hold all your fillings together; spring roll wrappers can be used for a different texture.
- Coconut oil – Essential for frying, giving a crispy finish; vegetable oil is a great alternative if you prefer.
For the Sushi Rice
- Sushi rice – The heart of your dish, providing that signature flavor and texture; remember to use short-grain rice for best results.
- Rice vinegar – Adds a tangy kick to your rice; if you're in a pinch, apple cider vinegar works, though the flavor will change.
- Sugar – Balances the seasoning for your sushi rice perfectly.
- Salt – Enhances the overall seasoning and flavor of your dish.
For the Filling
- Avocado – Brings creaminess and healthy fats; for a lighter bite, consider substituting with cucumber.
- Tuna steak (sushi-grade) – Main protein that gives flavor; feel free to swap in salmon or shrimp if you're looking for variety.
- Kewpie mayonnaise – Adds a nice creamy texture and umami flavor; regular mayonnaise can work too, or simply omit for a lighter version.
- Tomato ketchup or sauce – Provides sweetness and moisture in your tuna mixture.
- Sriracha – Optional, but adds a delightful heat to the tuna mixture.
- Lime zest – Infuses brightness and aromatic complexity to elevate flavors.
- Furikake or black sesame seeds – Gorgeous garnishes that add both flavor and visual appeal.
Ready to roll up your sleeves and enjoy these playful, handheld Sushi Wonton Cones? Let’s get cooking!
Step‑by‑Step Instructions for Sushi Wonton Cones
Step 1: Prepare the Wonton Cones
Start by preheating your oven to 175 °C (350 °F). Lay out the wonton wrappers and gently press them around cream horn or cone molds to shape them. Ensure the edges overlap slightly and press to seal tightly. Arrange the cones on a baking sheet, ready for frying, and set aside while you heat the coconut oil.
Step 2: Fry the Wonton Cones
In a deep pan, heat coconut oil to 175 °C (350 °F). Carefully add the wrapped cones in batches, frying until they turn golden brown, about 2-3 minutes per side. Watch for a crisp, golden appearance—this indicates they’re perfectly fried. Remove them with tongs and let draining on paper towels to absorb excess oil.
Step 3: Prepare the Sushi Rice
While the cones cool, let's focus on the sushi rice. Rinse and cook sushi rice according to package instructions until tender, then transfer it to a large bowl. While still warm, gently fold in the rice vinegar, sugar, and salt, mixing until fully incorporated. Allow the seasoned rice to cool to room temperature, ensuring it's sticky enough for filling.
Step 4: Make the Tuna Filling
In a mixing bowl, flake or cube the sushi-grade tuna, making sure to keep it chilled. Combine the tuna with Kewpie mayonnaise, tomato sauce, optional sriracha, and lime zest. Mix until everything is well-coated and flavors meld together. This creamy, flavorful filling will elevate your Sushi Wonton Cones.
Step 5: Assemble the Sushi Wonton Cones
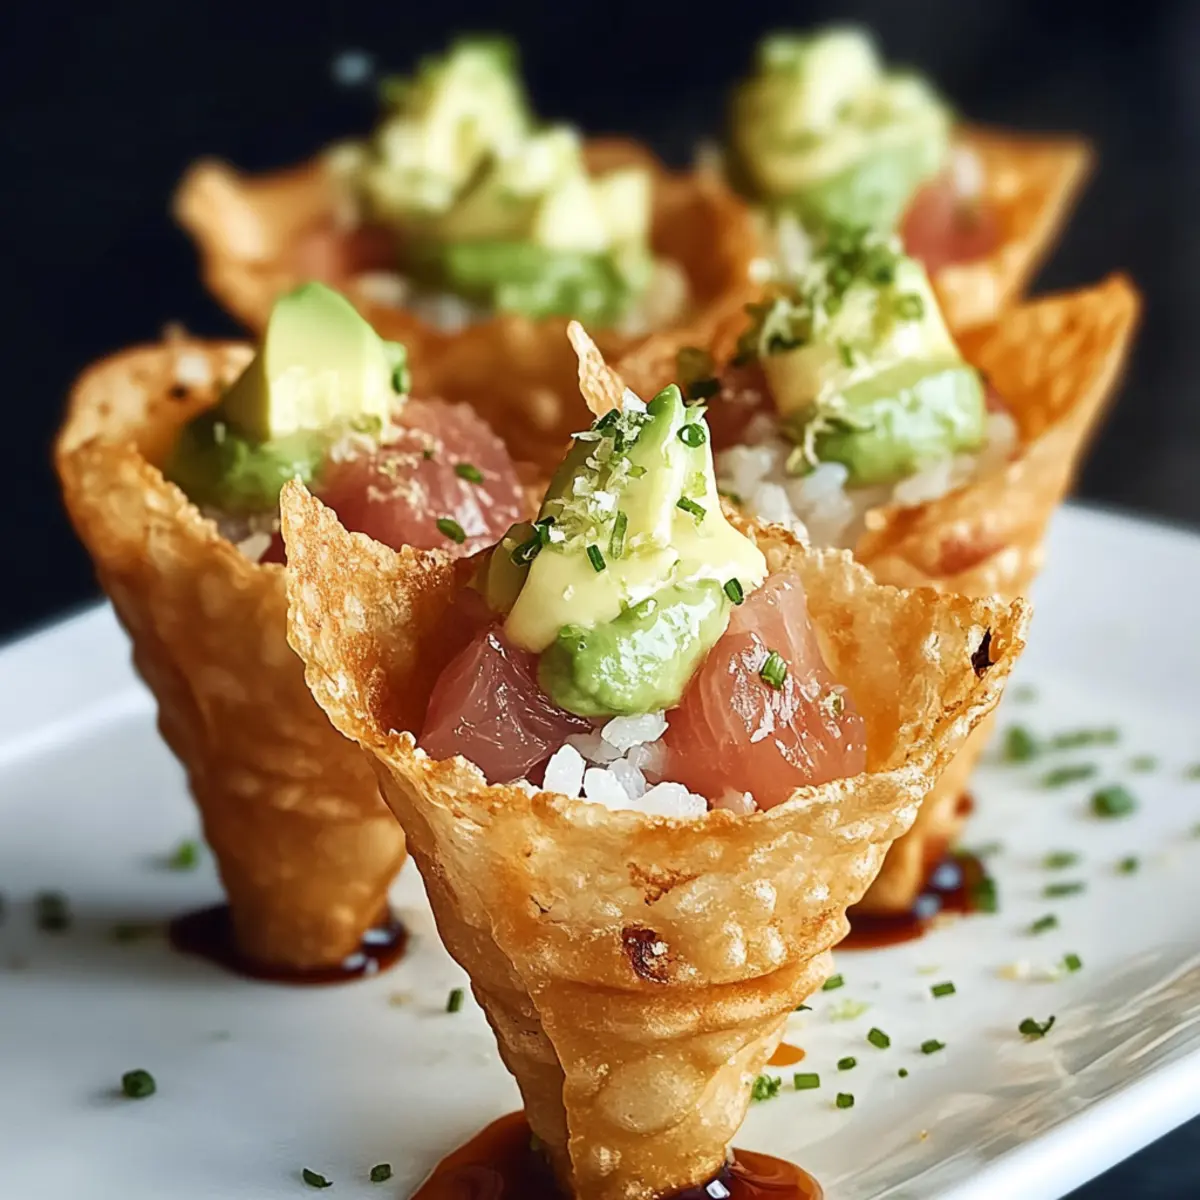
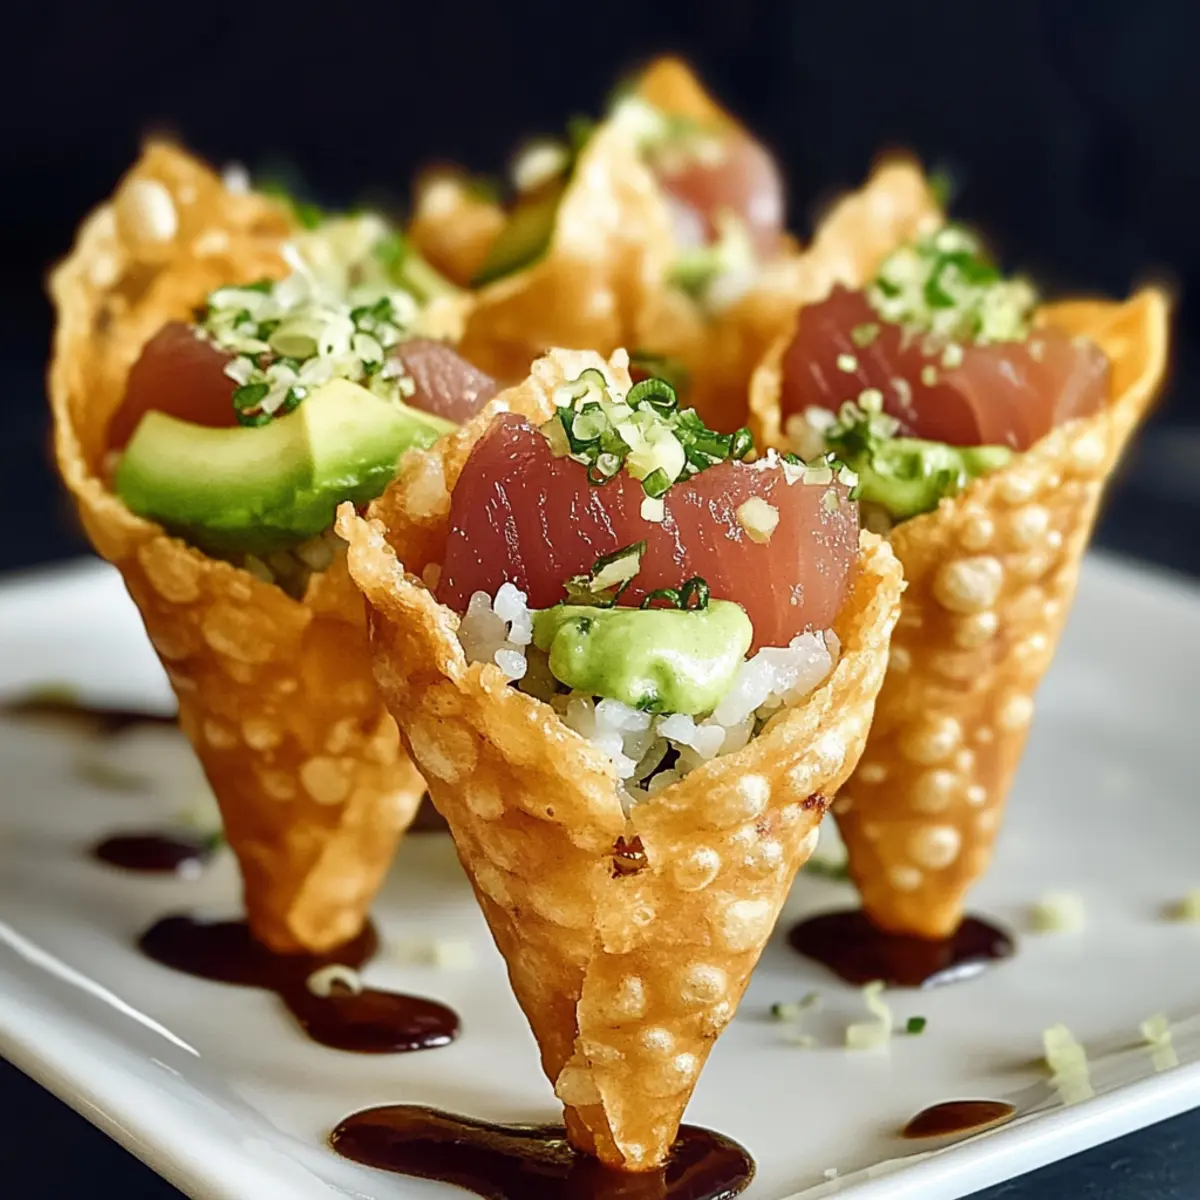
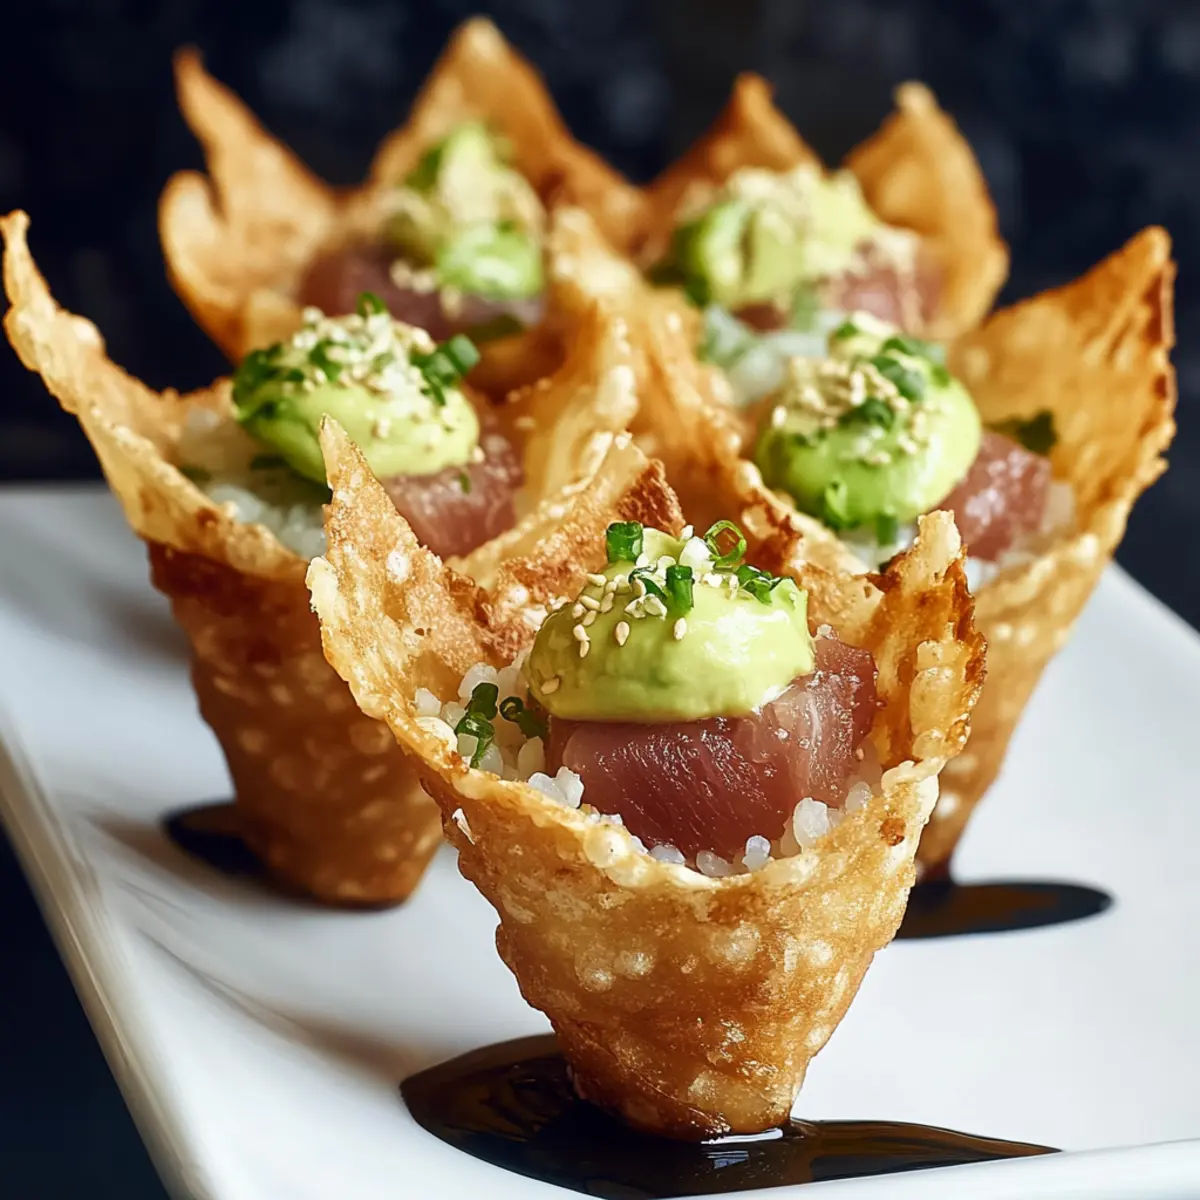
Once the cones and rice have cooled, it’s time to assemble your Sushi Wonton Cones. Start by filling each cone with a layer of sushi rice, packing it in gently. Follow with sliced avocado, adding a rich texture to the cone. Finally, spoon the tuna mixture generously on top, creating a colorful and appetizing display.
Step 6: Garnish and Serve
To finish your Sushi Wonton Cones, sprinkle furikake or black sesame seeds over the top for added flavor and visual appeal. Arrange the assembled cones upright in a mini muffin tin or on a serving platter for an eye-catching presentation. These delightful cones are ready to impress your guests at any gathering!
Make Ahead Options
These Sushi Wonton Cones are a fantastic choice for meal prep, saving you valuable time on busy days! You can prepare the sushi rice and the tuna filling up to 3 days in advance. Simply cook and season the sushi rice, then allow it to cool before refrigerating in an airtight container. For the tuna mix, combine the ingredients and store them chilled (to maintain freshness) until you’re ready to assemble. To ensure the wonton cones stay crispy, it's best to fry them fresh right before serving. Assemble the cones with the prepared rice and tuna mixture just before enjoyment, and you'll have a delightful, restaurant-quality appetizer that’s just as delicious as if you made it all in one go!
What to Serve with Sushi Wonton Cones
Imagine an inviting spread that complements the crunchy, flavorful experience of handheld sushi delights—perfect for a delightful gathering.
-
Eda Mame: Lightly salted edamame enhances the sushi experience while adding a satisfying crunch and protein boost.
-
Miso Soup: This warm, savory soup pairs beautifully with the fresh flavors of the cones, providing comforting contrast.
-
Cucumber Salad: Add a refreshing twist with thinly sliced cucumber dressed in rice vinegar for tangy zing—an excellent palate cleanser.
-
Sushi Rolls: Serve classic sushi rolls alongside your cones for a fun variety of flavors and textures; think spicy tuna or cucumber rolls.
-
Crispy Seaweed Snacks: These crunchy bites provide a delightful crispiness, echoing the texture of the wonton cones and making for easy snacking.
-
Iced Green Tea: Quench your guests' thirst with a cool, refreshing iced green tea; its lightness pairs superbly with the savory sushi flavors.
Sushi Wonton Cones become even more delightful when served alongside these bright, fresh offerings, creating a feast that will have everyone coming back for more!
Expert Tips for Sushi Wonton Cones
-
Fry Wisely: Keep an eye on your frying temperature; too hot can lead to burnt cones, while too low may leave them soggy.
-
Chill the Filling: Ensure your tuna is chilled until you’re ready to assemble. This keeps the texture perfect and flavor fresh!
-
Prep Ahead: Make your rice and filling ahead of time, but avoid filling the cones until just before serving to maintain crispness.
-
Don’t Overfill: While it’s tempting, avoid stuffing your cones too full. This can make them hard to eat and crush the delicate wrappers.
-
Try Alternatives: Experiment with different fillings like spicy tuna or even vegetarian options to customize your Sushi Wonton Cones to everyone’s taste!
How to Store and Freeze Sushi Wonton Cones
Room Temperature: Sushi Wonton Cones are best enjoyed fresh, but if left out, consume within 1-2 hours to maintain freshness and flavor.
Fridge: You can store assembled cones in the fridge for up to 3 hours. Wrap them tightly in plastic wrap to prevent the wontons from becoming soggy.
Freezer: While it's not ideal to freeze the filled cones, you can freeze unfilled, fried cones for up to 1 month. Thaw and fill just before serving for the best texture and taste.
Reheating: If needed, reheat fried cones in a preheated oven at 180 °C (350 °F) for about 5-7 minutes to regain their crispiness before filling with your sushi components.
Sushi Wonton Cones: Endless Customization
Embrace your creativity by personalizing these delightful cones to suit your taste and preferences!
-
Spicy Tuna: Swap the regular tuna for spicy tuna mixed with sriracha for an extra kick that amplifies the flavor and excitement.
-
Vegetarian Delight: Replace tuna with marinated tofu, diced bell peppers, and a splash of soy sauce to create a satisfying, meat-free option that’s just as filling.
-
Avocado Alternative: Instead of avocado, consider using thinly sliced cucumbers or radishes for a refreshing, crisp texture that lightens up the cone.
-
Energizing Greens: Add a layer of fresh arugula or spinach before the sushi rice for a peppery twist that adds freshness to each bite.
-
Gourmet Garnishes: Elevate your presentation with microgreens or edible flowers as a stunning garnish that will wow your guests and give a restaurant-style flair.
-
Heat Levels: For a bit of zing, kick up the heat with jalapeño slices or a touch of spicy mayo drizzled over the top.
-
Irresistible Dipping Sauces: Enhance the flavor experience by serving with sides of spicy mayo or a tangy soy-wasabi sauce. They're perfect for dunking and will leave everyone wanting more!
-
Crispy Texture Boost: For an added crunch, sprinkle crushed fried onions or tempura flakes on top just before serving, giving your cones a delightful twist.
Feel free to indulge in these variations, and why not consider pairing with some homemade Vegan Sushi Indulge to create a full sushi experience? Your guests will love the choices!
Sushi Wonton Cones Recipe FAQs
How do I choose the best ripe avocado for my Sushi Wonton Cones?
Absolutely! When selecting an avocado, look for one that yields slightly to gentle pressure; this indicates it’s ripe. Avoid those with dark spots or a mushy feel, as they may be overripe. A perfect avocado should have smooth, unblemished skin and feel firm yet slightly soft when held.
What is the best way to store leftover Sushi Wonton Cones?
Very! If you have any assembled Sushi Wonton Cones left, it's best to consume them within 3 hours for optimal freshness. To store them, wrap each cone in plastic wrap and refrigerate. This helps prevent the wonton from becoming soggy. However, if they must be stored, you can keep them in the fridge for up to 3 hours.
Can I freeze Sushi Wonton Cones?
Definitely! While it's not ideal to freeze filled cones, you can freeze the unfilled, fried wonton cones for up to 1 month. To do this, allow the cones to cool completely, then arrange them in a single layer on a baking sheet and place them in the freezer. Once frozen solid, transfer them to a freezer-safe bag or container. When ready to serve, thaw them in the fridge overnight and fill them just before enjoyment for the best texture.
What should I do if my wonton cones are too greasy after frying?
I’ve been there! If your cones come out greasy, it usually means the oil temperature was too low or they were in the oil for too long. For future batches, ensure the frying oil is preheated to 175 °C (350 °F). After frying, drain the cones on paper towels right away to remove excess oil effectively. If they’re already greasy, letting them sit on a paper towel can help absorb some of the oil.
Are there any dietary considerations for making these cones?
Absolutely! If hosting guests with dietary restrictions or allergies, you can customize your Sushi Wonton Cones easily. For gluten-free options, check that your wonton wrappers are gluten-free or use rice paper wrappers instead. If someone is allergic to seafood, consider using fresh vegetables or cooked proteins like chicken or tofu in your filling. Regardless of dietary needs, these cones can be made inclusive and enjoyable for everyone!
Sushi Wonton Cones: Fun and Fresh Handheld Delights
Ingredients
Equipment
Method
- Prepare the Wonton Cones: Preheat oven to 175 °C (350 °F). Press wonton wrappers around cone molds and seal edges, arrange on a baking sheet.
- Fry the Wonton Cones: Heat coconut oil to 175 °C (350 °F) and fry cones until golden brown, about 2-3 minutes; drain on paper towels.
- Prepare the Sushi Rice: Rinse and cook sushi rice as per package instructions. Mix in rice vinegar, sugar, and salt while warm, then cool to room temperature.
- Make the Tuna Filling: Flake sushi-grade tuna in a bowl and mix with Kewpie mayonnaise, tomato sauce, optional sriracha, and lime zest until well-coated.
- Assemble the Sushi Wonton Cones: Fill cones with sushi rice, then sliced avocado, and top with the tuna mixture for a colorful display.
- Garnish and Serve: Sprinkle with furikake or sesame seeds, and arrange cones upright on a platter for serving.


Leave a Reply