
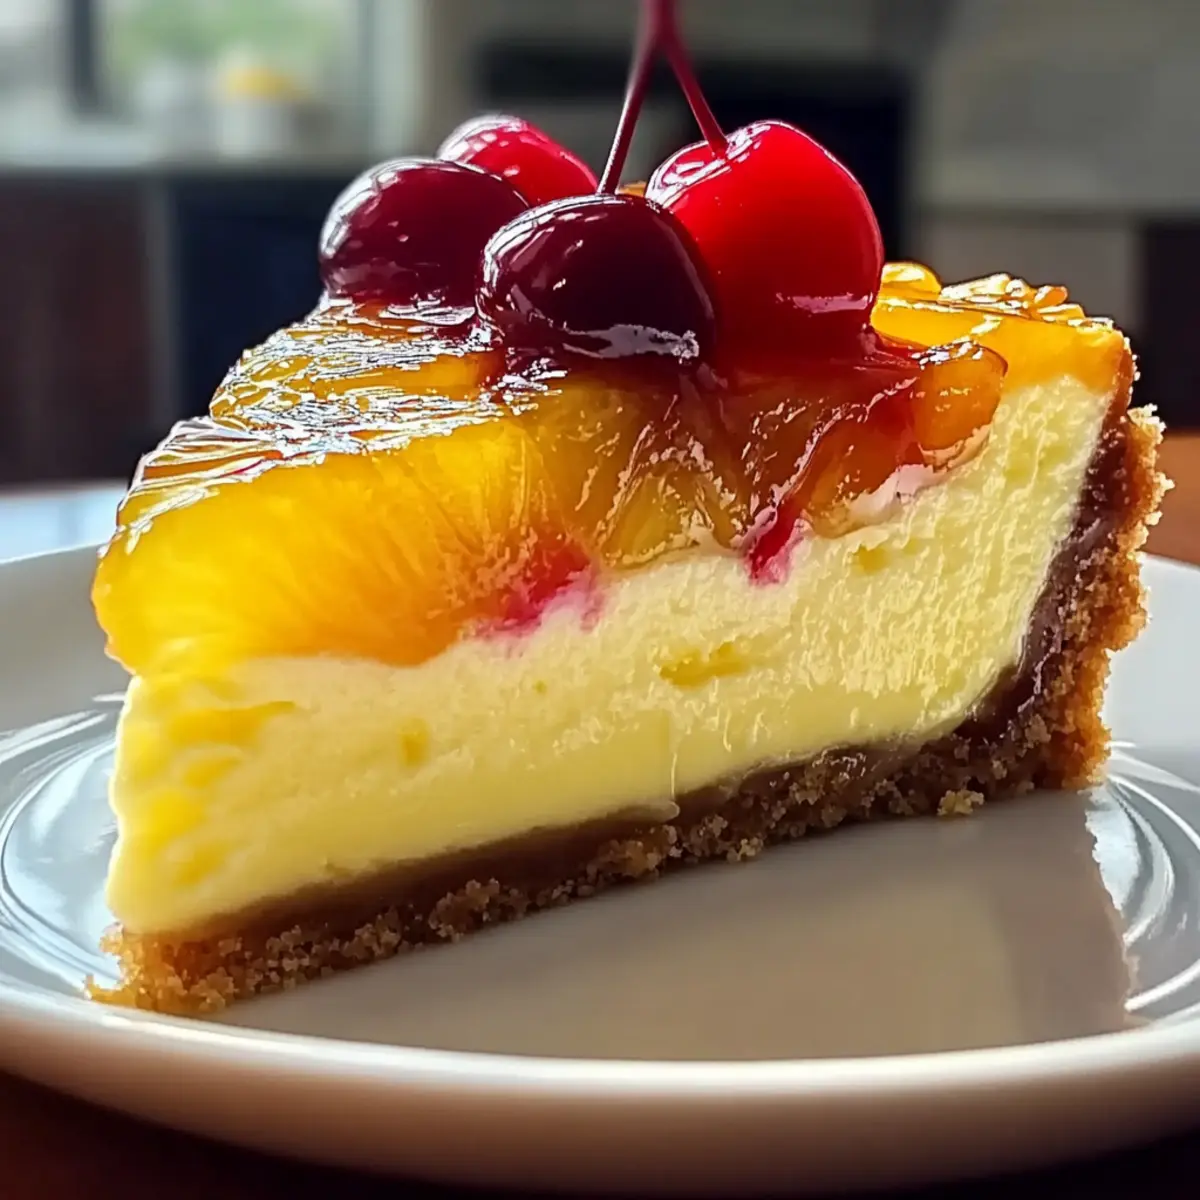
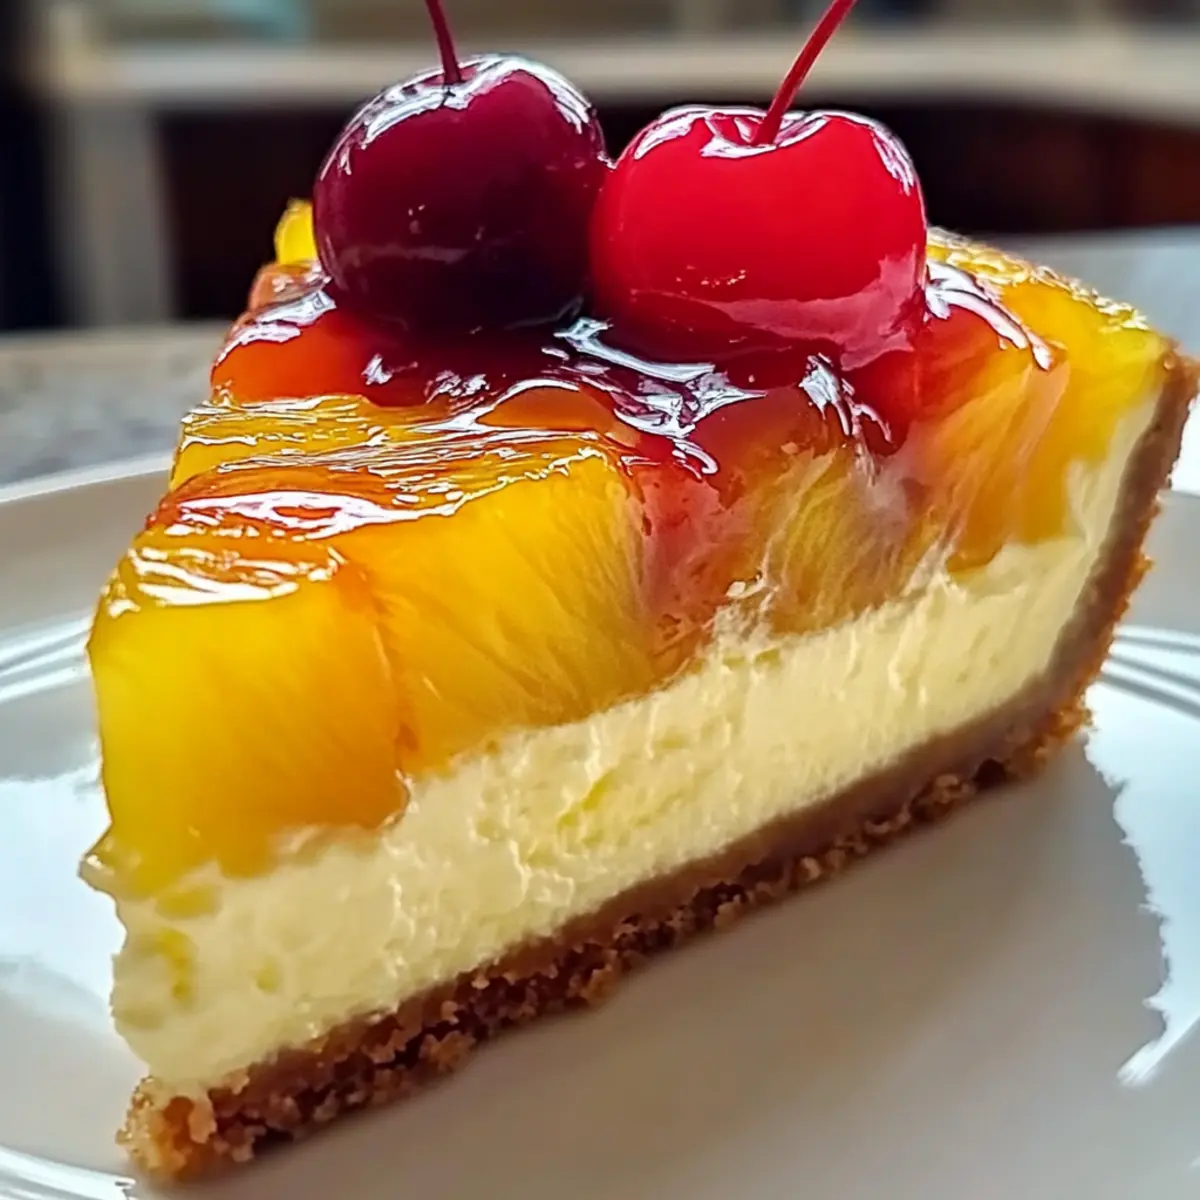
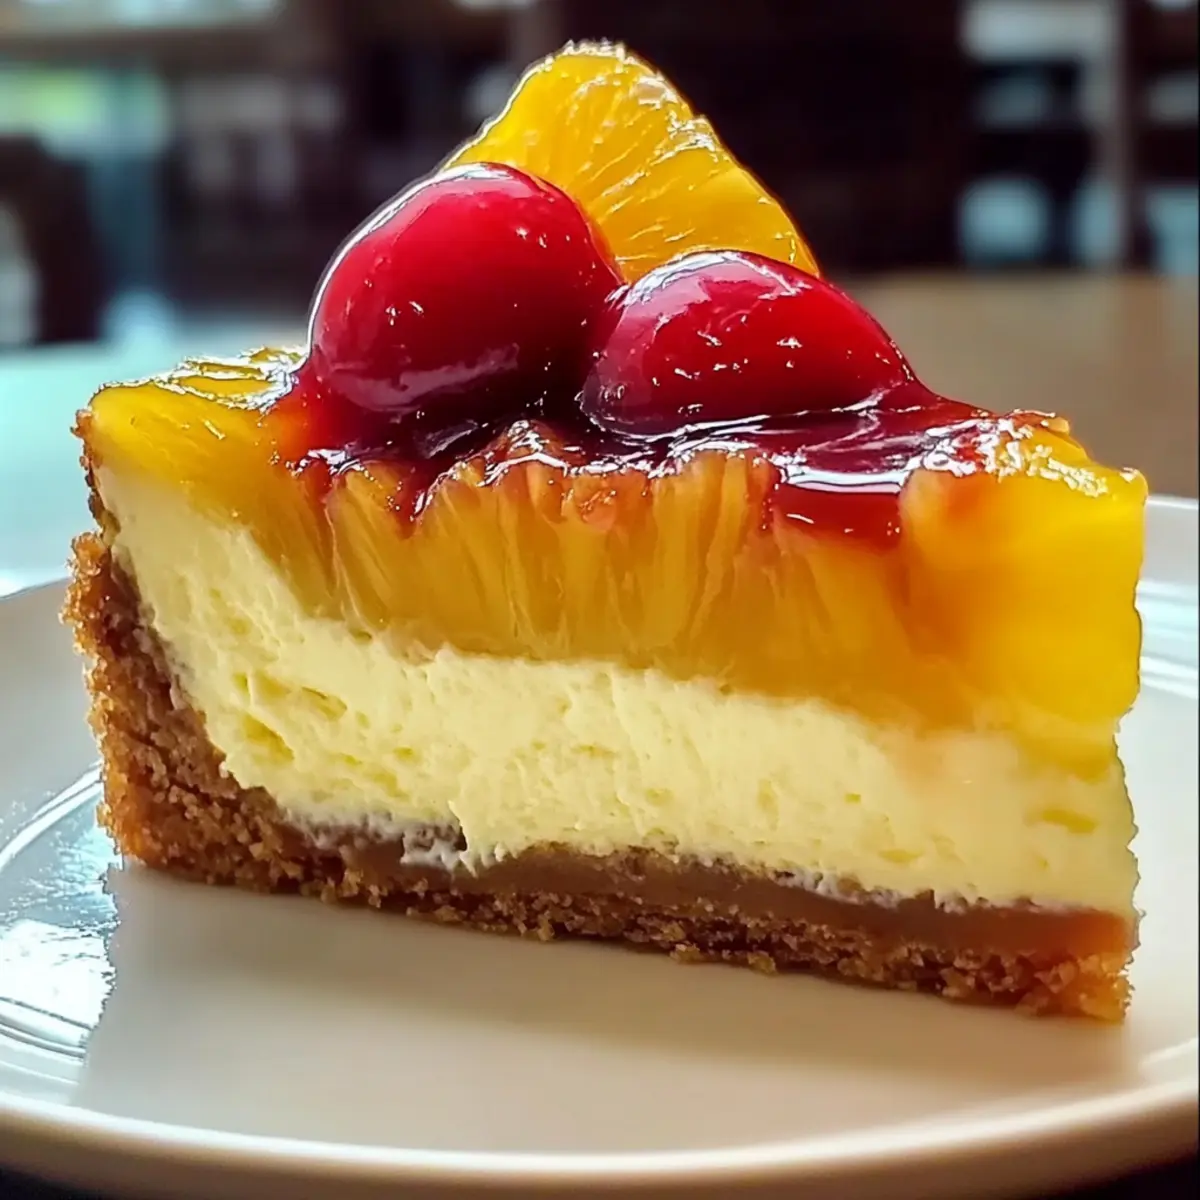
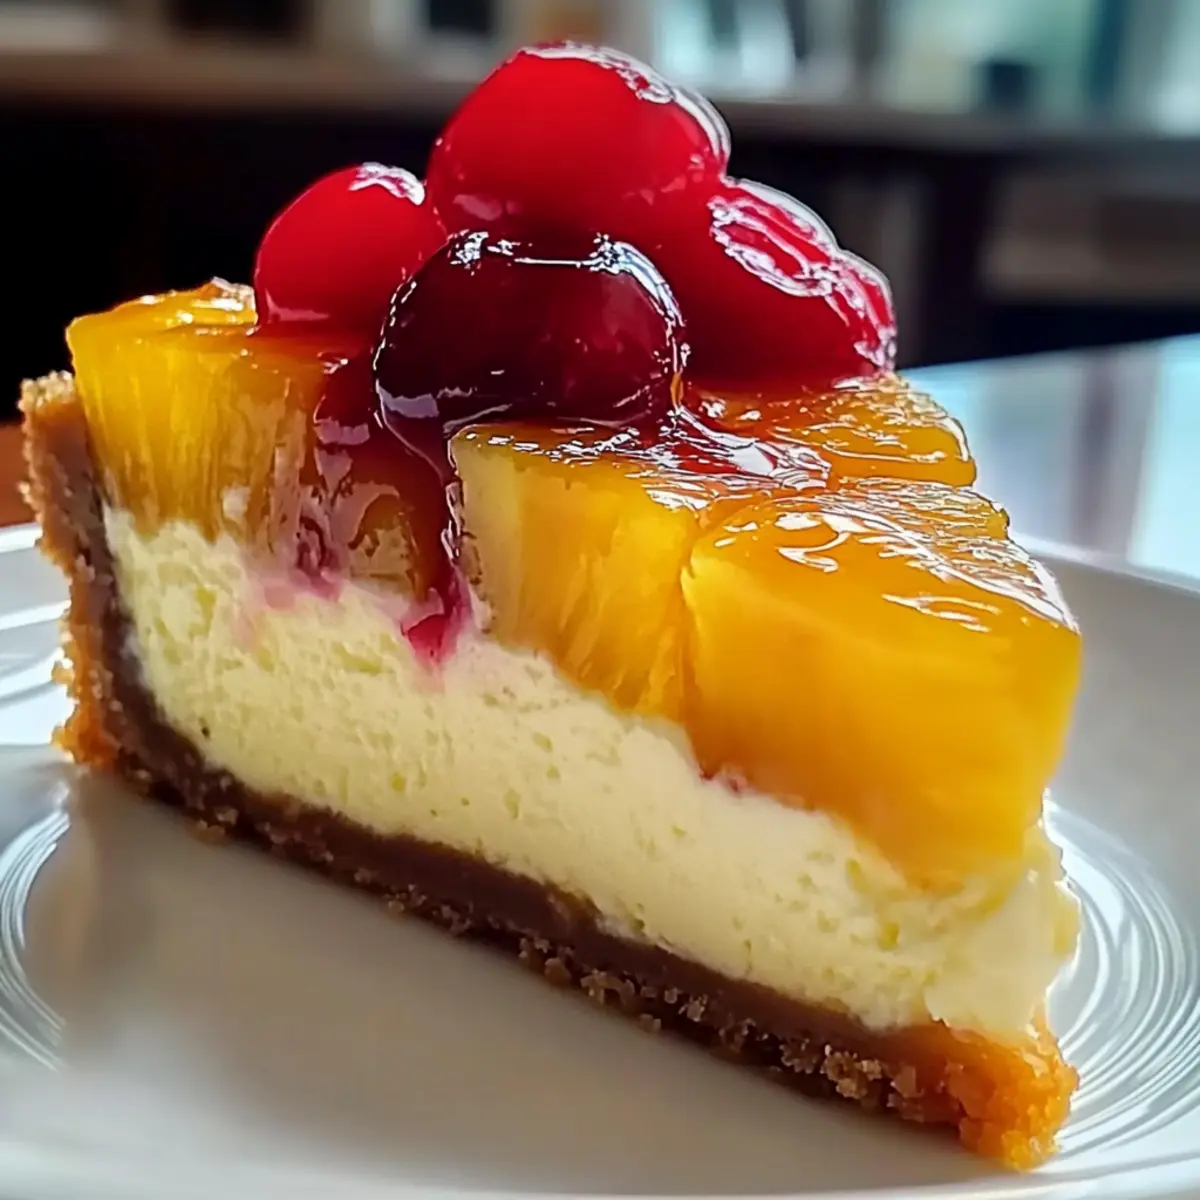
A sweet aroma wafts through my kitchen, transporting me back to sun-drenched afternoons and joyful gatherings. My Pineapple Upside-Down Cheesecake captivates hearts with its luscious layers, marrying the creamy richness of cheesecake with the nostalgic charm of a classic upside-down cake. This tropical dessert not only serves as a festive centerpiece for any celebration but also boasts the delightful perk of easy preparation that’ll have your guests clamoring for seconds. Just imagine cutting into that velvety cheesecake, revealing a vibrant tableau of caramelized pineapple and cherries on top! Are you ready to recreate this slice of paradise and make your next occasion unforgettable?
Why is This Cheesecake So Irresistible?
Indulgent flavors burst from each slice, thanks to the sweet, caramelized pineapple topping. Unique in its combination, this Pineapple Upside-Down Cheesecake seamlessly blends two beloved desserts into a tropical delight that you'll want to share. Easy preparation means you won't be stuck in the kitchen for hours, leaving more time for fun. Perfect for gatherings, its vibrant appearance and rich flavor will wow your guests at celebrations, making memorable moments even sweeter. Plus, don't miss my tips on how to achieve that luscious, creamy texture for the cheesecake—check out my expert tips included above!
Pineapple Upside-Down Cheesecake Ingredients
For the Crust
- Graham Cracker Crumbs – Provides structure for the crust; substitute with gluten-free graham crackers for a gluten-free option.
- Unsalted Butter – Binds crumbs for a crunchy crust; use salted butter for an enhanced flavor.
- Brown Sugar – Adds sweetness and moisture to the crust and caramel layer; white sugar can substitute but lacks depth in flavor.
For the Topping
- Pineapple Rings – The star of the dessert, providing sweetness and moisture; canned pineapple is recommended for consistency.
- Maraschino Cherries – Adds flavor contrast and a pop of color; optional or replace with another fruit for variety.
For the Cheesecake Filling
- Cream Cheese – The main component, creating the rich, creamy texture; ensure it’s softened for better mixing.
- Granulated Sugar – Sweetens the cheesecake filling; can substitute with a sugar alternative for a healthier option.
- Sour Cream – Adds tanginess and moisture; cream or Greek yogurt can substitute for a similar texture.
- Vanilla Extract – Enhances flavors in the filling; use high-quality vanilla for best results.
- Eggs – Provide structure and richness to the cheesecake; ensure they are at room temperature for better incorporation.
Indulge in something special with this Pineapple Upside-Down Cheesecake, elevating your dessert game to tropical heights!
Step‑by‑Step Instructions for Pineapple Upside-Down Cheesecake
Step 1: Preheat the Oven
Begin by preheating your oven to 325°F (163°C). While the oven warms up, grease a 9-inch springform pan with non-stick spray or butter to ensure easy removal later. Sprinkle an even layer of brown sugar over the bottom of the pan, creating a sweet base for the caramelized pineapple topping.
Step 2: Arrange Pineapple and Cherries
Next, take your pineapple rings and carefully arrange them on top of the brown sugar layer in the springform pan. For an extra burst of color and flavor, place a maraschino cherry in the center of each pineapple ring. The vibrant yellow and bright red will create a stunning contrast sure to impress.
Step 3: Prepare the Crust
In a mixing bowl, combine graham cracker crumbs with melted unsalted butter until thoroughly mixed. Press this mixture evenly into the bottom of the springform pan over the pineapple layer. For added texture, freeze the crust for 10-15 minutes to help it firm up and create a sturdy base for the creamy cheesecake.
Step 4: Mix the Cheesecake Filling
In a large mixing bowl, beat softened cream cheese and granulated sugar with an electric mixer until smooth and creamy. Be sure to scrape down the sides of the bowl for an even mixture. This creamy consistency is crucial for the luxurious texture of your Pineapple Upside-Down Cheesecake.
Step 5: Add the Eggs
Gradually add eggs, one at a time, mixing slowly on low speed until just incorporated. Avoid over-mixing, as this could lead to cracks during baking. The mixture should remain light and fluffy, integrating beautifully with the cream cheese for a rich cheesecake filling.
Step 6: Incorporate Sour Cream and Vanilla
Next, stir in the sour cream and vanilla extract gently until well-combined. This addition not only enhances the flavor but also contributes to the cheesecake's moisture. The filling should be creamy and luscious, perfect for layering atop your prepared crust and pineapple.
Step 7: Assemble the Cheesecake
Pour the cheesecake mixture over the crust in the springform pan, using a spatula to smooth the top for an even finish. The layers of creamy cheesecake over the pineapple will create a delightful contrast when you slice into your Pineapple Upside-Down Cheesecake.
Step 8: Bake in a Water Bath
Place the springform pan into a larger baking dish and fill the outer dish with hot water halfway up the sides of the springform pan. Bake the cheesecake in the preheated oven for 60-70 minutes. The center should be set but with a slight jiggle, signaling it's perfectly baked.
Step 9: Cool the Cheesecake
Once baked, turn off the oven, crack the door open, and let the cheesecake cool slowly in the oven for about 1 hour. This gradual cooling process helps prevent any cracks from forming on the surface, ensuring your Pineapple Upside-Down Cheesecake looks as beautiful as it tastes.
Step 10: Chill Before Serving
After cooling, move the cheesecake to the refrigerator to chill for at least 4 hours or, ideally, overnight. This allows the flavors to meld beautifully and ensures a firm texture for slicing. The result will be a refreshing tropical dessert that's ready to shine at your next celebration.
Step 11: Release and Serve
When you’re ready to serve, run a knife around the edge of the cheesecake to loosen it from the pan. Release the springform carefully, and then invert the cheesecake onto a serving plate. The stunning pineapple topping will be beautifully visible, making your Pineapple Upside-Down Cheesecake a showstopper at the table.
Pineapple Upside-Down Cheesecake Variations
Feel free to add your own spin to this delightful recipe, making each slice uniquely yours!
- Berry Delight: Swap maraschino cherries for fresh raspberries or blueberries for a fruity burst.
- Coconut Twist: Add a splash of coconut extract to the filling for an enhanced tropical experience.
- Nutty Crust: Incorporate chopped walnuts or pecans into the graham cracker crust for a delightful crunch.
- Spiced Cheesecake: Mix in a pinch of cinnamon or nutmeg for a warm, spiced twist that sings of comfort.
- Caramel Drizzle: Top with a luscious caramel drizzle right before serving for extra sweetness.
- Zesty Surprise: Add lemon or lime zest to the cheesecake filling to brighten the flavor profile beautifully.
- Chocolate Indulgence: Stir in mini chocolate chips into the cheesecake mixture for a delightful surprise in every bite.
- Savory Touch: For a savory twist, consider adding a hint of goat cheese in the filling, balancing the sweetness with rich flavor.
With these ideas, your Pineapple Upside-Down Cheesecake can embark on a flavor adventure, appealing to every palate at your next gathering! Plus, don't forget to check out my expert tips for achieving the perfect texture that’ll wow your guests.
Storage Tips for Pineapple Upside-Down Cheesecake
Fridge: Store your Pineapple Upside-Down Cheesecake in an airtight container to keep it fresh for up to 5 days. This will help retain its creamy texture and flavors.
Freezer: To freeze, slice the cheesecake into individual portions and wrap each slice tightly in plastic wrap. Place the wrapped slices in a freezer-safe container for up to 3 months.
Thawing: When you're ready to enjoy your frozen cheesecake, thaw it in the refrigerator overnight. This ensures the cheesecake regains its creamy consistency without compromising flavor.
Reheating: For a warm slice, microwave it for about 15-20 seconds, or simply let it sit at room temperature for a bit before serving.
What to Serve with Pineapple Upside-Down Cheesecake
Treat your guests to an unforgettable dining experience by pairing this tropical dessert with delightful accompaniments.
-
Whipped Cream: A light and airy topping that adds a delightful contrast to the rich cheesecake, creating a beautiful balance of flavors.
-
Fresh Fruit Salad: Bright, juicy fruits like strawberries, kiwis, and mangoes provide a refreshing, vibrant side that complements the tropical theme.
-
Coconut Ice Cream: The creamy, sweet taste of coconut ice cream mirrors the cheesecake elements while enhancing the tropical experience. It's a dreamy pairing!
-
Toasted Coconut: Sprinkle some toasted coconut flakes over your cheesecake before serving for an added crunch and nuttiness reminiscent of beach vibes.
-
Pineapple Mojito: This refreshing cocktail made with fresh pineapple, mint, and lime will bring an invigorating twist and elevate your dessert to new heights.
-
Chocolate Drizzle: A rich chocolate drizzle across the top gives a luxurious and indulgent touch that beautifully contrasts with the fruity elements.
-
Macadamia Nut Cookies: These chewy, buttery cookies offer a delightful texture contrast and mirror the tropical notes in your cheesecake, inviting more smiles.
Pairing these delightful options with your Pineapple Upside-Down Cheesecake will create a celebration of flavors that invites heartfelt conversations and joyous memories around the table.
Expert Tips for Pineapple Upside-Down Cheesecake
-
Water Bath Essential: Always bake your cheesecake in a water bath; it helps maintain moisture levels and prevents those pesky cracks.
-
Cool Gradually: After baking, letting the cheesecake cool slowly in the oven makes a significant difference in avoiding surface cracks.
-
Chill Time Matters: For the best flavor and texture, chill the cheesecake overnight if possible. This allows the flavors to develop beautifully.
-
Perfect Slices: Warm your knife under hot water right before slicing to achieve clean, beautiful portions of your Pineapple Upside-Down Cheesecake.
-
Freezing the Crust: Briefly freezing the crust before adding the filling helps prevent it from becoming soggy and maintains that satisfying crunch.
Make Ahead Options
These Pineapple Upside-Down Cheesecake preparations are perfect for busy home cooks looking to save time! You can prepare the crust and the pineapple layer up to 24 hours in advance—simply press the graham cracker mixture into the pan and arrange the caramelized pineapple and cherries, then refrigerate. The cheesecake filling can also be mixed ahead and stored in an airtight container in the refrigerator for up to 3 days. When you’re ready to complete your dessert, pour the filling over the prepared crust and bake as instructed. Trust me, this dessert will be just as delicious, ensuring you have a showstopping treat at your celebration without the last-minute rush!
Pineapple Upside-Down Cheesecake Recipe FAQs
What type of pineapple should I use?
I recommend using canned pineapple rings for consistency and sweetness, as they are already soft and have been conveniently cooked in their syrup. If you prefer fresh pineapple, slice it thin and sauté it briefly in butter and brown sugar to achieve a similar caramelized flavor.
How long can I store leftovers?
Store your Pineapple Upside-Down Cheesecake in an airtight container in the refrigerator for up to 5 days. This will help maintain its creamy texture and delicious flavors. Just be sure to keep it covered to avoid moisture loss and prevent any fridge odors from mingling with your dessert!
Can I freeze this cheesecake?
Absolutely! To keep your Pineapple Upside-Down Cheesecake at its best, slice it into individual portions and wrap each slice tightly in plastic wrap. Place them in a freezer-safe container for up to 3 months. When you’re ready to enjoy, simply thaw a slice in the refrigerator overnight for the best texture.
What if my cheesecake cracks during baking?
If you notice cracks forming, don’t worry too much! They’re pretty common but can be avoided by baking your cheesecake in a water bath, which helps regulate the temperature and moisture. Cooling the cheesecake slowly in the oven after baking also works wonders. Next time, remember to mix thoroughly but slowly when incorporating the eggs to keep your batter light and airy!
Is this cheesecake safe for those with allergies?
This Pineapple Upside-Down Cheesecake contains dairy and eggs, which are common allergens. If you're serving guests with allergies, consider using lactose-free cream cheese and a suitable sugar alternative for those with dietary restrictions. Always check the specific products you use for potential allergens, especially if you’re serving someone with a severe allergy.
How do I get neat slices?
For perfect, clean slices, warm a sharp knife under hot water before cutting into your cheesecake. Wipe the knife clean between cuts to maintain those beautiful layers and avoid any messy edges. This is a simple trick that makes a big difference in presentation!
Pineapple Upside-Down Cheesecake: A Tropical Dream Dessert
Ingredients
Equipment
Method
- Preheat your oven to 325°F (163°C). Grease a 9-inch springform pan with non-stick spray or butter and sprinkle an even layer of brown sugar over the bottom.
- Arrange pineapple rings on top of the brown sugar layer in the springform pan, placing a maraschino cherry in the center of each pineapple ring.
- Combine graham cracker crumbs with melted unsalted butter until mixed. Press the mixture into the bottom of the springform pan over the pineapple layer. Freeze for 10-15 minutes.
- Beat softened cream cheese and granulated sugar until smooth and creamy. Scrape down the sides for an even mixture.
- Gradually add eggs, one at a time, mixing slowly on low speed. Avoid over-mixing to prevent cracks.
- Stir in sour cream and vanilla extract until well-combined. The filling should be creamy and luscious.
- Pour the cheesecake mixture over the crust in the springform pan and smooth the top with a spatula.
- Place the springform pan into a larger dish and fill it with hot water halfway up the sides. Bake for 60-70 minutes.
- Turn off the oven, crack the door, and let the cheesecake cool slowly in the oven for about 1 hour.
- Chill the cheesecake in the refrigerator for at least 4 hours or ideally overnight before serving.
- Run a knife around the edge of the cheesecake to loosen it, release the springform, and invert onto a serving plate.


Leave a Reply