
As I whipped up a batch of Mom's Cream Horns recently, I was transported back to my childhood kitchen, where the air was filled with the sweet scent of baking and laughter. These delightful pastries, with their flaky puff pastry and velvety cream filling, are a true testament to homemade comfort. What I love most is how easy these cream horns are to make, and the best part? They’re fully customizable, allowing everyone to create their perfect treat, whether they opt for rich heavy cream or light Cool Whip. These creamy, dreamy delights not only make for an impressive dessert at gatherings but also serve as a nostalgic indulgence you can enjoy right at home. Are you ready to fill your kitchen with warmth and sweetness? Let’s dive into this recipe!
Why Are Mom’s Cream Horns Irresistible?
Easy to Make: This recipe is perfect for bakers of all skill levels, allowing you to whip up delightful treats without fuss.
Customizable Fillings: Choose between rich heavy cream for indulgence or light Cool Whip for a lighter touch, ensuring everyone’s preferences are satisfied.
Nostalgic Comfort: Each bite brings back childhood memories, making them a perfect dessert for family gatherings or cozy nights in.
Versatile Options: With possibilities like gluten-free and dairy-free variations, everyone can enjoy these creamy delights.
So, whether you’re exploring flavors with Peaches Cream Cookies or creating a cooling dessert with Vegan Cacao Cream, Mom's Cream Horns will quickly become a favorite in your recipe collection!
Mom’s Cream Horns Ingredients
For the Puff Pastry
- Puff Pastry Sheets – Provides flaky structure; ready-made saves you time in the kitchen.
For the Cream Filling
- Cream Cheese – Offers a creamy flavor essential for the filling; ensure it's softened for easy mixing.
- Cold Heavy Cream – Adds lightness and fluffiness to the filling; crucial for achieving that dreamy texture.
- Powdered Sugar – Sweetens the cream filling, ensuring smoothness; regular granulated sugar can work in a pinch.
- Vanilla Extract – Enhances the overall flavor profile of the filling with a hint of warmth.
- Sea Salt – Balances the sweetness, bringing out all the delicious flavors.
For the Light Filling Option
- Cool Whip – Use if seeking a lighter filling texture; perfect for those who prefer a fluffier cream.
Remember, the perfect Mom's Cream Horns come down to the quality of your ingredients and the love you put into making them!
Step‑by‑Step Instructions for Mom’s Cream Horns
Step 1: Preheat and Prepare
Begin by preheating your oven to 400°F (204°C). While the oven heats, take your thawed puff pastry sheets and roll them out on a lightly floured surface. You want the pastry to be smooth and even, so use a rolling pin for best results. Once rolled, cut the pastry into ¾ inch wide strips, ensuring they are uniform for even baking.
Step 2: Shape the Pastry
Take the strips of puff pastry and carefully wrap each one around a horn mold, slightly overlapping the edges as you go. This will create a cone shape essential for forming your Mom’s Cream Horns. Ensure that the pastry clings well to the mold to maintain its form during baking. Once all strips are wrapped, you're ready for the oven.
Step 3: Bake the Shells
Place the prepared cream horn molds on a baking sheet lined with parchment paper. Bake in the preheated oven for approximately 18 minutes or until the pastry is a light golden brown, puffed up beautifully. Keep an eye on them towards the end of the baking time, as they may brown quickly.
Step 4: Cool and Prepare
Once baked, remove the cream horn molds from the oven and let them cool for a couple of minutes. While they're still warm, carefully remove the pastry from the molds and transfer them to a wire rack. Allow your buttery shells to cool completely, which is essential before filling them with the luscious cream.
Step 5: Make the Cream Filling
In a mixing bowl, beat the softened cream cheese until it's smooth and creamy. Gradually add the powdered sugar, mixing well between additions to achieve a silky texture. Once combined, add a splash of vanilla extract and a pinch of sea salt to enhance the flavor profile of your filling for Mom’s Cream Horns.
Step 6: Incorporate Heavy Cream
Next, pour in the cold heavy cream to the cream cheese mixture. Using a handheld mixer or a whisk, beat the mixture until it thickens and achieves a light, fluffy texture akin to soft peaks. If you prefer a lighter filling, you can fold in Cool Whip instead of heavy cream for a delightful alternative.
Step 7: Fill the Pastry Horns
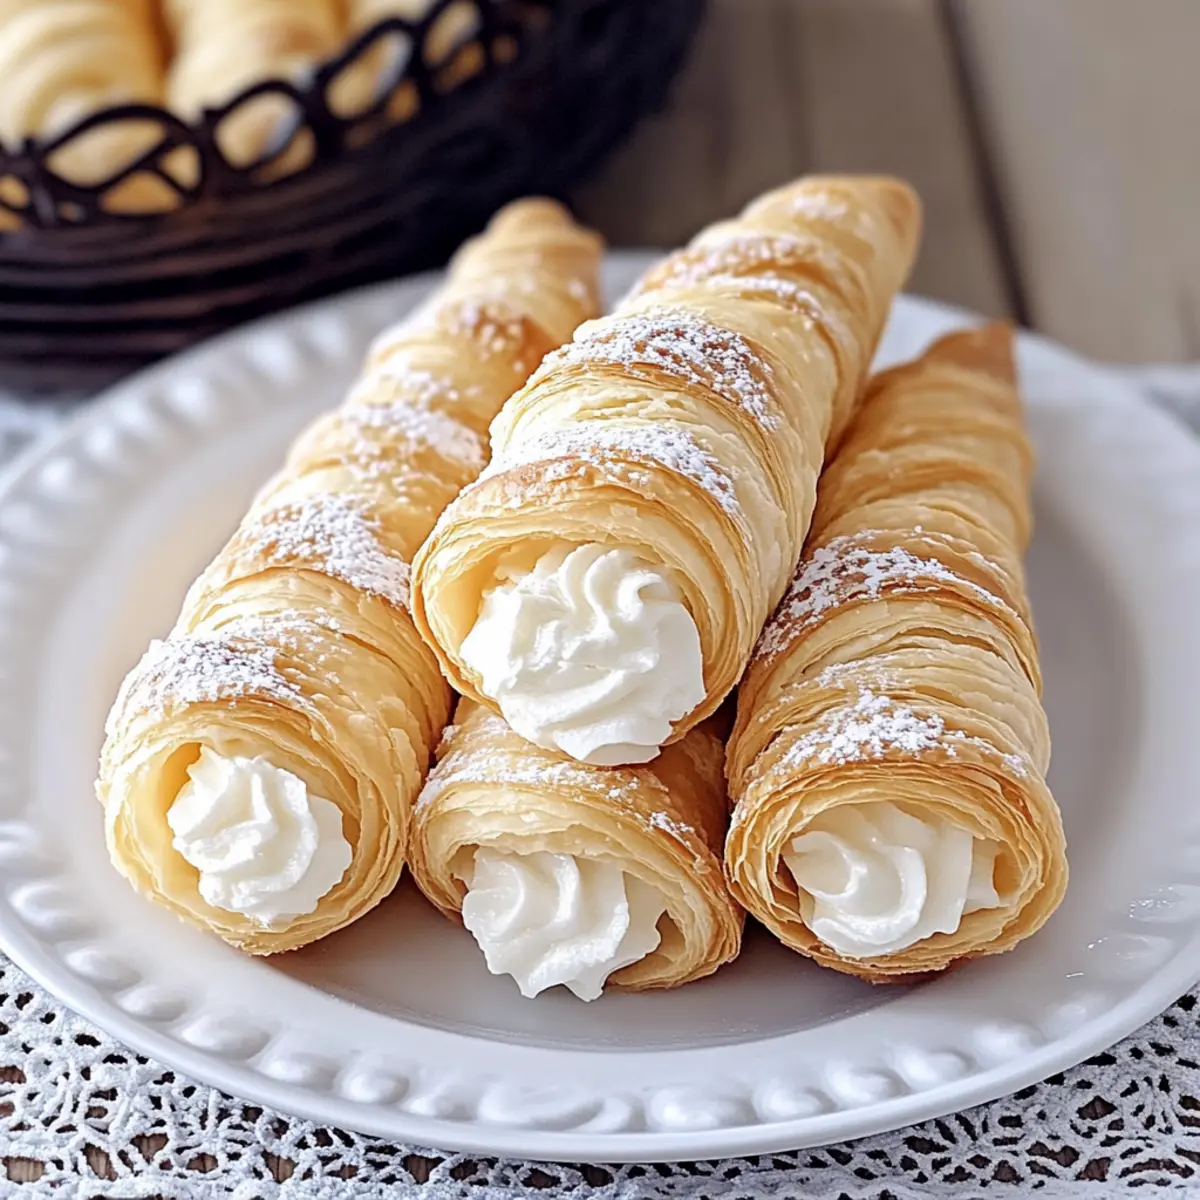
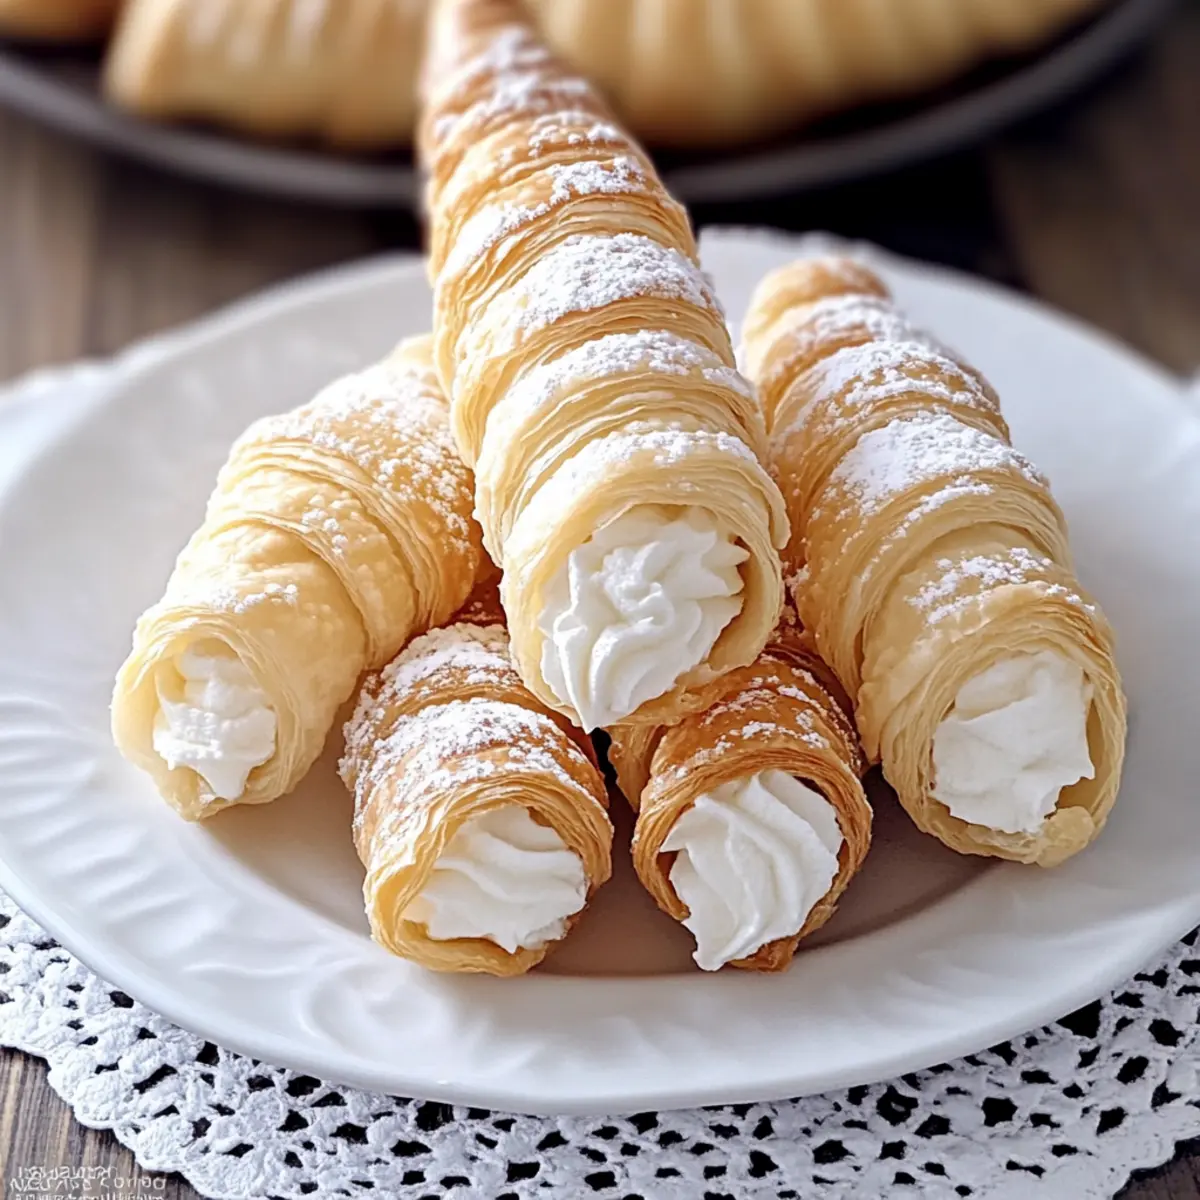
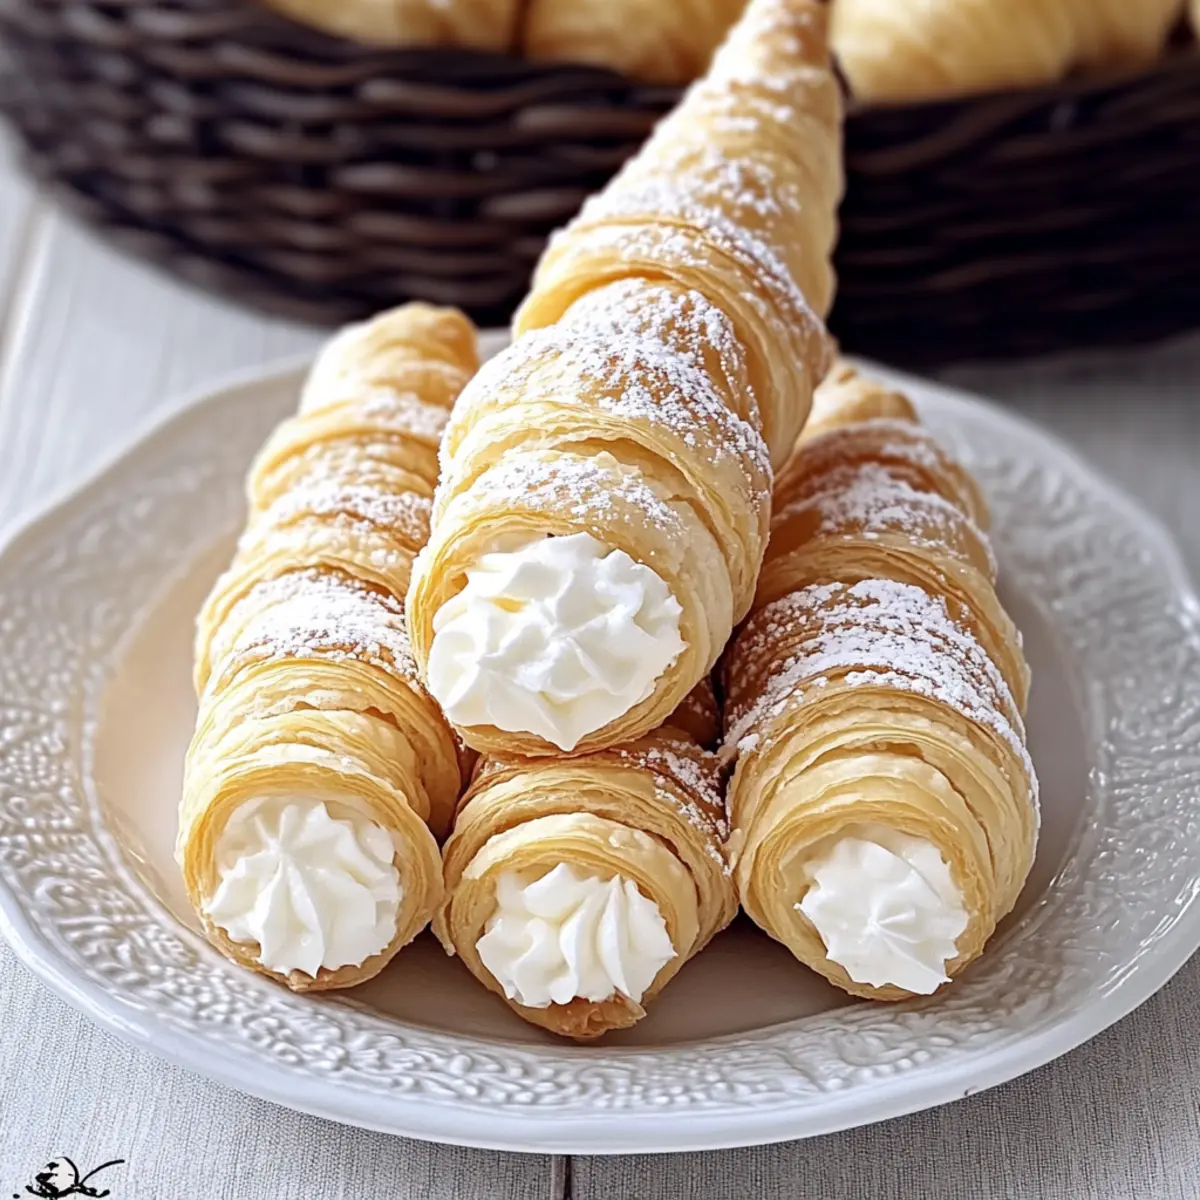
Once your pastry shells are entirely cool, take your cream filling and transfer it into a piping bag fitted with a star tip. Pipe the delicious cream into each horn, starting from the base and filling to the tip to ensure they’re generously packed. Make sure to fill them evenly for the best presentation and taste.
Step 8: Chill Before Serving
After filling each of the cream horns, place them in the refrigerator and let them chill for at least 8 hours. This step not only melds the flavors together but also helps the filling set properly. Just before serving, dust the tops lightly with powdered sugar for an elegant finish.
Mom’s Cream Horns Customization Ideas
Unleash your inner chef and create personalized flavors with these delightful twists!
- Gluten-Free: Substitute with gluten-free puff pastry, allowing everyone to join in on the fun. This ensures a similar, flaky texture that’s just as enjoyable.
- Dairy-Free: Opt for non-dairy cream cheese and coconut cream for a delicious vegan-friendly filling, perfect for those who are lactose intolerant.
- Flavor Boost: Add a teaspoon of almond extract or lemon zest into the filling for an extra burst of delightful flavor. Imagine the refreshing touch it gives!
- Chocolate Lovers: Fold in mini chocolate chips or cacao nibs to the cream mixture for a decadently rich twist sure to impress chocolate enthusiasts.
- Fruit-Filled: Mix in fruit purees like raspberry or strawberry to the cream filling for a fresh, fruity surprise that brightens every bite.
- Nutty Crunch: Sprinkle crushed nuts or cookie crumbs on top of your filled cream horns for an added layer of texture. It’s a delightful contrast that jazzes up the dessert!
- Spiced Delight: Incorporate a dash of cinnamon or nutmeg for a warm and comforting flavor that enhances the sweetness of the cream.
- Savory Twist: Experiment with adding a touch of goat cheese for a unique savory filling that surprises and delights your taste buds.
And if you're in the mood for more creamy goodness, why not explore making some Cajeta Ice Cream or indulge in a luscious Ice Cream Cake? There are countless ways to keep your dessert game exciting!
How to Store and Freeze Mom’s Cream Horns
-
Fridge: Store filled Mom’s Cream Horns in an airtight container for up to 3 days. This keeps the pastry soft and ensures the creamy filling stays fresh.
-
Freezer: Unfilled pastry shells can be frozen for up to 3 months. Wrap them tightly in plastic wrap to prevent freezer burn for a future treat.
-
Reheating: If you prefer the pastry warm, gently reheat unfilled shells in a 350°F (175°C) oven for about 5 minutes. Avoid reheating filled horns, as this can melt the cream.
-
Make-Ahead Tips: Prepare and freeze unfilled shells ahead of time, then whip up the filling fresh before serving for an irresistible dessert at a moment's notice!
Expert Tips for Mom’s Cream Horns
-
Bake in Batches: Avoid overcrowding the oven by baking the pastry horns in batches. This ensures even baking and a perfect golden crust.
-
Use a Piping Bag: For a professional and neat filling, use a piping bag fitted with a star tip. This allows for even distribution of the creamy filling in each Mom’s Cream Horn.
-
Cool Completely: It's crucial to let your baked pastry shells cool completely before filling. This prevents the cream from melting and ensures a delightful contrast in textures.
-
Adjust Sweetness: Taste your cream filling before piping. If you desire a sweeter touch, fold in a bit more powdered sugar to meet your preference.
-
Experiment with Flavors: Feel free to customize the filling by adding extracts, fruits, or chocolate for a delicious twist on the classic Mom’s Cream Horns.
Make Ahead Options
These Mom's Cream Horns are perfect for meal prep, making them a delightful choice for busy home cooks! You can prepare the puff pastry shells up to 24 hours in advance. Simply bake and cool the horns, then store them in an airtight container at room temperature to maintain their crispy texture. Additionally, the cream filling can be made up to 3 days ahead; just refrigerate tightly covered to keep it fresh and fluffy. When you're ready to serve, fill the cooled pastry shells with the cream and allow to chill in the refrigerator for at least 8 hours before enjoying—this way, they remain just as delicious and impressive, with minimal effort on your part!
What to Serve with Mom's Cream Horns
Looking to create a delightful meal that pairs beautifully with these creamy pastries?
-
Fresh Berries: Adding fresh strawberries, blueberries, or raspberries provides a burst of tartness that complements the sweetness of the cream horns. Their juicy freshness brings a vibrant touch to every bite.
-
Rich Hot Chocolate: A steaming cup of hot chocolate adds warmth and indulgence. The rich flavor of chocolate balances the sweetness, making it the perfect sipping companion alongside your cream horns.
-
Vanilla Ice Cream: The creamy texture of vanilla ice cream contrasts nicely with the light and crispy pastry. It melts beautifully with each bite, creating a delightful harmony of flavors.
-
Coffee or Espresso: A robust coffee or shot of espresso enhances the experience. The bitterness cuts through the sweetness and elevates the taste, proving to be the perfect after-dinner drink.
-
Lemon Sorbet: For a refreshing palate cleanser, lemon sorbet offers a zesty contrast. Its bright, citrusy flavor refreshes your taste buds after the rich cream filling.
-
Chocolate Drizzle: A light drizzle of melted chocolate over the cream horns adds a touch of elegance and enhances their decadence. It’s a fun and delicious way to accommodate chocolate lovers.
-
Fruit Salad: A medley of seasonal fruits brings a refreshing crunch to the table. The natural sweetness of the fruits complements the creamy dessert without overwhelming it.
-
Champagne: For a celebratory touch, pair with a glass of sparkling champagne. The bubbles create a lovely nod to special occasions while cutting through the richness of the cream horns.
-
Matcha Tea: Try serving a warm cup of matcha tea for an earthy balance. Its subtle flavor enhances the overall experience without overshadowing the sweetness of your Mom's Cream Horns.

Mom's Cream Horns Recipe FAQs
How do I choose ripe ingredients for my Mom's Cream Horns?
Absolutely! When selecting ingredients, ensure your cream cheese is fresh and at room temperature for easy mixing. If using heavy cream, look for a carton marked "heavy whipping cream" with a fat content of at least 36%. For the puff pastry, ensure it's kept frozen until you’re ready to use it, but it should be perfectly thawed and pliable during assembly.
What’s the best way to store Mom's Cream Horns?
You’ll want to store filled Mom's Cream Horns in an airtight container in the refrigerator for up to 3 days. This method keeps the pastry soft and the filling fresh. If you’re not filling them right away, unfilled shells can be frozen for up to 3 months—just wrap them tightly in plastic wrap to prevent freezer burn!
Can I freeze the filled Mom's Cream Horns?
I don't recommend freezing filled cream horns as the cream filling can become watery upon thawing, altering their delightful texture. Instead, I suggest preparing the pastry shells in advance and freezing them, then whip up the filling fresh before serving. This keeps everything tasting creamy and delicious!
What should I do if my pastry shells are soggy?
Very! If your pastry shells end up soggy, it may be due to excess moisture. Ensure that you let the shells cool completely to room temperature before filling them. For a crispier shell, you can also bake them a few extra minutes until they are golden brown, checking often to prevent burning. If they're still soggy, next time you can sprinkle a light layer of powdered sugar inside the hollow to absorb moisture.
Are there any dietary considerations for Mom's Cream Horns?
Yes, absolutely! For those looking for gluten-free options, simply substitute with gluten-free puff pastry. If you're catering to a dairy-free or vegan audience, you can use non-dairy cream cheese and coconut cream for the filling. You can even get creative and add fun flavorings like almond extract or lemon zest!
How long should I chill the filled Mom's Cream Horns before serving?
For the best flavor and texture, chill your filled Mom's Cream Horns in the refrigerator for at least 8 hours before serving. This helps the filling set beautifully and allows the flavors to meld together, resulting in an unforgettable treat, reminiscent of warm childhood memories!
Mom’s Cream Horns: A Whimsical Dessert You’ll Adore
Ingredients
Equipment
Method
- Preheat your oven to 400°F (204°C) and roll out puff pastry sheets on a floured surface. Cut into ¾ inch wide strips.
- Wrap each strip around a horn mold, overlapping edges slightly to create a cone shape.
- Bake molds on a lined baking sheet for approximately 18 minutes or until golden brown.
- Remove from the oven, let cool for a few minutes, then transfer to a wire rack to cool completely.
- Beat softened cream cheese in a bowl until smooth, gradually mixing in powdered sugar, vanilla, and sea salt.
- Add cold heavy cream to the mixture and beat until fluffy; alternatively, fold in Cool Whip for a lighter filling.
- Once cooled, fill a piping bag with cream and pipe into each horn, starting from the base.
- Chill the filled horns in the refrigerator for at least 8 hours before serving, dusting with powdered sugar before serving.


Leave a Reply