
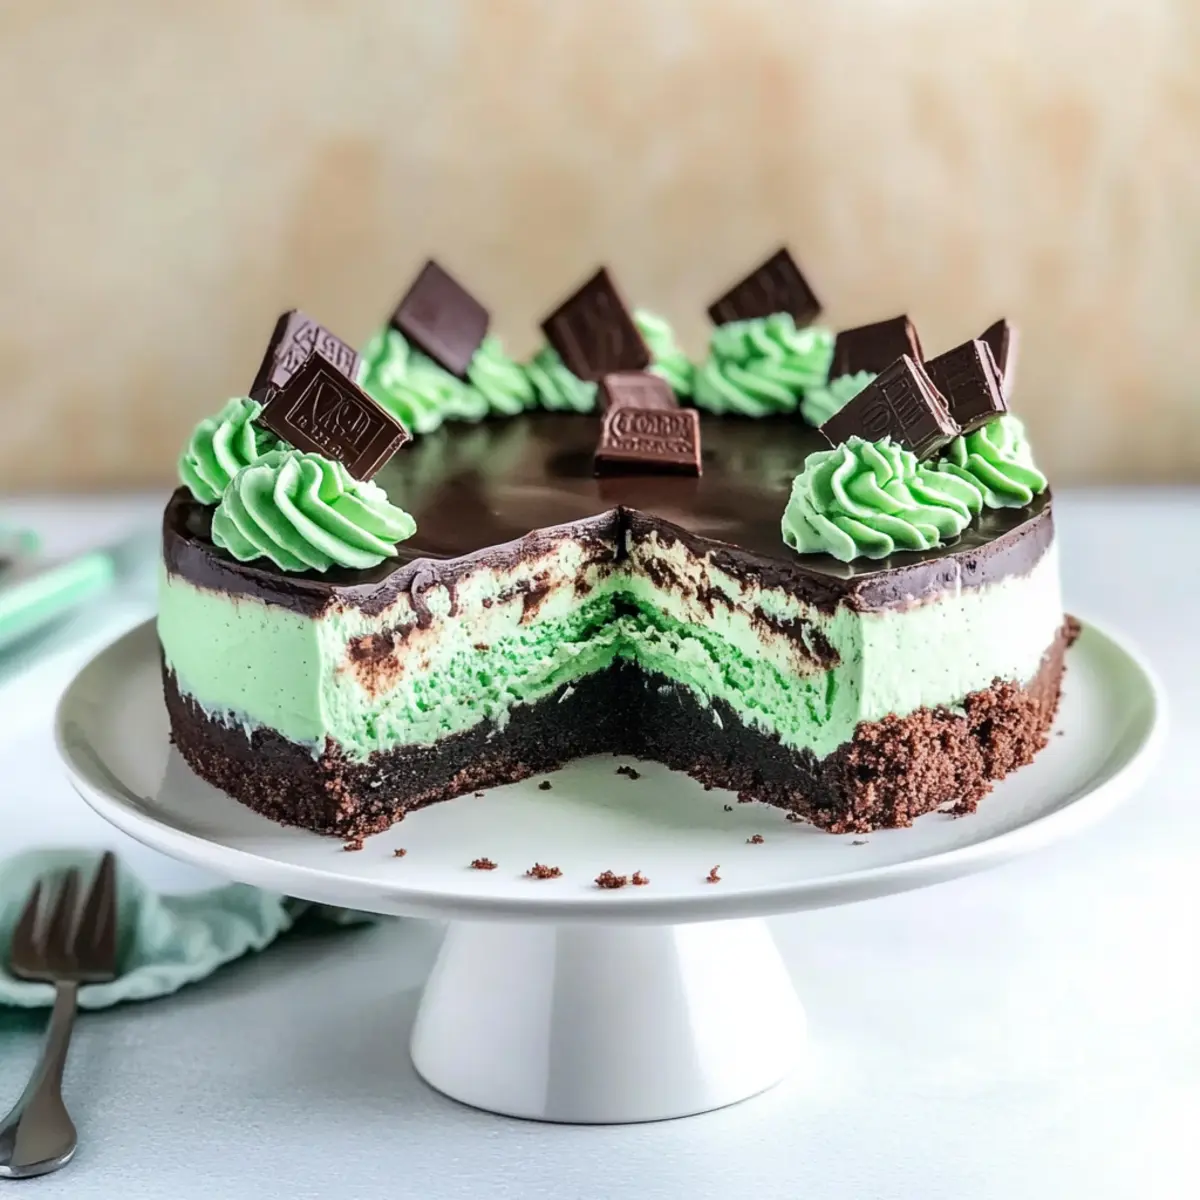
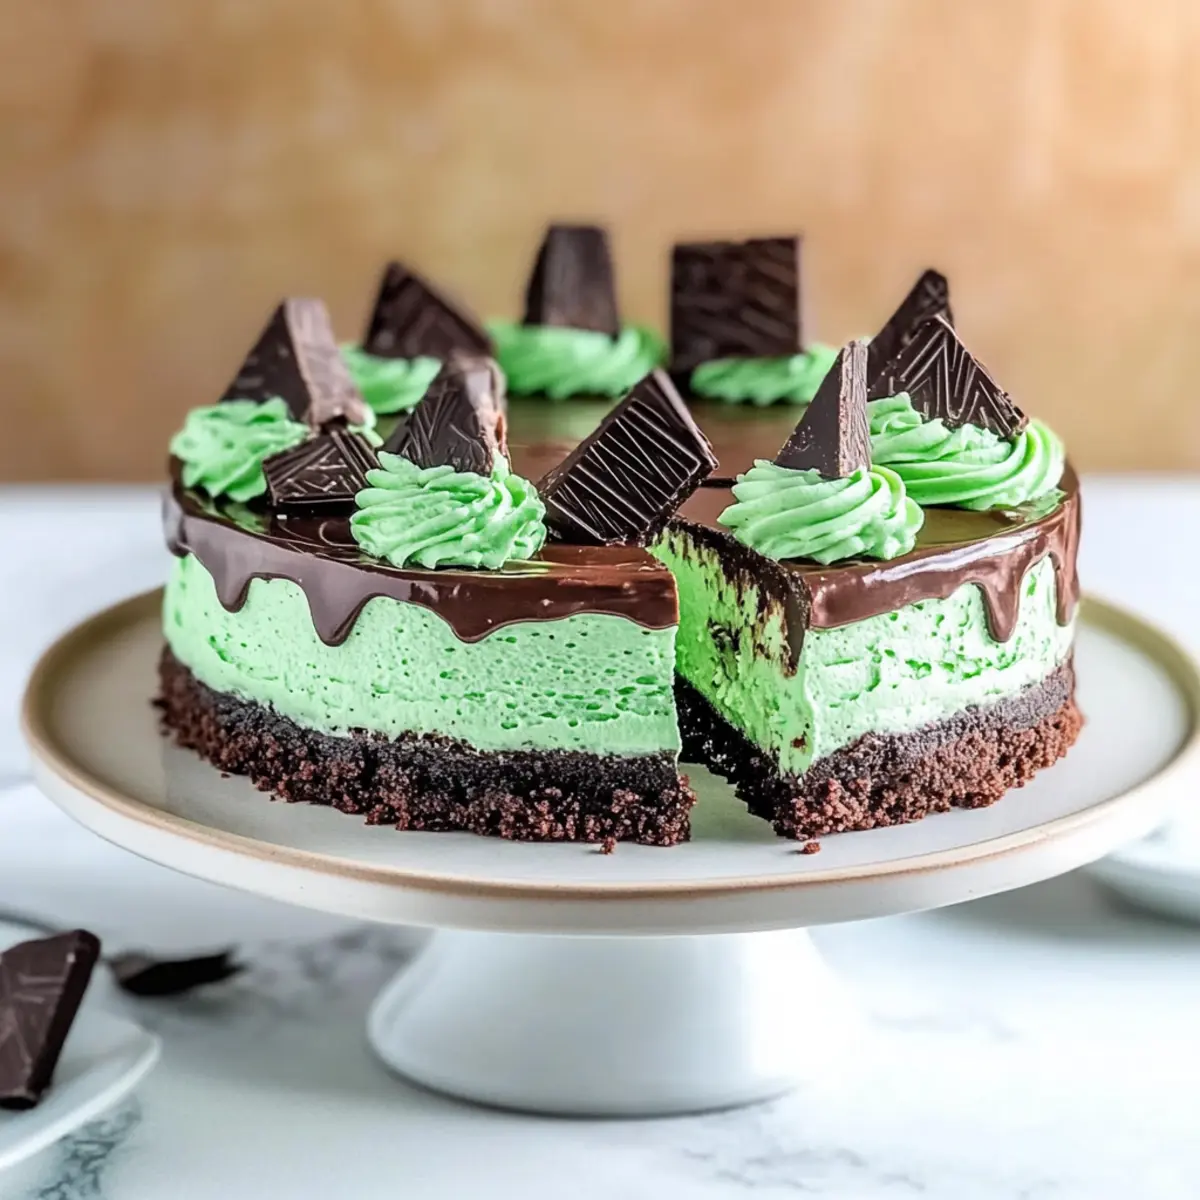
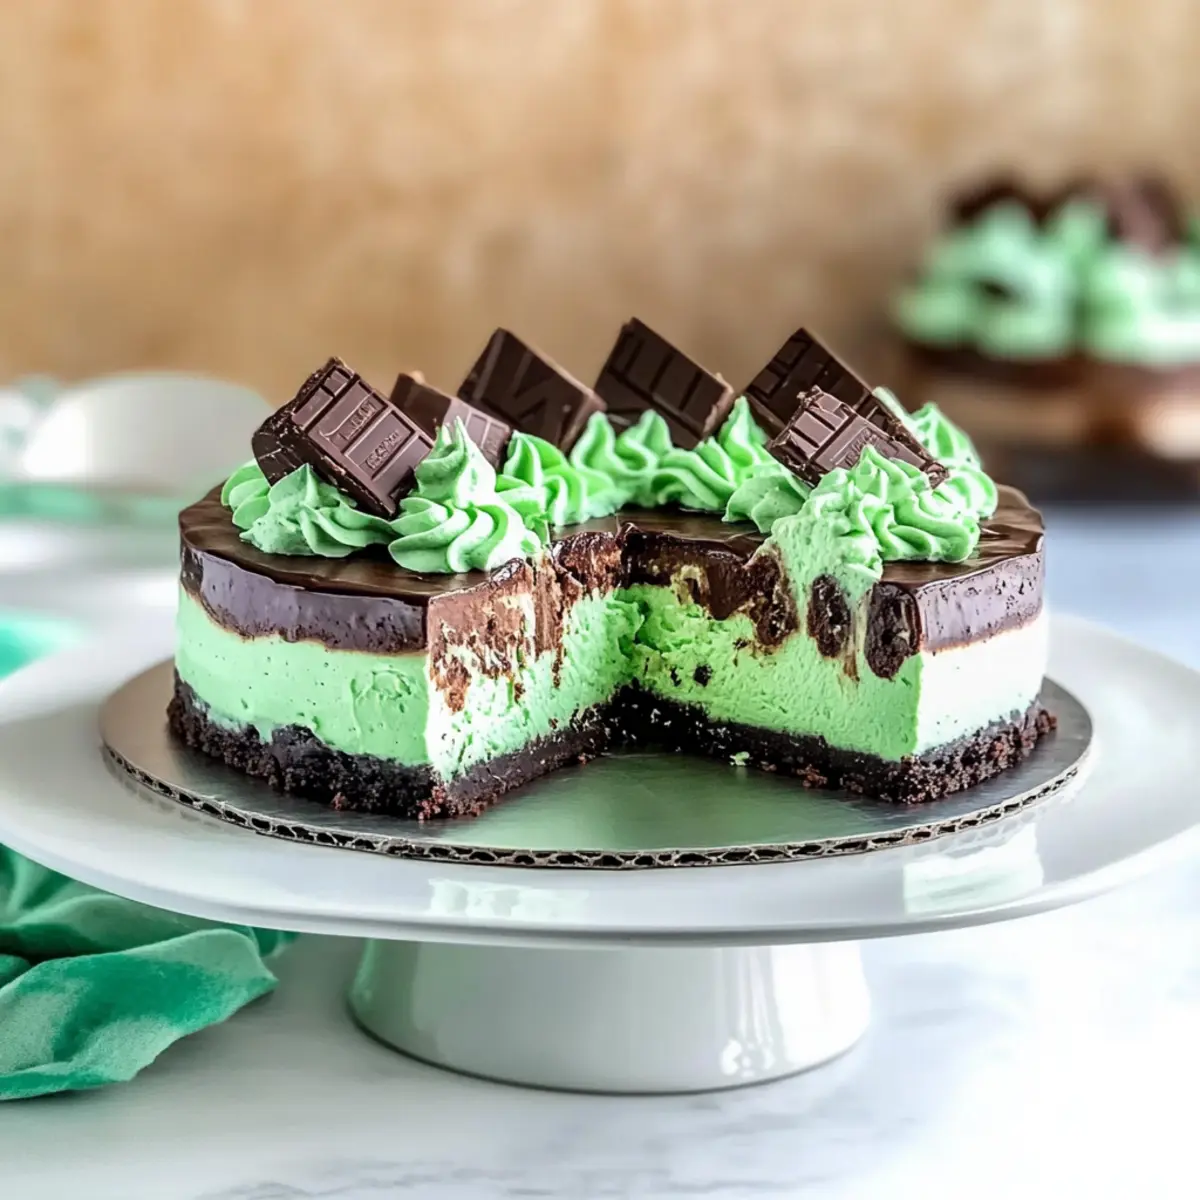
As I poured the rich chocolate ganache over my Mint Chocolate Cheesecake, memories of holiday gatherings flooded back. This stunning dessert is inspired by those delightful Andes mints we all love, blending cool mint with velvety chocolate for a truly irresistible treat. With its gluten-free Oreo crust, this Mint Chocolate Cheesecake offers the perfect balance of rich creaminess and refreshing flavor, making it an ideal choice for birthdays or any celebration. Plus, it's a breeze to prepare, ensuring you can wow your guests without spending all day in the kitchen. But what truly sets this recipe apart is how each slice delivers a joyful mix of textures and tastes. Are you ready to create a dessert that will have everyone asking for seconds?
Why Is This Cheesecake So Irresistible?
Decadent layers: The Mint Chocolate Cheesecake combines smooth mint-infused cream cheese with rich chocolate ganache, creating an explosion of flavor in every bite.
Gluten-free goodness: With a gluten-free Oreo crust, everyone can indulge, making it perfect for gatherings or a cozy night in.
Quick preparation: You’ll appreciate how this treat comes together easily, allowing you to spend more time enjoying it with loved ones.
Celebration-worthy: Whether for birthdays, holidays, or just because, this cheesecake's vibrant taste and stunning presentation are sure to impress.
Don’t forget to try some of our other delightful desserts like Homemade Hot Chocolate to accompany this cheesecake!
Mint Chocolate Cheesecake Ingredients
-
For the Crust
-
Oreo cookies – Provides the perfect base for a crunchy, sweet crust; opt for gluten-free if needed.
-
Unsalted butter – Binds the crust together, ensuring a firm and buttery foundation.
-
For the Cheesecake Batter
-
Cream cheese – The star of the show, offering a rich, creamy texture; make sure it's at room temperature for easy blending.
-
Granulated sugar – Sweetens the cheesecake, balancing out the minty and chocolatey flavors.
-
Sour cream – Adds moisture and a slight tang that enhances the overall creaminess.
-
Vanilla extract – Infuses warm undertones, elevating the flavor profile beautifully.
-
Mint or peppermint extract – The main flavoring agent; use mint for a softer flavor or peppermint for a bold kick.
-
Salt – Enhances all flavors, bringing harmony to the sweetness.
-
Eggs – Provides stability to the cheesecake; have them at room temperature for best results.
-
Green food coloring – Optional, but adds a festive touch; use sparingly to avoid overwhelming the color.
-
Andes mints – Chopped pieces create bursts of minty flavor throughout the batter.
-
For the Ganache and Topping
-
Chocolate chips or chopped chocolate – Forms the base for the rich ganache, adding luxurious chocolate depth.
-
Heavy cream – Used for both ganache and whipped cream, ensuring a velvety texture.
-
Confectioners' sugar – Sweetens whipped cream and stabilizes its texture for perfect peaks.
Get ready to dive into this incredible Mint Chocolate Cheesecake, guaranteed to elevate your dessert game and leave everyone craving more!
Step‑by‑Step Instructions for Mint Chocolate Cheesecake
Step 1: Prepare the crust
Preheat your oven to 350°F (175°C). Crush 24 Oreo cookies in a food processor until they resemble fine crumbs. Mix the cookie crumbs with 1/2 cup of melted unsalted butter until well combined. Press this mixture firmly into the bottom of a 9-inch springform pan to form an even layer. Bake the crust for 10 minutes, then reduce the oven temperature to 325°F (163°C).
Step 2: Make the cheesecake batter
In a large mixing bowl, beat 24 ounces of room-temperature cream cheese and 1 cup of granulated sugar with an electric mixer until smooth and creamy. Add in 1 cup of sour cream, 1 teaspoon of vanilla extract, 1 teaspoon of mint extract, and a sprinkle of salt. Mix until fully integrated. Gradually add 3 large room-temperature eggs, mixing minimally after each addition to prevent air pockets.
Step 3: Incorporate the special ingredients
Gently fold in a couple of drops of green food coloring and 1 cup of chopped Andes mints into your cheesecake batter. Ensure the mints are evenly distributed throughout the mixture, creating bursts of flavor in your Mint Chocolate Cheesecake. Avoid over-mixing the batter at this stage to maintain a smooth, rich texture.
Step 4: Prepare the baking pan
Wrap the outside of the springform pan with aluminum foil to create a water bath. Place the wrapped pan inside a larger baking dish filled with hot water, creating a gentle steam environment that helps the cheesecake bake evenly. Pour the cheesecake batter into the prepared crust, smoothing the top with a spatula.
Step 5: Bake the cheesecake
Bake your Mint Chocolate Cheesecake in the preheated oven for 70 minutes at 325°F (163°C). The edges should appear firm while the center remains slightly jiggly. Once baked, turn off the oven and let the cheesecake cool inside with the door slightly ajar for about 30 minutes to prevent cracking.
Step 6: Chill the cheesecake
After cooling, allow your cheesecake to reach room temperature before transferring it to the refrigerator. Chill the cheesecake for at least 4 hours, but overnight is best to achieve optimal flavor and texture. This cooling step allows the cheesecake to set and become easier to slice.
Step 7: Prepare the ganache
In a microwave-safe bowl, combine 1 cup of chocolate chips or chopped chocolate with 1/2 cup of heavy cream. Microwave in 30-second intervals, stirring after each, until the mixture is smooth and glossy. Once your cheesecake has chilled and set, pour the ganache over the top, spreading it evenly to coat the surface.
Step 8: Make the whipped cream
Using a clean mixing bowl, whip 1 cup of heavy cream with 1/4 cup of confectioners' sugar and 1/2 teaspoon of mint extract until stiff peaks form. This airy whipped cream will add a delightful touch atop your Mint Chocolate Cheesecake. Decorate the cheesecake generously with the whipped cream, adding any additional garnishes like chocolate shavings or sprigs of mint as desired.

Make Ahead Options
These Mint Chocolate Cheesecake slices are perfect for meal prep, making your busy weeknights a whole lot easier! You can prepare the cheesecake batter up to 24 hours in advance; simply mix everything together and store it in the refrigerator until you’re ready to pour it into the crust. Additionally, you can make the ganache up to 3 days ahead and keep it covered in the fridge. When you’re ready to serve, just bake the cheesecake and allow it to chill overnight for the best flavor and texture. This way, you’ll achieve that luscious, rich taste without the last-minute hassle, keeping your dessert just as delicious as if you made it fresh!
Mint Chocolate Cheesecake Variations
Feel free to get creative and put your own spin on this delightful Mint Chocolate Cheesecake!
-
Dairy-Free: Substitute the cream cheese and heavy cream with dairy-free alternatives like cashew cream for a non-dairy option. The flavors will still be vibrant and enjoyable!
-
Nut Crust: Swap the Oreo crust for a mixture of crushed nuts and dates for a gluten-free and healthier twist. This adds a delightful crunch and a touch of natural sweetness.
-
Different Mints: Play around with various mint candies, such as Junior Mints or peppermint patties, to change up the flavor and texture of each slice.
-
Chocolate Ganache Variation: Add a splash of coffee or espresso powder to the chocolate ganache for an enriched flavor that pairs beautifully with chocolate and mint.
-
Flavorful Swirls: Swirl in some raspberry or strawberry puree into the cheesecake batter before baking for a fruity twist that contrasts well with the creamy mint.
-
Extra Chocolate: Consider adding mini chocolate chips or chunks throughout the cheesecake batter for additional bursts of chocolate goodness in every bite!
-
Spicy Mint: Add a pinch of cayenne pepper to the batter for a fun, spicy kick that complements the mint beautifully. Just a tiny bit will elevate the flavor!
-
Layered Delight: Create a layered effect by alternating layers of mint cheesecake with chocolate cheesecake for an indulgent combination that will captivate flavor lovers.
Each of these ideas can elevate your Mint Chocolate Cheesecake experience. And if you're inspired to try another delightful dessert, don’t forget to check out our German Chocolate Poke recipes for more sweet inspiration!
What to Serve with Mint Chocolate Cheesecake
The perfect companion to your decadent dessert awaits, enhancing each delicious bite with vibrant flavors and comforting textures.
- Fresh Berries: Sweet, juicy berries like raspberries or strawberries add a refreshing contrast to the rich cheesecake, providing a burst of tartness.
- Chocolate Ganache Drizzle: Extra ganache on the plate not only looks stunning but amplifies the chocolate flavor, making every slice even more indulgent.
- Vanilla Ice Cream: Creamy vanilla ice cream perfectly balances the minty cheesecake, creating a delightful melting sensation in your mouth.
- Mint Tea: A warm cup of mint tea enhances the mint experience, offering a soothing finish to your rich dessert.
- Espresso or Coffee: Rich coffee or espresso serves as a bold counterpart that balances the sweetness, perfect for your post-dinner treat.
- Whipped Cream: A dollop of freshly whipped cream adds a light, airy texture, elevating the creaminess of the cheesecake and creating visual appeal.
- Chocolate-Covered Almonds: Crunchy chocolate-covered almonds lend a delightful contrast in texture and an irresistible nutty flavor, enhancing the overall tasting experience.
- Mint Sprigs for Garnish: Bright green mint leaves not only freshen the presentation but also offer an aromatic hint that complements your cheesecake beautifully.
- Chocolate Mousse: A small serving of airy chocolate mousse brings an extra layer of chocolate indulgence. This delightful pairing can make your dessert table truly memorable.
How to Store and Freeze Mint Chocolate Cheesecake
Fridge: Store leftover slices of your Mint Chocolate Cheesecake wrapped in plastic or in an airtight container for up to 5 days. This keeps the cheesecake fresh and delicious.
Freezer: For longer storage, freeze your cheesecake for up to 3 months. Remove the whipped cream before freezing, and wrap it tightly in plastic and aluminum foil to prevent freezer burn.
Thawing: To enjoy frozen cheesecake, transfer it to the fridge and let it thaw overnight. Avoid rapid temperature changes to maintain its creamy texture.
Reheating: If you want to enjoy it slightly warm, let it come to room temperature and serve, or microwave a slice for 10-15 seconds—and voila, your Mint Chocolate Cheesecake is ready to delight again!
Expert Tips for Mint Chocolate Cheesecake
-
Room Temperature Ingredients: Ensure all cheesecake components, especially cream cheese and eggs, are at room temperature to achieve a creamy texture and prevent cracks.
-
Gentle Mixing: When adding eggs, mix minimally to avoid incorporating too much air, which can lead to cracking during baking.
-
Crust Variations: For a stronger mint flavor, consider using mint-flavored Oreos for the crust. This step enhances the overall mintiness of your Mint Chocolate Cheesecake.
-
Careful Color Adding: If using green food coloring, start with a drop or two. You can always add more for a richer hue, but it's hard to lighten a vivid color.
-
Cooling Tips: Allow the cheesecake to cool gradually to room temperature before refrigerating. This helps minimize temperature shocks that can cause cracks.
-
Water Bath Method: Don’t skip the water bath! This technique helps the mousse-like texture of the cheesecake and prevents it from drying out.
Mint Chocolate Cheesecake Recipe FAQs
What type of Oreos should I use for the crust?
You can use regular or gluten-free Oreos for the crust of your Mint Chocolate Cheesecake. If you want to enhance the mint flavor, try using mint-flavored Oreos instead—this will add an extra burst of mintiness that pairs beautifully with the cheesecake!
How should I store leftover cheesecake?
Store any leftover slices of Mint Chocolate Cheesecake in an airtight container or wrapped tightly with plastic wrap in the refrigerator for up to 5 days. This ensures the cheesecake remains fresh and delectable for your next indulgence.
Can I freeze Mint Chocolate Cheesecake?
Absolutely! You can freeze your cheesecake for up to 3 months. Just make sure to remove the whipped cream topping before you freeze it. Wrap the cheesecake securely in plastic wrap and then in aluminum foil to prevent freezer burn, and when you’re ready to enjoy it, thaw it overnight in the fridge.
Why did my cheesecake crack during baking?
Cracking can occur for a few reasons. Ensure ingredients are at room temperature for smooth mixing, and avoid over-mixing after adding the eggs. Lastly, using a water bath will create a humid baking environment that helps prevent cracks. If your cheesecake does crack, don't worry; it will still taste divine!
Is there a way to make this cheesecake dairy-free?
You can substitute the cream cheese with a dairy-free cream cheese alternative and use coconut cream instead of heavy cream. Be mindful that the flavor and texture might alter slightly, but it can still be a delicious version of this Mint Chocolate Cheesecake, suitable for those with dairy allergies or intolerances.
Can pets eat mint chocolate cheesecake?
No, chocolate is toxic to dogs and cats. It’s important to keep your Mint Chocolate Cheesecake away from pets. If you’re looking to include your furry friends in your celebrations, consider making a pet-friendly treat just for them, using safe ingredients!
Mint Chocolate Cheesecake
Ingredients
Equipment
Method
- Preheat your oven to 350°F (175°C). Crush 24 Oreo cookies in a food processor until they resemble fine crumbs. Mix well with 1/2 cup of melted unsalted butter. Press into the bottom of a 9-inch springform pan. Bake for 10 minutes, then reduce the oven temperature to 325°F (163°C).
- In a large mixing bowl, beat 24 ounces of room-temperature cream cheese and 1 cup of granulated sugar until smooth. Add in 1 cup of sour cream, 1 teaspoon of vanilla extract, 1 teaspoon of mint extract, and a sprinkle of salt. Mix until fully integrated.
- Gradually add 3 large room-temperature eggs, mixing minimally after each addition to prevent air pockets.
- Gently fold in a couple of drops of green food coloring and 1 cup of chopped Andes mints into your batter.
- Wrap the outside of the springform pan with aluminum foil. Place inside a larger baking dish filled with hot water. Pour the cheesecake batter into the crust.
- Bake for 70 minutes at 325°F (163°C). Cool in the oven with the door slightly ajar for about 30 minutes.
- Chill the cheesecake for at least 4 hours, preferably overnight, in the refrigerator.
- Combine 1 cup of chocolate chips and 1/2 cup of heavy cream in a microwave-safe bowl. Microwave in 30-second intervals until smooth. Pour over the chilled cheesecake.
- Whip 1 cup of heavy cream with 1/4 cup of confectioners' sugar and 1/2 teaspoon of mint extract until stiff peaks form. Decorate the cheesecake with whipped cream.


Leave a Reply