
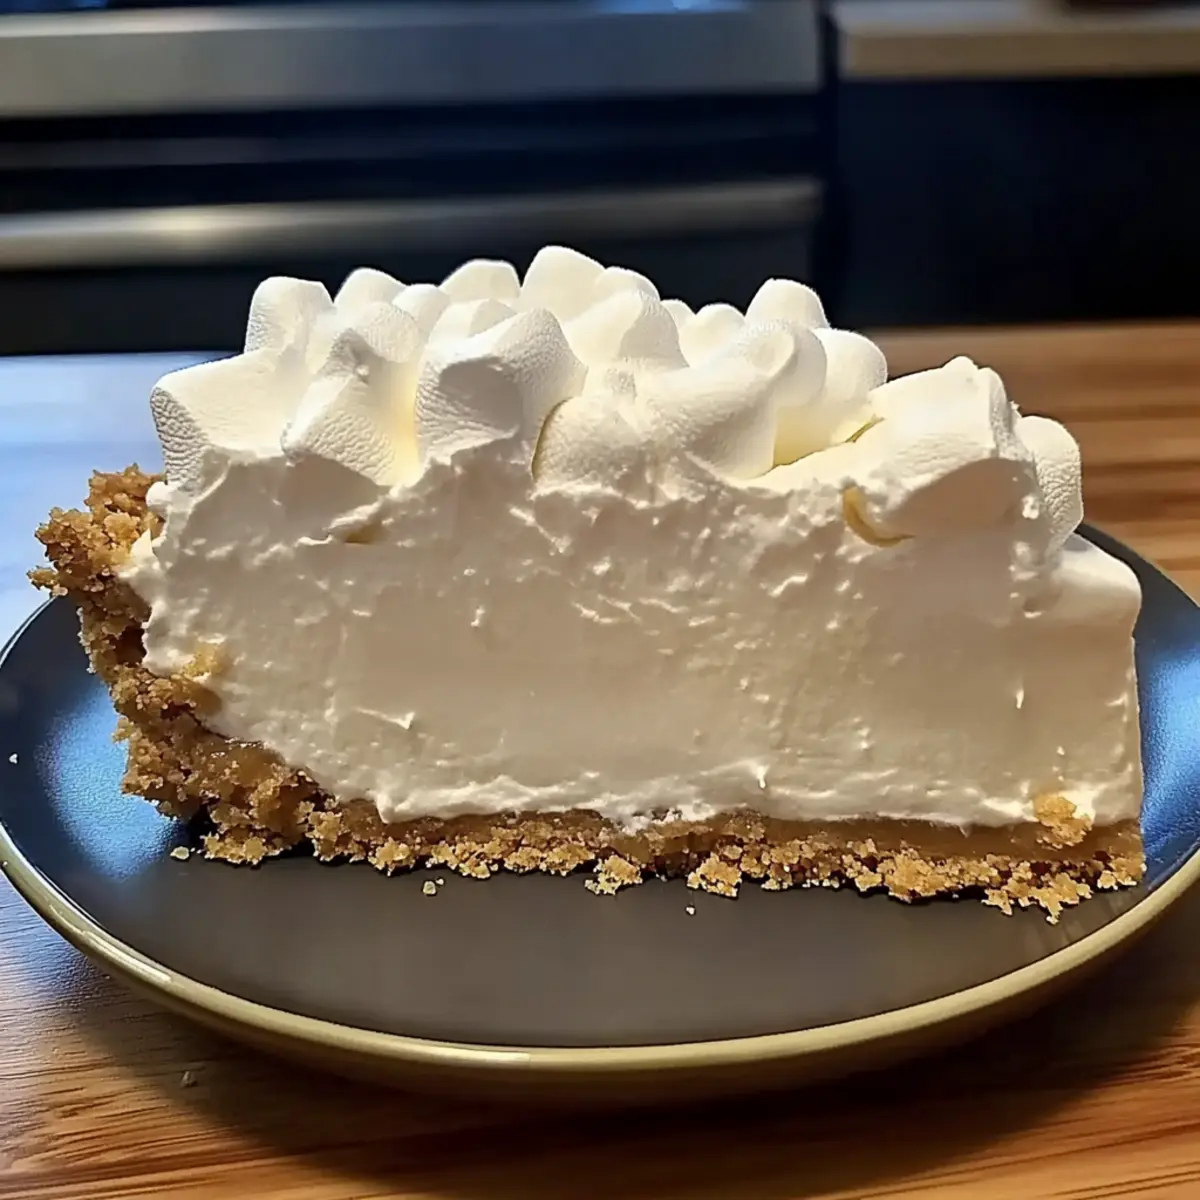
Summer isn’t just about the warm sun and cool breezes; it’s also about indulging in sweet, no-bake desserts that bring smiles and ease to any gathering. That’s where my Marshmallow Whip Cheesecake comes into play—a light and creamy delight that’s as effortless to whip up as it is to devour. This recipe marries the sweet, nostalgic taste of marshmallow fluff with the tanginess of cream cheese, all captured in a buttery graham cracker crust. Not only is it a crowd-pleaser that’s perfect for potlucks and family barbecues, but this cheesecake is also a fantastic option for those seeking gluten-free desserts. With minimal prep time and no oven required, you can delight everyone while keeping your kitchen cool. Ready to treat your taste buds and make a show-stopping dessert? Let’s dive into this irresistible cheesecake!

Why is Marshmallow Whip Cheesecake a Must-Try?
Effortless Preparation: This cheesecake is a no-bake masterpiece, making it ideal for busy days or last-minute gatherings.
Heavenly Texture: Enjoy a luscious, melt-in-your-mouth experience that perfectly balances creaminess and lightness.
Crowd-Pleasing Flavor: The delightful blend of marshmallow fluff and cream cheese creates a sweet, nostalgic taste that everyone will love.
Versatile Toppings: Dress it up with fresh berries or a drizzle of chocolate sauce for a stunning presentation and an extra flavor boost.
Perfect for Allergies: With a gluten-free crust option, it’s inclusive for various dietary needs; everyone can indulge in this delicious dessert!
Make this Marshmallow Whip Cheesecake for your next gathering, and be prepared for compliments galore!
Marshmallow Whip Cheesecake Ingredients
For the Crust
• Graham Cracker Crust – Provides structure and a buttery crunch; choose a gluten-free version if needed.
For the Filling
• Cream Cheese (8 oz) – Delivers creaminess and slight tang; make sure it is softened for easy mixing.
• Marshmallow Creme (7 oz) – Adds sweetness and fluffy texture; you can substitute with melted mini marshmallows if desired.
• Whipped Topping (Cool Whip, 8 oz) – Lightens the filling, making it airy; use real whipped cream if whipped to stiff peaks.
• Vanilla Extract (1 tsp) – Enhances the flavor profile of the cheesecake.
Optional Garnish
• Whipped Cream – Perfect for adding a creamy top layer.
• Berries – Fresh fruit provides a burst of color and flavor.
• Chocolate Sauce – A drizzle elevates the dessert and adds an extra layer of sweetness.
Explore this Marshmallow Whip Cheesecake recipe and treat yourself and loved ones to an unforgettable dessert experience!
Step‑by‑Step Instructions for Marshmallow Whip Cheesecake
Step 1: Prepare the Crust
Start by preheating your oven to 350°F (175°C) if you're baking your graham cracker crust. In a mixing bowl, combine the crushed graham crackers with melted butter until evenly moistened. Press this mixture firmly into the bottom of a 9-inch pie pan, ensuring it is compact and even. Bake for 8-10 minutes, or until lightly golden. Allow the crust to cool completely before adding the filling.
Step 2: Beat the Cream Cheese
In a large mixing bowl, place the softened cream cheese. Using an electric mixer, beat on medium speed until the cream cheese is smooth and fluffy, about 2-3 minutes. Make sure there are no lumps for a creamy texture in your Marshmallow Whip Cheesecake. Scrape down the sides of the bowl to ensure even mixing.
Step 3: Mix in the Marshmallow Creme
Gradually add the marshmallow creme and vanilla extract to the whipped cream cheese. Continue mixing on low until thoroughly combined, scraping the bowl as needed. The mixture should become creamy and slightly thick. This step is essential as it ensures the sweetness of the marshmallow fluff is evenly distributed throughout the filling.
Step 4: Fold in the Whipped Topping
Gently fold in the whipped topping using a rubber spatula, taking care not to deflate the mixture. Fold until the whipped topping is completely integrated into the cream cheese and marshmallow mixture, creating an airy, fluffy filling. This step ensures your Marshmallow Whip Cheesecake will have that light and creamy texture everyone loves.
Step 5: Assemble the Cheesecake
Carefully spread the light and creamy filling over the cooled graham cracker crust. Use a spatula to smooth the top evenly, ensuring it's beautiful and inviting. Make sure to leave a bit of space at the edges to allow for any slight expansion as it chills. This helps form the perfect slice later on.
Step 6: Chill the Cheesecake
Cover the assembled cheesecake with plastic wrap or a lid and place it in the refrigerator. Allow it to chill for a minimum of 4 hours, but preferably overnight. This chilling time is crucial for the flavors to meld and for the cheesecake to set up properly.
Step 7: Garnish and Serve
Once chilled, remove the Marshmallow Whip Cheesecake from the refrigerator. Before serving, add a generous dollop of whipped cream on top and decorate with fresh berries or chocolate sauce. This adds both taste and visual appeal, making it a delightful centerpiece for your dessert table. Slice and enjoy your delicious cheesecake!
Make Ahead Options
These Marshmallow Whip Cheesecakes are a fantastic choice for meal prep enthusiasts! You can prepare the filling and crust separately up to 24 hours in advance, keeping their delicious flavors intact. Simply mix the filling and store it in an airtight container in the refrigerator. Additionally, you can pre-bake the graham cracker crust (if baking) and keep it covered at room temperature. When you're ready to serve, assemble the cheesecake by spreading the filling into the prepared crust, and let it chill in the fridge for a minimum of 4 hours (or overnight is best) to set. With a bit of planning, you’ll enjoy a delightful dessert with minimal last-minute effort!
What to Serve with Marshmallow Whip Cheesecake
When planning a delightful meal around this luscious dessert, consider these fantastic pairings that will excite your taste buds and impress your guests.
-
Fresh Berries: Bright, juicy strawberries, blueberries, or raspberries add a burst of freshness that beautifully contrasts the creamy cheesecake. Serve them on top or alongside for a vibrant presentation.
-
Chocolate Sauce: A rich drizzle of chocolate sauce creates a decadent touch, melding the flavors in every bite. It’s an irresistible combination that enhances the sweetness of the cheesecake.
-
Coffee or Espresso: The boldness of coffee pairs well with the lightness of the cheesecake, making for a delightful after-dinner treat. A nice cappuccino can add a cozy touch to your gathering.
-
Lemon Sorbet: This refreshing scoop brings a zesty element that cuts through the richness of the cheesecake, creating a palate-cleansing experience while adding a cool texture.
-
Whipped Cream: Extra whipped cream on top elevates your cheesecake’s presentation and adds a luscious, creamy layer. Perfect for a genuinely indulgent dessert experience.
-
Mint Tea: Serve a warm mint tea for a soothing complement that refreshes the palate and enhances the creamy notes of your cheesecake.
-
Grilled Peaches: Sweet, caramelized peaches drizzled with honey create a fabulous warm side dish that pairs wonderfully with the cold cheesecake. The flavors complement each other beautifully.
Let these pairings transform your Marshmallow Whip Cheesecake into a full and unforgettable meal experience!
Expert Tips for Marshmallow Whip Cheesecake
-
Chill Overnight: Allow the cheesecake to set overnight for the best texture and flavor. This helps the filling become creamy and firm.
-
Room Temperature Cream Cheese: Ensure the cream cheese is softened to room temperature before mixing. This prevents lumps and ensures a smooth filling.
-
Gluten-Free Option: If you're serving guests with gluten sensitivities, use a gluten-free graham cracker crust to accommodate their needs without compromising flavor.
-
Gentle Folding: When incorporating the whipped topping, fold gently to maintain its airy texture. Avoid vigorous mixing to prevent deflation of your filling.
-
Optional Add-ins: For added flavor depth, consider adding a squeeze of lemon juice to the filling. This enhances the tanginess, complementing the sweetness of the marshmallow fluff.
Enjoy making your Marshmallow Whip Cheesecake with these helpful tips, and impress your family and friends!
How to Store and Freeze Marshmallow Whip Cheesecake
Fridge: Store any leftover cheesecake in an airtight container, where it will remain fresh for up to 3 days. This keeps the creamy texture intact while preventing any odors from invading.
Freezer: For longer storage, freeze the cheesecake for up to 2 months. Wrap it tightly in plastic wrap followed by aluminum foil to prevent freezer burn.
Thawing: To enjoy, transfer the frozen cheesecake to the fridge and allow it to thaw overnight. This ensures a smooth texture upon serving.
Reheating: Since this is a no-bake dessert, simply slice and serve cold; there's no need to reheat the Marshmallow Whip Cheesecake.
Marshmallow Whip Cheesecake: Delightful Variations
Feel free to customize this delectable dessert to match your taste or dietary needs while ensuring every bite is as delightful as the first!
-
Dairy-Free: Substitute the cream cheese and whipped topping with coconut cream and dairy-free cream cheese for a luscious alternative.
-
Gluten-Free: Swap out the graham cracker crust for a gluten-free crust made from almond flour or gluten-free cookies for a deliciously inclusive treat.
-
Fruit-Infused: Add your favorite fruit puree, such as raspberry or strawberry, into the filling for a refreshing twist that brightens the flavor.
-
Chocolate Chip: Stir in mini chocolate chips into the filling for a delightful texture and extra sweetness, making each slice a little more decadent.
-
Flavor Variations: Experiment with different extracts, like almond or lemon, to add a unique zing to the filling that will surprise and please your palate.
-
Nutty Crunch: Incorporate crushed nuts, like pecans or walnuts, into the crust for an added crunch that complements the creamy cheesecake perfectly.
-
Spicy Kick: For those who enjoy a bit of heat, mix a pinch of cayenne pepper or cinnamon into the filling to give it an unexpected warming undertone.
-
Layered Delight: Create a dessert parfait by layering cheesecake filling with crushed graham crackers and fruit compote in individual cups for a fun presentation.
Explore these variations and make your Marshmallow Whip Cheesecake an even more memorable dessert! If you're interested in perfecting your crust, don’t miss out on our handy tips on how to make a gluten-free crust. Additionally, for a refreshing touch, consider pairing it with a lovely berry compote for serving, adding beauty and flavor to your dish. Happy baking!

Marshmallow Whip Cheesecake Recipe FAQs
How do I select the right cream cheese for my cheesecake?
Absolutely! When choosing cream cheese, opt for a brand that is firmly packaged and not nearing the expiration date. Ensure it's at room temperature before mixing; this will ensure a smooth, lump-free consistency that’s perfect for your Marshmallow Whip Cheesecake.
What’s the best way to store leftovers?
Very! To keep your cheesecake fresh, store any leftovers in an airtight container in the refrigerator for up to 3 days. This method preserves its creamy texture while keeping unwanted odors at bay. Always ensure your cheesecake is covered to maintain its delightful flavor.
Can I freeze my Marshmallow Whip Cheesecake?
Absolutely! You can freeze your cheesecake for up to 2 months. Wrap it tightly in plastic wrap and then in aluminum foil to prevent freezer burn. To enjoy it later, just take it out and let it thaw in the refrigerator overnight. This method is essential to keep the cheesecake's texture and flavor intact.
What should I do if my filling isn't smooth?
Don’t fret! If your filling ends up lumpy, it’s likely because the cream cheese wasn’t softened enough. To fix this, return your mixture to a mixing bowl and beat it until smooth. If you’ve already combined everything, pass the mixture through a fine-mesh sieve or blend it again. Patience makes perfect, I often remind myself!
Can I make this cheesecake gluten-free?
Very! For a gluten-free Marshmallow Whip Cheesecake, simply use a gluten-free graham cracker crust. Most grocery stores offer a great selection of gluten-free options, or you can make your own using gluten-free cookies. This way, everyone can enjoy this delicious dessert without worries.

Heavenly Marshmallow Whip Cheesecake: No-Bake Bliss Awaits
Ingredients
Equipment
Method
- Preheat your oven to 350°F (175°C). Combine the crushed graham crackers with melted butter in a mixing bowl. Press into the bottom of a 9-inch pie pan and bake for 8-10 minutes until lightly golden. Allow to cool completely.
- In a large mixing bowl, beat the softened cream cheese on medium speed for 2-3 minutes until smooth and fluffy.
- Gradually add the marshmallow creme and vanilla extract, mixing on low until creamy and slightly thick.
- Gently fold in the whipped topping until completely integrated, creating an airy filling.
- Spread the filling over the cooled crust, smoothing the top evenly.
- Cover and chill in the refrigerator for at least 4 hours, preferably overnight.
- Remove from the fridge, add whipped cream, and decorate with berries or chocolate sauce before serving.


Leave a Reply