
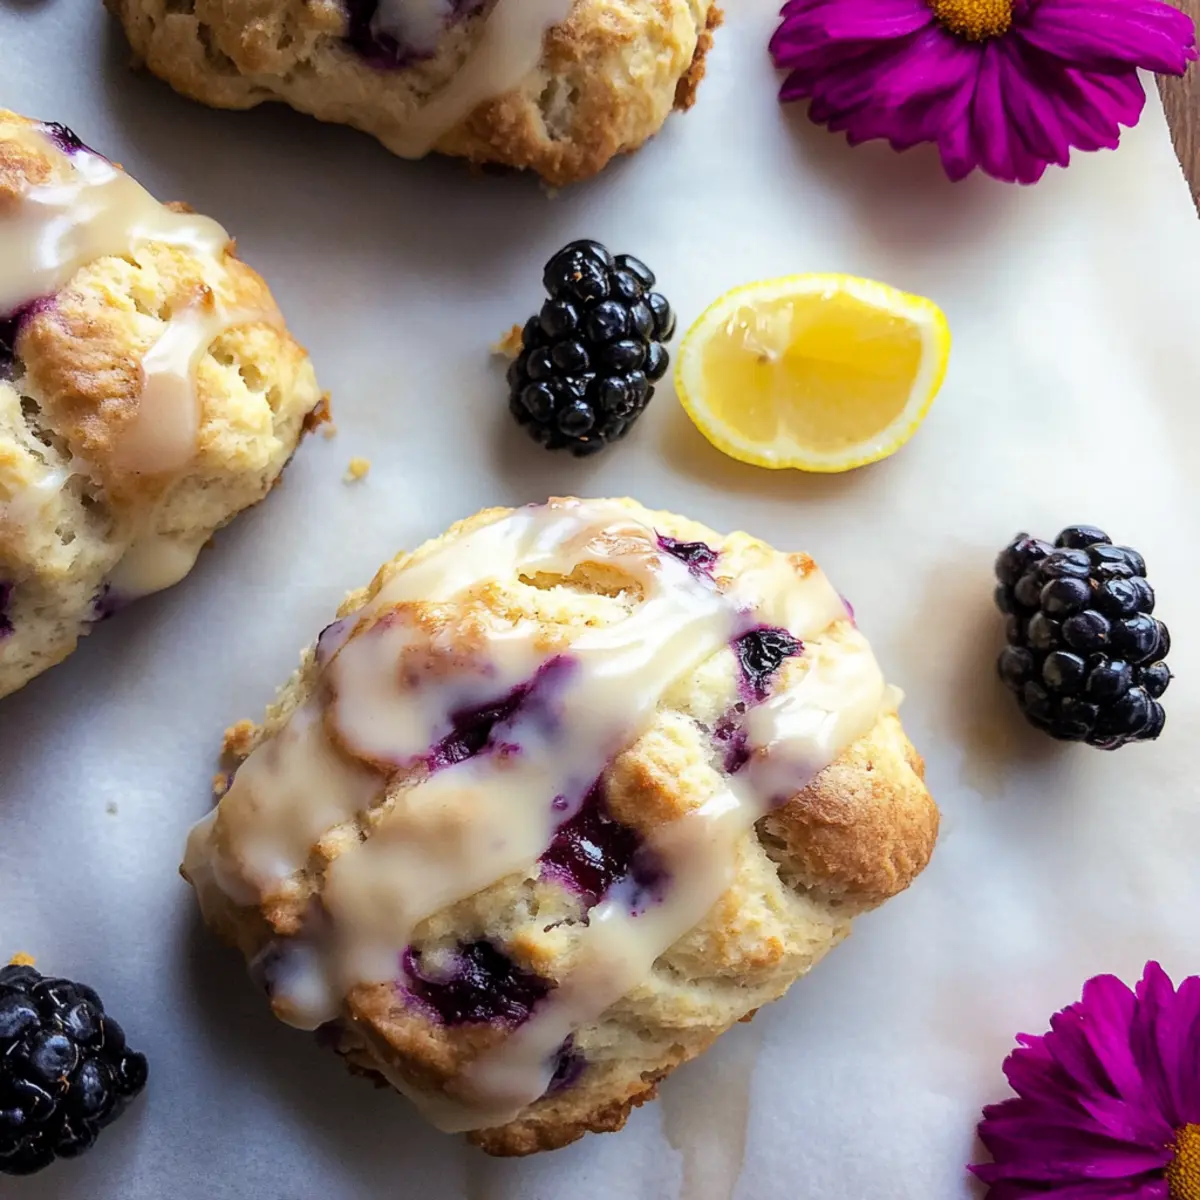
As I glanced through my pantry this morning, the familiar sight of Earl Grey tea called to me, sparking inspiration for a warm and inviting bake. Enter my Earl Grey Blackberry Scones with Lemon Glaze—a delightful twist that perfectly marries the rich, aromatic notes of tea with the vibrant tang of fresh blackberries. These scones are not just a treat; they’re a comforting hug in pastry form, ideal for breakfast or an afternoon tea with friends. Plus, they’re effortlessly freezer-friendly, so you can whip them out and bake whenever spontaneity strikes. Are you ready to elevate your baking game with these charming scones? Let’s dive in!

Why Are These Scones So Irresistible?
Comforting and elegant, these Earl Grey Blackberry Scones with Lemon Glaze are a delightful twist on the classic breakfast pastry. Flaky texture meets juicy blackberries for a mouthwatering combo that evokes cozy mornings. Time-saving prep means you’ll be enjoying these treats in under 30 minutes! Serve them warm with clotted cream or butter for a truly indulgent experience. And if you love meal-prepping, you can freeze the dough for those spontaneous tea parties. Perfect for impressing guests, these scones truly stand out as a sophisticated comfort food!
Earl Grey Blackberry Scones Ingredients
For the Scones
- All-Purpose Flour – Provides the structure, and feel free to swap with gluten-free flour for a gluten-free version.
- Baking Powder – This leavening agent ensures a light and fluffy texture; always check the freshness for the best rise.
- Sugar – Adds sweetness to balance the flavors; you can adjust the amount based on your taste preference.
- Salt – Enhances overall flavor—don’t skip this essential ingredient!
- Butter – The cold butter creates that coveted flaky texture; keep it chilled until ready to use.
- Earl Grey Tea – Infuses the scones with a distinctive, aromatic flavor; you can replace it with a favorite black tea in a pinch.
- Buttermilk – Ensures moisture and tenderness; in a hurry, mix regular milk with a splash of vinegar instead.
- Fresh Blackberries – Offers delightful bursts of tangy sweetness; substitute with blueberries or raspberries if desired.
- Lemon Zest & Juice – Provides brightness that enhances the flavors; opt for fresh lemons for the best zing.
For the Lemon Glaze
- Powdered Sugar – Sweetness for the glaze; sift it first to avoid lumps for a smooth finish.
- Lemon Juice – Adds a tangy brightness to balance the sweetness of the glaze; use freshly squeezed for maximum flavor.
These Earl Grey Blackberry Scones with Lemon Glaze make any day a special occasion, inviting warmth and comfort into every bite!
Step‑by‑Step Instructions for Earl Grey Blackberry Scones with Lemon Glaze
Step 1: Preheat and Prepare
Begin by preheating your oven to 400°F (200°C) and lining a baking sheet with parchment paper. This ensures an easy release for your scones once they’re baked. While the oven is heating up, get your ingredients ready; having everything organized will streamline the process and make the baking of your Earl Grey Blackberry Scones more enjoyable.
Step 2: Mix Dry Ingredients
In a large mixing bowl, whisk together the all-purpose flour, baking powder, sugar, and salt until evenly combined. You want these dry ingredients to be well mixed to ensure a consistent flavor throughout your scones. The cloud-like texture of the flour mixed with the granules of sugar should give you a good visual cue that your mixture is ready for the next step.
Step 3: Cut in Butter
Take your chilled butter and cut it into small cubes, then add it to the flour mixture. Using a pastry cutter or your fingertips, mix until it resembles coarse crumbs with small pea-sized butter pieces throughout. This step is crucial for achieving that flaky texture in your Earl Grey Blackberry Scones, so ensure that you don't overwork the butter.
Step 4: Brew and Combine Liquid Ingredients
Brew a strong cup of Earl Grey tea, allowing it to cool slightly. In a separate bowl, combine the brewed tea and buttermilk, mixing well. Create a well in the center of your dry ingredients and pour in the liquid mixture. Stir gently until just combined, as overmixing can lead to dense scones. You should see flecks of the tea only when finished.
Step 5: Add Blackberries and Lemon Zest
Carefully fold in the fresh blackberries and lemon zest into your dough. Use a spatula and try to keep your folding motion gentle to avoid crushing the blackberries. This step incorporates juicy bursts and zesty notes into your Earl Grey Blackberry Scones, making them utterly delightful. Once combined, the dough should start to come together but still appear slightly shaggy.
Step 6: Chill the Dough
Transfer the dough to a lightly floured surface, forming it into a rough disk about 1 inch thick. Wrap it in plastic wrap and place it in the freezer for about 10-15 minutes. Chilling the dough helps maintain the butter's solidity, ensuring your scones will be wonderfully flaky when baked. This brief chill time is key, so don’t skip it!
Step 7: Shape and Cut Scones
Once chilled, take the dough out and place it back on the floured surface. Pat it into a circle about 1 inch thick again, then using a sharp knife, cut it into wedges. You can also use a round cutter for perfectly shaped scones if preferred. Visualize them sitting in a sunny kitchen, just waiting to be baked into mouthwatering treats!
Step 8: Bake Scones
Arrange the cut scones on your prepared baking sheet, leaving space between each one. Bake for 15-20 minutes or until they are golden brown and firm to the touch. You’ll know they’re ready when the tops are lightly golden and smell heavenly throughout your kitchen, like an inviting café filled with warmth and charm.
Step 9: Cool and Drizzle
Once baked, remove the scones from the oven and allow them to cool slightly on the baking sheet for about 5 minutes, then transfer to a cooling rack. While they cool, prepare the lemon glaze by mixing powdered sugar with fresh lemon juice until smooth. Drizzle this tangy sweetness over your warm, flaky Earl Grey Blackberry Scones for a delightful finish before serving.
What to Serve with Earl Grey Blackberry Scones with Lemon Glaze
Elevate your tea time experience with delightful pairings that complement the rich flavors of these charming scones.
-
Clotted Cream:
Adds a rich, creamy texture that perfectly balances the bright lemon glaze; a classic choice for a truly luxurious treat. -
Fresh Berries Salad:
A refreshing mix of seasonal berries brightens the palate, creating a lovely contrast to the buttery scones' warmth. -
Honey-Drizzled Yogurt:
Smooth and sweet, it enhances the scones' flavors, making for a satisfying and wholesome breakfast or brunch addition. -
Herbal Tea:
A fragrant herbal tea, like chamomile or mint, can refresh your taste buds and create a soothing midday break; perfect for those cozy mornings. -
Lemonade Spritzer:
A fizzy lemonade can bring out the zesty lemon glaze's brightness, providing a refreshing sip alongside the indulgent sweetness of the scones. -
Creamy Coffee:
Rich, creamy coffee complements the floral notes of Earl Grey perfectly; it’s a match made in morning heaven. -
Mini Fruit Tarts:
These delightful treats echo the flavors of the scones while adding a delightful crunch and a new burst of flavors; a true dessert lover's dream.
Serve these alongside your Earl Grey Blackberry Scones with Lemon Glaze for a truly enchanting experience that will delight family and friends alike!
How to Store and Freeze Earl Grey Blackberry Scones
Room Temperature: Store scones in an airtight container at room temperature for up to 3 days. This keeps them fresh while maintaining their delightful texture.
Fridge: For longer storage, keep the scones in the fridge for up to 1 week. Place them in a sealed container to prevent drying out and preserve flavor.
Freezer: Freeze unfrosted scones for up to 3 months. Shape them, then freeze individually on a baking sheet before transferring to a freezer bag. Bake them from frozen, adding a few extra minutes to the baking time.
Reheating: Reheat leftover scones in a preheated oven at 350°F (175°C) for about 10 minutes. Drizzle with lemon glaze after warming to keep that fresh flavor in your Earl Grey Blackberry Scones!
Make Ahead Options
These Earl Grey Blackberry Scones with Lemon Glaze are a fantastic choice for meal prep enthusiasts! You can prepare the dough up to 24 hours in advance; simply follow the recipe instructions up to shaping the scones, then wrap the dough in plastic wrap and refrigerate. This helps maintain the flaky texture while keeping the flavors fresh. If you prefer, you can freeze the shaped scones individually and store them in a freezer bag for up to 3 months—when ready to enjoy, bake directly from frozen, adding a few extra minutes to the baking time. This way, you’ll have warm, inviting scones at your fingertips whenever you desire!
Expert Tips for Earl Grey Blackberry Scones
-
Chill Ingredients: Keeping your butter and buttermilk cold is essential to achieve a flaky texture in your scones. Only incorporate them when you’re ready to mix.
-
Avoid Overmixing: Gently fold your dough; overmixing can lead to tough Earl Grey Blackberry Scones instead of light and fluffy ones.
-
Cool Before Glazing: Let your scones cool on a rack for a few minutes before drizzling with lemon glaze. This prevents the glaze from melting away and ensures a lovely finish.
-
Use Fresh Ingredients: Ensure your baking powder is fresh to allow proper leavening, promoting the perfect rise for your scones.
-
Experiment with Flavors: Feel free to swap out blackberries for other berries or add spices like cinnamon, which can bring a unique twist to your scones!
Earl Grey Blackberry Scones Variations
Feel free to get creative and tailor these delightful scones to your taste buds for an even more delicious experience!
-
Gluten-Free: Use a 1:1 gluten-free flour blend to make these scones suitable for gluten-sensitive eaters.
-
Berry Swap: Replace blackberries with blueberries, raspberries, or even strawberries for a fresh take on flavor and color. Each berry brings a unique touch!
-
Nutty Crunch: Add 1/4 cup of chopped hazelnuts or almonds for extra texture and a nutty flavor that complements the tea beautifully.
-
Zesty Citrus: Incorporate a bit of orange zest along with lemon for a bright, citrusy explosion that adds sunshine to every bite.
-
Spiced Versions: Sprinkle in a pinch of cinnamon or cardamom for a warm, comforting spice that elevates the scone experience to new heights.
-
Sweet Maple Glaze: Instead of lemon, mix powdered sugar with maple syrup for a rich glaze, offering a different sweetness profile for those who prefer it.
-
Herbal Flair: Infuse the scone dough with a tablespoon of finely chopped fresh herbs like thyme or lavender for an unexpected twist that pairs wonderfully with tea.
-
Savory Version: Consider swapping out the blackberries for cheddar cheese pieces and chives for a savory scone perfect for brunch or as a snack alongside your favorite tea.
These variations allow you to customize your scones for any occasion — whether it’s cozy mornings at home or delightful gatherings with friends. If you’re intrigued by more comforting recipes, consider trying out my Lemon Chicken Soup or a sweet indulgence with Blackberry Crisp Amp. Happy baking!

Earl Grey Blackberry Scones with Lemon Glaze Recipe FAQs
How do I choose the right blackberries for my scones?
Absolutely! Look for blackberries that are plump, smooth, and shiny. Avoid any that have dark spots all over, as these can indicate overripeness. Aim for berries that feel a little firm but yield slightly to pressure, ensuring they’ll add just the right burst of tartness to your scones.
Can I store these scones after baking?
Very! Once baked, you can keep your Earl Grey Blackberry Scones in an airtight container at room temperature for about 3 days, or refrigerate them for up to 1 week. Just be sure they are cooled before storing to maintain their delightful texture.
What's the best way to freeze these scones?
Here's a great tip! Shape the scones first, then lay them out on a baking sheet and pop them in the freezer until solid. After about an hour, transfer them to a freezer bag where they can stay fresh for up to 3 months. When you’re ready to bake, there’s no need to thaw—just bake from frozen and add a few extra minutes to the time.
Why are my scones dense instead of fluffy?
The key culprit is often overmixing the dough. When you combine your ingredients, be gentle! Mix just until combined, and if you feel you've overdone it, worry not—next time, fold your dough with love and care, keeping an eye on that flakiness!
Are these scones suitable for those with gluten allergies?
Absolutely! You can easily make a gluten-free version by substituting all-purpose flour with a gluten-free flour blend. I often recommend checking the specific blend for a one-to-one substitution to ensure the consistency remains perfect in your Earl Grey Blackberry Scones.
How can I make these scones more or less sweet?
Great question! The sugar in these scones can be easily adjusted according to your palate. If you'd like to tone down the sweetness, reduce the sugar by a couple of tablespoons. Conversely, if you prefer a sweeter treat, add a bit more sugar and enjoy!

Earl Grey Blackberry Scones with Lemon Glaze for Cozy Mornings
Ingredients
Equipment
Method
- Preheat your oven to 400°F (200°C) and line a baking sheet with parchment paper.
- Whisk together the flour, baking powder, sugar, and salt in a large mixing bowl.
- Cut the chilled butter into cubes and mix into the flour mixture until it resembles coarse crumbs.
- Brew a strong cup of Earl Grey tea, allowing it to cool, then mix with buttermilk.
- Create a well in the dry ingredients and pour in the liquid mixture; stir gently until combined.
- Fold in the blackberries and lemon zest gently to avoid crushing the berries.
- Form the dough into a disk and wrap it in plastic wrap; chill in the freezer for 10-15 minutes.
- Once chilled, pat the dough into a circle again and cut it into wedges or use a round cutter.
- Bake the scones for 15-20 minutes or until they are golden brown and firm to the touch.
- Cool the scones slightly, then drizzle with the lemon glaze before serving.


Leave a Reply