
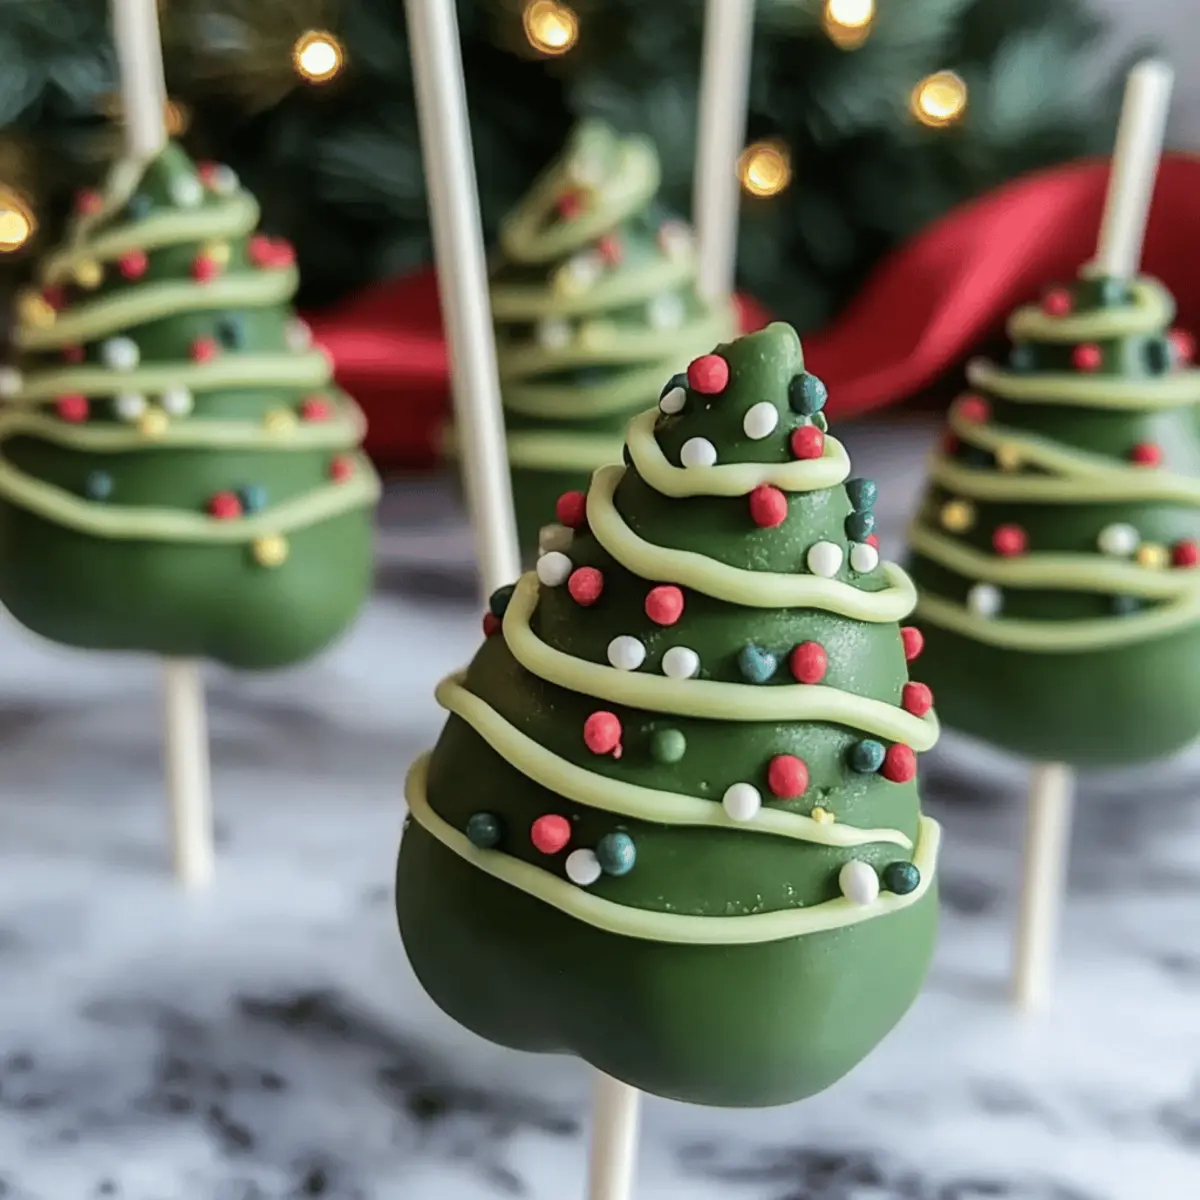
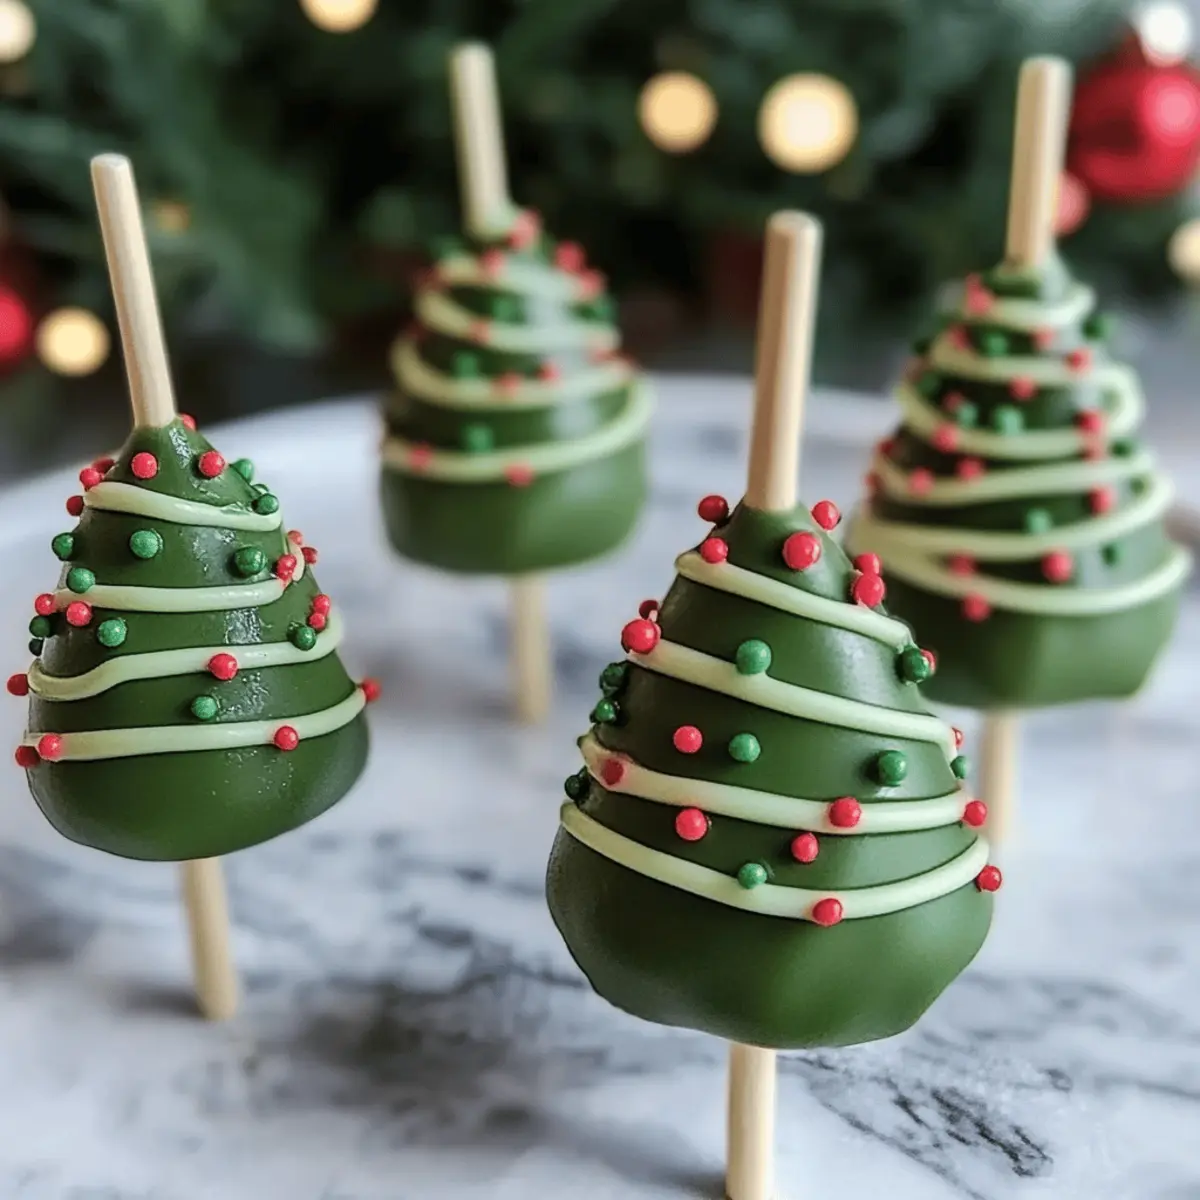
As I rummaged through my holiday decorations, I stumbled upon a cookie-cutter shaped like a Christmas tree. It sparked an idea that melds nostalgia with creativity, resulting in these delightful Christmas Tree Cake Pops! Perfect for gatherings and oh-so-quick to make, these festive treats will not only be a hit at your holiday parties, but they also cater to both homemade cake enthusiasts and those who appreciate the simplicity of Little Debbie Christmas Tree Cakes. With options for delicious vanilla or cream cheese frosting, the texture is reminiscent of a rich truffle that melts in your mouth. Ready to spread some joy and impress your guests? Let’s dive into this fun holiday baking adventure together!
Why Make Christmas Tree Cake Pops?
Irresistible Fun: These Christmas Tree Cake Pops are not just desserts; they are a festive activity the whole family can enjoy creating together!
Quick and Easy: Using either homemade cake or handy Little Debbie Christmas Tree Cakes makes preparation a breeze, perfect for those last-minute holiday gatherings.
Deliciously Versatile: With options for vanilla or cream cheese frosting, you can cater to everyone’s taste.
A Festive Showstopper: Their vibrant colors and playful decorations make these cake pops a showstopper on any holiday dessert table.
Truffle-Like Texture: Imagine sinking your teeth into a soft, moist cake pop that melts in your mouth—pure bliss during the holiday season!
Don't forget to check out other quick desserts like Ice Cream Cake to complement your holiday spread!
Christmas Tree Cake Pop Ingredients
For the Cake
• Cake (vanilla or chocolate) – Use homemade cake for a personal touch or opt for Little Debbie Christmas Tree Cakes for a quick setup.
For the Frosting
• Frosting (vanilla or cream cheese) – Vanilla offers a classic taste, while cream cheese provides a sturdier texture for decorating.
For Coating and Decorating
• Green candy melts – Perfect for achieving that festive green color; thin with coconut oil for easier dipping.
• White chocolate – Ideal for drizzling and creating a tinsel effect on your cake pops.
• Sprinkles (holiday colors) – Add a burst of fun and make your cake pops visually appealing with these festive accents.
To Assemble
• Cake pop sticks – Essential for holding your creations; insert directly into the tree cones for stability.
• Coconut oil – Use to adjust the thickness of candy melts, ensuring a smooth coating process.
• Marshmallows – Serve as a stand to keep cake pops upright while they cool.
These delightful Christmas Tree Cake Pops are bound to bring cheer to your holiday festivities!
Step‑by‑Step Instructions for Christmas Tree Cake Pops
Step 1: Prepare Cake
Begin by baking your chosen vanilla or chocolate cake according to package instructions or your family recipe. Once cooled completely, crumble the cake into fine crumbs using your hands or a food processor. The crumbled cake should resemble sand in texture. This creates the base for your Christmas Tree Cake Pops, which is crucial for shaping them later.
Step 2: Mix with Frosting
In a large bowl, gradually mix in 1/2 cup of vanilla or cream cheese frosting with the crumbled cake. Use a spatula to combine until the mixture is cohesive and dull, resembling dough. Aim for a consistency that holds together when squeezed, ensuring your Christmas Tree Cake Pops maintain form while shaping.
Step 3: Shape Cones
Scoop out a tablespoon of the mixture and roll it into a cone shape to resemble a mini Christmas tree. Ensure the tip is narrower than the base for a classic tree look. Place each shaped cone onto a baking sheet lined with parchment paper, and freeze them for at least 30 minutes, which helps maintain their structure during coating.
Step 4: Melt Coating
While the cake cones are chilling, melt 1 cup of green candy melts in a microwave-safe bowl in 30-second intervals, stirring between each session until smooth. If the mixture is too thick, blend in a teaspoon of coconut oil to achieve a drizzle-like consistency. This will give your Christmas Tree Cake Pops their delightful green color and smooth coating.
Step 5: Insert Sticks
Take the chilled cake cones out of the freezer. Dip the end of each cake pop stick into the melted green candy melts, then gently insert it into the bottom of each cake cone about halfway through. This step secures the stick in place and ensures ease while dipping the pops later.
Step 6: Dip Pops
Hold each cake pop by the stick and dip it into the melted green candy melts using a tall glass for stability. Make sure to coat each pop thoroughly while allowing any excess coating to drip back into the bowl. For a smooth finish, gently tap the stick against the sides of the glass, then place the pop upright in a marshmallow for drying.
Step 7: Decorate
Immediately sprinkle your preferred holiday sprinkles over the pops while the coating is still wet for a vibrant look. Once decorated, melt some white chocolate and drizzle it over the Christmas Tree Cake Pops to imitate tinsel. Finish with a small star-shaped decoration on top for a festive touch that truly captures the holiday spirit.
Step 8: Set
Allow your decorated Christmas Tree Cake Pops to cool completely at room temperature or in the refrigerator until the coating is firm. This final step ensures they hold their shape beautifully and are ready to be enjoyed by family and friends during your holiday celebrations.
Storage Tips for Christmas Tree Cake Pops
-
Room Temperature: Enjoy your Christmas Tree Cake Pops fresh for up to 3 days if stored in a cool, dry place away from direct sunlight.
-
Fridge: To extend freshness, store cake pops in the refrigerator in an airtight container for up to 1 week. This helps maintain their creamy texture and delightful flavors.
-
Freezer: For longer storage, freeze the Christmas Tree Cake Pops in a single layer on a baking sheet, then transfer them to a freezer-safe container for up to 3 months.
-
Reheating: While best enjoyed chilled or at room temperature, if needed, allow refrigerated cake pops to come to room temperature before serving. There's no need to reheat—enjoy the festive treat as is!
Christmas Tree Cake Pops Variations
Feel free to get creative and personalize your Christmas Tree Cake Pops with these delightful twists!
-
Chocolate Cake: Substitute vanilla cake for rich chocolate cake for a festive flavor variety that chocolate lovers will adore.
-
Flavored Frostings: Experiment with different flavored frostings like peppermint or orange cream for a seasonal twist that adds a unique burst of flavor.
-
Colorful Coatings: Use red or white candy melts instead of green for a vibrant pop of holiday color that stands out on any dessert table.
-
Nutty Crunch: Incorporate crushed nuts or toffee bits into the cake mixture for added texture and a delicious crunch that pairs perfectly with the smooth coating.
-
Spicy Touch: Add a pinch of cinnamon or nutmeg to the cake mixture for a warm spice that brings a cozy holiday feeling to each bite.
-
Mini Pops: Make bite-sized cake pops by using mini cones or shaping the cake mixture into small balls for a fun, cute treat that’s perfect for snacking!
-
Decorative Toppings: Top your pops with edible glitter or candy eyes to create whimsical characters that will bring smiles to your guests' faces.
Consider making these festive cake pops alongside other quick desserts like Chocolate Pudding Cake to expand your holiday treat lineup!
Expert Tips for Christmas Tree Cake Pops
-
Chill Properly: Ensure to freeze the shaped cones for at least 30 minutes. This helps maintain their shape during the coating process and prevents sticking.
-
Perfect Consistency: If the mixture feels too soft, add a little extra cake or reduce the frosting. You want a dough-like consistency that holds shape but isn’t too dry.
-
Dipping Technique: Use a tall glass for dipping the cake pops into melted green candy melts. This ensures an even coat while minimizing mess.
-
Timing for Sprinkles: Sprinkle your holiday decorations immediately after dipping in the candy melts. This ensures they stick well before the coating hardens.
-
Use Quality Ingredients: For the best Christmas Tree Cake Pops, opt for high-quality frosting and candy melts. This enhances the flavor and overall appearance of your festive treats.
What to Serve with Christmas Tree Cake Pops?
These delightful, festive treats are perfect for brightening up your holiday gatherings and complementing your celebrations with incredible flavor and fun.
-
Hot Cocoa Bar: Create a cozy hot cocoa station with marshmallows and whipped cream that pairs perfectly with the sweetness of cake pops.
-
Milk & Cookies: A classic duo; serve cold milk alongside these cake pops for a nostalgic twist that kids (and adults) will love.
-
Cheese Platter: A selection of sharp and creamy cheeses balances the sweetness of the cake pops, adding complexity to your dessert table.
-
Fruit Salad: Fresh, vibrant fruits like berries and citrus bring a refreshing contrast to the rich decadence of your Christmas Tree Cake Pops.
-
Mini Scones: Offer a variety of mini scones; their buttery texture and mild sweetness nicely complement the indulgent cake pops.
-
Peppermint Bark: For a festive touch, serve peppermint bark to enhance the holiday spirit and provide a satisfying crunch alongside the soft cake pops.
-
Sparkling Cider: Encourage a celebratory ambiance with sparkling cider; its bubbles and crispness highlight the joy of the season perfectly.
-
Gingerbread Men: These spiced cookies add a traditional flavor to your dessert spread, creating a charming, cohesive holiday atmosphere.
-
Chocolate Fondue: Dip fruits and cake pops into warm chocolate for a playful dessert experience that everyone will enjoy!
With these delicious options, your holiday spread will not only delight the taste buds but also create unforgettable memories at your festive gatherings.
Make Ahead Options
These Christmas Tree Cake Pops are perfect for meal prep, saving you time during the bustling holiday season! You can prepare the cake cones and freeze them for up to 3 days in advance, ensuring they maintain their shape. Simply roll them into cone shapes and place them on a baking sheet lined with parchment paper before freezing. Additionally, you can mix the cake crumbs with frosting (use a little extra frosting if they feel too dry) and shape them ahead of time. When you're ready to serve, dip the frozen pops in melted candy melts, decorate, and let them cool until firm—resulting in delightful treats that are just as delicious and festive!

Christmas Tree Cake Pops Recipe FAQs
How do I choose the best ingredients for Christmas Tree Cake Pops?
Absolutely! When selecting your cake, aim for a vanilla or chocolate flavor that brings warmth and nostalgia. If you're going homemade, make sure your cake is fresh and moist; a box mix can save time! Little Debbie Christmas Tree Cakes work wonderfully for a quick alternative. For frosting, cream cheese adds stability, while vanilla frosting offers a sweet texture—choose what suits your style best!
How should I store Christmas Tree Cake Pops?
To keep your Christmas Tree Cake Pops fresh, store them in a cool room for up to 3 days or in the refrigerator for as long as 1 week. Just place them in an airtight container to maintain their delightful textures. I find that chilling them can actually enhance the flavors—so if you can, allow them to cool before serving!
Can I freeze my Christmas Tree Cake Pops?
Certainly! For freezing, arrange the cake pops in a single layer on a baking sheet to freeze them individually. After about 2 hours, transfer them to a freezer-safe container where they can stay good for up to 3 months. When ready to enjoy, let them thaw in the refrigerator overnight so they retain their shape and texture.
What if my cake pop mixture is too soft while shaping?
Very common! If your mixture isn't holding together, you can add a tad more crumbled cake to thicken it up. Alternatively, if it’s too firm, simply mix in a bit more frosting until you achieve that wonderful dough-like consistency. Remember, it should clump well without crumbling apart—finding that balance is key!
Are these Christmas Tree Cake Pops safe for pets?
I wouldn’t recommend sharing these delightful treats with your furry friends. While the cake and frosting ingredients are generally safe for humans, chocolate can be toxic to dogs. Always keep these holiday treats away from pets and enjoy them yourself!
Can I use different coatings or decorations for my cake pops?
Absolutely! The more, the merrier! You can get creative with colored candy melts—try red or blue for a fun twist. Different sprinkle shapes or edible glitter can also add that personalized touch. Experimenting with flavored frostings, such as mint or raspberry, can yield unique and delightful results while keeping the holiday spirit alive!

Delicious Christmas Tree Cake Pops for Festive Holiday Fun
Ingredients
Equipment
Method
- Begin by baking your chosen vanilla or chocolate cake according to package instructions or your family recipe. Once cooled completely, crumble the cake into fine crumbs using your hands or a food processor.
- In a large bowl, gradually mix in 1/2 cup of vanilla or cream cheese frosting with the crumbled cake. Use a spatula to combine until the mixture is cohesive and dull, resembling dough.
- Scoop out a tablespoon of the mixture and roll it into a cone shape to resemble a mini Christmas tree. Place each shaped cone onto a baking sheet lined with parchment paper, and freeze them for at least 30 minutes.
- While the cake cones are chilling, melt 1 cup of green candy melts in a microwave-safe bowl in 30-second intervals, stirring until smooth. If the mixture is too thick, blend in a teaspoon of coconut oil.
- Take the chilled cake cones out of the freezer. Dip the end of each cake pop stick into the melted green candy melts, then gently insert it into the bottom of each cake cone about halfway through.
- Hold each cake pop by the stick and dip it into the melted green candy melts using a tall glass for stability. Allow any excess coating to drip back into the bowl.
- Immediately sprinkle your preferred holiday sprinkles over the pops while the coating is still wet. Melt some white chocolate and drizzle it over the Christmas Tree Cake Pops for decoration.
- Allow your decorated Christmas Tree Cake Pops to cool completely at room temperature or in the refrigerator until the coating is firm.


Leave a Reply