
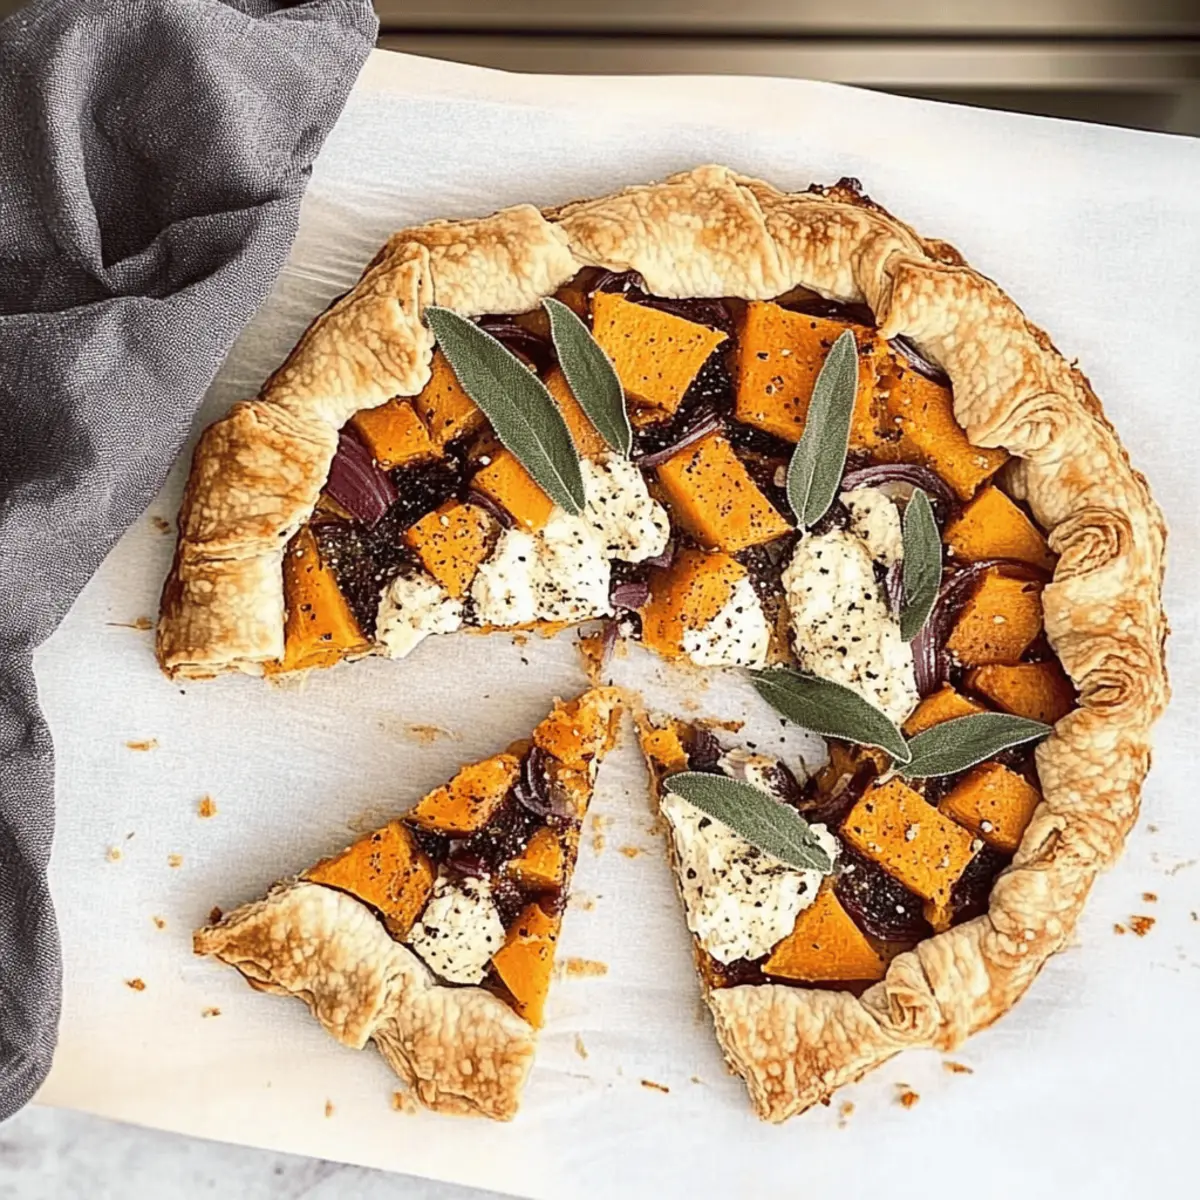
As the leaves begin to turn and the air gets that perfect crispness, there's something magical about the kitchen filling with the scent of roasted butternut squash. This Savory Butternut Squash Galette is a celebration of fall flavors, offering a delightful balance of sweet and savory. What I love most about this free-form tart is its versatility; it easily transitions from an impressive brunch centerpiece topped with a fried egg to a cozy dinner option paired with a simple salad. With the rich creaminess of Boursin cheese, the warmth of cayenne pepper, and the aromatic crunch of crispy sage, each bite transports you straight to autumn bliss. Plus, you'll appreciate its easy prep and crowd-pleasing appeal—what's not to love about a dish that brings everyone to the table? Are you ready to create your own slice of fall comfort?
Why is this Galette a Must-Try?
Versatile Delight: This Butternut Squash Galette shines at any meal—serve it warm for brunch or as a comforting dinner entrée.
Autumn Flavors: The combination of sweet butternut squash, spicy cayenne, and crispy sage captures the essence of fall in every bite.
Impressive Presentation: With its rustic charm, this galette is sure to wow your guests and elevate your dining experience.
Easy Preparation: Minimal fuss with the dough—feel free to use store-bought for a quick option without compromising flavor.
Crowd-Pleaser: Friends and family will love diving into this savory tart, making it a perfect dish for gatherings.
Enjoy this cozy recipe and don’t forget to check out our other fall favorites like Roasted Pumpkin Soup for a complete seasonal feast!
Butternut Squash Galette Ingredients
For the Dough
• Galette Dough – This forms the base and can be pre-made or conveniently store-bought for an easier option.
For the Filling
• Butternut Squash – Roasting brings out its natural sweetness, though you can easily substitute with pumpkin if desired.
• Red Onion – Adds a comforting sweetness; shallots work as a flavorful alternative.
• Boursin Cheese – This creamy cheese brings richness to the galette; feel free to swap with goat cheese for a tangier twist.
• Gorgonzola Dolce – Adds depth and creaminess; for a milder taste, feta is a great substitute.
• Crispy Sage Leaves – An aromatic garnish that enhances flavor; fresh is best, but dried will do in a pinch.
• Cayenne Pepper Powder – A dash of heat; adjust the amount to suit your spice preference.
• Heavy Cream – Brush on the crust for a golden finish; omit for a lighter version.
• Parmesan Cheese – Provides a nutty flavor to the crust; pecorino is a suitable alternative.
For Garnish
• Fresh Sage Leaves – Optional; use for an extra burst of flavor and a pop of color on top.
Enjoy creating this Butternut Squash Galette and let the fall flavors warm your kitchen!
Step‑by‑Step Instructions for Butternut Squash Galette (Free-Form Tart)
Step 1: Prepare Dough
Preheat your oven to 425°F (220°C). Begin by peeling and cubing the butternut squash, then toss it with olive oil, salt, and cayenne pepper. Spread the squash on a baking sheet lined with parchment paper and roast for 15-20 minutes, or until fork-tender and lightly caramelized. While the squash roasts, prepare your galette dough and set aside.
Step 2: Cook Onions
In a skillet over medium heat, add a tablespoon of olive oil. Once hot, add thinly sliced red onions and sauté for 3-5 minutes, stirring occasionally, until the onions become translucent and tender. The fragrant aroma will fill your kitchen! Set the sautéed onions aside to cool as you wait for the squash to finish roasting.
Step 3: Assemble Galette
Reduce the oven temperature to 350°F (175°C). Roll out your galette dough on a floured surface to a ¼-inch thickness, then transfer it to a lined baking sheet. Spread a generous layer of Boursin cheese over the dough, leaving a border around the edges. Evenly distribute the roasted butternut squash and sautéed onions on top, and finish with fresh sage leaves arranged for visual appeal.
Step 4: Form Crust
Gently fold the edges of the galette dough over the filling, creating a rustic border. Brush the exposed crust with heavy cream for a beautiful golden finish, then sprinkle the edges with grated Parmesan cheese and a pinch of black pepper. This will enhance the crust’s flavor and texture as the Butternut Squash Galette bakes.
Step 5: Bake
Place the assembled galette in the oven and bake for 45-50 minutes, or until the crust is golden brown and crispy. Keep a close eye on it during the last few minutes to avoid over-browning. When done, the galette should be fragrant and inviting. Remove from the oven and let cool for 5-10 minutes before slicing and serving it warm.
What to Serve with Savory Butternut Squash Galette?
Nothing elevates this beautiful galette like thoughtfully chosen sides that enhance its warm, comforting flavors.
-
Mixed Green Salad: The crisp freshness of a salad with a tangy vinaigrette brightens the rich flavors of the galette, creating a well-rounded meal.
-
Roasted Rosemary Potatoes: These golden, crispy potatoes echo the rustic charm of the galette while offering a satisfying crunch and herby fragrance.
-
Creamy Tomato Soup: A warm bowl of silky tomato soup provides a perfect contrasting texture and will keep you cozy during fall evenings.
-
Grilled Asparagus: Its vibrant color and slight char add a delightful contrast, while the freshness balances the richness of the galette's cheese.
-
Apple Cider: A glass of chilled or warmed apple cider brings a sweet and spicy element, enhancing the fall experience while pairing beautifully with the savory tart.
-
Pumpkin Spice Latte: For a seasonal touch, this comforting beverage complements the galette's flavors and makes for a delightful brunch pairing.
Eager to dive into your slice of fall comfort? Enjoy this flavorful journey, and let each bite transport you to a cozy autumn evening!
Expert Tips for Butternut Squash Galette
-
Even Dough Thickness: Ensure your galette dough is rolled out evenly to avoid uneven baking. A consistent thickness will yield a beautifully baked crust.
-
Cooling Time: Don't rush! Let the galette cool for 5-10 minutes after baking. This makes for easier slicing and enhances the flavor combination.
-
Adjust Spice Levels: The amount of cayenne pepper can be tailored to your preference. Start small and add more to suit your taste without overpowering the earthy flavors.
-
Fresh Ingredients: Use fresh sage for the best aromatic flavor. Dried sage can work, but nothing beats the taste of fresh in your Butternut Squash Galette.
-
Garnish Ideas: Experiment with additional toppings like crumbled feta or a drizzle of balsamic glaze for added complexity and visual appeal.
-
Perfect Pairing: Serve your galette with a crisp side salad or a warming bowl of soup for a cozy, satisfying meal perfect for fall gatherings.
Butternut Squash Galette Variations
Feel free to make this cozy galette your own with some delightful twists!
- Dairy-Free: Substitute Boursin and gorgonzola with cashew cream and nutritional yeast for a creamy yet dairy-free alternative.
- Herb Infusion: Incorporate fresh thyme or rosemary into the filling for an aromatic touch that brightens the dish beautifully. A little fresh herb goes a long way in elevating flavors.
- Pumpkin Swap: Use canned pumpkin puree in place of butternut squash for a shortcut that still captures the essence of fall. It will yield a slightly different texture, but equally comforting.
- Spicy Kick: Add thinly sliced jalapeños or a sprinkle of red pepper flakes to the filling for an extra heat boost. Adjust to your preference for that perfect zip!
- Additional Veggies: Mix in sautéed mushrooms or spinach for a heartier filling that adds another layer of flavor and nutrition. The more, the merrier in veggie land!
- Gluten-Free: Choose a gluten-free pie crust or make your own using almond flour and coconut flour, ensuring everyone can enjoy a slice of this savory delight.
- Nutty Crust: Try adding ground almonds or sunflower seeds into the crust for a delightful crunch and nutty flavor. Each bite will bring a lovely surprise!
Remember, this galette is as versatile as your creativity! And if you’re looking for more harvest flavors, check out our Perfect Fall Soups to serve alongside this comforting dish.
Storage Tips for Butternut Squash Galette
Fridge: Store leftover Butternut Squash Galette in an airtight container in the refrigerator for up to 3 days to maintain freshness.
Freezer: For longer storage, wrap the galette tightly in plastic wrap and aluminum foil, then freeze it for up to 2 months.
Reheating: Reheat the galette in a preheated oven at 350°F (175°C) for about 15-20 minutes to restore its crispy texture.
Serving Suggestions: Enjoy your galette warm, adding a fresh salad or soup for a complete and cozy meal!
Make Ahead Options
These Butternut Squash Galettes are perfect for busy home cooks looking to save time during meal prep! You can prepare the galette dough and refrigerate it for up to 24 hours; just wrap it tightly in plastic wrap to keep it fresh. Additionally, you can roast the butternut squash and cook the red onions in advance, storing them in an airtight container for up to 3 days in the refrigerator. When you're ready to enjoy your galette, simply roll out the dough, spread the Boursin cheese, and layer in the prepped filling before baking. This makes it easy to bring together a delicious, comforting dish with minimal effort right when you need it!
Butternut Squash Galette (Free-Form Tart) Recipe FAQs
What type of butternut squash should I use for this recipe?
Absolutely! Look for a butternut squash that feels firm and heavy for its size. The skin should be a dull beige, free from dark spots or blemishes. If you’re in a pinch, you can substitute it with pumpkin for a similar sweet flavor.
How should I store leftover Butternut Squash Galette?
To keep your galette fresh, store any leftovers in an airtight container in the refrigerator for up to 3 days. If you plan to enjoy it later, it's best to reheat it in the oven at 350°F (175°C) for about 15-20 minutes to maintain its crispy texture.
Can I freeze the Butternut Squash Galette?
Certainly! To freeze, wrap the cooled galette tightly in plastic wrap and then in aluminum foil to prevent freezer burn. It can be stored in the freezer for up to 2 months. When you're ready to eat, simply thaw it overnight in the fridge and reheat in the oven for the best results.
How do I prevent my galette from becoming soggy?
Very! To avoid a soggy crust, ensure that the filling is not too wet. You can pre-roast the butternut squash to remove excess moisture, and make sure to spread your cheese evenly without overloading the center. Plus, pre-baking the crust for a few minutes before adding the filling can help it stay crisp.
Are there any allergens I should consider with this recipe?
Definitely! This recipe contains cheese, which may not be suitable for those with dairy allergies or lactose intolerance. If that’s the case, you can use a dairy-free cheese alternative or skip it altogether. Just remember to check the labels of any store-bought ingredients to ensure they fit your dietary needs.
What are some variations I can try for this galette?
The more the merrier! You can incorporate additional veggies like sautéed spinach or roasted bell peppers for extra flavor and nutrition. Adding a sprinkle of nuts, like walnuts or pecans, on top can provide a delightful crunch. Feel free to experiment with different herbs, such as thyme or rosemary, to tailor the dish to your palate!
Irresistible Butternut Squash Galette for Cozy Fall Feasts
Ingredients
Equipment
Method
- Preheat the oven to 425°F (220°C). Peel and cube the butternut squash, toss with olive oil, salt, and cayenne pepper, and roast for 15-20 minutes until tender.
- In a skillet, heat olive oil and sauté the sliced red onions for 3-5 minutes until translucent.
- Reduce oven temperature to 350°F (175°C). Roll out the galette dough, spread Boursin cheese on it, and top with roasted squash, onions, and fresh sage leaves.
- Fold the edges of the dough over the filling, brush with heavy cream, and sprinkle with grated Parmesan and black pepper.
- Bake for 45-50 minutes until the crust is golden brown. Let cool for 5-10 minutes before serving warm.


Leave a Reply