
As the crisp autumn air ushers in October, thoughts of Halloween festivities bring out the inner child in all of us. That’s why I’m thrilled to share my delightful Chocolate Bat Biscuits, a spooktacular treat perfect for family gatherings or school parties! Not only are these biscuits a fun and creative way to enjoy baking with kids, but they’re also incredibly quick to whip up, making them a top choice for busy parents. With a rich chocolate flavor that will please both young and old, these biscuits are more than just a treat; they’re a chance to make lasting memories while surrounded by loved ones. Will you dare to create whimsical creatures like bats, owls, and even mischievous cats in your kitchen? Let’s get started on this delightful Halloween adventure!
Why are Chocolate Bat Biscuits a must-try?
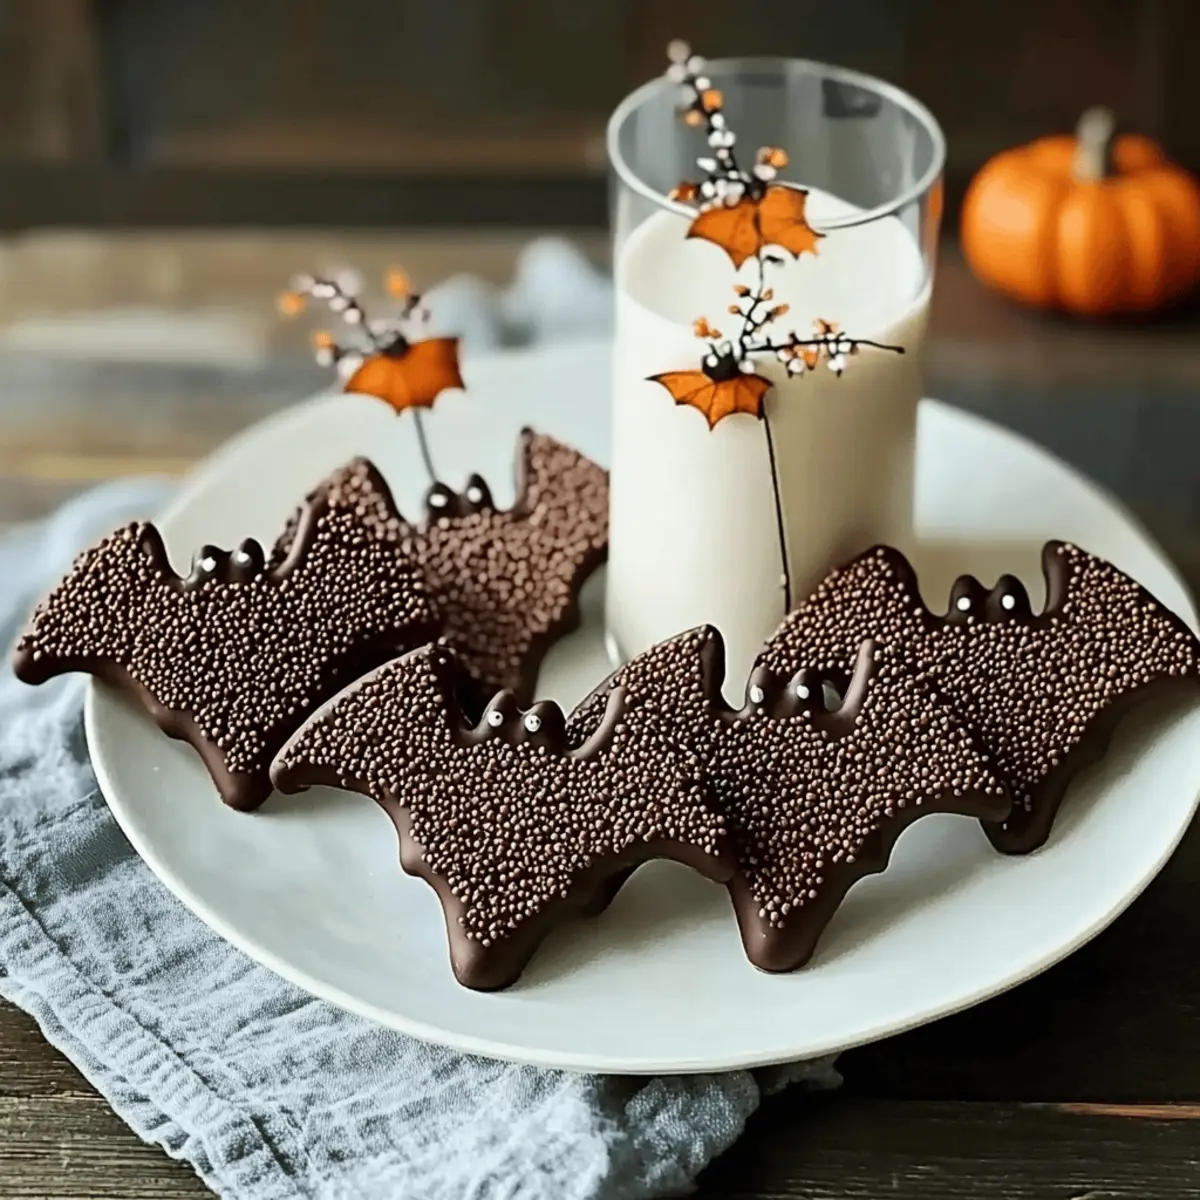
Halloween Fun: These whimsical Chocolate Bat Biscuits will bring a smile to everyone’s face, making any gathering a hit!
Quick to Make: With simple steps and easy-to-find ingredients, you can create these spooky treats in no time.
Family-Friendly Fun: Engage your kids in the kitchen and let them unleash their creativity by decorating bats, owls, and cats!
Rich Flavor: Each biscuit offers a decadent chocolatey taste that’s guaranteed to satisfy any sweet tooth and to go perfectly with a warm glass of Homemade Hot Chocolate.
Crowd-Pleaser: Serve them at Halloween parties, and watch as everyone gathers around for these delightful, crunchy cookies!
Storage Friendly: Keep them fresh for even longer in an airtight container, so everyone can enjoy the fun all week long!
Chocolate Bat Biscuits Ingredients
• Get ready to create some eerie yet delightful bites!
For the Cookies
- 125g Butter – Provides richness and a tender texture; make sure it's at room temperature for easier mixing.
- 85g Icing Sugar – Adds sweetness and helps create a smooth dough; can substitute with powdered sugar if preferred.
- 1 Large Egg Yolk – Acts as a binder and adds moisture; avoid using whole eggs for a firmer texture.
- 1 tsp Vanilla Extract – Enhances the flavor profile; try almond extract for a different twist.
- 1 tsp Milk – Adds moisture for dough consistency; replace with non-dairy milk for a vegan option.
- 175g Plain Flour – Provides structure to biscuits; gluten-free flour can be used for a gluten-free version.
- 1 tsp Fine Espresso-Style Coffee Powder – Intensifies the chocolate flavor; omit if you prefer a milder taste.
- 50g Cocoa Powder – The main source of chocolate flavor; ensure it's unsweetened for the best results.
- ¼ tsp Salt – Enhances all flavors in the biscuits; a key ingredient for balance.
For Decoration
- 100g Dark or Milk Chocolate – Used for decorating the bats; feel free to choose white chocolate for a different look.
- Chocolate Hundreds and Thousands – Adds a fun and festive touch; any kind of sprinkles will work beautifully.
- Coloured Writing Icing – Perfect for adding details; you can make your own with icing sugar and water mixed with food coloring.
Step-by-Step Instructions for Chocolate Bat Biscuits
Step 1: Preheat the Oven
Begin by preheating your oven to 180°C (160°C fan) or gas mark 4. While the oven warms up, line two baking sheets with baking parchment, ensuring that they are evenly covered. This will prevent the chocolate bat biscuits from sticking and help them bake evenly, setting the stage for a spooky treat.
Step 2: Cream the Butter and Sugar
In a large mixing bowl, cream together 125g of room temperature butter and 85g of icing sugar using a hand mixer or wooden spoon. Beat until the mixture is pale and fluffy, which should take about 3–5 minutes. Once whipped, mix in 1 large egg yolk, 1 teaspoon of vanilla extract, and 1 teaspoon of milk until well combined, forming a creamy base for your biscuits.
Step 3: Combine Dry Ingredients
Next, sift together 175g of plain flour, 1 teaspoon of fine espresso-style coffee powder, 50g of cocoa powder, and ¼ teaspoon of salt into the wet mixture. Stir gently until you form a soft dough, making sure all the flour is incorporated. You should have a cohesive, chocolatey dough that holds together well; if it’s too sticky, add a bit more flour.
Step 4: Chill the Dough
Once your dough is ready, shape it into a disc and wrap it in cling film. Refrigerate for about 15 minutes, allowing the dough to firm up slightly. This chilling time not only makes it easier to roll out but also ensures your chocolate bat biscuits keep their shape during baking, leading to delightful bat-like figures.
Step 5: Roll and Cut Out Shapes
After chilling, place the dough between two sheets of parchment paper and roll it out to about £1 coin thickness. Use an 8cm bat-shaped cookie cutter to cut out the shapes and transfer them carefully onto the lined baking sheets using a palette knife. Remember to re-roll the trimmings to cut out additional bats, maximizing your spooky creations.
Step 6: Add Stability Notches
To ensure your chocolate bat biscuits stand solidly, cut small notches at the base of each bat. This step helps them balance beautifully, especially if you plan to display them on glasses or plates.
Step 7: Bake the Biscuits
Place the baking sheets in the preheated oven and bake for about 10 minutes. The biscuits should look sandy and aromatic when done; they should not be overly soft but should maintain a slight crunch. Keep an eye on them as baking times may vary slightly depending on your oven.
Step 8: Cool the Biscuits
After baking, remove the biscuits from the oven and let them cool on the sheets for 5 minutes. This is important to allow them to firm up before transferring them to a wire rack. Once they’re firm enough to handle, move them to the rack to cool completely, ensuring they achieve the perfect crispy texture.
Step 9: Decorate the Biscuits
Now for the fun part! Melt 100g of dark or milk chocolate. Using a small brush, coat the wings and ears of your chocolate bat biscuits in melted chocolate. Then, sprinkle with chocolate hundreds and thousands for an eerie touch. Once the decorations are set, pipe on faces and fangs with colored writing icing to add character to your spooky treats.
Step 10: Allow to Set
Let the decorated biscuits sit on the wire rack until the chocolate hardens. This should take about 15-20 minutes. During this time, you can admire your whimsical creations and prepare them for the Halloween festivities ahead. Once set, your chocolate bat biscuits will be ready to delight family and friends with both their appearance and taste!

What to Serve with Spooky Chocolate Bat Biscuits?
Pair your delightful creations with choices that tantalize the taste buds and make your Halloween gatherings truly special!
- Warm Milk: Complements the rich chocolate flavors perfectly while evoking cozy childhood memories. It’s a delightful pairing for young and old alike during spooky storytelling sessions.
- Pumpkin Soup: A smooth, savory balance that cuts through the sweetness of the biscuits. Its warm, earthy flavor reflects the season’s spirit, inviting a festive ambiance.
- Ghostly Marshmallow Treats: Light, fluffy marshmallows shaped like ghosts add a cheerful contrast to the rich biscuits. They are a fun addition, especially for kids at Halloween parties!
- Fruity Halloween Punch: A refreshing drink, this fruity punch can feature seasonal berries and crisp apples, providing a fresh burst of flavor that complements the sweet cookies beautifully.
- Caramel Dipped Apples: The crunch of the apples with creamy caramel creates a delightful textural contrast alongside the chocolatey goodness of the biscuits.
- Chocolate Milkshake: For a double chocolate indulgence, a rich milkshake makes an irresistible pairing, enhancing the treat’s chocolatey flavor and enjoyment.
- Spooky Fruit Platters: Include orange wedges, grapes, and blackberries. This colorful assortment adds freshness and balances the sweetness, appealing to all tastes.
- Chocolate Cheesecake Bites: Bite-sized desserts provide a smooth, rich counterpart, making them a favorite for those craving extra chocolate during your Halloween feast!
How to Store and Freeze Chocolate Bat Biscuits
Airtight Container: Store your chocolate bat biscuits in an airtight container at room temperature for up to 7 days to keep them fresh and crunchy.
Freezer Friendly: For longer storage, freeze the baked biscuits in a single layer on a baking sheet, then transfer to a freezer-safe bag after an hour. They’ll last for up to 3 months!
Thawing: When ready to enjoy, simply remove the desired quantity from the freezer and let them thaw at room temperature for about 30 minutes.
Reheating: If you prefer warm biscuits, reheat in the oven at 160°C for 5-10 minutes, keeping an eye on them to prevent over-baking.
Expert Tips for Chocolate Bat Biscuits
- Room Temperature Butter: Ensure your butter is softened at room temperature for easier mixing, which yields a fluffier dough.
- Oven Readiness: Preheat your oven properly. An underheated oven can cause uneven baking, affecting the final texture of your chocolate bat biscuits.
- Chill Time Matters: Don't skip the chilling step! It helps the biscuits hold their shape and keeps them from spreading too much while baking.
- Optimal Thickness: Roll the dough to the right thickness—about £1 coin thickness—to ensure the biscuits bake evenly and maintain their delightful crunch.
- Decorate Creatively: Let your creativity shine when decorating! Use different shapes and colors to make your spooky characters even more fun and appealing.
Make Ahead Options
These delightful Chocolate Bat Biscuits are perfect for meal prep enthusiasts! You can prepare the dough up to 24 hours in advance by following the initial steps up to chilling the dough. Simply wrap it tightly in cling film and refrigerate until you're ready to roll it out. For those looking to save even more time, once baked, the biscuits can be stored in an airtight container for up to 3 days before decorating. Just remember to add the finishing touches—chocolate and decorations—right before serving to keep them looking fresh and exciting. With these make-ahead options, you can enjoy a fun baking session with minimal fuss during your Halloween festivities!
Chocolate Bat Biscuits Variations
Feel free to unleash your creativity and adjust the recipe to make it truly your own!
-
Cat and Owl Shapes: Use cookie cutters to create fun shapes like owls and cats for festive variety.
-
Dairy-Free: Swap out butter for coconut oil and use non-dairy milk for a delicious plant-based twist. You'll still get that rich flavor!
-
Gluten-Free: Substitute plain flour with gluten-free flour blend for a tummy-friendly alternative the whole family can enjoy.
-
Spicy Kick: Add a pinch of cayenne pepper to the dough for a surprising spicy accent in your chocolate treats. It’s a fun way to elevate the flavors!
-
Nut Flavors: Stir in some finely chopped nuts or nut butter for added texture and a nutty flavor explosion that pairs beautifully with chocolate. Almonds or hazelnuts work great!
-
Candied Bat Wings: Instead of chocolate decorations, coat the wings with melted candy melts in different colors for a vibrant look that pops.
-
Espresso Boost: For the coffee lovers, increase the espresso powder to 1 ½ teaspoons to really intensify that chocolate flavor.
-
Citrus Zest: A sprinkle of orange or lemon zest in the dough will add a refreshing twist that brightens up the rich chocolate taste.
As you explore these variations, remember to keep your family involved in the kitchen for extra fun! For more delightful treats, check out our other recipes like the charming German Chocolate Poke that will add even more sweetness to your Halloween festivities!

Chocolate Bat Biscuits Recipe FAQs
How can I tell if my ingredients are ripe or fresh?
Absolutely! For the butter, make sure it's at room temperature and soft but not melted. The icing sugar should be dry and powdery without clumps. The egg yolk should be fresh and free from any odd smell. Use fresh, unsweetened cocoa powder without any lumping, and check the expiration dates on all your ingredients to ensure they're at their best!
How should I store my Chocolate Bat Biscuits?
To maintain their freshness, store your chocolate bat biscuits in an airtight container at room temperature for up to 7 days. This will help them stay crunchy and delicious. If you notice any moisture in the container, consider adding a small piece of bread to absorb it and keep the biscuits crisp.
Can I freeze Chocolate Bat Biscuits? If so, how?
Very! To freeze your chocolate bat biscuits, first, allow them to cool completely. Place them in a single layer on a baking sheet and freeze for about an hour. After that, transfer the frozen biscuits to a freezer-safe bag or container, sealing it tightly. They can be stored for up to 3 months.
What’s the best way to thaw frozen biscuits?
When you're ready to enjoy your frozen chocolate bat biscuits, simply remove the desired quantity and let them thaw at room temperature for about 30 minutes. If you prefer them warm, you can reheat them in the oven at 160°C for 5-10 minutes, checking often to avoid over-baking.
What if my dough is too sticky or dry?
Don’t worry! If your dough seems too sticky, add a little more plain flour, one tablespoon at a time, until it reaches the right consistency. On the other hand, if the dough is too dry and crumbly, you can mix in a dash of milk to help bring it together. The goal is a soft and pliable dough that holds its shape when cut.
Are these Chocolate Bat Biscuits suitable for a gluten-free diet?
Definitely! To make these biscuits gluten-free, use a 1:1 gluten-free flour blend in place of plain flour. Just be sure to check that all other ingredients, like baking powder and cocoa powder, are labeled gluten-free as well. This way, everyone can enjoy the spooky fun!

Delicious Chocolate Bat Biscuits for Spooky Halloween Fun
Ingredients
Equipment
Method
- Preheat the oven to 180°C (160°C fan) or gas mark 4 and line two baking sheets with parchment paper.
- Cream together 125g of room temperature butter and 85g of icing sugar until pale and fluffy. Mix in 1 egg yolk, 1 tsp vanilla extract, and 1 tsp milk.
- Sift together 175g plain flour, 1 tsp coffee powder, 50g cocoa powder, and ¼ tsp salt into the wet mixture. Stir until a soft dough forms.
- Shape the dough into a disc, wrap in cling film, and refrigerate for about 15 minutes.
- Roll out the dough between two sheets of parchment paper to about £1 coin thickness and cut out shapes with a bat-shaped cookie cutter.
- Cut small notches at the base of each bat for stability.
- Bake the biscuits in the preheated oven for about 10 minutes until sandy and aromatic.
- Cool the biscuits on the sheets for 5 minutes before transferring to a wire rack to cool completely.
- Melt 100g of chocolate and coat the wings and ears of the biscuits. Sprinkle with hundreds and thousands and pipe on details with icing.
- Let the decorated biscuits sit until the chocolate hardens, about 15-20 minutes.


Leave a Reply