
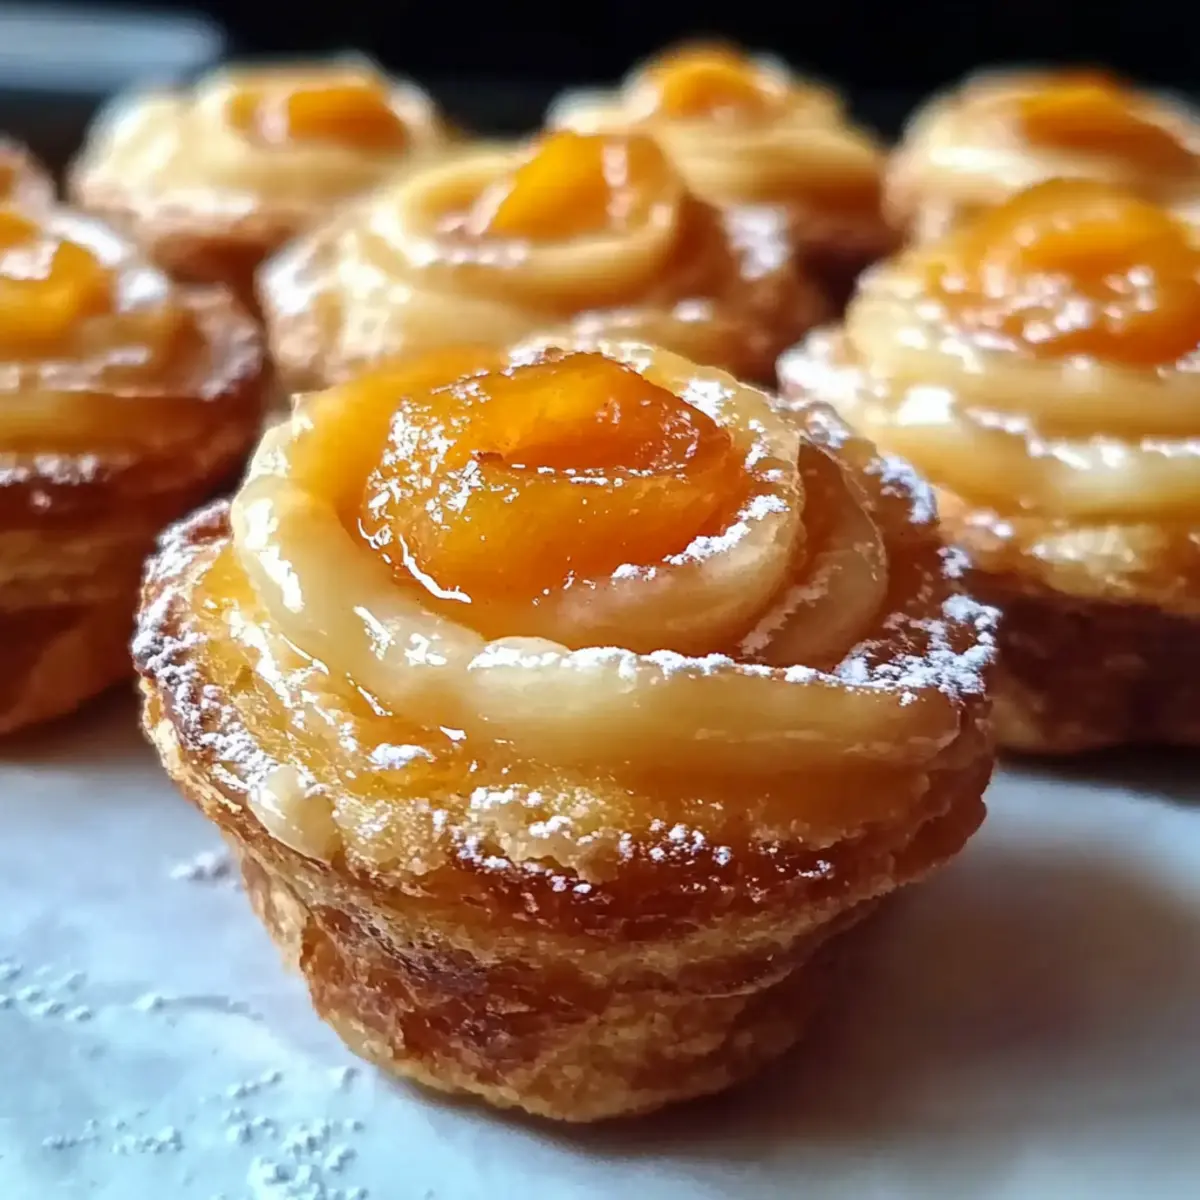
As the aroma of sweet peaches wafts through my kitchen, I can’t help but feel a rush of excitement—it's time to bake some Peach Pie Cruffins! These delightful creations merge the flaky goodness of croissants with the comforting essence of a muffin, and the result? An easy brunch pastry that feels like a special occasion treat. With a warm, gooey peach filling and a simple glaze, they are irresistibly inviting. You’re not just making a snack; you’re crafting a memorable moment for yourself and your loved ones. Plus, the best part? These cruffins come together surprisingly quickly, making them a perfect option for anyone wanting to escape the realm of fast food. What flavors do you think would elevate this flaky masterpiece even further?

Why Are Peach Pie Cruffins So Irresistible?
Flaky Layers: The use of puff pastry creates a perfectly flaky texture that’s incredibly satisfying with each bite.
Sweet Peach Filling: Bursting with fresh, juicy peach flavor, the filling transforms these treats into a nostalgic dessert.
Quick to Make: With just a few simple steps, you’ll have warm, delicious cruffins baked and ready in under 30 minutes!
Versatile Treat: Feel free to explore other fruit fillings, like berries or apples, for a delightful twist on this classic.
Perfect for Sharing: Ideal for brunch gatherings or cozy evenings, these cruffins are sure to impress your guests. If you're looking for more indulgent pastries, check out Tamale Pie Hearty or Spinach Pie Deliciously for additional flavorful options!
Peach Pie Cruffin Ingredients
For the Cruffins
• Puff Pastry Sheets – Provides flakiness and light texture; thaw before use for the best results.
• Peach Pie Filling – Offers sweetness and fruitiness, acting as the star component; fresh peaches can be cooked down with sugar and cornstarch as a delicious alternative.
• Granulated Sugar – Enhances sweetness (optional); can be omitted if the filling is sweet enough.
• Ground Cinnamon – Adds warmth and spice to the filling; can be replaced with nutmeg or omitted according to your preference.
• Egg (for egg wash) – Provides a golden-brown finish; essential for that beautiful color!
• Water – Mixed with egg for the egg wash; facilitates a shiny glaze.
For the Glaze
• Powdered Sugar – Used for the glaze to provide sweetness; could be substituted with a sugar alternative for a lower-sugar diet.
• Milk or Cream – Adds richness and helps in glaze consistency; feel free to use dairy-free milk if preferred.
Let’s get baking and bring those warm Peach Pie Cruffins to life in your kitchen!
Step‑by‑Step Instructions for Peach Pie Cruffins
Step 1: Preheat the Oven
Begin by preheating your oven to 375°F (190°C). While the oven warms up, take a moment to grease a muffin tin with non-stick spray or butter, ensuring that each cup is well-coated. This step is crucial to prevent the cruffins from sticking, allowing them to release easily once they’re baked to golden perfection.
Step 2: Prepare the Puff Pastry
Unroll your thawed puff pastry sheets onto a lightly floured surface. Gently roll them out with a rolling pin to smooth any creases and create an even thickness. This will help with the layering needed for those flaky Peach Pie Cruffins. Aim for about a ¼-inch thickness, making the pastry easier to work with as you progress to the next steps.
Step 3: Spread the Filling
Evenly spread the luscious peach pie filling over the entire surface of the rolled-out puff pastry. If you're using granulated sugar and ground cinnamon, sprinkle them generously over the filling to enhance the sweetness and add warmth. This layer will bring the delightful peachiness to each bite of your cruffins, so be sure to distribute it without skimping!
Step 4: Cut and Shape the Pastry
With a sharp knife or pizza cutter, slice the pastry into 2-inch wide strips. Carefully roll each strip into a spiral, starting from one end, creating those lovely swirls that will give your Peach Pie Cruffins their signature shape. As you roll, keep the filling contained, ensuring maximum flavor infusion during baking.
Step 5: Place in Muffin Tin
Next, position each rolled spiral upright in the greased muffin tin. Ensure there is space between each cruffin for some expansion during baking. This arrangement allows your cruffins to rise beautifully and develop that flaky texture, resulting in a decadent treat that looks as good as it tastes.
Step 6: Egg Wash the Cruffins
In a small bowl, whisk together the egg with a splash of water to create your egg wash. Using a pastry brush, generously coat the tops of each cruffin with the egg mixture. This step will give your Peach Pie Cruffins a shiny, golden brown finish that’s visually appealing and adds a delightful sheen to the pastry.
Step 7: Bake to Perfection
Carefully place the muffin tin in the oven and bake the cruffins for 20–25 minutes. Keep an eye on them as they bake; you’ll know they’re done when they turn a deep golden brown and the aroma of sweet peaches fills your kitchen. The crispy edges will contrast nicely with the soft, gooey filling inside.
Step 8: Prepare the Glaze
While the cruffins are baking, mix powdered sugar with a splash of milk or cream in a small bowl to create a glaze. Stir until smooth, adjusting the consistency by adding more sugar or liquid as needed. The glaze should be pourable yet thick enough to drizzle over your warm Peach Pie Cruffins for a delightful finishing touch.
Step 9: Drizzle and Serve
Once your Peach Pie Cruffins have finished baking and have cooled slightly, drizzle the prepared glaze over each one. The warmth from the cruffins will slightly melt the glaze, creating an irresistible sweet coating. Serve these delightful pastries warm to enjoy their full, flaky glory – perfect for brunch or a special treat!
Make Ahead Options
These Peach Pie Cruffins are ideal for busy home cooks looking to streamline their meal prep! You can assemble the cruffins up to 24 hours in advance by preparing the filled and rolled pastries, then covering them tightly with plastic wrap and refrigerating. To maintain their flaky texture, chill them in the muffin tin before baking. When you're ready to enjoy, simply brush with the egg wash and bake them straight from the fridge, adding an extra minute or two to the baking time if needed for even cooking. By prepping ahead, you’ll have warm, inviting cruffins ready with minimal last-minute effort—perfect for impressing guests or treating your family!
Peach Pie Cruffins Variations & Substitutions
Feel free to get creative and adapt your Peach Pie Cruffins to suit your taste and needs!
-
Berry Bliss: Swap the peach filling for a mix of fresh blueberries and raspberries for a refreshing twist. The tartness will add a delightful layer of flavor!
-
Apple Cinnamon: Use apple pie filling instead for a warm and comforting flavor. Add extra cinnamon for a cozy autumn vibe in every bite.
-
Nutty Surprise: Sprinkle in some chopped pecans or walnuts in the filling for a crunchy, nutty texture. It adds a wholesome element that family and friends will love.
-
Spice It Up: Incorporate a pinch of ground ginger or allspice into your filling to give the cruffins an exotic kick. This will awaken your taste buds, making them even more irresistible.
-
Sugar Alternatives: If you're looking to cut down on sugar, opt for coconut sugar or a sugar-free sweetener in your filling and glaze. Enjoy the sweetness with fewer calories!
-
Dairy-Free Delight: Substitute regular milk with almond or oat milk in your glaze. This makes the cruffins dairy-free, ensuring everyone can enjoy them without issue.
-
Flavorful Glaze: Instead of a simple powdered sugar glaze, try a lemon or vanilla-infused glaze for a zesty and aromatic twist that enhances each cruffin. A fun way to surprise your palate!
-
Peachy Heat: Add a pinch of cayenne pepper to your peach filling for a spicy kick. This unique combination of sweet and heat is sure to create an unforgettable treat.
Get inventive with these variations, and don't forget to try your hand at other delightful pastries like Tamale Pie Hearty or Spinach Pie Deliciously, where each recipe invites your culinary creativity!
What to Serve with Peach Pie Cruffins?
Indulging in warm Peach Pie Cruffins opens up a world of delightful pairing possibilities to create a sumptuous meal experience.
-
Creamy Vanilla Ice Cream: The rich creaminess enhances the sweet, fruity flavors of the cruffins, making each bite feel like a dessert dream. Imagine a scoop melting along the warm pastry for a heavenly contrast!
-
Strong Brewed Coffee: A bold cup cuts through the sweetness while balancing the flaky treats’ buttery layers. Pair with some creamer for a rich kick that’ll elevate your brunch.
-
Citrus Salad: Refreshing and zesty, a citrus salad adds a bright contrast to the sweet cruffins and is packed with vitamins, making it a light and enjoyable accomplice.
-
Honey Yogurt: The creamy texture of yogurt drizzled with honey makes a lovely dip for the cruffins and balances their sweetness, providing a wonderful, nutritious option.
-
Sparkling Lemonade: Serve a glass of fizzy lemonade to complement the sweet peach filling. The carbonation and tanginess will brighten up your palate beautifully!
-
Maple Pecan Biscotti: These crunchy delights add a textural contrast while their nutty sweetness pairs wonderfully with the fruity flavors of the cruffins.
-
Minted Iced Tea: Refreshing and aromatic, this drink with a hint of mint can cleanse the palate and enhance the freshness of the peach flavors.
-
Peanut Butter Smoothie: Thick, creamy, and nutty, a smoothie adds proteins to your brunch. It’s a fun twist that goes surprisingly well with the cruffins!
-
Chocolate Dipped Strawberries: These elegant treats bring a sophisticated touch to your meal, offering a combination of sweet and tart that perfectly complements any fruit pastry.
How to Store and Freeze Peach Pie Cruffins
Room Temperature: Store cooled cruffins in an airtight container at room temperature for up to 2 days to maintain freshness.
Fridge: If you want them to last a bit longer, keep cruffins in the fridge for up to 5 days. Seal them tightly to prevent drying out.
Freezer: For longer storage, wrap each Peach Pie Cruffin in plastic wrap followed by foil, and freeze for up to 2 months. Thaw overnight in the fridge before reheating.
Reheating: For the best texture, reheat thawed cruffins in a preheated oven at 350°F (175°C) for about 10-15 minutes, or until warmed through and crisp.
Expert Tips for Peach Pie Cruffins
-
Chill for Flakiness: Chill the formed cruffins in the muffin tin for 10 minutes before baking. This helps maintain that delightful flaky texture you crave.
-
Even Egg Wash: Make sure to apply the egg wash evenly across each cruffin for a uniformly golden color. This enhances the visual appeal and adds sheen.
-
Watch the Bake Time: Avoid overbaking by keeping an eye on your cruffins in the final minutes. They should be golden brown but moist on the inside—to achieve the best Peach Pie Cruffins, aim for a perfect balance.
-
Keep It Fresh: If you’re making these ahead, store them in an airtight container after cooling. Reheat in the oven briefly before serving for maximum freshness!
-
Experiment with Fillings: Don’t hesitate to try different fillings, like apple or berry, to customize your cruffins. It’s a fun way to switch up flavors and keep things exciting!

Peach Pie Cruffins Recipe FAQs
What type of peaches should I use for the filling?
Absolutely! For the best flavor, choose ripe peaches that are slightly soft to the touch but not overly mushy. Look for peaches with a fragrant aroma and a vibrant color. If you can't find fresh peaches, you can always use store-bought peach pie filling as a convenient alternative.
How should I store leftover Peach Pie Cruffins?
Store your cooled cruffins in an airtight container at room temperature for up to 2 days. If you want them to last longer, refrigerate them where they’ll stay fresh for up to 5 days. Just be sure to seal them tightly to avoid any dryness!
Can I freeze Peach Pie Cruffins?
Yes! You can freeze your cruffins for up to 2 months. Wrap each cruffin individually in plastic wrap, followed by aluminum foil to protect them from freezer burn. When ready to enjoy, thaw them overnight in the fridge, then reheat in a preheated oven at 350°F (175°C) for about 10-15 minutes for the best texture.
What should I do if my cruffins are not rising properly?
Very! If your cruffins aren't rising as expected, it may be due to the puff pastry being too warm or not rolled out evenly. Make sure your pastry is cold and properly thawed. Additionally, ensure your muffin tin is greased well; this prevents sticking and promotes even rising during baking.
Are Peach Pie Cruffins suitable for my gluten-free diet?
If you’re on a gluten-free diet, you can easily substitute the puff pastry with a gluten-free version readily available in stores. Just ensure that all your other ingredients, especially the filling and glaze, are gluten-free as well. I recommend checking labels for any hidden gluten!
How long does it take to bake Peach Pie Cruffins?
Bake your cruffins for 20-25 minutes at 375°F (190°C). Keep an eye on them towards the end; they should be a gorgeous golden brown, and the enticing aroma of peaches will fill your kitchen, letting you know they're almost ready!

Peach Pie Cruffins: Delightfully Flaky and Irresistibly Sweet
Ingredients
Equipment
Method
- Preheat your oven to 375°F (190°C) and grease a muffin tin with non-stick spray or butter.
- Unroll your thawed puff pastry sheets onto a lightly floured surface and roll them out to about a ¼-inch thickness.
- Spread the peach pie filling evenly over the puff pastry. If using, sprinkle granulated sugar and ground cinnamon over the filling.
- Slice the pastry into 2-inch wide strips and roll each strip into a spiral, containing the filling.
- Position each rolled spiral upright in the greased muffin tin, leaving space between each cruffin.
- Whisk the egg with water to create an egg wash and brush it generously over the tops of each cruffin.
- Bake the cruffins for 20–25 minutes until they are deep golden brown.
- Mix the powdered sugar with milk or cream to create a glaze, adjusting consistency as needed.
- Drizzle the glaze over each cruffin after they've cooled slightly and serve warm.
Leave a Reply