
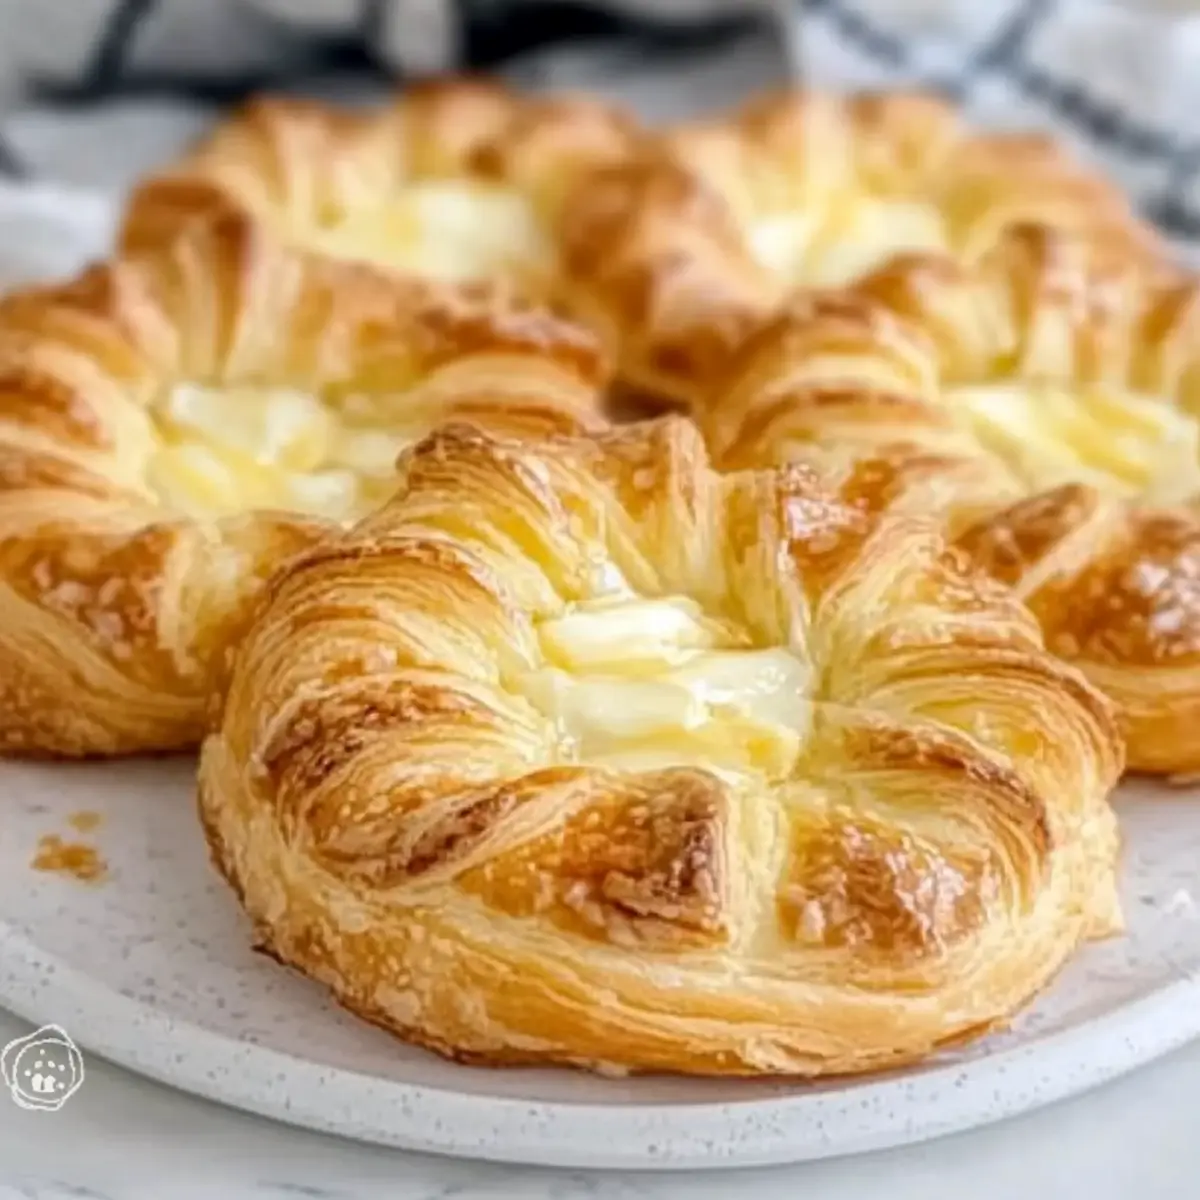
There's a magical moment when you pull a piping hot pastry from the oven and the delightful aroma fills your kitchen, instantly transporting you to a charming café. Today, I’m excited to share my Flaky Cheese Danish Recipe, bringing that bakery experience right to your home. Perfect for breakfast or brunch, this treat is not only a crowd-pleaser but also incredibly simple to whip up, especially when using ready-made puff pastry. You’ll savor the buttery, flaky layers wrapped around a luscious cream cheese filling that’s utterly divine. Plus, it’s a fun project that even beginners can tackle, making it perfect for a cozy weekend gathering or a delightful surprise for your loved ones. Are you ready to enjoy a warm slice of homemade happiness? Let’s get baking!

Why is This Cheese Danish Recipe Amazing?
Deliciously Flaky: Each bite showcases layers of buttery puff pastry that are perfectly crispy and delightfully flaky.
Creamy Center: The rich cream cheese filling adds a smooth texture that melts in your mouth, taking your tastebuds on a joyous ride.
Beginner-Friendly: With ready-made puff pastry, this recipe is designed for anyone, even the newest bakers in the kitchen!
Versatility: You can easily customize your cheese Danish by adding fruits or herbs—think berries or zesty citrus zest—to elevate your experience.
Perfect for Sharing: It’s an excellent addition to brunch gatherings or simply for a cozy morning at home. Pair it with fresh coffee or tea for a delicious start to your day.
Trust me, once you try these flaky cheese danishes, you won't want to go back to store-bought! For more delightful ideas, check out my Potato Blue Cheese and Spatchcock Chicken recipes to impress your guests.
Flaky Cheese Danish Ingredients
• Bring the magic of a bakery to your kitchen with these essential ingredients for a Flaky Cheese Danish Recipe.
For the Pastry
- Ready-made puff pastry – This convenient base minimizes prep time, allowing for a quick assembly of your delicious Danish.
For the Cream Cheese Filling
- Cream cheese – The heart of your filling, offering a rich and creamy texture. Swap it with ricotta for a lighter option!
- Granulated sugar – Sweetens the cream cheese mixture; reduce the amount if you prefer a less sugary bite.
- Vanilla extract – Enhances the flavor of your filling; try almond extract for a different depth of taste.
- Lemon juice – Adds a zesty tang that brightens the creamy filling; lime juice is a great alternative if needed.
For the Finish
- Egg yolk (for wash) – Provides a beautiful golden color on the baked pastry; milk is a great vegan substitute.
- Powdered sugar – Used for glazing your danish for an extra touch of sweetness; feel free to omit if you want it less sweet.
With these simple ingredients, you’re just a few steps away from whipping up a stunning Flaky Cheese Danish that will impress everyone at your table! Happy baking!
Step‑by‑Step Instructions for Flaky Cheese Danish Recipe
Step 1: Preheat Your Oven
Begin by preheating your oven to 400°F (200°C). While it heats, line a large baking sheet with parchment paper to prevent sticking. This step sets the perfect stage for creating your Flaky Cheese Danish, ensuring that the pastries puff up beautifully and develop that tempting golden color.
Step 2: Make the Cream Cheese Filling
In a mixing bowl, combine 8 oz of cream cheese, 1/4 cup of granulated sugar, 1 tsp of vanilla extract, 1 tbsp of lemon juice, and a pinch of salt. Use a hand mixer or whisk to blend until the mixture is smooth and creamy, which should take about 2-3 minutes. This rich filling is what gives the Flaky Cheese Danish its delightful taste.
Step 3: Prepare the Puff Pastry
Lay your thawed puff pastry on a lightly floured surface. Roll it out gently to smooth out the creases, then cut it into 8 equal rectangles or squares. Aim for about 4x5 inches each. The pastry should feel soft and pliable—this will ensure those flaky layers rise perfectly in the oven.
Step 4: Arrange the Pastry on the Baking Sheet
Place the cut puff pastry rectangles on the prepared baking sheet, leaving space between each piece. For an added decorative touch, you can fold the edges over slightly or use a knife to score a border around the perimeter. This visual cue will help create a beautiful crust on your Flaky Cheese Danish.
Step 5: Fill the Pastries
Spoon approximately 1 tablespoon of the cream cheese filling into the center of each pastry rectangle. Be careful not to overfill, as this can cause the filling to leak during baking. This step allows you to enjoy the perfect balance of flaky pastry and creamy filling in each bite!
Step 6: Apply the Egg Wash
In a small bowl, whisk 1 egg yolk with a splash of water or milk to create an egg wash. Using a pastry brush, carefully brush the edges of each pastry rectangle with this mixture. This will give your Flaky Cheese Danish a gorgeous, shiny golden finish as they bake.
Step 7: Bake the Danishes
Pop the baking sheet into your preheated oven and bake for about 15-18 minutes, or until the pastries are puffed and golden brown. You’ll know they’re ready when the kitchen fills with a delightful aroma and the tops are beautifully caramelized—a clear indicator of your success!
Step 8: Cool and Glaze the Danishes
Once baked, remove the Flaky Cheese Danishes from the oven and allow them to cool on the baking sheet for about 5 minutes. Meanwhile, prepare a glaze by mixing powdered sugar with a little milk or lemon juice. Drizzle this over your warm pastries before serving, adding a delightful finishing touch to your homemade treat.

Flaky Cheese Danish Recipe Variations
Feel free to explore and play with these variations to make the recipe your own!
-
Fruit-Filled: Add a layer of fruit preserves or fresh berries atop the cream cheese filling for a burst of sweetness. Think raspberry, blueberry, or strawberry—each bite will be a delightful surprise!
-
Lemon Zest: Grate some lemon zest into your cream cheese mixture for a zesty kick that elevates the flavor profile. This twist adds brightness and is a refreshing contrast to the creamy filling.
-
Savory Style: For a savory option, blend in chopped herbs like chives or dill into your cream cheese filling. You can also incorporate finely diced spinach or roasted red peppers for an exciting flavor profile that’s still rich and creamy.
-
Almond Flour: If you're looking for a gluten-free twist, try using almond flour to dust your work surface. It adds a nutty flavor while still allowing you to enjoy that flaky texture you love.
-
Cinnamon Sugar Dusting: Before baking, sprinkle a mixture of cinnamon and sugar on the pastry. This sweet and spicy touch brings warmth and comfort to your pastry that’s perfect for cooler mornings.
-
Mascarpone Swap: Substitute mascarpone for the cream cheese to create a surprisingly creamy texture with a subtly sweet flavor. It’s great for those who love a bit of luxurious indulgence.
-
Berry Compote Drizzle: After baking, drizzle a warm berry compote over the top for extra visual appeal and luscious flavor. This will turn your Danish into an impressive dessert that beautifully pairs with coffee or tea.
Take these ideas as a stepping stone to craft your unique pastry masterpiece! Once you feel inspired, you might also want to check out my ideas for Chicken Adobo or how to make a delightful Spatchcock Chicken for your next meal. Happy baking!
Make Ahead Options
These Flaky Cheese Danishes are ideal for meal prep, allowing you to enjoy delicious homemade pastries with less effort during busy mornings! You can prepare the cream cheese filling up to 3 days ahead and store it in an airtight container in the refrigerator. Additionally, you can assemble the shaped danishes (filled and brushed) and refrigerate them for up to 24 hours before baking. To maintain their delightful flaky texture, cover the baking tray tightly with plastic wrap. When you're ready to impress your family or guests, simply preheat your oven and bake the refrigerated danishes directly, adding a few extra minutes to the bake time for perfect results! Enjoy the warm, buttery goodness with minimal fuss!
How to Store and Freeze Flaky Cheese Danish
Fridge: Store baked Flaky Cheese Danishes in an airtight container for up to 5 days. This ensures they maintain their delightful texture and flavor.
Freezer: If you have unbaked shaped pastries, they can be frozen for up to 1 month. Just bake them straight from the freezer, adding a few extra minutes to the baking time.
Reheating: To revive leftovers, preheat your oven to 325°F (160°C) and reheat the Danishes for 5-7 minutes until warm and flaky again.
Expert Tips for Flaky Cheese Danish Recipe
-
Proper Thawing: Ensure the puff pastry is fully thawed to achieve optimal flakiness; if it's still cold, it won’t puff as beautifully.
-
Mind the Filling: Avoid overfilling with cream cheese to prevent leakage during baking; a tablespoon in the center is just right for balance.
-
Golden Finish: Brush the edges with egg wash (or milk) for that shiny golden look; just remember to keep the wash away from the filling to avoid sogginess.
-
Cooling Time: Allow your Flaky Cheese Danishes to cool completely before storing them; this keeps them from becoming soggy due to trapped steam.
-
Experiment with Flavors: Don’t hesitate to add fruits like raspberries or zests of citrus to the filling, creating a personalized twist that's unique and delicious!
What to Serve with Flaky Cheese Danish Recipe
Pair your delightful cheese danish with some delicious sides to create a memorable breakfast or brunch experience.
- Fresh Fruit Salad: A vibrant medley of seasonal fruits adds a refreshing contrast to the rich danish, lightening up every bite.
- Greek Yogurt Parfait: Layered with granola and berries, this parfait offers a creamy texture and healthful elements that balance the sweetness.
- Light Green Salad: Crisp greens with a citrus vinaigrette complement the pastry’s buttery nature, providing a fresh and zesty bite.
- Savory Bacon or Sausage: These protein-packed sides add a savory contrast to the danish's sweetness, making for a well-rounded meal.
- Classic Coffee: A fresh brew enhances the flavors of the cheese danish, perfect for enjoying alongside a warm slice.
- Herbal Tea: Pair your danish with a fragrant herbal tea for a calming, aromatic addition that soothes the palate.
- Lemon Curd for Dipping: This tangy companion adds a zesty pop of flavor that enhances the creaminess of the filling.
Elevate your Flaky Cheese Danish recipe with these delightful pairings and create a brunch that everyone will remember!

Flaky Cheese Danish Recipe FAQs
How do I choose the right puff pastry?
Absolutely! Look for ready-made puff pastry that is labeled as "all-butter" for the best flavor. Make sure it’s well-thawed before using, avoiding any cracking or tearing. You can tell it’s ready when it’s pliable and soft to the touch.
How should I store leftover cheese Danish?
To keep your Flaky Cheese Danishes fresh, store them in an airtight container in the fridge for up to 5 days. This method prevents them from drying out while maintaining their delightful texture and flavor. If they cool completely first, it helps maintain their crispiness!
Can I freeze cheese Danish before baking?
Yes, you can! If you’ve shaped the pastries but haven’t baked them yet, they can be frozen for up to 1 month. Simply place them on a baking sheet to freeze them individually for 1-2 hours, then transfer to an airtight bag. When you're ready to bake, just pop them in from frozen, adding a few extra minutes to the baking time.
What if my filling leaks during baking?
No worries! If this happens, it’s often due to overfilling the pastries. Make sure to keep the filling to about 1 tablespoon per Danish. If you experience leakage, you can also try placing the pastries on a parchment-lined baking sheet to catch any drips, making cleanup easier!
Are there any allergies I should be aware of?
Certainly! This recipe contains dairy and eggs, so it’s not suitable for those with lactose intolerance or egg allergies. For a dairy-free option, consider using a plant-based cream cheese. Also, if you're cooking for someone with gluten sensitivities, be sure to look for gluten-free puff pastry alternatives.
How can I add a personal touch to my cheese Danish?
The more the merrier! You can easily customize your cheese Danish by mixing in fruits like raspberries or blueberries into the cream cheese filling. Another fun twist is to sprinkle some lemon or orange zest to add a refreshing citrus flavor. Experiment and find what makes your heart sing!
Delicious Flaky Cheese Danish Recipe for Effortless Mornings
Ingredients
Equipment
Method
- Preheat your oven to 400°F (200°C) and line a baking sheet with parchment paper.
- In a mixing bowl, combine cream cheese, sugar, vanilla extract, lemon juice, and a pinch of salt. Blend until smooth and creamy.
- Lay the thawed puff pastry on a floured surface. Roll it out and cut into 8 equal rectangles.
- Place the pastry rectangles on the baking sheet, leaving space in between. You can decorate the edges if desired.
- Spoon approximately 1 tablespoon of the cream cheese filling into the center of each pastry rectangle.
- Whisk the egg yolk with a splash of water or milk, then brush the edges of each pastry with the egg wash.
- Bake for 15-18 minutes until puffed and golden brown.
- Remove from oven and let cool for 5 minutes. Glaze with powdered sugar mixed with milk or lemon juice before serving.


Leave a Reply