
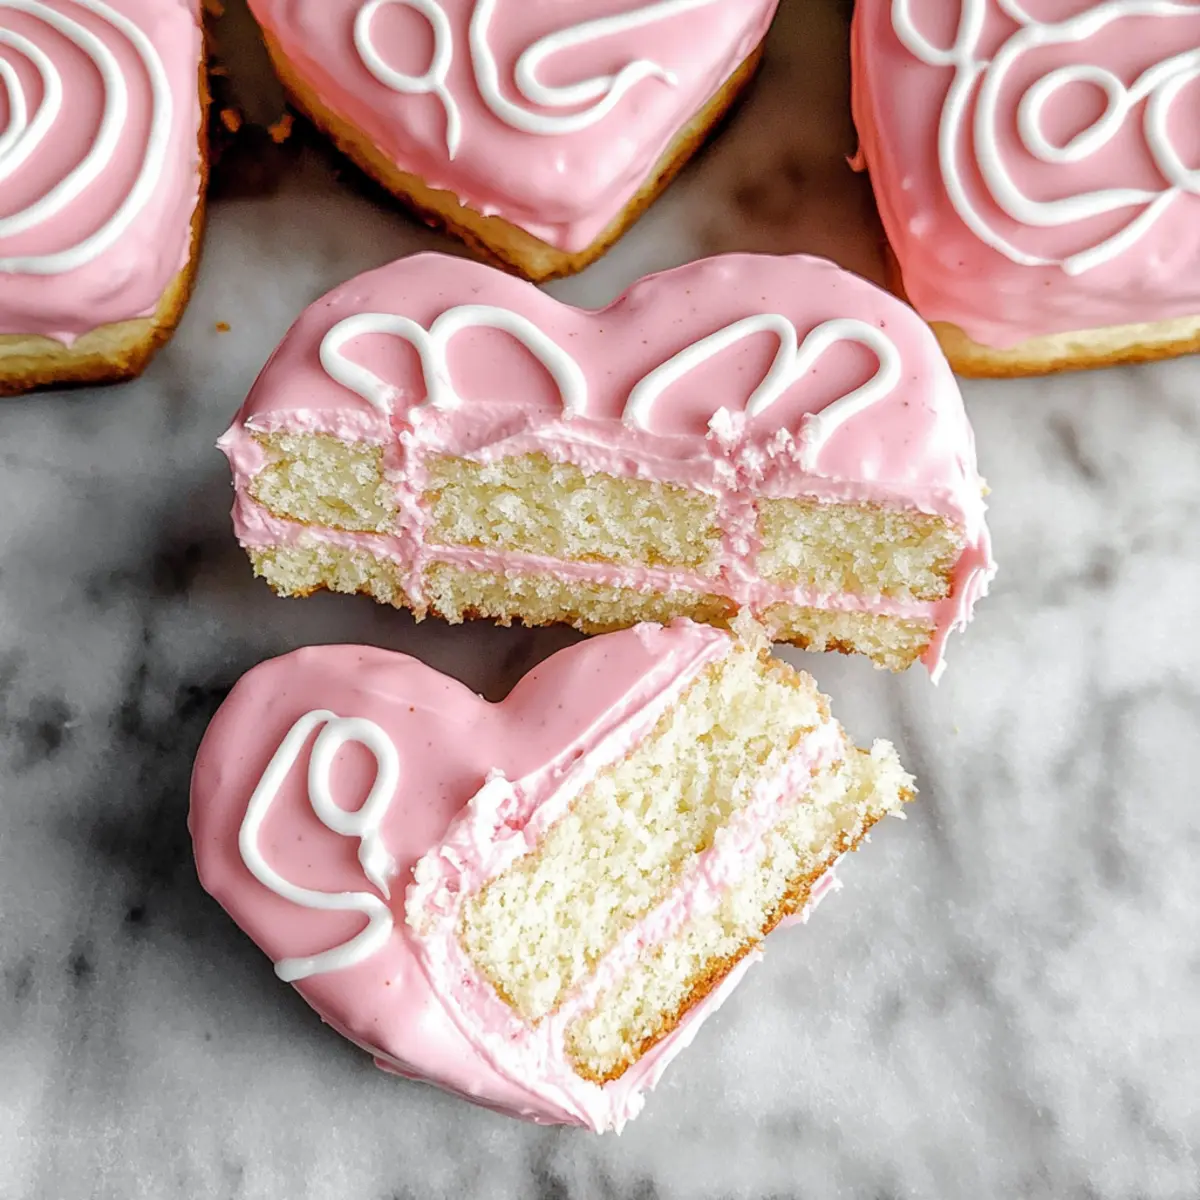
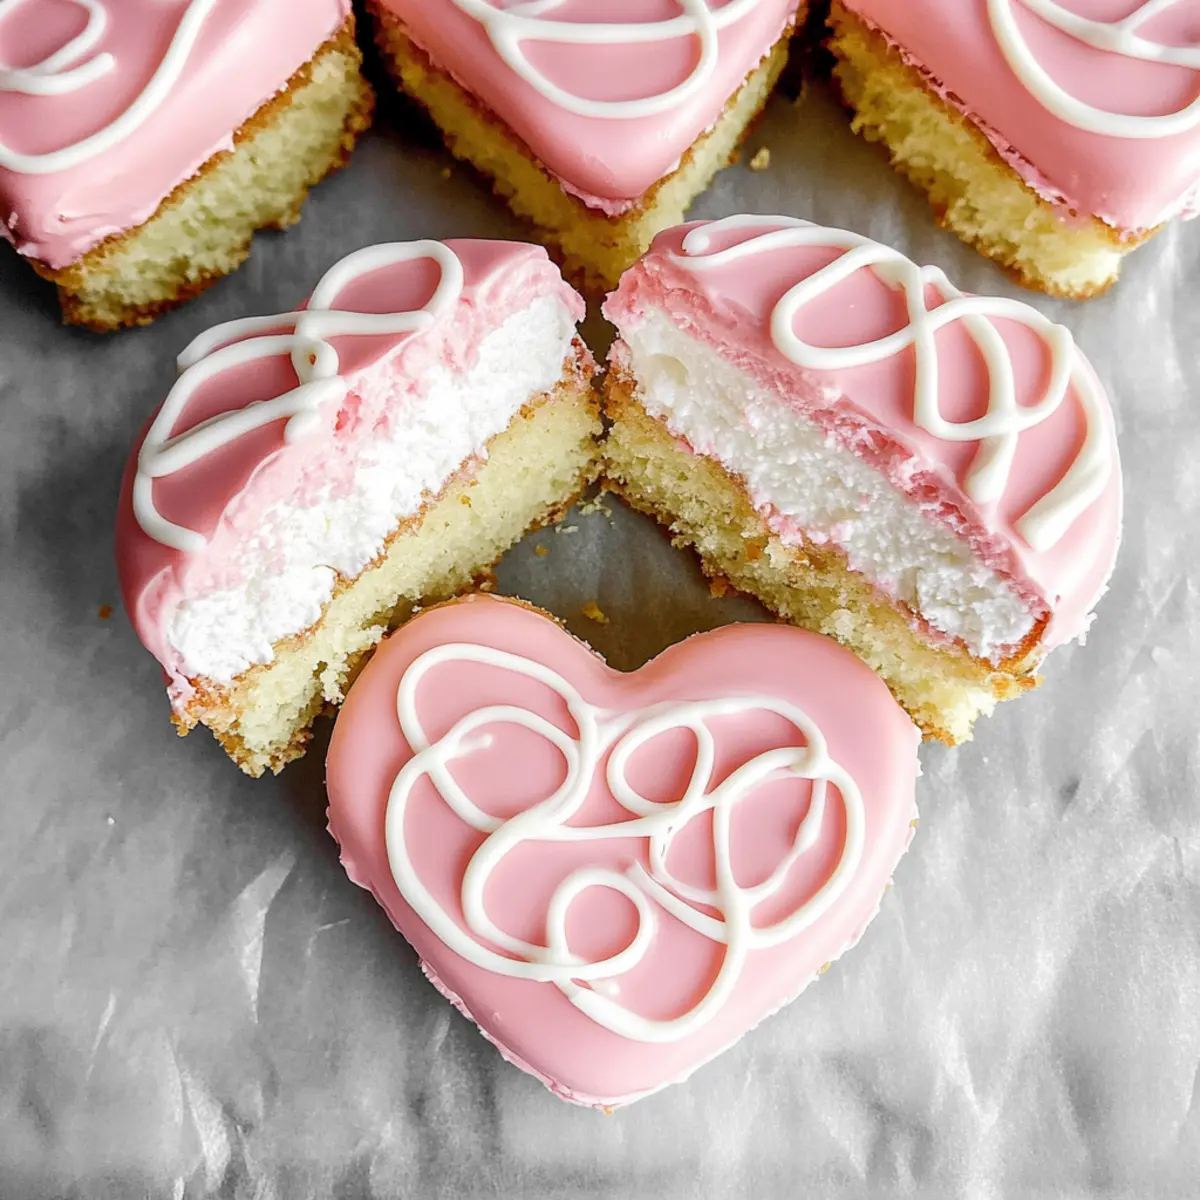
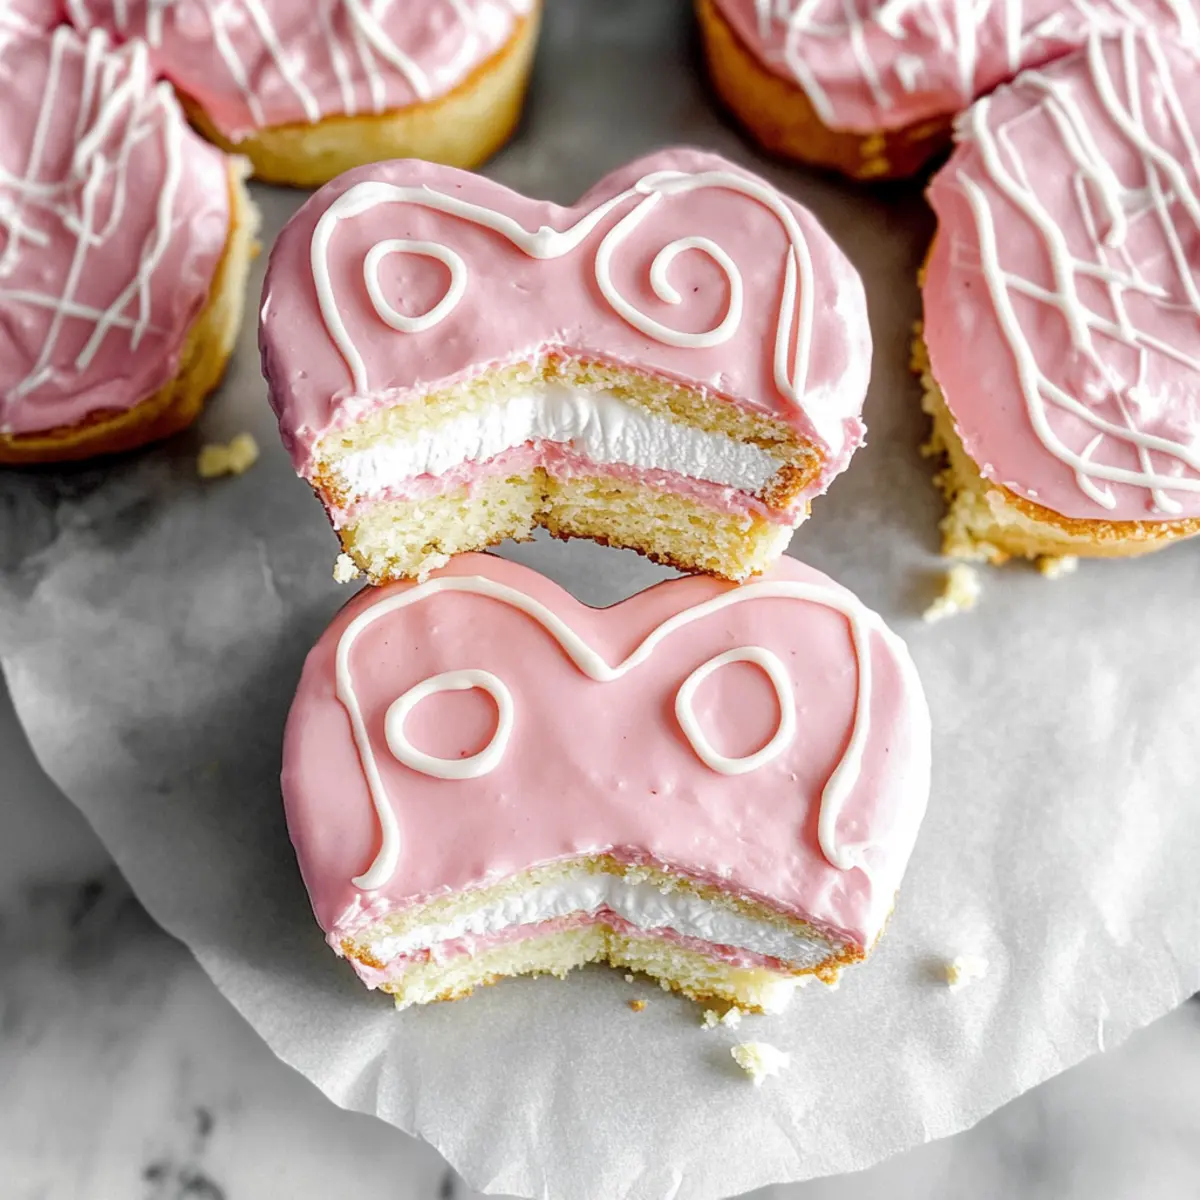
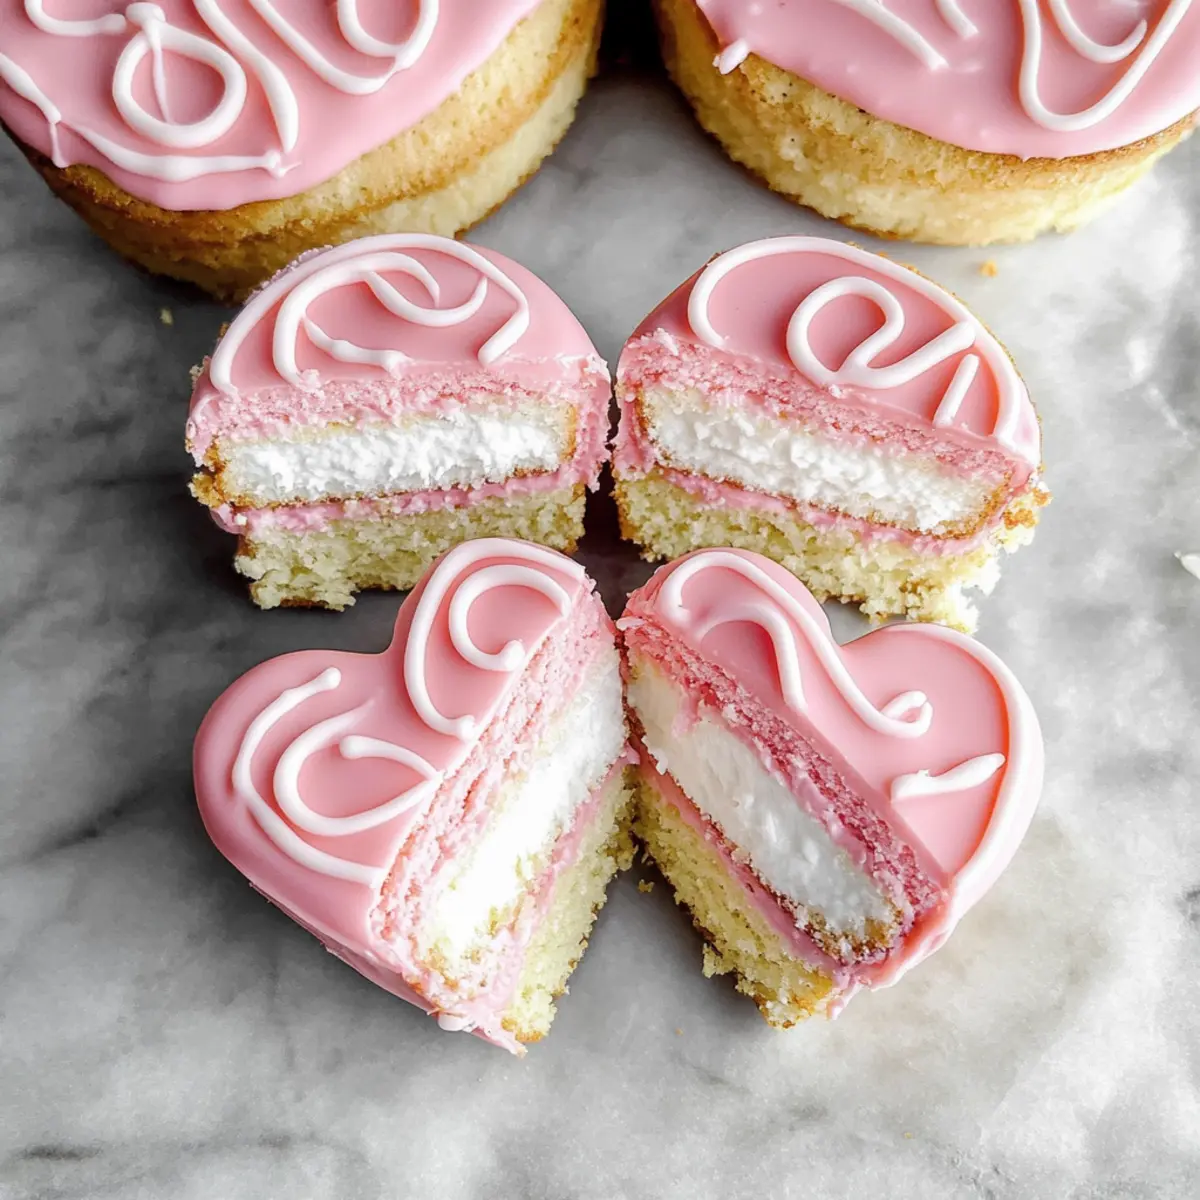
You might feel a rush of sweetness when you catch a whiff of nostalgia wafting through your kitchen, just like the blissful days of your childhood. This is exactly what you’ll experience as you whip up these delightful Homemade Copycat Little Debbie Valentine Cakes. With their tender, moist cake layered with fluffy marshmallow crème and coated in a cheerful pink chocolate, these treats are not just a feast for the eyes, but an easy way to celebrate love on Valentine’s Day. Each bite is reminiscent of those beloved snacks we devoured, but crafted with homemade warmth and care. Plus, they’re perfect for impressing guests or enjoying a sweet moment with someone special! Ready to create some heart-shaped magic that will take you back? Let’s dive in!
Why Love Little Debbie Valentine Cakes?
Nostalgic Treat: These cakes bring back fond childhood memories while adding a homemade touch to your Valentine’s Day festivities.
Simple Steps: With easy-to-follow instructions, even novice bakers can create these delightful desserts without stress.
Rich Marshmallow Filling: The fluffy, sweet marshmallow crème elevates each bite into a luxurious treat that’s sure to impress!
Fun for Any Occasion: Use different cookie cutter shapes to make these cakes perfect for birthdays or anniversaries, not just Valentine’s Day.
Shared Joy: These whimsical creations are perfect for gatherings, sparking smiles and sweet conversations with every slice. If you’re looking for more fun dessert ideas, check out my delicious Crab Cakes Forget and Ricotta Protein Pancakes!
Little Debbie Valentine Cakes Ingredients
For the Cake
• Boxed White Cake Mix – Provides the base structure and flavor. Substitution: Yellow box cake mix can also be used in a pinch.
• Granulated Sugar – Adds sweetness.
• Water – Hydrates the batter.
• Eggs (room temperature) – Contributes to the cake's structure and moisture.
• Vanilla Extract – Enhances flavor.
• Vegetable Oil – Keeps the cake moist and tender.
• All-purpose Flour – Aids in the cake’s structure.
• Kosher Salt – Balances sweetness.
• Full Fat Sour Cream – Adds moisture and richness. Note: Not to skip; it enriches flavor and texture.
For the Filling
• Marshmallow Crème – Used for the filling. Note: Can substitute with marshmallow fluff.
• Salted Butter (room temperature) – Provides creaminess for the filling.
• Powdered Sugar – Gives sweetness to the filling.
• Heavy Cream (room temperature) – Adjusts filling consistency to be spreadable.
For the Coating
• Almond Bark – Coating chocolate; easy to melt. Note: Real white chocolate can be used but may be more temperamental.
• Crisco – Used to adjust the consistency of melted chocolate.
• Pink Gel Food Dye – For coloring the coating chocolate; must be gel-based to avoid seizing.
Step‑by‑Step Instructions for Little Debbie Valentine Cakes
Step 1: Preheat Oven
Begin by preheating your oven to 350°F (175°C). While the oven heats, prepare two half sheet pans by lining them with parchment paper to ensure easy removal of the cake later. This foundation sets the stage for your Homemade Little Debbie Valentine Cakes, so be sure to have everything ready before moving on to the next step.
Step 2: Mix Cake Batter
In a large mixing bowl, combine the boxed white cake mix, granulated sugar, water, eggs, vanilla extract, and vegetable oil. Use a mixer on medium speed to blend these ingredients until smooth, about 2–3 minutes. Next, incorporate the all-purpose flour, kosher salt, and full-fat sour cream, mixing until you achieve a smooth batter that’s ready to be transformed into delightful cake layers.
Step 3: Divide & Bake
Carefully divide the cake batter evenly between the prepared pans, using a spatula to smooth the tops. Place them in the preheated oven and bake for 15-18 minutes, or until a toothpick inserted into the center comes out clean. Once baked, remove the cakes and allow them to cool for 30 minutes at room temperature before placing them in the refrigerator for an additional 30-60 minutes to firm up.
Step 4: Prepare Filling
In a mixing bowl, beat together the marshmallow crème and soft salted butter until fluffy and smooth, approximately 2-3 minutes. Gradually add the powdered sugar and a pinch of salt, then mix thoroughly. Next, incorporate enough heavy cream until you reach a spreadable consistency that will create a deliciously sweet layer for your Little Debbie Valentine Cakes.
Step 5: Cut Cake Hearts
Once cooled completely, remove the cakes from the pans and use a 3-inch heart-shaped cookie cutter to cut out 32 hearts from the cake layers. Gently press the cutter down, making sure you get clean edges. Gather any leftover cake scraps and save them for a fun decoration or snacking later.
Step 6: Assemble Cakes
Take half of the heart-shaped cake pieces and spread a generous layer of the marshmallow filling on top of each. Carefully place another heart on top of each frosted piece, creating a sandwich effect. Once assembled, place them in the freezer for 1 hour to firm up, allowing for easier handling when it’s time to dip them in chocolate.
Step 7: Melt Coating
In a heatproof bowl, melt the almond bark in the microwave or over a double boiler, heating in intervals of 30 seconds and stirring in between until fully melted and smooth. Once melted, mix in a small amount of Crisco to adjust the consistency for a perfect dipping glaze. This coating will beautifully cover your Homemade Little Debbie Valentine Cakes.
Step 8: Dip & Decorate
Remove the frozen cakes from the freezer and carefully dip each one into the melted pink chocolate coating. Allow any excess chocolate to drip off before placing them on a parchment-lined tray. After all the cakes are coated, drizzle any reserved white chocolate on top for a decorative finish. Let them set at room temperature until the coating hardens, and then they’re ready to share!
Make Ahead Options
These Homemade Little Debbie Valentine Cakes are fantastic for meal prep enthusiasts looking to save time during busy days! You can prepare the cake layers and filling up to 24 hours in advance; simply bake and cool the cakes, then wrap them tightly in plastic wrap and refrigerate. The filling can also be made ahead and stored in an airtight container for up to 3 days in the fridge. When you're ready to serve, cut out your heart shapes, assemble the cakes, and freeze briefly for easy dipping in chocolate. By prepping these components in advance, you’ll have a delightful dessert ready to impress with minimal effort on the day of serving!
How to Store and Freeze Little Debbie Valentine Cakes
Fridge: Keep assembled Little Debbie Valentine Cakes in an airtight container in the fridge for up to 1 week, preserving their freshness and flavor.
Freezer: Freeze uncoated, assembled cakes for up to 3 months. Wrap each cake in plastic wrap then foil to prevent freezer burn before dipping in chocolate.
Reheating: To enjoy, let frozen cakes thaw in the fridge overnight before dipping or serving, allowing for a delightful texture.
Room Temperature: If serving the cakes the same day, they can be kept at room temperature for 1-2 hours, ensuring they stay delightful for any gathering.
Little Debbie Valentine Cakes Variations
Feel free to get creative and make these delightful cakes uniquely yours with a few simple adjustments!
-
Cake Flavor: Swap the boxed white cake mix for a chocolate or strawberry cake mix to add a twist in flavor. Vanilla will always be classic, but chocolate will elevate the indulgence!
-
Filling Variety: Try using strawberry or raspberry jam for a fruity filling instead of marshmallow crème. The tartness will perfectly balance the sweetness, creating a delicious contrast!
-
Gluten-Free Option: Use a gluten-free cake mix for accommodating dietary needs without sacrificing taste. Both flavor and texture will still shine through in your creation.
-
Dairy-Free Delight: Substitute the full-fat sour cream and butter with dairy-free alternatives like coconut cream and plant-based butter. Your cakes will be just as rich and delicious!
-
Coating Alternatives: Instead of almond bark, feel free to use chocolate candy melts or dark chocolate for a different coating flavor. Dark chocolate adds a sophisticated touch to these sweet treats.
-
Decorative Shapes: Use cookie cutters to create festive shapes other than hearts, such as stars or flowers, to make these cakes perfect for any occasion or celebration.
-
Extra Crunch: Sprinkle finely chopped nuts or crushed cookies on top after dipping the cakes in chocolate for added texture and a satisfying crunch.
-
Creamy Center: For an added layer of richness, mix in a few spoonfuls of peanut butter or Nutella with the marshmallow filling. It introduces a delightful surprise in each bite!
These variations are just the beginning! Explore your special touches while keeping the nostalgia alive. For more inspiration, don’t miss my delightful Crab Cakes Forget or these tasty Ricotta Protein Pancakes.
What to Serve with Homemade Copycat Little Debbie Valentine Cakes
The perfect sweet companion elevates your celebration, making each bite even more delightful.
-
Fresh Berries: Bright, juicy strawberries and raspberries offer a refreshing contrast to the rich cakes, enhancing the overall sweetness while adding a hint of tartness. Serve them nestled alongside the cakes for an inviting, colorful display.
-
Vanilla Ice Cream: A scoop of creamy vanilla ice cream provides a dreamy, cold balance to the soft, fluffy cakes. The combination of warm and cold sensations will enchant your taste buds and make the moment extra special.
-
Rich Hot Chocolate: Warm, velvety hot chocolate brings a cozy beverage option to your dessert table and effortlessly pairs with the chocolate-coated cakes, inviting everyone to savor each indulgent bite.
-
Whipped Cream: A dollop of freshly whipped cream adds airy lightness, enhancing the sweetness without overwhelming flavors. It creates a charming presentation when piped onto cakes or served alongside.
-
Coffee or Espresso: A rich cup of coffee or a shot of espresso counterbalances the sweetness beautifully, making it an excellent choice for adults enjoying these treats after a romantic dinner.
-
Chocolate-Covered Strawberries: These sweet, decadent additions mirror the pink chocolate coating on the cakes while providing a familiar flavor profile that nods to love and affection. Perfect for sharing!
-
Sparkling Water with Lemon: A refreshing glass of sparkling water with a squeeze of fresh lemon invigorates the palate and cleanses the taste buds, ensuring every bite of cake feels just as special as the first.
-
Pink Champagne: Raise the celebratory flair with a glass of bubbly pink champagne. This effervescent drink adds a luxurious touch to any gathering and pairs beautifully with sweet treats, perfect for toasting to love!
Expert Tips for Little Debbie Valentine Cakes
• Room Temperature Ingredients: Always use room temperature ingredients for better mixing and a fluffy texture in your Little Debbie Valentine Cakes.
• Cool Before Frosting: Make sure your cakes are entirely cooled before adding the filling to prevent it from melting and sliding off.
• Freeze for Stability: Freezing the assembled cakes before dipping helps them maintain their shape and makes handling easier.
• Gel Food Dye: When coloring the coating, opt for gel-based dye to ensure it doesn’t seize, allowing for a smooth chocolate finish.
• Monitor Baking Time: Keep an eye on your cakes while baking; check at the lower end of the time range to avoid overbaking and maintain moisture.
Little Debbie Valentine Cakes Recipe FAQs
What kind of cake mix works best for this recipe?
Absolutely! A boxed white cake mix is preferred for its light and fluffy texture, but in a pinch, you can substitute it with a yellow box cake mix. Just ensure to adjust any other sweeteners as needed for balance!
How do I store my Little Debbie Valentine Cakes?
Keep your assembled cakes in an airtight container in the refrigerator for up to 1 week. This will help preserve their freshness and fluffy marshmallow filling. If you want to store them longer, see the next question!
Can I freeze these cakes?
Yes! To freeze your Little Debbie Valentine Cakes, I recommend wrapping each uncoated cake tightly in plastic wrap and then in foil to prevent freezer burn. They can be stored for up to 3 months. When you’re ready to enjoy them, simply thaw in the fridge overnight before dipping!
What should I do if my chocolate coating seizes during melting?
Oh no! If your chocolate becomes thick and clumpy, it sounds like it may have come into contact with moisture. To remedy this, add a teaspoon of vegetable oil or Crisco while gently reheating it in your microwave or over a double boiler. Stir continuously until smooth and shiny again.
Are there any dietary considerations I should be aware of?
Definitely! If you have guests with specific dietary restrictions, be sure to check for allergies to key ingredients like eggs, dairy, or nut products. You can also make these cakes gluten-free by opting for a gluten-free cake mix, which can still provide that delightful taste and texture!
How can I make these cakes truly special for Valentine’s Day?
Consider adding extra flair by making heart-shaped decorations from colored sprinkles or edible glitter on top of the pink chocolate. You can also experiment with flavored extracts in the cake batter or filling, such as almond or raspberry, to give your Little Debbie Valentine Cakes a unique and personal touch!
Homemade Little Debbie Valentine Cakes for a Sweet Surprise
Ingredients
Equipment
Method
- Preheat your oven to 350°F (175°C) and prepare two half sheet pans by lining them with parchment paper.
- In a large mixing bowl, combine the boxed white cake mix, granulated sugar, water, eggs, vanilla extract, and vegetable oil. Blend until smooth, about 2–3 minutes. Incorporate the all-purpose flour, kosher salt, and full-fat sour cream until smooth.
- Divide the batter evenly between the prepared pans and smooth the tops. Bake for 15-18 minutes until a toothpick inserted comes out clean. Cool the cakes for 30 minutes before refrigerating for 30-60 minutes.
- Beat together the marshmallow crème and salted butter until fluffy. Gradually add powdered sugar and mix thoroughly, then add heavy cream until you reach a spreadable consistency.
- Use a 3-inch heart-shaped cookie cutter to cut out 32 hearts from the cooled cake layers. Press down gently to ensure clean edges.
- Spread a generous layer of the marshmallow filling on half of the heart-shaped cake pieces. Place another heart on top, creating a sandwich. Freeze for 1 hour to firm up.
- Melt the almond bark in a heatproof bowl using the microwave or double boiler, mixing in Crisco for consistency. This coating will cover your cakes beautifully.
- Dip each frozen cake into the melted pink chocolate coating and allow excess chocolate to drip off. Let set until coating hardens.


Leave a Reply