
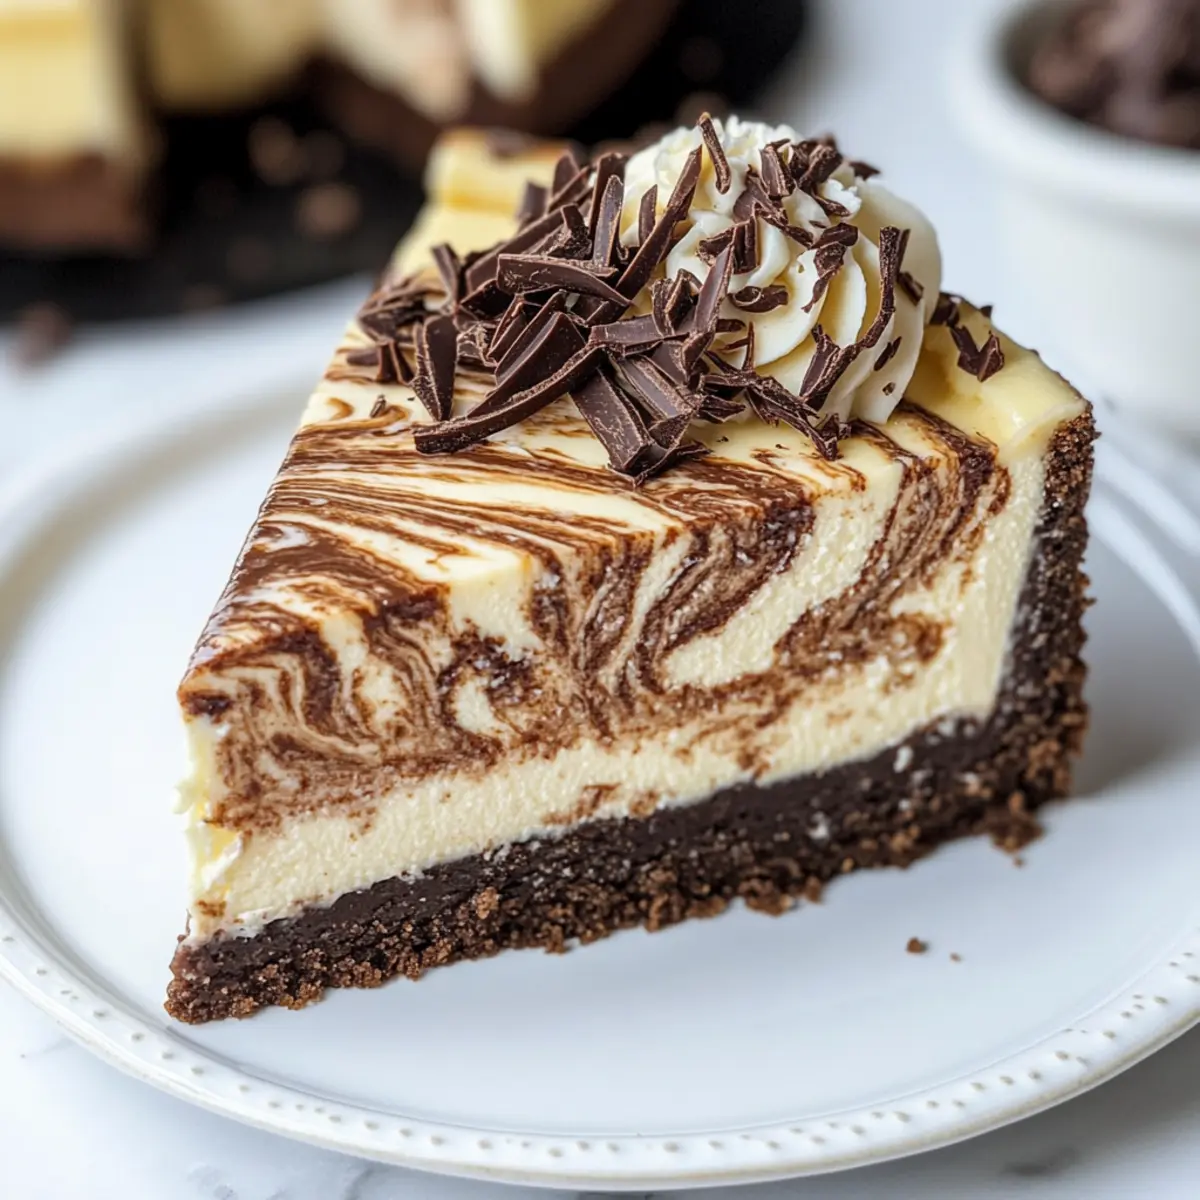
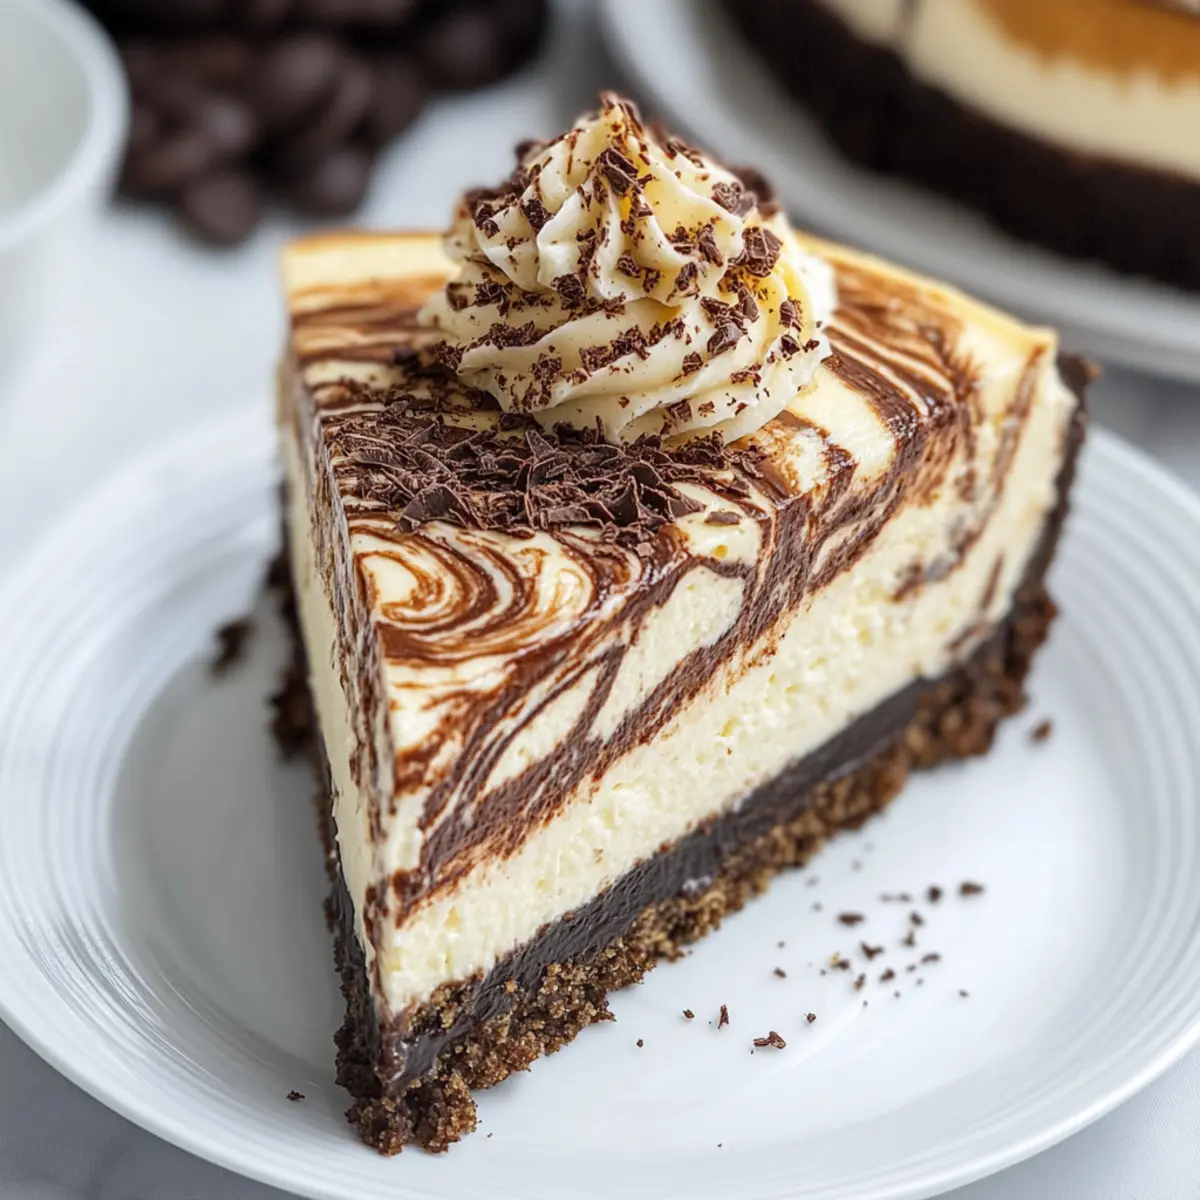
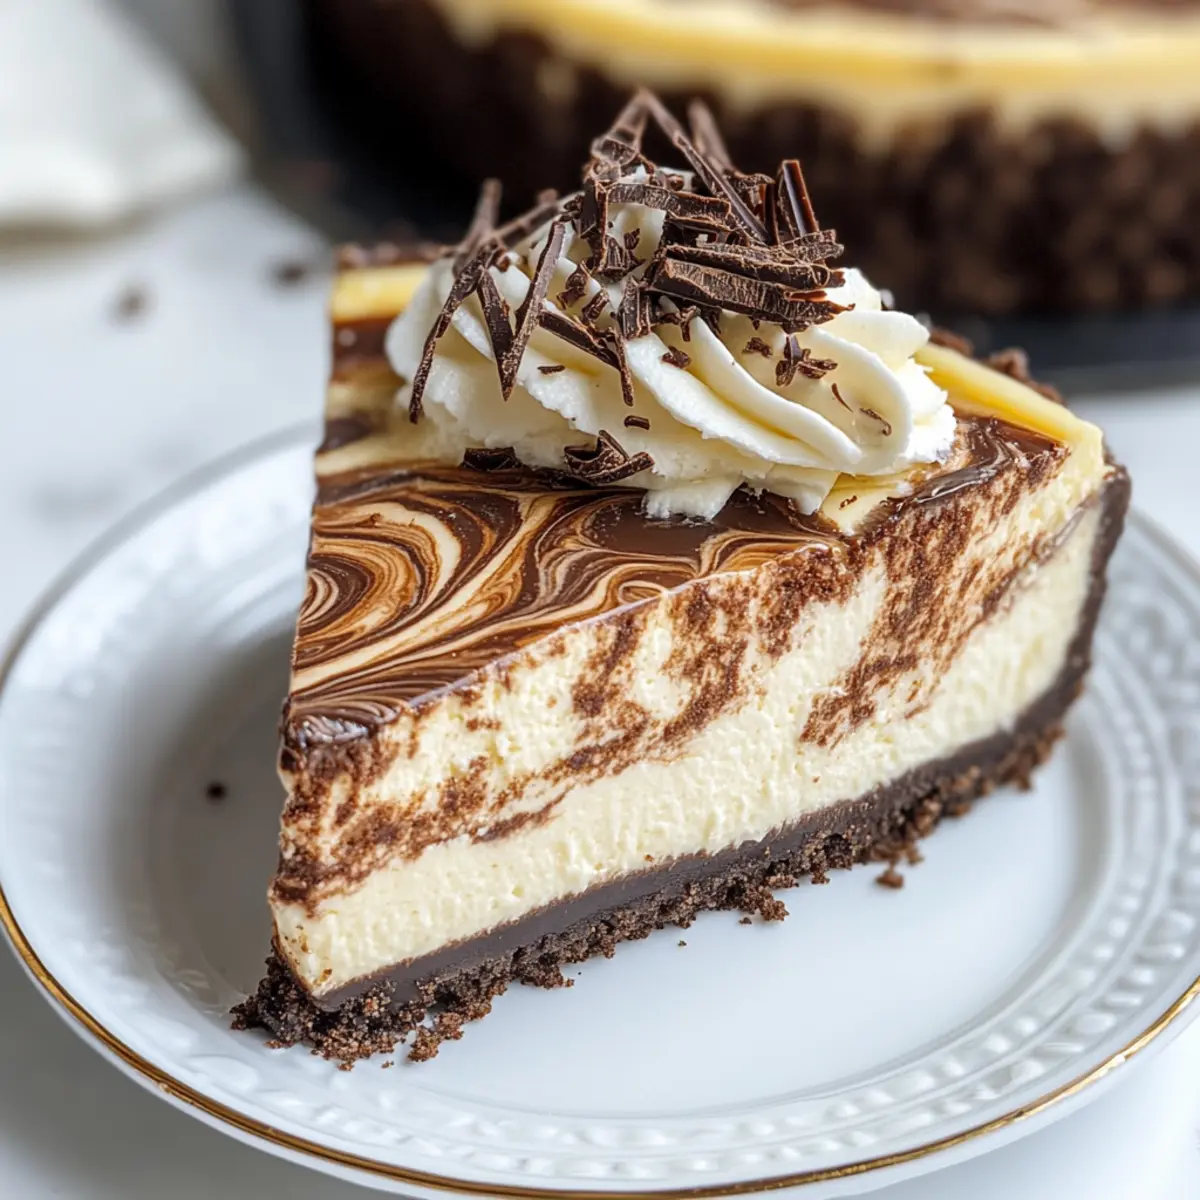
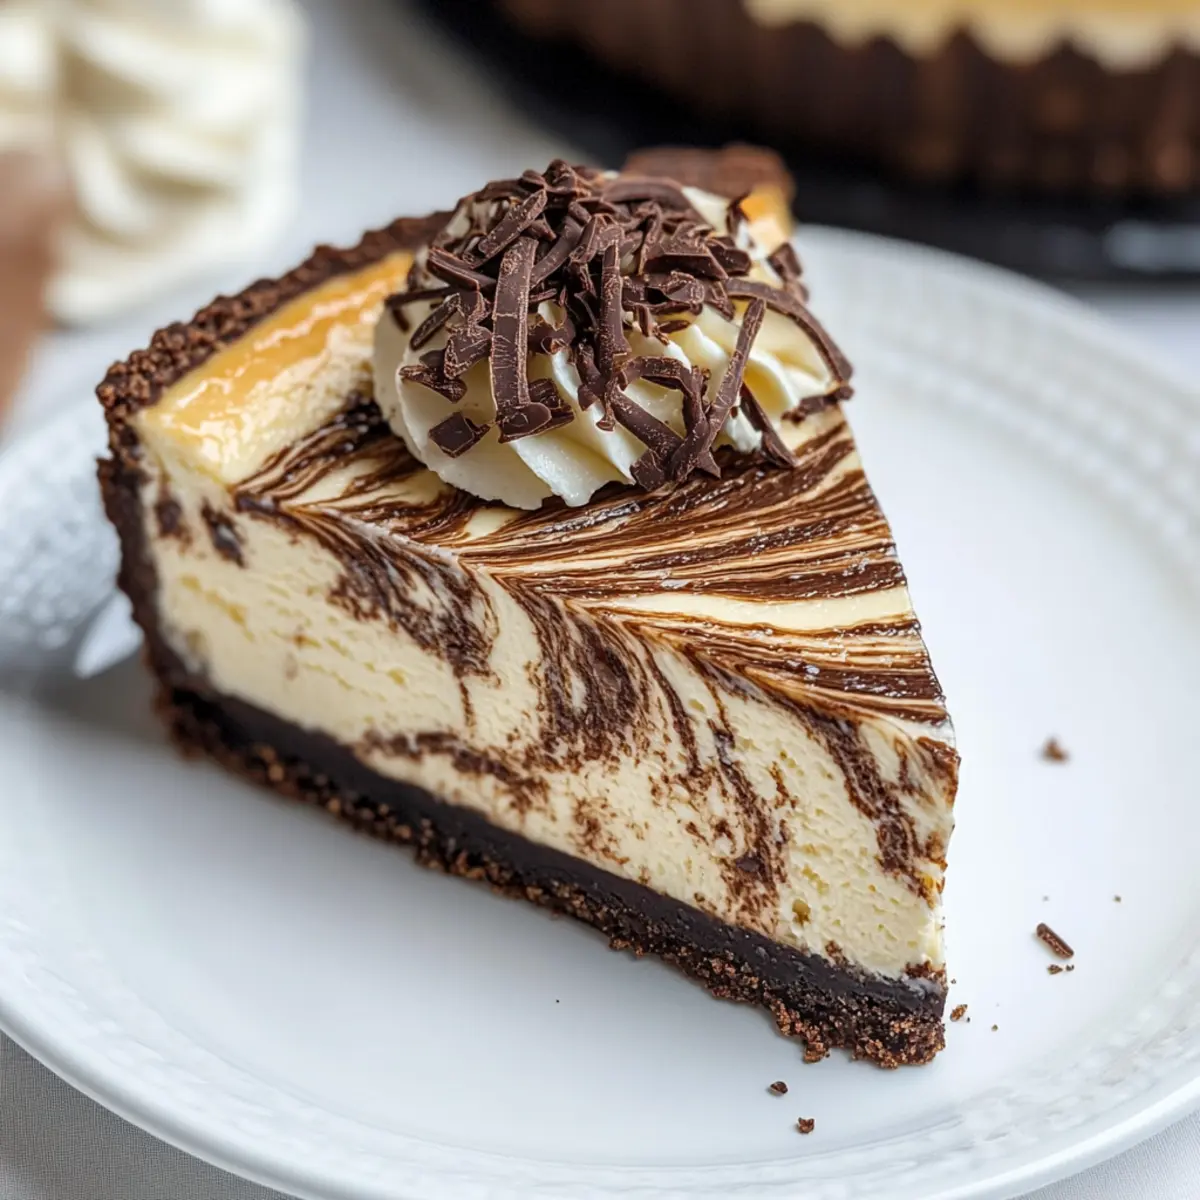
As I stirred the silky batter, a delightful aroma filled my kitchen, evoking sweet memories of family gatherings and celebratory feasts. This Creamy Marbled Cheesecake brings together the rich embrace of chocolate and the gentle allure of vanilla, making every slice a tender moment worth savoring. Not only is this recipe easy to whip up—perfect for unexpected guests—but it also creates an eye-catching dessert that elevates any occasion. With its luscious texture and harmonious flavors, you’ll find this cheesecake charming everyone around your table. Curious to discover how to create this delightful masterpiece? Let's dive into the recipe!
How is this cheesecake so irresistible?
Creamy, each bite melts in your mouth, balancing richness and lightness flawlessly. Gorgeous swirls of chocolate and vanilla create an eye-catching dessert that’s perfect for gatherings. Quick prep time means you can whip this up anytime, impressing guests with minimal effort. Versatile flavor options allow for personal twists, while its crowd-pleasing appeal makes it a hit at any event. For added inspiration, don’t forget to check out our tips on Serving Suggestions.
Marbled Cheesecake Ingredients
• Gather your ingredients for this luscious marbled cheesecake that combines creamy textures with delightful flavors!
For the Crust
- Oreo Cookie Crust – Provides a sweet, crunchy base; substitute with graham cracker crumbs for a different flavor.
- Salted Butter – Binds the crust together; use unsalted butter for a milder taste.
- Granulated Sugar – Sweetens both crust and filling; brown sugar can add a deeper flavor.
For the Filling
- Granulated Sugar (for filling) – Sweetens the cheesecake batter; no substitutions are recommended for optimal results.
- Cornstarch – Stabilizes the cheesecake filling; all-purpose flour can be used if cornstarch is unavailable.
- Full Fat Cream Cheese – Essential for a creamy texture; avoid low-fat varieties for best consistency.
- Large Eggs – Provide structure and richness; ensure they are at room temperature for proper blending.
- Full-Fat Sour Cream – Adds creaminess and tang; Greek yogurt is a good substitute if necessary.
- Vanilla Extract or Vanilla Bean Paste – Enhances flavor; fresh vanilla bean can intensify the aroma.
For the Chocolate Layer
- Semi-Sweet or Dark Chocolate Chips – Creates the rich chocolate layer of the cheesecake; use milk chocolate for a sweeter twist.
Step‑by‑Step Instructions for Marbled Cheesecake
Step 1: Prepare the Crust
Preheat your oven to 350°F (175°C) to create the perfect environment for your marbled cheesecake. In a medium bowl, combine crushed Oreo cookies, melted salted butter, and granulated sugar until mixed well. Press this mixture firmly into the bottom of an 8-inch springform pan to create a sturdy crust. Bake for 12-14 minutes, until you see the edges slightly firm up, and then allow it to cool.
Step 2: Melt the Chocolate
While your crust cools, it’s time to melt the chocolate. In a microwave-safe bowl or a double boiler, heat the semi-sweet or dark chocolate chips until smooth and glossy, stirring every 30 seconds in the microwave to avoid burning. Once melted, set the chocolate aside to cool slightly while you prepare the cheesecake filling.
Step 3: Make the Cheesecake Filling
In a large mixing bowl, beat the full-fat cream cheese with granulated sugar and cornstarch until creamy, making sure there are no lumps. Gradually add in the large eggs, one at a time, mixing on low speed to avoid incorporating too much air. Finally, blend in the full-fat sour cream and vanilla extract until the batter is smooth and well combined, ensuring it retains a luscious texture.
Step 4: Marble the Batters
To create the beautiful marbling effect in your cheesecake, reserve 2 cups of your filling in a separate bowl and gently fold the melted chocolate into this portion. In the springform pan with the cooled crust, alternate spoonfuls of the plain cheesecake batter and the chocolate mixture on top. Use a knife or skewer to gently swirl through the batters, creating a stunning marbled pattern.
Step 5: Bake the Cheesecake
Lower the oven temperature to 300°F (150°C) and bake your marbled cheesecake for 15 minutes. After that, reduce the temperature again to 225°F (110°C) and continue to bake for an additional 2 hours. The cheesecake should be set at the edges while still slightly wobbly in the center for the perfect creamy texture.
Step 6: Cool Gradually
Once baking is complete, turn off the oven and crack the door slightly open, allowing your cheesecake to cool gradually inside for 1 hour. Afterward, let it sit at room temperature for another 2 hours, ensuring a gentle cooling process to prevent cracking before transferring it to the refrigerator. Chill in the fridge for at least 3-4 hours or overnight for the best texture and flavor.
What to Serve with Creamy Marbled Cheesecake
Elevate your dessert experience by pairing this velvety cheesecake with delightful accompaniments that harmonize with its rich flavors.
-
Fresh Berries: The tartness of strawberries and blueberries contrasts beautifully with the cheesecake's sweetness, adding a refreshing burst to each bite.
-
Chocolate Drizzle: A rich chocolate sauce drizzled on top enhance the chocolate element, bringing out the dessert's decadent side.
-
Whipped Cream: Light and airy, this classic topping adds creaminess while offering a lovely visual appeal, creating an indulgent finish.
-
Coffee or Espresso: The deep, bold flavors of coffee pair wonderfully with the sweetness of cheesecake, making each slice an exquisite after-dinner treat.
-
Vanilla Ice Cream: Adding a scoop of creamy vanilla ice cream provides a smooth temperature contrast and enhances the already luxurious experience.
-
Caramel Sauce: A drizzle of warm caramel provides a sweet, buttery flavor, adding a fun twist that complements the cake's rich layers.
Indulging in these pairings not only supports the flavors of your creamy marbled cheesecake, but they'll also make your dessert table truly irresistible!
Marbled Cheesecake Variations & Substitutions
Feel free to make this marbled cheesecake your own by exploring these creative twists and substitutions!
- Dairy-Free: Substitute cream cheese with a dairy-free cream cheese and use coconut milk in place of sour cream for a rich vegan option.
- Gluten-Free: Use gluten-free Oreo cookies or almond flour for the crust, ensuring everyone can indulge.
- Sweetener Swap: Try maple syrup or honey instead of granulated sugar; just adjust the liquid ingredients accordingly.
- White Chocolate Twist: Fold in melted white chocolate instead of dark chocolate for a sweet, creamy alternative. The combination adds a delightful twist that complements the vanilla beautifully.
- Nutty Flavor: Incorporate ground almonds or hazelnuts into the crust for an added depth and crunch that enhances overall flavor.
- Berry Fusion: Mix in pureed raspberries or strawberries into the cream cheese mixture for a fruity marbled surprise. The brightness of berries really elevates this dessert!
- Extra Spices: Add a pinch of cinnamon or nutmeg to the cheesecake batter for a warm flavor profile that pairs excellently with chocolate and vanilla.
- Mini Cheesecakes: Pour the batter into muffin tins for adorable mini cheesecakes, adjusting the bake time to about 20-25 minutes; they’re perfect for portion control and easy serving!
Explore these variations to suit your taste preferences, and don’t hesitate to check out our tips on Serving Suggestions for delightful ideas!
How to Store and Freeze Marbled Cheesecake
Fridge: Keep your marbled cheesecake tightly covered in the fridge for up to 1 week. This helps maintain its creamy texture and rich flavor, making it perfect for indulgent snacking.
Freezer: Store the cheesecake in an airtight container or wrap it tightly in plastic wrap and aluminum foil for up to 3 months. To enjoy, let it thaw in the fridge overnight before serving.
Serving Tip: Before serving your cheesecake, allow it to sit at room temperature for about 15-30 minutes. This will enhance its creamy goodness, ensuring every slice is as delightful as the first.
Toppings: It's best to add toppings, like whipped cream or chocolate shavings, just before serving to keep them fresh and intact.
Expert Tips for Marbled Cheesecake
-
Room Temperature Ingredients: Ensure all your ingredients, especially cream cheese and eggs, are at room temperature. This helps achieve a smooth and creamy marbled cheesecake batter.
-
Gentle Mixing: Avoid over-mixing after adding the eggs. Over-mixing can incorporate too much air and lead to cracks in your cheesecake.
-
Water Bath Wonder: Use a water bath by placing a tray of water on the oven floor while baking. This creates a humid environment and minimizes the risk of cracks.
-
Smooth Slicing: To achieve clean slices, dip a knife in hot water before cutting and wipe it clean between slices. This keeps your presentation beautiful.
-
Chill Properly: Don’t skip the cooling time! Allow the cheesecake to cool slowly in the oven, then refrigerate for at least 3-4 hours to enhance the flavors and texture.
Make Ahead Options
These Creamy Marbled Cheesecakes are ideal for meal prep! You can prepare the crust and refrigerate it up to 24 hours in advance, ensuring a fresh base for your dessert. Additionally, the cheesecake filling can be made and stored in the refrigerator for up to 3 days before assembly. To maintain the velvety texture, cover the filling tightly with plastic wrap. When ready to serve, simply pour the filling over the prepped crust, marble in the melted chocolate, and bake according to the original instructions. This approach not only saves time on busy days but also allows the flavors to meld beautifully, resulting in a deliciously creamy dessert that’s just as delightful as the day it was made!
Creamy Marbled Cheesecake Recipe FAQs
How can I tell if my cream cheese is at the right temperature?
Absolutely! For the best results, check that your cream cheese is soft enough to easily blend into a creamy consistency. It should not be warm but should yield to gentle pressure when pressed, indicating it’s at room temperature.
What's the best way to store leftover marbled cheesecake?
To keep your marbled cheesecake fresh, tightly cover it with plastic wrap or store it in an airtight container. You can refrigerate it for up to 1 week. This keeps the rich flavor intact, allowing you to enjoy a slice whenever you crave something sweet!
Can I freeze my marbled cheesecake, and how do I do it?
Absolutely! To freeze your cheesecake, ensure it is completely cooled and wrapped tightly in plastic wrap followed by aluminum foil. This prevents freezer burn. Your cheesecake will maintain its quality for up to 3 months. When you're ready to enjoy it, just let it thaw in the refrigerator overnight before serving.
What should I do if my cheesecake cracks during baking?
No worries! If you notice cracks, it could be due to overmixing the batter or baking at too high a temperature. To avoid this, mix the batter gently once the eggs are added, and consider using a water bath while baking. To salvage cracked areas, simply cover them with a dollop of whipped cream or chocolate shavings when serving!
Can I make this cheesecake dairy-free?
Yes, you can! For a dairy-free version, look for dairy-free cream cheese and sour cream alternatives available in stores. Be mindful to check the ingredients for any allergens. This way, you can still savor the delicious marbled flavors without dairy.
What if I cannot find Oreo cookies for the crust?
If you can't find Oreos, don't fret! You can easily substitute them with graham cracker crumbs or any chocolate cookie of your choice. This will give you a deliciously different crust while maintaining that sweet, crunchy base we all love!
Decadent Marbled Cheesecake to Satisfy Your Sweet Cravings
Ingredients
Equipment
Method
- Preheat your oven to 350°F (175°C). Combine crushed Oreo cookies, melted salted butter, and granulated sugar in a medium bowl. Press mixture firmly into an 8-inch springform pan and bake for 12-14 minutes. Allow to cool.
- Melt the chocolate in a microwave-safe bowl or double boiler, stirring every 30 seconds until smooth. Set aside to cool slightly.
- In a large bowl, beat cream cheese, granulated sugar, and cornstarch until creamy. Gradually add eggs, mixing on low speed. Blend in sour cream and vanilla until smooth.
- Reserve 2 cups of filling in a separate bowl and fold in melted chocolate. In the springform pan, alternate spoonfuls of plain batter and chocolate mixture. Swirl the batters with a knife to create marbling.
- Lower oven temperature to 300°F (150°C) and bake for 15 minutes. Reduce to 225°F (110°C) and bake for an additional 2 hours until edges are set.
- Turn off the oven and crack the door slightly, allowing cheesecake to cool in the oven for 1 hour. Let sit at room temperature for another 2 hours before chilling for 3-4 hours or overnight.


Leave a Reply