
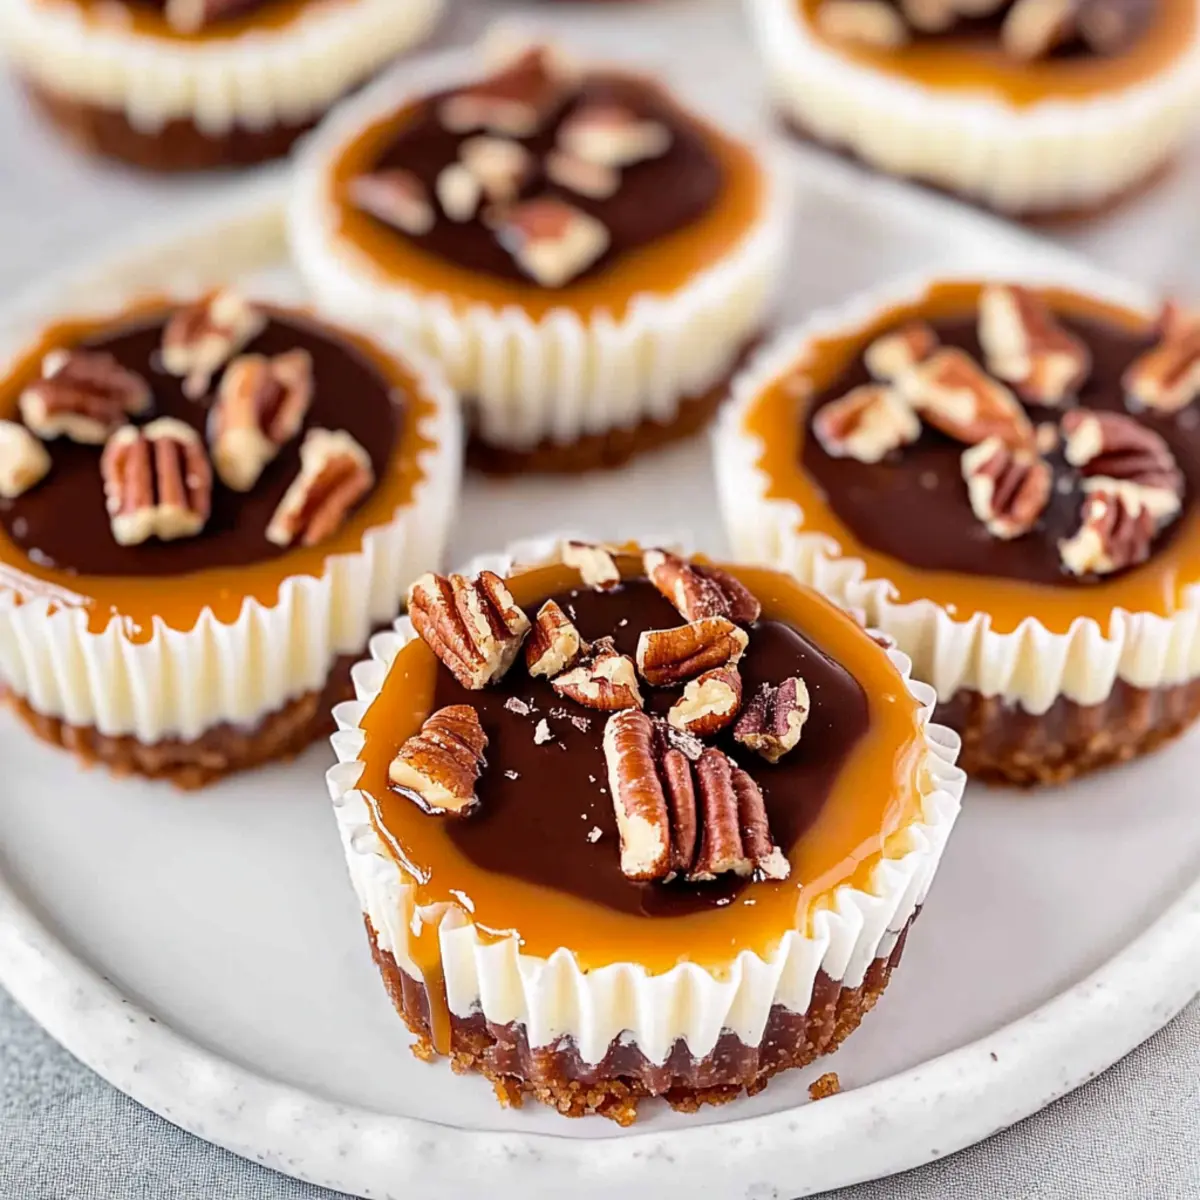
As I slid the last tray of mini turtle cheesecakes out of the fridge, I couldn’t help but smile. The combination of smooth chocolate, luscious caramel, and crunchy nuts perched atop a creamy cheesecake base offered a beautiful nod to the beloved candy they’re inspired by. These no-bake mini turtle cheesecakes are an absolute dream for those days when you crave a delicious dessert without spending hours in the kitchen. They’re not only quick to whip up but also perfect for grab-and-go sweetness at parties and gatherings. You’ll love how easily they satisfy sweet cravings while looking elegant enough to impress your guests. So, are you ready to dive into this delightful recipe?
Why Are These Mini Cheesecakes a Hit?
Irresistible Flavor: The fusion of rich chocolate, gooey caramel, and crunchy nuts creates an explosion of taste that will have everyone coming back for seconds.
No-Bake Simplicity: Perfect for busy days, these cheesecakes can be prepared without any baking, saving you time while still delivering a stunning dessert.
Gourmet Experience: Elevated ingredients like fresh cream cheese and homemade ganache provide a restaurant-quality treat right in your kitchen.
Crowd-Pleasing Size: Mini portions make these desserts ideal for parties and gatherings, allowing guests to indulge without feeling guilty.
Versatile Toppings: Feel free to customize with your favorite toppings like Mini Tropical Pavlovas or a seasonal twist for festive occasions!
Mini Turtle Cheesecake Ingredients
These delightful mini turtle cheesecakes come together with easily accessible ingredients for a sweet treat that's sure to impress!
For the Crust
- Graham Cracker Crumbs – Provides a crunchy base for the cheesecake; substitute with crushed cookies like digestive biscuits for a unique twist.
- Unsalted Butter – Binds everything together and adds a rich flavor; can be swapped with coconut oil for a dairy-free version.
For the Cheesecake Filling
- Full Fat Cream Cheese – Essential for that creamy, luscious texture; Neufchâtel cheese could be used for a lighter option.
- Granulated Sugar – Sweetens the filling; consider a sugar substitute for a lower-calorie option if desired.
- Vanilla Extract – Adds a beautiful aroma and depth; opt for pure vanilla extract to enhance flavor.
- Large Eggs – Provides firmness and stability; you can replace with flax eggs for an egg-free twist.
For the Toppings
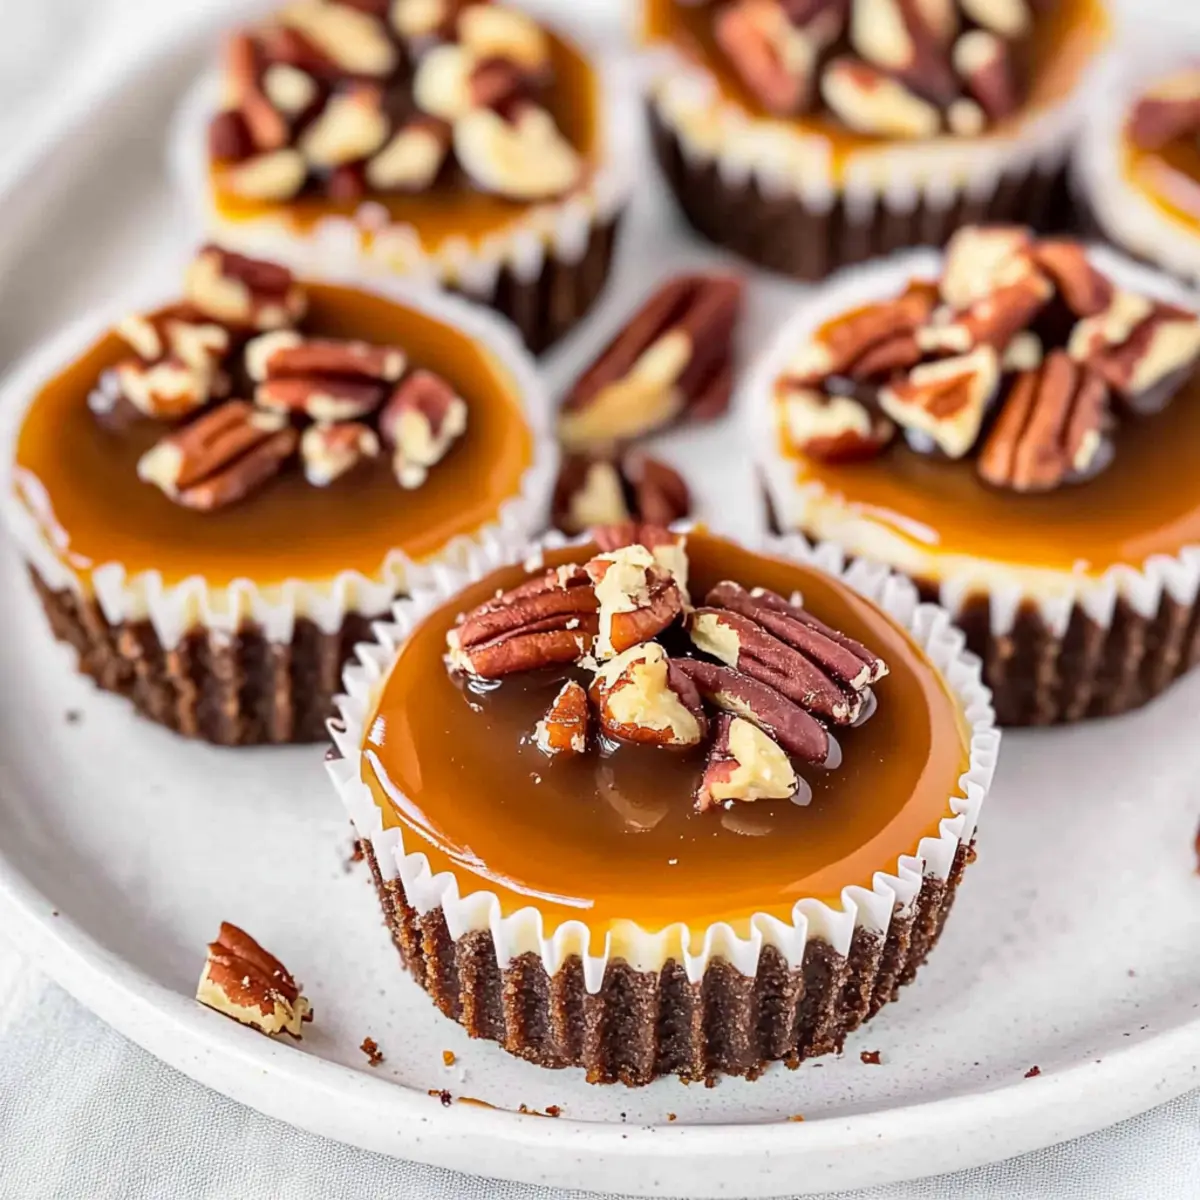
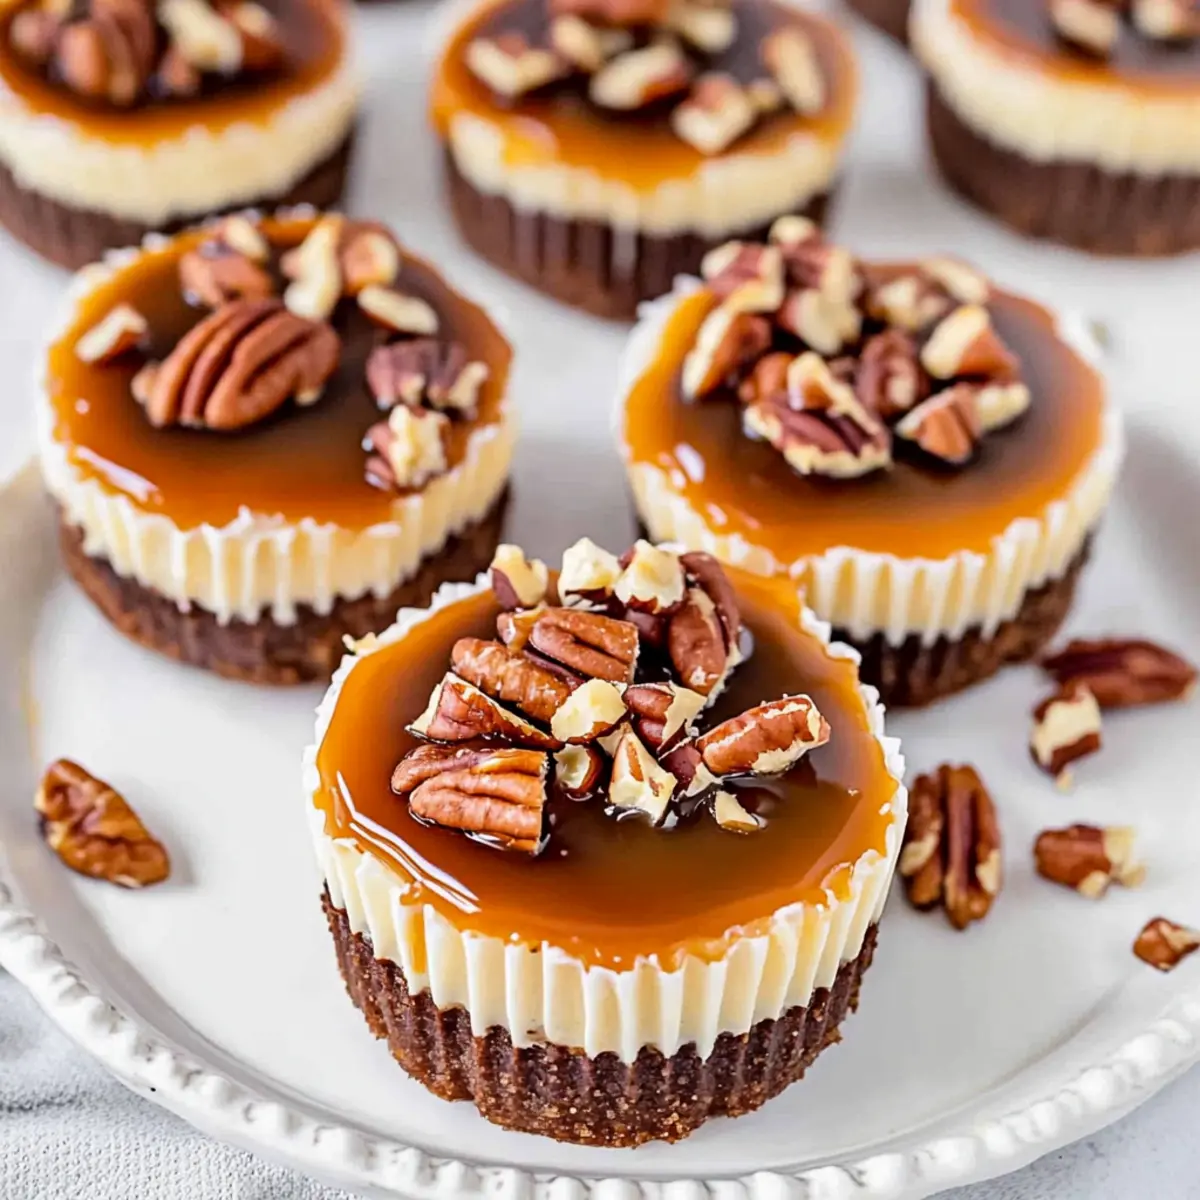
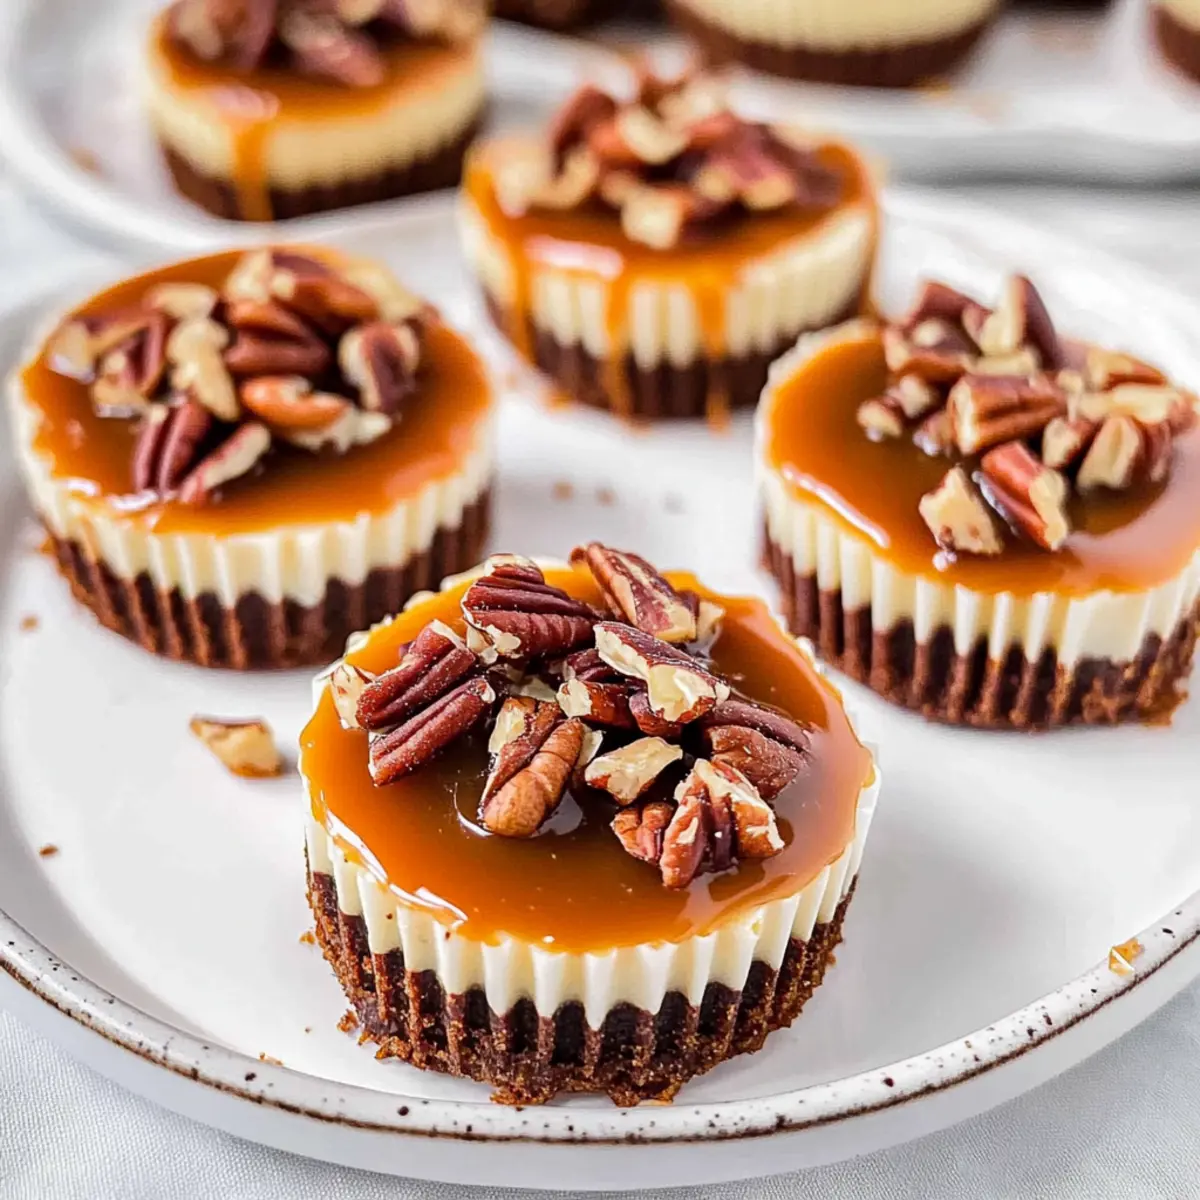
- Jarred Caramel Sauce – Adds a drizzle of sweetness on top; homemade caramel can elevate this dessert.
- Chocolate Ganache – A rich, silky topping made from semi-sweet chocolate and heavy cream for the ultimate decadence.
- Chopped Nuts (Pecans recommended) – Gives a satisfying crunch; feel free to substitute with walnuts or almonds based on your taste!
These mini turtle cheesecakes combine simplicity with elegance, making them perfect for any occasion!
Step‑by‑Step Instructions for Mini Turtle Cheesecakes
Step 1: Prepare Crust
Preheat your oven to 350°F (175°C) and line a muffin pan with paper liners. In a mixing bowl, combine graham cracker crumbs and melted butter until the mixture resembles wet sand. Evenly distribute about 1-2 tablespoons of this mixture into each liner, pressing down firmly to form a crust. Bake for 5 minutes until lightly golden, then allow to cool.
Step 2: Make Cheesecake Filling
In a large mixing bowl, beat the room-temperature cream cheese and granulated sugar with an electric mixer on medium speed for 1-2 minutes until smooth. This mixture should be creamy and free of lumps. Next, add vanilla extract and eggs, mixing until just combined to avoid incorporating too much air, which can lead to cracking.
Step 3: Assemble Mini Cheesecakes
Carefully distribute the creamy cheesecake filling evenly among the cooled crusts in the muffin tin. Use a spatula to smooth the tops for a neat finish. This step ensures that every mini turtle cheesecake is filled to perfection, setting the stage for the wonderful textures and flavors that follow.
Step 4: Bake
Place the muffin pan in the preheated oven and bake the mini turtle cheesecakes for 15-17 minutes. You’ll know they’re done when the edges appear set but the centers have a slight jiggle, signaling just the right level of creaminess. Keep an eye out; overbaking can lead to cracks!
Step 5: Cool and Chill
After baking, remove the pan from the oven and let it cool to room temperature. This cooling process is essential for achieving the perfect texture. Once cooled, transfer the mini cheesecakes to the refrigerator and chill for at least 4 hours, allowing them to firm up and develop their flavors.
Step 6: Garnish and Serve
Before serving, drizzle the cooled mini turtle cheesecakes with jarred caramel sauce and decadent chocolate ganache. Sprinkle with chopped nuts for an added crunch that complements the silky cheesecake. These mini turtle cheesecakes are now ready to impress your guests!
Make Ahead Options
These mini turtle cheesecakes are a fantastic choice for meal prep! You can prepare the crust and cheesecake filling up to 24 hours in advance. Simply mix the graham cracker crumbs with melted butter and set it in the liners, then prepare the filling and pour it over the crusts. Cover the muffin pan tightly with plastic wrap and refrigerate. When ready to serve, bake them fresh for about 15-17 minutes, cool to room temperature, then refrigerate for at least 4 hours before garnishing with caramel sauce, ganache, and nuts. This way, you'll have delectable mini turtle cheesecakes ready to impress your guests with minimal effort!
How to Store and Freeze Mini Turtle Cheesecakes
Fridge: Store your mini turtle cheesecakes in an airtight container for up to 1 week. This keeps them fresh and delicious while allowing those sweet flavors to meld beautifully.
Freezer: For longer storage, freeze these mini cheesecakes in individual portions for up to 3 months. Wrap each in plastic wrap and then place them in a freezer-safe bag to prevent freezer burn.
Thawing: When you're ready to enjoy your frozen mini turtle cheesecakes, transfer them to the fridge to thaw overnight. This gentle thawing helps maintain their creamy texture.
Reheating: These cheesecakes are best enjoyed cold; however, if you want to soften them slightly, let them sit at room temperature for about 15 minutes before serving. Enjoy!
Variations & Substitutions for Mini Turtle Cheesecakes
Get ready to personalize these delightful mini turtle cheesecakes to suit your taste and dietary needs!
-
Oreo Crust: Swap out graham crackers for crushed Oreos for a rich, chocolatey base.
This adds a fun twist and a deep flavor, perfect for any chocolate lover. -
Peanut Butter Swirl: Stir in creamy peanut butter into the cheesecake filling for a nutty flavor.
This twist brings a classic combination, elevating each bite to pure bliss! -
Honey or Maple Syrup: Replace granulated sugar with honey or maple syrup for a natural sweetener.
These substitutes can impart a unique flavor profile that warms the soul while still satisfying your sweet tooth. -
Nut-Free Option: Use sunflower seed butter and omit the nuts entirely for a nut-free treat.
This makes them suitable for allergy-friendly gatherings, ensuring everyone can indulge! -
Caramel Sauce Alternatives: Try using homemade caramel for a gourmet touch or a sugar-free version for a lighter option.
Homemade caramel can elevate the overall taste and make it truly special, while a sugar-free version keeps guilt at bay. -
Dairy-Free Version: Substitute full-fat cream cheese with a dairy-free cream cheese alternative.
This keeps the creaminess intact while catering to those with lactose intolerance or vegan preferences. -
Flavor Infusion: Add a splash of espresso or coffee to the cheesecake mixture for a mocha twist.
The combination of coffee with chocolate is magical, creating a sophisticated dessert that delights all the senses! -
Fruit Topping: Top with fresh berries or fruit preserves for a refreshing contrast.
This adds a lovely pop of color and a tart juiciness that beautifully balances the rich flavors of the cheesecake.
With these variations, you can explore different flavors and textures while making your mini turtle cheesecakes uniquely yours. Perhaps consider pairing them with a delightful batch of Mini Tropical Pavlovas for a fun dessert spread at your next gathering!
Expert Tips for Mini Turtle Cheesecakes
-
Room Temperature Cream Cheese: Ensure your cream cheese is at room temperature to achieve a smooth and creamy filling; cold cream cheese can create lumps.
-
Gentle Mixing: When adding eggs to the cheesecake filling, mix gently to avoid over-aeration, which can lead to cracking during baking—a common pitfall when making mini turtle cheesecakes.
-
Jiggle Test: The ideal doneness for these mini cheesecakes means they should jiggle slightly in the center when you take them out of the oven; this indicates perfect creaminess.
-
Cool Gradually: Let the mini cheesecakes cool to room temperature before refrigerating; this gradual cooling prevents condensation that can affect texture.
-
Chill Time Matters: Refrigerate for at least 4 hours (or overnight) before serving; this allows flavors to meld beautifully and achieves the ideal firmness.
What to Serve with Mini Turtle Cheesecakes
Indulging in these mini treats opens up a world of flavor pairings to elevate your dessert experience even further.
-
Fresh Berries: The tartness of strawberries or raspberries balances the sweetness of the cheesecakes, creating a delightful contrast. Their vibrant colors also add a touch of elegance to your presentation.
-
Whipped Cream: A dollop of airy whipped cream enhances the richness of the cheesecake while adding a light texture. It’s a classic pairing that never goes out of style.
-
Coffee: A warm cup of robust coffee or espresso complements the creamy sweetness beautifully, providing a perfect finish for your dessert platter.
-
Chocolate Sauce: For the true chocolate lovers, a drizzle of extra chocolate sauce can intensify the flavors of your mini turtle cheesecakes, making them even more decadent.
-
Vanilla Ice Cream: Serve alongside a scoop of creamy vanilla ice cream for a contrasting temperature and added sweetness that takes the dessert to the next level.
-
Nutty Cookies: A plate of buttery pecan or almond cookies can add an additional crunchy texture that echoes the nutty flavor of the mini cheesecakes, enhancing every bite.
Pair these suggestions with your mini turtle cheesecakes for a delightful and unforgettable dessert spread!
Mini Turtle Cheesecakes Recipe FAQs
How do I select ripe ingredients for my mini turtle cheesecakes?
Absolutely! When choosing your cream cheese, go for a fresh, smooth package without any lumps, and make sure it’s at room temperature for easy mixing. For the eggs, opt for large, clean, and uncracked eggs that have been properly stored in the refrigerator. If you're using nuts, select those that smell fresh and have no dark spots or signs of rancidity.
How should I store my mini turtle cheesecakes?
Very simply! Store your mini turtle cheesecakes in an airtight container in the fridge for up to one week. Make sure they are properly cooled before placing them in the container to prevent condensation. This keeps them fresh and allows the flavors to develop nicely.
Can I freeze mini turtle cheesecakes?
Absolutely! To freeze, wrap each mini cheesecake in plastic wrap and then place them in a freezer-safe bag. They can be stored for up to three months! When you’re ready to enjoy, just transfer them to the refrigerator for overnight thawing. Avoid reheating them, as they’re best enjoyed chilled or at room temperature.
What if my mini turtle cheesecakes crack during baking?
No worries—this can happen to the best of us! To avoid cracking, be gentle when mixing your batter, especially after adding the eggs. Overmixing introduces air bubbles that can lead to cracks. Also, make sure to bake them until the edges are set with a slight jiggle in the center. Cooling them gradually at room temperature before refrigerating also helps.
Can I make mini turtle cheesecakes if I have dietary restrictions?
Very much so! For a gluten-free version, use gluten-free graham crackers for the crust. To make them dairy-free, swap out the cream cheese for a non-dairy cream cheese alternative and use coconut oil in place of butter. If you're looking for an egg-free version, try substituting eggs with flax eggs—mix 1 tablespoon of flaxseed meal with 2.5 tablespoons of water for each egg.
How do I ensure my mini turtle cheesecakes have the perfect texture?
Follow the jiggle test! After baking, the centers should still have a slight jiggle while the edges appear set—this indicates a creamy texture. Make sure your cream cheese is at room temperature and beat it well to eliminate lumps. Gradual cooling is key, so let them cool at room temperature before refrigerating for at least 4 hours. Enjoy the delightful texture of your mini turtle cheesecakes!
Mini Turtle Cheesecakes: Decadent No-Bake Dessert Bliss
Ingredients
Equipment
Method
- Preheat your oven to 350°F (175°C) and line a muffin pan with paper liners. Combine graham cracker crumbs and melted butter until it resembles wet sand. Evenly distribute 1-2 tablespoons into each liner for the crust and bake for 5 minutes. Allow to cool.
- In a large bowl, beat room-temperature cream cheese and granulated sugar with an electric mixer until smooth. Add vanilla and eggs, mixing gently until just combined.
- Distribute the cheesecake filling evenly among the cooled crusts in the muffin tin and smooth the tops with a spatula.
- Bake cheesecakes for 15-17 minutes until the edges are set and the center has a slight jiggle.
- Cool to room temperature, then transfer to the fridge and chill for at least 4 hours.
- Before serving, drizzle with caramel sauce and chocolate ganache, then sprinkle with chopped nuts.


Leave a Reply